![[iOS] UITableViewにUIDatePickerをインライン表示する](https://devio2023-media.developers.io/wp-content/uploads/2019/07/eyecatch_ios_1200x630.png)
[iOS] UITableViewにUIDatePickerをインライン表示する
この記事は公開されてから1年以上経過しています。情報が古い可能性がありますので、ご注意ください。
はじめに
こんにちは。CX事業本部の平屋です。
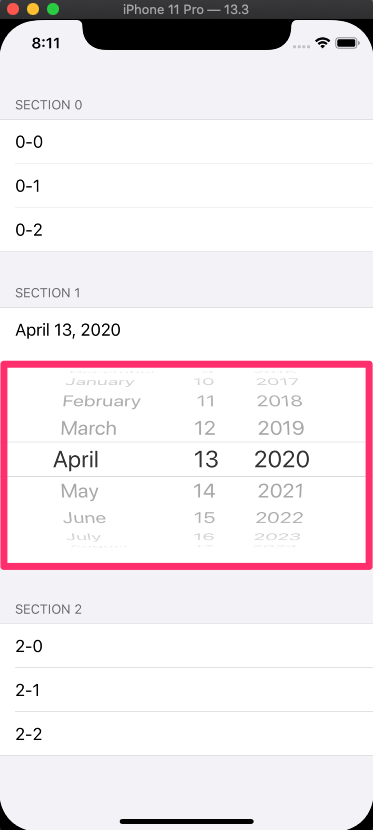
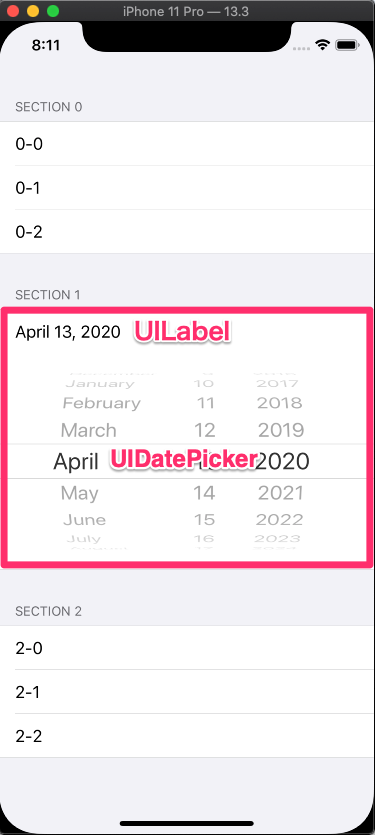
本記事では、以下のスクショのような、UITableViewにUIDatePickerをインライン表示する実装を紹介します。
iOS標準のカレンダーアプリなどで採用されているUIで、UIDatePickerの真上のセルをタップすると、UIDatePickerの表示/非表示を切り替えられます。
検証環境
- macOS Mojave 10.15.3
- Xcode Version 11.3.1
実現方法
インラインでのUIDatePicker表示を実現する方法はいくつかありますが、本記事では、UILabelとUIDatePickerを持つセルを用意し、このセルの高さを動的に変更することによって、インライン表示のUIDatePickerの表示/非表示を切り替えられるようにします。UIDatePickerの代わりに他のコンポーネント(UIPickerViewなど)を使う場合でも同様な動きが実現できるかと思います。
サンプルプロジェクト
本記事は大まかな実装のみ解説します。実装の詳細は、以下のリポジトリで公開しているサンプルプロジェクトを参照してください。
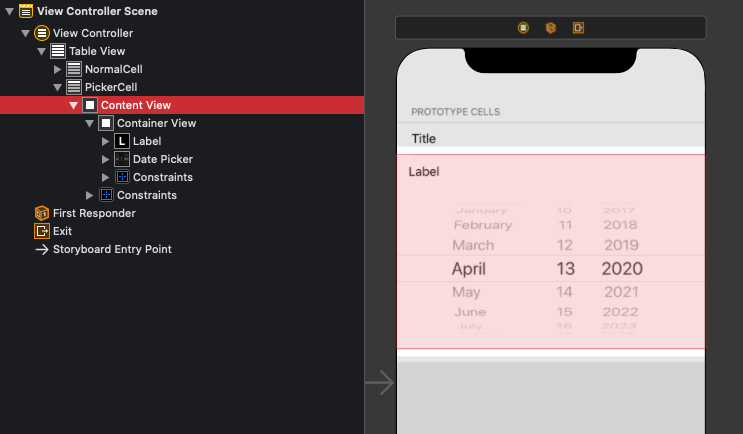
PickerCellのレイアウトを作成する
まず、UILabelとUIDatePickerを持つPickerCellのレイアウトを組んでいきます。
PickerCellのContentViewのサブビューにContainerView(UIView)を追加し、さらにそのサブビューにUILabel, UIDatePickerを追加します。ビューの階層は以下のようになります。
- PickerCell
- ContentView
- ContainerView(UIView)
- UILabel
- UIDatePicker
- ContainerView(UIView)
- ContentView
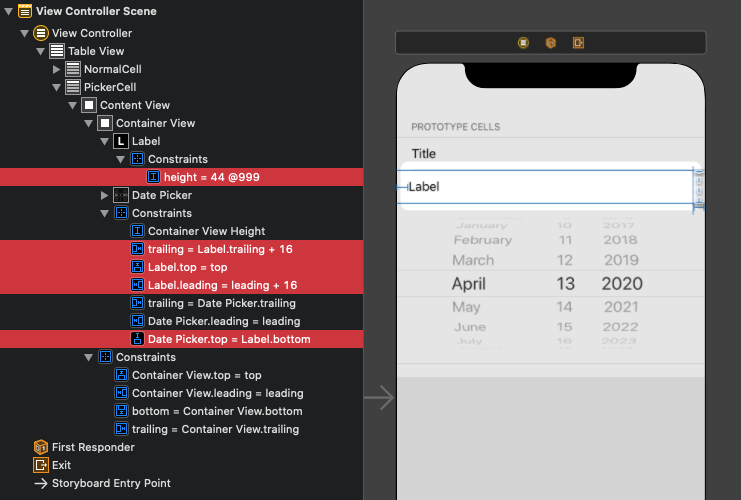
ContainerViewに制約を追加する
ContainerViewの4辺(top, bottom, leading, trailing)に関する制約と、ContainerViewの高さの制約を追加します。(高さの制約の値は260、後述するUILabelとUIDatePickerの高さの和が260なので260を設定)
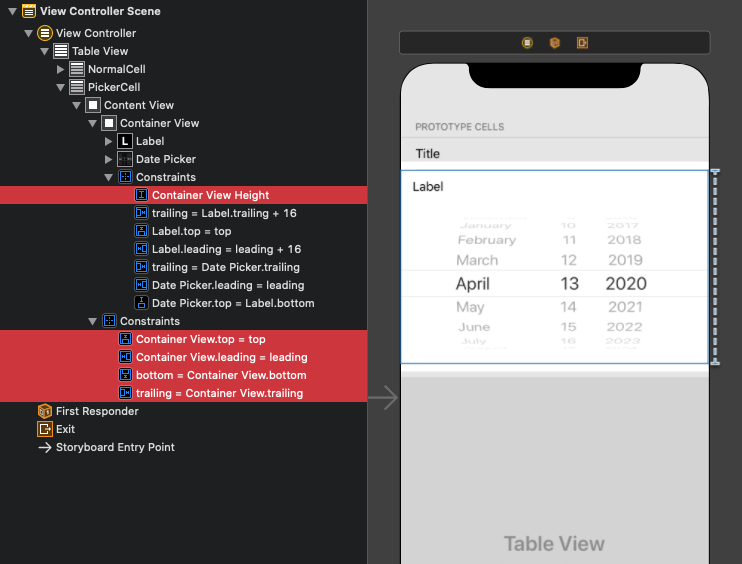
UILabelに制約を追加する
UILabelの4辺(top, bottom, leading, trailing)に関する制約と、UILabelの高さの制約を追加します。(高さの制約の値は44)
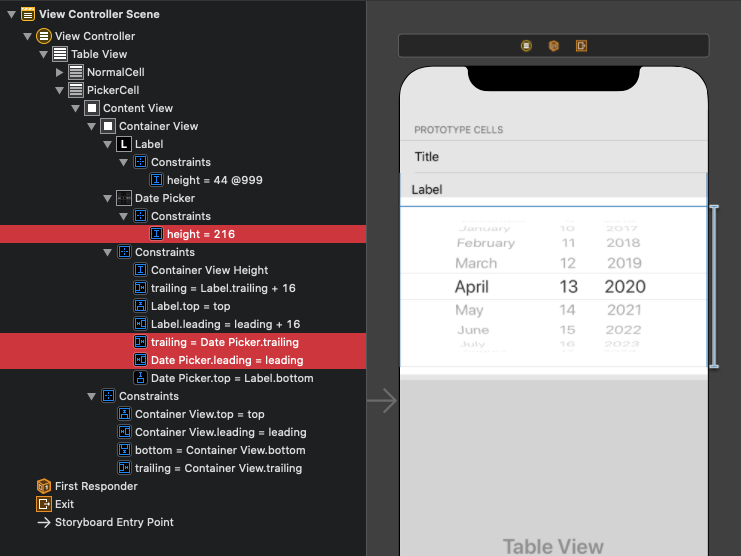
UIDatePickerに制約を追加する
UIDatePickerの2辺(leading, trailing)に関する制約と、UIDatePickerの高さの制約を追加します。(高さの制約の値は216)
UILabelのbottomとUIDatePickerとの間の制約は追加しましたが、UIDatePickerのbottomに関する制約は追加していません。後述の実装によってContainerViewの高さをUILabelの高さと等しくすると、UIDatePickerを隠すことができます。
PickerCellを実装する
続いてPickerCellにコードを追加していきます。
アウトレットを繋ぐ
ContainerViewの高さの制約、UIDatePicker、UILabelをPickerCellにアウトレット接続します。
import UIKit

class PickerCell: UITableViewCell {
    @IBOutlet weak var containerViewHeight: NSLayoutConstraint!
    @IBOutlet weak var datePicker: UIDatePicker!
    @IBOutlet weak var label: UILabel!

    // ...
}
PickerCell生成時の処理を実装する
UIDatePickerとUILabelのセットアップを行う実装を追加します。
Pickerはデフォルトで非表示にしたいのでPickerを非表示にし、ContainerViewの高さの制約をPicker非表示時用の値(compressedHeight)にします。
class PickerCell: UITableViewCell {
    // ...
    override func awakeFromNib() {
        super.awakeFromNib()
        prepare()
    }

    @objc func datePickerValueDidChange(sender: UIDatePicker) {
        label.text = PickerCell.formatter.string(from: sender.date)
    }

    // ...
}

private extension PickerCell {
    static let compressedHeight: CGFloat = 44
    static let expandedHeight: CGFloat = 260

    // ...

    static let formatter: DateFormatter = // ...

    func prepare() {
        // Picker非表示時用の値を設定
        containerViewHeight.constant = PickerCell.compressedHeight

        let now = Date()
        datePicker.date = now
        datePicker.addTarget(self, action: #selector(datePickerValueDidChange), for: .valueChanged)

        // Pickerを非表示にする
        datePicker.isHidden = true
        datePicker.alpha = 0

        label.text = PickerCell.formatter.string(from: now)
    }
}
Pickerを表示する処理を実装する
ContainerViewの高さの制約をPicker表示時用の値(expandedHeight)に変更し、animate(withDuration:animations:completion:)を呼ぶ実装を追加します。
class PickerCell: UITableViewCell {
    // ...

    func showPicker() {
        guard datePicker.isHidden else { return }

        // セルの高さの制約の値を変更して、Pickerが見えるようにする
        containerViewHeight.constant = PickerCell.expandedHeight
        datePicker.isHidden = false
        UIView.animate(withDuration: 0.25) {
            self.datePicker.alpha = 1
            self.layoutIfNeeded()
        }
    }

    // ...
}
Pickerを非表示にする処理を実装する
非表示にする処理も同様に実装します。
class PickerCell: UITableViewCell {
    // ...

    func hidePicker() {
        guard !datePicker.isHidden else { return }

        // セルの高さの制約の値を変更して、Pickerが隠れるようにする
        containerViewHeight.constant = PickerCell.compressedHeight
        UIView.animate(withDuration: 0.25, animations: {
            self.datePicker.alpha = 0
            self.layoutIfNeeded()
        }, completion: { _ in
            self.datePicker.isHidden = true
        })
    }

    // ...
}
ViewControllerを実装する
UITableViewDataSourceとUITableViewDelegateのメソッドを実装します。
PickerCellがタップされたら、performBatchUpdates(_:completion:)を呼び、第一引数のブロック内でPickerCellのhidePicker()またはshowPicker()を呼びます。
import UIKit

class ViewController: UITableViewController {
    private var showingDatePicker = false
    private var pickerCell: PickerCell?

    // ...
}

extension ViewController {
    override func numberOfSections(in tableView: UITableView) -> Int {
        // ...
    }

    override func tableView(_ tableView: UITableView, numberOfRowsInSection section: Int) -> Int {
        // ...
    }

    override func tableView(_ tableView: UITableView, cellForRowAt indexPath: IndexPath) -> UITableViewCell {
        // ...
    }

    override func tableView(_ tableView: UITableView, didSelectRowAt indexPath: IndexPath) {
        tableView.deselectRow(at: indexPath, animated: true)
        guard indexPath.section == 1 else { return }

        // PickerCellを更新する
        tableView.performBatchUpdates({
            // Pickerを表示する(非表示にする)メソッドを呼ぶ
            if self.showingDatePicker {
                pickerCell?.hidePicker()
            } else {
                pickerCell?.showPicker()
            }
        }, completion: { _ in
            self.showingDatePicker.toggle()
        })
    }

    // ...
}
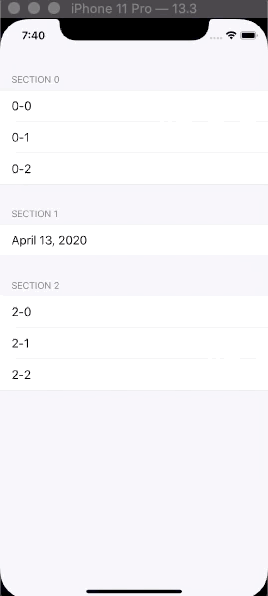
動作確認
Pickerはデフォルト非表示で、PickerCellをタップすると表示/非表示がアニメーション付きで切り替わります。
さいごに
本記事では、UITableViewにインラインでUIDatePickerを表示する実装を紹介しました。同じような実装をやろうとしている方の参考になれば幸いです。
サンプルプロジェクトは以下のリポジトリで公開していますのでこちらも参考にしてください。