
Twitter製フレームワーク「Flight」を試してみた!
この記事は公開されてから1年以上経過しています。情報が古い可能性がありますので、ご注意ください。
こんにちは。クラスメソッドの稲毛です。
前回のパッケージ管理ツール「Bower」インストールに続いて、いよいよ本編となります「Flight」フレームワークです。
通常なら「Flightとは?」から始める所ですが、今回はどんどんサンプルを作っていくことで理解を深めてみました。
Flightのインストール
まずはBowerを利用してFlightを構成するスクリプトファイルをインストールする必要がありますので、アプリケーションを作成する場所に下記の内容で「component.json」というファイルを用意します。
component.json
{
  "name": "Flight Sample",
  "version": "1.0.0",
  "dependencies": {
    "flight": "~1.0.0"
  }
}
用意できたらコマンドプロンプトを起動し、component.jsonがあるディレクトリへ移動、下記のコマンドを実行すればインストールが開始します。
C:\Users\inage.toru\Documents\GitHub\flight-sample>bower install
bower cloning git://github.com/twitter/flight.git
bower cached git://github.com/twitter/flight.git
bower fetching flight
bower checking out flight#v1.0.0
bower copying C:\Users\inage.toru\AppData\Roaming\bower\cache\flight\ed24657cc77b071e9d061dbf92e2b09d
bower cloning git://github.com/kriskowal/es5-shim.git
bower cached git://github.com/kriskowal/es5-shim.git
bower fetching es5-shim
bower cloning git://github.com/components/jquery.git
bower cached git://github.com/components/jquery.git
bower fetching jquery
bower checking out es5-shim#v2.0.5
bower error Failed to parse json
Unexpected token p

There were errors, here's a summary of them:
- es5-shim Failed to parse json
Unexpected token p
An error was caught when reading the component.json:Failed to parse json
Unexpected token p
( Д ) ゚ ゚
なんと、エラーでインストールが出来ませんでした……。orz
調べてみると、es5-shimのcomponent.jsonがnpm用のpackage.jsonのシンボリックリンクとして用意されている為、シンボリックリンクを理解できないWindowsではJSONパースエラーとなってしまうとのことです。
せっかくBowerをインストールしたのに……。
気を取り直して、今回はGitHubに用意されているデモから「demo」の中のファイル群をそのまま利用しました。
flight-gh-pages
│  index.html
├─css
├─demo
│  │  index.html
│  │  requireMain.js
│  ├─app
│  └─components
│      ├─bootstrap
│      ├─es5-shim
│      ├─flight
│      ├─jquery
│      ├─mustache
│      └─requirejs
└─img
下記のような構成でアプリケーションを作成しました。
flight-sample
│  index.html(新規作成)
│  requireMain.js
├─app
│   └component(新規作成)
│      my_button.js(新規作成)
│      my_label.js(新規作成)
└─components
    ├─bootstrap
    ├─es5-shim
    ├─flight
    ├─jquery
    ├─mustache
    └─requirejs
コンポーネントの作成
コンポーネントは下記のように記述するようです。「AMD(Asynchronous Module Definition)」によるモジュール定義ですね。
define(
    [
        'components/flight/lib/component' // 依存するモジュールの名称(当該JSファイルの".js"を省いたもの)
    ],

    function (defineComponent) {

        return defineComponent(コンポーネント名); // コンポーネント定義

        function コンポーネント名() { // コンストラクタ
            this.defaultAttrs( // デフォルト属性値の設定
                属性名: 値
            );
            this.after('initialize', function () { // 初期化処理
                                 :
                this.on('イベント名', function (e) { // イベントハンドラ
                    // Does something.
                });
                                 :
            });
        }

    }
);
今回は以下のような二つのコンポーネントを作成しました。
myButton
- button要素にアタッチするコンポーネント
- ボタンラベルのデフォルト値は「Say hello」
- ボタンのクラスは「btn」
- 押下するとデフォルトメッセージ「Hello, world!」を伴って「textChanged」イベントを送出
app/component/my_button.js
define(
    [
        'components/flight/lib/component'
    ],

    function (defineComponent) {
        'use strict';

        var myButton = function () {
            this.defaultAttrs({
                buttonClass: 'btn', // デフォルトのクラス
                message: 'Hello, world!', // デフォルトのメッセージ
                text: 'Say hello' // デフォルトのボタンラベル
            });
            this.after('initialize', function () {
                this.$node
                    .addClass(this.attr.buttonClass) // アタッチしたノードにデフォルトのクラスを設定
                    .text(this.attr.text); // アタッチしたノードにデフォルトのテキストを設定
                this.on('click', function (e) {
                    this.trigger('textChanged', {message: this.attr.message}); // textChangeイベントを送出
                });
            });
        }

        return defineComponent(myButton);
    }
);
myLabel
- テキストを表示する要素にアタッチするコンポーネント
- テキストのデフォルト値は「Default message」
- バブリングしてきた「textChanged」イベントをハンドルしてそのイベントに付与されているメッセージを表示
app/component/my_label.js
define(
    [
        'components/flight/lib/component'
    ],

    function (defineComponent) {
        'use strict';

        var myLabel = function () {
            this.defaultAttrs({
                message: 'Default message' // デフォルトのテキスト
            });
            this.updateText = function (ev, data) { // textChangedイベントハンドラ
                this.$node.text(data.message); // textChangedイベントに付与されてきたメッセージをテキストに設定
            };
            this.after('initialize', function () {
                this.$node.text(this.attr.message); // アタッチしたノードにデフォルトのテキストを設定
                this.on(document, 'textChanged', this.updateText); // textChangedイベントのハンドリング設定
            });
        }

        return defineComponent(myLabel);
    }
);
myLabelコンポーネントの「textChanged」イベントはルートへバブリングしてくるので、イベントハンドラは「document」に対して設定されている点がミソですね。
DOMノードへのアタッチ
コンポーネントをDOMノードへアタッチするには下記のように記述するようです。ただアタッチするだけではなく、オプションとしてオーバライドする属性値を設定することもできます。
define(
    [
        'app/component/my_button'
    ],

    function (MyButton) {
        MyButton.attachTo('#button1'); // アタッチのみ
        MyButton.attachTo('#button2', {
            text: 'New label name'
        }); // デフォルト属性をオーバーライドしてアタッチ
    }
);
myButtonコンポーネントは初期化時にボタンのラベルにデフォルト値を設定するように実装されていますので、アタッチ時に「text」属性をオーバーライドすることでラベルを変更することができます。もちろんその他の属性をオーバーライドすることも可能です。
HTML
HTMLファイルは下記のように作成しました。
index.html
<!DOCTYPE html>
<html>
    <head>
        <meta charset="utf-8">
        <title>Flight Sample</title>
        <link rel="stylesheet" href="components/bootstrap/css/bootstrap.css">
        <style type="text/css">
            h1 {
                text-align: center;
            }
        </style>
    </head>
    <body>
        <div class="container">
            <div class="row">
                <div class="span6">
                    <!-- myLabelコンポーネントをアタッチする要素1号 -->
                    <h1 id="label1"></h1>
                </div>
                <div class="span6">
                    <!-- myLabelコンポーネントをアタッチする要素2号 -->
                    <h1 id="label2"></h1>
                </div>
            </div>
            <div class="row">
                <!-- myButtonコンポーネントをアタッチする要素 -->
                <button id="button"></button>
            </div>
            <br />
            <div class="row">
                <!-- デフォルト属性をオーバーライドしてmyButtonコンポーネントをアタッチする要素1号 -->
                <button id="button1"></button>
            </div>
            <br />
            <div class="row">
                <!-- デフォルト属性をオーバーライドしてmyButtonコンポーネントをアタッチする要素2号 -->
                <button id="button2"></button>
            </div>
            <br />
            <div class="row">
                <!-- デフォルト属性をオーバーライドしてmyButtonコンポーネントをアタッチする要素3号 -->
                <button id="button3"></button>
            </div>
        </div>

        <script src="components/jquery/jquery.js"></script>
        <script src="components/es5-shim/es5-shim.js"></script>
        <script src="components/es5-shim/es5-sham.js"></script>
        <script data-main="requireMain.js" src="components/requirejs/require.js"></script>

        <script>
            require(
                [
                    'app/component/my_label', // myLabelコンポーネント
                    'app/component/my_button' // myButtonコンポーネント
                ],

                function (MyLabel, MyButton) {
                    'use strict';

                    MyLabel.attachTo('#label1'); // myLabelコンポーネントをアタッチ
                    MyLabel.attachTo('#label2'); // myLabelコンポーネントをアタッチ
                    MyButton.attachTo('#button'); // myButtonコンポーネントをアタッチ
                    MyButton.attachTo('#button1', {
                        buttonClass: 'btn btn-block btn-success',
                        message: 'HogeHoge!',
                        text: 'Hoge'
                    }); // デフォルト値をオーバーライドしてmyButtonコンポーネントをアタッチ
                    MyButton.attachTo('#button2', {
                        buttonClass: 'btn btn-block btn-warning',
                        message: 'PiyoPiyo!',
                        text: 'Piyo'
                    }); // デフォルト値をオーバーライドしてmyButtonコンポーネントをアタッチ
                    MyButton.attachTo('#button3', {
                        buttonClass: 'btn btn-block btn-danger',
                        message: 'FugaFuga!',
                        text: 'Fuga'
                    }); // デフォルト値をオーバーライドしてmyButtonコンポーネントをアタッチ
                }
            );
        </script>
    </body>
</html>
実行結果
実行した結果は以下のようになります。
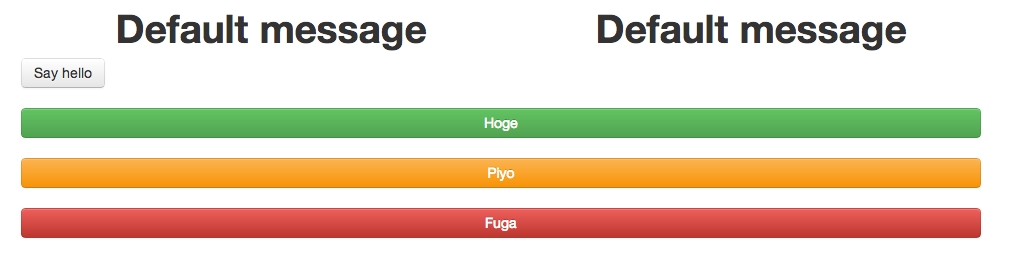
ボタンを押下することで上部ラベルのテキストが変化します。下3つのボタンのデフォルト値がオーバーライドされていることも見て取れます。上部2つのラベルはバブリングしてきたイベントをハンドルして双方ともにメッセージが変わります。
まとめ
FlightはコンポーネントベースのJavaScriptウェブフレームワークと案内されています。コンポーネントをDOMノードにアタッチすることで画面要素に振るまいを持たせるようになっているとのことで、画面要素とコンポーネント間、コンポーネントとコンポーネント間の依存性を可能な限り排除して「コンポーネント」を再利用性の高いものにしようとしていることがよく感じられました。(上のサンプルでは実際に複数の要素にアタッチしていますね。)
「RequireJS」によるスクリプト間の依存性解決は初めてだったので最初は戸惑いましたが、慣れればサクサクとモジュールが作れそうで楽しいです。この記事を読んで興味を持たれた方は、是非Flightフレームワークに触れてコンポーネントを作ってみましょう!( >ω<)ノ