Xcode 5 プラグイン 開発のテクニック
この記事は公開されてから1年以上経過しています。情報が古い可能性がありますので、ご注意ください。
まえおき
前回の記事でお伝えしたように、Xcode プラグインは Appleが公式でサポートしている機能ではありません。言い換えると、Xcode に関連するクラスの API が公開されていない上、いつ変更されるかわからない、ということになります。Xcode 4 のプラグインが Xcode 5 で動作しないのは、それが問題であることが多いです。
このように、Xcode プラグインを開発する上では、これらの公開されていない API を知る必要があります。
この記事では、Common Xcode4 Plugin Techniques » BlackDog Foundry を参考に、プラグイン開発の Tips や、Xcode で発行される通知や関連するクラスを把握する方法を解説します。
Xcode プラグインはシングルトンで作成する
既に公開されている Xcode プラグインでは、Xcode プラグインのクラス、すなわちプリンシパルクラスは、シングルトンインスタンスとして作成します。この場合、シングルトンインスタンスはプリンシパルクラスで定義される + pluginDidLoad:メソッドで生成する方法が一般的のようです。
static StoryboardIdentifierHelper *_sharedPlugin = nil;

+ (void)pluginDidLoad:(NSBundle *)bundle
{
    static dispatch_once_t _onceToken;
    dispatch_once(&_onceToken, ^{
        _sharedPlugin = [[self alloc] initWithBundle:bundle];
    });
}

+ (instancetype)sharedPlugin
{
    return _sharedPlugin;
}
(参考:Common Xcode4 Plugin Techniques » BlackDog Foundry)
Xcode にメニューを追加する
Xcode プラグインの機能の呼び出し方としては一番簡単な方法です。Xcode プラグインでは、Xcode のメインメニューに新しくメニューを追加することができます。
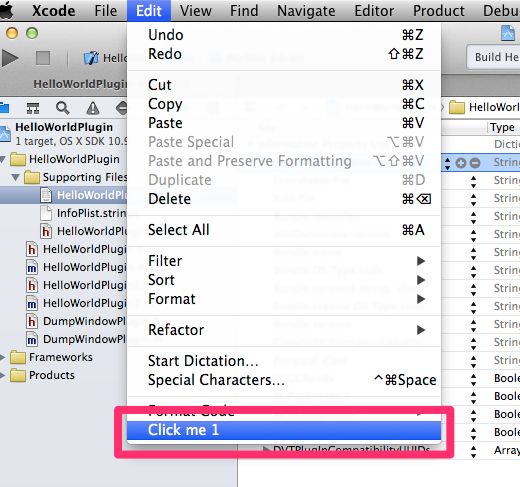
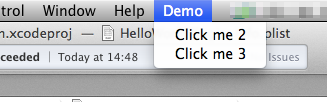
やり方はいたって簡単。例えば、上の画像のようにメニューを追加する場合は以下のように記述します。
- (instancetype)init
{
    self = [super init];

    if (self) {
        // メニューを追加する
        [self addMenuItems];
    }

    return self;
}

- (void)addMenuItems
{
    NSMenu *mainMenu = [NSApp mainMenu];

    // 既存のメニューの下に追加する
    NSMenuItem *editMenu = [mainMenu itemWithTitle:@"Edit"];
    NSMenuItem *item1 = [[NSMenuItem alloc] initWithTitle:@"Click me 1" action:@selector(click1:) keyEquivalent:@""];
    [item1 setTarget:self];
    [[editMenu submenu] addItem:item1];

    // 新しくメニューを作成する
    NSMenu *demoMenu = [[NSMenu alloc] initWithTitle:@"Demo"];

    NSMenuItem *item2 = [[NSMenuItem alloc] initWithTitle:@"Click me 2" action:@selector(click2:) keyEquivalent:@""];
    [item2 setTarget:self];
    [demoMenu addItem:item2];

    NSMenuItem *newMenuItem = [[NSMenuItem alloc] initWithTitle:@"Demo" action:NULL keyEquivalent:@""];
    [newMenuItem setSubmenu:demoMenu];
    [mainMenu addItem:newMenuItem];
}

- (void)click1:(id)sender
{
    NSLog(@"Menu item 1 clicked");
}

- (void)click2:(id)sender
{
    NSLog(@"Menu item 2 clicked");
}
(参考:Common Xcode4 Plugin Techniques » BlackDog Foundry)
簡単ですね!
利用可能な通知をチェックする
Xcode から発行される通知(NSNotification)を利用するには、Xcode でどんな通知が発行されているかを知る必要があります。利用可能な通知は、以下のコードでチェックすることができます。
- (instancetype)init
{
    self = [super init];

    if (self) {
        [[NSNotificationCenter defaultCenter] addObserver:self
                                                 selector:@selector(notificationListener:)
                                                     name:nil
                                                   object:nil];
    }

    return self;
}

- (void)notificationListener:(NSNotification *)notification
{
    // Xcode 固有の通知のみを表示するため、「NSxxx」は除外する
    if (notification.name.length >= 2 && [[notification.name substringWithRange:NSMakeRange(0, 2)] isEqualTo:@"NS"]) {
        return;
    }

    // 通知名をログに出力する
    NSLog(@"  Notification: %@", notification.name);
}

- (void)dealloc
{
    [[NSNotificationCenter defaultCenter] removeObserver:self];
}
(参考:Common Xcode4 Plugin Techniques » BlackDog Foundry)
プラグインをビルドして Xcode を再起動し、画面を適当に操作すると、いろんなタイミングでいろんな通知が飛んでいる事がわかります。実行結果を記事に貼り付けるのは微妙なので、自分で確認してくださいw
これで、機能を呼び出したいタイミングでどんな通知が発行されているか確認することができます!
コントロールを探索する
Xcode のコントロールを操作したい場合、利用可能なオブジェクトを探索する方法があります。その1つの方法として、プラグインからルートウィンドウを参照し、サブビューをダンプすることが可能です。その場合、以下のようなコードを書いてログを確認します。
#import "DumpWindowPlugin.h"

@implementation NSView (Dumping)

- (void)dumpWithIndent:(NSString *)indent
{
    NSString *clazz = NSStringFromClass([self class]);
    NSString *info = @"";
    if ([self respondsToSelector:@selector(title)]) {
        NSString *title = [self performSelector:@selector(title)];
        if (title != nil && [title length] > 0)
            info = [info stringByAppendingFormat:@" title=%@", title];
    }
    if ([self respondsToSelector:@selector(stringValue)]) {
        NSString *string = [self performSelector:@selector(stringValue)];
        if (string != nil && [string length] > 0)
            info = [info stringByAppendingFormat:@" stringValue=%@", string];
    }
    NSString *tooltip = [self toolTip];
    if (tooltip != nil && [tooltip length] > 0)
        info = [info stringByAppendingFormat:@" tooltip=%@", tooltip];

    NSLog(@"%@%@%@", indent, clazz, info);

    if ([[self subviews] count] > 0) {
        NSString *subIndent = [NSString stringWithFormat:@"%@%@", indent, ([indent length]/2)%2==0 ? @"| " : @": "];
        for (NSView *subview in [self subviews])
            [subview dumpWithIndent:subIndent];
    }
}

@end

@implementation DumpWindowPlugin

static DumpWindowPlugin *_sharedPlugin;

+ (void)pluginDidLoad:(NSBundle *)plugin
{
    static dispatch_once_t onceToken;

    dispatch_once(&onceToken, ^{
        _sharedPlugin = [self new];
    });
}

+ (instancetype)sharedPlugin
{
    return _sharedPlugin;
}

- (instancetype)init
{
    self = [super init];

    if (self) {
        // メニューを追加する
        [self addMenuItems];
    }

    return self;
}

- (void)addMenuItems
{
    NSMenu *mainMenu = [NSApp mainMenu];

    // 新しくメニューを作成する
    NSMenu *demoMenu = [[NSMenu alloc] initWithTitle:@"Dump"];

    NSMenuItem *item2 = [[NSMenuItem alloc] initWithTitle:@"Dump window" action:@selector(dumpWindow:) keyEquivalent:@""];
    [item2 setTarget:self];
    [demoMenu addItem:item2];

    NSMenuItem *newMenuItem = [[NSMenuItem alloc] initWithTitle:@"Dump" action:NULL keyEquivalent:@""];
    [newMenuItem setSubmenu:demoMenu];
    [mainMenu addItem:newMenuItem];
}

- (void)dumpWindow:(id)sender
{
    [[[NSApp mainWindow] contentView] dumpWithIndent:@""];
}

@end
(参考:Common Xcode4 Plugin Techniques » BlackDog Foundry)
こちらも実行結果を記事に貼り付けるのは微妙なので、ご自身でご確認を。
クラス・インスタンスメソッドをチェックする
お目当ての通知やコントロールが見つかったら、今度はそのインスタンスのクラスでどんなメソッドが定義されているかを知る必要があります。その場合は、以下のコードを利用してお目当てのインスタンスの情報をダンプできます。
#import <objc/runtime.h>

・・・

- (void)dumpClassFromInstance:(id)instance
{
    unsigned int count;

    Class class = [instance class];

    // インスタンスメソッドを列挙する
    NSLog(@"Instance Methods:");
    Method *instanceMethods = class_copyMethodList(class, &count);
    for (NSUInteger i = 0; i < count; i++) {
        NSLog(@"%3lu: %@", i + 1, NSStringFromSelector(method_getName(instanceMethods[i])));
    }
    free(instanceMethods);

    // クラスメソッドを列挙する
    NSLog(@"Class Methods:");
    Method *classMethods = class_copyMethodList(object_getClass(class), &count);
    for (NSUInteger i = 0; i < count; i++) {
        NSLog(@"%3lu: %@", i + 1, NSStringFromSelector(method_getName(classMethods[i])));
    }
    free(classMethods);

    // プロパティを列挙する
    NSLog(@"Properties:");
    objc_property_t *properties = class_copyPropertyList(class, &count);
    for(NSUInteger i = 0; i < count; i++) {
        objc_property_t property = properties[i];
        const char *propName = property_getName(property);
        NSLog(@"%3lu: %@", i + 1, [NSString stringWithCString:propName encoding:NSUTF8StringEncoding]);
    }
    free(properties);
}
Xcode でプラグインをデバッグする
前回の記事で、Xcode プラグインをデバッグする方法は 「NSLog() で出力したログを /var/log/system.log で確認する以外に方法がない」といいましたが、すごくいい方法がツィートされてました!
方法は、Xcode プラグインプロジェクトで Edit Scheme... よりスキーマ編集画面を開き、Executable に Xcode.app 選択し、Run(Cmd + R)するだけです。

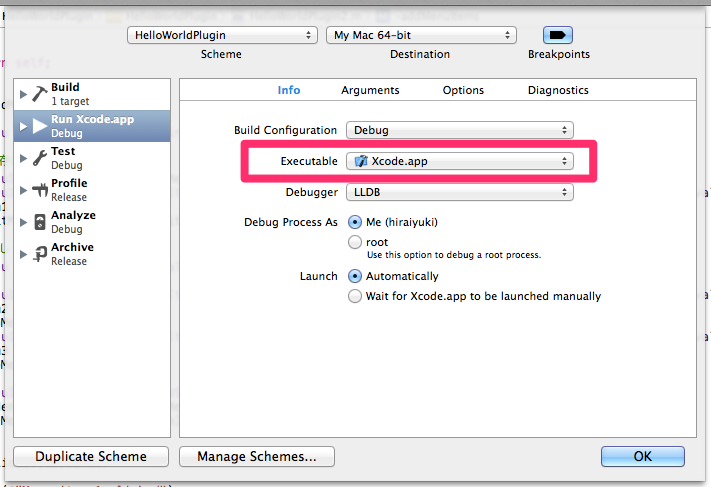
Run 後は Xcode のコンソールウィンドウにデバッグログが表示されます!
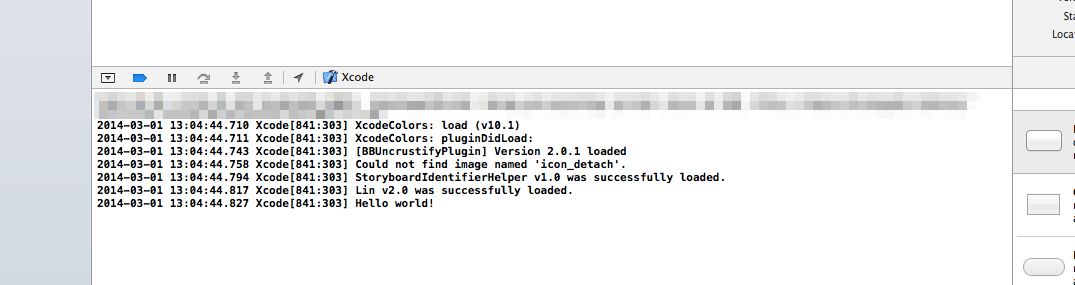
もちろん、ブレイクポイントも貼れます。こんな素敵な方法があったとは・・・。本当にありがとうございます!
まとめ
Xcode プラグインを作成する場合は、これらの方法を駆使してお目当てのタイミングを探し出す必要があります。すご~く泥臭い感じがしますが、その先には快適開発ライフが待っているはずです!頑張りましょう。