![[Androidアプリ開発] iOS 7 みたいなラジオボタンをdrawableで作ってみた](https://devio2023-media.developers.io/wp-content/uploads/2013/09/ios7_logo_android.png)
[Androidアプリ開発] iOS 7 みたいなラジオボタンをdrawableで作ってみた
この記事は公開されてから1年以上経過しています。情報が古い可能性がありますので、ご注意ください。
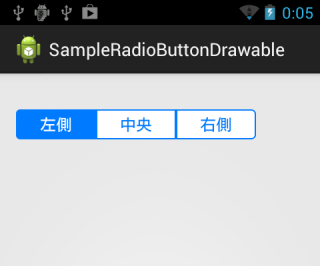
今回は、Android の drawable で、iOS7 の UISegmentedControl みたいな ラジオボタン を作ってみます。
iOS7 の UISegmentedControl というのは、下の画像のようなものです。
実装
それでは作っていきます。
dimens.xml
res/valuesフォルダ 内の dimens.xml に値を追加します。
<resources>

    <!-- Default screen margins, per the Android Design guidelines. -->
    <dimen name="activity_horizontal_margin">16dp</dimen>
    <dimen name="activity_vertical_margin">16dp</dimen>
    <dimen name="radio_corner_radius">4dp</dimen>

</resources>
color.xml
res/valuesフォルダ に color.xmlファイル を新規作成します。
<resources>

    <color name="radio_color">#007aff</color>
    <color name="radio_tap_color">#40007aff</color>
    <color name="radio_white_color">#ffffff</color>

</resources>
radio_text_color.xml
res/drawable-xxhdpiフォルダ に radio_text_color.xmlファイル を新規作成します。
<?xml version="1.0" encoding="utf-8"?>
<selector xmlns:android="http://schemas.android.com/apk/res/android">

    <!-- 選択時 -->
    <item android:state_checked="true" android:color="@color/radio_white_color"/>

    <!-- 未選択時 -->
    <item android:color="@color/radio_color"/>

</selector>
radio_left.xml
res/drawable-xxhdpiフォルダ に radio_left.xmlファイル を新規作成します。
<?xml version="1.0" encoding="UTF-8"?>
<selector xmlns:android="http://schemas.android.com/apk/res/android">

    <!-- 選択時 -->
    <item android:state_checked="true">
        <shape android:shape="rectangle">
            <corners android:bottomLeftRadius="@dimen/radio_corner_radius"
                android:topLeftRadius="@dimen/radio_corner_radius" />
            <solid android:color="@color/radio_color" />
        </shape>
    </item>

    <!-- タップ時 -->
    <item android:state_pressed="true" >
        <shape android:shape="rectangle">
            <corners android:bottomLeftRadius="@dimen/radio_corner_radius"
                android:topLeftRadius="@dimen/radio_corner_radius" />
            <solid android:color="@color/radio_tap_color" />
            <stroke android:width="1dp" android:color="@color/radio_color" />
        </shape>
    </item>

    <!-- 未選択時 -->
    <item>
        <shape android:shape="rectangle">
            <corners android:bottomLeftRadius="@dimen/radio_corner_radius"
                android:topLeftRadius="@dimen/radio_corner_radius" />
            <solid android:color="@color/radio_white_color" />
            <stroke android:width="1dp" android:color="@color/radio_color" />
        </shape>
    </item>

</selector>
radio_center.xml
res/drawable-xxhdpiフォルダ に radio_center.xmlファイル を新規作成します。
<?xml version="1.0" encoding="UTF-8"?>
<selector xmlns:android="http://schemas.android.com/apk/res/android">

    <!-- 選択時 -->
    <item android:state_checked="true">
        <shape android:shape="rectangle">
            <solid android:color="@color/radio_color" />
        </shape>
    </item>

    <!-- タップ時 -->
    <item android:state_pressed="true" >
        <shape android:shape="rectangle">
            <solid android:color="@color/radio_tap_color" />
            <stroke android:width="1dp" android:color="@color/radio_color" />
        </shape>
    </item>

    <!-- 未選択時 -->
    <item>
        <shape android:shape="rectangle">
            <solid android:color="@color/radio_white_color" />
            <stroke android:width="1dp" android:color="@color/radio_color" />
        </shape>
    </item>

</selector>
radio_right.xml
res/drawable-xxhdpiフォルダ に radio_right.xmlファイル を新規作成します。
<?xml version="1.0" encoding="UTF-8"?>
<selector xmlns:android="http://schemas.android.com/apk/res/android">

    <!-- 選択時 -->
    <item android:state_checked="true">
        <shape android:shape="rectangle">
            <corners android:bottomRightRadius="@dimen/radio_corner_radius"
                android:topRightRadius="@dimen/radio_corner_radius" />
            <solid android:color="@color/radio_color" />
        </shape>
    </item>

    <!-- タップ時 -->
    <item android:state_pressed="true" >
        <shape android:shape="rectangle">
            <corners android:bottomRightRadius="@dimen/radio_corner_radius"
                android:topRightRadius="@dimen/radio_corner_radius" />
            <solid android:color="@color/radio_tap_color" />
            <stroke android:width="1dp" android:color="@color/radio_color" />
        </shape>
    </item>

    <!-- 未選択時 -->
    <item>
        <shape android:shape="rectangle">
            <corners android:bottomRightRadius="@dimen/radio_corner_radius"
                android:topRightRadius="@dimen/radio_corner_radius" />
            <solid android:color="@color/radio_white_color" />
            <stroke android:width="1dp" android:color="@color/radio_color" />
        </shape>
    </item>

</selector>
activity_main.xml
最後に res/layoutフォルダ の activity_main.xmlファイル を修正して、
作成した drawable が反映されるように設定したボタンを配置します。
<RelativeLayout xmlns:android="http://schemas.android.com/apk/res/android"
    xmlns:tools="http://schemas.android.com/tools"
    android:layout_width="match_parent"
    android:layout_height="match_parent"
    android:paddingBottom="@dimen/activity_vertical_margin"
    android:paddingLeft="@dimen/activity_horizontal_margin"
    android:paddingRight="@dimen/activity_horizontal_margin"
    android:paddingTop="@dimen/activity_vertical_margin"
    tools:context=".MainActivity" >

    <RadioGroup
        android:id="@+id/radioGroup1"
        android:layout_width="wrap_content"
        android:layout_height="30dp"
        android:layout_marginTop="20dp"
        android:checkedButton="@+id/leftBtn"
        android:orientation="horizontal" >

        <RadioButton
            android:id="@+id/leftBtn"
            android:layout_width="80dp"
            android:layout_height="match_parent"
            android:background="@drawable/radio_left"
            android:button="@null"
            android:gravity="center"
            android:text="左側"
            android:textColor="@drawable/radio_text_color" />

        <RadioButton
            android:layout_width="80dp"
            android:layout_height="match_parent"
            android:background="@drawable/radio_center"
            android:button="@null"
            android:gravity="center"
            android:text="中央"
            android:textColor="@drawable/radio_text_color" />

        <RadioButton
            android:layout_width="80dp"
            android:layout_height="match_parent"
            android:background="@drawable/radio_right"
            android:button="@null"
            android:gravity="center"
            android:text="右側"
            android:textColor="@drawable/radio_text_color" />
    </RadioGroup>

</RelativeLayout>
これで完成です。Android2.3系で動かす場合は、下側の角丸が左右逆になってしまうのでご注意ください。
もし対応する場合は、drawable-xxhdpi-v11フォルダを作成して、Android2.3以前と以後でファイルを分けるようにしてください。
動作確認
では、動かしてみます。
はい。こんな感じです。
でも、よくよく考えるとiOSのヤツは、文字の領域で切り抜かれてたりしますね。。。ということで、その辺りはまた今度。
ではでは。


