![[iOS 8] CTRubyAnnotationRef を使って文字にルビを付ける](https://devio2023-media.developers.io/wp-content/uploads/2014/06/ios81.png)
[iOS 8] CTRubyAnnotationRef を使って文字にルビを付ける
2014.09.18
この記事は公開されてから1年以上経過しています。情報が古い可能性がありますので、ご注意ください。
CTRubyAnnotationRef
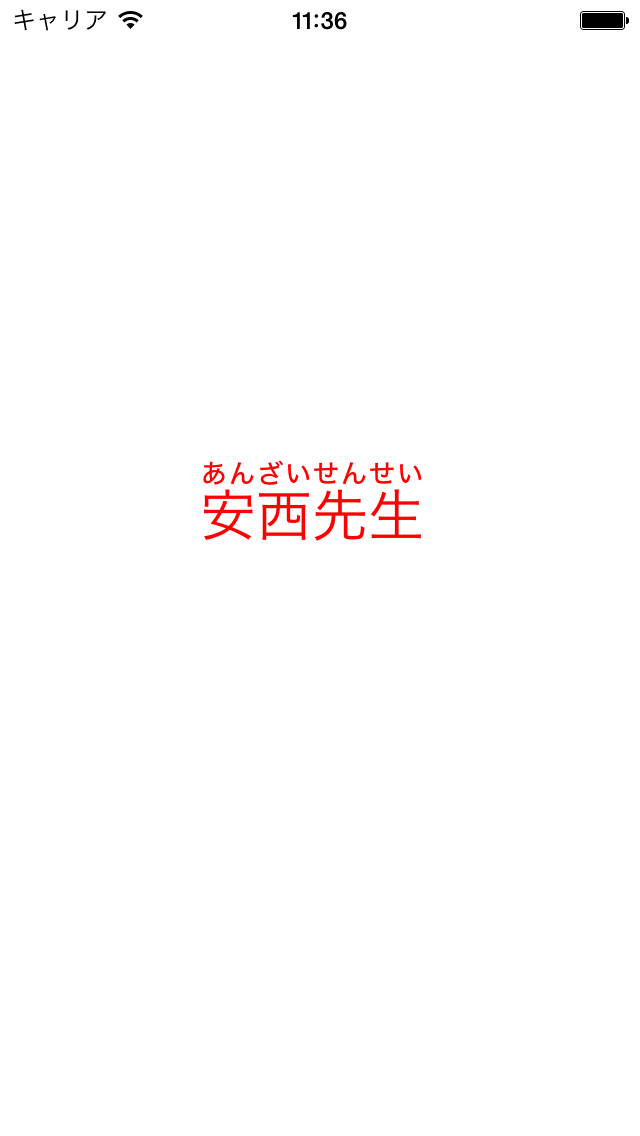
iOS 8 の Core Text フレームワークに CTRubyAnnotationRef という文字にルビを付けるためのクラスが登場しました。下図のように、テキストにふりがなを付けるといったようなことが実装できます。
文字にルビを付けてみよう
Core Text を使って描画する場合は、次のように記述します。
@import CoreText;

// 読み
CFStringRef writing = (__bridge CFStringRef)@"安西先生";

// ふりがなの配列
CFStringRef furigana[kCTRubyPositionCount] = {
    (__bridge CFStringRef) @"あんざいせんせい", NULL, NULL, NULL
};

// ルビ
CTRubyAnnotationRef ruby = CTRubyAnnotationCreate(kCTRubyAlignmentAuto, kCTRubyOverhangAuto, 0.5, furigana);
まず furigana[kCTRubyPositionCount] でふりがなの配列を生成しています。あとは CTRubyAnnotationCreate で CTRubyAnnotationRef を生成します。
描画処理を含めると次のような感じになります。上記で生成した CTRubyAnnotationRef は CFAttributedStringRef に設定する CFDictionaryRef に、kCTRubyAnnotationAttributeName というキーでセットします。
- (void)drawRect:(CGRect)rect {

    CFStringRef writing = (__bridge CFStringRef)@"安西先生";

    CFStringRef furigana[kCTRubyPositionCount] = {
        (__bridge CFStringRef) @"あんざいせんせい", NULL, NULL, NULL
    };

    CTRubyAnnotationRef ruby = CTRubyAnnotationCreate(kCTRubyAlignmentAuto, kCTRubyOverhangAuto, 0.5, furigana);

    CGContextRef context = UIGraphicsGetCurrentContext();
    CGContextSetTextMatrix(context, CGAffineTransformIdentity);

    CGAffineTransform transform = CGAffineTransformMakeScale(1, -1);
    transform = CGAffineTransformTranslate(transform, 0, - self.bounds.size.height);

    CGContextRef ctx = UIGraphicsGetCurrentContext();
    CGContextSetTextMatrix(ctx, CGAffineTransformIdentity);
    CGContextTranslateCTM(ctx, 0, ([self bounds]).size.height );
    CGContextScaleCTM(ctx, 1.0, -1.0);

    CFAttributedStringRef writingAttributedString = [self attributedString:writing ruby:ruby];
    CTLineRef writingLine = CTLineCreateWithAttributedString(writingAttributedString);
    CGContextSetTextPosition(context, 100.0, 300.0);
    CTLineDraw(writingLine, context);

    CFRelease(writingLine);
}

- (CFAttributedStringRef)attributedString:(CFStringRef)string ruby:(CTRubyAnnotationRef)ruby
{
    // Font style
    CTFontRef font = CTFontCreateWithName(CFSTR("Verdana"), 28, NULL);

    // Font color
    CGColorRef fontColor = [UIColor redColor].CGColor;

    // Paragraph
    CTTextAlignment alignment = kCTRightTextAlignment;

    CTParagraphStyleSetting settings[] = {
        {kCTParagraphStyleSpecifierAlignment, sizeof(alignment), &alignment}
    };

    CTParagraphStyleRef paragraphStyle = CTParagraphStyleCreate(settings, sizeof(settings) / sizeof(settings[0]));

    // Create an attributed string
    CFStringRef keys[] = { kCTFontAttributeName , kCTParagraphStyleAttributeName, kCTForegroundColorAttributeName, kCTRubyAnnotationAttributeName};
    CFTypeRef values[] = { font, paragraphStyle, fontColor, ruby};

    CFDictionaryRef attr = CFDictionaryCreate(NULL, (const void **)&keys, (const void **)&values,
                                              sizeof(keys) / sizeof(keys[0]), &kCFTypeDictionaryKeyCallBacks, &kCFTypeDictionaryValueCallBacks);
    CFAttributedStringRef attributes = CFAttributedStringCreate(NULL, string, attr);
    CFRelease(attr);

    return attributes;
}
実行すると次のように文字の上にルビ(ふりがな)が表示されます。
まとめ
地味に便利な機能ですよね。使いドコロとしては、例えば
- 子供向けアプリに、説明文にふりがなをつける
- 読みと書きが異なる単語を表現する(歌詞など)
- 英語の発音をカタカナで分かりやすくする
などといったようなときに使えそうですね!


