![[iOS 8] Local Notification / Remote Notification の通知にボタンを配置する](https://devio2023-media.developers.io/wp-content/uploads/2014/06/ios81.png)
[iOS 8] Local Notification / Remote Notification の通知にボタンを配置する
この記事は公開されてから1年以上経過しています。情報が古い可能性がありますので、ご注意ください。
通知にボタンが置けるようになりました
iOS 8 では、下図のように Local Notification または Remote Notification の通知にボタンを配置できるようになりました。

いくつか制約があるので、まずは忙しい人のためにまとめます。
- Local Notification と Remote Notification で使える
- 通知センターで表示できるボタンは2つまでしか置けない(アラートの場合は2つ以上置ける)
- ボタンの種類が選択でき、青/赤/グレーの色がつけられる
- APNs 利用時はメッセージにアクションの設定を記述する必要がある
Notification Action と Category
iOS 8 では、上述したような「通知のボタンを押した」というユーザー操作を Notification Action と呼んでいます。この Notification Action を自分で定義 (タイトルやアクションの種別など) して通知にくっつけるわけですが、複数の Notification Action が設定できるように Category というグループに取りまとめて設定します。例えば、メールの着信通知であれば、着信通知の Category の中に返信や破棄といった Notification Action をセットして通知します。また、Category は1つのアプリに対して複数設定することができます。
Local Notification の通知にボタンを置いてみる
それでは Local Notification の通知にボタン (Notification Action) を設定してみましょう。
まず UILocalNotification を生成する前に、 UIApplication に Category を予め設定しておく必要があります。UIMutableUserNotificationAction を生成します。UIMutableUserNotificationCategory で取りまとめて、UIUserNotificationSettings にセットして登録します。identifier はアクションを呼び出すときに必要になるので必ずセットしてください。
// Notification Actionの作成
var actionA = UIMutableUserNotificationAction()
actionA.identifier = "actionA"
actionA.title = "A"
actionA.activationMode = UIUserNotificationActivationMode.Background
actionA.authenticationRequired = false
actionA.destructive = true

var actionB = UIMutableUserNotificationAction()
actionB.identifier = "actionB"
actionB.title = "B"
actionB.activationMode = UIUserNotificationActivationMode.Background
actionB.authenticationRequired = false
actionB.destructive = true

var actionC = UIMutableUserNotificationAction()
actionC.identifier = "actionC"
actionC.title = "C"
actionC.activationMode = UIUserNotificationActivationMode.Foreground
actionC.authenticationRequired = false
actionC.destructive = false

// Category にまとめる
var category = UIMutableUserNotificationCategory()
// identifierは必ず設定する
category.identifier = "custom"
// 通知センター(上から引っ張るやつ)で表示される通知に使われる
category.setActions([actionC, actionA], forContext: UIUserNotificationActionContext.Minimal)
// アラートで表示される通知に使われる
category.setActions([actionA, actionB, actionC], forContext: UIUserNotificationActionContext.Default)

// 登録する
var settings = UIUserNotificationSettings(
    forTypes: UIUserNotificationType.Badge | UIUserNotificationType.Sound | UIUserNotificationType.Alert,
    categories:NSSet(object: category))
application.registerUserNotificationSettings(settings);
UIMutableUserNotificationAction に設定できるプロパティは次のとおりです。
| プロパティ | 型 | 説明 |
|---|---|---|
| identifier | String | ID |
| title | String | ボタンのタイトル |
| activationMode | UIUserNotificationActivationMode | アクションの動作方式(アプリを起動するかしないか) |
| authenticationRequired | Bool | アクション実行にロック解除を求めるか否か |
| destructive | Bool | 破壊的なアクションか否か(trueにすると赤くなる) |
次に Local Notification を作成し、通知します。UILocalNotification を呼び出すときはこれまでと基本的に変わりません。UILocalNotification#category に先ほど登録した UIMutableUserNotificationCategory#identifier と同じ文字列をセットします。
var notification = UILocalNotification()
notification.fireDate = NSDate()
notification.timeZone = NSTimeZone.defaultTimeZone()
notification.alertBody = "Notification";
notification.alertAction = "Open";
notification.applicationIconBadgeNumber = 1;
notification.soundName = UILocalNotificationDefaultSoundName;
notification.userInfo = ["sample":"aaaaa"];
notification.category = "custom"
UIApplication.sharedApplication().scheduleLocalNotification(notification);
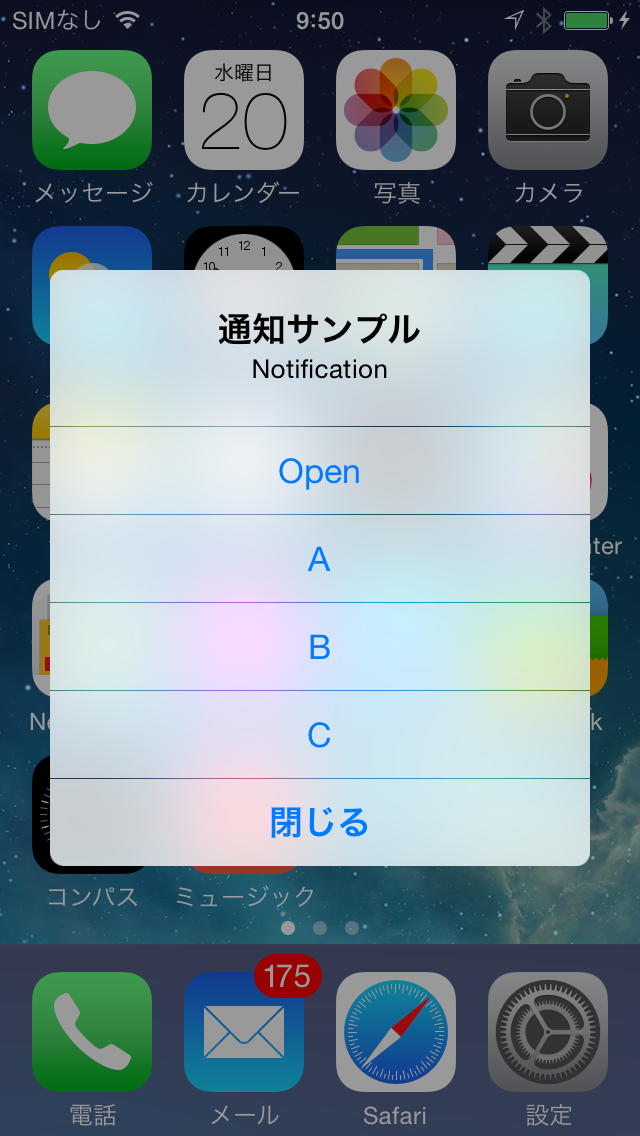
上記メソッドを applicationDidEnterBackground: などで呼び出されるようにしましょう。実行すると下図のようになります。

通知方式を「ダイアログ」に設定すると下図のようになります。
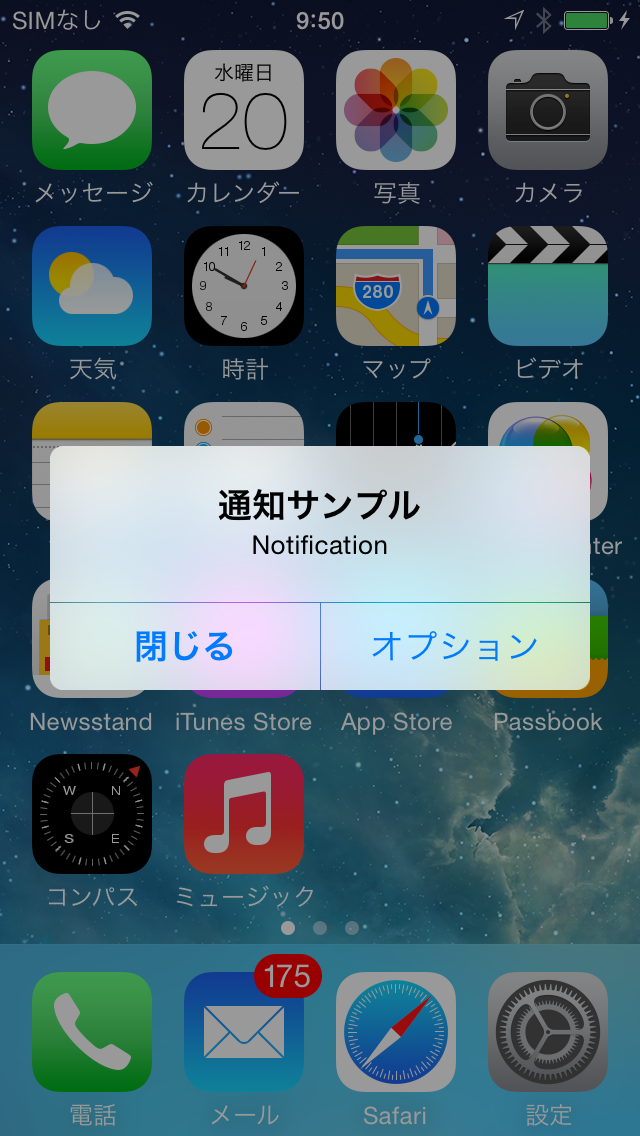
この「オプション」を選択するとようやく Notification Action が表示されます。少しわかりづらいですね。。
なお、ボタンが押されたときに application:handleActionWithIdentifier:forLocalNotification:completionHandler が呼び出されるので、この中で条件分岐して処理を実行します。
func application(application: UIApplication!, handleActionWithIdentifier identifier: String!, forLocalNotification notification: UILocalNotification!, completionHandler: (() -> Void)!)
{
    println("application:handleActionWithIdentifier:forLocalNotification:completionHandler")
}
Remote Notification の場合
Remote Notification の場合、APNs で Push 通知を送るときのメッセージに category を設定すると反映されます。
{
  "aps" : {
    "alert" : "You’re invited!",
    "category" : "INVITE_CATEGORY",
  }
}
Local Notification と同様、UIApplication に Category を予め設定しておく必要があります。
なお、ボタンが押されたときには application:handleActionWithIdentifier:forRemoteNotification:completionHandler が呼び出されるので、この中で条件分岐して処理を実行します。
func application(application: UIApplication!, handleActionWithIdentifier: String!, forRemoteNotification: NSDictionary!, completionHandler: (() -> Void)!)
{
    println("application:handleActionWithIdentifier:forRemoteNotification:completionHandler")
}
まとめ
アプリを起動しなくてもアプリの操作ができるという点で、かなり使えそうな機能ですね。Local Notification でも、Remote Notification でも、ぜひ活用しましょう!