![[iOS 8/Xcode 6] SwiftではじめるiOS開発 #1 [Table View]](https://devio2023-media.developers.io/wp-content/uploads/2014/06/ios81.png)
[iOS 8/Xcode 6] SwiftではじめるiOS開発 #1 [Table View]
2014.09.18
この記事は公開されてから1年以上経過しています。情報が古い可能性がありますので、ご注意ください。
ただいま基本動作を絶賛学習中です。
Table View
ツール系のアプリで使う場面が多いリスト表示について実装してみたいと思います。
Objective-Cの記事ですが、UITableViewを使うにあたって、事前にこちらの記事を確認しておくと、スムーズに理解できると思います。
[iOS] StoryboardでUITableViewを実装し理解する [4月からはじめるiPhoneアプリ #1]
プロジェクトの作成
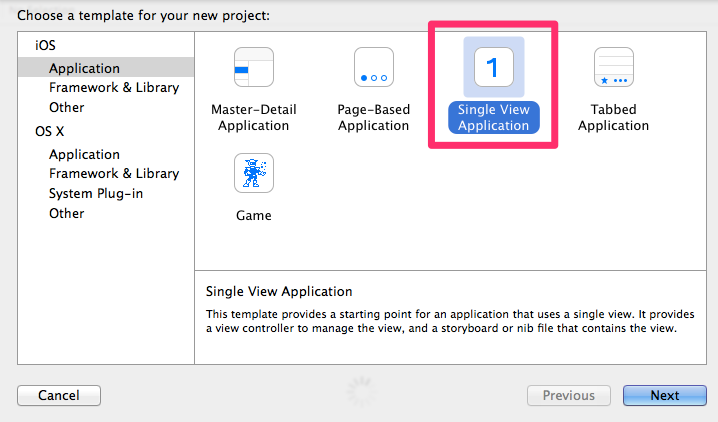
Single View Applicationでプロジェクトを作成します。
作成したプロジェクトのMain.storyboardを開き、右下のコンテナからTableViewを選択してドラッグ&ドロップでstoryboardのViewControllerに追加します。

次に、先ほど追加したTableViewをViewController.swiftに登録します。

ひとまずこれで準備が完了したので、早速実装していきます。
TableViewの実装
まずは、以下のようにclassに"UITableViewDataSource"と"UITableViewDelegate"を追加します。
<変更前>
class ViewController: UIViewController

<変更後>
class ViewController: UIViewController, UITableViewDataSource, UITableViewDelegate
最低限必要なメソッドがないため、ここではエラーとなります。
以下のように2つの"tableView"メソッドを追加します。
    // セルに表示するテキスト
    let texts = ["Sunday", "Monday", "Tuesday", "Wednesday", "Thursday", "Friday", "Saturday"]

    // セルの行数
    func tableView(tableView: UITableView, numberOfRowsInSection section: Int) -> Int {
        return texts.count
    }

    // セルの内容を変更
    func tableView(tableView: UITableView, cellForRowAtIndexPath indexPath: NSIndexPath) -> UITableViewCell {
        let cell: UITableViewCell = UITableViewCell(style: UITableViewCellStyle.Subtitle, reuseIdentifier: "Cell")

        cell.textLabel?.text = texts[indexPath.row]
        return cell
    }
最後にviewDidLoad()内でtableViewの紐付けをします。
override func viewDidLoad() {
        super.viewDidLoad()
        // Do any additional setup after loading the view, typically from a nib.

        tableView.delegate = self
        tableView.dataSource = self
    }
最終的には、以下のようなコードになります。
class ViewController: UIViewController, UITableViewDataSource, UITableViewDelegate  {

    @IBOutlet weak var tableView: UITableView!

    override func viewDidLoad() {
        super.viewDidLoad()
        // Do any additional setup after loading the view, typically from a nib.

        tableView.delegate = self
        tableView.dataSource = self
    }

    override func didReceiveMemoryWarning() {
        super.didReceiveMemoryWarning()
        // Dispose of any resources that can be recreated.
    }


    // セルに表示するテキスト
    let texts = ["Sunday", "Monday", "Tuesday", "Wednesday", "Thursday", "Friday", "Saturday"]


    // セルの行数
    func tableView(tableView: UITableView, numberOfRowsInSection section: Int) -> Int {
        return texts.count
    }


    //セルの内容を変更
    func tableView(tableView: UITableView, cellForRowAtIndexPath indexPath: NSIndexPath) -> UITableViewCell {
        let cell: UITableViewCell = UITableViewCell(style: UITableViewCellStyle.Subtitle, reuseIdentifier: "Cell")

        cell.textLabel?.text = texts[indexPath.row]
        return cell
    }

}
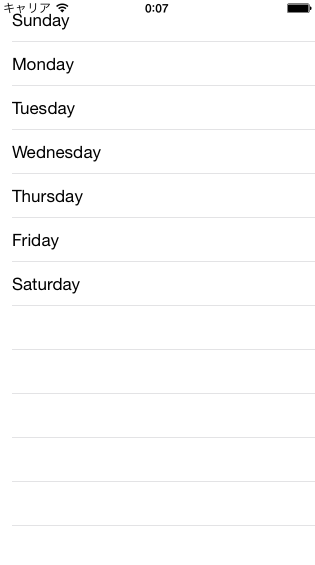
実際に実行してみると、以下のように曜日がリスト形式で表示されるかと思います。(ステータスバーに食い込んでますが。。。)
TableViewの実装は以上です。ありがとうございました。