![[iOS 8] UIAlert, UIActionSheet から UIAlertController へ](https://devio2023-media.developers.io/wp-content/uploads/2014/06/ios81.png)
[iOS 8] UIAlert, UIActionSheet から UIAlertController へ
この記事は公開されてから1年以上経過しています。情報が古い可能性がありますので、ご注意ください。
UIAlert, UIActionSheetに取って代わるUIAlertController
iOS 8では新しいUIAlertControllerというクラスが追加されました。これは従来のUIAlert, UIActionSheetに取って代わるものです。UIAlert, UIActionSheetは今のところほとんど変更が無いようですが、わざわざ同じ機能の新しいクラスを追加したということはしかるべき変更が後に行われる可能性が強そうです。
今回のサンプルコードです。
ViewController.swift
import UIKit

class ViewController: UIViewController {

    @IBAction func alertButtonDidTouchUpInside(sender: AnyObject) {
        // アラートのインスタンスを生成
        let alert =
        UIAlertController(
            title: "Title",
            message: "Message",
            preferredStyle: .Alert)
        // Actionを追加
        addActionsToAlertController(alert)
        // TextFieldを追加
        alert.addTextFieldWithConfigurationHandler{ textField in
            // 必要な設定を行う
            textField.delegate = self
        }
        // アラートを表示
        self.presentViewController(alert,
            animated: true,
            completion: {
                println("Alert displayed")
            })

    }

    @IBAction func actionSheetButtonDidTouchUpInside(sender: AnyObject) {
        let actionSheet =
        UIAlertController(
            title: "Title",
            message: "Message",
            preferredStyle: .ActionSheet)
        addActionsToAlertController(actionSheet)
//        actionSheet.addTextFieldWithConfigurationHandler{ textField in
//
//        } // ActionSheetにTextFieldを追加することはできない追加して表示しようとするとランタイムエラー
        self.presentViewController(actionSheet,
            animated: true,
            completion: {
                println("ActionSheet displayed")
            })
    }

    // AlertControllerにActionを追加
    func addActionsToAlertController(controller: UIAlertController) {
        // 基本的にはActionが追加された順序でボタンが配置される
        // Cancelは例外的に一番下に配置される
        controller.addAction(
            UIAlertAction(
                title: "Cancel",
                style: .Cancel,
                handler: { action in
                    println(action.title)
                }))
        controller.addAction(
            UIAlertAction(
                title: "Default",
                style: .Default,
                handler: { action in
                    println(action.title)
                }))
        // 削除等のアクションを示す為に赤くなる
        controller.addAction(
            UIAlertAction(
                title: "Destructive",
                style: .Destructive,
                handler: { action in
                    println(action.title)
                }))
    }

}

// UITextFieldDelegateを扱うためのエクステンション
extension ViewController : UITextFieldDelegate {
    func textFieldDidEndEditing(textField: UITextField!) {
        println(textField.text)
    }
}
生成方法
インスタンスの生成とボタンの追加はUIAlertViewではひとつにまとまった指定イニシャライザがありましたが、UIAlertControllerでは生成とボタンの追加のメソッドは分かれています。さらにボタンの追加はUIAlertActionインスタンスの追加によってなされ、UIAlertActionはボタンが押された時のハンドラを生成時に指定することが可能です。従来ではUIAlertView-BlocksなどのOSSを使わない場合はデリゲードとタグを用いたハンドリングが通例でしたが、ボタン、アラートごとにタグ用の定数を切る手間がなくなります。
インスタンス生成
l6 - l11
// アラートのインスタンスを生成
let alert =
UIAlertController(
    title: "Title",
    message: "Message",
    preferredStyle: .Alert)
アラートのタイトルとメッセージが指定できるのは従来のAPI通りです。preferredStyleの後にUIAlertControllerStyleの値を入れて従来のUIAlertView風の表示スタイルかUIActionSheet風の表示スタイルを選択します。
UIAlertControllerStyle
enum UIAlertControllerStyle : Int {
    case ActionSheet // UIActionSheet風のアラート
    case Alert       // UIAlertView風のアラート
}
ボタン追加
l45 - l71
UIAlertActionをUIAlertControllerに追加することでボタンの追加と、ボタンをおした時の挙動を追加できます。
// AlertControllerにActionを追加
func addActionsToAlertController(controller: UIAlertController) {
    // 基本的にはActionが追加された順序でボタンが配置される
    // Cancelは例外的に一番下に配置される
    controller.addAction(
        UIAlertAction(
            title: "Cancel",
            style: .Cancel,
            handler: { action in
                println(action.title)
            }))
    controller.addAction(
        UIAlertAction(
            title: "Default",
            style: .Default,
            handler: { action in
                println(action.title)
            }))
    // 削除等のアクションを示す為に赤くなる
    controller.addAction(
        UIAlertAction(
            title: "Destructive",
            style: .Destructive,
            handler: { action in
                println(action.title)
            }))
}
UIAlertAction生成時にはボタンのタイトルとスタイルとボタンを押した時の挙動を記述します
l56 - l62
UIAlertAction(
    title: "Default",
    style: .Default,
    handler: { action in
        println(action.title)
}))
styleの後にUIAlertActionStyleを次の3つから選択することができます。
enum UIAlertActionStyle : Int {
    case Default // 通常のボタンタイトル表示スタイル
    case Cancel  // キャンセルボタン表示スタイル、追加順序に関係なく最後にボタンが移動する
    case Destructive // 削除等の動作を明示的にするための赤いボタンタイトル表示スタイル
}
表示方法
UIActionControllerはUIViewControllerのサブクラスとして定義されているため、従来通りのモーダルの表示方法で表示がなされます。
l19 - l24
// アラートを表示
self.presentViewController(alert,
    animated: true,
    completion: {
        println("Alert displayed")
})
TextFieldの追加
UIAlertControllerStyle.Alertでスタイル指定されたUIAlertControllerに対してはUITextFieldを追加できます。
l14 - l18
// TextFieldを追加
alert.addTextFieldWithConfigurationHandler{ textField in
    // 必要な設定を行う
    textField.delegate = self
}
メソッドの末尾クロージャではUITextFieldの追加の際に必要な設定を行うことができます。
尚、個々ではUIAlertContollerのインスタンスがプロパティで保持されないため、循環参照の危険性がありません。このためselfに対してweakやunownedの識別子を特に使っていません。
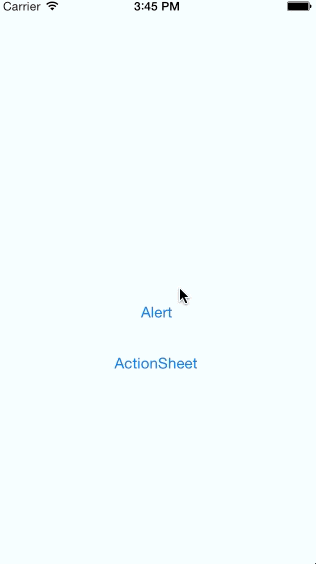
実際に動かす
改めて確認するまでもないですが、実際に動かしてみます。
参考サイト
iOS8でのダイアログ表示:廃止になるUIAlertViewと推奨されているUIAlertControllerのメリット - Qiita