API Gateway + Lambda + Transcribeで音声ファイルをテキストに変換して、Flutterで表示してみた
この記事は公開されてから1年以上経過しています。情報が古い可能性がありますので、ご注意ください。
こんにちは、ゲームソリューション部のsoraです。
今回は、API Gateway + Lambda + Transcribeで音声をテキストに変換して、Flutterで表示してみたことについて書いていきます。
構成
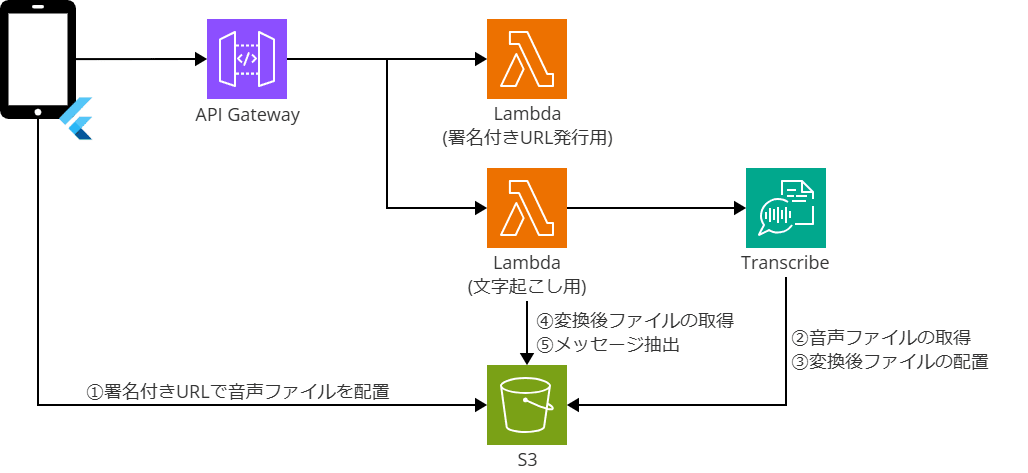
構成は簡単なものですが以下です。
Flutterにて音声ファイルを指定した後、Lambdaで署名付きURLを発行して音声ファイルをS3に配置します。
その後、別のLambdaでTranscribeに渡してテキストに変換します。
最後に、Flutterでテキストを表示します。

先に動作した画面を載せておきます。

環境
- Lambdaランタイム:Python 3.13
- Flutter:3.22.3
AWSインフラの作成
Terraformソースコード
AWSインフラはTerraformで作成しました。
API Gateway + Lambdaのよくある構成のため、説明は割愛します。
一部異なりますが、ソースコードや詳細は以下ブログをご参照ください。
Lambdaソースコード
LambdaのTranscribeで音声をテキストに変換するコードは以下です。
S3に配置された音声ファイルをTranscribeでテキストに変換して返却しています。
今回は、Transcribeにてジョブが完了するまで、LambdaからTranscribeに対してポーリングするシンプルな形にしていますが、フロントエンドから見ると同期的な処理になっているため、処理時間によってはフロントエンドからポーリングしたりpush通知する形の方が良いと思いました。
今回の実装だと、TranscribeのジョブがLambdaの実行時間の上限にあたってしまうとエラーになります。
もう1つのLambdaは、S3に配置された音声ファイルの署名付きURLを取得するものですが、本ブログのメイン部分でないため割愛します。
import json
import boto3
import os
import uuid
import time

def lambda_handler(event, context):
    try:
        body = json.loads(event['body'])
        bucket = body.get('bucketName')
        key = body.get('fileName')

        transcribe_client = boto3.client('transcribe')
        s3_client = boto3.client('s3')

        # ジョブの設定
        job_name = f"transcribe-job-{str(uuid.uuid4())}"
        media_uri = f"s3://{bucket}/{key}"
        output_bucket = os.environ['S3_BUCKET_NAME']
        output_prefix = os.environ['S3_PREFIX']
        output_key = f"{output_prefix}{str(uuid.uuid4())}.json"

        # Transcribeジョブを開始
        transcribe_client.start_transcription_job(
            TranscriptionJobName=job_name,
            Media={'MediaFileUri': media_uri},
            MediaFormat='mp3',
            LanguageCode='ja-JP',
            OutputBucketName=output_bucket,
            OutputKey=output_key
        )

        # ジョブが完了するまで待機
        while True:
            status = transcribe_client.get_transcription_job(
                TranscriptionJobName=job_name
            )
            if status['TranscriptionJob']['TranscriptionJobStatus'] in ['COMPLETED', 'FAILED']:
                break
            time.sleep(5)

        # ジョブが失敗した場合
        if status['TranscriptionJob']['TranscriptionJobStatus'] == 'FAILED':
            raise Exception('Transcribeジョブが失敗しました')

        # 結果ファイルを取得
        response = s3_client.get_object(
            Bucket=output_bucket,
            Key=output_key
        )

        # JSONファイルの内容を読み取り
        transcription_result = json.loads(response['Body'].read().decode('utf-8'))

        # 変換後のテキストを取得
        transcript = transcription_result['results']['transcripts'][0]['transcript']

        return {
            'statusCode': 200,
            'headers': {
                'Content-Type': 'application/json',
                'Access-Control-Allow-Origin': '*'
            },
            'body': json.dumps({
                'message': 'Transcribeジョブが完了しました',
                'text': transcript
            }, ensure_ascii=False)
        }

    except Exception as e:
        return {
            'statusCode': 500,
            'body': json.dumps({
                'error': f'処理に失敗しました: {str(e)}'
            })
        }
Flutterの実装
Flutterのメイン部分のコードは以下です。
Flutterでは音声ファイルを指定して、署名付きURLを取得してS3に配置します。
その後、Transcribeのジョブを実行するためにリクエストを送信します。
最後に、Lambdaから返却されたテキストをFlutterで表示します。
import 'dart:convert';
import 'package:flutter/material.dart';
import 'package:flutter_riverpod/flutter_riverpod.dart';
import 'package:http/http.dart' as http;
import 'dart:developer' as developer;
import 'package:file_picker/file_picker.dart';
import 'dart:io';
// 文字起こし対象のファイルパス用のNotifier
class AudioUrlNotifier extends Notifier<String?> {
String? build() => null;
void setUrl(String url) {
state = url;
}
}
final audioUrlProvider = NotifierProvider<AudioUrlNotifier, String?>(AudioUrlNotifier.new);
// 文字起こし結果用のNotifier
class TranscriptionNotifier extends Notifier<String?> {
String? build() => null;
void setText(String text) {
state = text;
}
}
final transcriptionProvider = NotifierProvider<TranscriptionNotifier, String?>(TranscriptionNotifier.new);
class ContentsPage extends ConsumerWidget {
ContentsPage({super.key});
final AudioService audioService = AudioService();
Widget build(BuildContext context, WidgetRef ref) {
final transcriptionText = ref.watch(transcriptionProvider);
final audioUrl = ref.watch(audioUrlProvider);
return Scaffold(
appBar: AppBar(
backgroundColor: Theme.of(context).colorScheme.inversePrimary,
title: const Text('音声文字起こしテスト'),
),
body: Center(
child: Column(
mainAxisAlignment: MainAxisAlignment.start,
crossAxisAlignment: CrossAxisAlignment.center,
children: [
const SizedBox(height: 16),
ElevatedButton(
onPressed: () async {
try {
// 音声ファイルの選択
FilePickerResult? result = await FilePicker.platform.pickFiles(
type: FileType.audio,
);
if (result != null) {
final filePath = result.files.first.path;
if (filePath != null) {
ref.read(audioUrlProvider.notifier).setUrl(filePath);
}
}
} catch (e) {
ScaffoldMessenger.of(context).showSnackBar(
SnackBar(content: Text('エラーが発生しました: $e')),
);
}
},
child: const Text('音声ファイルを選択'),
),
const SizedBox(height: 16),
if (audioUrl != null) ...[
Text('選択されたファイル: $audioUrl'),
const SizedBox(height: 16),
],
ElevatedButton(
onPressed: audioUrl == null ? null : () async {
try {
// S3アップロードとTranscribe実行
final uploadResult = await audioService.uploadToS3(audioUrl);
if (uploadResult != null) {
final text = await audioService.transcribe(
uploadResult['bucket'],
uploadResult['fileName']
);
ref.read(transcriptionProvider.notifier).setText(text);
}
} catch (e) {
ScaffoldMessenger.of(context).showSnackBar(
SnackBar(content: Text('エラーが発生しました: $e')),
);
}
},
child: const Text('アップロードと文字起こしを実行'),
),
const SizedBox(height: 32),
if (transcriptionText != null) ...[
const SizedBox(height: 32),
const Text(
'文字起こし結果',
style: TextStyle(fontSize: 20),
),
const SizedBox(height: 16),
Container(
padding: const EdgeInsets.all(16),
decoration: BoxDecoration(
border: Border.all(color: Colors.grey),
borderRadius: BorderRadius.circular(8),
),
child: Text(transcriptionText),
),
],
],
),
),
);
}
}
class AudioService {
// ★署名付きURL取得用のAPIエンドポイント
final String uploadApiUrl = '{API_GATEWAY_URL}/{STAGE_NAME}/{PATH}';
// ★文字起こし用のAPIエンドポイント
final String transcribeApiUrl = '{API_GATEWAY_URL}/{STAGE_NAME}/{PATH}';
Future<Map<String, dynamic>?> uploadToS3(String audioUrl) async {
try {
// 署名付きURLを取得
// ※発行時に指定したContent-TypeとアップロードするファイルのContent-Typeが一致している必要があるため注意
final presignedUrlResponse = await http.post(
Uri.parse(uploadApiUrl),
headers: {
'Content-Type': 'audio/mp3',
}
);
if (presignedUrlResponse.statusCode != 200) {
throw Exception('署名付きURLの取得に失敗しました');
}
final presignedData = json.decode(presignedUrlResponse.body);
final uploadUrl = presignedData['uploadUrl'];
File audioFile = File(audioUrl);
List<int> fileBytes = await audioFile.readAsBytes();
// 署名付きURLを使用してS3に直接アップロード
final uploadResponse = await http.put(
Uri.parse(uploadUrl),
headers: {
'Content-Type': 'audio/mp3',
},
body: fileBytes,
);
if (uploadResponse.statusCode != 200) {
throw Exception('S3へのアップロードに失敗しました');
}
return {
'fileName': presignedData['fileName'],
'bucket': presignedData['bucket']
};
} catch (e) {
developer.log('エラーが発生しました: $e');
rethrow;
}
}
Future<String> transcribe(String bucket, String fileName) async {
try {
final response = await http.post(
Uri.parse(transcribeApiUrl),
headers: {
'Content-Type': 'application/json',
},
body: json.encode({
'bucketName': bucket,
'fileName': fileName
}),
);
if (response.statusCode == 200) {
final data = json.decode(response.body);
return data['text'];
} else {
throw Exception('文字起こしに失敗しました');
}
} catch (e) {
developer.log('エラーが発生しました: $e');
rethrow;
}
}
}
実行
準備ができたためテストします。
適当な音声を入力して、「変換する」ボタンを押すとテキストが表示されました。

AWSマネージメントコンソール上で、Transcribeのジョブが確認できました。(何度かテストしたため複数ジョブがあります。)

S3内に変換後テキストが入っていることも確認できました。

最後に
今回は、API Gateway + Lambda + Transcribeで音声をテキストに変換して、Flutterで表示してみたことを記事にしました。
どなたかの参考になると幸いです。


