
I tried deploying an AI agent to AgentCore using AgentCore CLI
This page has been translated by machine translation. View original
Introduction
Hello, I'm Jinno from the Consulting Department. I've been interested in Life supermarket lately.
AWS has released a new CLI tool called AgentCore CLI (@aws/agentcore) as a Public Preview.
It allows you to create projects, develop locally, and deploy to AWS with a single command.
Some of you might think, "Wait, wasn't there an AgentCore Starter Toolkit...?" I was also curious about the difference between these two.
With this difference in mind, I'd like to introduce the process of creating, deploying, and testing an agent using this AgentCore CLI.
Prerequisites
I used the following environment for this article.
Environment Information
| Item | Version / Information |
|---|---|
| Node.js | v25.5.0 |
| Python | 3.13.11 |
| AgentCore CLI | 0.3.0-preview.6.1 |
AgentCore CLI
AgentCore CLI is a command line tool for creating, developing, and deploying AI agents on Amazon Bedrock AgentCore.
Its key features include:
- Interactive project template creation (
agentcore create) - Local development server support (
agentcore dev) - AWS CDK-based infrastructure deployment (
agentcore deploy) - Adding resources like Memory, Gateway, Identity, and Evaluator with
agentcore add - An interactive TUI (Terminal UI)
Differences from Starter Toolkit
Before the AgentCore CLI appeared, there was already the Bedrock AgentCore Starter Toolkit (Python-based).
The rough differences, as of now, appear to be:
| Aspect | AgentCore CLI | Starter Toolkit |
|---|---|---|
| Implementation | CLI itself is provided as a Node.js package (@aws/agentcore), currently generating Python agents |
Python-based toolkit. Offers Python quickstart and also provides guides for TypeScript agents |
| User Experience | Commands like agentcore create plus interactive terminal UI |
CLI-based usage. While interactive, it doesn't provide the terminal UI experience of AgentCore CLI |
| Infrastructure | Generated projects include agentcore/cdk/ for CDK-based infrastructure management |
The create command can automatically generate CDK/Terraform templates. https://dev.classmethod.jp/articles/bedrock-agentcore-starter-toolkit-create-command/ However, you need to run deployment commands separately. |
| Recommendation for new users | The official README advises Starter Toolkit users to uninstall it, suggesting this is the natural choice for new users | Still usable, but for new users, checking out AgentCore CLI first seems to be the recommended approach |
While the Starter Toolkit covered similar functionality, AgentCore CLI offers a more refined developer experience with its terminal UI wizards, rating scale presets, and CDK-based infrastructure management.
The question is, which one should we use? Will they both continue to be updated?
When Minorun asked this question in an Issue, the response was that AgentCore CLI is the future standard and is recommended for use starting now. For new development or when in doubt, it seems AgentCore CLI is the way to go.
Terminal UI
I'll introduce this feature first as it helps understand the rest of the content.
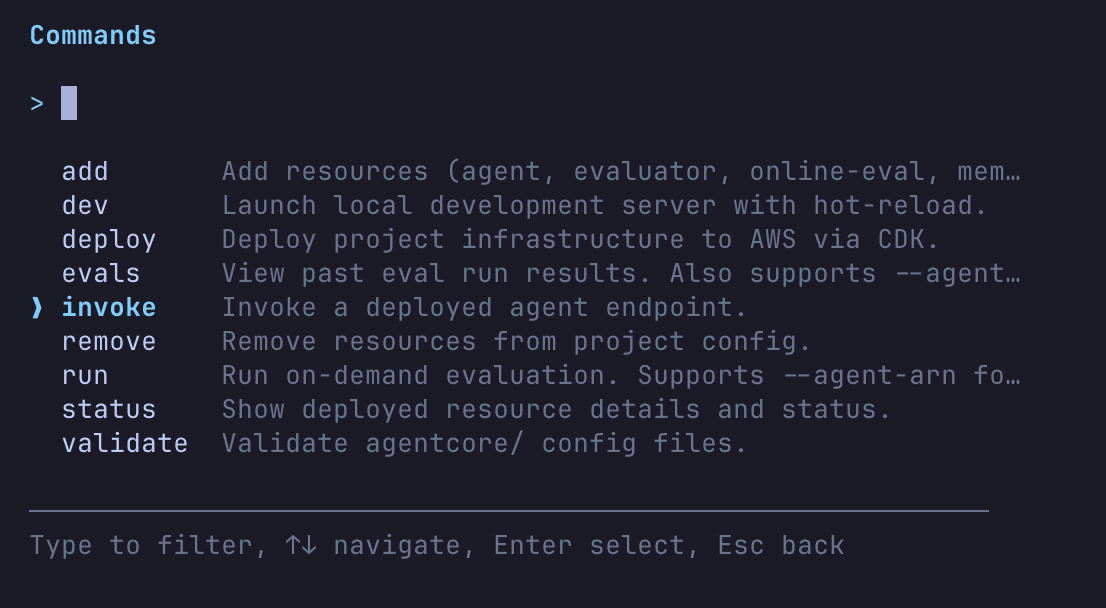
One interesting feature of AgentCore CLI is its interactive terminal UI. Running agentcore without arguments launches it.
agentcore
It looks like there are many capabilities. I'll try the invoke command to run an AI agent. (This assumes you've already deployed an AI agent.)
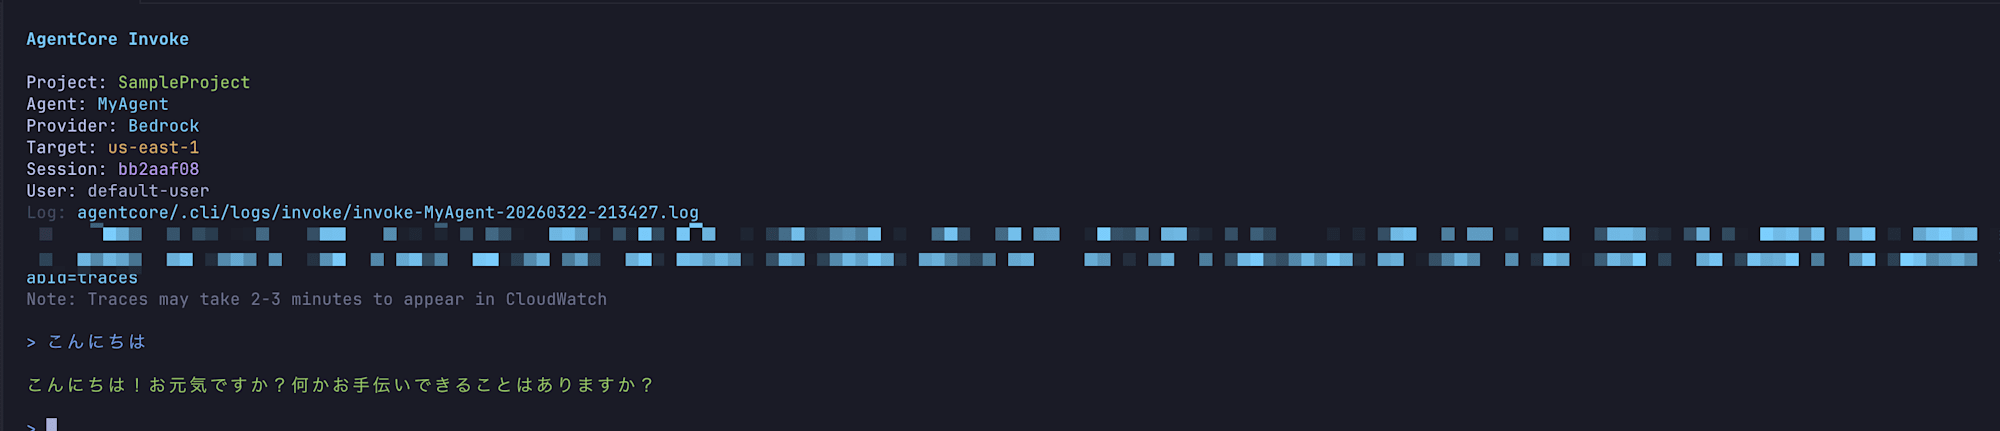
The response came back as a stream!
Now let's try the evals command to evaluate the AI agent.


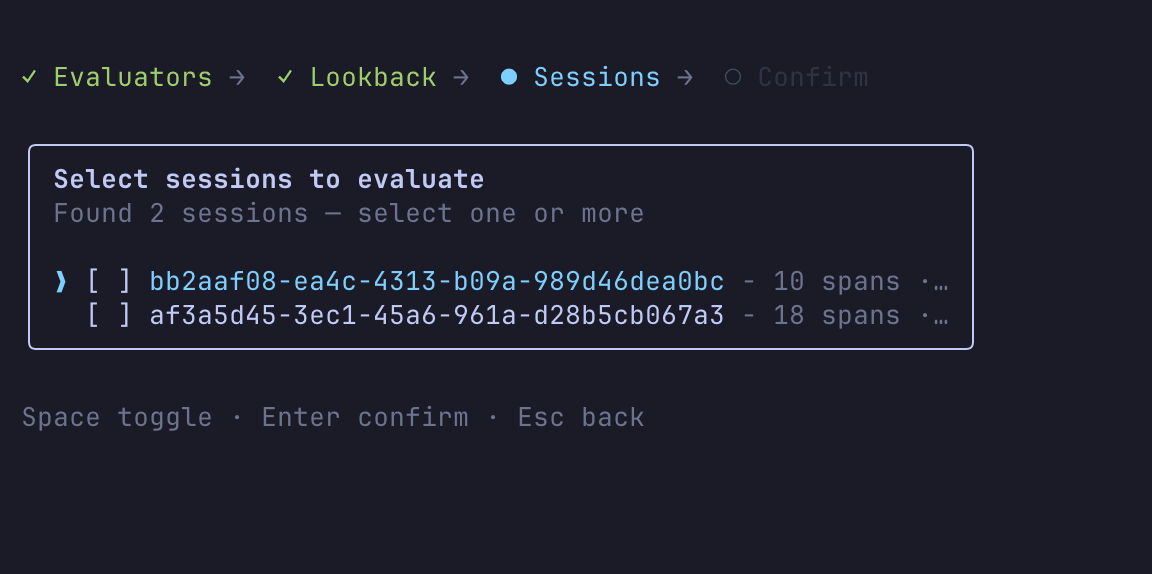
You can interactively select the evaluator, time period, and target session.
Then you'll get results like this:

In the Terminal UI, available commands are listed and operations are guided step by step.
Many of the non-interactive commands I'll introduce today can be performed via the Terminal UI. It's quite helpful that even if you don't remember CLI commands, you can find the operations you need through the Terminal UI! I found it convenient that evaluations can be executed entirely within the terminal.
Let's install it and give it a try.
Installation
Install it globally using npm.
npm install -g @aws/agentcore
After installation, check the version:
agentcore --version
0.3.0-preview.6.1
If the version number displays, you're good to go!
Creating a Project
Let's first understand the management units in AgentCore CLI:
Project (agentcore.json)
├── Agents (agents[])
├── Memories (memories[])
├── Credentials (credentials[])
├── Custom evaluators (evaluators[])
├── Online eval configs (onlineEvalConfigs[])
└── Gateway (mcp.json)
    └── Targets (targets[])
agentcore create creates an entire project, which by default includes one agent.
Resources like Memory, Gateway, and Credentials are defined at the project level, and agents reference these resources through environment variables in their code. Deployment with agentcore deploy targets the entire project.
You can add agents to the project with the agentcore add agent command:
agentcore add agent --name SubAgent --framework Strands --model-provider Bedrock --protocol HTTP
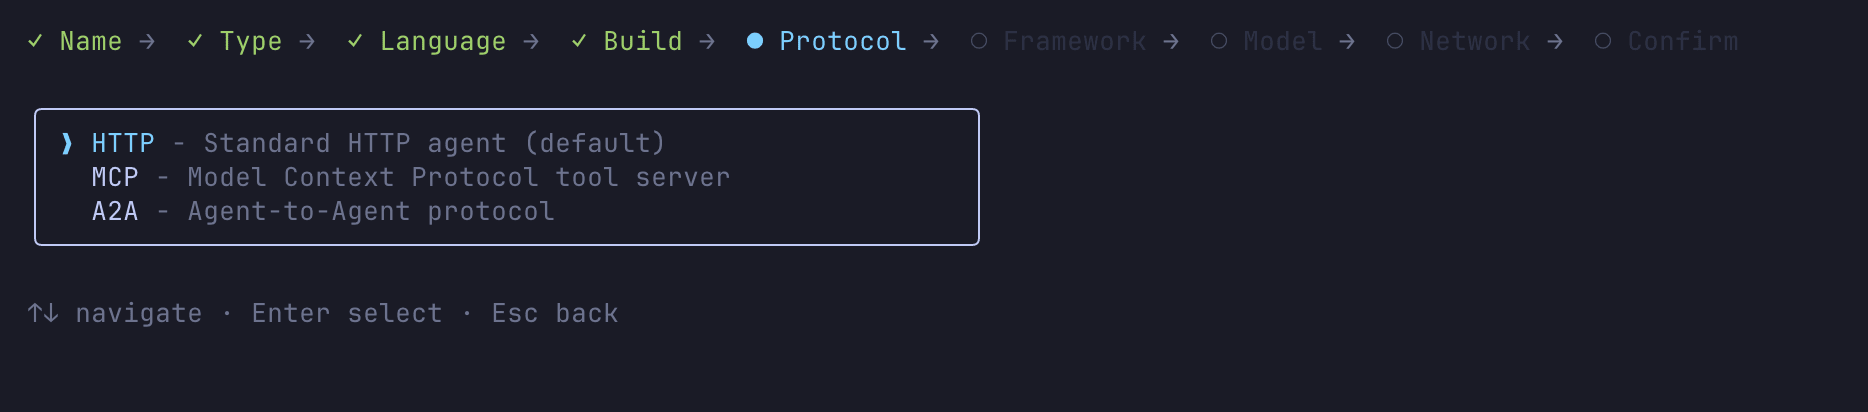
For protocol, you can choose between HTTP, MCP, or A2A. Additionally, specifying --type byo allows you to bring your own existing code.
Creating interactively
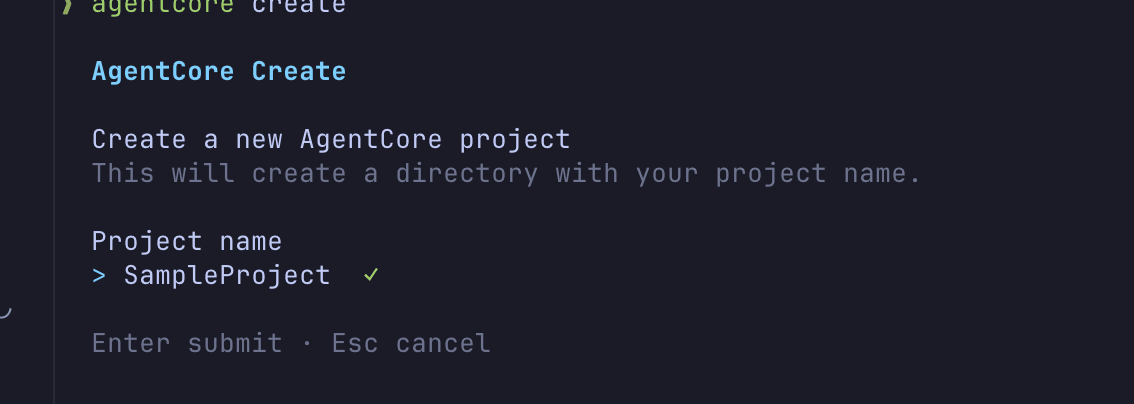
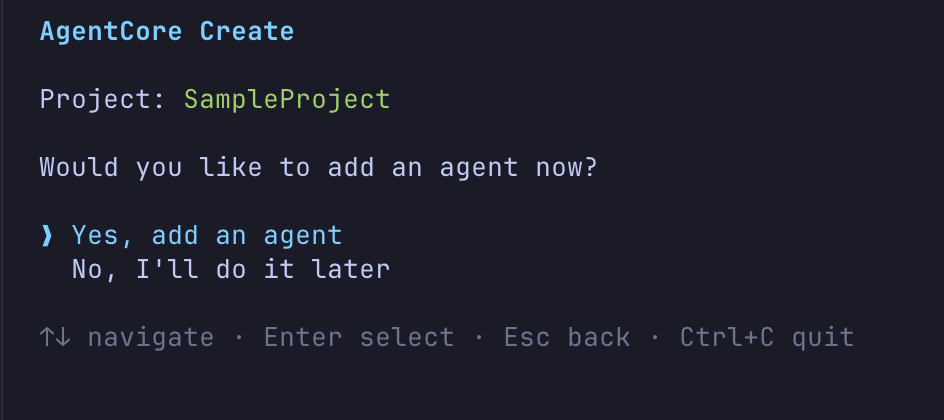
Create a project with agentcore create. You can select the framework and model provider interactively.
agentcore create
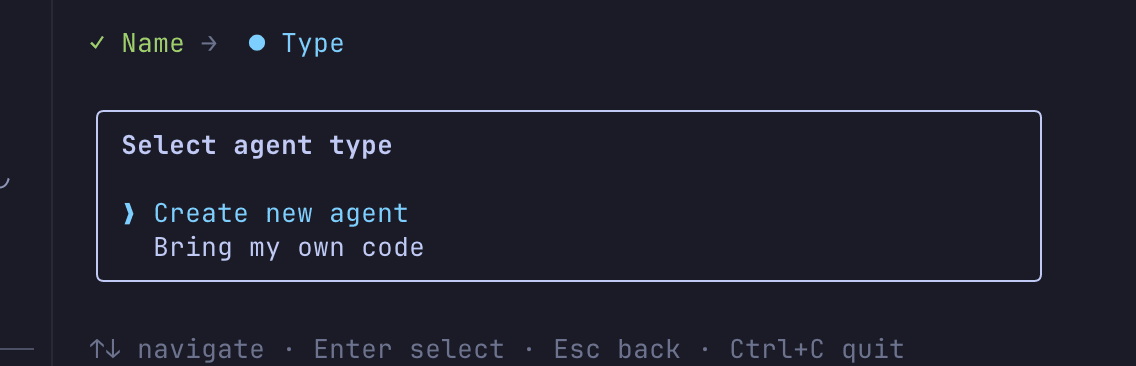
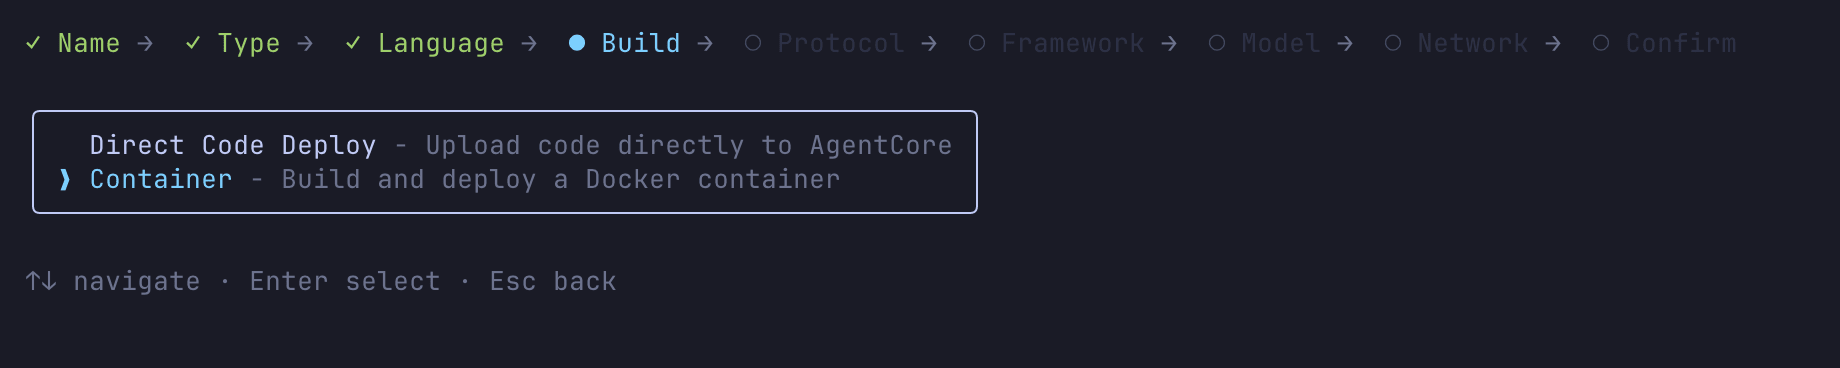
The interactive wizard will ask:
- Project name selection
- Whether to add an agent to the project
- Agent name input
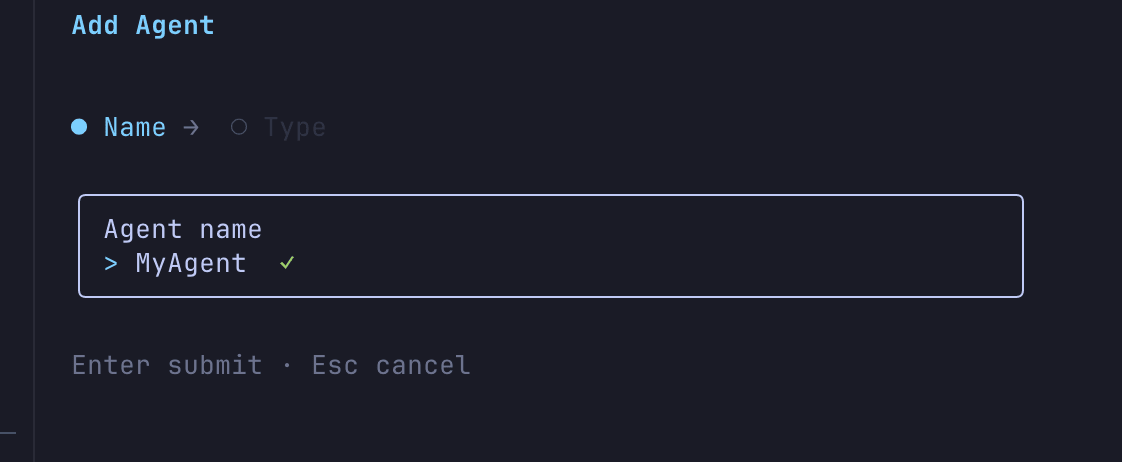
- Create a new agent or bring your own code
- Language selection (currently only Python is available; TypeScript is marked as "Soon" so there's high expectation)

- Build type selection (Direct Code Deploy / Container)
- Protocol selection (HTTP/A2A/MCP)
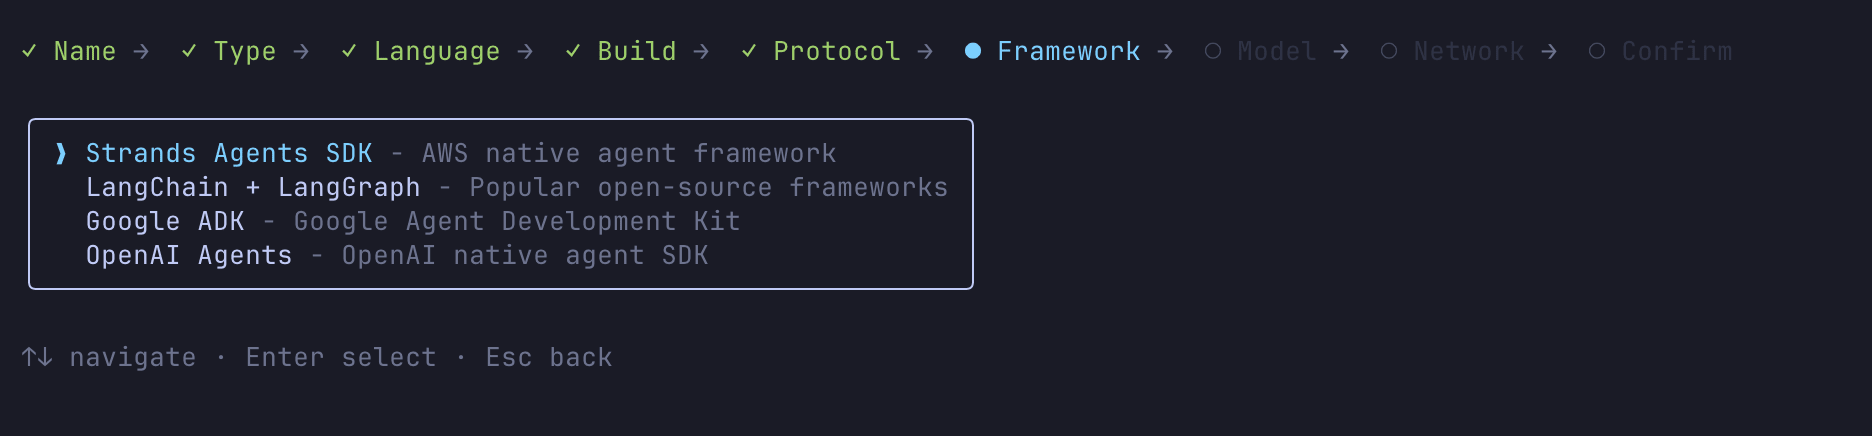
- Framework selection (Strands / LangChain + LangGraph / GoogleADK / OpenAI Agents)
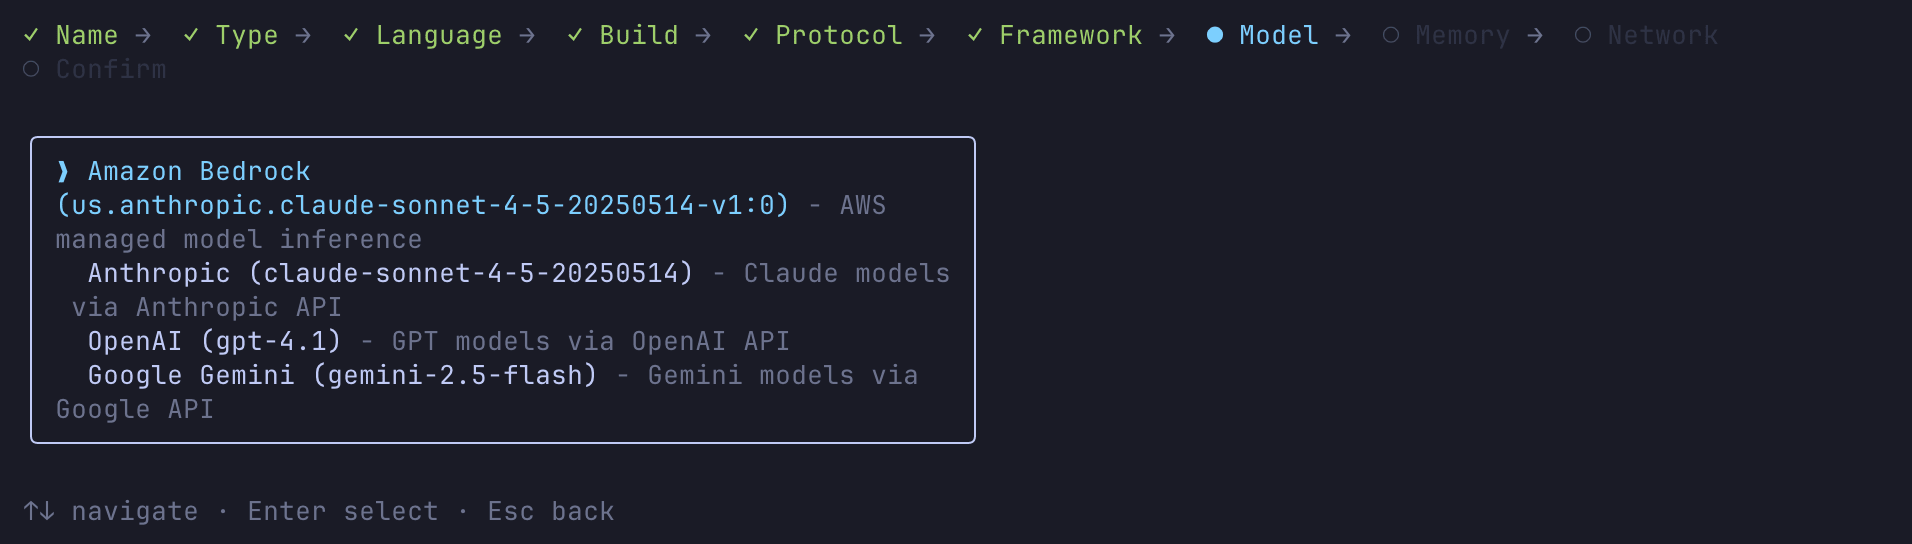
- Model provider selection (Bedrock / Anthropic / OpenAI / Gemini)
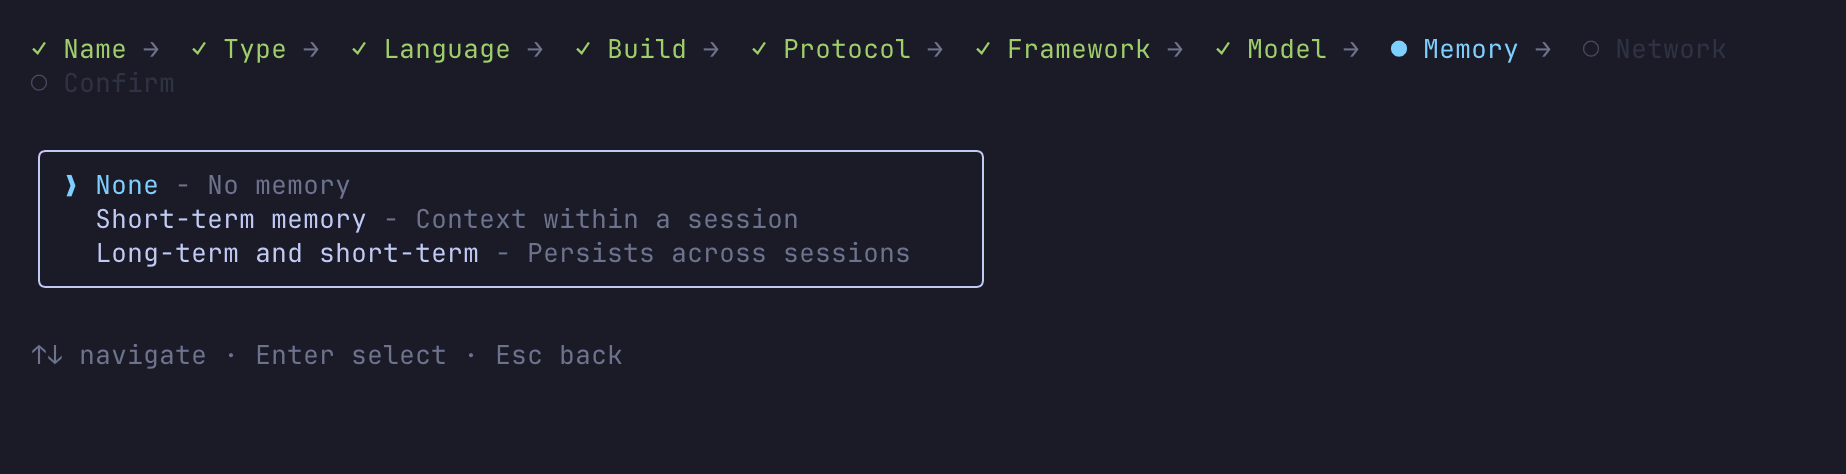
- Memory selection
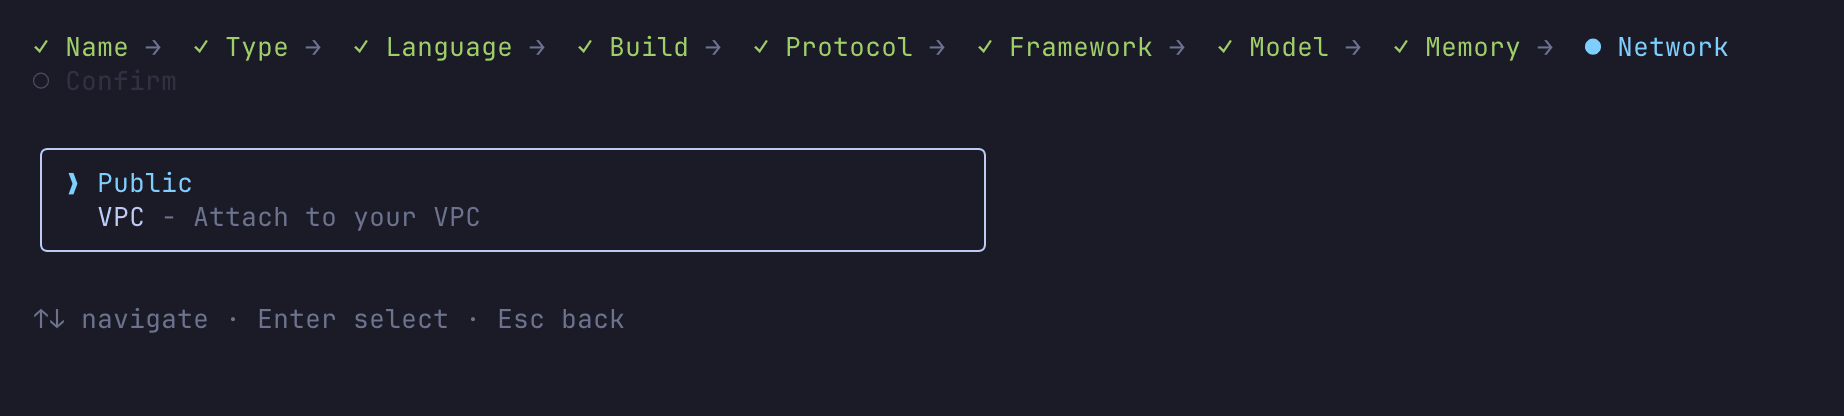
- Network mode (PUBLIC / VPC)
The wizard is thorough in its questioning.
For this demo, I created an agent using Strands Agents + Amazon Bedrock with Memory enabled.
I enabled Long-term and short-term memory, which activated three long-term memory strategies: SEMANTIC, SUMMARIZATION, and USER_PREFERENCE.
After creating it, I noticed the authentication method wasn't selectable and was automatically set to IAM authentication.
Currently there doesn't seem to be a UI to change to JWT authentication.
For setting up JWT authentication and easily creating AgentCore Runtime, the Starter Toolkit currently has an advantage.
As mentioned elsewhere in this blog, the agentcore identity command makes it easy to create Cognito and handle token acquisition logic, which makes the Starter Toolkit convenient in some aspects.
Creating non-interactively
For CI/CD or scripting purposes, you can create projects non-interactively by specifying flags:
agentcore create --name MyAgent --framework Strands --model-provider Bedrock --memory longAndShortTerm --defaults
Using the --defaults flag applies default values to any unspecified options.
Generated Project Structure
Let's examine the directory structure that was created:
SampleProject/
├── agentcore/
│   ├── .env.local          # Environment variables for local development (gitignored)
│   ├── agentcore.json      # Resource definitions (agents, memory, etc.)
│   ├── aws-targets.json    # Deployment region settings
│   └── cdk/                # CDK infrastructure code
├── app/
│   └── MyAgent/
│       ├── main.py          # Agent entry point
│       ├── pyproject.toml   # Python dependencies
│       ├── Dockerfile       # For container builds
│       ├── mcp_client/
│       │   └── client.py    # MCP client connection settings
│       ├── memory/
│       │   └── session.py   # Memory session management
│       └── model/
│           └── load.py      # Model loading settings
agentcore/agentcore.json is the core configuration file for the project, containing definitions for agents, memory, credentials, and evaluations. The actual agent code is generated in the app/ directory based on the chosen framework.
The code is ready to deploy and test right away.
Configuration File Details
Let's take a closer look at the configuration files generated in the agentcore/ directory.
agentcore.json
This is the core configuration file for the project. Here's what was generated for our project:
{
  "name": "sampleProject",
  "version": 1,
  "agents": [
    {
      "type": "AgentCoreRuntime",
      "name": "MyAgent",
      "build": "Container",
      "entrypoint": "main.py",
      "codeLocation": "app/MyAgent/",
      "runtimeVersion": "PYTHON_3_12",
      "networkMode": "PUBLIC",
      "modelProvider": "Bedrock",
      "protocol": "HTTP"
    }
  ],
  "memories": [
    {
      "type": "AgentCoreMemory",
      "name": "MyAgentMemory",
      "eventExpiryDuration": 30,
      "strategies": [
        {
          "type": "SEMANTIC",
          "namespaces": [
            "/users/{actorId}/facts"
          ]
        },
        {
          "type": "USER_PREFERENCE",
          "namespaces": [
            "/users/{actorId}/preferences"
          ]
        },
        {
          "type": "SUMMARIZATION",
          "namespaces": [
            "/summaries/{actorId}/{sessionId}"
          ]
        }
      ]
    }
  ],
  "credentials": [],
  "evaluators": [],
  "onlineEvalConfigs": []
}
Here's a summary of the key fields:
| Field | Description |
|---|---|
name |
Project name (alphanumeric, 23 characters max) |
version |
Schema version |
agents[] |
Array of agent definitions. Specifies build (Direct Code Deploy / Container), runtimeVersion (PYTHON_3_10 to 3_13), networkMode (PUBLIC / VPC), etc. |
memories[] |
Array of Memory resources. Defines strategies (SEMANTIC / SUMMARIZATION / USER_PREFERENCE) and expiration period |
credentials[] |
Array of API keys or OAuth credentials |
evaluators[] |
Custom evaluator definitions |
onlineEvalConfigs[] |
Online evaluation settings |
When you add agents or Memory with agentcore add, they're automatically reflected in this file.
To pass custom environment variables to an agent, add an envVars field to the agent definition:
{
  "agents": [
    {
      "type": "AgentCoreRuntime",
      "name": "MyAgent",
      ...
      "envVars": [
        { "name": "LOG_LEVEL", "value": "INFO" },
        { "name": "CUSTOM_PARAM", "value": "my-value" }
      ]
    }
  ]
}
Only alphanumeric characters and underscores are allowed in envVars names. Environment variables set here are automatically passed to the runtime both during local development (agentcore dev) and after deployment. Note that there's no direct subcommand in agentcore add to add environment variables, so you need to edit agentcore.json directly.
mcp.json
This is the Gateway configuration file. It defines MCP (Model Context Protocol) compatible gateways and their targets. It's not generated at project creation time but is automatically created when you add a Gateway with agentcore add gateway.
{
  "agentCoreGateways": [
    {
      "name": "ToolGateway",
      "description": "Gateway for ToolGateway",
      "targets": [],
      "authorizerType": "NONE",
      "enableSemanticSearch": true,
      "exceptionLevel": "NONE"
    }
  ]
}
| Field | Description |
|---|---|
agentCoreGateways[] |
Array of Gateway definitions |
targets[] |
Array of connection targets (added with agentcore add gateway-target) |
authorizerType |
Authorization type (NONE / AWS_IAM / CUSTOM_JWT) |
enableSemanticSearch |
Enable semantic search (default true) |
exceptionLevel |
Exception level (NONE / DEBUG) |
When a Gateway is created, targets starts as an empty array, and you add targets later with agentcore add gateway-target.
aws-targets.json
This configuration file specifies the AWS account and region for deployment:
[]
By default, it's an empty array, and account information is read during agentcore deploy. You can also explicitly define multiple targets:
[
  {
    "name": "default",
    "account": "123456789012",
    "region": "us-east-1",
    "description": "Default target (us-east-1)"
  }
]
.env.local
This file contains environment variables for local development. It's included in .gitignore and not committed to the repository.
Credentials added with agentcore add identity are stored in this file for local development. Environment variable naming follows this pattern:
| Environment Variable | Description |
|---|---|
AGENTCORE_CREDENTIAL_{NAME}=value |
Credential value added with Identity |
After deployment, credentials are managed by Identity, so .env.local is only used during local development.
Examining the Agent Code
Let's look at the generated agent entry point app/MyAgent/main.py:
from strands import Agent, tool
from bedrock_agentcore.runtime import BedrockAgentCoreApp
from model.load import load_model
from mcp_client.client import get_streamable_http_mcp_client
from memory.session import get_memory_session_manager

app = BedrockAgentCoreApp()
log = app.logger

# MCP client definition
mcp_clients = [get_streamable_http_mcp_client()]

# Tool definitions
tools = []

@tool
def add_numbers(a: int, b: int) -> int:
    """Return the sum of two numbers"""
    return a+b
tools.append(add_numbers)

for mcp_client in mcp_clients:
    if mcp_client:
        tools.append(mcp_client)

def agent_factory():
    cache = {}
    def get_or_create_agent(session_id, user_id):
        key = f"{session_id}/{user_id}"
        if key not in cache:
            cache[key] = Agent(
                model=load_model(),
                session_manager=get_memory_session_manager(session_id, user_id),
                system_prompt="You are a helpful assistant. Use tools when appropriate.",
                tools=tools
            )
        return cache[key]
    return get_or_create_agent
get_or_create_agent = agent_factory()

@app.entrypoint
async def invoke(payload, context):
    log.info("Invoking Agent.....")
    session_id = getattr(context, 'session_id', 'default-session')
    user_id = getattr(context, 'user_id', 'default-user')
    agent = get_or_create_agent(session_id, user_id)

    stream = agent.stream_async(payload.get("prompt"))
    async for event in stream:
        if "data" in event and isinstance(event["data"], str):
            yield event["data"]

if __name__ == "__main__":
    app.run()
BedrockAgentCoreApp serves as the runtime wrapper, and the function with the @app.entrypoint decorator is the entry point for the agent.
The generated code modularizes Memory, MCP client, and model loading:
model/load.py— Creates aBedrockModelinstancememory/session.py— Session management usingAgentCoreMemorySessionManager. Reads Memory ID from environment variableMEMORY_MYAGENTMEMORY_IDmcp_client/client.py— Connection settings for the Streamable HTTP MCP client
When you add a Gateway and deploy it, the environment variable AGENTCORE_GATEWAY_{GATEWAY_NAME}_URL is automatically injected with the Gateway URL. Modifying mcp_client/client.py to read this environment variable allows connecting to external tools through the Gateway.
Adding Resources
With AgentCore CLI, you can declaratively add resources other than agents using the agentcore add command.
The terminal UI allows adding and creating resources interactively, making it easy to experiment. The supported resources cover all AgentCore primitives.
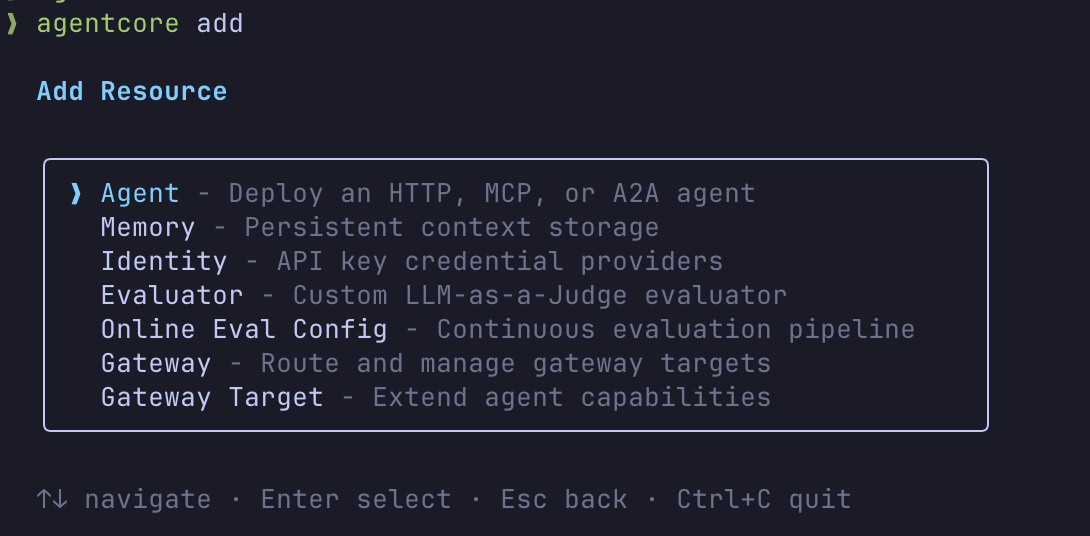
The interactive interface makes creating resources straightforward. If you don't need to automate the process, starting with the interactive approach is helpful.
Resources can also be added non-interactively. Here are some command examples:
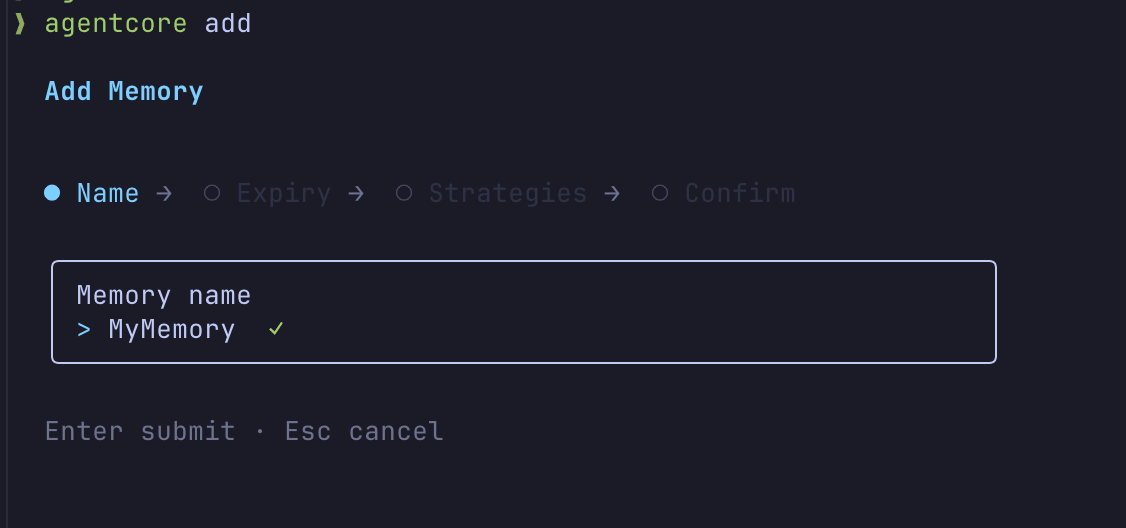
Adding Memory
agentcore add memory --name SharedMemory --strategies SEMANTIC,SUMMARIZATION --expiry 30
Memory strategies include SEMANTIC (vector search), SUMMARIZATION (conversation history summarization), and USER_PREFERENCE (remembering user settings). Added Memory is defined in the memories array of agentcore.json and can be referenced in agent code through the environment variable MEMORY_SHAREDMEMORY_ID.
Adding Gateway
agentcore add gateway --name ToolGateway
Gateway is an MCP (Model Context Protocol) compatible proxy that manages connections to external tools. You can add targets to a Gateway to connect to Lambda functions or external MCP servers. Target types include mcp-server, api-gateway, open-api-schema, smithy-model, and lambda-function-arn.
agentcore add gateway-target \
  --gateway ToolGateway \
  --name WeatherAPI \
  --type mcp-server \
  --endpoint https://mcp.example.com/mcp
To set up JWT authorization for a Gateway, specify --authorizer-type CUSTOM_JWT when creating it:
agentcore add gateway \
  --name SecureGateway \
  --authorizer-type CUSTOM_JWT \
  --discovery-url https://example.auth0.com/.well-known/openid-configuration \
  --allowed-audience my-api-audience
For Lambda targets, you pass a tool definition via a JSON file (--tool-schema-file):
agentcore add gateway-target \
  --gateway ToolGateway \
  --name WeatherLambda \
  --type lambda-function-arn \
  --lambda-arn arn:aws:lambda:us-east-1:123456789012:function:get-weather \
  --tool-schema-file ./tool-schema.json
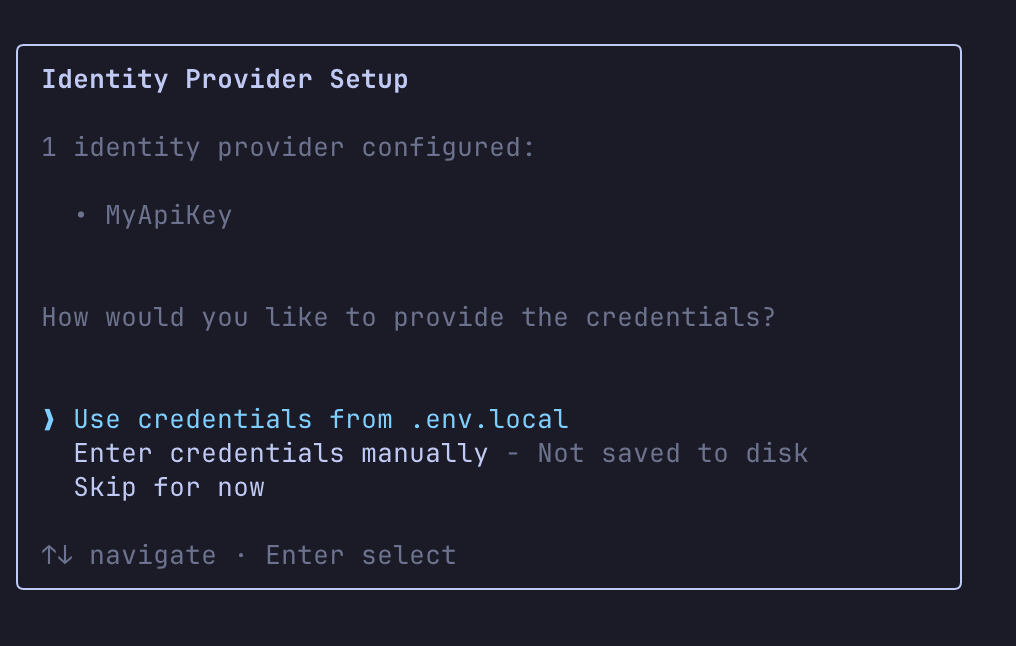
Adding Identity
Identity is a mechanism for securely managing API keys or OAuth credentials. During local development, they're stored in .env.local, and after deployment, they're managed by AgentCore Identity.
agentcore add identity --name OpenAI --api-key sk-...
agentcore add identity \
  --type oauth \
  --name MyOAuthService \
  --discovery-url https://example.com/.well-known/openid-configuration \
  --client-id my-client-id \
  --client-secret my-client-secret \
  --scopes "read,write"
During deployment, you can choose whether to use the values from .env.local, enter them manually, or skip and handle them later.
If you're unsure about commands, using the terminal UI for adding resources is a good approach.
Now that we've covered the command examples, let's move on to local development and AWS deployment.
Local Development
Let's run the agent locally:
agentcore dev
This command launches an interactive window. Let's try typing "hello":
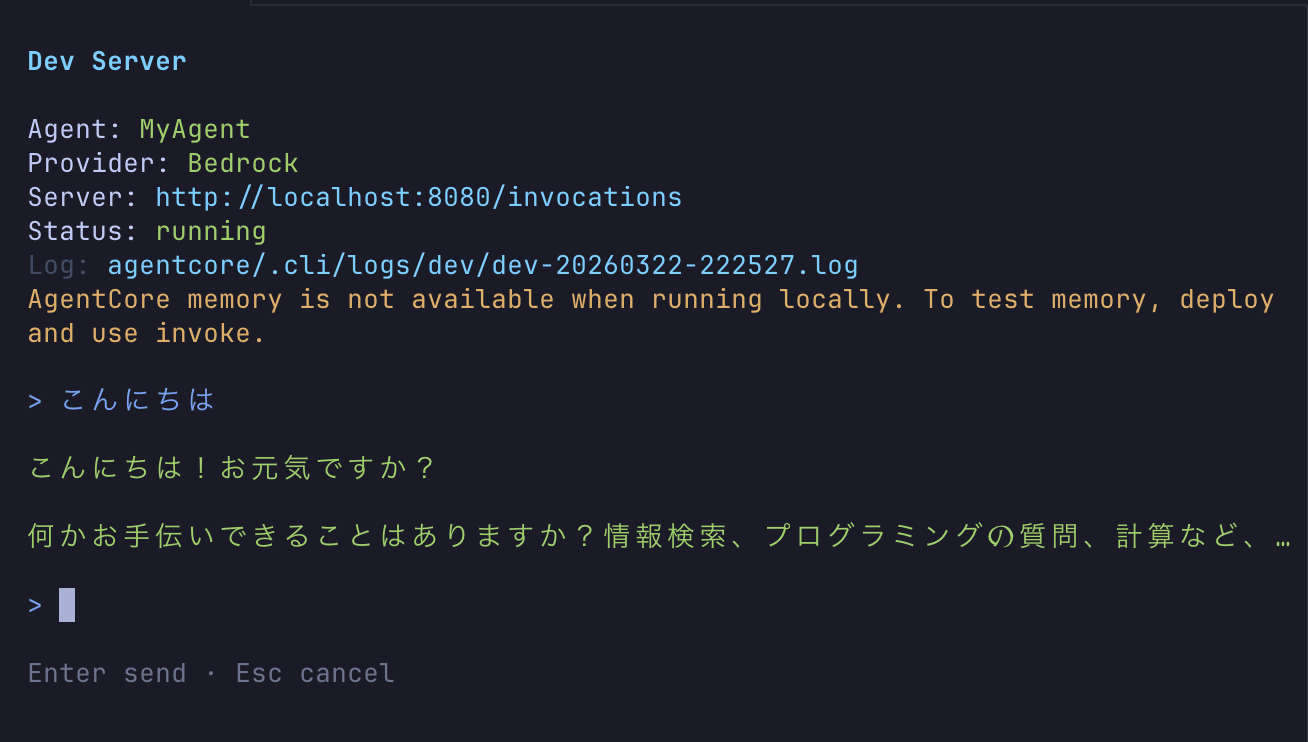
The agent is successfully running locally! Being able to interact quickly is nice.
Deploying to AWS
It's time to deploy to AWS.
agentcore deploy
Internally, AWS CDK is executed, and the following resources are created:
- AgentCore Runtime endpoint
- ECR repository and container image
- AgentCore Memory resources (if configured)
- IAM roles
- CloudWatch log groups
Additionally, after deployment, if CloudWatch Transaction Search is not yet enabled in the target region, there is a built-in process to automatically enable it (PR #506). This allows you to immediately search and analyze agent traces and session details in CloudWatch after deployment.
Previously, we had to manually enable it once, so this is a welcome update.
After deployment is complete, let's check the status.
agentcore status
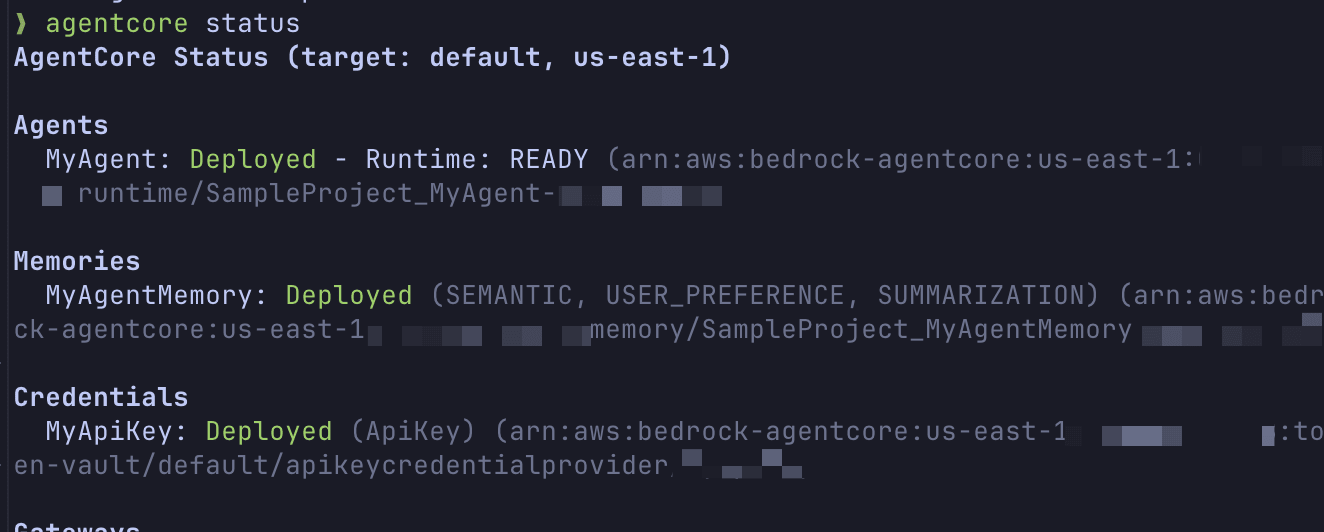
You can check the agent's status, endpoint information, environment variable settings, and more.
For this deployment, I added Gateway, Identity, Memory, and custom environment variables before deploying, and when I checked the console, the following environment variables were automatically configured:
| Environment Variable | Example Value | Source |
|---|---|---|
MEMORY_MYAGENTMEMORY_ID |
SampleProject_MyAgentMemory-xxx |
Memory addition |
AGENTCORE_GATEWAY_TOOLGATEWAY_URL |
https://sampleproject-toolgateway-xxxxx.gateway...amazonaws.com/mcp |
Gateway addition |
AGENTCORE_GATEWAY_TOOLGATEWAY_AUTH_TYPE |
AWS_IAM |
Gateway addition |
CREDENTIAL_OPENAI_NAME |
OpenAI |
Identity addition |
CUSTOM_PARAM |
my-value |
Defined in envVars |
LOG_LEVEL |
INFO |
Defined in envVars |
The system automatically injects corresponding environment variables when resources are added. You can access them in your agent code with os.environ.get("MEMORY_MYAGENTMEMORY_ID"), eliminating the need to hardcode connection information.
Testing the Deployed Agent
Once deployment is complete, let's send a prompt to our cloud-based agent.
agentcore invoke "こんにちは" --agent MyAgent
When executed, the response displays as follows:
Provider: Bedrock
こんにちは!お元気ですか?

何かお手伝いできることはありますか?質問や知りたいことがあれば、お気軽にお聞きください。

Log: /path/to/project/agentcore/.cli/logs/invoke/invoke-MyAgent-20260322-122023.log
We got a response! Provider: Bedrock shows the model provider information, and Log: at the end displays the path to the log file containing request and response details.
Let's look at the log file contents.
================================================================================
AGENTCORE INVOKE LOG
Agent: MyAgent
Runtime ARN: arn:aws:bedrock-agentcore:us-east-1:123456789012:runtime/SampleProject_MyAgent-xxxxx
Region: us-east-1
Session ID: none
Started: 2026-03-22T03:20:23.910Z
================================================================================

[12:20:23.911] INVOKE REQUEST (Session: none)

--- REQUEST ---
{
  "timestamp": "2026-03-22T03:20:23.911Z",
  "agent": "MyAgent",
  "runtimeArn": "arn:aws:bedrock-agentcore:us-east-1:123456789012:runtime/SampleProject_MyAgent-xxxxx",
  "region": "us-east-1",
  "prompt": "こんにちは"
}
--- END REQUEST ---

[12:20:28.746] INVOKE RESPONSE (4835ms)

--- RESPONSE ---
{
  "timestamp": "2026-03-22T03:20:28.746Z",
  "durationMs": 4835,
  "success": true,
  "response": "こんにちは!お元気ですか?..."
}
--- END RESPONSE ---
The request and response are recorded in JSON format, and you can also check the response time. This can be useful for debugging and performance analysis.
Continuing Conversations with Session ID
Next, let's try using a session ID to maintain conversation context with Memory.
agentcore invoke "私の名前は神野です" --session-id my-session-001-01231233123123123123312312312 --agent MyAgent
Provider: Bedrock
こんにちは、神野さん!はじめまして。

お名前を教えていただきありがとうございます。何かお手伝いできることはありますか?質問や知りたいことがあれば、お気軽にお尋ねください。

Log: /path/to/project/agentcore/.cli/logs/invoke/invoke-MyAgent-20260322-122722.log
Let's continue the call with the same session ID.
agentcore invoke "記憶しておりますか?先ほどの発言を。" --session-id my-session-001-01231233123123123123312312312 --agent MyAgent
Provider: Bedrock
はい、記憶しております!

先ほど「私の名前は神野です」とおっしゃいましたね。神野さんのお名前はしっかり覚えています。

何かお手伝いできることがありましたら、お気軽にお申し付けください。

Log: /path/to/project/agentcore/.cli/logs/invoke/invoke-MyAgent-20260322-122746.log
It remembered the name correctly! Using the same session ID confirmed that AgentCore Memory is maintaining the conversation context.
Evaluations
AgentCore CLI includes an LLM-as-a-Judge based evaluation feature. Being able to quantitatively measure the quality of agent responses is valuable. Let's create an Evaluator and run an evaluation.
Let's first briefly explain what an Evaluator is.
Built-in Evaluator
First, AgentCore provides pre-defined Built-in Evaluators.
The good point is that you can start evaluations immediately without having to write your own instructions.
Creating a Custom Evaluator
If the Built-in Evaluators are not sufficient, you can create a custom Evaluator with AgentCore CLI.
agentcore add evaluator \
  --name ResponseQuality \
  --level SESSION \
  --model us.anthropic.claude-sonnet-4-5-20250929-v1:0 \
  --instructions "Evaluate the quality and helpfulness of the agent response. Context: {context}" \
  --rating-scale 1-5-quality
You can choose from 3 evaluation levels.
| Level | Evaluation Target |
|---|---|
| SESSION | Overall session quality |
| TRACE | Response accuracy per turn |
| TOOL_CALL | Individual tool selection appropriateness |
For --rating-scale, presets like 1-5-quality (default), 1-3-simple, pass-fail, and good-neutral-bad are available. You can choose between numerical scales or categorical scales based on your needs.
Running On-Demand Evaluations
After creating and deploying an Evaluator, let's run an evaluation on past traces.
agentcore run evals --agent MyAgent --evaluator ResponseQuality --days 7
This performs an LLM-as-a-Judge evaluation on traces from the specified period (here, the past 7 days). To use a Built-in Evaluator, specify it like this:
agentcore run evals --agent MyAgent --evaluator Builtin.Helpfulness --days 7
Let's look at the execution results.
Agent: MyAgent | Mar 22, 2026, 12:28 PM | Sessions: 2 | Lookback: 7d

  Builtin.Helpfulness: 0.50

Results saved to: /path/to/project/agentcore/.cli/eval-results/eval_2026-03-22_03-28-42.json
The evaluation results are displayed in the terminal, and a detailed JSON file is also saved. Looking at the JSON contents, we can see the score, label, and explanation for each session recorded.
{
  "timestamp": "2026-03-22T03:28:42.469Z",
  "agent": "MyAgent",
  "evaluators": ["Builtin.Helpfulness"],
  "lookbackDays": 7,
  "sessionCount": 2,
  "results": [
    {
      "evaluator": "Builtin.Helpfulness",
      "aggregateScore": 0.5,
      "sessionScores": [
        {
          "sessionId": "55541c29-a909-48b1-af5f-8815aebf3297",
          "value": 0.5,
          "label": "Neutral/Mixed",
          "explanation": "The user's initial message 'こんにちは' is a greeting..."
        }
      ],
      "tokenUsage": {
        "inputTokens": 1757,
        "outputTokens": 621,
        "totalTokens": 2378
      }
    }
  ]
}
Since this was just a greeting exchange like "hello," the Helpfulness evaluation was 0.50 (Neutral/Mixed). That makes sense since we weren't having a particularly useful conversation.
Let's try running it with our custom Evaluator (ResponseQuality) as well.
Agent: MyAgent | Mar 22, 2026, 12:57 PM | Sessions: 2 | Lookback: 7d

  ResponseQuality: 3.00

Results saved to: /path/to/project/agentcore/.cli/eval-results/eval_2026-03-22_03-57-17.json
This one worked well too!
Looking at the logs, the result was 3.00 (Good) on the 1-5-quality scale. The evaluation reasons include "appropriate use of Japanese language and honorifics" and "Memory correctly retained the name," allowing us to see the aspects the Evaluator considered in its evaluation.
{
  "timestamp": "2026-03-22T03:57:17.969Z",
  "agent": "MyAgent",
  "evaluators": [
    "ResponseQuality"
  ],
  "lookbackDays": 7,
  "sessionCount": 2,
  "results": [
    {
      "evaluator": "ResponseQuality",
      "aggregateScore": 3,
      "sessionScores": [
        {
          "sessionId": "55541c29-a909-48b1-af5f-8815aebf3297",
          "value": 3,
          "label": "Good",
          "explanation": "The user simply greeted the agent with 'こんにちは' (Hello in Japanese). The agent's response is appropriate and well-constructed in several ways: 1) It reciprocates the greeting in Japanese, maintaining language consistency. 2) It asks 'お元気ですか?' (How are you?), which is a natural follow-up to a greeting. 3) It proactively offers assistance by asking if there's anything it can help with. 4) It encourages the user to ask questions freely with 'お気軽にお聞きください' (please feel free to ask). 5) It includes a friendly emoji to create a welcoming tone. The response is culturally appropriate, polite, and conversational. It successfully opens the door for further interaction while being concise and not overwhelming. The agent demonstrates readiness to help without being pushy. This response meets all expectations for handling a simple greeting - it's warm, professional, maintains the user's language choice, and effectively invites continued conversation."
        },
        {
          "sessionId": "my-session-001-01231233123123123123312312312",
          "value": 3,
          "label": "Good",
          "explanation": "The conversation consists of two exchanges. In the first exchange, the user introduces themselves as '神野' (Kamino/Jinno). The agent responds politely in Japanese, acknowledging the name and offering assistance. This is appropriate and courteous.\n\nIn the second exchange, the user asks if the agent remembers the previous statement. The agent confirms it does remember and accurately recalls that the user said '私の名前は神野です' (My name is Kamino/Jinno). The agent demonstrates successful memory retention across the conversation.\n\nStrengths: 1) The agent uses appropriate Japanese language and honorifics (さん suffix), showing cultural awareness. 2) The agent correctly remembers the user's name from the previous exchange, which is the core of what was being tested. 3) The tone is friendly and helpful throughout. 4) The agent explicitly quotes what the user said, confirming accurate memory.\n\nThe responses are appropriate, polite, and functionally correct. The agent successfully demonstrates conversation continuity and memory - a key capability being tested. The quality meets expectations for a basic memory retention test with culturally appropriate responses. There are no significant errors or issues that would warrant a lower score, but the responses are straightforward without exceptional added value that would justify exceeding expectations."
        }
      ],
      "tokenUsage": {
        "inputTokens": 1160,
        "outputTokens": 557,
        "totalTokens": 1717
      }
    }
  ]
}
Setting Up Online Evaluation
You can also set up continuous sample-based evaluation for production traffic.
agentcore add online-eval \
  --name QualityMonitor \
  --agent MyAgent \
  --evaluator ResponseQuality \
  --sampling-rate 10 \
  --enable-on-create
Adding --enable-on-create enables online evaluation immediately after deployment. Without this flag, it remains disabled after deployment and needs to be manually enabled from the management console.
Cleanup
After completing your testing, you can remove the resources you created.
agentcore remove all --force
This command resets the agentcore.json and mcp.json schemas (returns them to an empty state). The source code itself is not changed.
To actually delete the AWS resources (AgentCore Runtime, Memory, ECR repository, etc.), run agentcore deploy after resetting the schema.
agentcore deploy
Deploying with an empty schema triggers CloudFormation stack deletion, cleaning up your AWS resources.
Conclusion
Although it's still in Public Preview and specifications may change in the future, I found it helpful that when starting AgentCore development, you can follow the terminal UI guide. Building on AgentCore CLI as a foundation for adding resources seems to reduce confusion when getting started.
During testing, I was surprised by how much can be done. There are other interesting points that I couldn't fully cover, so I hope to share more interesting use cases and notable features in future articles.
I hope this article was helpful. Thank you for reading to the end!