
Implementing User Delegated Authorization (3LO) with Amazon Bedrock AgentCore Identity to Access Google Drive
This page has been translated by machine translation. View original
Introduction
Hello, I'm Kanno from the Consulting Department, who loves supermarkets.
When an AI agent accesses external services (like Google Drive, Calendar, etc.), it needs to obtain authorization on behalf of the user. This is achieved through 3LO (Three-Legged OAuth).
By using Amazon Bedrock AgentCore Identity, you can implement this 3LO flow.
AWS provides official samples.
However, the flow is complex and there are many terms that confused me at first...
For example, terms like Token Vault, Credential Provider, Workload Identity, and Session Binding appear, but understanding what each one means took me some time...
In this article, I'd like to organize these terms and flows while implementing actual access to Google Drive to deepen our understanding!
Prerequisites
Environment
- Python 3.12
- uv
- Used as a package manager
- Google Cloud project created
- Google Drive API enabled
What we'll use
- Amazon Bedrock AgentCore (Runtime / Identity)
- Amazon Cognito (User Authentication)
- Google OAuth 2.0 (Google Drive API)
We'll create the environment using uv.
# Initialize project
uv init

# Add required libraries
uv add bedrock-agentcore boto3 pyjwt strands-agents bedrock-agentcore-starter-toolkit google-api-python-client google-auth-httplib2 google-auth-oauthlib fastapi uvicorn pyyaml
Terminology Overview
Before implementation, let's organize the key components of AgentCore Identity.
Three components will appear in this article.
- Workload Identity
- Credential Provider
- Token Vault
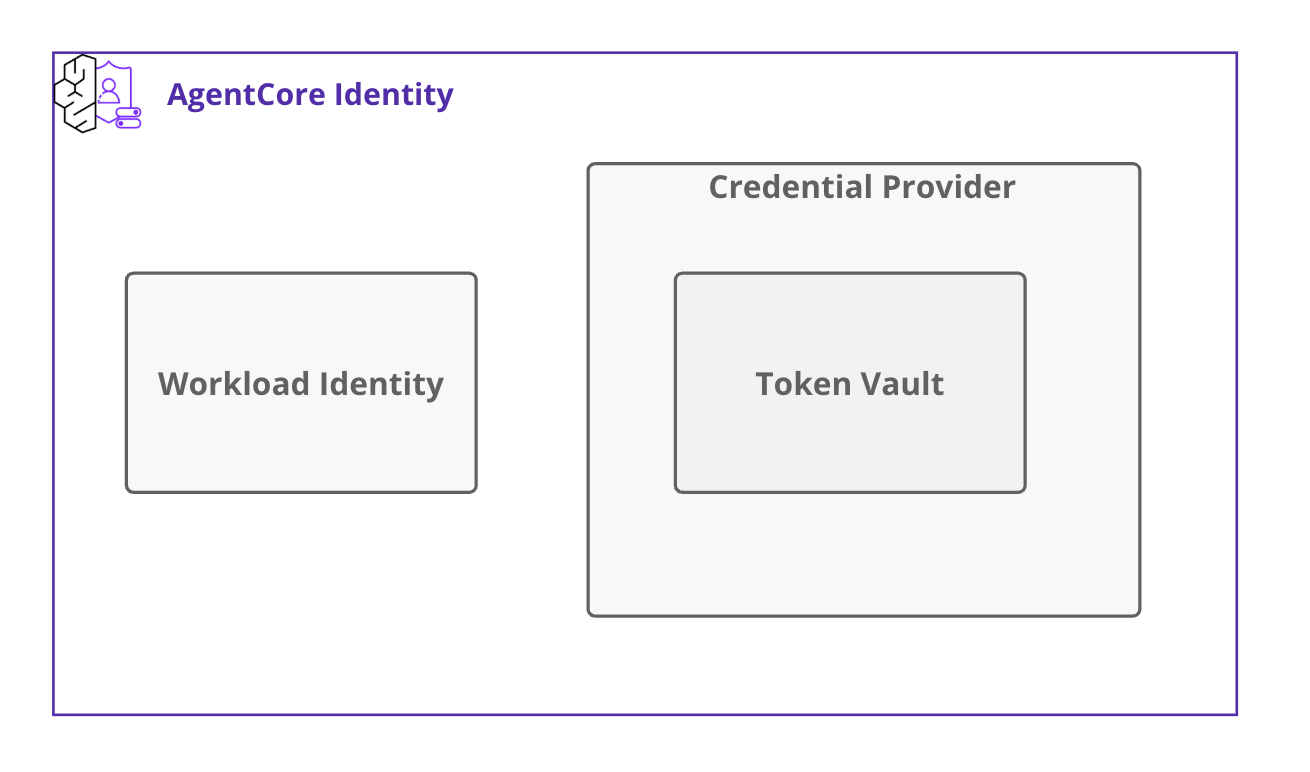
Let's clarify the role of each component.
Workload Identity
This is like an identification card for the agent.

When you deploy an agent to Runtime, a Workload Identity is automatically created and associated with it.
Workload Identity includes the following information:
- ID
- A unique identifier based on the agent name (e.g.,
agent_server-ABC)
- A unique identifier based on the agent name (e.g.,
- ARN
- allowedResourceOauth2ReturnUrls: Callback URL after OAuth authentication
When the agent accesses the Token Vault,
it uses Workload Identity to get a Workload Access Token in exchange for a JWT or user ID.
Internally, the SDK calls the following API to get the Workload Access Token:
# Call AWS API via boto3 client
dp_client.get_workload_access_token_for_jwt(workloadName, userToken)  # When using JWT
dp_client.get_workload_access_token_for_user_id(workloadName, userId) # When using user_id
It also holds the Callback URL for when authentication is completed with the partner service. Note that callbacks can only be made to URLs permitted here.
Note: Behavior in local environment
This is a very detailed point, but the behavior changes depending on whether the deployment is local or in Runtime.
For local deployments, Workload Identity is created on first run and stores workload_identity_name and user_id in a .agentcore.json file.
For subsequent runs, the existing Workload Identity is reused. The Workload Access Token itself is obtained by calling an API each time.
For Runtime deployments, the Workload Access Token is obtained from the automatically created Workload Identity during deployment.
Token Vault
This is like a vault that safely stores user access tokens.
The tokens here refer to access tokens that can be used with partner APIs like Google, not the Workload Access Tokens mentioned earlier. It's a bit confusing with so many different tokens...
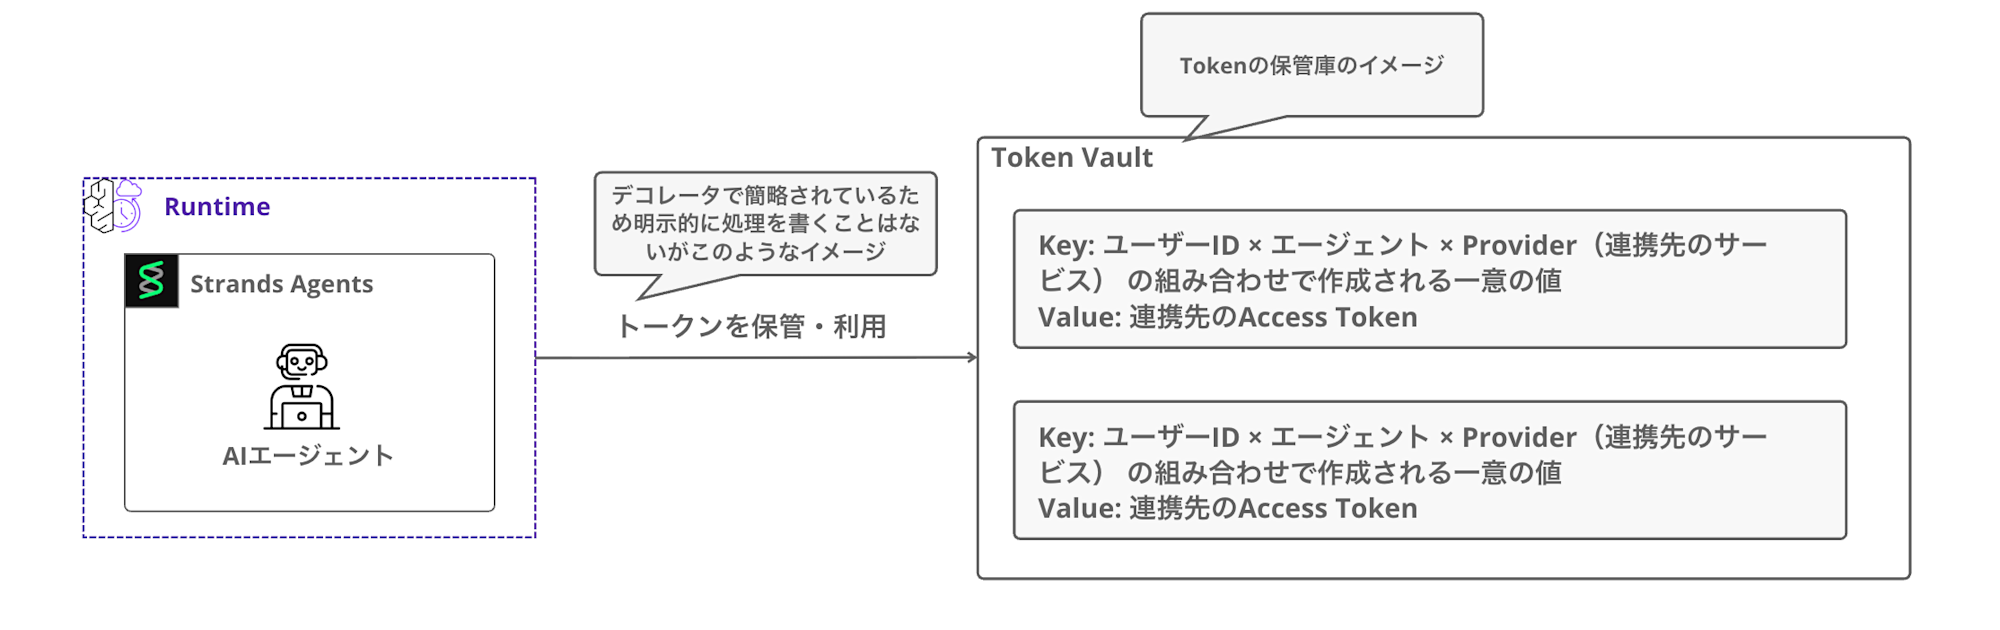
The Token Vault stores tokens by distinguishing the combinations of user ID × agent × Provider (partner service).
This allows the same agent to distinguish tokens for different users.
The agent doesn't directly hold tokens; instead, by using the @requires_access_token decorator,
it automatically retrieves tokens from the Token Vault when needed.
It accesses the Vault using the previously mentioned Workload Access Token.
@requires_access_token(
      provider_name="my-google-provider",
      scopes=["..."],
      auth_flow="USER_FEDERATION",
      callback_url="http://localhost:9090/callback",
 )
Credential Provider
This manages connection settings for external services.
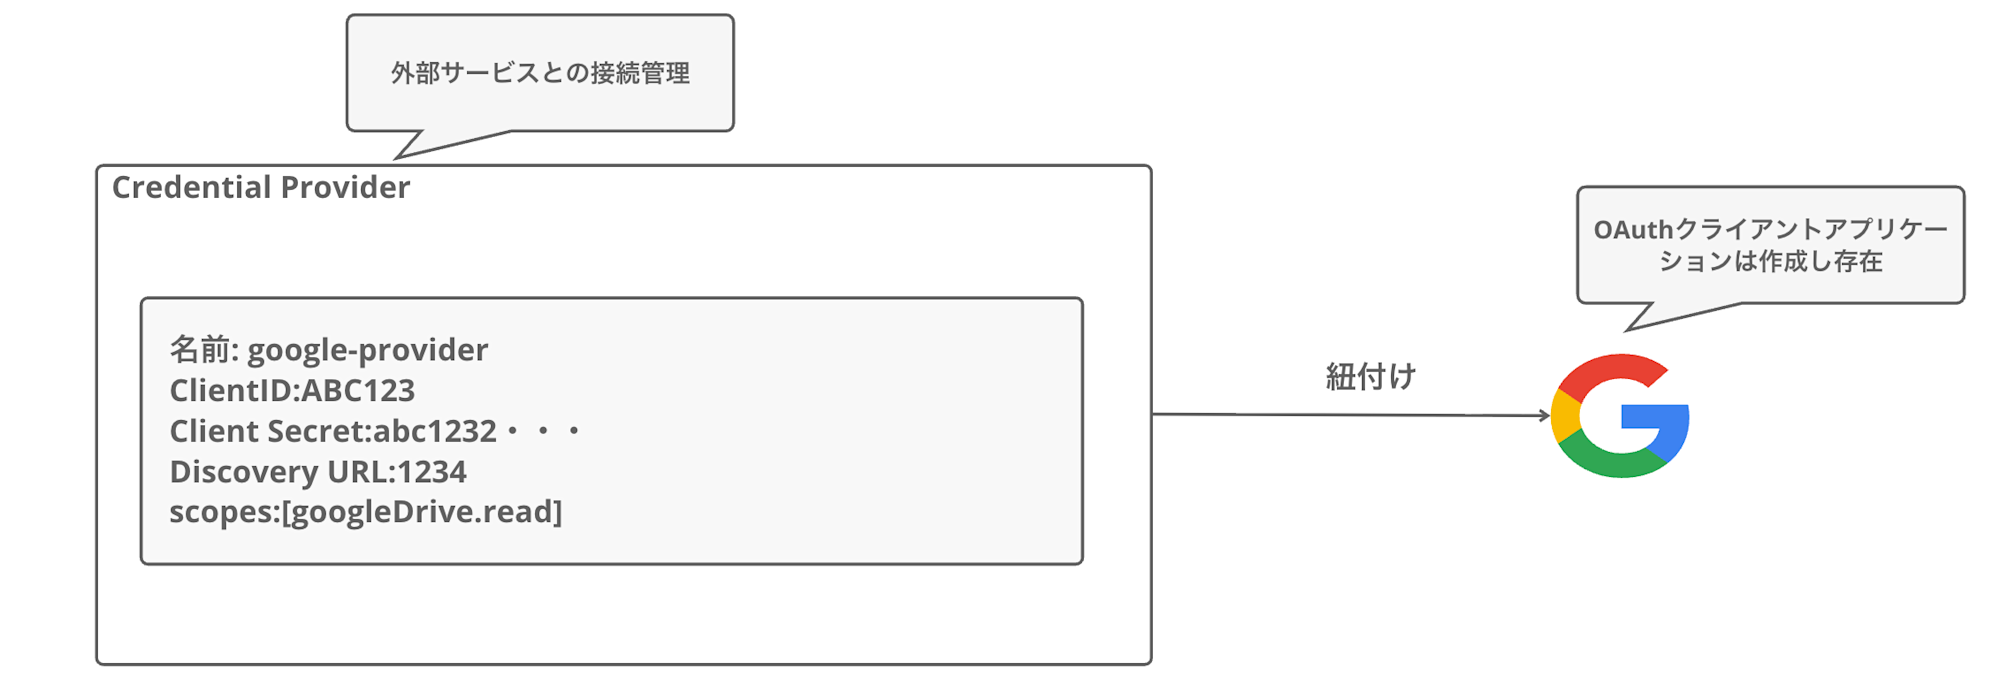
First, create an OAuth client application in the Google Cloud Console,
then register that information with the Credential Provider. (Of course, you can create providers for services other than Google)
The following information is set in the Credential Provider:
| Item | Description |
|---|---|
| Name | Provider identification name (e.g., google-provider) |
| Client ID | Google OAuth client ID |
| Client Secret | Google OAuth client secret |
| Discovery URL | OpenID Connect configuration URL |
| Scopes | Access scope for resources (e.g., https://www.googleapis.com/auth/drive.metadata.readonly) |
It's easier to understand if you think of it as a place to register how to connect to Google.
AgentCore uses the Credential Provider's information to generate OAuth authentication URLs and obtain tokens.
Session Binding
This is the process of linking the user's authentication to the Token Vault after OAuth completion.
In the 3LO flow, the user performs Google authentication in a browser.
This authentication happens in a context separate from the agent's execution. In other words, when the authorization code is returned from Google, it's not known which user was authenticated.
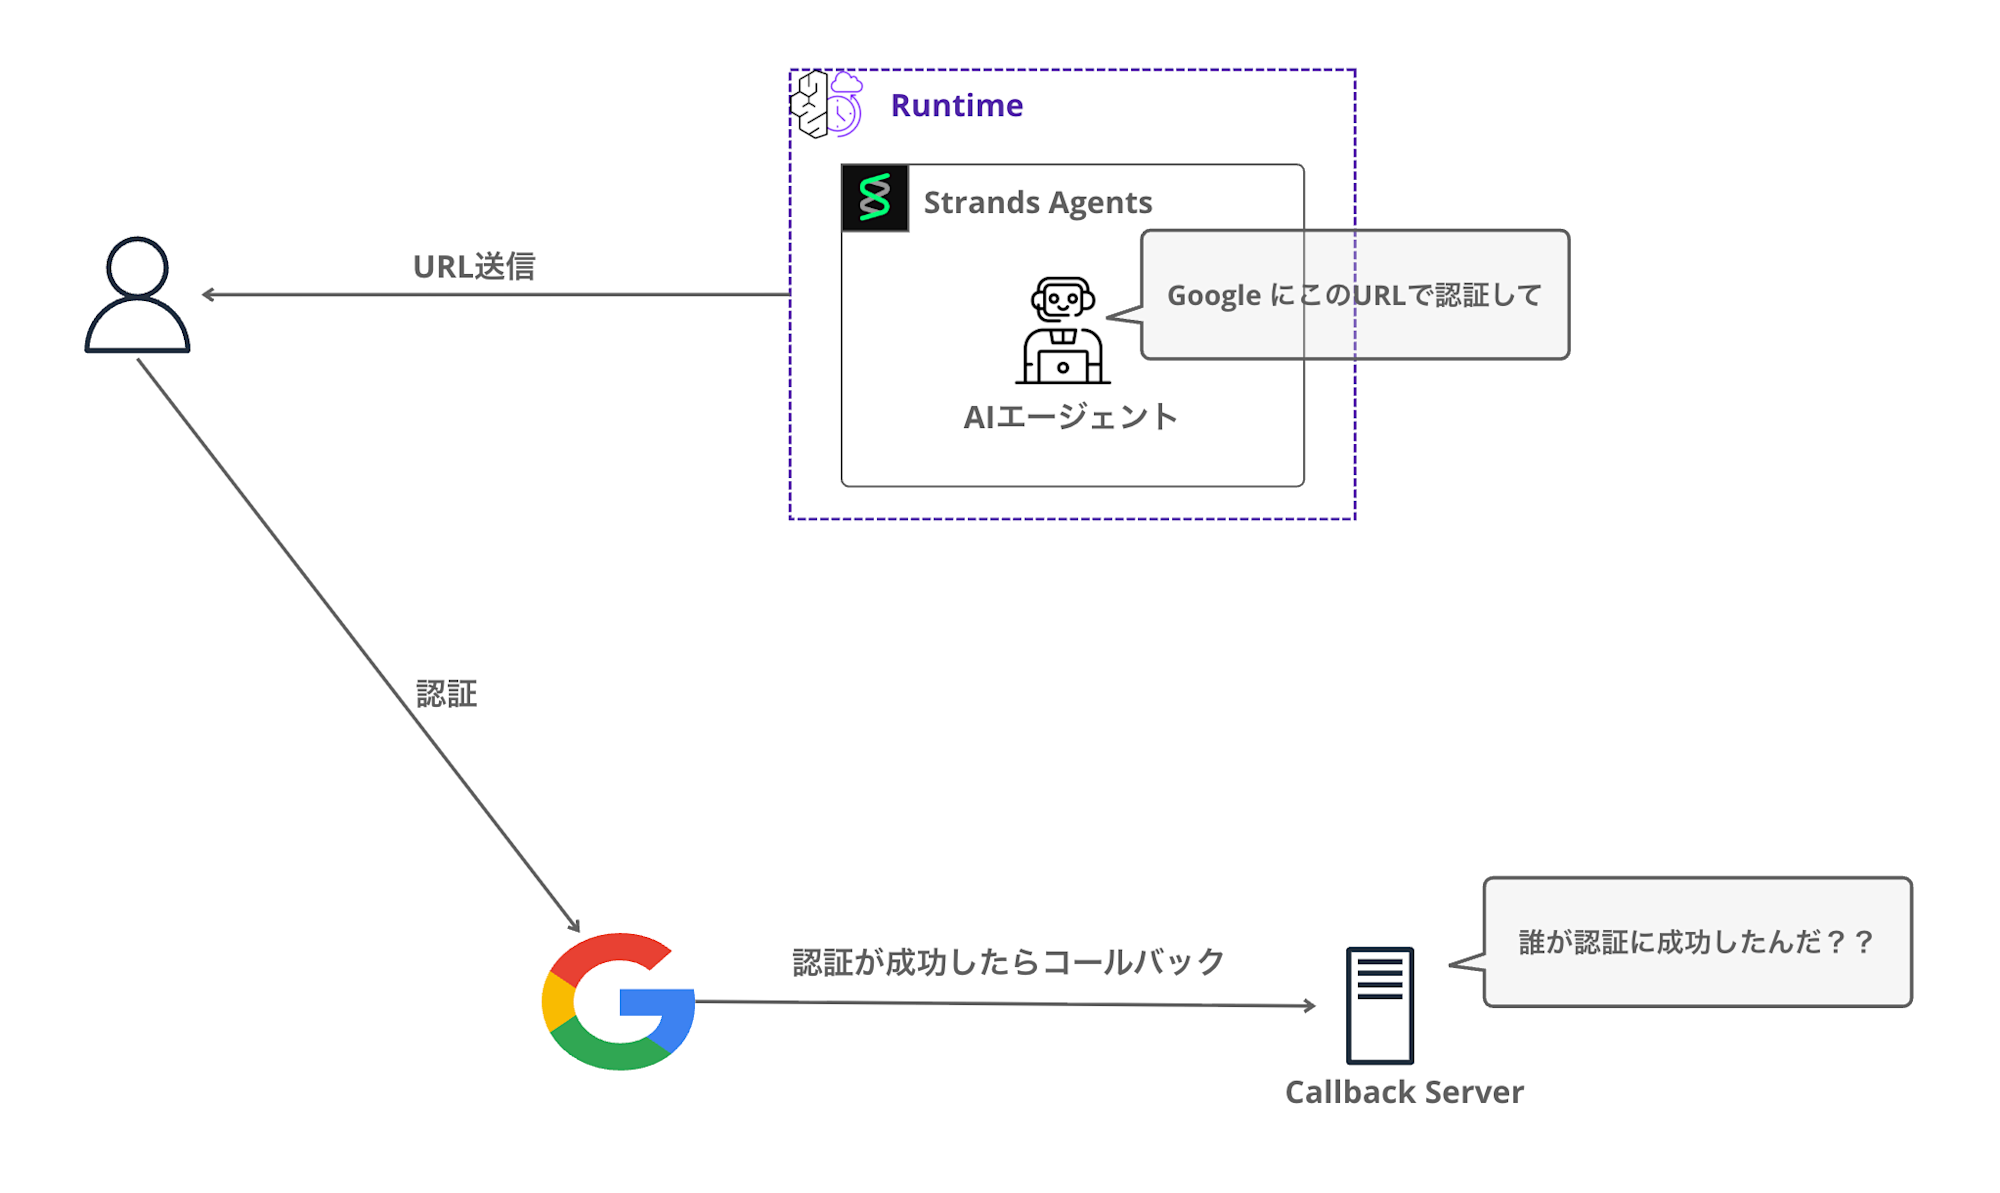
Therefore, using the CompleteResourceTokenAuth API provided by the SDK,
binding the session to the user makes it possible to store the access token in the Vault. (Conversely, if this process doesn't succeed, the token won't be saved)
identity_client.complete_resource_token_auth(
    session_uri=session_id,
    user_identifier=UserTokenIdentifier(user_token=cognito_access_token)
)
Since the token is stored in the Token Vault, the AI agent can retrieve tokens from the Vault afterwards.
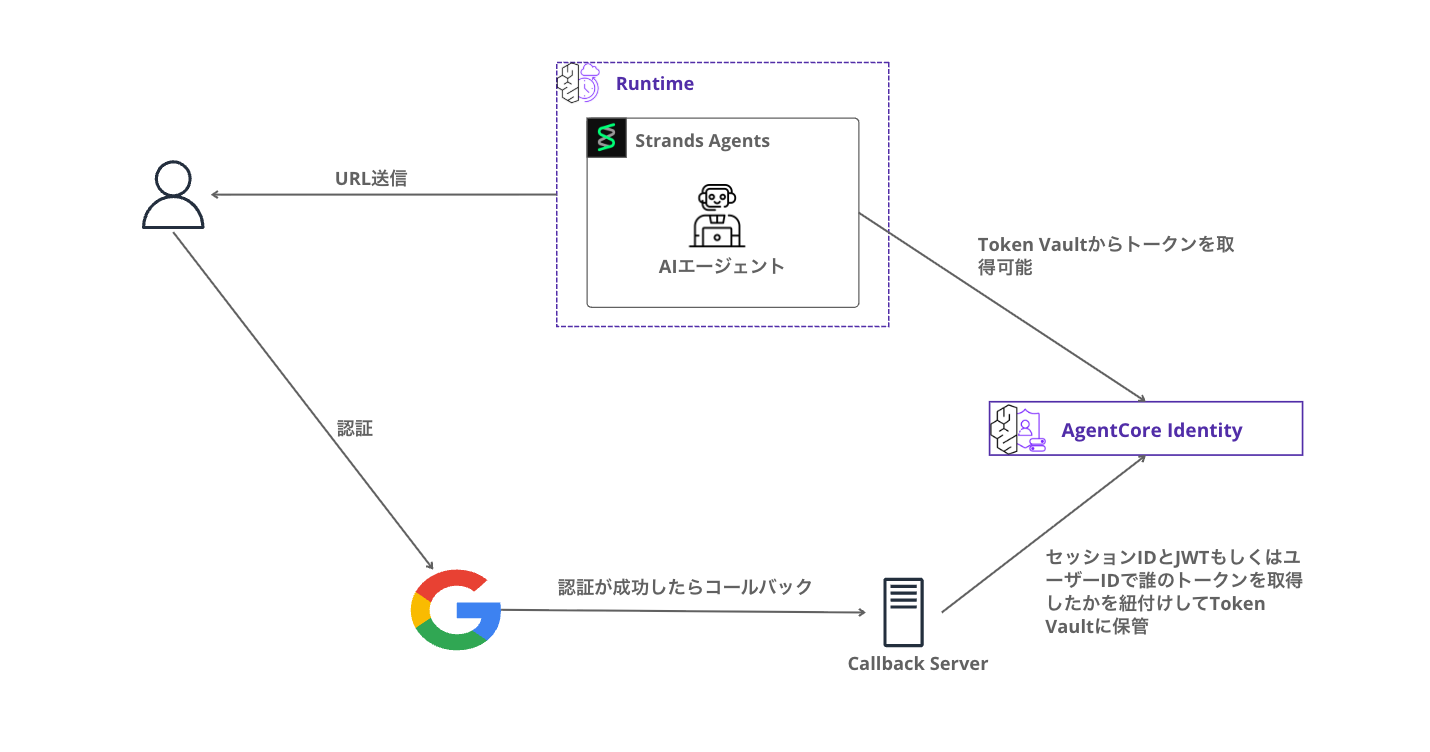
3LO Flow Overview
Here's a rough sequence diagram in Mermaid showing the flow of the system we're building.
There are quite a lot of steps...
On the first run, it returns an authentication URL, and after authentication is complete, you invoke it again. While we'd ideally want to open a browser and redirect seamlessly, I'm taking this step-by-step approach to deepen understanding. I'll explain the details as we progress with implementation.
Let's deepen our understanding by getting our hands on the code!
Implementation
Now let's get into the actual implementation!
Creating an App in Google Cloud Console
First, create an OAuth 2.0 client in the Google Cloud Console.
Access the Google Cloud Console and select APIs & Services > Credentials.
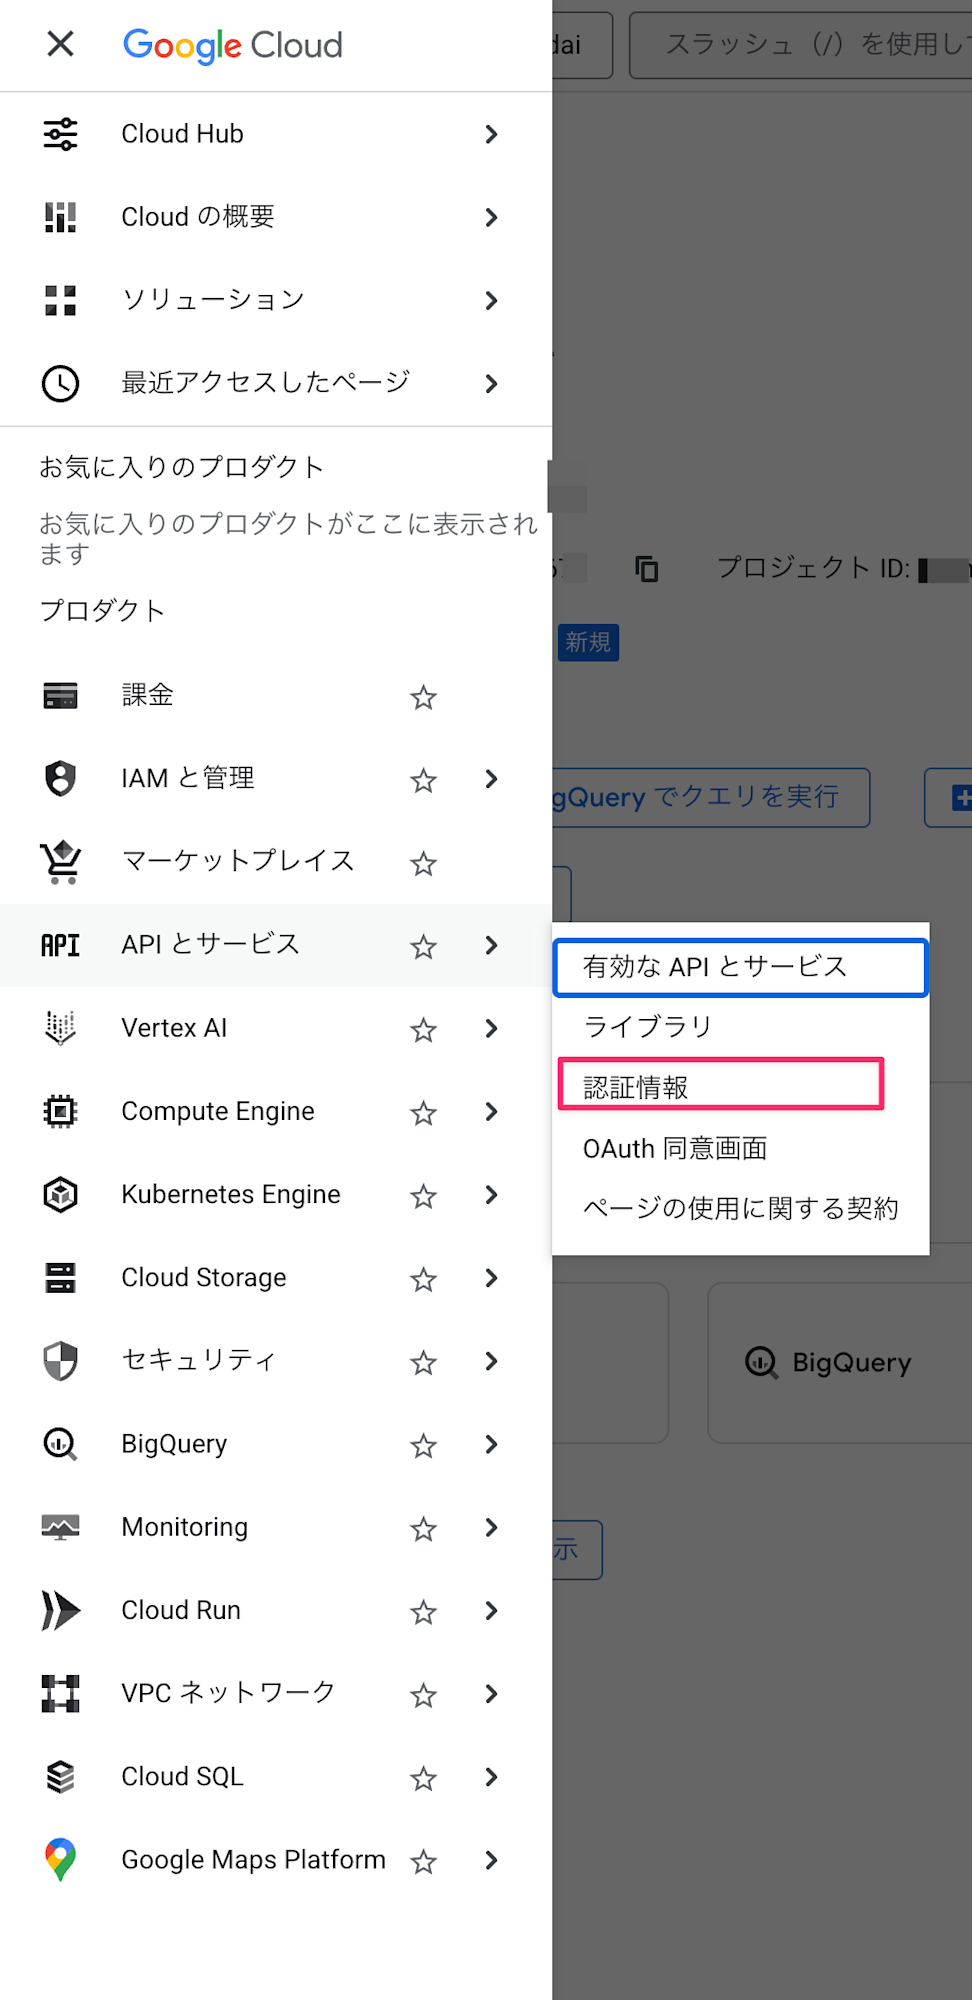
Select Create Credentials > OAuth client ID.
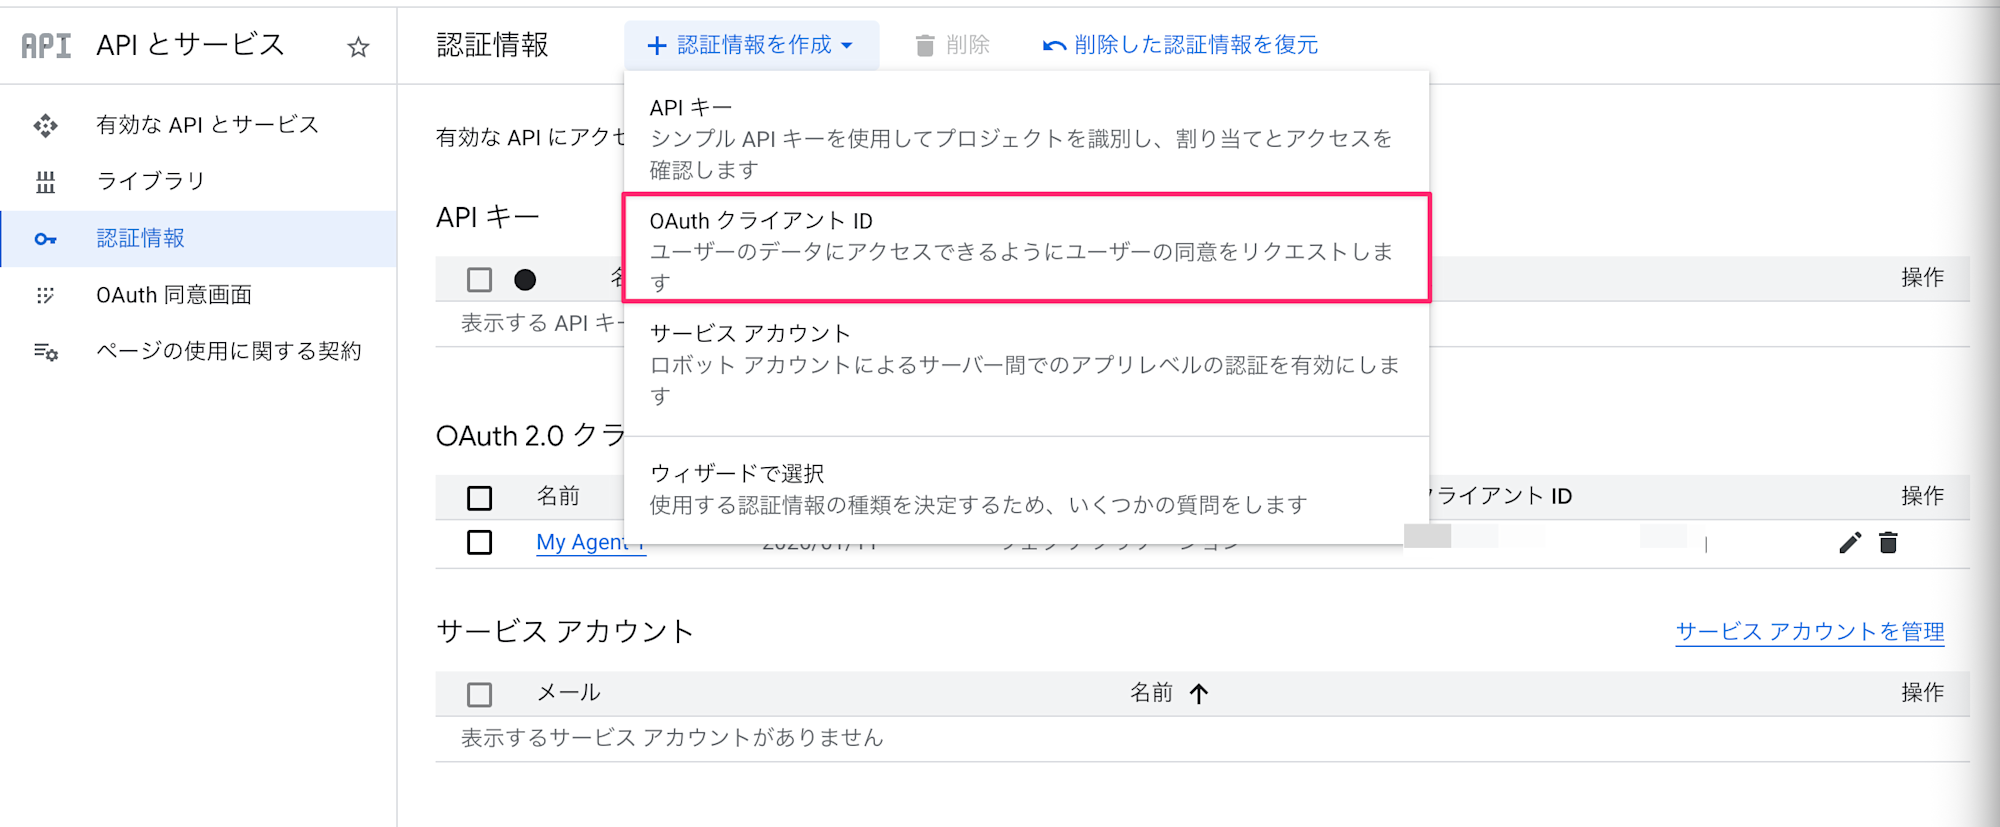
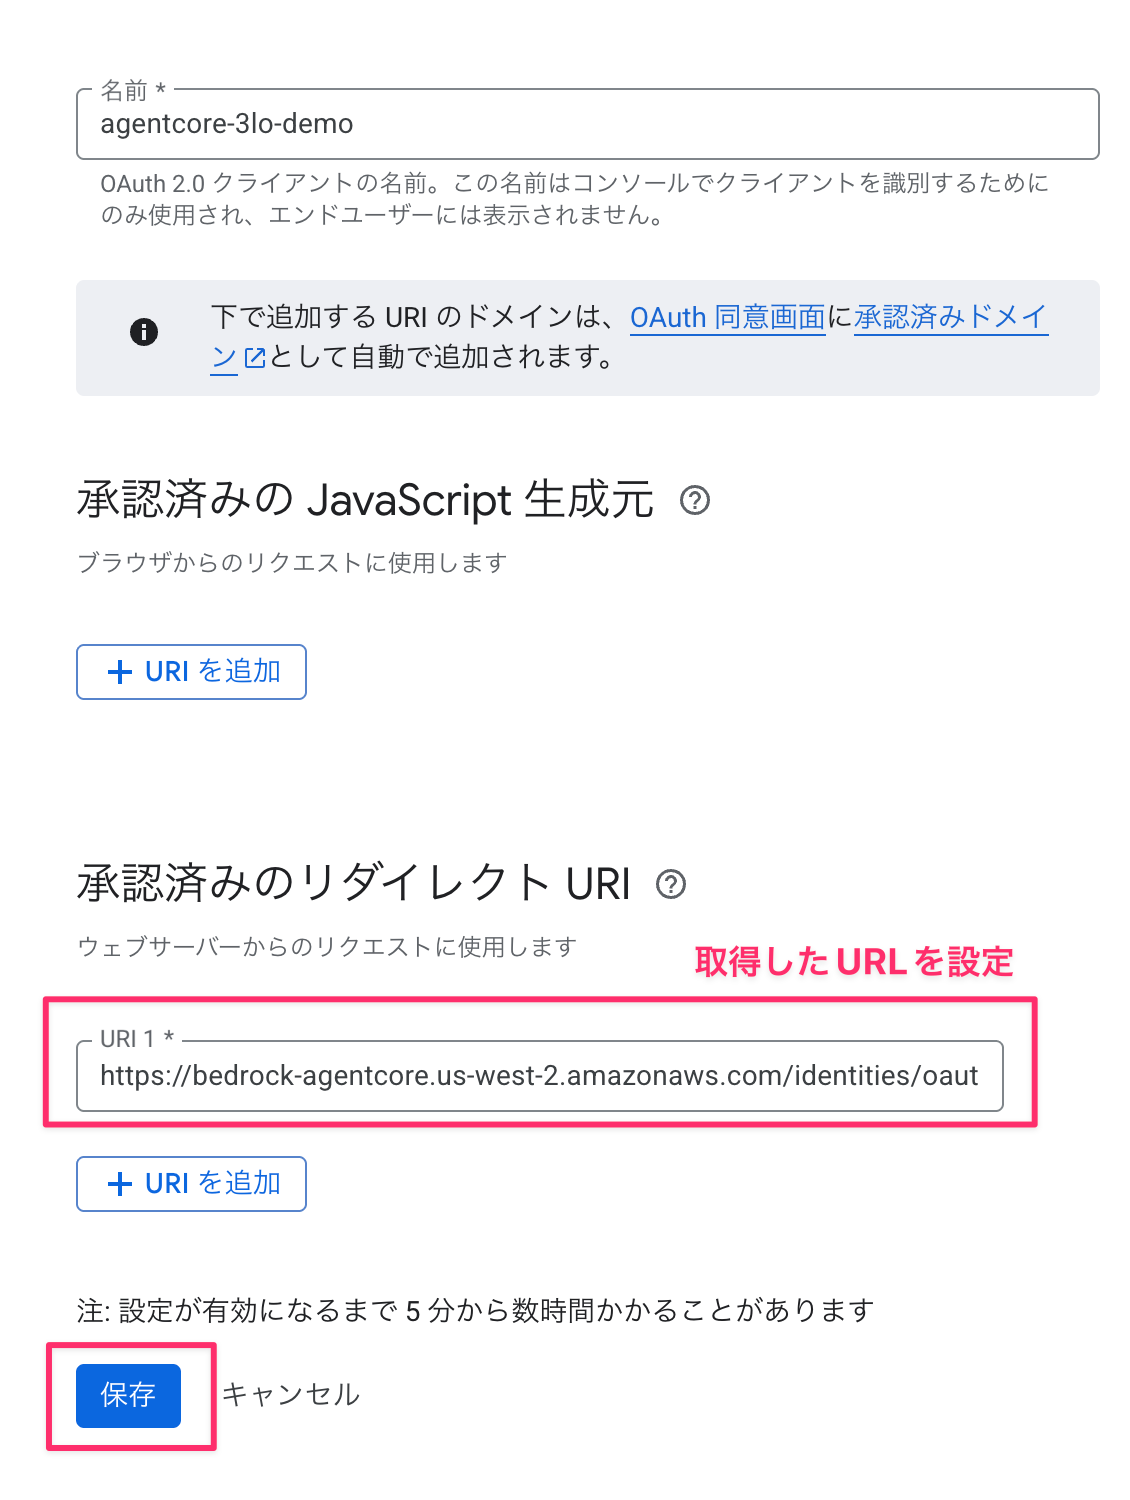
Choose "Web application" as the application type, and the name can be anything you like. (Example: agentcore-3lo-demo)
We'll add the authorized redirect URIs later.
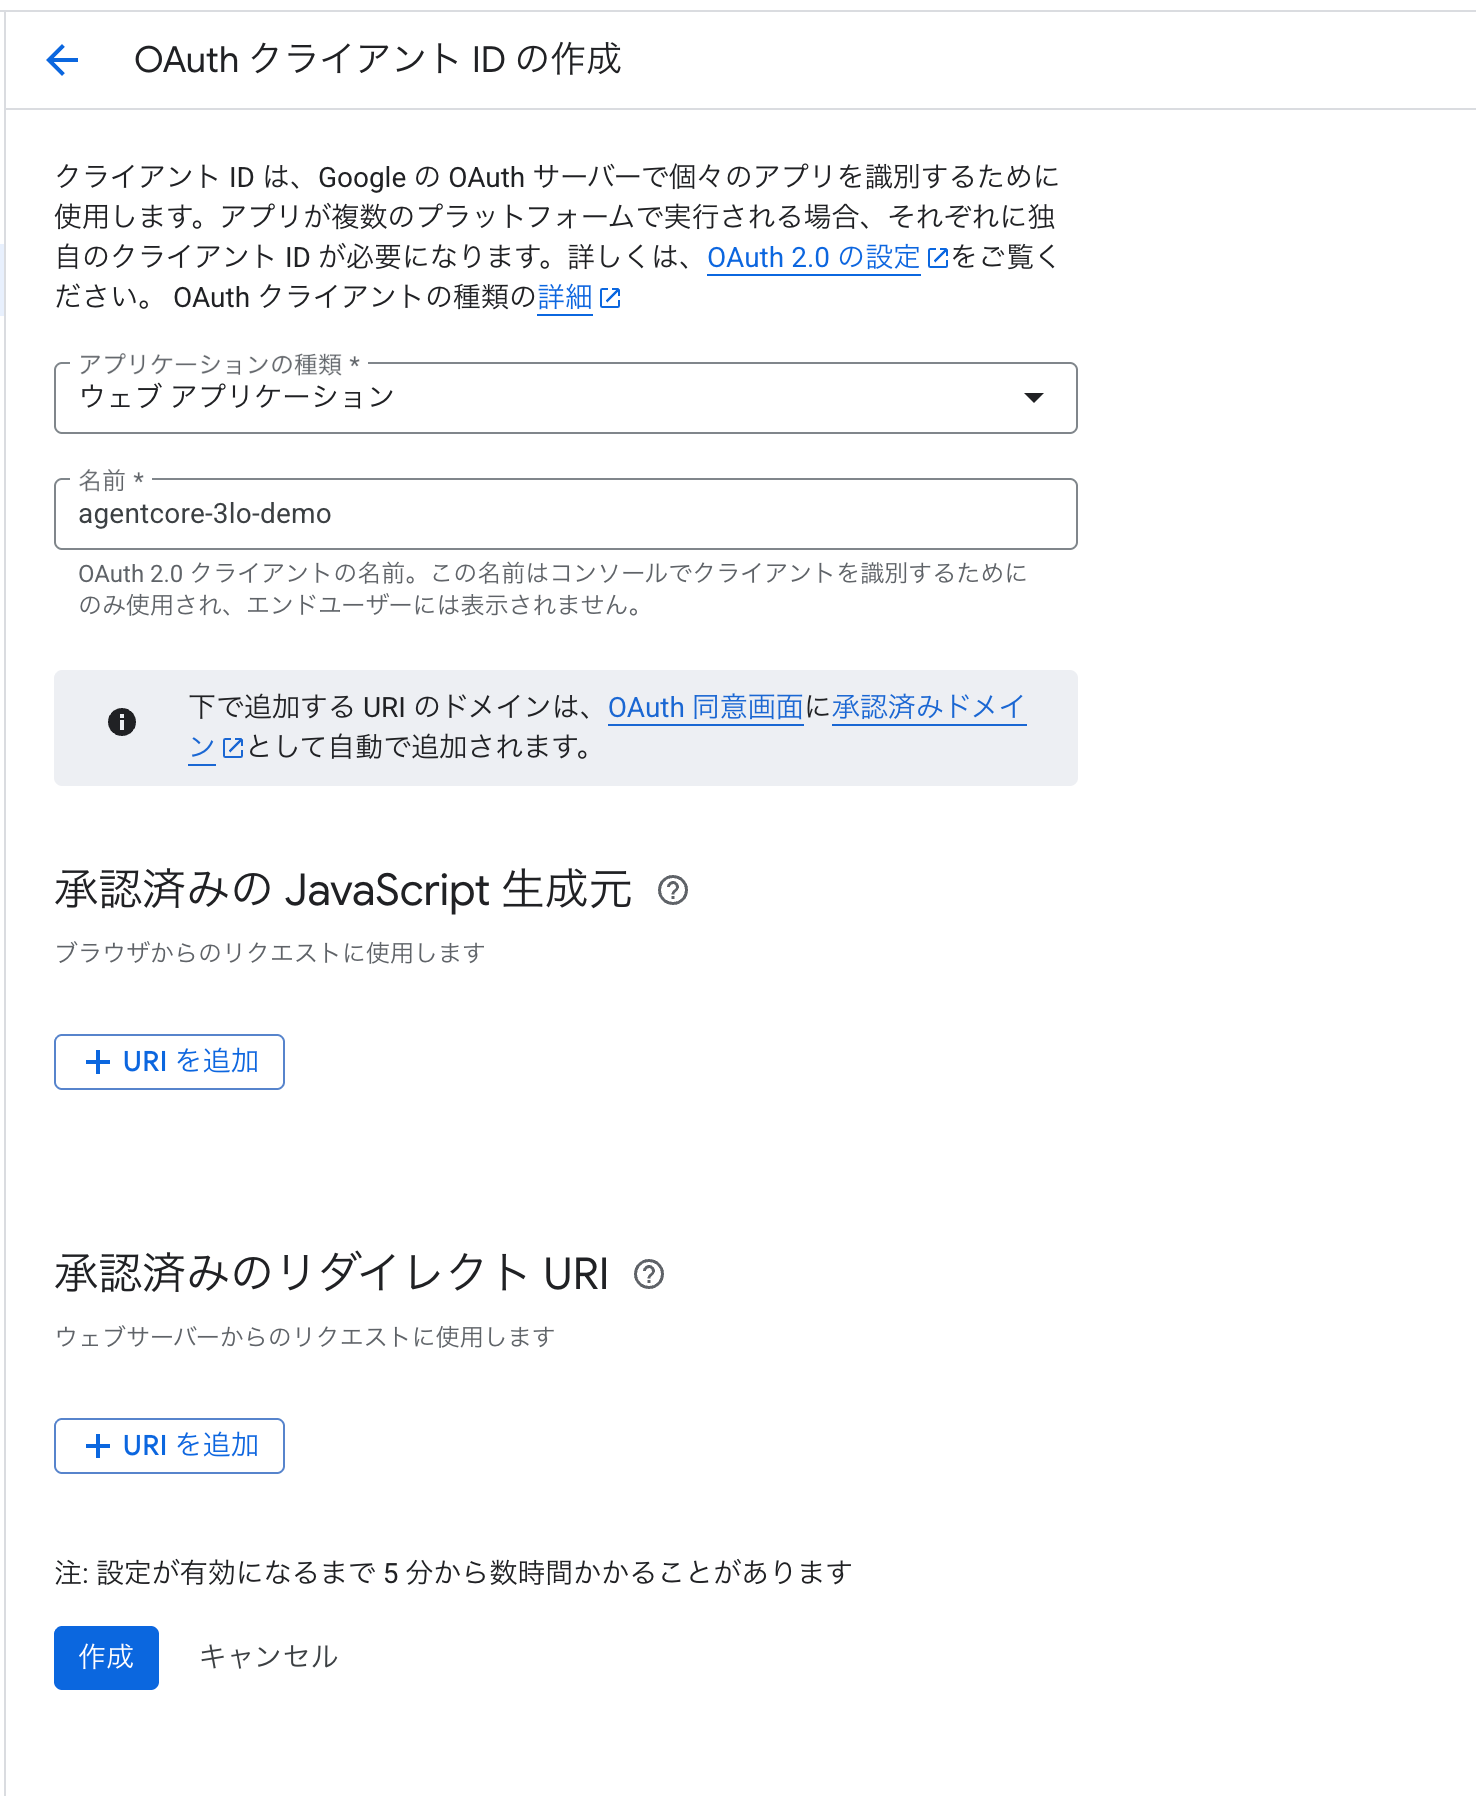
Redirect URIs can be obtained after creating the Credential Provider. Create it with a blank field for now, and add it later.
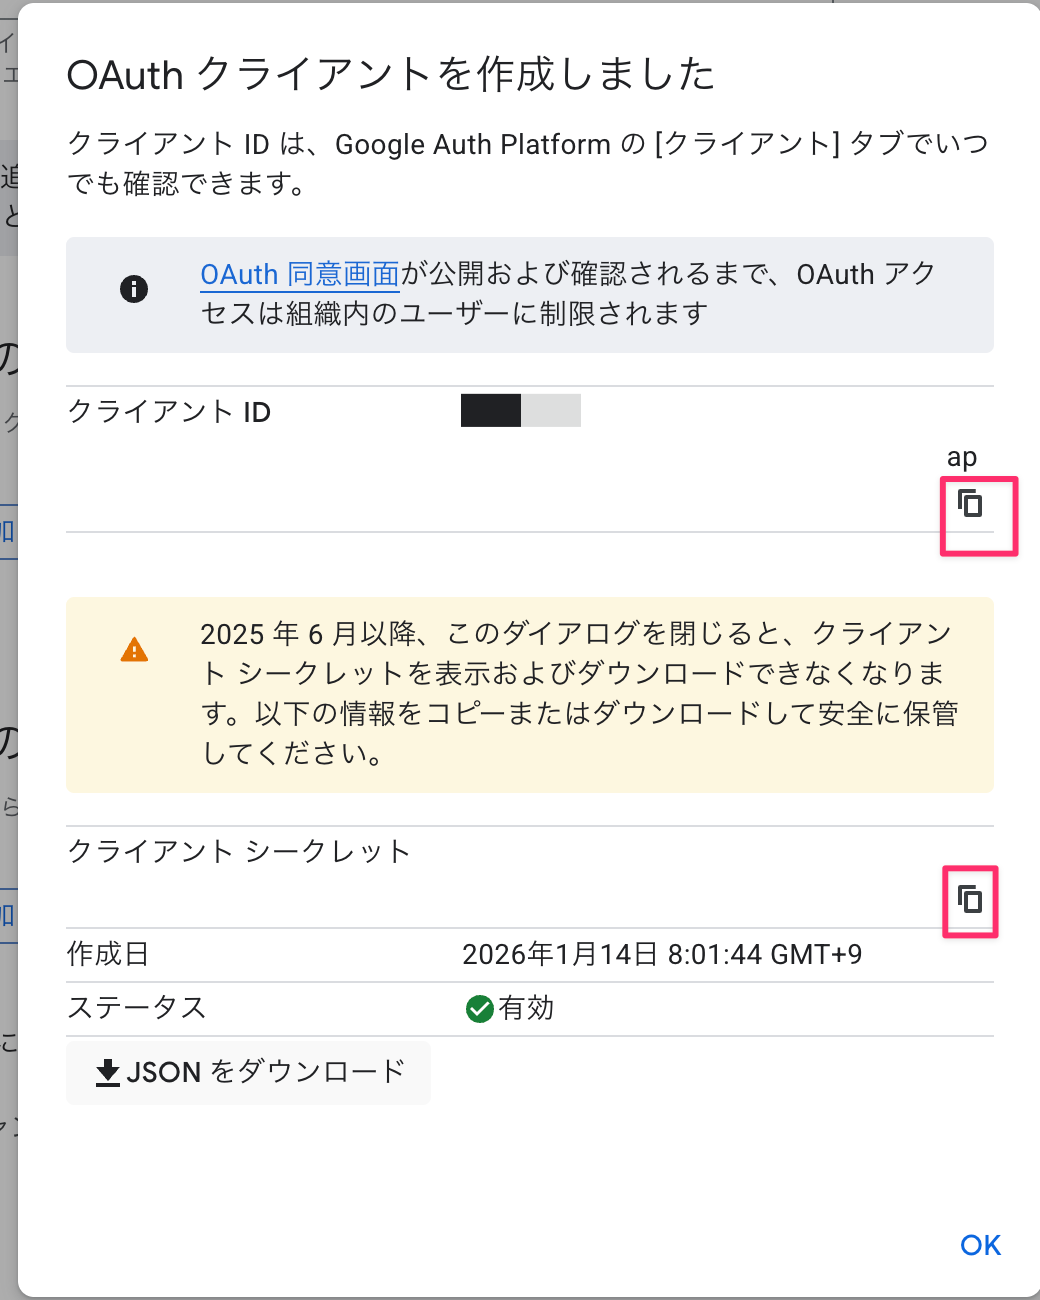
After creation, note down the client ID and client secret.
Creating a Credential Provider (Python)
Register the Google OAuth connection settings with AgentCore.
Enter the client ID and client secret you noted earlier in GOOGLE_CLIENT_ID and GOOGLE_CLIENT_SECRET. Once registration is complete, delete the hardcoded values.
Please change the region to match your environment.
import boto3

REGION = "us-west-2"
PROVIDER_NAME = "google-drive-provider"
GOOGLE_CLIENT_ID = "your-client-id.apps.googleusercontent.com"
GOOGLE_CLIENT_SECRET = "your-client-secret"

def create_google_provider():
    """Google OAuth Credential Provider を作成"""
    client = boto3.client("bedrock-agentcore-control", region_name=REGION)

    try:
        response = client.create_oauth2_credential_provider(
            name=PROVIDER_NAME,
            credentialProviderVendor="GoogleOauth2",
            oauth2ProviderConfigInput={
                "googleOauth2ProviderConfig": {
                    "clientId": GOOGLE_CLIENT_ID,
                    "clientSecret": GOOGLE_CLIENT_SECRET
                }
            },
        )
        print(f"Created provider: {PROVIDER_NAME}")
        print(f"Callback URL: {response.get('callbackUrl', '')}")
        return response

    except client.exceptions.ConflictException:
        # 既に存在する場合は取得
        response = client.get_oauth2_credential_provider(name=PROVIDER_NAME)
        print(f"Provider already exists: {PROVIDER_NAME}")
        print(f"Callback URL: {response.get('callbackUrl', '')}")
        return response

if __name__ == "__main__":
    create_google_provider()
Once the code is written, run it.
python create_credential_provider.py
Created provider: google-drive-provider
Callback URL: https://identity.agentcore.us-west-2.amazonaws.com/oauth2/callback/xxxxxxxx-xxxx-xxxx-xxxx-xxxxxxxxxxxx
Great! We've created it!
Add this Callback URL to the authorized redirect URIs in the Google Cloud Console.
Setting up Cognito User Pool
Create Cognito for user authentication.
import secrets
import string
import boto3

REGION = "us-west-2"
POOL_NAME = "AgentCore3LODemoPool"
CLIENT_NAME = "AgentCore3LOClient"

def generate_password(length: int = 16) -> str:
    """パスワードを生成"""
    alphabet = string.ascii_letters + string.digits + "!@#$%^&*"
    password = "".join(secrets.choice(alphabet) for _ in range(length))
    password += secrets.choice(string.digits)
    return password

def create_cognito_resources():
    """Cognito リソースを作成"""
    client = boto3.client("cognito-idp", region_name=REGION)

    # 1. User Pool 作成
    pool_response = client.create_user_pool(
        PoolName=POOL_NAME,
        AutoVerifiedAttributes=["email"],
        UsernameAttributes=["email"],
    )
    user_pool_id = pool_response["UserPool"]["Id"]

    # 2. User Pool Client 作成
    client_response = client.create_user_pool_client(
        UserPoolId=user_pool_id,
        ClientName=CLIENT_NAME,
        GenerateSecret=True,
        ExplicitAuthFlows=["ALLOW_USER_PASSWORD_AUTH", "ALLOW_REFRESH_TOKEN_AUTH"],
    )
    client_id = client_response["UserPoolClient"]["ClientId"]
    client_secret = client_response["UserPoolClient"]["ClientSecret"]

    # テストユーザー作成
    username = f"testuser{secrets.randbelow(10000):04d}@example.com"
    password = generate_password()

    client.admin_create_user(
        UserPoolId=user_pool_id, Username=username, MessageAction="SUPPRESS"
    )
    client.admin_set_user_password(
        UserPoolId=user_pool_id, Username=username, Password=password, Permanent=True
    )

    # 出力
    discovery_url = f"https://cognito-idp.{REGION}.amazonaws.com/{user_pool_id}/.well-known/openid-configuration"

    print(f"Client ID: {client_id}")
    print(f"Client Secret: {client_secret}")
    print(f"Discovery URL: {discovery_url}")
    print(f"Test Username: {username}")
    print(f"Test Password: {password}")

    print("\n# 環境変数として設定:")
    print(f"export USER_POOL_ID='{user_pool_id}'")
    print(f"export CLIENT_ID='{client_id}'")
    print(f"export CLIENT_SECRET='{client_secret}'")
    print(f"export COGNITO_USERNAME='{username}'")
    print(f"export COGNITO_PASSWORD='{password}'")

if __name__ == "__main__":
    create_cognito_resources()
When executed, the Client ID, Discovery URL, and test user information will be displayed.
python create_cognito.py
Client ID: xxxxxxxxxxxxxxxxxxxxxxxxxx
Client Secret: xxxxxxxxxxxxxxxxxxxxxxxxxx
Discovery URL: https://cognito-idp.us-west-2.amazonaws.com/us-west-2_XXXXXX/.well-known/openid-configuration
Test Username: testuser1234@example.com
Test Password: xxxxxxxxxxxxxxxx

# 環境変数として設定:
export USER_POOL_ID='us-west-2_XXXXXX'
...
Set up the environment variables that were displayed.
Getting an Access Token
Let's also prepare a script to get the Access Token used as a Bearer Token when calling the agent.
import os
import hmac
import hashlib
import base64
import boto3

REGION = "us-west-2"

def get_access_token(
    user_pool_id: str,
    client_id: str,
    client_secret: str,
    username: str,
    password: str,
) -> dict:
    """Cognito から Access Token を取得"""
    # SECRET_HASH の計算
    message = username + client_id
    dig = hmac.new(
        client_secret.encode("utf-8"),
        message.encode("utf-8"),
        hashlib.sha256,
    ).digest()
    secret_hash = base64.b64encode(dig).decode()

    client = boto3.client("cognito-idp", region_name=REGION)

    response = client.initiate_auth(
        ClientId=client_id,
        AuthFlow="USER_PASSWORD_AUTH",
        AuthParameters={
            "USERNAME": username,
            "PASSWORD": password,
            "SECRET_HASH": secret_hash,
        },
    )

    return response["AuthenticationResult"]

if __name__ == "__main__":
    result = get_access_token(
        user_pool_id=os.environ["USER_POOL_ID"],
        client_id=os.environ["CLIENT_ID"],
        client_secret=os.environ["CLIENT_SECRET"],
        username=os.environ["COGNITO_USERNAME"],
        password=os.environ["COGNITO_PASSWORD"],
    )

    access_token = result["AccessToken"]
    print(f"Access Token: {access_token[:50]}...")

    # ファイルに保存
    with open(".access_token.txt", "w") as f:
        f.write(access_token)
    print("Saved to .access_token.txt")
python refresh_cognito_token.py
The Access Token is saved in .access_token.txt. Let's set it as an environment variable.
export ACCESS_TOKEN=$(cat .access_token.txt)
The Access Token expires after one hour. If it expires, run the script again and reset the environment variable.
Agent Processing
Now let's implement the agent's main processing.
"""
Google Drive 3LO Agent

AgentCore Runtime にデプロイするエージェント。
BedrockAgentCoreApp を使用して Runtime コンテキストを受け取ります。
"""

import json
from typing import Any, AsyncGenerator, Dict

from bedrock_agentcore.identity.auth import requires_access_token
from bedrock_agentcore.runtime import BedrockAgentCoreApp
from google.oauth2.credentials import Credentials
from googleapiclient.discovery import build
from googleapiclient.errors import HttpError

# クライアントアプリケーションの名前を設定
PROVIDER_NAME = "google-drive-provider"
SCOPES = ["https://www.googleapis.com/auth/drive.metadata.readonly"]
CALLBACK_URL = "http://localhost:9090/callback"  # 後で設定

# BedrockAgentCoreApp を使用
app = BedrockAgentCoreApp()

class AuthRequiredException(Exception):
    """認証が必要な場合にスローされる例外"""
    def __init__(self, auth_url: str):
        self.auth_url = auth_url
        super().__init__(f"認証が必要です: {auth_url}")

def raise_auth_required(url: str):
    """認証 URL を受け取ったら例外をスロー"""
    raise AuthRequiredException(url)

@requires_access_token(
    provider_name=PROVIDER_NAME,
    scopes=SCOPES,
    auth_flow="USER_FEDERATION",
    on_auth_url=raise_auth_required,
    force_authentication=False,
    callback_url=CALLBACK_URL,
)
async def access_google_drive(*, access_token: str) -> dict:
    """Google Drive にアクセスしてファイル一覧を取得"""
    creds = Credentials(token=access_token, scopes=SCOPES)

    try:
        service = build("drive", "v3", credentials=creds)
        results = (
            service.files()
            .list(pageSize=10, fields="nextPageToken, files(id, name, mimeType)")
            .execute()
        )
        return {"status": "success", "files": results.get("files", [])}

    except HttpError as error:
        return {"status": "error", "message": str(error)}

@app.entrypoint
async def agent_invocation(payload: Dict[str, Any]) -> AsyncGenerator[str, None]:
    """エージェントのエントリーポイント"""

    try:
        result = await access_google_drive(access_token="")
        yield json.dumps(result, ensure_ascii=False)

    except AuthRequiredException as e:
        response = {
            "status": "auth_required",
            "auth_url": e.auth_url,
            "message": "以下の URL をブラウザで開いて Google 認証を完了してください",
        }
        yield json.dumps(response, ensure_ascii=False)

    except Exception as e:
        yield json.dumps({"status": "error", "message": str(e)}, ensure_ascii=False)

if __name__ == "__main__":
    app.run()
The key point is that if the token can't be obtained on the first run, it sends an authentication URL.
On the first run, since there's no access token in the Token Vault, we need to get a token first.
response = {
            "status": "auth_required",
            "auth_url": e.auth_url,
            "message": "以下の URL をブラウザで開いて Google 認証を完了してください",
}
After obtaining the token, when you send a request again, you can send a request to Google Drive to get drive file information.
async def access_google_drive(*, access_token: str) -> dict:
    """Google Drive にアクセスしてファイル一覧を取得"""
    creds = Credentials(token=access_token, scopes=SCOPES)

    try:
        service = build("drive", "v3", credentials=creds)
        results = (
            service.files()
            .list(pageSize=10, fields="nextPageToken, files(id, name, mimeType)")
            .execute()
        )
        return {"status": "success", "files": results.get("files", [])}

    except HttpError as error:
        return {"status": "error", "message": str(error)}
Deployment and Callback URL Configuration
First, we'll configure the deployment using the configure command.
uv run agentcore configure -e agent.py
We'll mostly use the recommended settings, but we'll switch to JWT for authentication.
Configuring Bedrock AgentCore...
✓ Using file: agent.py

🏷️  Inferred agent name: agent
Press Enter to use this name, or type a different one (alphanumeric without '-')
Agent name [agent]: agent_sample_test_0123
✓ Using agent name: agent_sample_test_0123

🔍 Detected dependency file: pyproject.toml
Press Enter to use this file, or type a different path (use Tab for autocomplete):
Path or Press Enter to use detected dependency file: pyproject.toml
✓ Using requirements file: pyproject.toml

🚀 Deployment Configuration
Select deployment type:
  1. Direct Code Deploy (recommended) - Python only, no Docker required
  2. Container - For custom runtimes or complex dependencies
Choice [1]: 1

Select Python runtime version:
  1. PYTHON_3_10
  2. PYTHON_3_11
  3. PYTHON_3_12
  4. PYTHON_3_13
Choice [3]: 3
✓ Deployment type: Direct Code Deploy (python.3.12)

🔐 Execution Role
Press Enter to auto-create execution role, or provide execution role ARN/name to use existing
Execution role ARN/name (or press Enter to auto-create):
✓ Will auto-create execution role

🏗️  S3 Bucket
Press Enter to auto-create S3 bucket, or provide S3 URI/path to use existing
S3 URI/path (or press Enter to auto-create):
✓ Will auto-create S3 bucket

🔐 Authorization Configuration
By default, Bedrock AgentCore uses IAM authorization.
Configure OAuth authorizer instead? (yes/no) [no]: yes

📋 OAuth Configuration
Enter OAuth discovery URL: https://cognito-idp.us-west-2.amazonaws.com/us-west-2_XXXXXXXXX/.well-known/openid-configuration
Enter allowed OAuth client IDs (comma-separated): xxxxxxxxxxxxxxxxxxxxxxxxxx
Enter allowed OAuth audience (comma-separated):
Enter allowed OAuth allowed scopes (comma-separated):
Enter allowed OAuth custom claims as JSON string (comma-separated):
✓ OAuth authorizer configuration created

🔒 Request Header Allowlist
Configure which request headers are allowed to pass through to your agent.
Common headers: Authorization, X-Amzn-Bedrock-AgentCore-Runtime-Custom-*
Configure request header allowlist? (yes/no) [no]: no
✓ Using default request header configuration
Configuring BedrockAgentCore agent: agent_sample_test_0123
Now let's deploy the agent.
agentcore deploy
After deployment, register the Callback URL in Workload Identity.
from bedrock_agentcore.services.identity import IdentityClient

# If you know the agent_id
agent_id = "agent_sample_test_0123-5PWohQFJ8u"

identity_client = IdentityClient(region="us-west-2")

# Get Workload Identity
workload_identity = identity_client.get_workload_identity(name=agent_id)
print(workload_identity)

print("=== Workload Identity ===")
print(f"Name: {workload_identity.get('name')}")
print(f"ARN: {workload_identity.get('arn')}")
print(
    f"Allowed Callback URLs: {workload_identity.get('allowedResourceOauth2ReturnUrls')}"
)

identity_client.update_workload_identity(
    name=agent_id,
    allowed_resource_oauth_2_return_urls=["http://localhost:9090/callback"],
)
Running this twice shows the update:
=== Workload Identity ===
Name: my-agent-XXXXXXXXXX
ARN: arn:aws:bedrock-agentcore:us-west-2:123456789012:workload-identity-directory/default/workload-identity/my-agent-XXXXXXXXXX
Allowed Callback URLs: []
=== Workload Identity ===
Name: my-agent-XXXXXXXXXX
ARN: arn:aws:bedrock-agentcore:us-west-2:123456789012:workload-identity-directory/default/workload-identity/my-agent-XXXXXXXXXX
Allowed Callback URLs: ['http://localhost:9090/callback']
Implementing the Callback Server
This server receives callbacks after OAuth authentication and binds the session:
"""
OAuth2 Callback Server

After Google authentication is complete, it calls AgentCore Identity's CompleteResourceTokenAuth
to complete Session Binding.
"""

import os
import uvicorn
from fastapi import FastAPI
from fastapi.responses import HTMLResponse
from bedrock_agentcore.services.identity import IdentityClient, UserTokenIdentifier

PORT = 9090
REGION = "us-west-2"

app = FastAPI()
identity_client = IdentityClient(region=REGION)

@app.get("/callback")
async def oauth2_callback(session_id: str):
    """OAuth2 callback processing"""

    # Get Cognito Access Token from environment variable
    token = os.environ.get("ACCESS_TOKEN", "")

    if not token:
        return HTMLResponse(
            content="<h1>Error</h1><p>ACCESS_TOKEN not set</p>",
            status_code=500
        )

    try:
        # Complete Session Binding
        identity_client.complete_resource_token_auth(
            session_uri=session_id,
            user_identifier=UserTokenIdentifier(user_token=token)
        )

        html = """
        <!DOCTYPE html>
        <html>
        <head><title>Authentication Complete</title></head>
        <body>
            <h1>Authentication Complete!</h1>
            <p>Access token has been stored in the Token Vault.</p>
            <p>Return to terminal and invoke again.</p>
        </body>
        </html>
        """
        return HTMLResponse(content=html, status_code=200)

    except Exception as e:
        return HTMLResponse(
            content=f"<h1>Error</h1><pre>{str(e)}</pre>",
            status_code=500
        )

if __name__ == "__main__":
    print(f"Callback Server running on http://localhost:{PORT}/callback")
    uvicorn.run(app, host="127.0.0.1", port=PORT)
The most important point is completing the session binding by passing the JWT and session ID:
identity_client.complete_resource_token_auth(
            session_uri=session_id,
            user_identifier=UserTokenIdentifier(user_token=token)
)
Now our implementation is complete! Let's proceed to testing!
Testing
Start the Callback Server
First, start the Callback Server and set the access token as an environment variable:
export ACCESS_TOKEN=$(cat .access_token.txt)
python callback_server.py

# Log
Callback Server running on http://localhost:9090/callback
INFO:     Started server process [77981]
INFO:     Waiting for application startup.
INFO:     Application startup complete.
INFO:     Uvicorn running on http://127.0.0.1:9090 (Press CTRL+C to quit)
Invoke the agent (first time)
uv run agentcore invoke --agent agent_sample_test_0123 --bearer-token $ACCESS_TOKEN {"prompt": ""}
Using bearer token for OAuth authentication
Using JWT authentication
{"status": "auth_required", "auth_url":
"https://bedrock-agentcore.us-west-2.amazonaws.com/identities/oauth2/authorize?request_uri=urn%3Aietf%3Apa
rams%3Aoauth%3Arequest_uri%sample", "message": "Please open the following URL in your browser to complete Google authentication"}
As this is the first time, we got an authentication URL!
Browser Authentication
Open the returned auth_url in your browser and complete Google authentication.
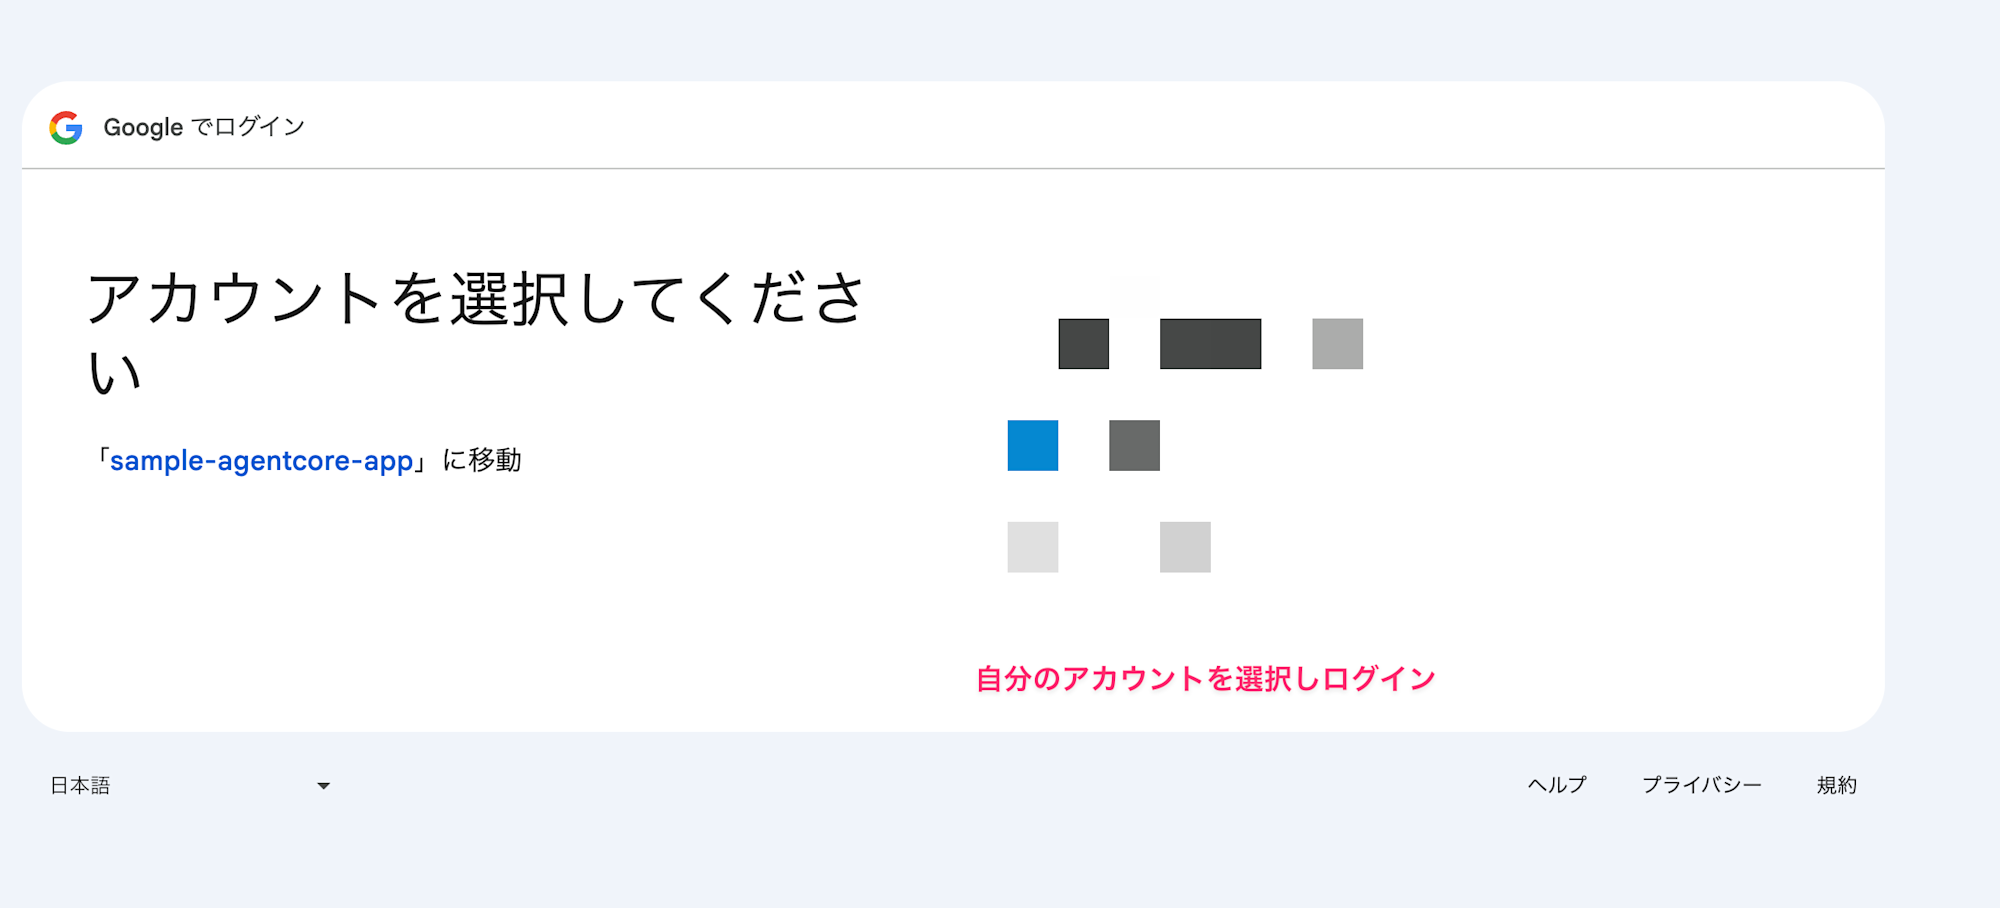
After authentication, you'll be redirected to the Callback Server, completing the session binding.
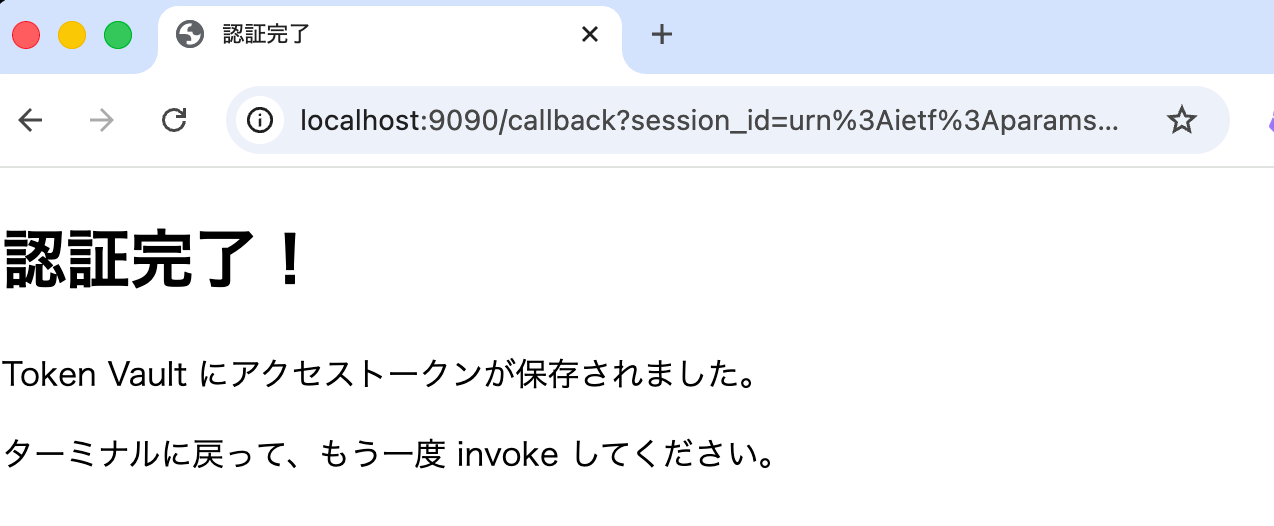
Now the access token issued by Google is stored in the Token Vault, so let's invoke again.
Invoke the agent (second time)
agentcore invoke --agent agent_sample_test_0123 --bearer-token $ACCESS_TOKEN
{
  "status": "success",
  "files": [
    {"id": "1abc...", "name": "Sample 1", "mimeType": "application/vnd.google-apps.document"},
    {"id": "2def...", "name": "Sample 2", "mimeType": "application/vnd.google-apps.spreadsheet"},
    {"id": "3ghi...", "name": "Sample 3", "mimeType": "application/vnd.google-apps.presentation"},
    ...
  ]
}
Great! We successfully retrieved the Google Drive file list!
Since the token is stored in the Token Vault, we can access it without re-authenticating.
Stumbling Points
Here are some points where I got stuck during implementation:
Not Using BedrockAgentCoreApp
# Wrong: Not using BedrockAgentCoreApp
async def main():
    result = await access_google_drive(access_token="")

# Correct: Using BedrockAgentCoreApp
app = BedrockAgentCoreApp()

@app.entrypoint
async def agent_invocation(payload):
    ...
If you don't use BedrockAgentCoreApp, the SDK creates its own Workload Identity, causing user ID mismatches when trying to verify with JWT in the Callback Server. I wondered why this was happening when I should be verifying with the JWT obtained from the access token, but the reason was surprisingly simple. The server processing I quickly put together ended up working against me.
Forgetting to Register the Callback URL for Workload Identity
If allowedResourceOauth2ReturnUrls in Workload Identity is empty, all URLs are allowed, but if even one value is explicitly set, all others are rejected. For production use, you'd definitely want to set this.
# All URLs allowed
allowed_resource_oauth_2_return_urls=[]

# Only specified URLs allowed
# Only http://localhost:9090/callback is allowed
allowed_resource_oauth_2_return_urls=["http://localhost:9090/callback"]
While our procedure is complex, in production it would be better to create and configure everything together with IaC. With Terraform, you can create Workload Identity and link it to the Runtime.
Production Environment Considerations
In our example, we implemented the Callback Server assuming JWT is held in the local environment, so certain considerations weren't necessary. However, in a production environment where everything runs server-side, there's a risk that if the authentication URL leaks, an attacker could bind their token to another user.
One approach would be to use cookies or other information that only a legitimate user's browser would have for verification. This is just an example, so when implementing in production, consider these security measures carefully!
Conclusion
To be honest, there were many terms that confused me at first, but organizing them helped me understand better. This time we implemented the authentication and authorization flow step by step in a hybrid form between local and deployed Runtime, but ideally, we'd want to implement a seamless authentication flow entirely in the cloud.
I hope this article was helpful! Thank you for reading to the end!
References
The following blogs were very helpful and informative. Thank you very much!!