
I created an agent that utilizes the Identity feature to implement Cognito authentication and Azure OpenAI integration
This page has been translated by machine translation. View original
Introduction
Hello, I'm Kamino from the Consulting Department.
Are you using Amazon Bedrock AgentCore (hereafter Agent Core) which was preview-released last month?
There are various useful features for agent development such as Runtime, Gateway, Identity, etc., which are quite interesting, aren't they? I've also been enjoying catching up on these recently.
Today, I've written an article focusing on the Identity feature among the many functions! I'd like to introduce it by creating a simple agent!
About Identity
When you try to use the Identity feature on the console, you'll find explanations about Inbound Auth and Outbound Auth.
It's nice to see a service that uses such illustrations for explanations on the console, which is quite rare.
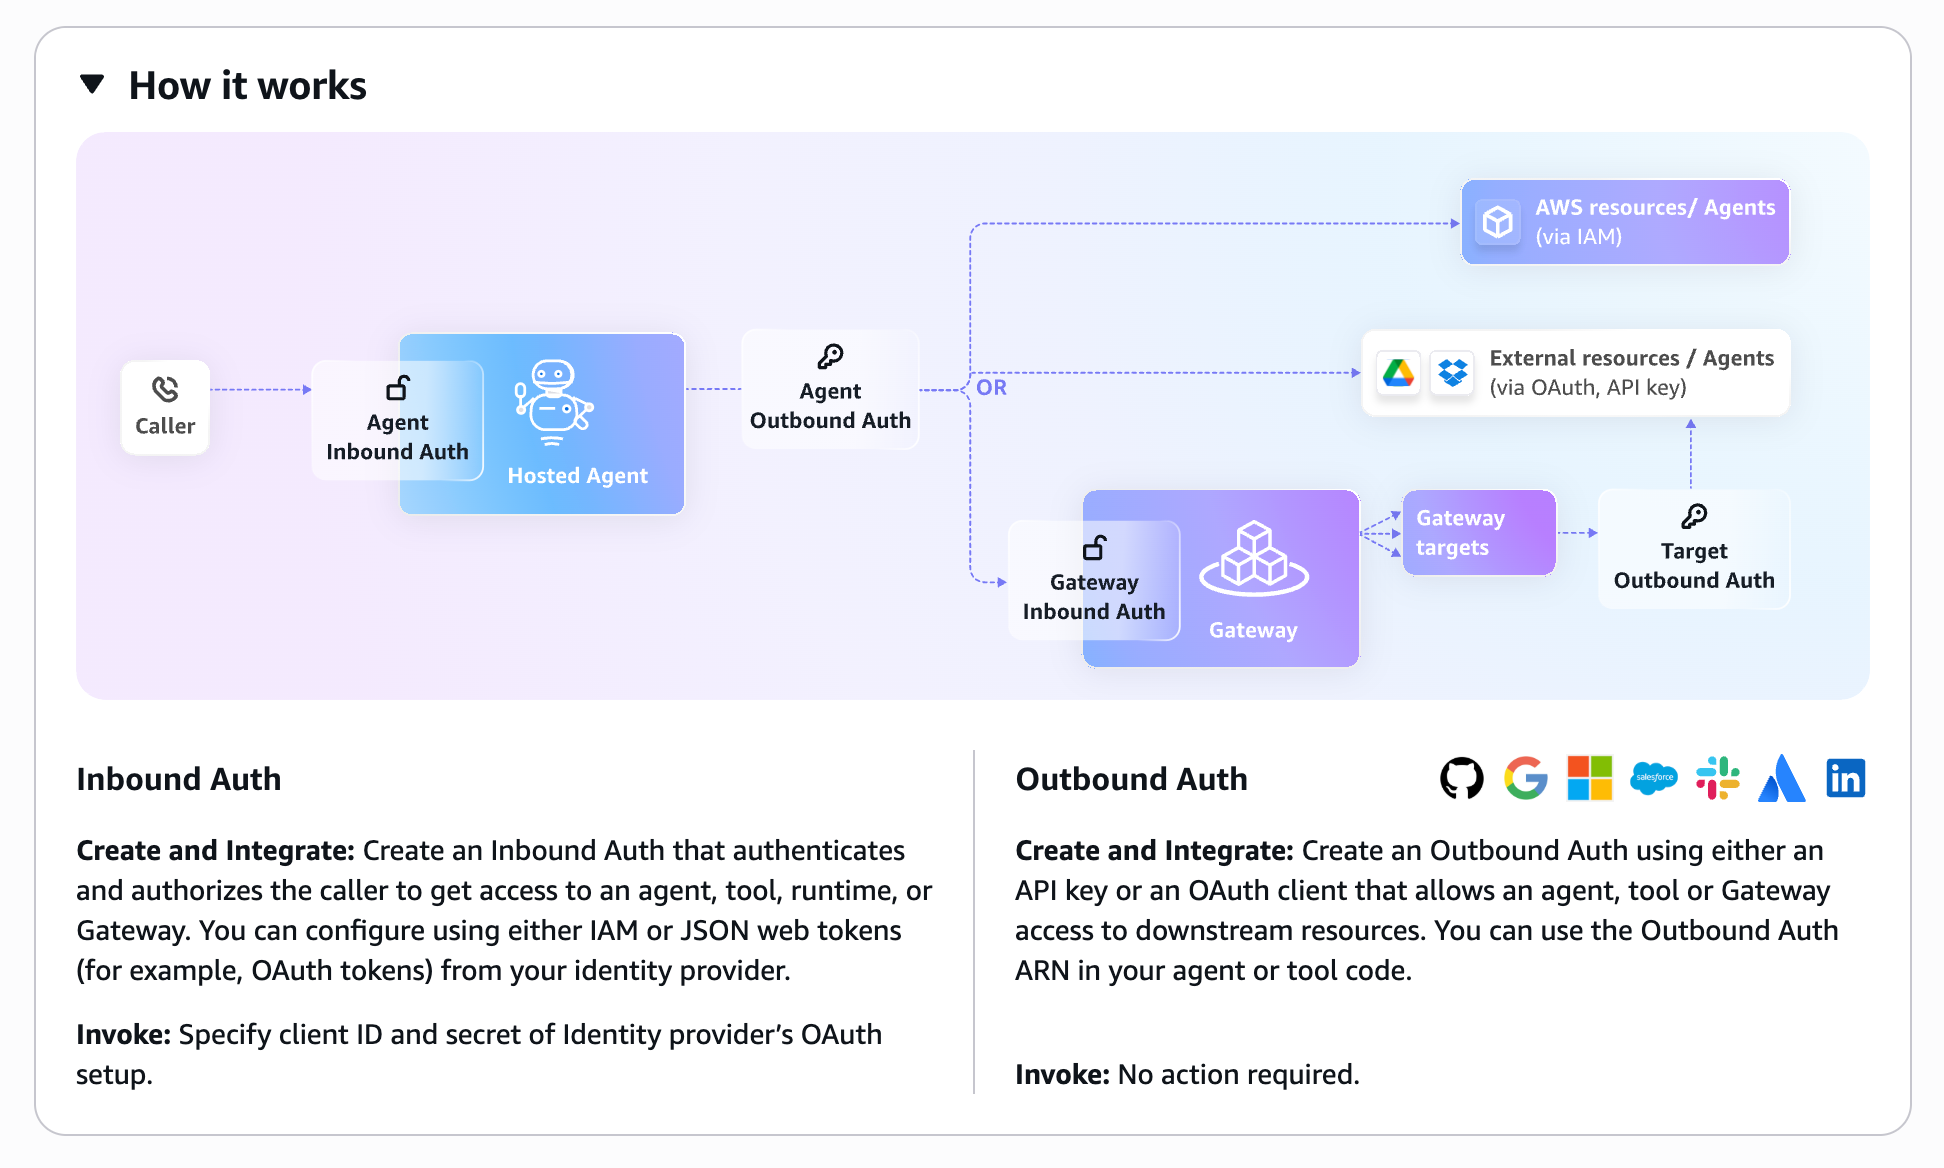
Identity has two types of authentication: Inbound Auth and Outbound Auth.
Inbound Auth
- This is authentication for "who calls" the agent
- It controls "who can access the agent"
- Example: Authentication when a user calls an agent (we'll use Cognito in this case)
- Benefit: It supports multiple IdPs, and it's great that you can offload authentication without implementing it yourself!
Outbound Auth
- This is authentication for the agent to "call external services"
- Manages authentication information when the agent accesses external APIs or services
- Example: Authentication when an agent calls Azure OpenAI's API (we'll use API Key in this case)
- The stored API Key is saved in AWS Secrets Manager
- Benefit: It's great that you can achieve secure external integration without hardcoding!
- Example: Authentication when an agent calls Azure OpenAI's API (we'll use API Key in this case)
The Agent We'll Implement
In this article, we'll implement an agent that uses Azure OpenAI, utilizing both authentication methods simultaneously.
- Inbound Auth: Only users authenticated by Cognito can access the agent
- Outbound Auth: The agent securely accesses the Azure OpenAI API
Here's a simple diagram of the agent we'll create.
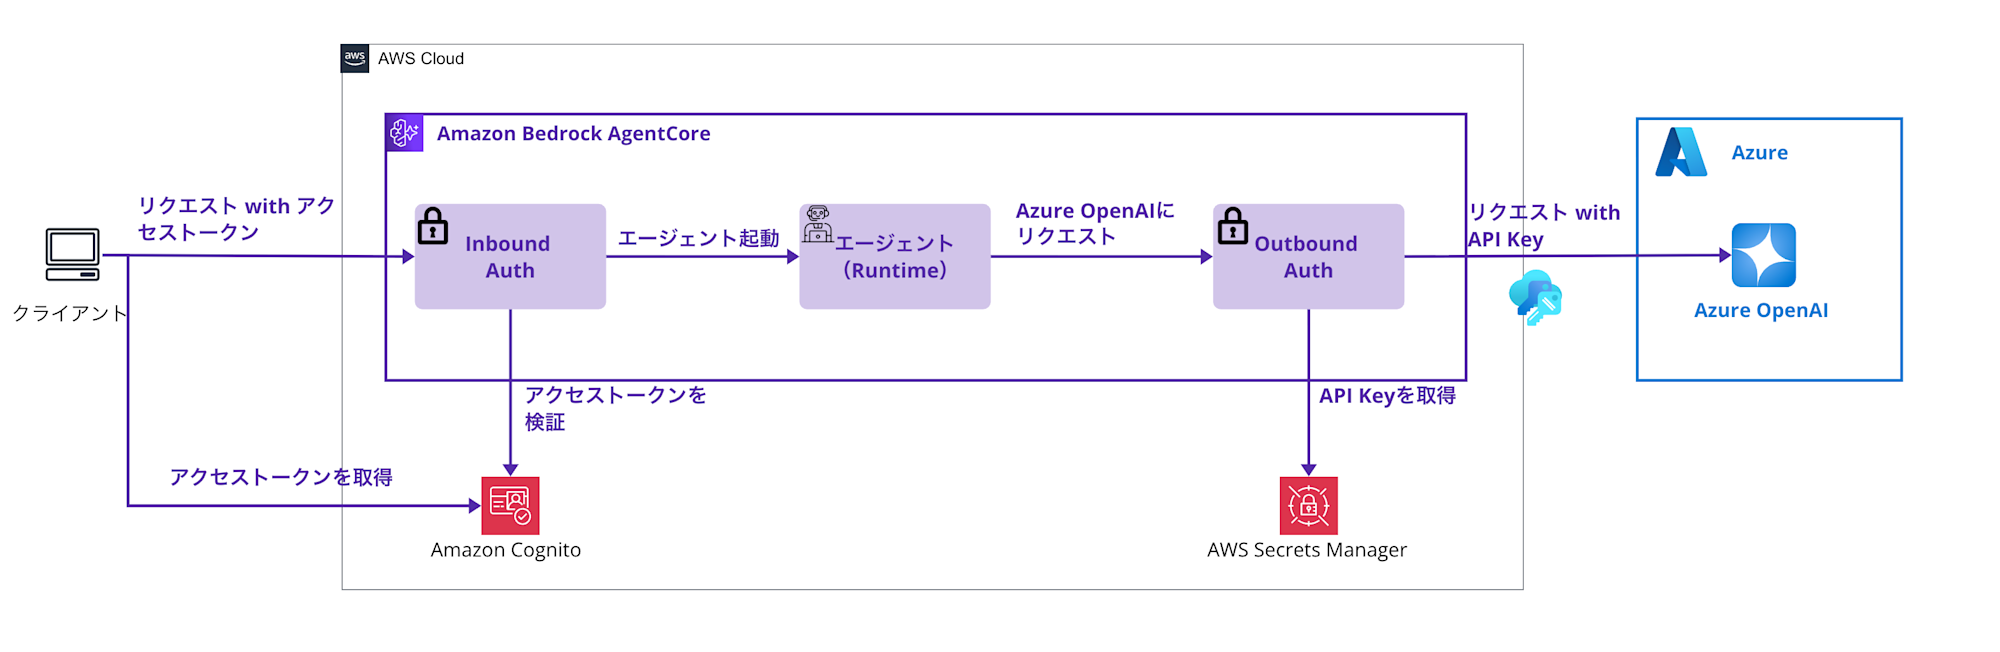
The overall flow is as follows:
- Authenticated request from client
- The client sends a request to AgentCore with an access token obtained from Amazon Cognito
- Access control with Inbound Auth
- AgentCore Identity's inbound authentication feature verifies the Cognito access token
- Only requests that pass authentication can reach the agent (Runtime)
- Agent startup and preparation for Azure OpenAI calls
- The agent starts with the request that passed authentication
- When the agent needs to call Azure OpenAI, Outbound Auth comes into action
- Obtaining API key with Outbound Auth
- Securely retrieves the Azure OpenAI API key stored in AWS Secrets Manager
- This API key is managed through AgentCore Identity's token-vault
- Secure access to Azure OpenAI
- The agent sends a request to Azure OpenAI using the obtained API key
- Returns the response from Azure OpenAI to the client
The structure controls "who can use the agent" with Inbound Auth and "authentication for the agent to call external services" with Outbound Auth!
The sample implemented in this article is uploaded to the repository below, so please refer to it as needed.
Prerequisites
Required Environment
-
AWS CLI 2.28.8
-
Python 3.12.6
-
AWS account
- Region to use: us-west-2 region
-
Azure account
- Deployment of
gpt-4.1-mini
- Deployment of
Azure OpenAI Preparation
We need some preparation on the Azure OpenAI side. You need to deploy a model in Azure AI Foundry. I used gpt-4.1-mini this time, but you can use any model you prefer!
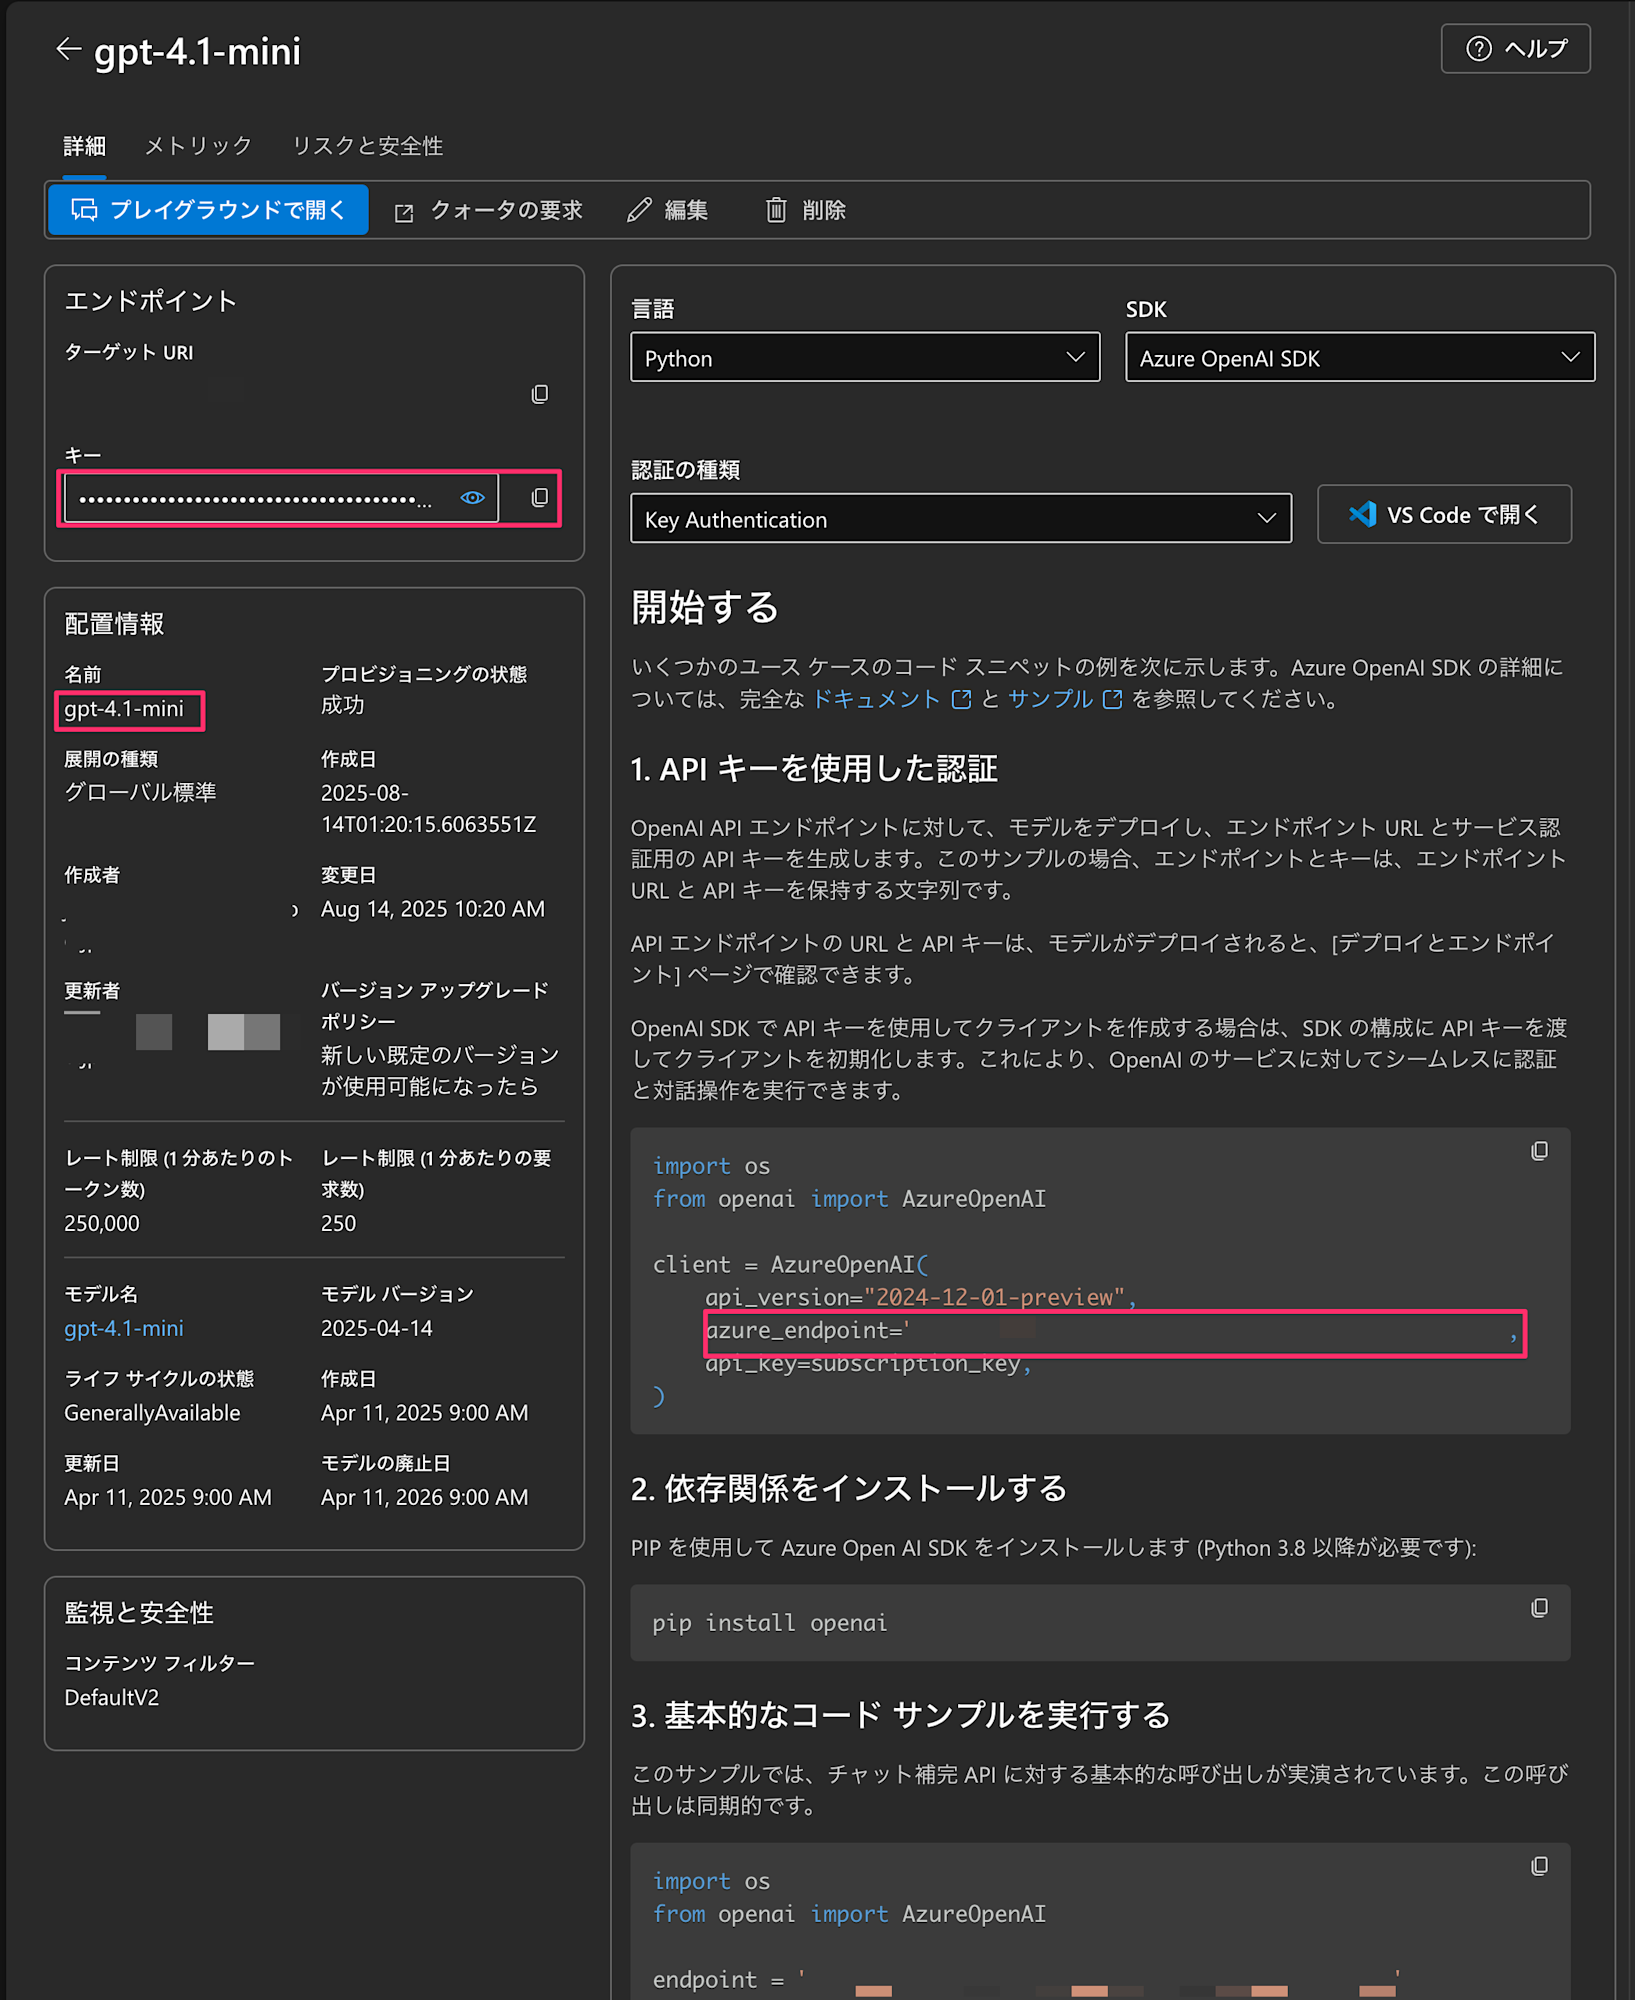
After deployment, please note the following information. You'll need it later!
-
Deployment name (example: gpt-4.1-mini)
- This is listed in the deployment information
-
Endpoint URL (example: https://your-resource.openai.azure.com/)
-
API key
Once the preparation is complete, let's proceed with setting up the environment.
Environment Setup
Python Environment Setup
First, let's install the necessary libraries. Create a requirements.txt file.
strands-agents
strands-agents-tools
boto3
litellm
openai
bedrock-agentcore
bedrock-agentcore-starter-toolkit
python-dotenv
Create a virtual environment and install the libraries.
# Create and activate a virtual environment
python3 -m venv agentcore-env
source agentcore-env/bin/activate

# Install dependencies
pip install -r requirements.txt
Environment Variable Management File
As we progress with implementation, environment variables will increase and become difficult to manage, so I decided to manage them with a .env file.
Some sections will be filled in later, but for now, I'm using placeholder.
Let's add the Azure OpenAI information we obtained earlier (AZURE_DEPLOYMENT_NAME, AZURE_API_BASE, AZURE_API_VERSION)!
# Cognito Configuration (to be filled in later)
DISCOVERY_URL=placeholder
CLIENT_ID=placeholder
USERNAME=testuser
PASSWORD=Testpass123!
REGION=us-west-2

# IAM Role (to be filled in later)
ROLE_ARN=placeholder

# Agent Name (you can set any agent name)
AGENT_NAME=strands_sample_agent

# Azure OpenAI Configuration
AZURE_DEPLOYMENT_NAME=gpt-4.1-mini
AZURE_API_BASE=https://your-resource.openai.azure.com/
AZURE_API_VERSION=2025-01-01-preview
Here's a summary of all the environment variables you'll need.
| Environment Variable | Description | Example |
|---|---|---|
DISCOVERY_URL |
Cognito Discovery URL | https://cognito-idp.us-west-2.amazonaws.com/{POOL_ID}/.well-known/openid-configuration |
CLIENT_ID |
Cognito Client ID | 1234567890abcdef... |
USERNAME |
Test username | testuser |
PASSWORD |
Test user password | Testpass123! |
REGION |
AWS region | us-west-2 |
ROLE_ARN |
IAM role ARN | arn:aws:iam::XXXXXXXXXXXX:role/AgentCoreExecutionRole-... |
AGENT_NAME |
Agent name (arbitrary) | strands_sample_agent (e.g., any name like xxx_agent is OK) |
AZURE_DEPLOYMENT_NAME |
Azure deployment name | gpt-4.1-mini |
AZURE_API_BASE |
Azure endpoint | https://your-resource.openai.azure.com/ |
AZURE_API_VERSION |
Azure API version | 2025-01-01-preview |
Creating a Cognito User Pool
Cognito Setup Script
For Cognito setup, there's a sample script in the official documentation's Appendix. I created one for this use case based on that.
#!/bin/bash

# Cognito User Pool creation script
# AgentCore only works in us-west-2, so we fix the region
REGION="us-west-2"

# Create User Pool
echo "Creating Cognito User Pool..."
POOL_ID=$(aws cognito-idp create-user-pool \
  --pool-name "MyUserPool" \
  --policies '{"PasswordPolicy":{"MinimumLength":8}}' \
  --region $REGION | jq -r '.UserPool.Id')

# Create App Client (important: enable USER_PASSWORD_AUTH flow)
echo "Creating App Client..."
CLIENT_ID=$(aws cognito-idp create-user-pool-client \
  --user-pool-id $POOL_ID \
  --client-name "MyClient" \
  --no-generate-secret \
  --explicit-auth-flows "ALLOW_USER_PASSWORD_AUTH" "ALLOW_REFRESH_TOKEN_AUTH" \
  --region $REGION | jq -r '.UserPoolClient.ClientId')

# Create a test user
echo "Creating test user..."
aws cognito-idp admin-create-user \
  --user-pool-id $POOL_ID \
  --username "testuser" \
  --temporary-password "TempPass123!" \
  --region $REGION \
  --message-action SUPPRESS > /dev/null

# Set permanent password
aws cognito-idp admin-set-user-password \
  --user-pool-id $POOL_ID \
  --username "testuser" \
  --password "Testpass123!" \
  --region $REGION \
  --permanent > /dev/null

# Output configuration
echo "===== Cognito Setup Complete ====="
echo "Pool ID: $POOL_ID"
echo "Discovery URL: https://cognito-idp.us-west-2.amazonaws.com/$POOL_ID/.well-known/openid-configuration"
echo "Client ID: $CLIENT_ID"
echo "Username: testuser"
echo "Password: Testpass123!"
When executed, all the necessary information will be displayed, so copy it to your .env file!
Creating an IAM Role
About Required Permissions
The official documentation lists the basic permissions for IAM roles, but actually, when using Outbound Auth, additional permissions are required.
You'll need access permissions to Secrets Manager and direct access permissions to the token-vault, so I'm granting permissions that take this into account. This is mentioned in the official documentation below, so please refer to it as needed.
Trust Policy
{
    "Version": "2012-10-17",
    "Statement": [
        {
            "Sid": "AssumeRolePolicy",
            "Effect": "Allow",
            "Principal": {
                "Service": "bedrock-agentcore.amazonaws.com"
            },
            "Action": "sts:AssumeRole",
            "Condition": {
                "StringEquals": {
                    "aws:SourceAccount": "123456789012"
                },
                "ArnLike": {
                    "aws:SourceArn": "arn:aws:bedrock-agentcore:us-west-2:123456789012:*"
                }
            }
        }
    ]
}
Execution Policy
{
    "Version": "2012-10-17",
    "Statement": [
        {
            "Sid": "ECRImageAccess",
            "Effect": "Allow",
            "Action": [
                "ecr:BatchGetImage",
                "ecr:GetDownloadUrlForLayer"
            ],
            "Resource": [
                "arn:aws:ecr:us-west-2:123456789012:repository/*"
            ]
        },
        {
            "Sid": "ECRTokenAccess",
            "Effect": "Allow",
            "Action": [
                "ecr:GetAuthorizationToken"
            ],
            "Resource": "*"
        },
        {
            "Sid": "LogsAccess",
            "Effect": "Allow",
            "Action": [
                "logs:DescribeLogStreams",
                "logs:CreateLogGroup",
                "logs:DescribeLogGroups",
                "logs:CreateLogStream",
                "logs:PutLogEvents"
            ],
            "Resource": [
                "arn:aws:logs:us-west-2:123456789012:log-group:*"
            ]
        },
        {
            "Sid": "XRayAccess",
            "Effect": "Allow",
            "Action": [
                "xray:PutTraceSegments",
                "xray:PutTelemetryRecords",
                "xray:GetSamplingRules",
                "xray:GetSamplingTargets"
            ],
            "Resource": ["*"]
        },
        {
            "Sid": "CloudWatchMetrics",
            "Effect": "Allow",
            "Resource": "*",
            "Action": "cloudwatch:PutMetricData",
            "Condition": {
                "StringEquals": {
                    "cloudwatch:namespace": "bedrock-agentcore"
                }
            }
        },
        {
            "Sid": "GetAgentAccessToken",
            "Effect": "Allow",
            "Action": [
                "bedrock-agentcore:GetWorkloadAccessToken",
                "bedrock-agentcore:GetWorkloadAccessTokenForJWT",
                "bedrock-agentcore:GetWorkloadAccessTokenForUserId"
            ],
            "Resource": [
                "arn:aws:bedrock-agentcore:us-west-2:123456789012:workload-identity-directory/default",
                "arn:aws:bedrock-agentcore:us-west-2:123456789012:workload-identity-directory/default/*"
            ]
        },
        {
            "Sid": "BedrockModelInvocation",
            "Effect": "Allow",
            "Action": [
                "bedrock:InvokeModel",
                "bedrock:InvokeModelWithResponseStream"
            ],
            "Resource": [
                "arn:aws:bedrock:*::foundation-model/*",
                "arn:aws:bedrock:us-west-2:123456789012:*"
            ]
        },
        {
            "Sid": "CredentialProviderAccess",
            "Effect": "Allow",
            "Action": [
                "bedrock-agentcore:GetApiKeyCredentialProvider",
                "bedrock-agentcore:GetOauth2CredentialProvider",
                "bedrock-agentcore:CreateApiKeyCredentialProvider",
                "bedrock-agentcore:CreateOauth2CredentialProvider",
                "bedrock-agentcore:GetResourceApiKey"
            ],
            "Resource": [
                "arn:aws:bedrock-agentcore:us-west-2:123456789012:workload-identity-directory/*",
                "arn:aws:bedrock-agentcore:us-west-2:123456789012:token-vault/*"
            ]
        },
        {
            "Sid": "SecretsManagerAccess",
            "Effect": "Allow",
            "Action": [
                "secretsmanager:GetSecretValue"
            ],
            "Resource": "*"
        }
    ]
}
The reason Secrets Manager permissions are needed is that AgentCore Identity internally manages API keys with Secrets Manager. It took me a while to realize this...
IAM Role Creation Script
I created and ran a shell script like this. It's designed to automatically get the account ID and replace the placeholders in the JSON files!
#!/bin/bash

# Get account ID and region
ACCOUNT_ID=$(aws sts get-caller-identity --query Account --output text)
REGION="us-west-2"
AGENT_NAME="${AGENT_NAME:-strands_full_auth_agent}"

# Replace placeholders in JSON files
sed -i.bak "s/123456789012/$ACCOUNT_ID/g" trust-policy.json
sed -i.bak "s/123456789012/$ACCOUNT_ID/g" execution-policy.json

# Create IAM role
ROLE_NAME="AgentCoreExecutionRole-$(date +%s)"

aws iam create-role \
    --role-name $ROLE_NAME \
    --assume-role-policy-document file://trust-policy.json

# Create and attach policy
aws iam put-role-policy \
    --role-name $ROLE_NAME \
    --policy-name AgentCoreExecutionPolicy \
    --policy-document file://execution-policy.json

# Get role ARN
ROLE_ARN=$(aws iam get-role --role-name $ROLE_NAME --query 'Role.Arn' --output text)
echo "✅ IAM Role created: $ROLE_ARN"
export ROLE_ARN

# Save environment variable to file
echo "export ROLE_ARN=\"$ROLE_ARN\"" > role_vars.sh
echo "IAM Role ARN has been saved to role_vars.sh"
When you run this script, it saves the role ARN to role_vars.sh at the end, so copy it to your .env file.
Registering Azure OpenAI API Key
API Key Registration Process
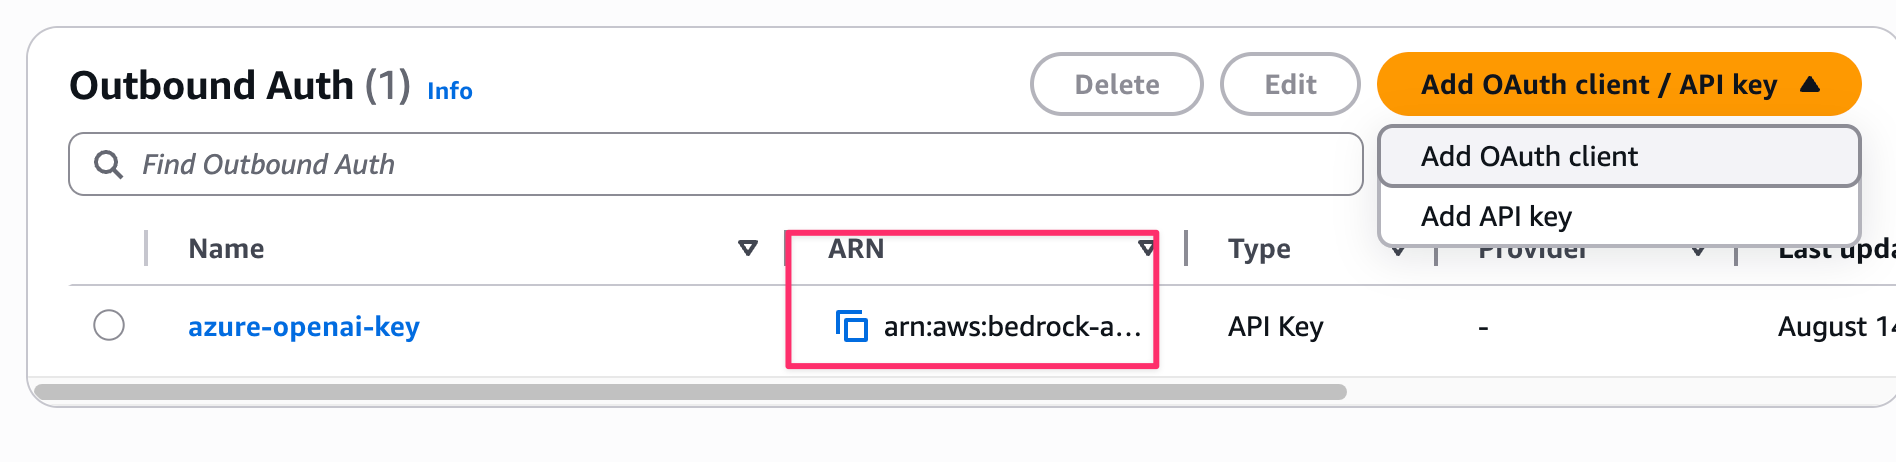
We'll proceed with the API Key method. We'll register the Azure OpenAI API key in AgentCore Identity's token-vault. This is done from the AWS console.
- Navigate to the "Identity" section of the Bedrock AgentCore console
- Click "Add OAuth Client / API key"
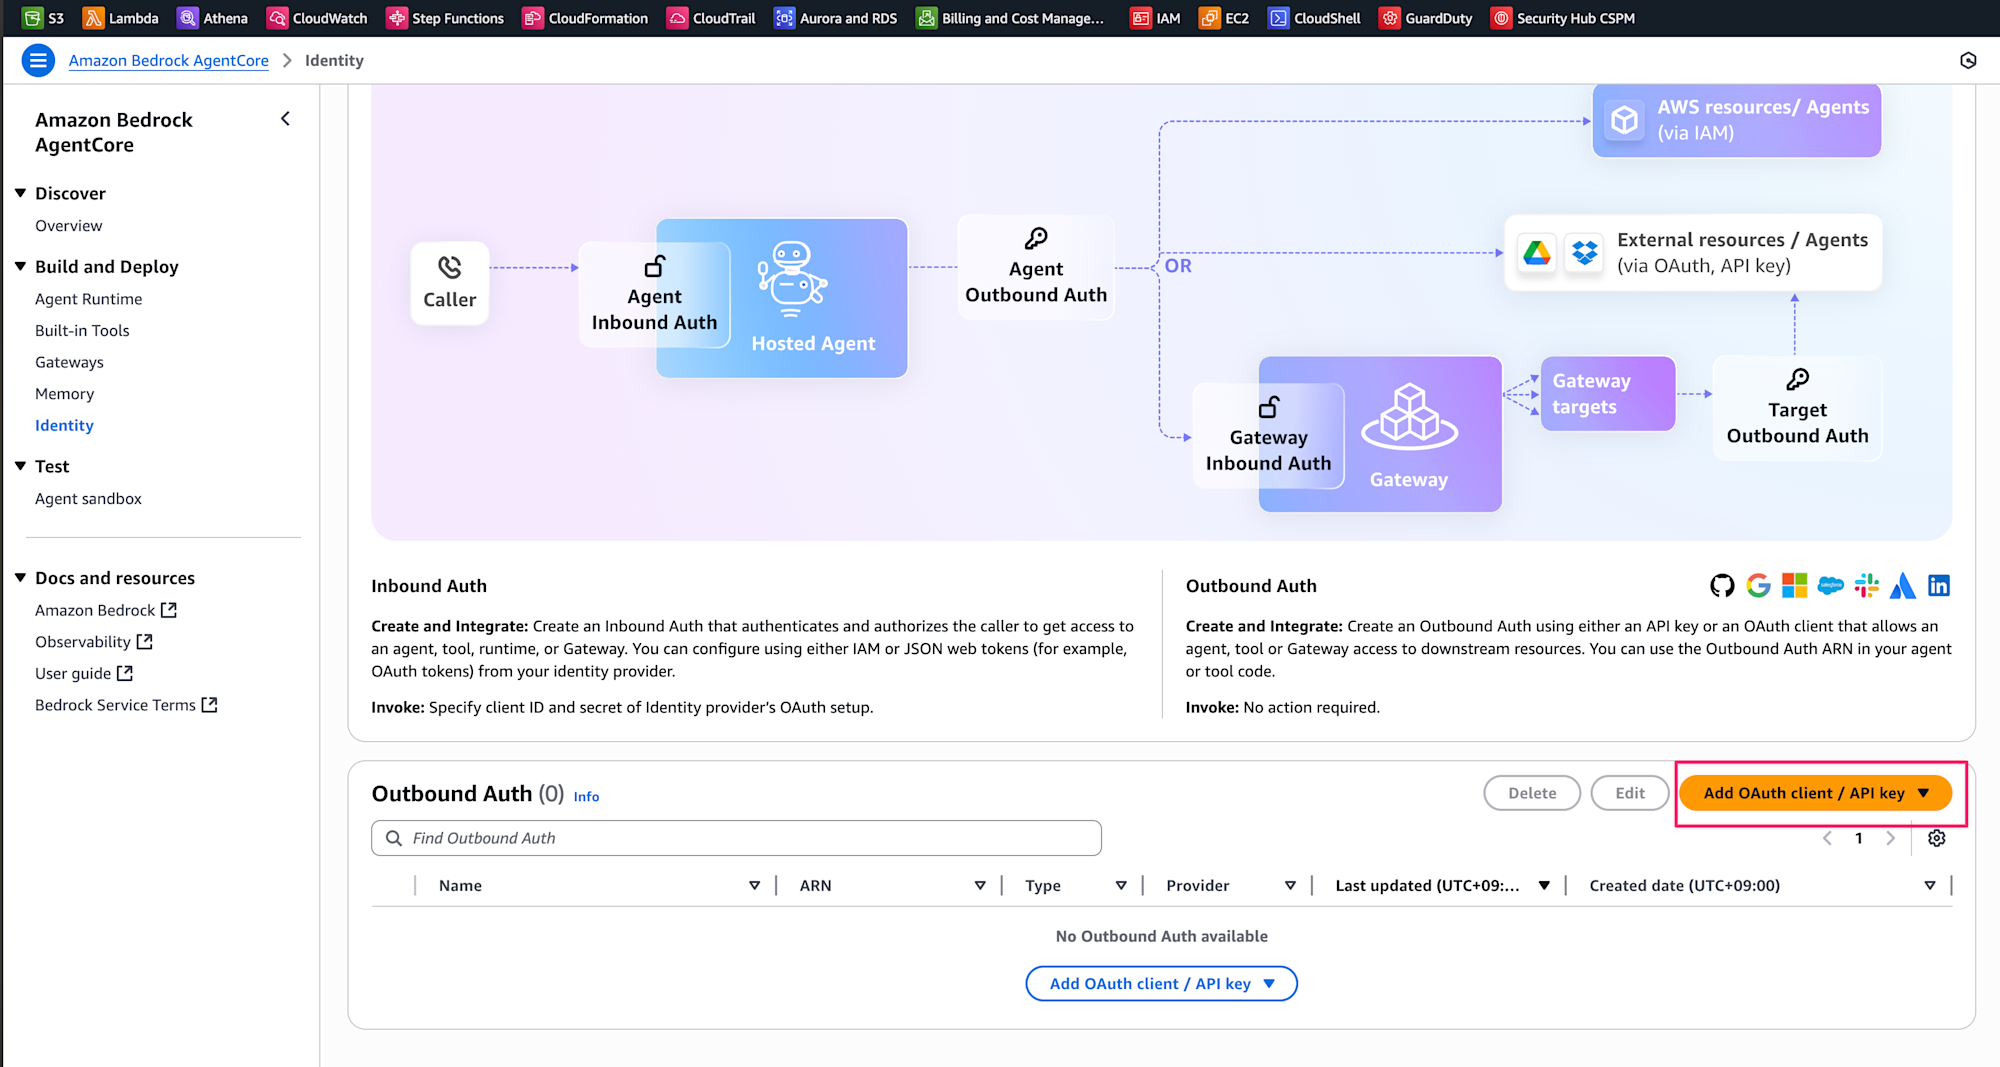
- Select "API Key" as the Provider type
- Enter "azure-openai-key" in the Name field and paste the Azure OpenAI API key
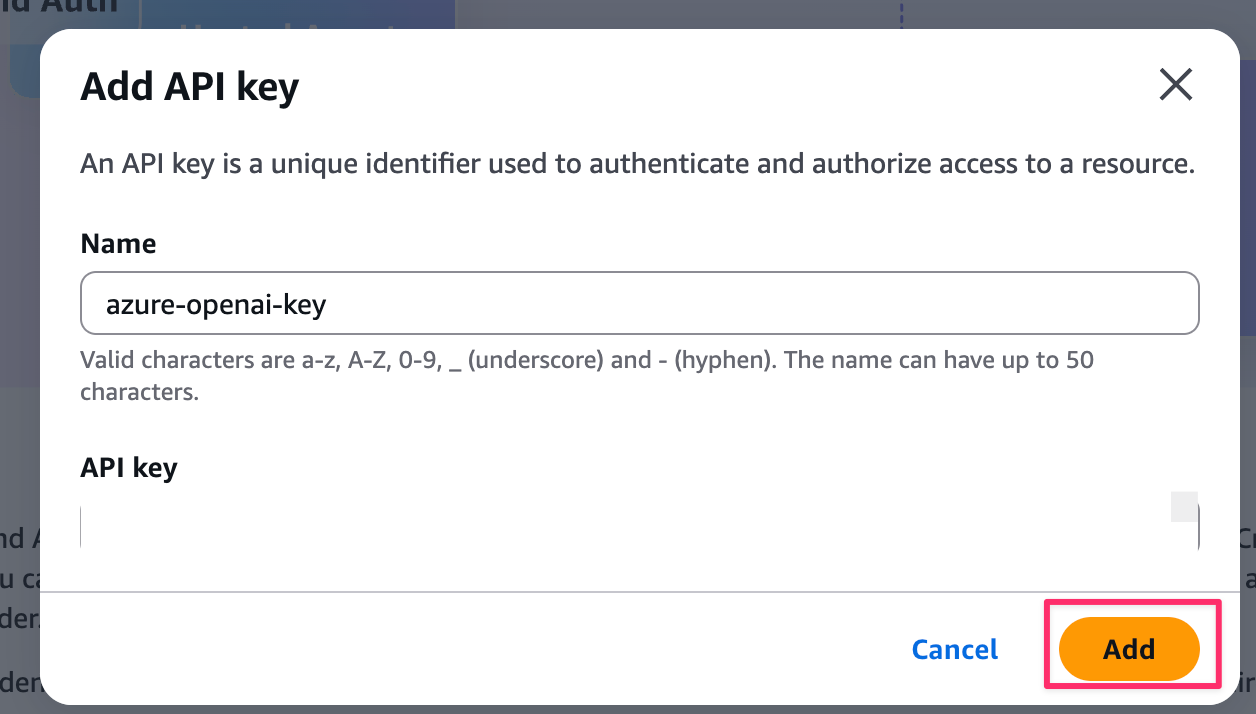
After creation, note the Provider ARN displayed and copy it to your .env file!
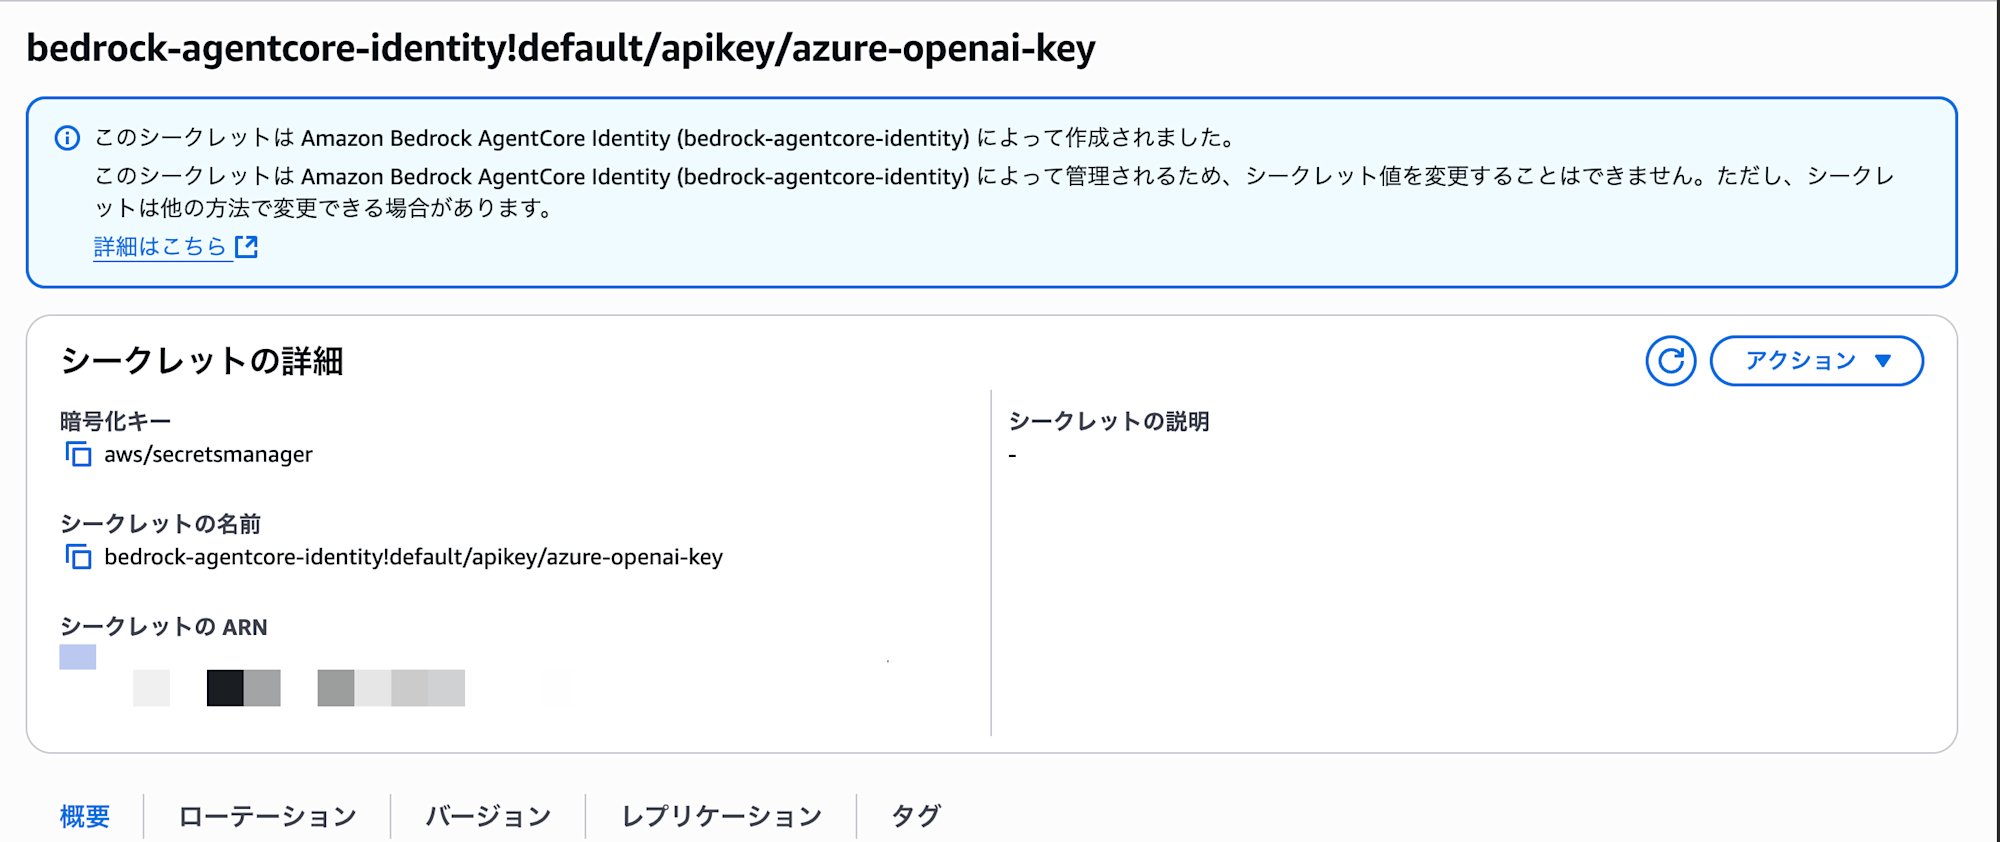
The saved API key is stored in AWS Secrets Manager, so resources were automatically created.
It seems to be saved in the format bedrock-agentcore-identity!default/apikey/name.
Agent Implementation
Now for the main agent implementation! I've kept it simple this time.
- Provides weather information: a chatbot with a simple tool integrated
- I've created a dummy tool for this example.
requires_api_keydecorator- This seems to be a feature of Outbound Auth.
- If you set the
namecreated earlier as an argument to the decorator, it will automatically retrieve the key for you.
- If you set the
- This seems to be a feature of Outbound Auth.
import os
from bedrock_agentcore.identity.auth import requires_api_key
from strands import Agent, tool
from strands.models.litellm import LiteLLMModel
from bedrock_agentcore.runtime import BedrockAgentCoreApp

# Manage API key with global variable
AZURE_API_KEY_FROM_CREDS_PROVIDER = ""

# Outbound Auth: Function with decorator to get API key
# This decorator automatically retrieves the API key from token-vault!
@requires_api_key(
    provider_name="azure-openai-key"  # Provider name created in Step 4
)
async def need_api_key(*, api_key: str):
    global AZURE_API_KEY_FROM_CREDS_PROVIDER
    print(f'✅ Got API key from Credential Provider: {api_key[:10]}...')
    AZURE_API_KEY_FROM_CREDS_PROVIDER = api_key

app = BedrockAgentCoreApp()

# Azure OpenAI settings (loaded from environment variables)
os.environ["AZURE_OPENAI_ENDPOINT"] = os.getenv("AZURE_OPENAI_ENDPOINT", "")
os.environ["AZURE_OPENAI_API_VERSION"] = os.getenv("AZURE_OPENAI_API_VERSION", "2025-01-01-preview")

# Custom tool definition (a simple tool that returns weather information)
@tool
def weather():
    """Get the current weather"""
    return "The current weather is sunny. It's a pleasant day"

# Manage agent as a global variable (initialize only once)
agent = None

@app.entrypoint
async def full_auth_agent(payload):
    """
    Entry point for the agent using both Inbound Auth (Cognito authentication)
    and Outbound Auth (Azure OpenAI)

    By the time this method is called, Cognito authentication has already been passed!
    """
    global AZURE_API_KEY_FROM_CREDS_PROVIDER, agent

    print("✅ Received Cognito-authenticated request")
    print(f"Received payload: {payload}")

    # Outbound Auth: Get API key only the first time
    # Reuse the key from the second time onwards
    if not AZURE_API_KEY_FROM_CREDS_PROVIDER:
        print("Outbound Auth: Getting Azure API key from Credential Provider...")
        try:
            await need_api_key(api_key="")  # The decorator automatically injects the key
            os.environ["AZURE_OPENAI_API_KEY"] = AZURE_API_KEY_FROM_CREDS_PROVIDER
            print("✅ Azure API key setup complete!")
        except Exception as e:
            print(f"❌ API key retrieval error: {e}")
            raise

    # Initialize agent (only once)
    # Initializing every time would be slow, so initialize once and reuse
    if agent is None:
        print("Initializing agent with Azure OpenAI model...")
        deployment_name = os.environ.get("AZURE_DEPLOYMENT_NAME", "gpt-4o-mini")
        model = f"azure/{deployment_name}"  # Format for LiteLLM
        print(f"Model to use: {model}")

        litellm_model = LiteLLMModel(
            model_id=model,
            params={"max_tokens": 4096, "temperature": 0.7}
        )

        agent = Agent(
            model=litellm_model,
            tools=[calculator, weather],  # Add calculation and weather tools
            system_prompt="You are a helpful assistant. You can provide calculation and weather information."
        )
        print("✅ Agent initialization complete!")

    # Process user input
    user_input = payload.get("prompt", "Hello")
    print(f"User input: {user_input}")

    try:
        # Generate response using Azure OpenAI
        response = agent(user_input)
        result = response.message['content'][0]['text']
        print(f"Agent response: {result}")
        return result
    except Exception as e:
        print(f"❌ Agent processing error: {e}")
        return f"An error occurred: {str(e)}"

if __name__ == "__main__":
    app.run()
Deployment
I created a deployment script! Running python deploy_agent.py will execute the following:
- Automatic loading of the
.envfile - Injection of Azure OpenAI configuration environment variables
- Building and deploying the agent
from bedrock_agentcore_starter_toolkit import Runtime
import os
from urllib.parse import urlencode
from dotenv import load_dotenv

def prepare_environment_variables():
    """Prepare all environment variables for the agent"""
    print("⚙️  Preparing environment variables...")

    # Prepare environment variables for the agent container
    env_vars = {
        # Azure OpenAI settings
        "AZURE_API_BASE": os.environ.get('AZURE_API_BASE', ''),
        "AZURE_API_VERSION": os.environ.get('AZURE_API_VERSION', '2025-01-01-preview'),
        "AZURE_DEPLOYMENT_NAME": os.environ.get('AZURE_DEPLOYMENT_NAME', 'gpt-4.1-mini'),
    }

    # Filter out empty values
    env_vars = {k: v for k, v in env_vars.items() if v}

    print(f"✅ Environment variables prepared: {list(env_vars.keys())}")
    return env_vars

def deploy_agent():
    """Deploy agent with integrated environment variable management"""
    print("🚀 Starting integrated deployment script...")

    # Load .env file using python-dotenv
    print("📋 Loading .env file...")
    if not load_dotenv():
        print("❌ .env file not found")
        return

    # Get required environment variables
    try:
        discovery_url = os.environ['DISCOVERY_URL']
        client_id = os.environ['CLIENT_ID']
        role_arn = os.environ['ROLE_ARN']
    except KeyError as e:
        print(f"❌ Required environment variable not set: {e}")
        return

    # Prepare environment variables for agent container
    env_vars = prepare_environment_variables()

    print("🔧 Configuring AgentCore Runtime...")

    # Configure AgentCore Runtime
    agentcore_runtime = Runtime()

    response = agentcore_runtime.configure(
        entrypoint="strands_full_auth_agent.py",
        execution_role=role_arn,
        auto_create_ecr=True,  # Automatically create ECR repository
        requirements_file="requirements.txt",
        region="us-west-2",
        # Can't use hyphens in agent names! Use underscores
        agent_name=os.environ.get('AGENT_NAME', 'strands_full_auth_agent'),
        # Inbound Auth: Cognito authentication settings
        authorizer_configuration={
            "customJWTAuthorizer": {
                "discoveryUrl": discovery_url,
                "allowedClients": [client_id]
            }
        }
    )

    print("✅ Configuration complete! Deploying...")

    # Execute deployment (inject environment variables)
    launch_result = agentcore_runtime.launch(env_vars=env_vars)

    print(f"✅ Deployment complete!")
    print(f"   Agent ARN: {launch_result.agent_arn}")

    return agentcore_runtime

if __name__ == "__main__":
    deploy_agent()
Running the Integrated Deployment
Let's deploy by running deploy_agent.py!
python deploy_agent.py
When executed, it will proceed as follows:
🚀 Starting integrated deployment script...
📋 Loading .env file...
⚙️  Preparing environment variables...
🔧 Configuring AgentCore Runtime...
✅ Configuration complete! Deploying...
✅ Deployment complete!
   Agent ARN: arn:aws:bedrock-agentcore:us-west-2:123456789012:agent/...
When you run it, a Dockerfile for creating container images and agent configuration files are automatically created.
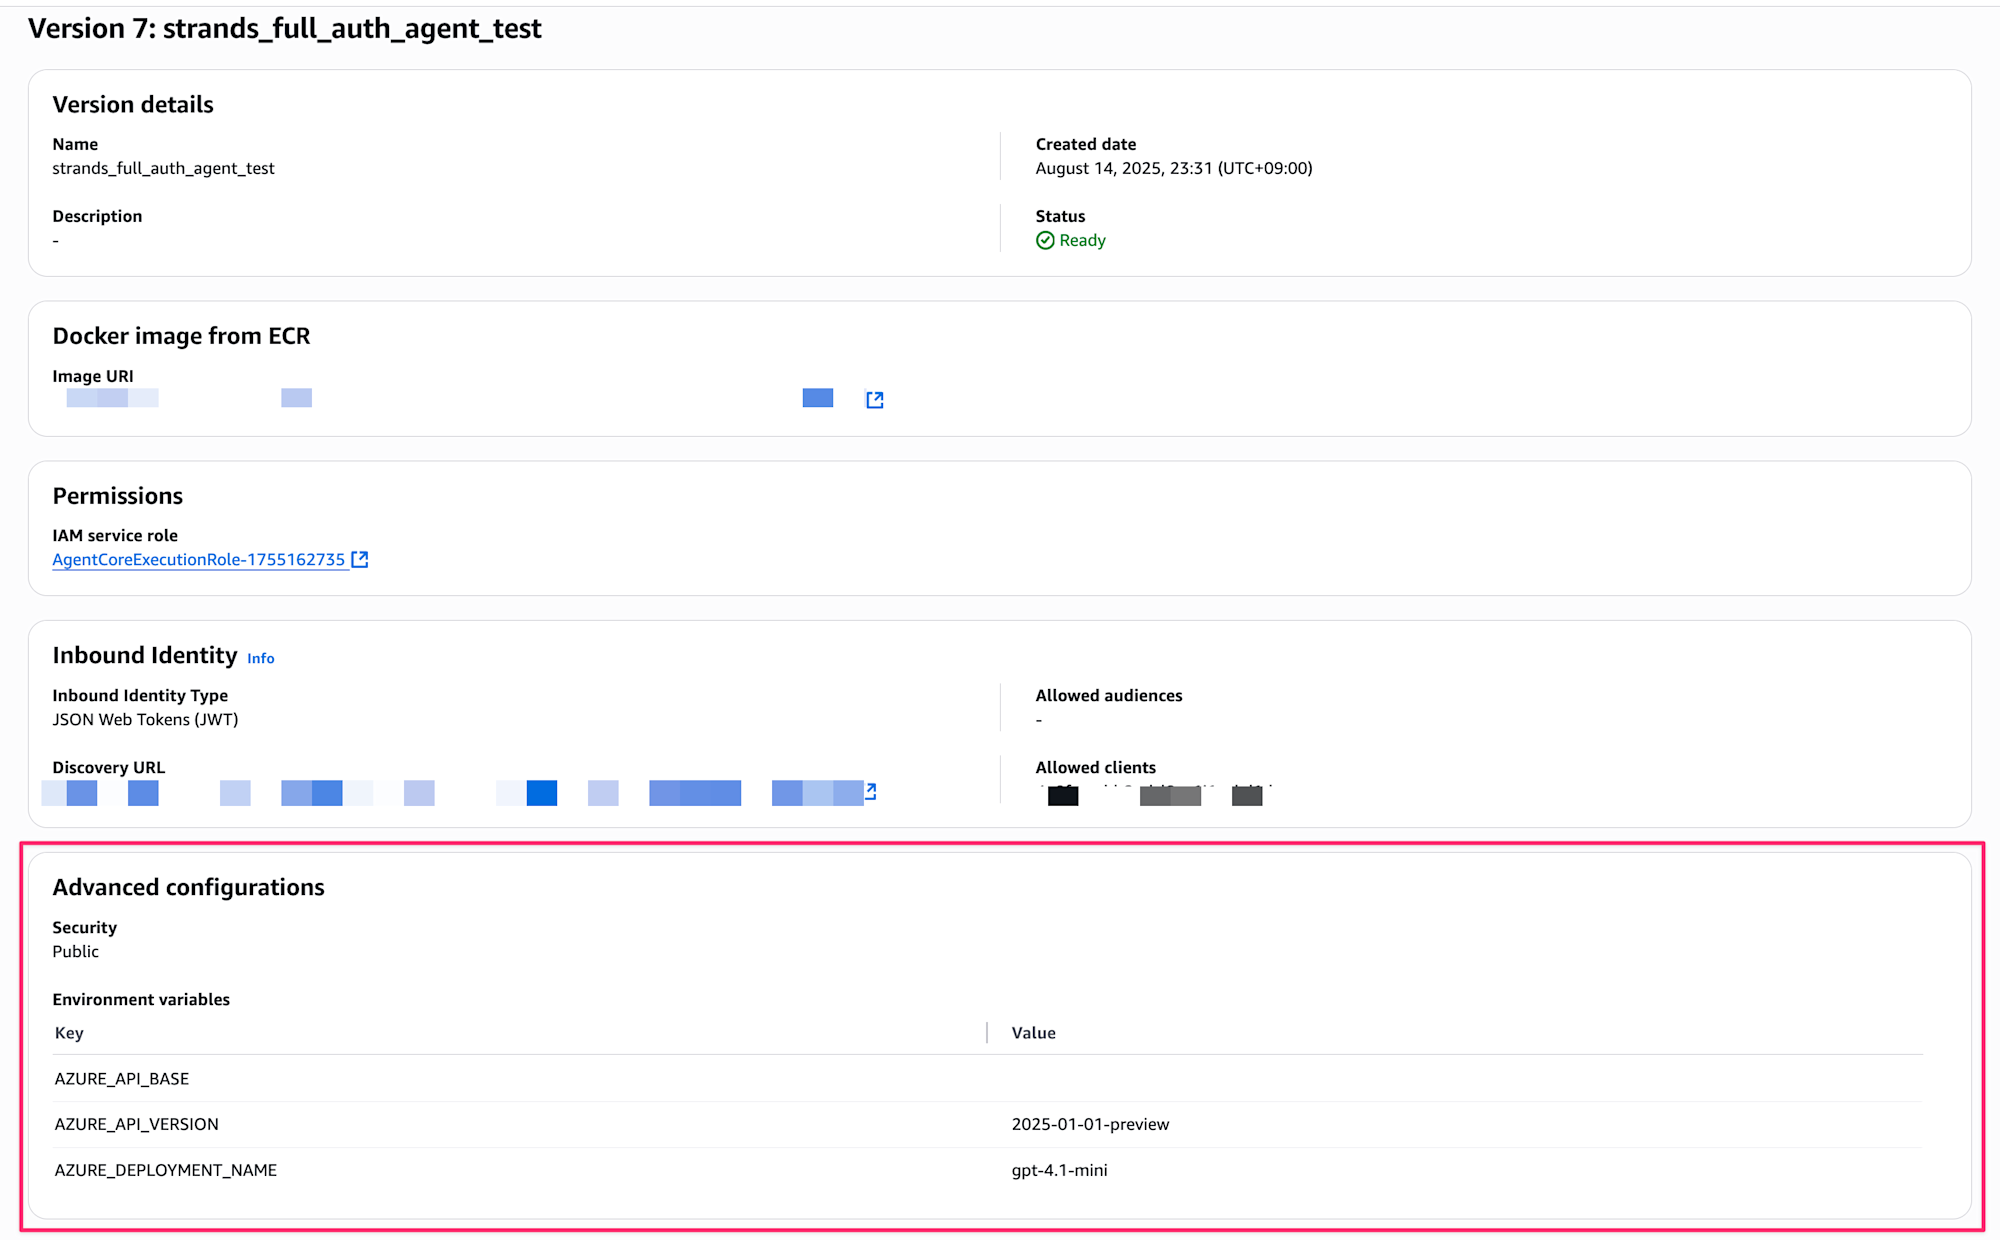
Once deployment is complete, you can check the agent's status from the console.
You can also verify the injected environment variables.
How to Build an Agent URL (Endpoint)
We assume you'll be executing the agent with curl commands, but you need to build the agent URL from the ARN. It's a bit complex, but you can create it following these steps!
You need to encode the ARN.
:(colon) in the ARN must be encoded to%3A/(slash) must be encoded to%2F
For example, with an ARN like this:
arn:aws:bedrock-agentcore:us-west-2:XXXXXXXXXXXX:runtime/strands_full_auth_agent-abc123
The encoded URL would be built like this:
https://bedrock-agentcore.us-west-2.amazonaws.com/runtimes/arn%3Aaws%3Abedrock-agentcore%3Aus-west-2%3AXXXXXXXXXXXX%3Aruntime%2Fstrands_full_auth_agent-abc123/invocations?qualifier=DEFAULT
Verification
Getting a Token
Create a token retrieval script get_token.py.
Full Code
#!/usr/bin/env python3
"""
Cognito Bearer Token retrieval script (Python version)

Usage:
    python get_token.py && source .token_env
"""

import os
import boto3
import sys
from dotenv import load_dotenv

def get_cognito_bearer_token():
    """Get Cognito Bearer Token using boto3"""
    try:
        print("🔐 Getting Cognito Bearer Token...")

        # Get settings from environment variables (USER_POOL_ID not needed!)
        required_vars = ['CLIENT_ID', 'USERNAME', 'PASSWORD']
        missing_vars = [var for var in required_vars if var not in os.environ]

        if missing_vars:
            print(f"❌ Required environment variables are not set: {', '.join(missing_vars)}")
            print("   The following settings are needed in the .env file:")
            for var in missing_vars:
                print(f"   {var}=your_value_here")
            return None

        client_id = os.environ['CLIENT_ID']
        username = os.environ['USERNAME']
        password = os.environ['PASSWORD']
        region = os.environ.get('REGION', 'us-west-2')

        # Initialize Cognito Identity Provider client
        cognito_client = boto3.client('cognito-idp', region_name=region)

        # User authentication (equivalent to AWS CLI command)
        response = cognito_client.initiate_auth(
            ClientId=client_id,
            AuthFlow='USER_PASSWORD_AUTH',
            AuthParameters={
                'USERNAME': username,
                'PASSWORD': password
            }
        )

        # Get access token
        access_token = response['AuthenticationResult']['AccessToken']
        print("✅ Successfully retrieved Cognito Bearer Token!")

        return access_token

    except Exception as e:
        print(f"❌ Cognito authentication error: {e}")
        print("   Please check:")
        print("   - If the settings in the .env file are correct")
        print("   - If AWS credentials are properly configured")
        print("   - If network connection is normal")
        return None

def save_token_to_file(token):
    """Save token to .token_env file for sourcing"""
    try:
        with open('.token_env', 'w') as f:
            f.write(f'export BEARER_TOKEN="{token}"\n')
        print("💾 Token saved to .token_env file")
        print("   Set the environment variable with the following command:")
        print("   source .token_env")
        return True
    except Exception as e:
        print(f"❌ File save error: {e}")
        return False

def main():
    """Main function"""
    print("🚀 Cognito Bearer Token retrieval script (Python version)")
    print()

    # Load .env file using python-dotenv
    print("📋 Loading .env file...")
    if not load_dotenv():
        print("❌ .env file not found")
        print("   Make sure settings needed for Cognito authentication are in the .env file")
        sys.exit(1)

    # Get Cognito token
    token = get_cognito_bearer_token()
    if not token:
        sys.exit(1)

    # Save token to file
    if not save_token_to_file(token):
        sys.exit(1)

    print()
    print("✅ Complete! Set the environment variable with the following command:")
    print("   source .token_env")
    print()
    print("Or run as a one-liner:")
    print("   python get_token.py && source .token_env")

if __name__ == "__main__":
    main()
The token is output to .token_env, so set the access token as an environment variable with a one-liner.
python get_token.py && source .token_env
Verification with curl Command
Calling the Agent
After getting the token, call the agent with curl.
Build the URL using the obtained ARN.
# Get token
python get_token.py && source .token_env

# Call the agent (properly encode the ARN portion of the URL)
curl -X POST "https://bedrock-agentcore.us-west-2.amazonaws.com/runtimes/arn%3Aaws%3Abedrock-agentcore%3Aus-west-2%3AXXXXXXXXXXXX%3Aruntime%2Fstrands_full_auth_agent-{your-id}/invocations?qualifier=DEFAULT" \
  -H "Authorization: Bearer ${BEARER_TOKEN}" \
  -H "Content-Type: application/json" \
  -d '{"prompt": "What kind of AI are you?"}'

# Response
"I am a helpful assistant AI. I can answer questions, provide information, and offer various kinds of support. I can also provide weather information, so please let me know if there's anything you'd like to know."
It's working properly and responding using Azure OpenAI!!!
Accessing Without a Token
Let's try accessing without a token...
curl -X POST "https://bedrock-agentcore.us-west-2.amazonaws.com/runtimes/..." \
  -H "Content-Type: application/json" \
  -d '{"prompt": "Hello"}'

# Error response
{"message":"Missing Authentication Token"}
As expected, we confirmed that access is not allowed without Cognito authentication!
Summary
We were able to create an agent that simultaneously implements Cognito authentication and Azure OpenAI integration using Amazon Bedrock AgentCore Identity!
What I felt when implementing this was that, especially regarding IAM permissions, I kept adjusting while looking at logs only to find that it was already described in the official documentation...!
I think it's incredibly attractive that by combining Inbound Auth and Outbound Auth, we can offload authentication and key management without implementing them ourselves while integrating with managed services.
Both Inbound Auth and Outbound Auth were simple implementations this time, so I hope to try various patterns and share them on my blog!
I hope this article was helpful! Thank you for reading to the end!