
I tried upgrading Automated Security Response on AWS (ASR) to v3 and used the Web UI
This page has been translated by machine translation. View original
Introduction
Are you using Automated Security Response on AWS (hereafter ASR, formerly known as SHARR)?
ASR is one of the AWS solutions that automatically remediates findings from AWS Security Hub CSPM.
Recently, I happened to check the GitHub repository and noticed that the major version had been updated to v3.
Since I hadn't updated the version for a while, I decided to take this opportunity to upgrade from v2.2.1 to v3.1.1.
If you're using it for the first time, please refer to the official documentation for the procedure.
What has changed
The v3 update includes the following major changes:
- Added Web UI, allowing checking and executing remediation history
- Support for Security Hub v2 and Security Control findings
- Filtering functionality moved from stack parameters to SSM Parameter Store
- EventBridge rules integrated from per-Control ID rules to a single rule
- Added DynamoDB tables to store finding data, remediation history, etc.
We'll check the details later, but the added UI looks like this screen that lets you execute and check remediation history.
For more detailed update information, please refer to the release notes.
In this article, I'll cover the v3 update procedure and examine the Web UI.
Architecture
The overall architecture looks like this. Mainly UI-related resources have been added.
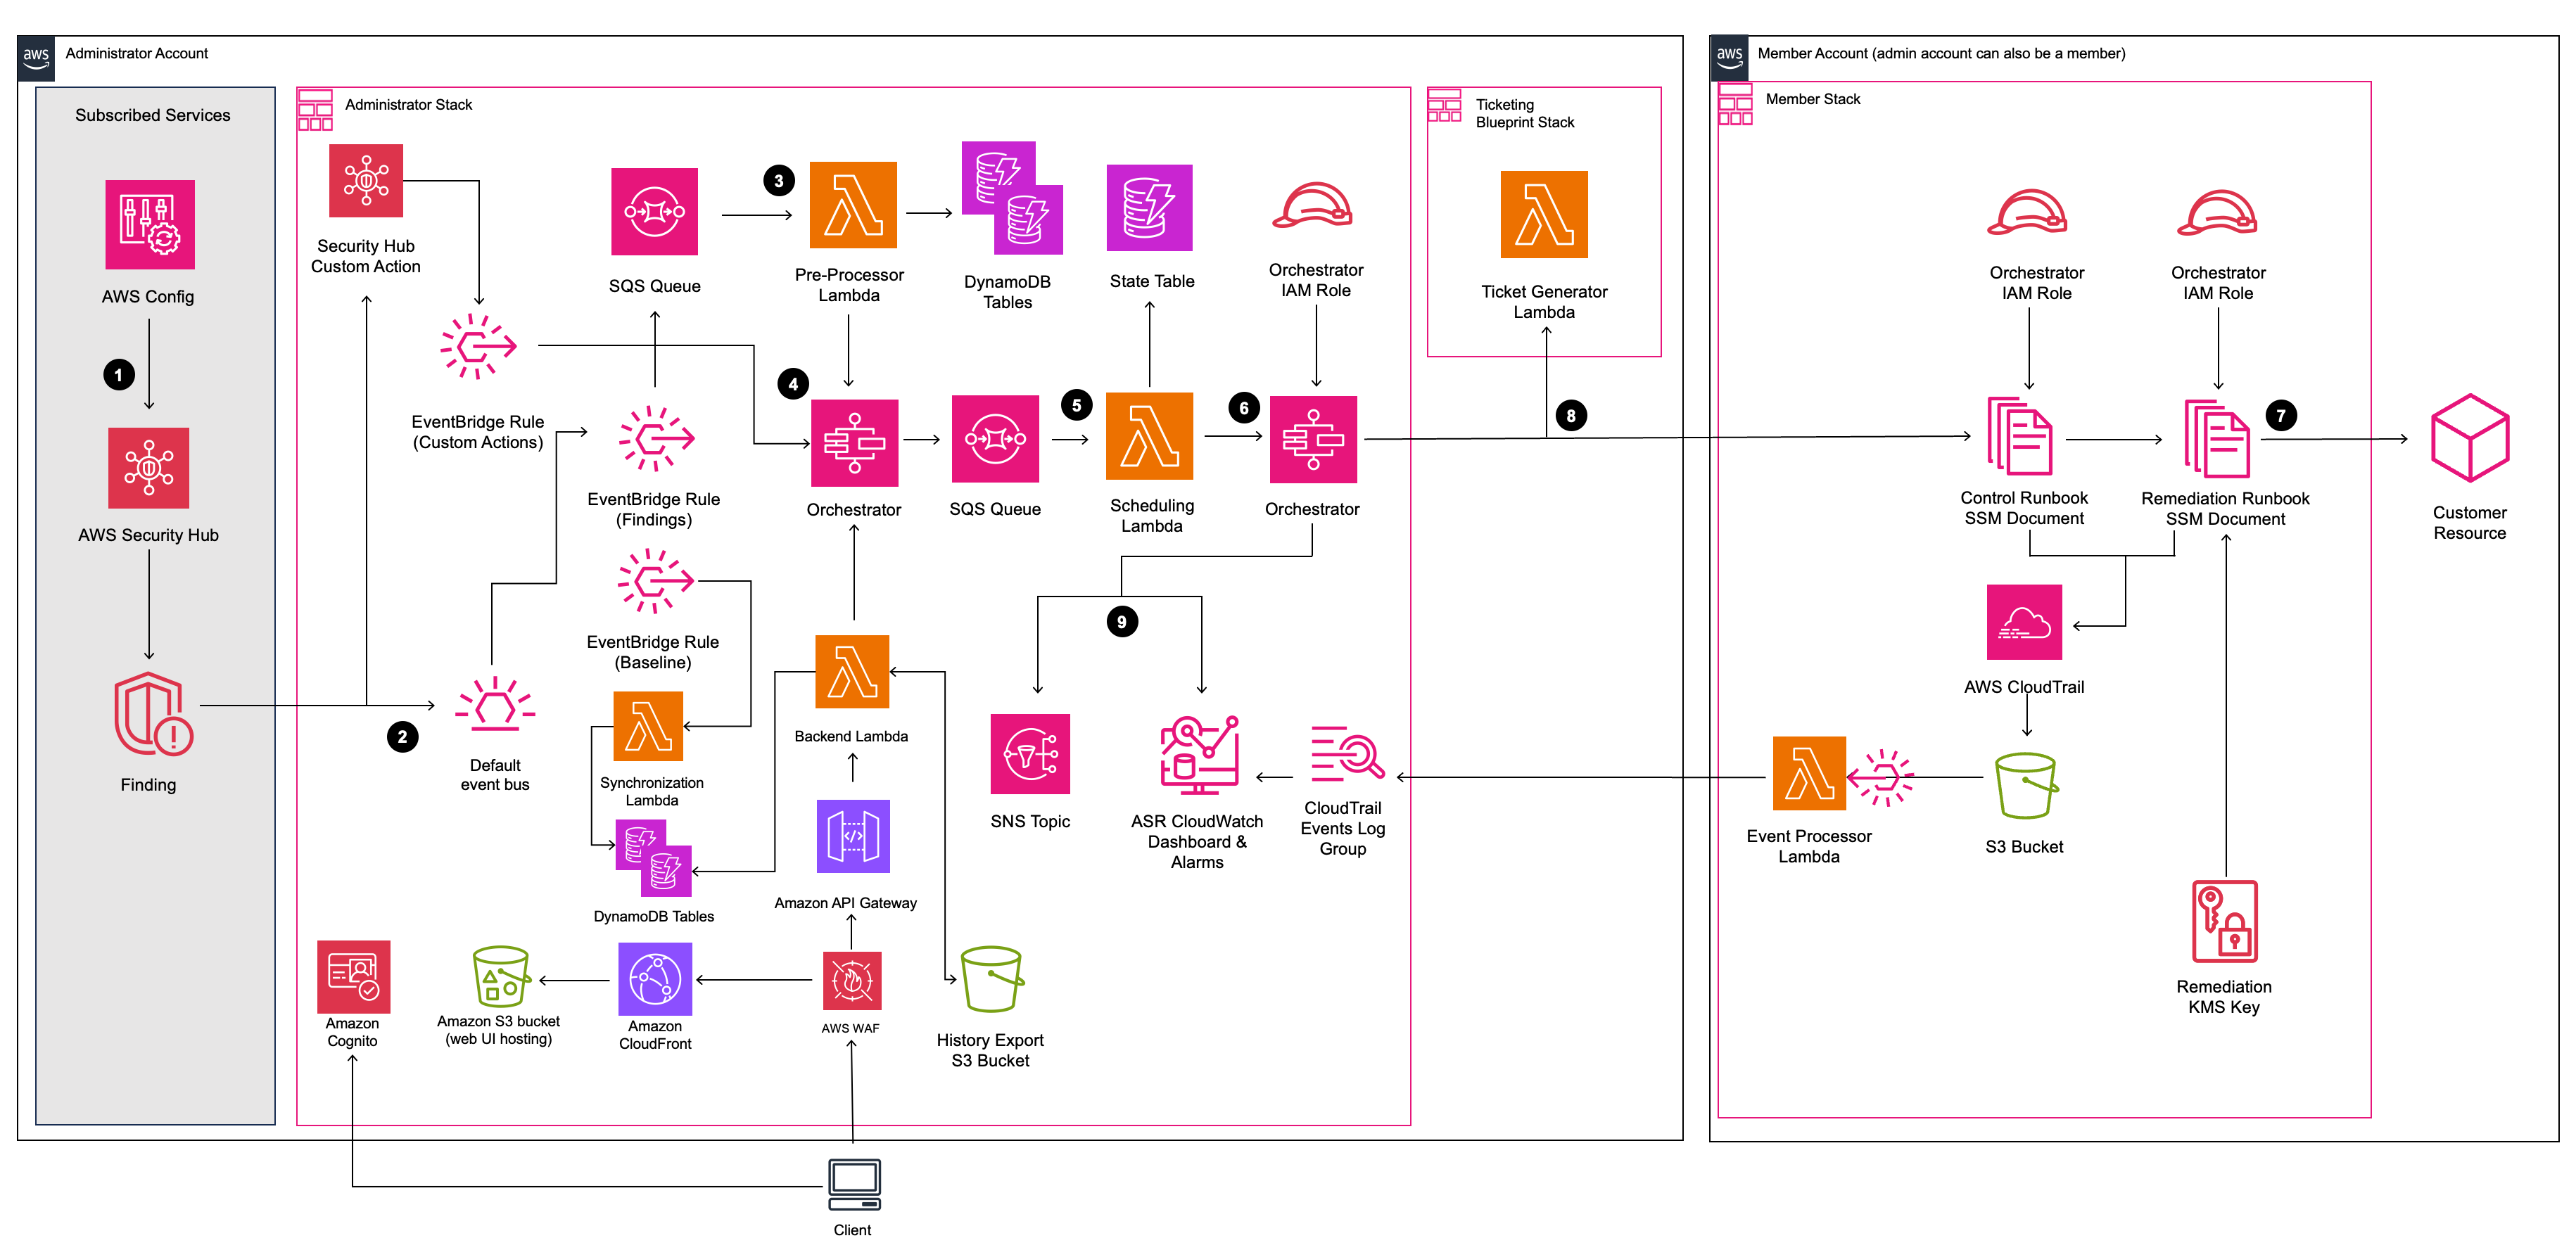
Quoted from Architecture Overview - Automated Security Response on AWS
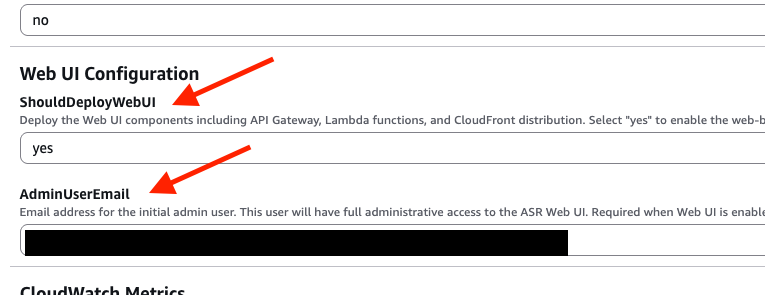
Web UI Parameters Added in v3.0.0
With v3.0.0, new parameters were added to the Admin stack for the Web UI functionality.
| Parameter | Description | Example |
|---|---|---|
ShouldDeployWebUI |
Whether to deploy the Web UI | yes or no |
AdminUserEmail |
Email address for Web UI administrator | admin@example.com |
If ShouldDeployWebUI is set to yes, AdminUserEmail is required.
Since we'll be using the UI in this walkthrough, we'll set both parameters.
Update Procedure
The procedure in this article assumes that it is deployed in a multi-account environment.
Also, stack names are arbitrary and may differ depending on the documents or blogs you refer to. Please interpret accordingly.
Step 1: Update the Admin Stack
First, update the Admin stack (aws-sharr-deploy). It's typically in the management account or the delegated account for Security Hub CSPM.
- Open the CloudFormation console in the target account
- Select the
aws-sharr-deploystack - Click "Update"
- Select "Replace current template"
- Enter the following for Amazon S3 URL:
https://solutions-reference.s3.amazonaws.com/automated-security-response-on-aws/v3.1.1/automated-security-response-admin.template
- On the parameter settings screen, set the new parameters:
ShouldDeployWebUI:yes(if using Web UI)AdminUserEmail: Administrator's email address
- Click "Next" and review the change set
- Click "Submit" to update the stack
Wait for the update to complete. At this point, you'll receive login information for the UI, which we'll discuss later.
Step 2: Update the Member Roles Stack
Next, update the Member Roles stack (aws-sharr-member-roles) deployed to each member account.
Log in to the account where StackSets were deployed and update.
-
Open the CloudFormation console in the target account
-
Select "StackSets" and choose the
aws-sharr-member-rolesstack set from the self-managed tab -
Click "Actions" then "Edit stack set details"
-
Select "Replace current template" and enter the following for Amazon S3 URL:
https://solutions-reference.s3.amazonaws.com/automated-security-response-on-aws/v3.1.1/automated-security-response-member-roles.template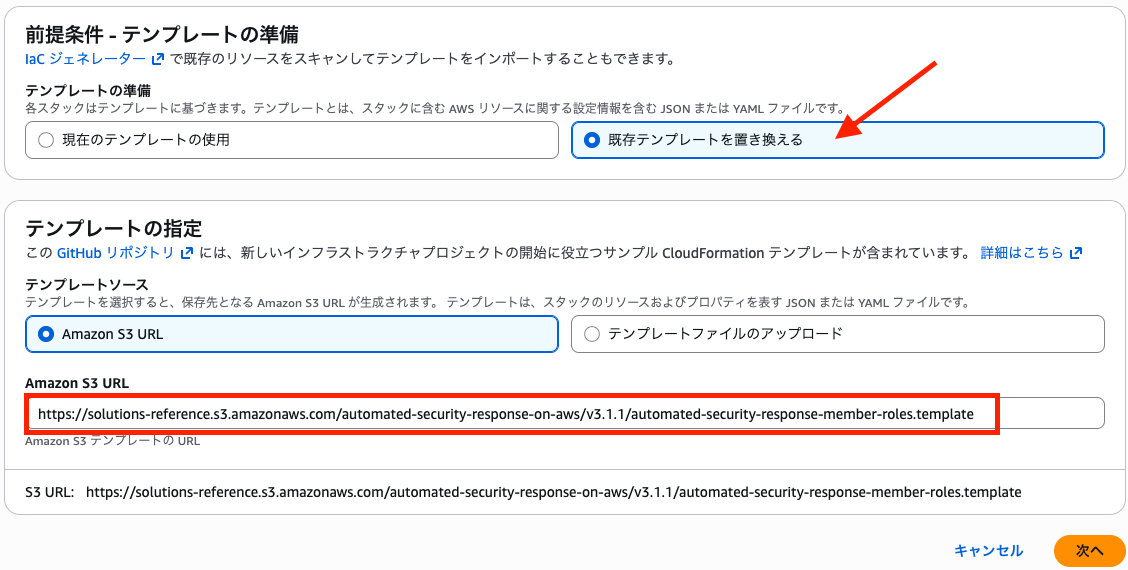
-
Maintain the existing values for parameters
-
Configure regions and deployment options as needed
-
Click "Submit" to update the StackSet (starts batch deployment to each account)
Step 3: Update the Member Stack
Finally, update the Member stack (aws-sharr-member) deployed to each member account.
Similar to Step 2, log in to the account where StackSets were deployed and update.
-
Open the CloudFormation console in the target account
-
Select "StackSets" and choose the
aws-sharr-memberstack set from the self-managed tab -
Click "Actions" then "Edit stack set details"
-
Select "Replace current template" and enter the following for Amazon S3 URL:
https://solutions-reference.s3.amazonaws.com/automated-security-response-on-aws/v3.1.1/automated-security-response-member.template -
Maintain the existing values for parameters
-
Configure regions and deployment options as needed
-
Click "Submit" to update the StackSet
Once the update is applied, you're done.
Web UI Features and Usage
Now that deployment is complete, let's check out the newly added Web UI.
Previously, you needed to check Step Functions execution history and logs directly, but now you can check and operate remediation status from a dedicated screen on a resource basis.
Login Process
After deploying the Admin stack, you'll receive an email with the Web UI URL and initial password at the email address specified in AdminUserEmail.
You'll be prompted to change your password at the first login, so set a new password and log in.
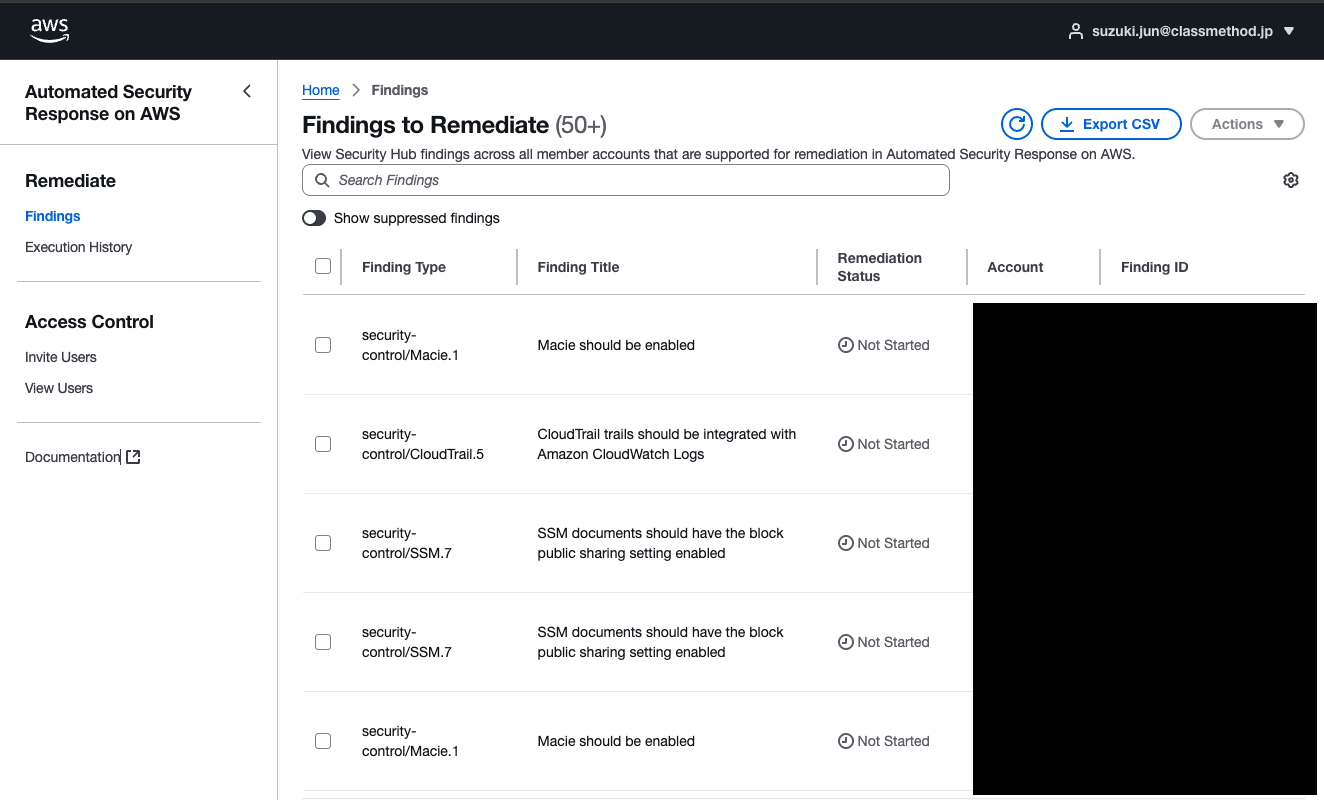
Findings (Remediate)
The Findings to Remediate screen appears immediately after login.
This shows a list of unremediated findings detected by Security Hub CSPM.
From here, you can select target findings and manually execute remediation actions.
Use this when you want to remediate immediately or retry resources that failed automatic remediation.
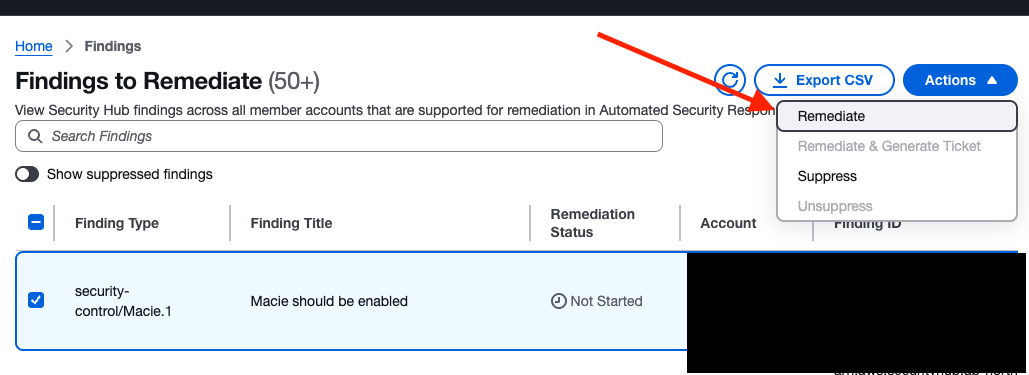
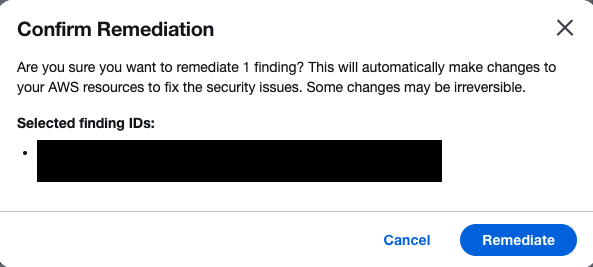
When you click Remediate, a confirmation screen for the target remediation appears.
As a test, I specified an account without a remediation stack deployed, and the Status became Failed.
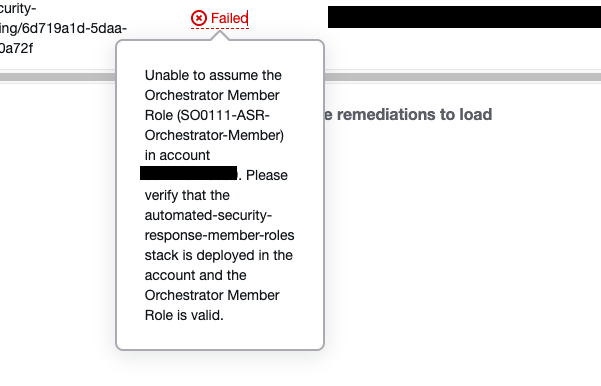
When clicked, it showed me the cause - missing member roles preventing execution.
It's very helpful to be able to check this much from the UI.
Unable to assume the Orchestrator Member Role (SO0111-ASR-Orchestrator-Member) in account 111111111111. Please verify that the automated-security-response-member-roles stack is deployed in the account and the Orchestrator Member Role is valid.
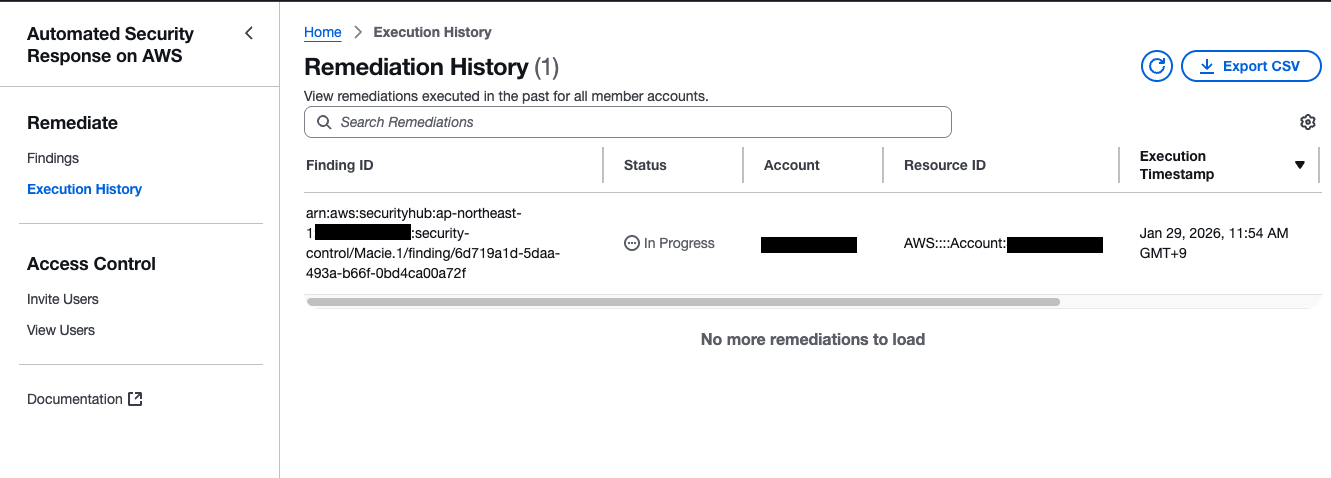
Execution History (Remediate)
From the left navigation Remediate > Execution History, you can check the history of previously executed remediation actions.
This is useful for troubleshooting as you can see a list of execution history.
Access Control
From the left navigation Access Control, you can manage users of the Web UI.
You can invite other members from Invite Users or check the user list from View Users. Use this when granting permissions to operation team members.
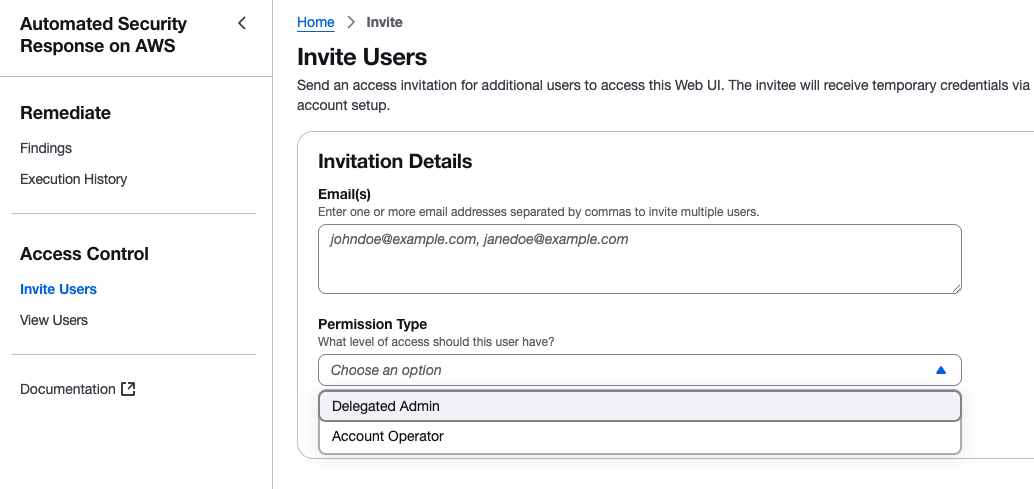
Users invited as Delegated Admin here can perform all operations except user management.
Note that user management can only be performed by the initially registered admin user.
Summary
I've summarized the upgrade procedure for ASR v3.x.
The key update points are:
- Template names changed from
aws-sharr-*toautomated-security-response-* - Update in order of Admin stack → Member Roles stack → Member stack
- If using Web UI, need to set
ShouldDeployWebUIandAdminUserEmailparameters
I hope this helps those who are considering upgrading ASR.