![[Update] I tried nested virtualization which is now available on instances other than bare metal](https://images.ctfassets.net/ct0aopd36mqt/wp-thumbnail-bac3d29aa65f45576f73094798087ee5/039ad6f8a7d8f18da47986d21c447f48/amazon-ec2?w=3840&fm=webp)
[Update] I tried nested virtualization which is now available on instances other than bare metal
This page has been translated by machine translation. View original
Introduction
Hello everyone, this is Akaike.
On February 12, 2026, a nested virtualization option was added to the EC2 API.
Until now, to use nested virtualization on EC2 instances, you needed to use bare metal instances.
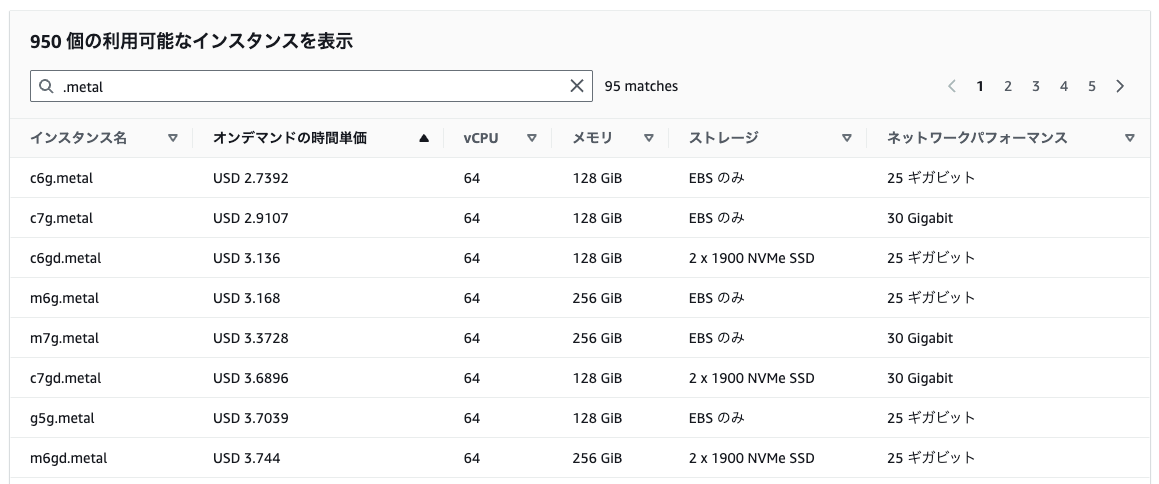
Even the smallest bare metal instances were quite expensive compared to other instance types...
(The following is an example from the Tokyo region)
However, with this update, nested virtualization is now available on 8th generation Intel instances (c8i, m8i, r8i, etc.).
So in this article, I've tested enabling EC2 nested virtualization and running Firecracker (AWS's lightweight microVM).
Supported Instance Types
Nested virtualization is supported on 8th generation Intel-based instance types.
Although it wasn't mentioned in the API change log at the beginning of this article, I was able to confirm it in the following documentation.
How to Check with AWS CLI
Let's also verify with AWS CLI.
We can check instance types using the describe-instance-types command.
aws ec2 describe-instance-types \
  --filters "Name=processor-info.supported-features,Values=nested-virtualization" \
  --query "sort(InstanceTypes[].InstanceType)" \
  --region ap-northeast-1
The results below confirm that only 8th generation Intel-based instance types are supported, as stated in the documentation.
[
    "c8i-flex.12xlarge",
    "c8i-flex.16xlarge",
    "c8i-flex.2xlarge",
    "c8i-flex.4xlarge",
    "c8i-flex.8xlarge",
    "c8i-flex.large",
    "c8i-flex.xlarge",
    "c8i.12xlarge",
    "c8i.16xlarge",
    "c8i.24xlarge",
    "c8i.2xlarge",
    "c8i.32xlarge",
    "c8i.48xlarge",
    "c8i.4xlarge",
    "c8i.8xlarge",
    "c8i.96xlarge",
    "c8i.large",
    "c8i.xlarge",
    "c8id.12xlarge",
    "c8id.16xlarge",
    "c8id.24xlarge",
    "c8id.2xlarge",
    "c8id.32xlarge",
    "c8id.48xlarge",
    "c8id.4xlarge",
    "c8id.8xlarge",
    "c8id.96xlarge",
    "c8id.large",
    "c8id.xlarge",
    "m8i.12xlarge",
    "m8i.16xlarge",
    "m8i.24xlarge",
    "m8i.2xlarge",
    "m8i.32xlarge",
    "m8i.48xlarge",
    "m8i.4xlarge",
    "m8i.8xlarge",
    "m8i.96xlarge",
    "m8i.large",
    "m8i.xlarge",
    "m8id.12xlarge",
    "m8id.16xlarge",
    "m8id.24xlarge",
    "m8id.2xlarge",
    "m8id.32xlarge",
    "m8id.48xlarge",
    "m8id.4xlarge",
    "m8id.8xlarge",
    "m8id.96xlarge",
    "m8id.large",
    "m8id.xlarge",
    "r8i-flex.12xlarge",
    "r8i-flex.16xlarge",
    "r8i-flex.2xlarge",
    "r8i-flex.4xlarge",
    "r8i-flex.8xlarge",
    "r8i-flex.large",
    "r8i-flex.xlarge",
    "r8i.12xlarge",
    "r8i.16xlarge",
    "r8i.24xlarge",
    "r8i.2xlarge",
    "r8i.32xlarge",
    "r8i.48xlarge",
    "r8i.4xlarge",
    "r8i.8xlarge",
    "r8i.96xlarge",
    "r8i.large",
    "r8i.xlarge",
    "r8id.12xlarge",
    "r8id.16xlarge",
    "r8id.24xlarge",
    "r8id.2xlarge",
    "r8id.32xlarge",
    "r8id.48xlarge",
    "r8id.4xlarge",
    "r8id.8xlarge",
    "r8id.96xlarge",
    "r8id.large",
    "r8id.xlarge"
]
API Changes
With this update, a NestedVirtualization field was added to the CpuOptions in the EC2 API.
CpuOptions Structure
| Field | Type | Description |
|---|---|---|
| CoreCount | Integer | Number of CPU cores |
| ThreadsPerCore | Integer | Number of threads per core |
| AmdSevSnp | String | Enable/disable AMD SEV-SNP |
| NestedVirtualization | String | Enable/disable nested virtualization (newly added) |
Affected APIs
The following eight APIs can now configure and check nested virtualization settings:
| API | Purpose |
|---|---|
RunInstances |
Configure during instance launch |
ModifyInstanceCpuOptions |
Change settings of existing instances (when stopped) |
DescribeInstances |
Check current instance settings |
DescribeInstanceTypes |
Check supported instance types |
CreateLaunchTemplate |
Configure in launch templates |
CreateLaunchTemplateVersion |
Configure in new launch template versions |
DescribeLaunchTemplateVersions |
Check launch template settings |
GetLaunchTemplateData |
Get launch template data from existing instances |
Testing It Out
Let's launch an instance with nested virtualization enabled and run Firecracker.
As of 2026/2/13, this doesn't seem to be configurable through the management console, so we'll try with AWS CLI.
About AWS CLI Version
When testing, the CloudShell default CLI (v2.33.6) didn't recognize the NestedVirtualization parameter.
aws --version
aws-cli/2.33.6 Python/3.13.11 Linux/6.1.159-182.297.amzn2023.x86_64 exec-env/CloudShell exe/x86_64.amzn.2023
Parameter validation failed:
Unknown parameter in CpuOptions: "NestedVirtualization", must be one of: CoreCount, ThreadsPerCore, AmdSevSnp
Updating to the latest version (v2.33.21) resolved the issue.
If you encounter the same error, please update your AWS CLI to the latest version.
# Install CLI in home directory
curl "https://awscli.amazonaws.com/awscli-exe-linux-x86_64.zip" -o "awscliv2.zip"
unzip -o awscliv2.zip
./aws/install -i ~/aws-cli -b ~/bin --update
echo 'export PATH=~/bin:$PATH' >> ~/.bashrc
source ~/.bashrc
aws --version
aws-cli/2.33.21 Python/3.13.11 Linux/6.1.159-182.297.amzn2023.x86_64 exec-env/CloudShell exe/x86_64.amzn.2023
1. Launch Instance with Nested Virtualization Enabled
First, we'll create an EC2 instance using the run-instances command that utilizes the RunInstances API.
We'll launch an instance with the --cpu-options NestedVirtualization=enabled parameter.
Prepare the instance profile, subnet, and security group in advance.
# Set environment variables
AMI_ID=$(aws ec2 describe-images \
  --owners amazon \
  --filters "Name=name,Values=al2023-ami-2023*-x86_64" "Name=architecture,Values=x86_64" \
  --query "Images | sort_by(@, &CreationDate)[-1].ImageId" \
  --output text \
  --region ap-northeast-1)

INSTANCE_PROFILE="ec2-ssm-role" # IAM role for SSM Session Manager connection
SUBNET_ID="subnet-xxxxxxxxx"
SG_ID="sg-xxxxxxxxx"

# Launch instance with nested virtualization enabled
aws ec2 run-instances \
  --instance-type m8i.large \
  --image-id ${AMI_ID} \
  --iam-instance-profile Name=${INSTANCE_PROFILE} \
  --subnet-id ${SUBNET_ID} \
  --security-group-ids ${SG_ID} \
  --cpu-options NestedVirtualization=enabled \
  --tag-specifications 'ResourceType=instance,Tags=[{Key=Name,Value=nested-virt-enabled}]' \
  --region ap-northeast-1
In the response, we can see that NestedVirtualization is set to enabled in the CpuOptions.
"CpuOptions": {
    "CoreCount": 1,
    "ThreadsPerCore": 2,
    "NestedVirtualization": "enabled"
}
2. Also Launch an Instance with Nested Virtualization Disabled for Comparison
For comparison, let's also launch an instance with NestedVirtualization=disabled.
aws ec2 run-instances \
  --instance-type m8i.large \
  --image-id ${AMI_ID} \
  --iam-instance-profile Name=${INSTANCE_PROFILE} \
  --subnet-id ${SUBNET_ID} \
  --security-group-ids ${SG_ID} \
  --cpu-options NestedVirtualization=disabled \
  --tag-specifications 'ResourceType=instance,Tags=[{Key=Name,Value=nested-virt-disabled}]' \
  --region ap-northeast-1
"CpuOptions": {
    "CoreCount": 1,
    "ThreadsPerCore": 2,
    "NestedVirtualization": "disabled"
}
3. Verify Settings
Let's check the nested virtualization settings on both instances.
# Get instance IDs for nested-virt-*
INSTANCE_IDS=$(aws ec2 describe-instances \
  --filters "Name=tag:Name,Values=nested-virt-*" "Name=instance-state-name,Values=running,pending" \
  --query "Reservations[].Instances[].InstanceId" \
  --output text \
  --region ap-northeast-1)

# Check CPU Options with the retrieved IDs
aws ec2 describe-instances \
  --instance-ids ${INSTANCE_IDS} \
  --query "Reservations[].Instances[].{Name:Tags[?Key=='Name'].Value|[0],InstanceId:InstanceId,NestedVirt:CpuOptions.NestedVirtualization}" \
  --output table \
  --region ap-northeast-1
---------------------------------------------------------------
|                      DescribeInstances                      |
+----------------------+------------------------+-------------+
|      InstanceId      |         Name           | NestedVirt  |
+----------------------+------------------------+-------------+
|  i-04bcb6070c6f00747 |  nested-virt-disabled  |  disabled   |
|  i-03b4642ffd5fd31d0 |  nested-virt-enabled   |  enabled    |
+----------------------+------------------------+-------------+
Checking the Differences in Nested Virtualization
Let's connect to both instances using SSM Session Manager and compare the KVM-related status.
Checking for KVM Device
The /dev/kvm device only exists when nested virtualization is enabled.
ls -la /dev/kvm
sh-5.2$ ls -la /dev/kvm
crw-rw-rw-. 1 root kvm 10, 232 Feb 13 14:23 /dev/kvm
sh-5.2$ ls -la /dev/kvm
ls: cannot access '/dev/kvm': No such file or directory
Checking CPU Flags
The Intel VT-x (vmx) flag indicates that virtualization assistance is available at the CPU level.
grep -E 'vmx|svm' /proc/cpuinfo | head -1
sh-5.2$ grep -E 'vmx|svm' /proc/cpuinfo | head -5flags           : fpu vme de pse tsc msr pae mce cx8 apic sep mtrr pge mca cmov pat pse36 clflush mmx fxsr sse sse2 ss ht syscall nx pdpe1gb rdtscp lm constant_tsc arch_perfmon rep_good nopl xtopology nonstop_tsc cpuid aperfmperf tsc_known_freq pni pclmulqdq monitor vmx ssse3 fma cx16 pdcm pcid sse4_1 sse4_2 x2apic movbe popcnt tsc_deadline_timer aes xsave avx f16c rdrand hypervisor lahf_lm abm 3dnowprefetch cpuid_fault ssbd ibrs ibpb stibp ibrs_enhanced tpr_shadow flexpriority ept vpid ept_ad fsgsbase tsc_adjust bmi1 avx2 smep bmi2 erms invpcid avx512f avx512dq rdseed adx smap avx512ifma clflushopt clwb avx512cd sha_ni avx512bw avx512vl xsaveopt xsavec xgetbv1 xsaves avx_vnni avx512_bf16 wbnoinvd ida arat vnmi avx512vbmi umip pku ospke waitpkg avx512_vbmi2 gfni vaes vpclmulqdq avx512_vnni avx512_bitalg tme avx512_vpopcntdq rdpid bus_lock_detect cldemote movdiri movdir64b md_clear serialize amx_bf16 avx512_fp16 amx_tile amx_int8 flush_l1d arch_capabilitiesvmx flags       : vnmi preemption_timer posted_intr invvpid ept_x_only ept_ad ept_1gb ept_5level flexpriority apicv tsc_offset vtpr mtf vapic ept vpid unrestricted_guest vapic_reg vid shadow_vmcs pml tsc_scaling usr_wait_pause
flags           : fpu vme de pse tsc msr pae mce cx8 apic sep mtrr pge mca cmov pat pse36 clflush mmx fxsr sse sse2 ss ht syscall nx pdpe1gb rdtscp lm constant_tsc arch_perfmon rep_good nopl xtopology nonstop_tsc cpuid aperfmperf tsc_known_freq pni pclmulqdq monitor vmx ssse3 fma cx16 pdcm pcid sse4_1 sse4_2 x2apic movbe popcnt tsc_deadline_timer aes xsave avx f16c rdrand hypervisor lahf_lm abm 3dnowprefetch cpuid_fault ssbd ibrs ibpb stibp ibrs_enhanced tpr_shadow flexpriority ept vpid ept_ad fsgsbase tsc_adjust bmi1 avx2 smep bmi2 erms invpcid avx512f avx512dq rdseed adx smap avx512ifma clflushopt clwb avx512cd sha_ni avx512bw avx512vl xsaveopt xsavec xgetbv1 xsaves avx_vnni avx512_bf16 wbnoinvd ida arat vnmi avx512vbmi umip pku ospke waitpkg avx512_vbmi2 gfni vaes vpclmulqdq avx512_vnni avx512_bitalg tme avx512_vpopcntdq rdpid bus_lock_detect cldemote movdiri movdir64b md_clear serialize amx_bf16 avx512_fp16 amx_tile amx_int8 flush_l1d arch_capabilitiesvmx flags       : vnmi preemption_timer posted_intr invvpid ept_x_only ept_ad ept_1gb ept_5level flexpriority apicv tsc_offset vtpr mtf vapic ept vpid unrestricted_guest vapic_reg vid shadow_vmcs pml tsc_scaling usr_wait_pause
sh-5.2$ grep -E 'vmx|svm' /proc/cpuinfo | head -5
Checking KVM Modules
When nested virtualization is enabled, the kvm and kvm_intel modules are loaded.
lsmod | grep kvm
sh-5.2$ lsmod | grep kvm
kvm_intel             421888  0
kvm                  1351680  1 kvm_intel
irqbypass              12288  1 kvm
sh-5.2$ lsmod | grep kvm
Running a microVM with Firecracker
Now that we've confirmed KVM is enabled, let's run a guest VM using Firecracker (AWS's lightweight microVM) on the instance with nested virtualization enabled.
What is Firecracker?
Firecracker is an open-source virtualization technology developed by AWS that serves as the foundation for AWS Lambda and AWS Fargate. Its key feature is the ability to quickly launch lightweight microVMs using KVM.
The procedures in this article refer to the following documentation.
1. Installing Firecracker
ARCH="$(uname -m)"
release_url="https://github.com/firecracker-microvm/firecracker/releases"
latest=$(basename $(curl -fsSLI -o /dev/null -w %{url_effective} ${release_url}/latest))

curl -L ${release_url}/download/${latest}/firecracker-${latest}-${ARCH}.tgz | tar -xz

sudo mv release-${latest}-${ARCH}/firecracker-${latest}-${ARCH} /usr/local/bin/firecracker
sudo mv release-${latest}-${ARCH}/jailer-${latest}-${ARCH} /usr/local/bin/jailer
If the version is displayed with the following command, you're good to go.
firecracker --version
2026-02-13T14:58:50.237291230 [anonymous-instance:main] Firecracker exiting successfully. exit_code=0
2. Preparing the Kernel and rootfs
Download the kernel and rootfs from Firecracker's official CI artifacts.
CI_VERSION=${latest%.*}

# Get kernel
KERNEL=$(curl -fsSL "https://s3.amazonaws.com/spec.ccfc.min?prefix=firecracker-ci/${CI_VERSION}/${ARCH}/vmlinux-" \
  | grep -oP "(?<=<Key>)firecracker-ci/${CI_VERSION}/${ARCH}/vmlinux-[0-9]+\.[0-9]+\.[0-9]+(?=</Key>)" \
  | sort -V | tail -1)

# Get rootfs (squashfs)
ROOTFS_SQUASHFS=$(curl -fsSL "https://s3.amazonaws.com/spec.ccfc.min?prefix=firecracker-ci/${CI_VERSION}/${ARCH}/ubuntu-" \
  | grep -oP "(?<=<Key>)firecracker-ci/${CI_VERSION}/${ARCH}/ubuntu-[0-9.]+\.squashfs(?=</Key>)" \
  | sort -V | tail -1)

curl -fsSL -o vmlinux.bin "https://s3.amazonaws.com/spec.ccfc.min/${KERNEL}"
curl -fsSL -o rootfs.squashfs "https://s3.amazonaws.com/spec.ccfc.min/${ROOTFS_SQUASHFS}"
Firecracker requires an ext4 format rootfs, so we need to convert it from squashfs.
sudo dnf install -y squashfs-tools
unsquashfs rootfs.squashfs
truncate -s 1G rootfs.ext4
sudo mkfs.ext4 -d squashfs-root -F rootfs.ext4
Parallel unsquashfs: Using 2 processors
7798 inodes (9786 blocks) to write

[================================================================================================================================================================================================-] 9786/9786 100%

created 7079 files
created 1466 directories
created 717 symlinks
created 0 devices
created 0 fifos
created 0 sockets
mke2fs 1.46.5 (30-Dec-2021)
Discarding device blocks: done
Creating filesystem with 262144 4k blocks and 65536 inodes
Filesystem UUID: b590c0f5-e25d-4086-b0a9-d6ea8bc214b9
Superblock backups stored on blocks:
        32768, 98304, 163840, 229376

Allocating group tables: done
Writing inode tables: done
Creating journal (8192 blocks): done
Copying files into the device: done
Writing superblocks and filesystem accounting information: done
3. Setting KVM Device Permissions
sudo setfacl -m u:${USER}:rw /dev/kvm
ls -la /dev/kvm
crw-rw-rw-+ 1 root kvm 10, 232 Feb 13 14:57 /dev/kvm
4. Configuring and Starting Firecracker
Create a configuration file and launch the microVM.
cat > vm-config.json <<EOF
{
  "boot-source": {
    "kernel_image_path": "./vmlinux.bin",
    "boot_args": "console=ttyS0 reboot=k panic=1 pci=off"
  },
  "drives": [{
    "drive_id": "rootfs",
    "path_on_host": "./rootfs.ext4",
    "is_root_device": true,
    "is_read_only": false
  }],
  "machine-config": {
    "vcpu_count": 1,
    "mem_size_mib": 256
  }
}
EOF
firecracker --api-sock /tmp/firecracker.socket --config-file vm-config.json
Boot logs flow for a few seconds...
2026-02-13T16:20:26.537932986 [anonymous-instance:main] Running Firecracker v1.14.1
2026-02-13T16:20:26.538193079 [anonymous-instance:main] Listening on API socket ("/tmp/firecracker.socket").
2026-02-13T16:20:26.538373815 [anonymous-instance:fc_api] API server started.
2026-02-13T16:20:26.548660637 [anonymous-instance:main] Artificially kick devices
2026-02-13T16:20:26.548677019 [anonymous-instance:fc_vcpu 0] Received a VcpuEvent::Resume message with immediate_exit enabled. immediate_exit was disabled before proceeding
2026-02-13T16:20:26.548716526 [anonymous-instance:main] Successfully started microvm that was configured from one single json
2026-02-13T16:20:26.574100739 [anonymous-instance:fc_vcpu 0] vcpu: IO write @ 0xcf8:0x4 failed: bus_error: MissingAddressRange
2026-02-13T16:20:26.574148966 [anonymous-instance:fc_vcpu 0] vcpu: IO read @ 0xcfc:0x2 failed: bus_error: MissingAddressRange
[    0.000000] Linux version 6.1.155 (root@0e0250f7f2f2) (gcc (Ubuntu 11.4.0-1ubuntu1~22.04.2) 11.4.0, GNU ld (GNU Binutils for Ubuntu) 2.38) #1 SMP PREEMPT_DYNAMIC Tue Nov 18 09:27:27 UTC 2025
[    0.000000] Command line: console=ttyS0 reboot=k panic=1 pci=off pci=off root=/dev/vda rw virtio_mmio.device=4K@0xc0001000:6
[    0.000000] KASLR disabled
[    0.000000] x86/split lock detection: #DB: warning on user-space bus_locks
[    0.000000] BIOS-provided physical RAM map:
[    0.000000] BIOS-e820: [mem 0x0000000000000000-0x000000000009fbff] usable
[    0.000000] BIOS-e820: [mem 0x000000000009fc00-0x00000000000fffff] reserved
[    0.000000] BIOS-e820: [mem 0x0000000000100000-0x000000000fffffff] usable
[    0.000000] BIOS-e820: [mem 0x00000000eec00000-0x00000000febfffff] reserved
The prompt appeared.
It looks like it started successfully.
Ubuntu 24.04.3 LTS ubuntu-fc-uvm ttyS0

ubuntu-fc-uvm login: root (automatic login)

Welcome to Ubuntu 24.04.3 LTS (GNU/Linux 6.1.155 x86_64)

 * Documentation:  https://help.ubuntu.com
 * Management:     https://landscape.canonical.com
 * Support:        https://ubuntu.com/pro

This system has been minimized by removing packages and content that are
not required on a system that users do not log into.

To restore this content, you can run the 'unminimize' command.

The programs included with the Ubuntu system are free software;
the exact distribution terms for each program are described in the
individual files in /usr/share/doc/*/copyright.

Ubuntu comes with ABSOLUTELY NO WARRANTY, to the extent permitted by
applicable law.

root@ubuntu-fc-uvm:~#
Confirming It's a microVM
Run the following commands inside the VM to confirm it's running on KVM.
It's clear that it's running on a KVM-based VM using Firecracker.
root@ubuntu-fc-uvm:~# systemd-detect-virt
kvm
root@ubuntu-fc-uvm:~# dmesg | grep -i "firecracker\|kvm"
[    0.000000] Hypervisor detected: KVM
[    0.000000] kvm-clock: Using msrs 4b564d01 and 4b564d00
[    0.000001] kvm-clock: using sched offset of 37019422 cycles
[    0.000026] clocksource: kvm-clock: mask: 0xffffffffffffffff max_cycles: 0x1cd42e4dffb, max_idle_ns: 881590591483 ns
[    0.014759] Booting paravirtualized kernel on KVM
[    0.020964] kvm-guest: PV spinlocks disabled, single CPU
[    0.279668] clocksource: Switched to clocksource kvm-clock
[    0.992762] systemd[1]: Detected virtualization kvm.
root@ubuntu-fc-uvm:~# lscpu | grep -E "Hypervisor|Model name"
Model name:                              Intel(R) Xeon(R) Processor
Hypervisor vendor:                       KVM
Bonus: Applying to Existing Instances
You can also enable nested virtualization on existing instances using the modify-instance-cpu-options command.
However, the instance must be in a stopped state.
# Stop the instance
aws ec2 stop-instances --instance-ids ${INSTANCE_ID}
aws ec2 wait instance-stopped --instance-ids ${INSTANCE_ID}
- Disabling it
aws ec2 modify-instance-cpu-options \
  --instance-id ${INSTANCE_ID} \
  --nested-virtualization disabled  \
  --region ap-northeast-1
{
    "InstanceId": "i-0a9ae55440f193dd1",
    "NestedVirtualization": "disabled"
}
- Enabling it
aws ec2 modify-instance-cpu-options \
  --instance-id ${INSTANCE_ID} \
  --nested-virtualization enabled \
  --region ap-northeast-1
{
    "InstanceId": "i-0a9ae55440f193dd1",
    "NestedVirtualization": "enabled"
}
Conclusion
In this article, I've tested launching a microVM using Firecracker with EC2's nested virtualization feature.
Until now, if you wanted to use KVM on EC2, you had to use bare metal instances, which was a high barrier for those who just wanted to try it out.
With this update, it's great that you can now use it on non-bare metal instances, starting from the large size.
I hope this article was helpful to someone.