
I tried malware scanning of backup data using Amazon GuardDuty Malware Protection for AWS Backup
This page has been translated by machine translation. View original
Introduction
Have you ever wondered "Is this backup really safe?" when restoring from a backup?
If malware was already lurking at the time the backup was taken, the infection could spread when you restore it. This is the so-called "dormant malware" problem.
Last year at re:Invent, a feature called Amazon GuardDuty Malware Protection for AWS Backup was released to address this issue.
Let's actually try malware scanning on backup data.
What are the benefits?
Verify backup safety before restoring
You can run malware scans before restoring from a backup.
This reduces the risk of inadvertently restoring an infected backup.
Can be used without enabling GuardDuty
You can use this feature independently without enabling GuardDuty itself. Basically, enabling GuardDuty is recommended. However, detection notification via EventBridge and CloudWatch can be used even without GuardDuty enabled.
Efficient scanning with incremental scans
In addition to full scans, it supports incremental scans that only examine the differences between two resources. This allows for efficient execution of regular scans.
What is Malware Protection for AWS Backup
Resources that can be scanned include:
| Resource Type | Description |
|---|---|
| EBS Snapshots | Block storage snapshots of EC2 instances |
| EC2 AMI | EC2 machine images containing snapshots |
| S3 Recovery Points | Recovery points for S3 created by AWS Backup |
| Locked Vault | Immutable backup vault |
For more details, please refer to the documentation.
Requirements for incremental scanning
There are several conditions for using incremental scanning:
- Base resource scanned within the last 90 days (status COMPLETED or COMPLETED_WITH_ISSUES)
- Base resource creation date is before the target
- For snapshots, the encryption type must be the same
- Same lineage (same volume or its copy)
Let's try it
Let's actually run a scan. For this test, we'll log into a test EC2 instance, download an EICAR file, create an EBS snapshot, and scan it on-demand.
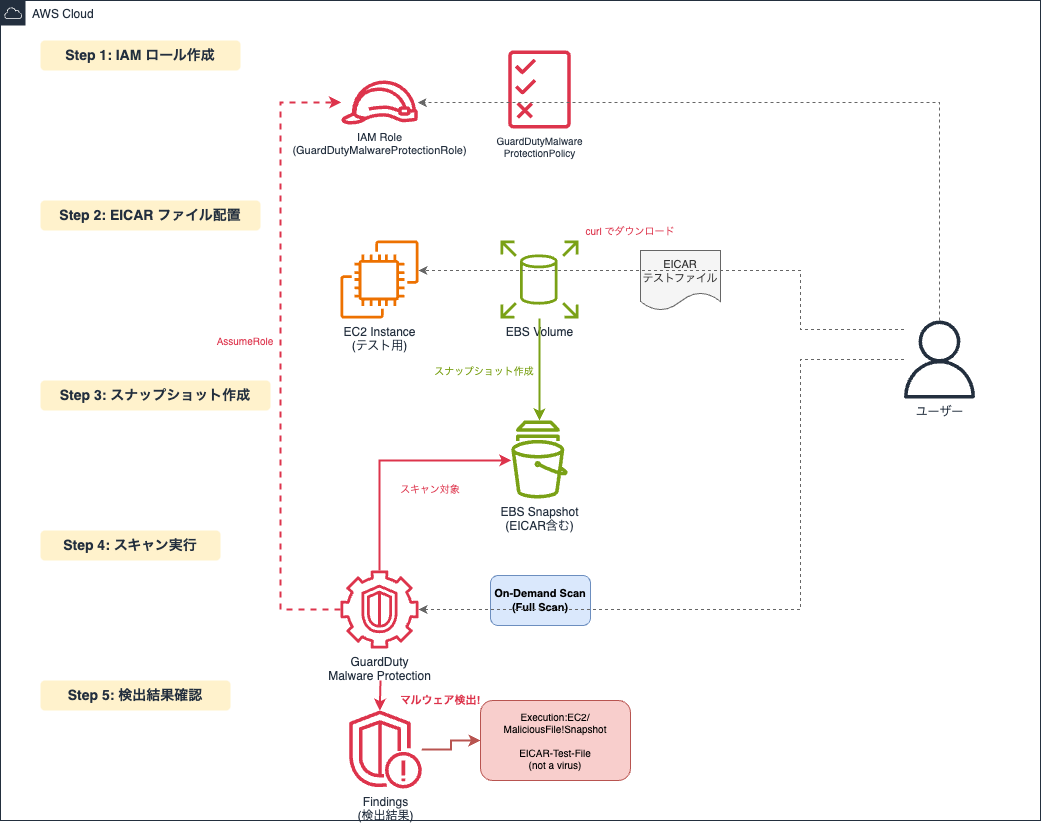
Creating an IAM Role
First, let's prepare the IAM role that GuardDuty will use for scanning.
Select "Custom trust policy" for "Trusted entity type" and enter the following JSON:
{
  "Version": "2012-10-17",
  "Statement": [
    {
      "Effect": "Allow",
      "Principal": {
        "Service": "malware-protection.guardduty.amazonaws.com"
      },
      "Action": "sts:AssumeRole"
    }
  ]
}
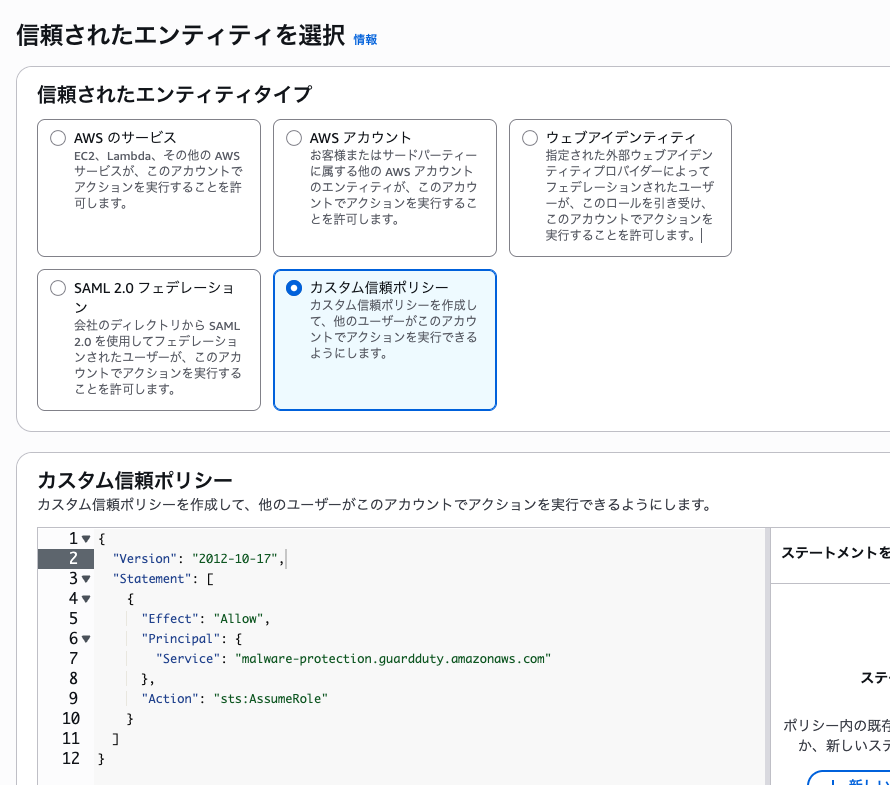
On the permissions policy screen, select "Create role without permissions" to skip for now, and click "Next". Enter GuardDutyMalwareProtectionRole as the role name and click "Create role".
Adding Access Permission Policy
Add policies referring to the documentation:
Open the created role, click "Add permissions" → "Create inline policy". Select the JSON tab and enter the following policy:
GuardDutyMalwareProtectionPolicy (click to expand)
{
  "Version": "2012-10-17",
  "Statement": [
    {
      "Effect": "Allow",
      "Action": [
        "ebs:ListSnapshotBlocks",
        "ebs:ListChangedBlocks",
        "ebs:GetSnapshotBlock"
      ],
      "Resource": "arn:aws:ec2:*::snapshot/*"
    },
    {
      "Sid": "CreateGrantPermissions",
      "Effect": "Allow",
      "Action": "kms:CreateGrant",
      "Resource": "arn:aws:kms:*:*:key/*",
      "Condition": {
        "ForAnyValue:StringLike": {
          "kms:EncryptionContext:aws:guardduty:id": "snap-*",
          "kms:ViaService": [
            "guardduty.*.amazonaws.com",
            "backup.*.amazonaws.com"
          ]
        },
        "ForAllValues:StringEquals": {
          "kms:GrantOperations": [
            "Decrypt",
            "CreateGrant",
            "GenerateDataKeyWithoutPlaintext",
            "ReEncryptFrom",
            "ReEncryptTo",
            "RetireGrant",
            "DescribeKey"
          ]
        },
        "Bool": {
          "kms:GrantIsForAWSResource": "true"
        }
      }
    },
    {
      "Sid": "CreateGrantPermissionsForReEncryptAndDirectAPIs",
      "Effect": "Allow",
      "Action": "kms:CreateGrant",
      "Resource": "arn:aws:kms:*:*:key/*",
      "Condition": {
        "ForAnyValue:StringLike": {
          "kms:EncryptionContext:aws:ebs:id": "snap-*",
          "kms:ViaService": [
            "guardduty.*.amazonaws.com",
            "backup.*.amazonaws.com"
          ]
        },
        "ForAllValues:StringEquals": {
          "kms:GrantOperations": [
            "Decrypt",
            "ReEncryptTo",
            "ReEncryptFrom",
            "RetireGrant",
            "DescribeKey"
          ]
        },
        "Bool": {
          "kms:GrantIsForAWSResource": "true"
        }
      }
    },
    {
      "Effect": "Allow",
      "Action": [
        "ec2:DescribeImages",
        "ec2:DescribeSnapshots"
      ],
      "Resource": "*"
    },
    {
      "Sid": "ShareSnapshotPermission",
      "Effect": "Allow",
      "Action": "ec2:ModifySnapshotAttribute",
      "Resource": "arn:aws:ec2:*:*:snapshot/*"
    },
    {
      "Sid": "ShareSnapshotKMSPermission",
      "Effect": "Allow",
      "Action": [
        "kms:ReEncryptTo",
        "kms:ReEncryptFrom"
      ],
      "Resource": "arn:aws:kms:*:*:key/*",
      "Condition": {
        "StringLike": {
          "kms:ViaService": "ec2.*.amazonaws.com"
        }
      }
    },
    {
      "Sid": "DescribeKeyPermission",
      "Effect": "Allow",
      "Action": "kms:DescribeKey",
      "Resource": "arn:aws:kms:*:*:key/*"
    },
    {
      "Sid": "DescribeRecoveryPointPermission",
      "Effect": "Allow",
      "Action": "backup:DescribeRecoveryPoint",
      "Resource": "*"
    },
    {
      "Sid": "CreateBackupAccessPointPermissions",
      "Effect": "Allow",
      "Action": "backup:CreateBackupAccessPoint",
      "Resource": "arn:aws:backup:*:*:recovery-point:*"
    },
    {
      "Sid": "ReadAndDeleteBackupAccessPointPermissions",
      "Effect": "Allow",
      "Action": [
        "backup:DescribeBackupAccessPoint",
        "backup:DeleteBackupAccessPoint"
      ],
      "Resource": "*"
    },
    {
      "Sid": "KMSKeyPermissionsForInstantAccess",
      "Effect": "Allow",
      "Action": "kms:Decrypt",
      "Resource": "arn:aws:kms:*:*:key/*",
      "Condition": {
        "StringLike": {
          "kms:ViaService": "backup.*.amazonaws.com"
        }
      }
    }
  ]
}
Enter GuardDutyMalwareProtectionPolicy as the policy name and click "Create policy".
Placing the EICAR Test File
Connect to the EC2 instance and download the EICAR test file.
The EICAR test file is a harmless file designed to test malware detection software. It's not actual malware, but it's designed to be detected by scanners.
Log into the EC2 instance created for testing and run the following command in the terminal to download the EICAR file:
curl https://secure.eicar.org/eicar.com.txt -o ./eicar.com.txt
After confirming the download, end the connection.
Creating a Snapshot
Create a snapshot of the EBS volume containing the EICAR file.
From the EC2 console's left menu, select "Volumes". Select the volume attached to the test instance and click "Actions" → "Create Snapshot".

Enter "Malware scan test snapshot" as the description and click "Create Snapshot". Wait for the snapshot to complete.
Running the Scan
Once the snapshot is created, run the scan from the GuardDuty console.
Open the GuardDuty console, select "Malware Protection" from the left menu, and open "AWS Backup".
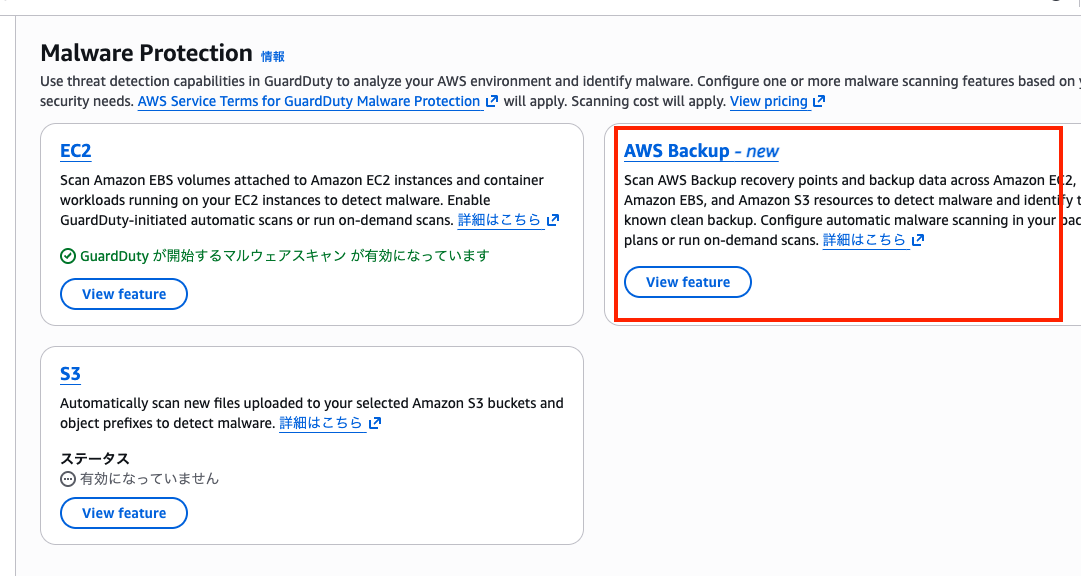
Click "Start on-demand scan".
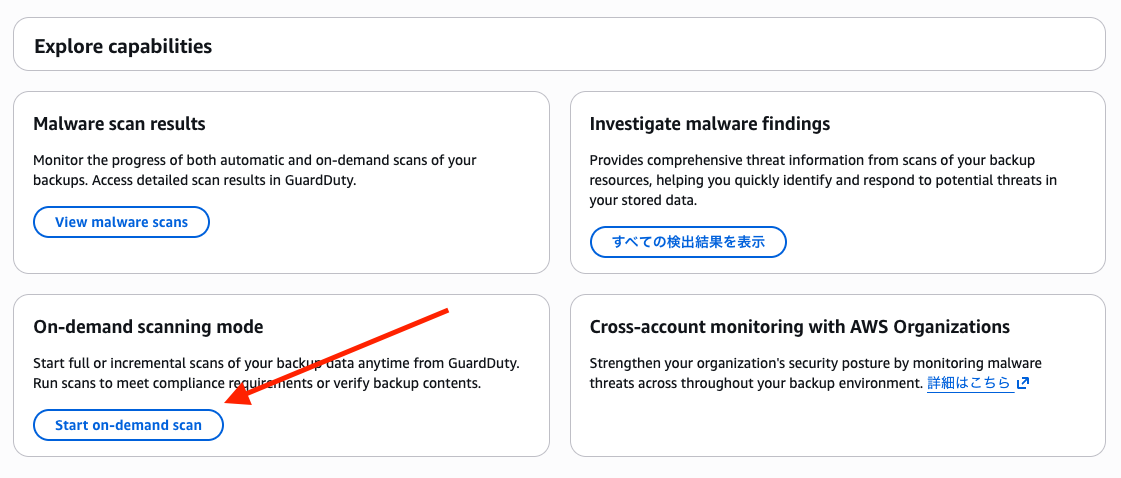
Start the scan with the following settings:
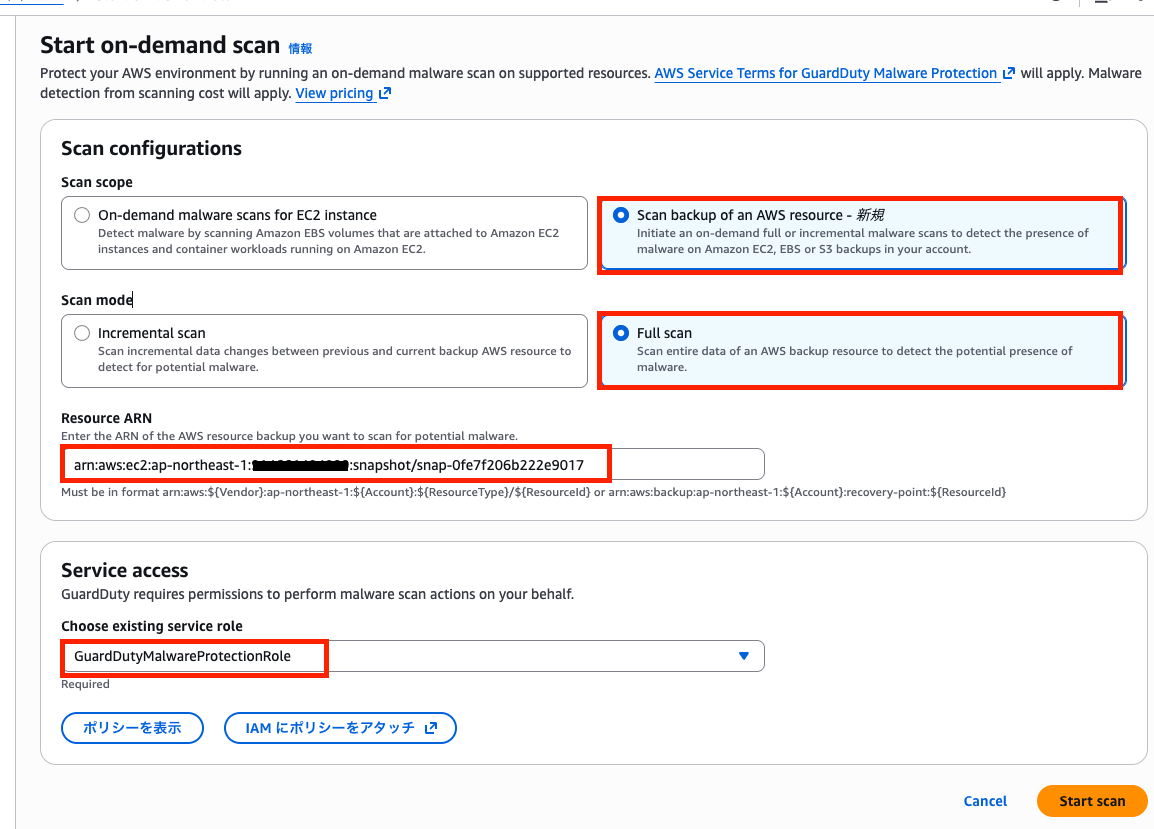
| Item | Setting |
|---|---|
| Scan scope | Scan backup of an AWS resource |
| Scan mode | Full scan |
| Target resource ARN | Snapshot ARN |
| Service access | GuardDutyMalwareProtectionRole |
Enter the snapshot ARN in the following format:
arn:aws:ec2:ap-northeast-1:123456789012:snapshot/snap-xxxxxxxxxxxxxxxxx
The snapshot ID can be found in the "Snapshots" screen of the EC2 console.
Click "Start scan" to begin scanning. The scan status can be checked in the "Malware scans" screen from the left menu.
After waiting for a while, the EICAR file was successfully detected.
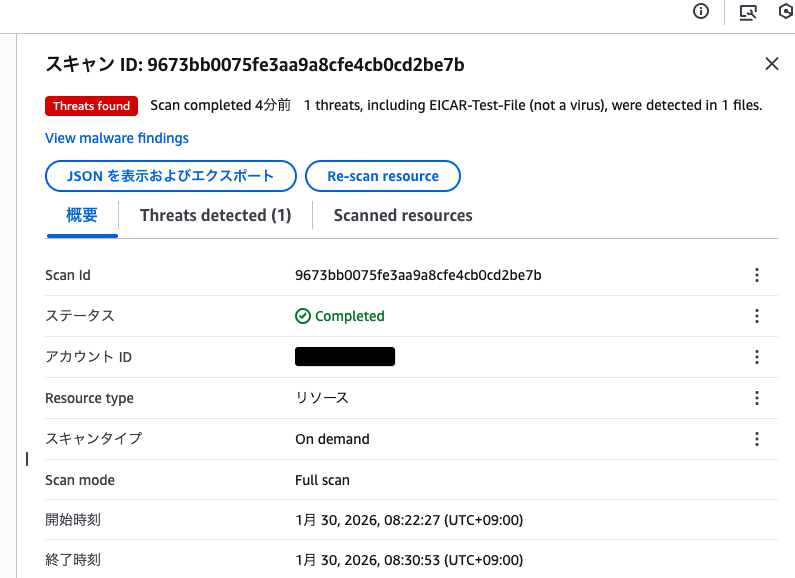
It's displayed as EICAR-Test-File (not a virus) in the scan results.
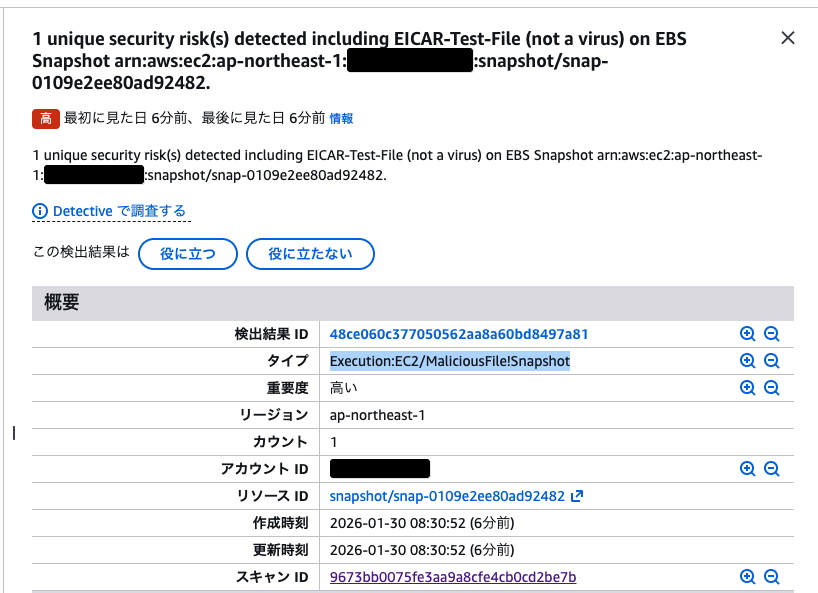
Checking the Detection Results
When malware is detected, Findings like the following are generated:
| Finding Type | Target Resource |
|---|---|
Execution:EC2/MaliciousFile!Snapshot |
EBS snapshot |
Execution:EC2/MaliciousFile!AMI |
EC2 AMI |
Execution:EC2/MaliciousFile!RecoveryPoint |
EC2 Recovery Point |
Execution:S3/MaliciousFile!RecoveryPoint |
S3 Recovery Point |
If GuardDuty is enabled, you can also check these Findings from the console.
Looking at the GuardDuty detection results from View malware findings, it was detected as Execution:EC2/MaliciousFile!Snapshot.
Now you can restore with peace of mind.
Notes
Quotas (Limitations)
There are several limitations for scan targets:
| Item | Limit |
|---|---|
| Maximum snapshot size | 2 TB |
| Maximum S3 object size | 100 GB |
| Number of snapshots in AMI | 40 (for full scan) |
| Maximum archive expansion size | 100 GB |
| Number of files in archive | 10,000 |
| Nesting depth | 5 levels |
Note that snapshots over 2 TB and S3 objects over 100 GB cannot be scanned.
Pricing
Pricing is based on the amount of data scanned. For details, check the official pricing page.
Summary
Malware Protection for AWS Backup enables malware scanning of backup data. Being able to verify the safety of backups before restoring reduces the risk of infection spread by dormant malware.
Consider incorporating it into your backup operations for regular scanning.