![[Informatica IDMC] S3/GCS Compatible! Summary of File Ingestion and Replication configuration procedures](https://images.ctfassets.net/ct0aopd36mqt/wp-thumbnail-e1a66a537a5daec3b05815a1259d5739/6cf59e44342f83614cfc7ce99ff5a914/informatica_black.png?w=3840&fm=webp)
[Informatica IDMC] S3/GCS Compatible! Summary of File Ingestion and Replication configuration procedures
This page has been translated by machine translation. View original
1. Overview
This document explains the creation procedure for File Ingestion and Replication, which is one of the Data Ingestion and Replication services.
1-1. What is Data Ingestion and Replication
Data Ingestion and Replication is a service that provides data ingestion and replication functionality in Informatica. It consists of the following 4 types of ingestion functions.
Service Components
| Function | Description | Covered in this document |
|---|---|---|
| Database Ingestion and Replication | Data ingestion and replication from databases | - |
| File Ingestion and Replication | Data ingestion and replication from files | ◎ |
| Application Ingestion and Replication | Data ingestion from applications such as SaaS | - |
| Streaming Ingestion and Replication | Ingestion of streaming data such as Kafka | - |
1-2. What is File Ingestion and Replication
File Ingestion and Replication, which is the focus of this document, is a function for transferring large volumes of files between on-premises and cloud environments, and tracking/monitoring file transfers.
Features
| Feature | Description |
|---|---|
| Mass file transfer | Supports transfer of large volumes of various file types |
| Batch transfer | Improves performance by transferring multiple files in batches |
| Scheduled execution | Allows defining regular execution schedules for tasks |
| File operations | Supports operations such as compression, decompression, encryption, decryption |
| Transfer monitoring | Enables tracking and monitoring of file transfers |
Supported Connectors
Source
Supports major cloud storage and on-premises environments.
- Amazon S3, Google Cloud Storage, Azure Blob Storage, Azure Data Lake Store, etc.
- Local folder, FTP/SFTP, Hadoop Files, etc.
Target
Supports major cloud storage, data warehouses, and on-premises environments.
- Amazon S3, Google Cloud Storage, Azure Blob Storage, Azure Data Lake Store, etc.
- Snowflake, Databricks, BigQuery, Redshift, Azure Synapse, etc.
- Local folder, FTP/SFTP, Hadoop Files, etc.
💡 Note: For details on supported connectors, please refer to the Informatica official documentation.
2. Prerequisites
2-1. Target Connectors
This document explains the setup procedure for File Ingestion and Replication using the following two types of connectors.
It assumes that the connectors have already been created.
| Connector | Description | Note |
|---|---|---|
| Amazon S3 | AWS object storage service | Available as source/target |
| Google Cloud Storage (GCS) | Google Cloud object storage service | Available as source/target |
2-2. Preliminary Checks (Optional)
If necessary, perform the following steps to verify the existence of connectors and test connections:
- Log in to Informatica Intelligent Data Management Cloud (IDMC)
- Select the "Administrator" screen
- Select "Connections"
- Search for the target connector and verify that it is displayed
- Click on the target connector
- Click "Test"
- Confirm that the connection test is successful
3. File Ingestion and Replication Creation Procedure
Create a File Ingestion and Replication asset and configure data ingestion settings.
3-1. Creating a New Asset
- Log in to Informatica Intelligent Data Management Cloud (IDMC)
- Select the "Data Integration" screen
- Click the "New" button
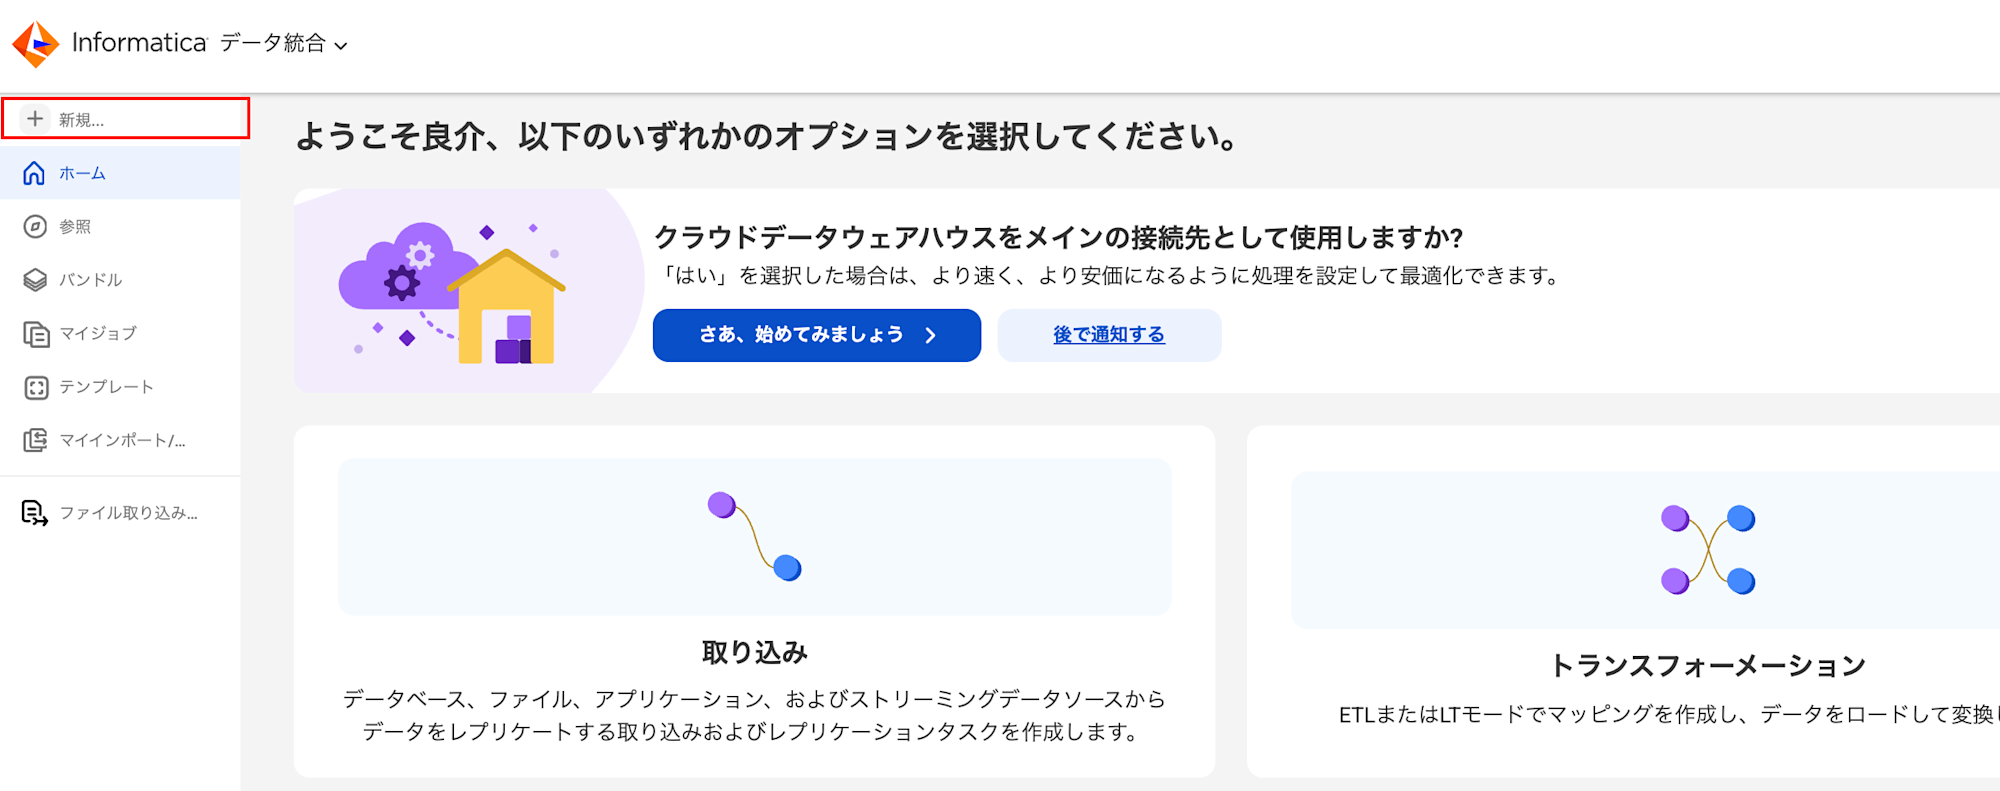
- Select "File Ingestion and Replication Task" from the new assets as shown below

- Click the "Create" button
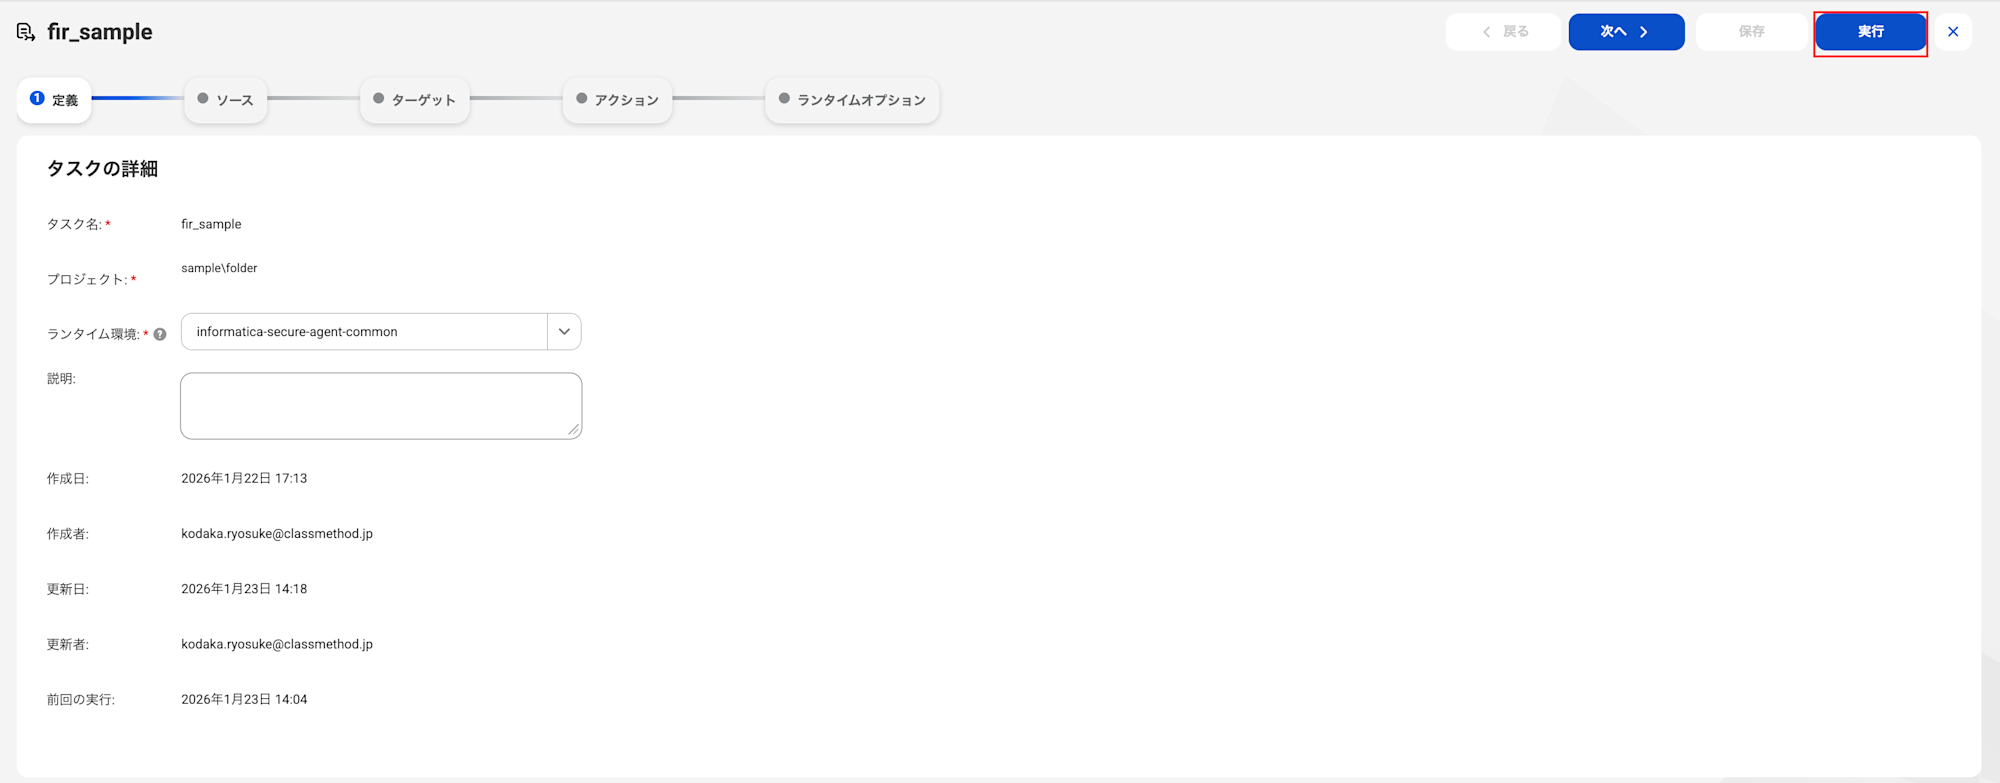
3-2. Definition Settings
Configure the definition settings according to the table below.
| Item | Setting Content | Required | Notes |
|---|---|---|---|
| Task Name | Enter a name for the task | ○ | Example: fir_sample |
| Project | Specify the project/folder to save to | ○ | Select from "Browse" button |
| Runtime Environment | Select the runtime environment to use | ○ | Example: informatica-secure-agent |
| Description | Enter a description for the task | - | - |

3-3. Source Settings
Configure the source details.
Setting items vary depending on the selected connector.
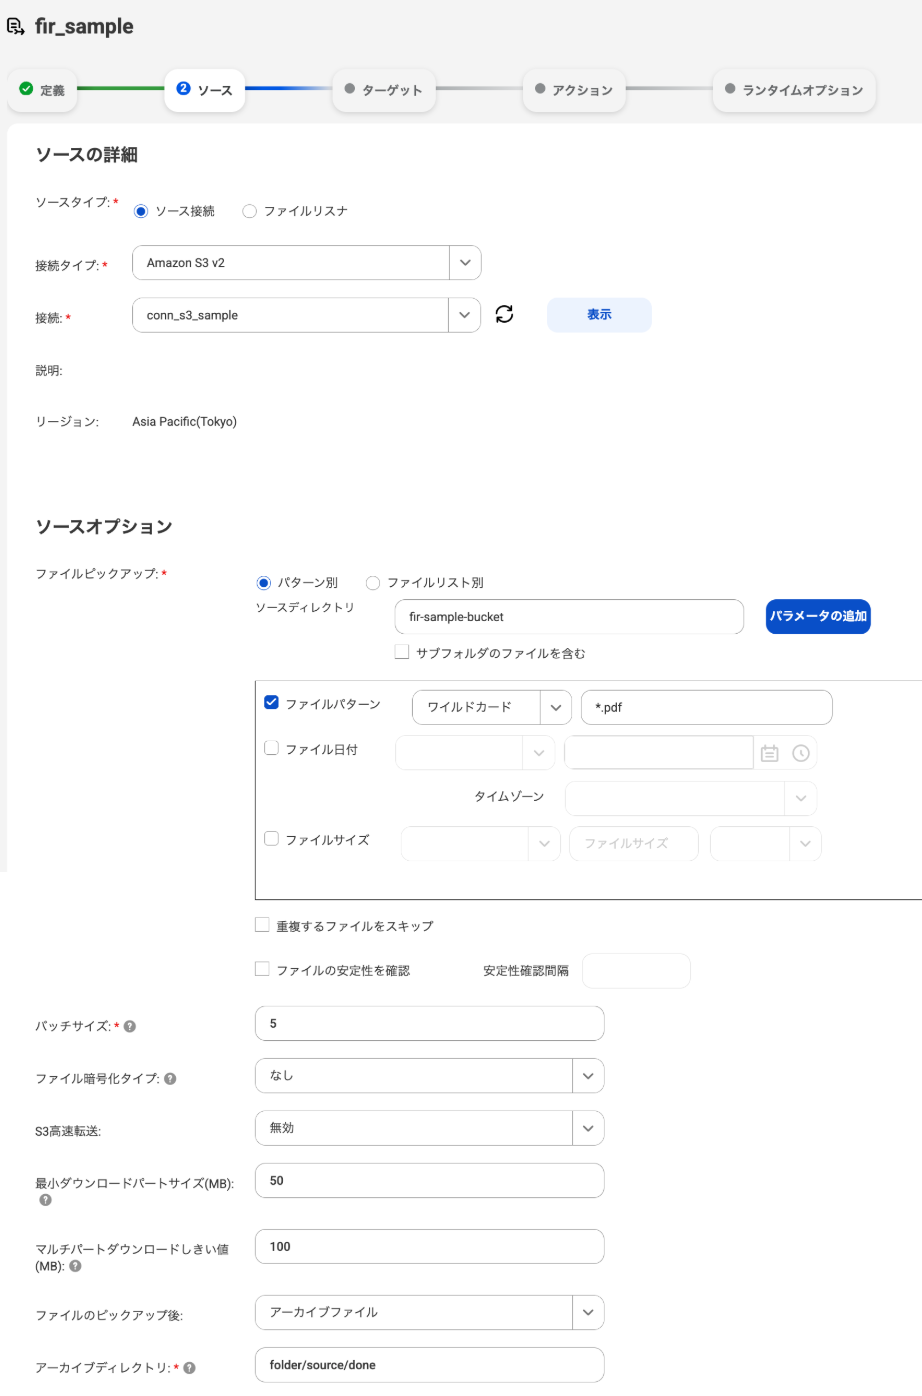
For Amazon S3 connector
Source Details
| Item | Setting Content | Required | Notes |
|---|---|---|---|
| Source Type | Source Connection / File Listener | ○ | Select one |
Depending on the selected source type, configure the following:
- If Source Connection is selected → Select the connector to use from "Connection"
- If File Listener is selected → Select an existing file listener from "File Listener"
⚠️ Caution: If you select a file listener, the 3-6. Runtime Option Settings described later will be limited to the selected file listener.
Source Options
| Item | Setting Content | Required | Notes |
|---|---|---|---|
| File Pickup | By Pattern / By File List | ○ | Select file acquisition method |
| Source Directory | Specify the path to acquire files from | ○ | Example: bucket-name/folder/source |
File Pickup
When selecting By Pattern
| Item | Setting Content | Required | Notes |
|---|---|---|---|
| Include Files in Subfolders | Enable/Disable | - | Enable to include files in subfolders |
| File Pattern | Specify with wildcards | △ | Example: *.csv, data_??.txt |
| File Date | Filter by date | △ | Greater than/Less than/Equal to/N days from today |
| Time Zone | Select time zone | - | Specify when File Date is set |
| File Size | Filter by size | △ | Greater than/Less than/Equal to |
⚠️ Caution: At least one of the △ items (File Pattern, File Date, File Size) must be set.
When selecting By File List
| Item | Setting Content | Required | Notes |
|---|---|---|---|
| File Path Containing List | Path where file list is stored | △ | |
| Input File Paths | Directly specify file names | △ | Comma separated |
⚠️ Caution:
Please select one of the △ items.
Options
| Item | Setting Content | Required | Notes |
|---|---|---|---|
| Skip Duplicate Files | Enable/Disable | - | Skip files with same name/size |
| Check File Stability | Enable/Disable | - | Skip files being written |
| Stability Check Interval | Specify in seconds | - | Specify when Check File Stability is enabled |
| Batch Size | Specify number of files to transfer in one task | - | Default: 5 |
| File Encryption Type | None / S3 Server-side Encryption / S3 Client-side Encryption | - | Default: None |
| S3 High-speed Transfer | Disable / Enable / Dual-stack High-speed | - | Default: Disable |
| Minimum Download Part Size(MB) | Specify part size for download | - | Default: 50 |
| Multi-part Download Threshold(MB) | Specify threshold file size for multi-part download | - | Default: 100 |
| After File Pickup | Retain / Delete / Rename / Archive | - | Handling of source files after transfer |
After File Pickup
When selecting Rename
| Item | Setting Content | Required | Notes |
|---|---|---|---|
| File Name Suffix | Specify suffix | ○ | Example: ($date) / ($time) / ($timestamp) / ($runId) |
When selecting Archive
| Item | Setting Content | Required | Notes |
|---|---|---|---|
| Archive Directory | Specify archive path | ○ | Absolute or relative path |
💡 Note: For details on S3 connector items, please refer to the Informatica official documentation.
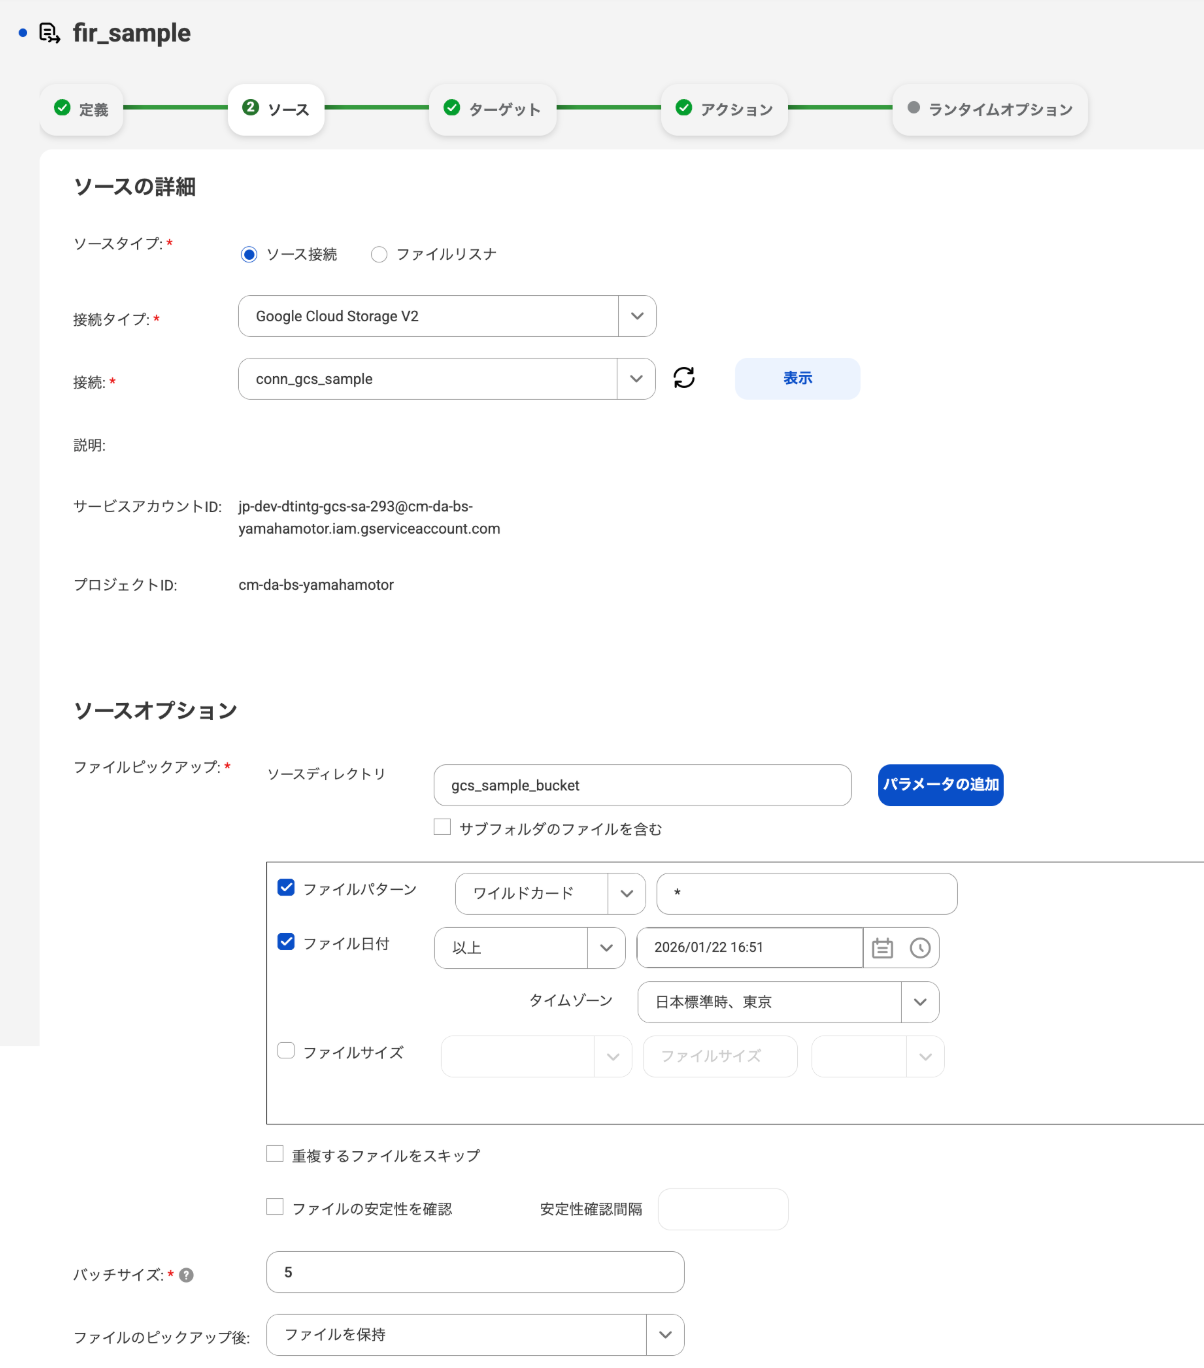
For Google Cloud Storage connector
Source Details
| Item | Setting Content | Required | Notes |
|---|---|---|---|
| Source Type | Source Connection / File Listener | ○ | Select one |
Depending on the selected source type, configure the following:
- If Source Connection is selected → Select the connector to use from "Connection"
- If File Listener is selected → Select an existing file listener from "File Listener"
⚠️ Caution: _If you select a file listener, the 3-6. Runtime Option Settings described later will be limited to the selected file listener.
Source Options
| Item | Setting Content | Required | Notes |
|---|---|---|---|
| Source Directory | Specify the path to acquire files from | ○ | Example: bucket-name/folder/source |
| Include Files in Subfolders | Enable/Disable | - | Enable to include files in subfolders |
| File Pattern | Specify with wildcards | △ | Example: *.csv, data_??.txt |
| File Date | Filter by date | △ | Greater than/Less than/Equal to/N days from today |
| Time Zone | Select time zone | - | Specify when File Date is set |
| File Size | Filter by size | △ | Greater than/Less than/Equal to |
| Skip Duplicate Files | Enable/Disable | - | Skip files with same name/size |
| Check File Stability | Enable/Disable | - | Skip files being written |
| Stability Check Interval | Specify in seconds | - | Specify when Check File Stability is enabled |
| Batch Size | Specify number of files to transfer in one task | ○ | Default: 5 |
| After File Pickup | Retain / Delete / Rename / Archive | - | Handling of source files after transfer |
⚠️ Caution:_ At least one of the △ items (File Pattern, File Date, File Size) must be set.
When selecting Rename
| Item | Setting Content | Required | Notes |
|---|---|---|---|
| File Name Suffix | Specify suffix | ○ | Example: ($date) / ($time) / ($timestamp) / ($runId) |
When selecting Archive
| Item | Setting Content | Required | Notes |
|---|---|---|---|
| Archive Directory | Specify archive path | ○ | Absolute or relative path |
💡 Note: For details on Google Cloud Storage items, please refer to the Informatica official documentation.
3-4. Target Settings
Configure the target details.
Setting items vary depending on the selected connector.
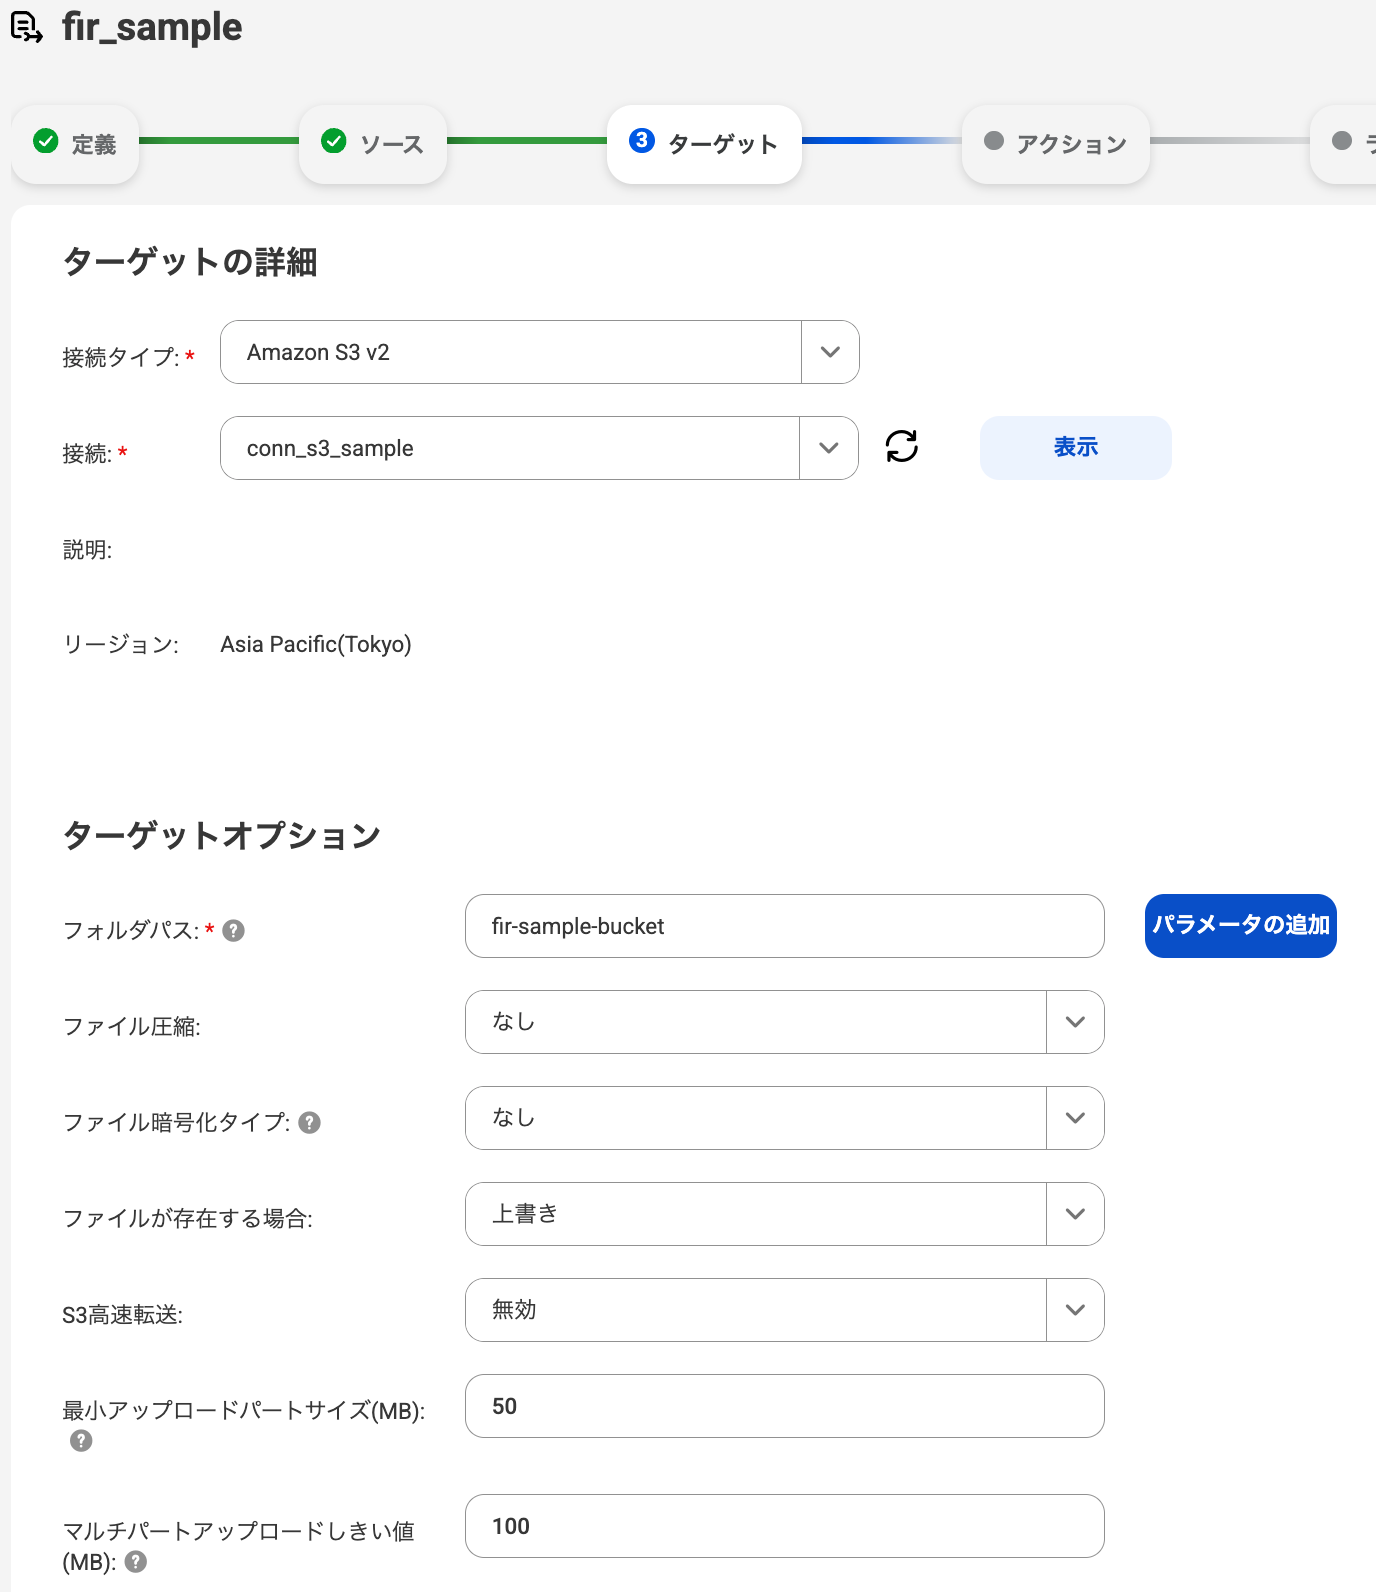
For Amazon S3 connector
Target Details
| Item | Setting Content | Required | Notes |
|---|---|---|---|
| Connection | Select connector to use | ○ |
Target Options
| Item | Setting Content | Required | Notes |
|---|---|---|---|
| Folder Path | Specify output path | ○ | Example: bucket-name/folder/target |
| File Compression | None / GZIP | - | Default: None |
| File Encryption Type | None / S3 Server-side Encryption / S3 Client-side Encryption | - | Default: None |
| If File Exists | Overwrite / Add Timestamp | - | Default: Overwrite |
| S3 High-speed Transfer | Disable / Enable / Dual-stack High-speed | - | Default: Disable |
| Minimum Upload Part Size(MB) | Specify part size for upload | - | Default: 50 |
| Multi-part Upload Threshold(MB) | Specify threshold file size for multi-part upload | - | Default: 100 |
💡 Note: For details on S3 connector items, please refer to the Informatica official documentation.
For Google Cloud Storage connector
Target Details
| Item | Setting Content | Required | Notes |
|---|---|---|---|
| Connection | Select connector to use | ○ |
Target Options
| Item | Setting Content | Required | Notes |
|---|---|---|---|
| Folder Path | Specify output path | ○ | |
| File Compression | None / GZIP | - | Default: None |
| If File Exists | Overwrite / Add Timestamp | - | Default: Overwrite |
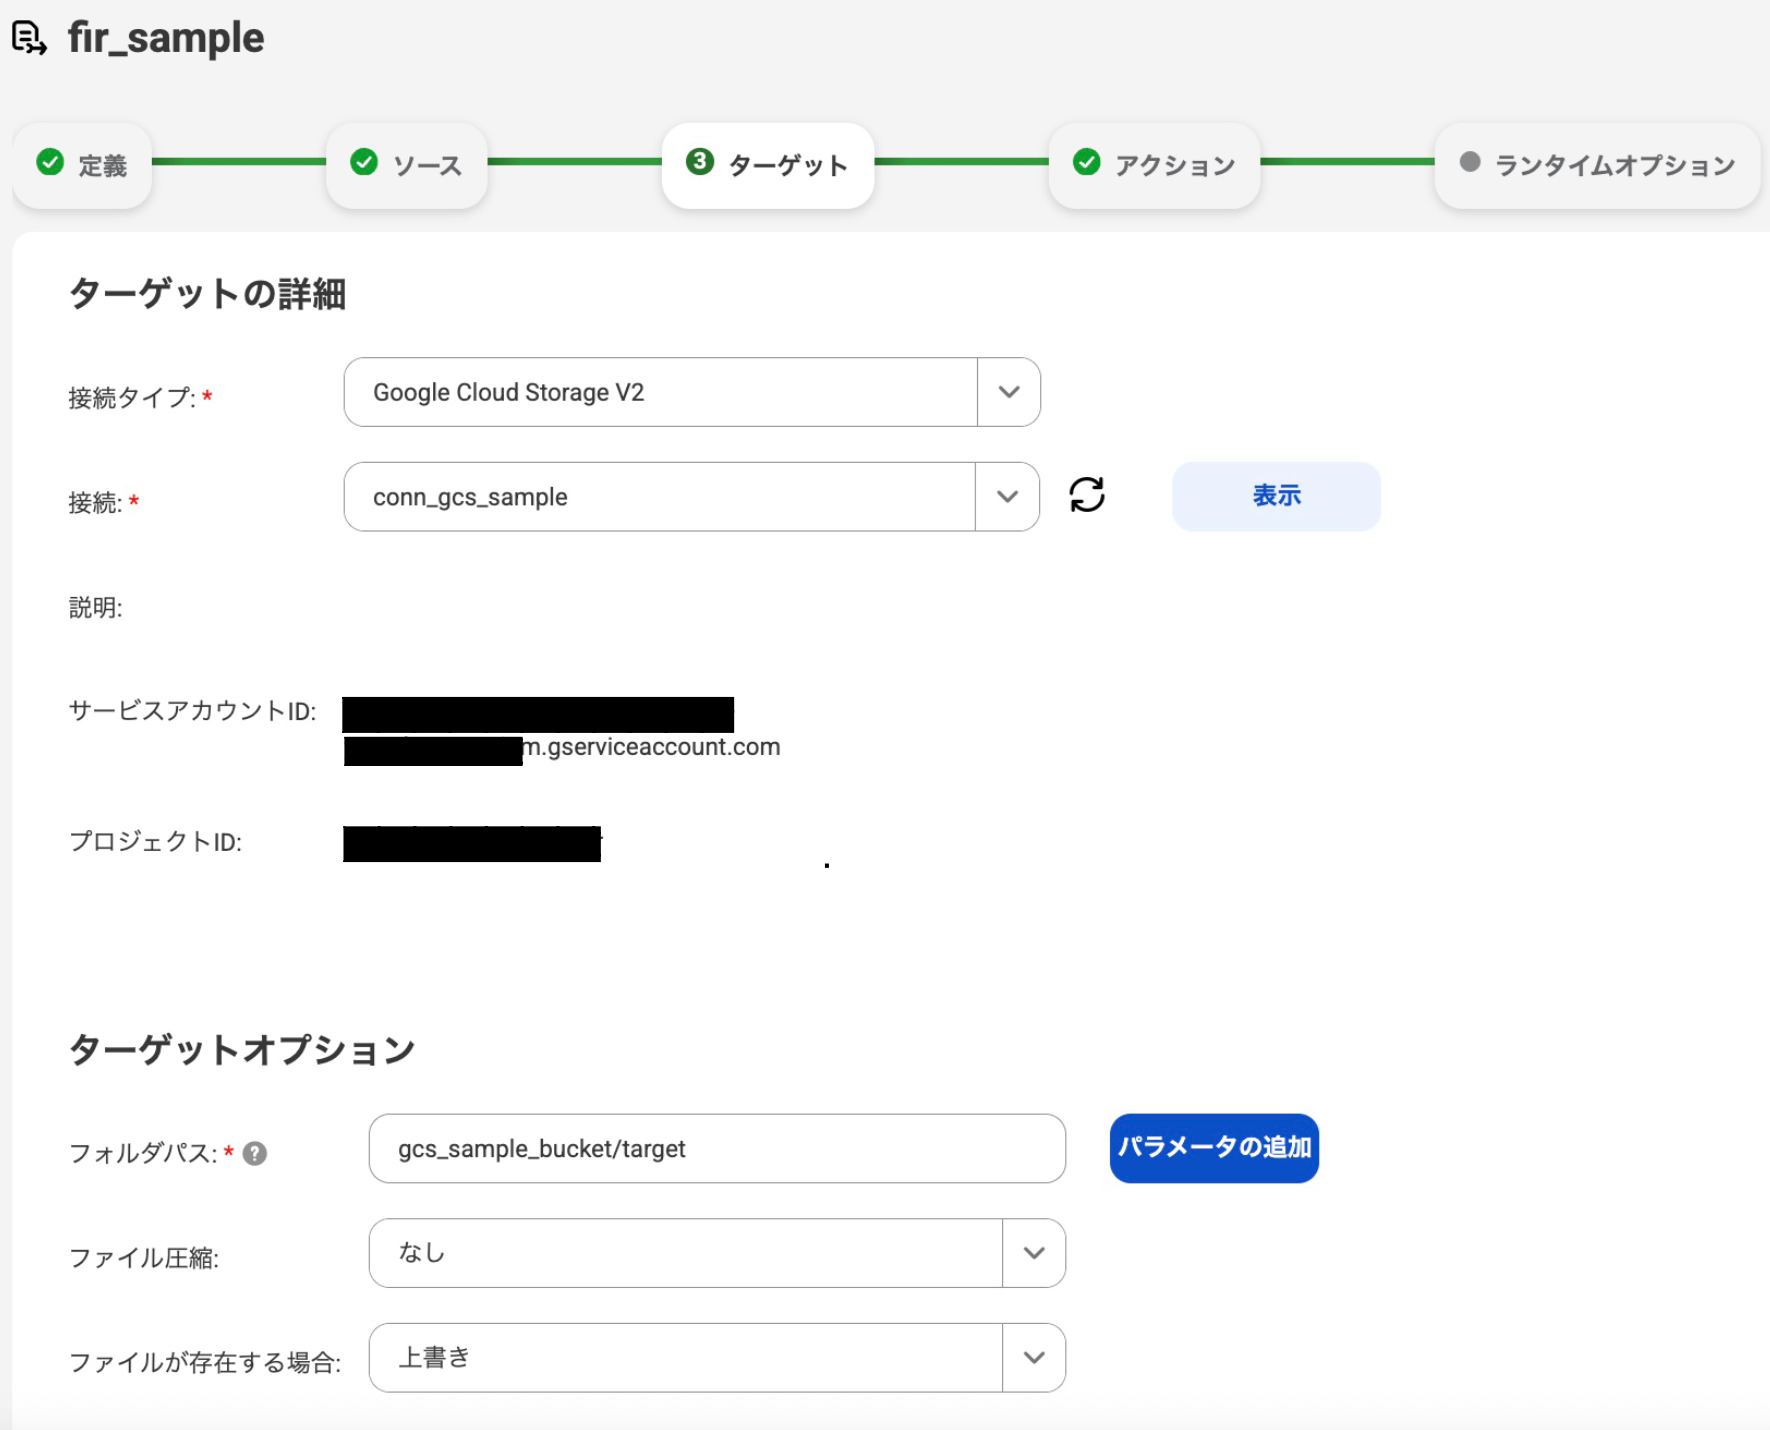
💡 Note: For details on Google Cloud Storage items, please refer to the Informatica official documentation.
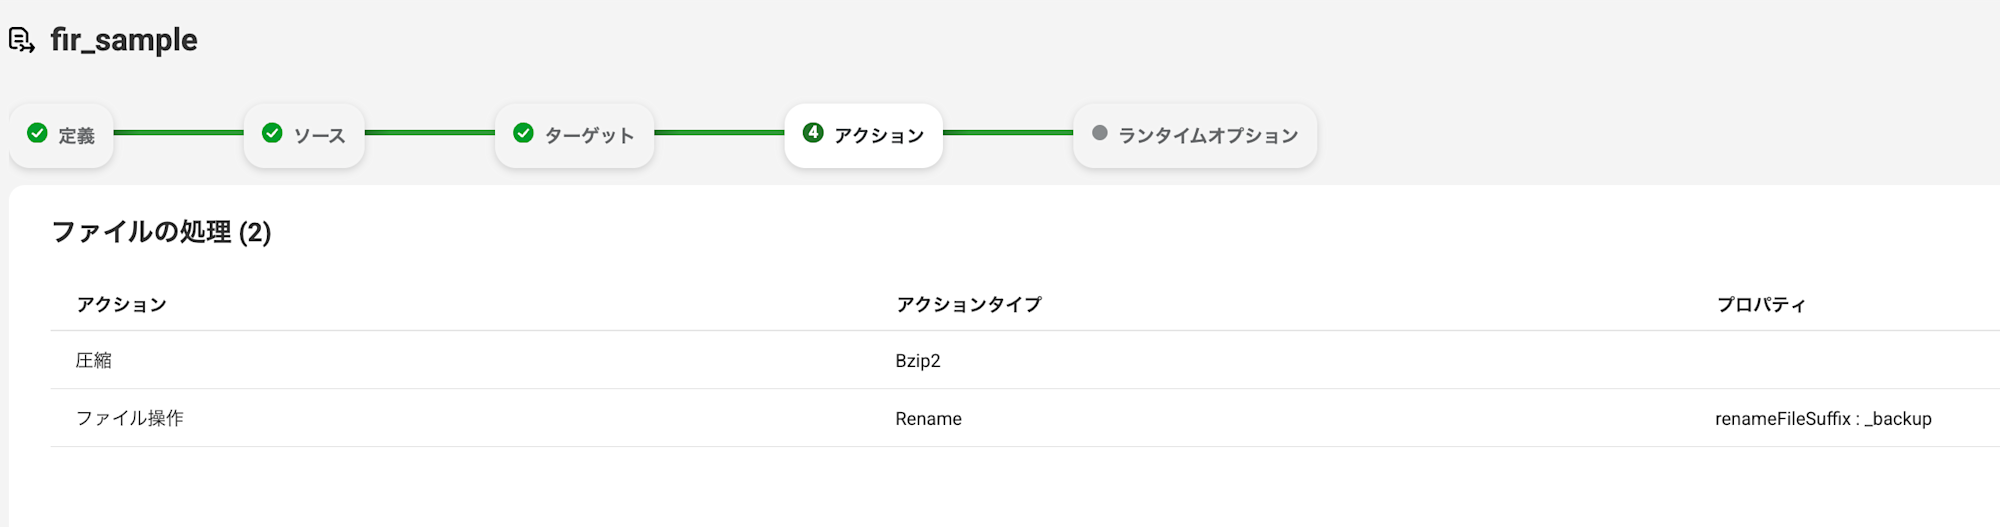
3-5. Action Settings (Optional)
Configure file processing actions to be executed before file transfer.
💡 Note:Action settings are optional. Skip if not needed.
For details on actions, please refer to the Informatica official documentation.
File Processing
| Action | Action Type | Description |
|---|---|---|
| Compress | Zip / gzip / Tar / Bzip2 | Compress files before transfer. Zip can be password protected |
| Decompress | Unzip / Gunzip/ Untar / Bunzip2 | Decompress files before transfer. Unzip can handle password protection |
| Encrypt | PGP | Encrypt files using PGP method before transfer |
| Decrypt | PGP | Decrypt PGP-encrypted files before transfer |
| File Operation | Flatten / Rename File | Flatten file structure or rename files |
| Virus Scan | ICAP | Scan for viruses/malware using ICAP server |
Setup Procedure
- Click "+"
- Select an action
- Select action type
- Configure properties as needed
- Repeat steps 1-4 to add multiple actions
💡 Note: Actions are executed in the order configured. You can change the order by drag and drop.
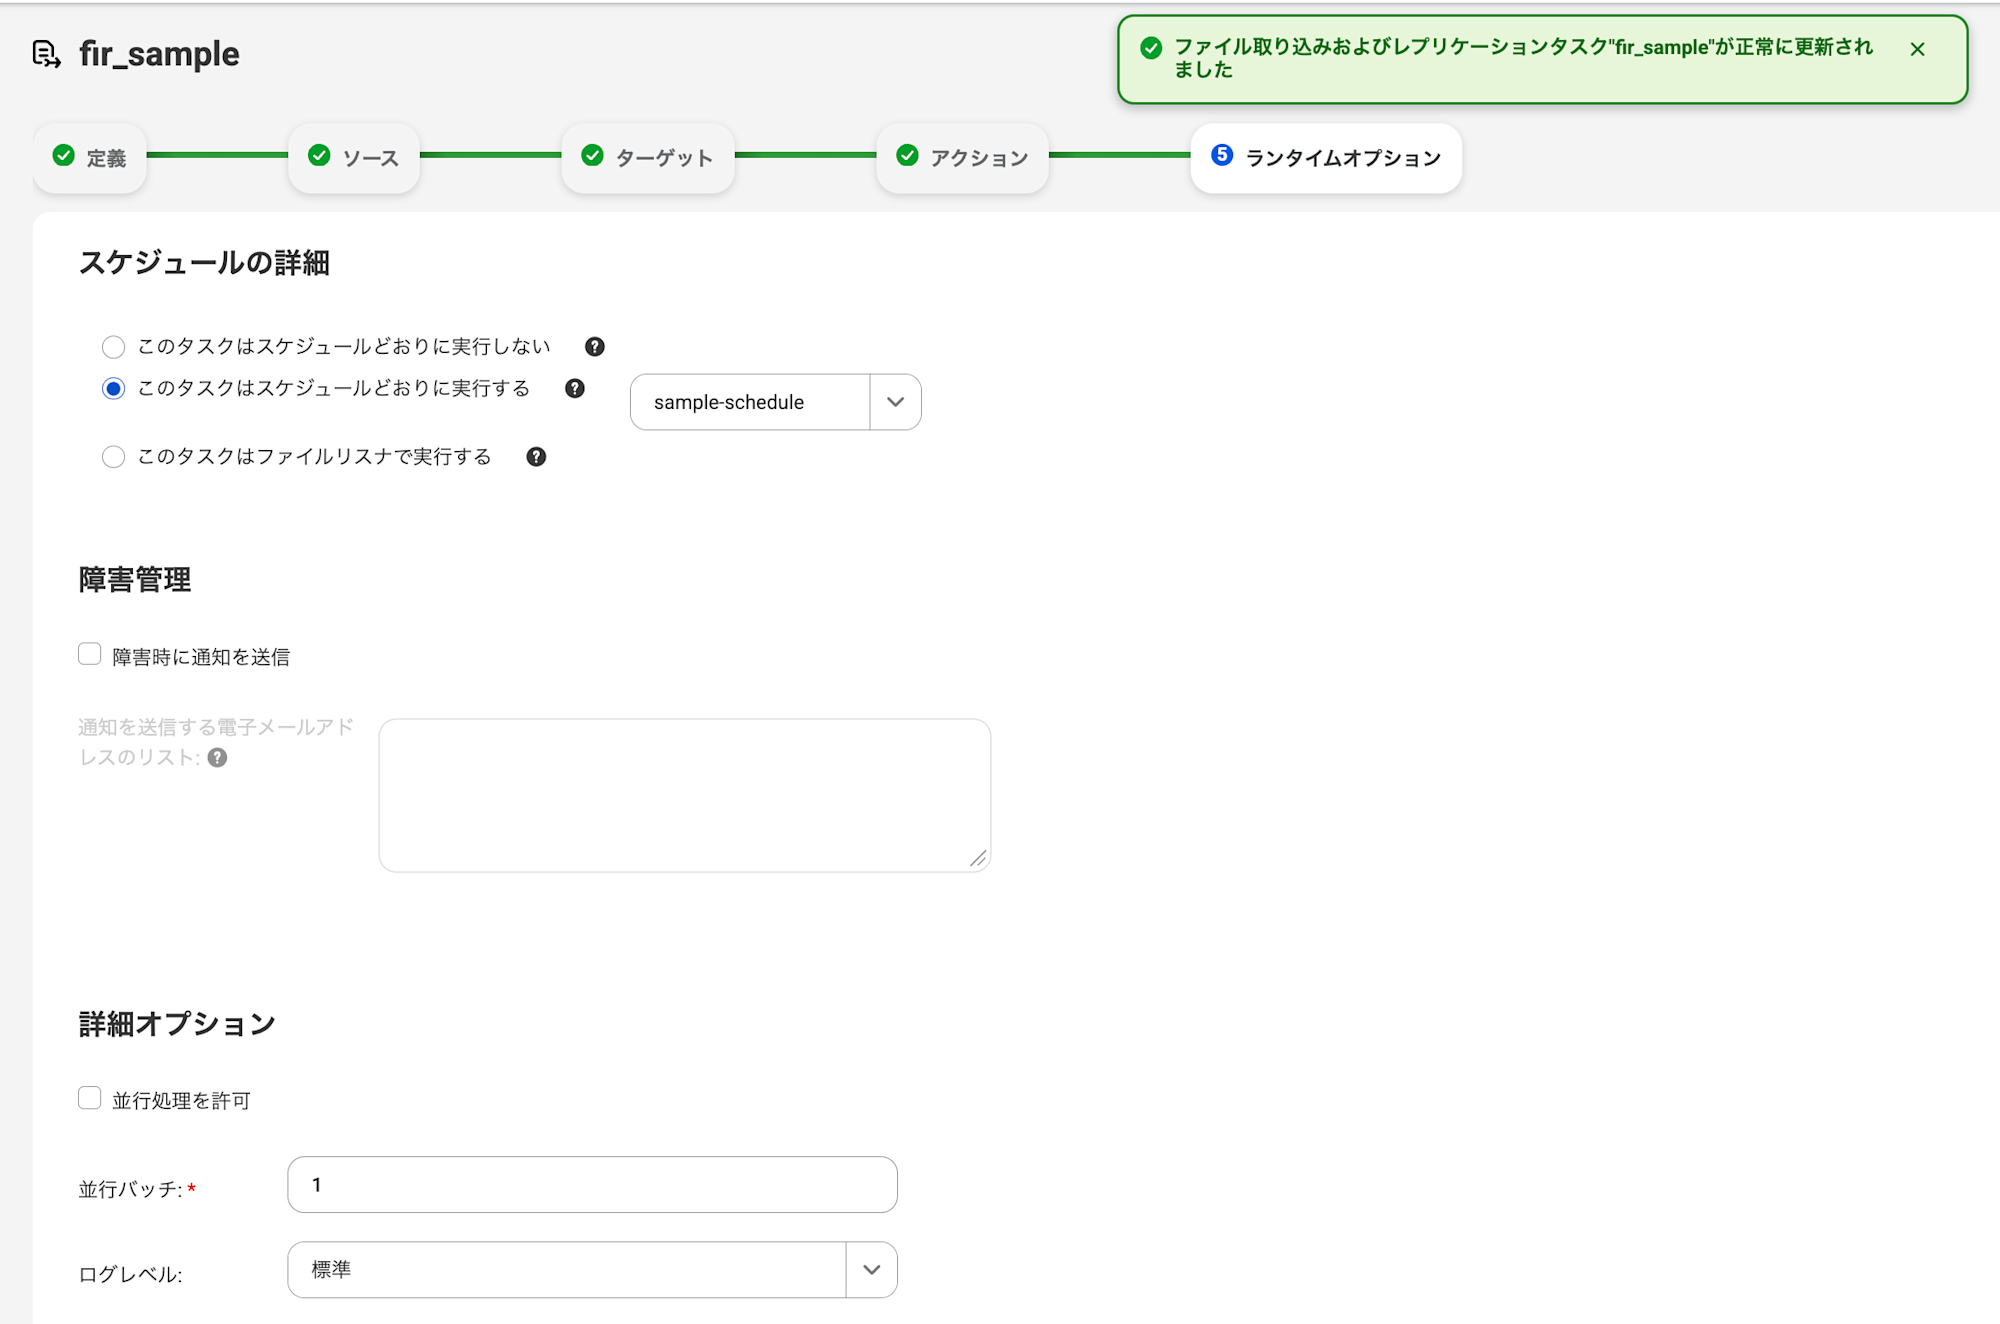
3-6. Runtime Options Settings
Configure task execution methods and notification settings.
For details on actions, please refer to the Informatica official documentation.
Schedule Details
Select the execution method from the following three options:
| Option | Description | Additional Settings |
|---|---|---|
| Do not run this task on schedule | Manual execution | - |
| Run this task on schedule | Scheduled execution (regular execution) | Select schedule frequency |
| Run this task with file listener | File listener execution (event-driven) | Select file listener |
Failure Management
| Item | Setting Content | Required | Notes |
|---|---|---|---|
| Send notification on failure | Enable/Disable | - | |
| List of email addresses to send notifications to | Enter email addresses | - | Set when Send notification on failure is enabled |
Advanced Options
| Item | Setting Content | Required | Notes |
|---|---|---|---|
| Allow concurrent execution | Enable/Disable | - | Allow simultaneous execution of multiple jobs |
| Concurrent batches | Specify number of batches to execute concurrently | ○ | Default: 1 |
| Log level | Standard / Silent / Verbose / Debug | ○ | Default: Standard |
⚠️Caution: If you enable concurrent execution, unexpected results may occur when duplicate files exist in the target.
Save
After completing the settings, click the "Save" button in the upper right corner of the screen to save the task.
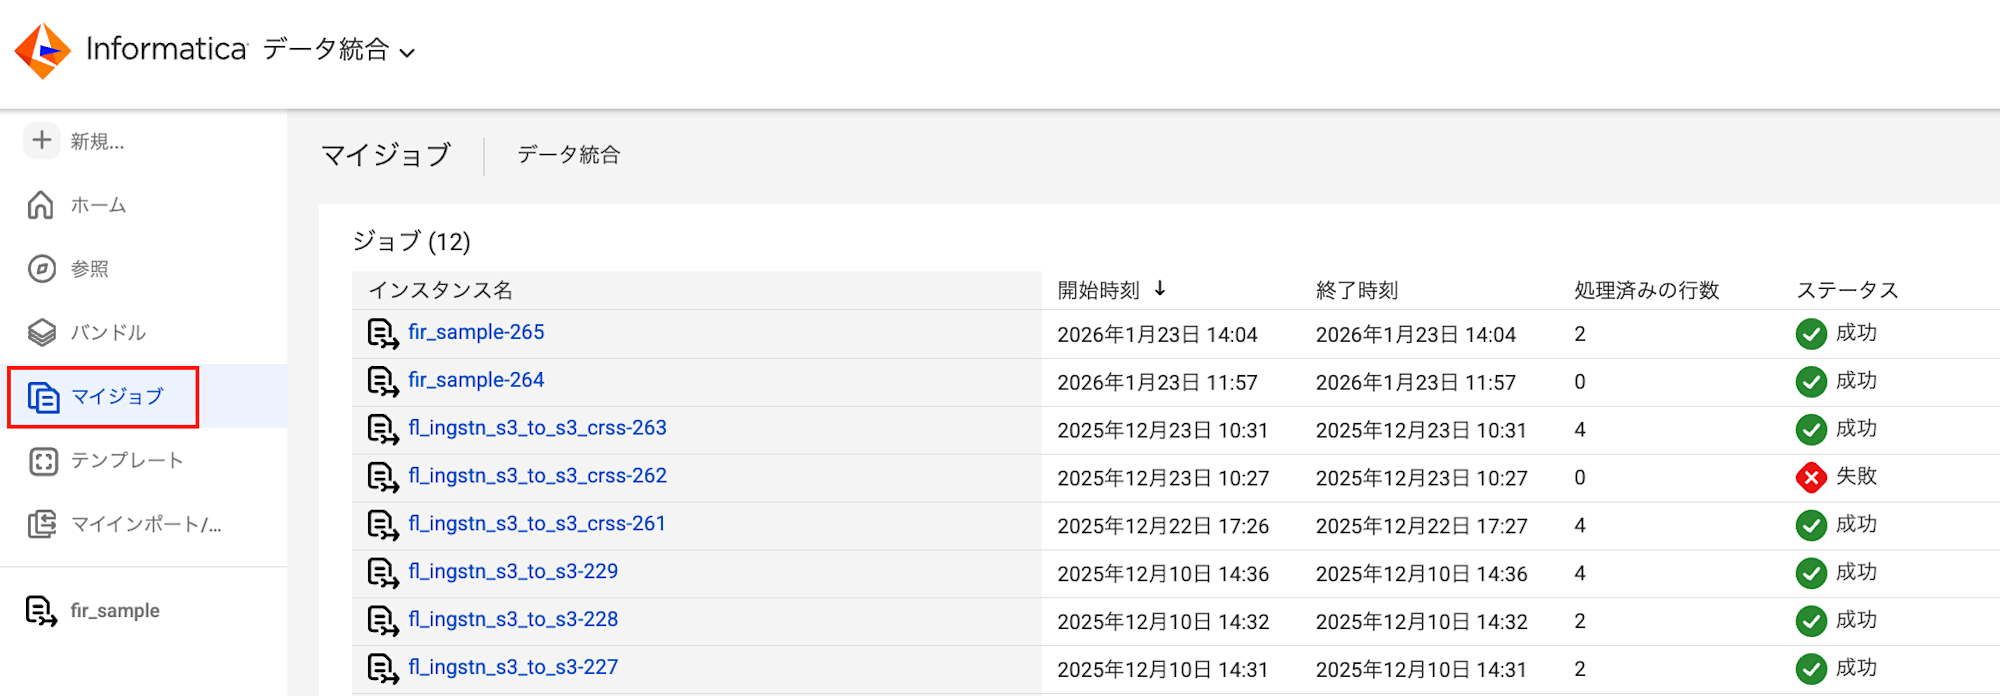
4. How to Run Jobs
Run the created job.
-
Click "Run" in the upper right corner of the File Ingestion and Replication screen
-
You can check the job status from "My Jobs"
5. Summary
In this article, we explained the procedure for creating a file transfer task using Informatica IDMC's File Ingestion and Replication.
We hope to continue sharing more efficient usage methods and best practices for Informatica IDMC features in this blog as we discover them through practical use.
Thank you for reading.