
Using Cloudflare WARP for IPv4 communication from an IPv6-only EC2 instance
This page has been translated by machine translation. View original
Since February 1, 2024, AWS has begun charging for Public IPv4 addresses. This fee is $0.005/hour, which translates to approximately $3.6/address per month (30 days), a cost comparable to the monthly fee for a t4g.nano instance (approximately $3.94).
Meanwhile, as of January 2025, some AWS services like SSM (Systems Manager) are still only available via IPv4. To use these services from EC2 instances without public IPv4 addresses, NAT Gateways or VPC endpoints were previously required.
In this article, I'll introduce how I tested whether IPv4 communication is possible through Cloudflare WARP's tunnel (IPv4 over IPv6) without using public IPv4 addresses or NAT Gateways.
Architecture Overview
The components of the environment we'll build are as follows:
- VPC: IPv4/IPv6 dual-stack (but IPv4 is private only, IGW is omitted)
- Egress-Only Internet Gateway: IPv6 outbound only
- S3 Gateway Endpoint: Used as a route for package acquisition from the official Amazon Linux 2023 repository and for S3 connection to temporarily store the WARP RPM
- EC2 Instance Connect Endpoint: Used as an SSH connection route from outside in an Egress-Only Gateway environment
- Cloudflare WARP: Implementing IPv4 over IPv6
Why This Configuration Works
How Cloudflare WARP Works
Cloudflare WARP is a WireGuard-based VPN tunnel. It connects to Cloudflare via IPv6, and Cloudflare performs the conversion to IPv4, enabling IPv4 over IPv6.
Environment Setup
VPC Setup (vpc-template.yaml)
I created a VPC with the following resources using CloudFormation:
- VPC (IPv4/IPv6 dual-stack)
- Two private subnets
- Egress-Only Internet Gateway
- S3 Gateway Endpoint
- EC2 Instance Connect Endpoint
Full template
AWSTemplateFormatVersion: '2010-09-09'
Description: 'IPv6-only VPC Test - Complete private VPC with IPv6 connectivity'

Parameters:
  ProjectName:
    Type: String
    Default: 'ipv6-vpc-test'
    Description: 'IPv6-only VPC Test - Project name prefix for AWS resources'

Resources:
  # VPC
  VPC:
    Type: AWS::EC2::VPC
    Properties:
      CidrBlock: '192.168.0.0/18'
      EnableDnsHostnames: true
      EnableDnsSupport: true
      Tags:
        - Key: Name
          Value: !Ref ProjectName

  # IPv6 CIDR Block
  IPv6CidrBlock:
    Type: AWS::EC2::VPCCidrBlock
    Properties:
      VpcId: !Ref VPC
      AmazonProvidedIpv6CidrBlock: true

  # Private Subnets
  PrivateSubnet1:
    Type: AWS::EC2::Subnet
    DependsOn: IPv6CidrBlock
    Properties:
      VpcId: !Ref VPC
      CidrBlock: '192.168.0.0/20'
      AvailabilityZone: !Select [0, !GetAZs '']
      Ipv6CidrBlock: !Select [0, !Cidr [!Select [0, !GetAtt VPC.Ipv6CidrBlocks], 2, 64]]
      AssignIpv6AddressOnCreation: true
      Tags:
        - Key: Name
          Value: !Sub '${ProjectName}-private-subnet-1a'

  PrivateSubnet2:
    Type: AWS::EC2::Subnet
    DependsOn: IPv6CidrBlock
    Properties:
      VpcId: !Ref VPC
      CidrBlock: '192.168.16.0/20'
      AvailabilityZone: !Select [1, !GetAZs '']
      Ipv6CidrBlock: !Select [1, !Cidr [!Select [0, !GetAtt VPC.Ipv6CidrBlocks], 2, 64]]
      AssignIpv6AddressOnCreation: true
      Tags:
        - Key: Name
          Value: !Sub '${ProjectName}-private-subnet-1c'

  # Egress-Only Internet Gateway (IPv6)
  EgressOnlyInternetGateway:
    Type: AWS::EC2::EgressOnlyInternetGateway
    Properties:
      VpcId: !Ref VPC

  # Private Route Table
  PrivateRouteTable:
    Type: AWS::EC2::RouteTable
    Properties:
      VpcId: !Ref VPC
      Tags:
        - Key: Name
          Value: !Sub '${ProjectName}-private-rt'

  # IPv6 Route (via Egress-Only IGW)
  PrivateRouteIPv6:
    Type: AWS::EC2::Route
    Properties:
      RouteTableId: !Ref PrivateRouteTable
      DestinationIpv6CidrBlock: '::/0'
      EgressOnlyInternetGatewayId: !Ref EgressOnlyInternetGateway

  # Subnet Associations
  PrivateSubnet1Association:
    Type: AWS::EC2::SubnetRouteTableAssociation
    Properties:
      SubnetId: !Ref PrivateSubnet1
      RouteTableId: !Ref PrivateRouteTable

  PrivateSubnet2Association:
    Type: AWS::EC2::SubnetRouteTableAssociation
    Properties:
      SubnetId: !Ref PrivateSubnet2
      RouteTableId: !Ref PrivateRouteTable

  # VPC Endpoint - S3
  S3Endpoint:
    Type: AWS::EC2::VPCEndpoint
    Properties:
      VpcId: !Ref VPC
      ServiceName: !Sub 'com.amazonaws.${AWS::Region}.s3'
      VpcEndpointType: Gateway
      RouteTableIds:
        - !Ref PrivateRouteTable

  # EC2 Instance Connect Endpoint
  EC2InstanceConnectEndpoint:
    Type: AWS::EC2::InstanceConnectEndpoint
    Properties:
      SubnetId: !Ref PrivateSubnet1
      SecurityGroupIds:
        - !Ref EC2InstanceConnectSecurityGroup
      Tags:
        - Key: Name
          Value: !Sub '${ProjectName}-eice'

  # Security Group for EC2 Instance Connect Endpoint
  EC2InstanceConnectSecurityGroup:
    Type: AWS::EC2::SecurityGroup
    Properties:
      GroupDescription: Security group for EC2 Instance Connect Endpoint
      VpcId: !Ref VPC
      SecurityGroupEgress:
        - IpProtocol: tcp
          FromPort: 22
          ToPort: 22
          CidrIp: 192.168.0.0/18
      Tags:
        - Key: Name
          Value: !Sub '${ProjectName}-eice-sg'

Outputs:
  VPCId:
    Description: 'VPC ID'
    Value: !Ref VPC
    Export:
      Name: !Sub '${ProjectName}-vpc-id'

  PrivateSubnet1Id:
    Description: 'Private Subnet 1 ID'
    Value: !Ref PrivateSubnet1
    Export:
      Name: !Sub '${ProjectName}-private-subnet-1-id'

  PrivateSubnet2Id:
    Description: 'Private Subnet 2 ID'
    Value: !Ref PrivateSubnet2
    Export:
      Name: !Sub '${ProjectName}-private-subnet-2-id'
Preparing the WARP RPM
Since there is no official Cloudflare WARP repository for Amazon Linux 2023, I used the one for CentOS/RHEL8.
The WARP dependencies (desktop-file-utils nftables nss-tools) were installed from the official Amazon Linux 2023 repository.
For WARP itself, I downloaded the CentOS/RHEL8 RPM from the Cloudflare download page, saved it to S3, and used it for installation.
- Download source: https://developers.cloudflare.com/cloudflare-one/team-and-resources/devices/warp/download-warp/
- Version used: Linux for CentOS/RHEL8(arm64)
- Version: 2025.9.558.0
- Date: 2025-11-11
EC2 Instance Setup (ec2-warp-launch-template.yaml)
I created an EC2 environment with the following resources using CloudFormation:
- IAM role (for SSM + S3 access)
- Security group (allowing SSH from the EC2 Instance Connect Endpoint)
- Launch Template (configuring Cloudflare WARP in UserData)
- EC2 instance (launched using the Launch Template)
Full template
AWSTemplateFormatVersion: '2010-09-09'
Description: 'Launch Template with Cloudflare WARP in IPv6-only VPC (ARM64 Optimized)'

Parameters:
  VpcId:
    Type: AWS::EC2::VPC::Id
    Description: 'VPC ID'

  SubnetId:
    Type: AWS::EC2::Subnet::Id
    Description: 'Subnet ID'

  InstanceType:
    Type: String
    Default: 't4g.micro'
    AllowedValues: ['t4g.nano', 't4g.micro', 't4g.small']
    Description: 'EC2 instance type (ARM64 only)'

  KeyPairName:
    Type: AWS::EC2::KeyPair::KeyName
    Description: 'EC2 Key Pair for SSH access'

  WarpRpmS3Uri:
    Type: String
    Description: 'S3 URI for WARP RPM'

  ImageId:
    Type: AWS::SSM::Parameter::Value<AWS::EC2::Image::Id>
    Default: '/aws/service/ami-amazon-linux-latest/al2023-ami-kernel-default-arm64'
    Description: 'AMI ID for EC2 instance'

Resources:
  EC2Role:
    Type: AWS::IAM::Role
    Properties:
      RoleName: !Sub '${AWS::StackName}-ec2-role'
      AssumeRolePolicyDocument:
        Version: '2012-10-17'
        Statement:
          - Effect: Allow
            Principal:
              Service: ec2.amazonaws.com
            Action: sts:AssumeRole
      ManagedPolicyArns:
        - arn:aws:iam::aws:policy/AmazonSSMManagedInstanceCore
      Policies:
        - PolicyName: WarpS3Access
          PolicyDocument:
            Version: '2012-10-17'
            Statement:
              - Effect: Allow
                Action: s3:GetObject
                Resource: arn:aws:s3:::cloudflare-warp-temp/*

  EC2InstanceProfile:
    Type: AWS::IAM::InstanceProfile
    Properties:
      InstanceProfileName: !Sub '${AWS::StackName}-instance-profile'
      Roles:
        - !Ref EC2Role

  EC2SecurityGroup:
    Type: AWS::EC2::SecurityGroup
    Properties:
      GroupDescription: 'Security group for WARP EC2 instance'
      VpcId: !Ref VpcId
      SecurityGroupEgress:
        - IpProtocol: -1
          CidrIpv6: '::/0'
          Description: 'All outbound traffic over IPv6'
        - IpProtocol: -1
          CidrIp: '0.0.0.0/0'
          Description: 'All outbound traffic over IPv4'
      Tags:
        - Key: Name
          Value: 'warp-ec2-sg'

  WarpLaunchTemplate:
    Type: AWS::EC2::LaunchTemplate
    Properties:
      LaunchTemplateName: !Sub '${AWS::StackName}-launch-template'
      LaunchTemplateData:
        ImageId: !Ref ImageId
        InstanceType: !Ref InstanceType
        KeyName: !Ref KeyPairName
        IamInstanceProfile:
          Arn: !GetAtt EC2InstanceProfile.Arn
        NetworkInterfaces:
          - DeviceIndex: 0
            SubnetId: !Ref SubnetId
            Ipv6AddressCount: 1
            Groups:
              - !Ref EC2SecurityGroup
        UserData:
          Fn::Base64: !Sub |
            #!/bin/bash
            # Install dependencies
            dnf install -y desktop-file-utils nftables nss-tools
            # Download and install WARP
            aws s3 cp "${WarpRpmS3Uri}" /tmp/cloudflare-warp.rpm
            rpm -ivh /tmp/cloudflare-warp.rpm
            # Start WARP service
            systemctl enable --now warp-svc
            for i in {1..30}; do warp-cli status &>/dev/null && break; sleep 2; done
            # Register and configure WARP
            script -q -c "yes | warp-cli registration new" /dev/null
            warp-cli mode warp
            # Exclude IPv6 from WARP tunnel (IPv4 only through WARP)
            warp-cli tunnel ip add-range ::/0
            warp-cli connect
            # Restart SSM agent
            systemctl restart amazon-ssm-agent

  WarpEC2Instance:
    Type: AWS::EC2::Instance
    Properties:
      LaunchTemplate:
        LaunchTemplateId: !Ref WarpLaunchTemplate
        Version: !GetAtt WarpLaunchTemplate.LatestVersionNumber

Outputs:
  InstanceId:
    Description: 'EC2 Instance ID'
    Value: !Ref WarpEC2Instance
    Export:
      Name: !Sub '${AWS::StackName}-instance-id'
Key Points for WARP Configuration
- Starting warp-svc can take several tens of seconds, so I added a wait process
# Enable and start WARP service
systemctl enable --now warp-svc

# Wait for service to start (max 60 seconds)
for i in {1..30}; do warp-cli status &>/dev/null && break; sleep 2; done
- During
warp-cli registration new, you're interactively asked to agree to terms, which I handled with a pseudo TTY
# Register WARP
script -q -c "yes | warp-cli registration new" /dev/null
- I implemented a split tunnel configuration to exclude IPv6 communication from the WARP tunnel
# Exclude IPv6 from WARP tunnel (IPv4 only through WARP)
warp-cli tunnel ip add-range ::/0
For Cloudflare WARP's terms of service and constraints, please check the official documentation and FAQ (https://developers.cloudflare.com/warp-client/known-issues-and-faq/).
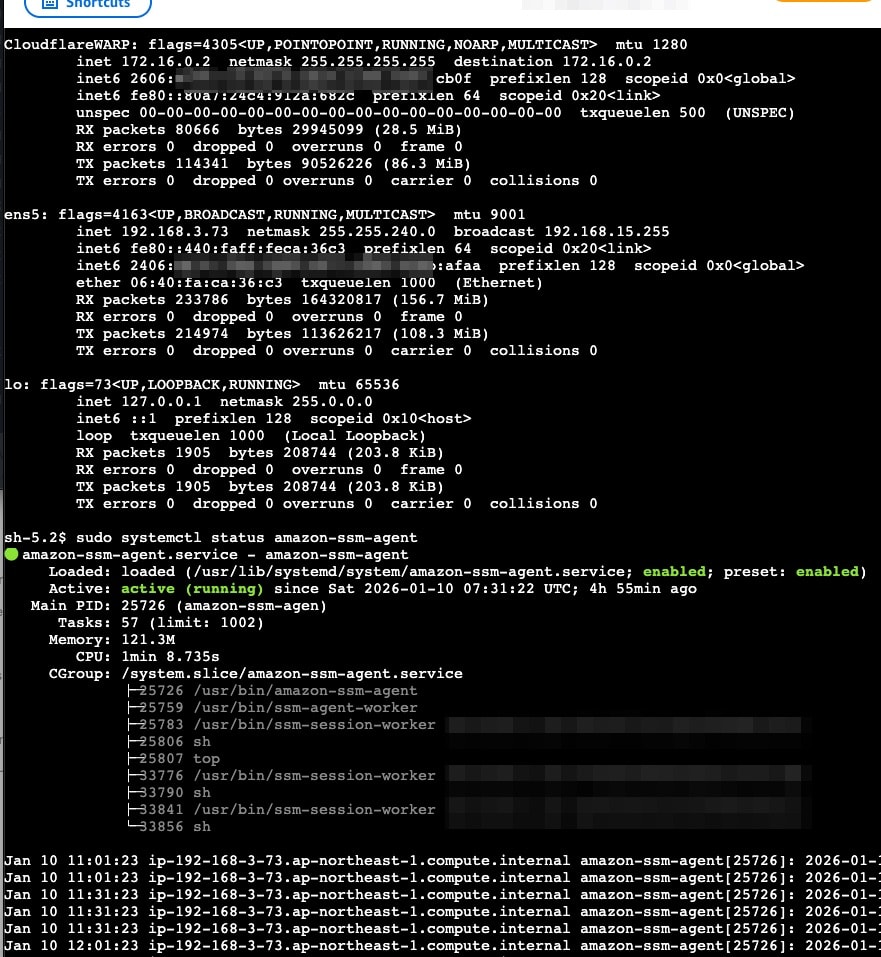
Verification
I connected via the EC2 Instance Connect Endpoint using SSH to perform the verification.
$ aws ec2-instance-connect ssh --instance-id i-xxxxxxxxxxxxx71f5 --region ap-northeast-1
WARP Status Check
$ warp-cli status
Status update: Connected
Network: healthy
IPv6 Communication Check
$ curl -6 -s https://ipv6.icanhazip.com
2406:da14:xxxx:xxxx:xxxx:xxxx:848b:afaa
The global IPv6 address assigned to the EC2 was returned. This is going through the Egress-Only IGW.
IPv4 Communication Check
$ curl -4 -s https://ipv4.icanhazip.com
104.xx.xxx.105
An IPv4 address owned by Cloudflare was returned. This confirms that the WARP tunnel is functioning properly.
SSM Connection Check
After configuring WARP, I confirmed that SSM's "start-session" could be used.
$ aws ssm start-session --target i-xxxxxxxxxxxxx71f5 --region ap-northeast-1
I was able to connect using Session Manager even to an EC2 without public IPv4 addresses, NAT Gateway, or VPC endpoints (ssm, ssmmessages, ec2messages).
Cost Comparison
| Item | EC2 Public IP | NAT Gateway | Cloudflare WARP |
|---|---|---|---|
| Fixed cost | $0.005/hour (approx. $3.6/month) | $0.062/hour (approx. $45/month) | $0 |
| EC2 data transfer (in) | $0 | $0 | $0 |
| EC2 data transfer (out) | $0.114/GB | $0.114/GB | $0.114/GB |
| NAT Gateway processing | - | $0.062/GB | - |
Conclusion
I've confirmed that even in an IPv6-only VPC environment without NAT Gateway, services requiring IPv4 communication like SSM can be used by using Cloudflare WARP.
For workloads that primarily use IPv6 communication and use IPv4 communication for auxiliary purposes, especially for low-spec instances or development environments leveraging the t4g.small free tier extended to the end of 2026, IPv4 over IPv6 connection via WARP is effective.
However, Amazon Linux 2023 is not included in Cloudflare WARP's list of supported operating systems, and support from both Cloudflare and AWS cannot be expected. I strongly recommend limiting the configuration introduced in this article to testing environments without service impact or personal use.
In the future, I hope that AWS will officially provide a low-cost IPv4 over IPv6 mechanism, and that dual-stack support will advance in services from AWS and other companies, enabling a practical IPv6 native environment.
Reference Links