
Building a Private LLM Environment (Qwen 3.5-4B) on AWS That Can Be Used from Both Smartphones and PCs
This page has been translated by machine translation. View original
Introduction
When cloud LLM services like Claude or ChatGPT experience outages, they become unavailable. For engineers who regularly use LLMs, these outages can significantly impact work efficiency. I imagine many of you would like to have your own LLM environment as a backup.
Running a local LLM on your home PC isn't particularly difficult. However, this assumes continuous operation, and you can't access it when you're away from home.
In this article, we'll self-host an open model—a so-called local LLM—on an AWS GPU instance, and use Tailscale to create a private environment that can be accessed from both PC and smartphone regardless of location. When not in use, it automatically stops to minimize costs.
For the LLM, I used Qwen 3.5-4B which was just released on March 2, 2026. The 4B parameter model has been verified to work on a g4dn.xlarge with T4 GPU (VRAM 16GB).
What is Qwen?
Qwen is a family of open-source large language models developed by Alibaba Cloud's Qwen team. The Qwen 3.5 series released in March 2026 comes in a wide range of sizes from 0.8B to 397B parameters, all available under the Apache 2.0 license. It supports a "thinking mode" that outputs the reasoning process during inference, and I used the 4B model, which is the easiest to run.
Test Environment
- Project setup: WSL2 Ubuntu 24.04
- Terraform: v1.12.2
- AWS CLI: v2.31.31
- AWS Region: us-east-1
- EC2 instance type: g4dn.xlarge
- Browser testing (PC): Windows 11
- Tailscale: v1.94.2
- Browser testing (smartphone): Android OS 16
- Tailscale: v1.94.2
Target Audience
- Engineers who want to have their own LLM environment as a backup
- People who want to access their personal LLM from both smartphone and PC, regardless of location
- People interested in local LLMs but don't want to keep their home PC running constantly
References
Overall Architecture
Here is an overview of the architecture.
-
Tailscale
A service that creates a private network simply by installing client apps on your PC and smartphone. In this setup, we don't expose any inbound ports, accessinghttp://qwen-llm:8080only through Tailscale. It's free for personal use. -
Open WebUI
A chat UI that integrates with Ollama. It features a responsive design for comfortable operation on both PCs and smartphones. -
Ollama
A runtime that allows easy execution of LLMs in Docker containers. You can download and start using models with just anollama pullcommand. -
Qwen 3.5-4B
A 4B parameter LLM developed by Alibaba Cloud. Its thinking mode allows you to see the reasoning process while getting answers. -
EC2 Spot Instance (g4dn.xlarge)
A GPU instance equipped with an NVIDIA T4 GPU. Using it as a spot instance reduces costs by 60-70% compared to on-demand pricing. -
Auto-shutdown Script
A shell script that runs every 5 minutes via cron. It automatically stops the instance if it remains idle for over an hour.
Environment Setup
From here, I'll explain the steps to actually build the environment. I'll provide the full Terraform code, so you can use it as is.
Prerequisites
You'll need the following tools and accounts:
Directory Structure
Create files with the following directory structure:
qwen-on-ec2/
└── infra/
    ├── main.tf
    ├── variables.tf
    ├── outputs.tf
    ├── versions.tf
    └── userdata.sh
versions.tf
AWS provider configuration:
terraform {
  required_version = ">= 1.5"

  required_providers {
    aws = {
      source  = "hashicorp/aws"
      version = "~> 5.0"
    }
  }
}

provider "aws" {
  region = var.aws_region
}
variables.tf
Variable definitions. Since default values are set, only tailscale_auth_key needs to be specified.
variable "aws_region" {
  description = "AWS region to deploy resources"
  type        = string
  default     = "us-east-1"
}

variable "instance_type" {
  description = "EC2 instance type for GPU inference"
  type        = string
  default     = "g4dn.xlarge"
}

variable "ami_id" {
  description = "AMI ID to use. Leave empty to auto-detect the Deep Learning Base AMI (Ubuntu 22.04)"
  type        = string
  default     = ""
}

variable "tailscale_auth_key" {
  description = "Tailscale auth key for private network access"
  type        = string
  sensitive   = true
}

variable "spot_max_price" {
  description = "Maximum spot price in USD per hour"
  type        = string
  default     = "0.25"
}

variable "root_volume_size" {
  description = "Root EBS volume size in GB (Deep Learning AMI requires >= 75)"
  type        = number
  default     = 75
}

variable "open_webui_port" {
  description = "Port number for Open WebUI"
  type        = number
  default     = 8080
}
Leaving ami_id empty will automatically detect the Deep Learning Base AMI. This AMI has NVIDIA drivers pre-installed, reducing setup time.
main.tf
This is the core infrastructure. The file is long, so I've collapsed it.
Full main.tf
# --- AMI ---

data "aws_ami" "deep_learning_base" {
  count       = var.ami_id == "" ? 1 : 0
  most_recent = true
  owners      = ["amazon"]

  filter {
    name   = "name"
    values = ["Deep Learning Base OSS Nvidia Driver GPU AMI (Ubuntu 22.04) *"]
  }

  filter {
    name   = "architecture"
    values = ["x86_64"]
  }
}

locals {
  ami_id = var.ami_id != "" ? var.ami_id : data.aws_ami.deep_learning_base[0].id
}

# --- Network ---

data "aws_vpc" "default" {
  default = true
}

data "aws_subnets" "default" {
  filter {
    name   = "vpc-id"
    values = [data.aws_vpc.default.id]
  }

  filter {
    name   = "default-for-az"
    values = ["true"]
  }
}

resource "aws_security_group" "llm" {
  name_prefix = "qwen-llm-"
  description = "Qwen LLM - inbound denied, outbound allowed"
  vpc_id      = data.aws_vpc.default.id

  egress {
    from_port   = 0
    to_port     = 0
    protocol    = "-1"
    cidr_blocks = ["0.0.0.0/0"]
    description = "Allow all outbound traffic"
  }

  tags = {
    Name = "qwen-llm"
  }

  lifecycle {
    create_before_destroy = true
  }
}

# --- IAM Role (for self-stop via AWS API) ---

resource "aws_iam_role" "llm" {
  name = "qwen-llm-ec2"

  assume_role_policy = jsonencode({
    Version = "2012-10-17"
    Statement = [{
      Action = "sts:AssumeRole"
      Effect = "Allow"
      Principal = {
        Service = "ec2.amazonaws.com"
      }
    }]
  })

  tags = {
    Name = "qwen-llm"
  }
}

resource "aws_iam_role_policy" "llm_self_stop" {
  name = "self-stop"
  role = aws_iam_role.llm.id

  policy = jsonencode({
    Version = "2012-10-17"
    Statement = [{
      Effect   = "Allow"
      Action   = "ec2:StopInstances"
      Resource = "*"
      Condition = {
        StringEquals = {
          "ec2:ResourceTag/Name" = "qwen-llm"
        }
      }
    }]
  })
}

resource "aws_iam_role_policy_attachment" "llm_ssm" {
  role       = aws_iam_role.llm.name
  policy_arn = "arn:aws:iam::aws:policy/AmazonSSMManagedInstanceCore"
}

resource "aws_iam_instance_profile" "llm" {
  name = "qwen-llm-ec2"
  role = aws_iam_role.llm.name
}

# --- EC2 Spot Instance ---

resource "aws_instance" "llm" {
  ami           = local.ami_id
  instance_type = var.instance_type

  instance_market_options {
    market_type = "spot"
    spot_options {
      max_price                      = var.spot_max_price
      spot_instance_type             = "persistent"
      instance_interruption_behavior = "stop"
    }
  }

  iam_instance_profile = aws_iam_instance_profile.llm.name

  vpc_security_group_ids      = [aws_security_group.llm.id]
  subnet_id                   = tolist(data.aws_subnets.default.ids)[0]
  associate_public_ip_address = true

  root_block_device {
    volume_size           = var.root_volume_size
    volume_type           = "gp3"
    delete_on_termination = true
  }

  user_data_base64 = base64encode(templatefile("${path.module}/userdata.sh", {
    tailscale_auth_key = var.tailscale_auth_key
    open_webui_port    = var.open_webui_port
  }))

  tags = {
    Name = "qwen-llm"
  }
}
-
Security Group
No inbound rules are defined. All access is via Tailscale, so there's no need to expose ports. Only outbound is allowed. -
IAM Role
Grantsec2:StopInstancespermission. This is needed for the auto-shutdown script to stop the instance itself. AConditionwith tagName = qwen-llmensures it doesn't affect other instances. -
Spot Instance
Set withspot_instance_type = "persistent"andinstance_interruption_behavior = "stop". If AWS needs to interrupt the instance, it will be stopped rather than terminated. Data on EBS is preserved, and you can continue using it after restarting.
outputs.tf
Output definitions to check after deployment:
output "instance_id" {
  description = "EC2 instance ID"
  value       = aws_instance.llm.id
}

output "public_ip" {
  description = "Public IP address (for debugging only - use Tailscale IP for access)"
  value       = aws_instance.llm.public_ip
}

output "ami_id" {
  description = "AMI ID used"
  value       = local.ami_id
}

output "access_url" {
  description = "Open WebUI URL (via Tailscale)"
  value       = "http://qwen-llm:${var.open_webui_port}"
}
userdata.sh
A script that automatically runs during the instance's first boot. It automates everything from installing Docker and Tailscale to downloading the LLM model.
Full userdata.sh
#!/bin/bash
set -euxo pipefail

exec > >(tee /var/log/userdata.log) 2>&1
echo "=== User Data: started at $(date) ==="

# Skip if already initialized (for stop/start cycles)
if [ -f /opt/qwen-llm/.initialized ]; then
  echo "Already initialized. Exiting."
  exit 0
fi

# ---- Install AWS CLI (for auto-shutdown via API) ----
apt-get update
apt-get install -y ca-certificates curl gnupg unzip conntrack
if ! command -v aws &> /dev/null; then
  curl -fsSL "https://awscli.amazonaws.com/awscli-exe-linux-x86_64.zip" -o "/tmp/awscliv2.zip"
  unzip -q /tmp/awscliv2.zip -d /tmp
  /tmp/aws/install
  rm -rf /tmp/aws /tmp/awscliv2.zip
fi

# ---- Install Docker (skip if pre-installed on Deep Learning AMI) ----
if ! command -v docker &> /dev/null; then
  install -m 0755 -d /etc/apt/keyrings
  curl -fsSL https://download.docker.com/linux/ubuntu/gpg \
    | gpg --dearmor -o /etc/apt/keyrings/docker.gpg
  chmod a+r /etc/apt/keyrings/docker.gpg

  echo \
    "deb [arch=$(dpkg --print-architecture) signed-by=/etc/apt/keyrings/docker.gpg] https://download.docker.com/linux/ubuntu \
    $(. /etc/os-release && echo "$VERSION_CODENAME") stable" \
    | tee /etc/apt/sources.list.d/docker.list > /dev/null

  apt-get update
  apt-get install -y docker-ce docker-ce-cli containerd.io docker-buildx-plugin docker-compose-plugin
else
  echo "Docker already installed, skipping."
fi

# ---- Install NVIDIA Container Toolkit (skip if pre-installed) ----
if ! dpkg -l nvidia-container-toolkit &> /dev/null; then
  rm -f /usr/share/keyrings/nvidia-container-toolkit-keyring.gpg
  curl -fsSL https://nvidia.github.io/libnvidia-container/gpgkey \
    | gpg --dearmor -o /usr/share/keyrings/nvidia-container-toolkit-keyring.gpg

  curl -s -L https://nvidia.github.io/libnvidia-container/stable/deb/nvidia-container-toolkit.list \
    | sed 's#deb https://#deb [signed-by=/usr/share/keyrings/nvidia-container-toolkit-keyring.gpg] https://#g' \
    | tee /etc/apt/sources.list.d/nvidia-container-toolkit.list

  apt-get update
  apt-get install -y nvidia-container-toolkit
else
  echo "NVIDIA Container Toolkit already installed, skipping."
fi

# Ensure Docker is configured for NVIDIA runtime
nvidia-ctk runtime configure --runtime=docker
systemctl restart docker

# ---- Install Tailscale ----
curl -fsSL https://tailscale.com/install.sh | sh
set +x  # Don't output auth key to logs
tailscale up --auth-key=${tailscale_auth_key} --hostname=qwen-llm
set -x

# ---- Create Docker Compose file ----
mkdir -p /opt/qwen-llm
cat > /opt/qwen-llm/docker-compose.yml << 'COMPOSE_EOF'
services:
  ollama:
    image: ollama/ollama
    ports:
      - "11434:11434"
    volumes:
      - ollama_data:/root/.ollama
    environment:
      - OLLAMA_KEEP_ALIVE=-1
      - OLLAMA_NUM_PARALLEL=4
    deploy:
      resources:
        reservations:
          devices:
            - driver: nvidia
              count: all
              capabilities: [gpu]
    restart: unless-stopped

  open-webui:
    image: ghcr.io/open-webui/open-webui:main
    ports:
      - "${open_webui_port}:8080"
    environment:
      - OLLAMA_BASE_URL=http://ollama:11434
      - ENABLE_TITLE_GENERATION=false
      - ENABLE_TAGS_GENERATION=false
      - ENABLE_SEARCH_QUERY_GENERATION=false
    volumes:
      - open_webui_data:/app/backend/data
    depends_on:
      - ollama
    restart: unless-stopped

volumes:
  ollama_data:
  open_webui_data:
COMPOSE_EOF

# ---- Start services ----
cd /opt/qwen-llm
docker compose up -d

# ---- Wait for Ollama and pull model ----
echo "Waiting for Ollama to be ready..."
for i in $(seq 1 60); do
  if curl -sf http://localhost:11434/api/tags > /dev/null 2>&1; then
    echo "Ollama is ready!"
    break
  fi
  echo "Waiting... ($i/60)"
  sleep 5
done

echo "Pulling Qwen 3.5-4B model..."
docker exec $(docker ps -qf "ancestor=ollama/ollama") ollama pull qwen3.5:4b

# ---- Auto-shutdown script ----
cat > /opt/qwen-llm/auto-shutdown.sh << 'SHUTDOWN_EOF'
#!/bin/bash
# Monitor TCP connections to Open WebUI with conntrack,
# and stop the instance if it remains idle for a certain period.
# Using conntrack because connections through Docker NAT aren't visible with ss.
IDLE_THRESHOLD=3600
TIMESTAMP_FILE="/tmp/last-activity"
WEBUI_PORT=${open_webui_port}

ACTIVE_CONNECTIONS=$(conntrack -L -p tcp --dport "$WEBUI_PORT" 2>/dev/null \
  | grep -c ESTABLISHED || echo "0")

if [ "$ACTIVE_CONNECTIONS" -gt 0 ]; then
  date +%s > "$TIMESTAMP_FILE"
  exit 0
fi

if [ ! -f "$TIMESTAMP_FILE" ]; then
  date +%s > "$TIMESTAMP_FILE"
  exit 0
fi

LAST_ACTIVITY=$(cat "$TIMESTAMP_FILE")
CURRENT_TIME=$(date +%s)
IDLE_TIME=$((CURRENT_TIME - LAST_ACTIVITY))

if [ "$IDLE_TIME" -ge "$IDLE_THRESHOLD" ]; then
  INSTANCE_ID=$(curl -sf http://169.254.169.254/latest/meta-data/instance-id)
  REGION=$(curl -sf http://169.254.169.254/latest/meta-data/placement/region)
  logger "auto-shutdown: Idle for $${IDLE_TIME}s. Stopping instance $${INSTANCE_ID}."
  aws ec2 stop-instances --instance-ids "$INSTANCE_ID" --region "$REGION"
fi
SHUTDOWN_EOF

chmod +x /opt/qwen-llm/auto-shutdown.sh

# Cron job: run every 5 minutes + initialize timestamp at reboot
printf '%s\n%s\n' \
  '@reboot root date +\%s > /tmp/last-activity' \
  '*/5 * * * * root /opt/qwen-llm/auto-shutdown.sh >> /var/log/auto-shutdown.log 2>&1' \
  > /etc/cron.d/auto-shutdown
chmod 644 /etc/cron.d/auto-shutdown

# Initialize timestamp
date +%s > /tmp/last-activity

# Mark as initialized
touch /opt/qwen-llm/.initialized

echo "=== User Data: completed at $(date) ==="
This script is processed by Terraform's templatefile function, so ${tailscale_auth_key} and ${open_webui_port} will be replaced with Terraform variable values. The script checks for /opt/qwen-llm/.initialized at the beginning, so it won't run anything if the instance is stopped and restarted. It's designed to run only the first time.
Running the Deployment
Create terraform.tfvars and set your Tailscale auth key:
tailscale_auth_key = "tskey-auth-xxxxxxxxxxxx-xxxxxxxxxxxxxxxxxxxxxxxxxxxxxxxx"
Run the deployment:
cd infra
terraform init
terraform apply
When apply completes, the access URL will be output to the terminal:
Outputs:

access_url  = "http://qwen-llm:8080"
instance_id = "i-0xxxxxxxxxxxx"
Automatic Setup After Launch
After terraform apply completes, the User Data script runs in the background:
- Install AWS CLI
- Install Docker
- Install NVIDIA Container Toolkit
- Install and authenticate Tailscale
- Start Ollama + Open WebUI containers
- Download Qwen 3.5-4B model (about 3 GB)
- Register auto-shutdown cron job
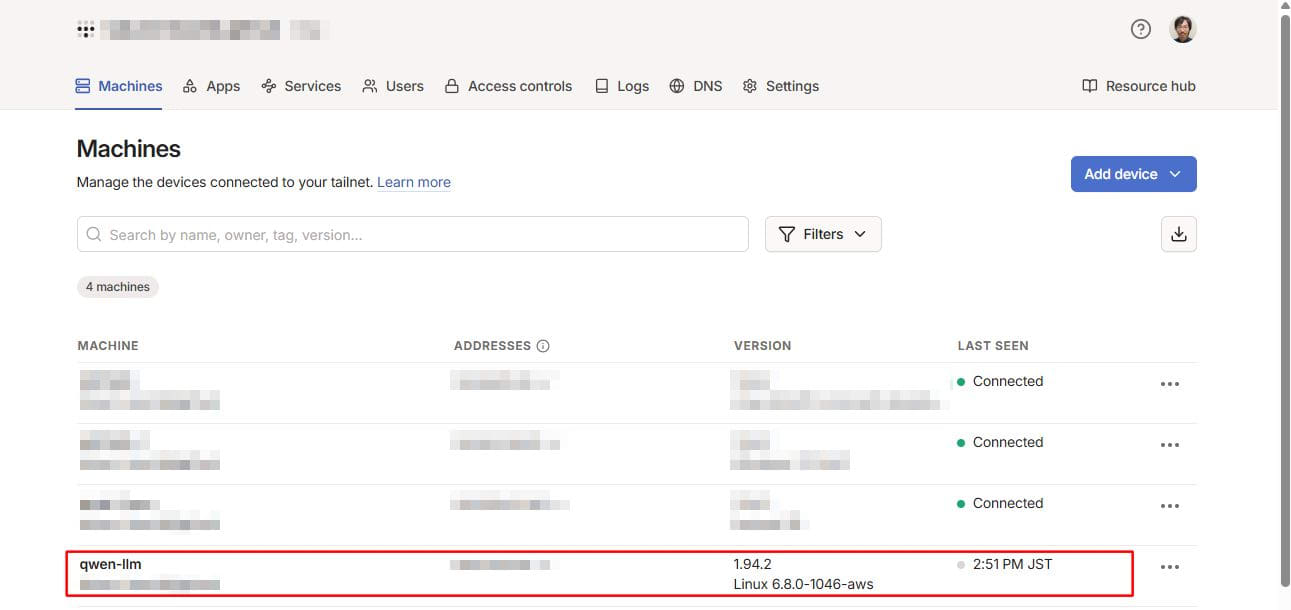
The whole process takes about 5-10 minutes. When qwen-llm appears in the Tailscale admin panel, steps 1-4 are complete.
Testing: Access from Both PC and Smartphone
Verifying Tailscale Connection
Open the Tailscale admin panel and confirm that qwen-llm appears in the device list.
Accessing Open WebUI and Initial Setup
Open http://qwen-llm:8080 in your PC browser. You'll see the account creation screen on first access.
- Click Sign up
- Enter Name, Email, and Password
- Click Create Account
Chatting from PC
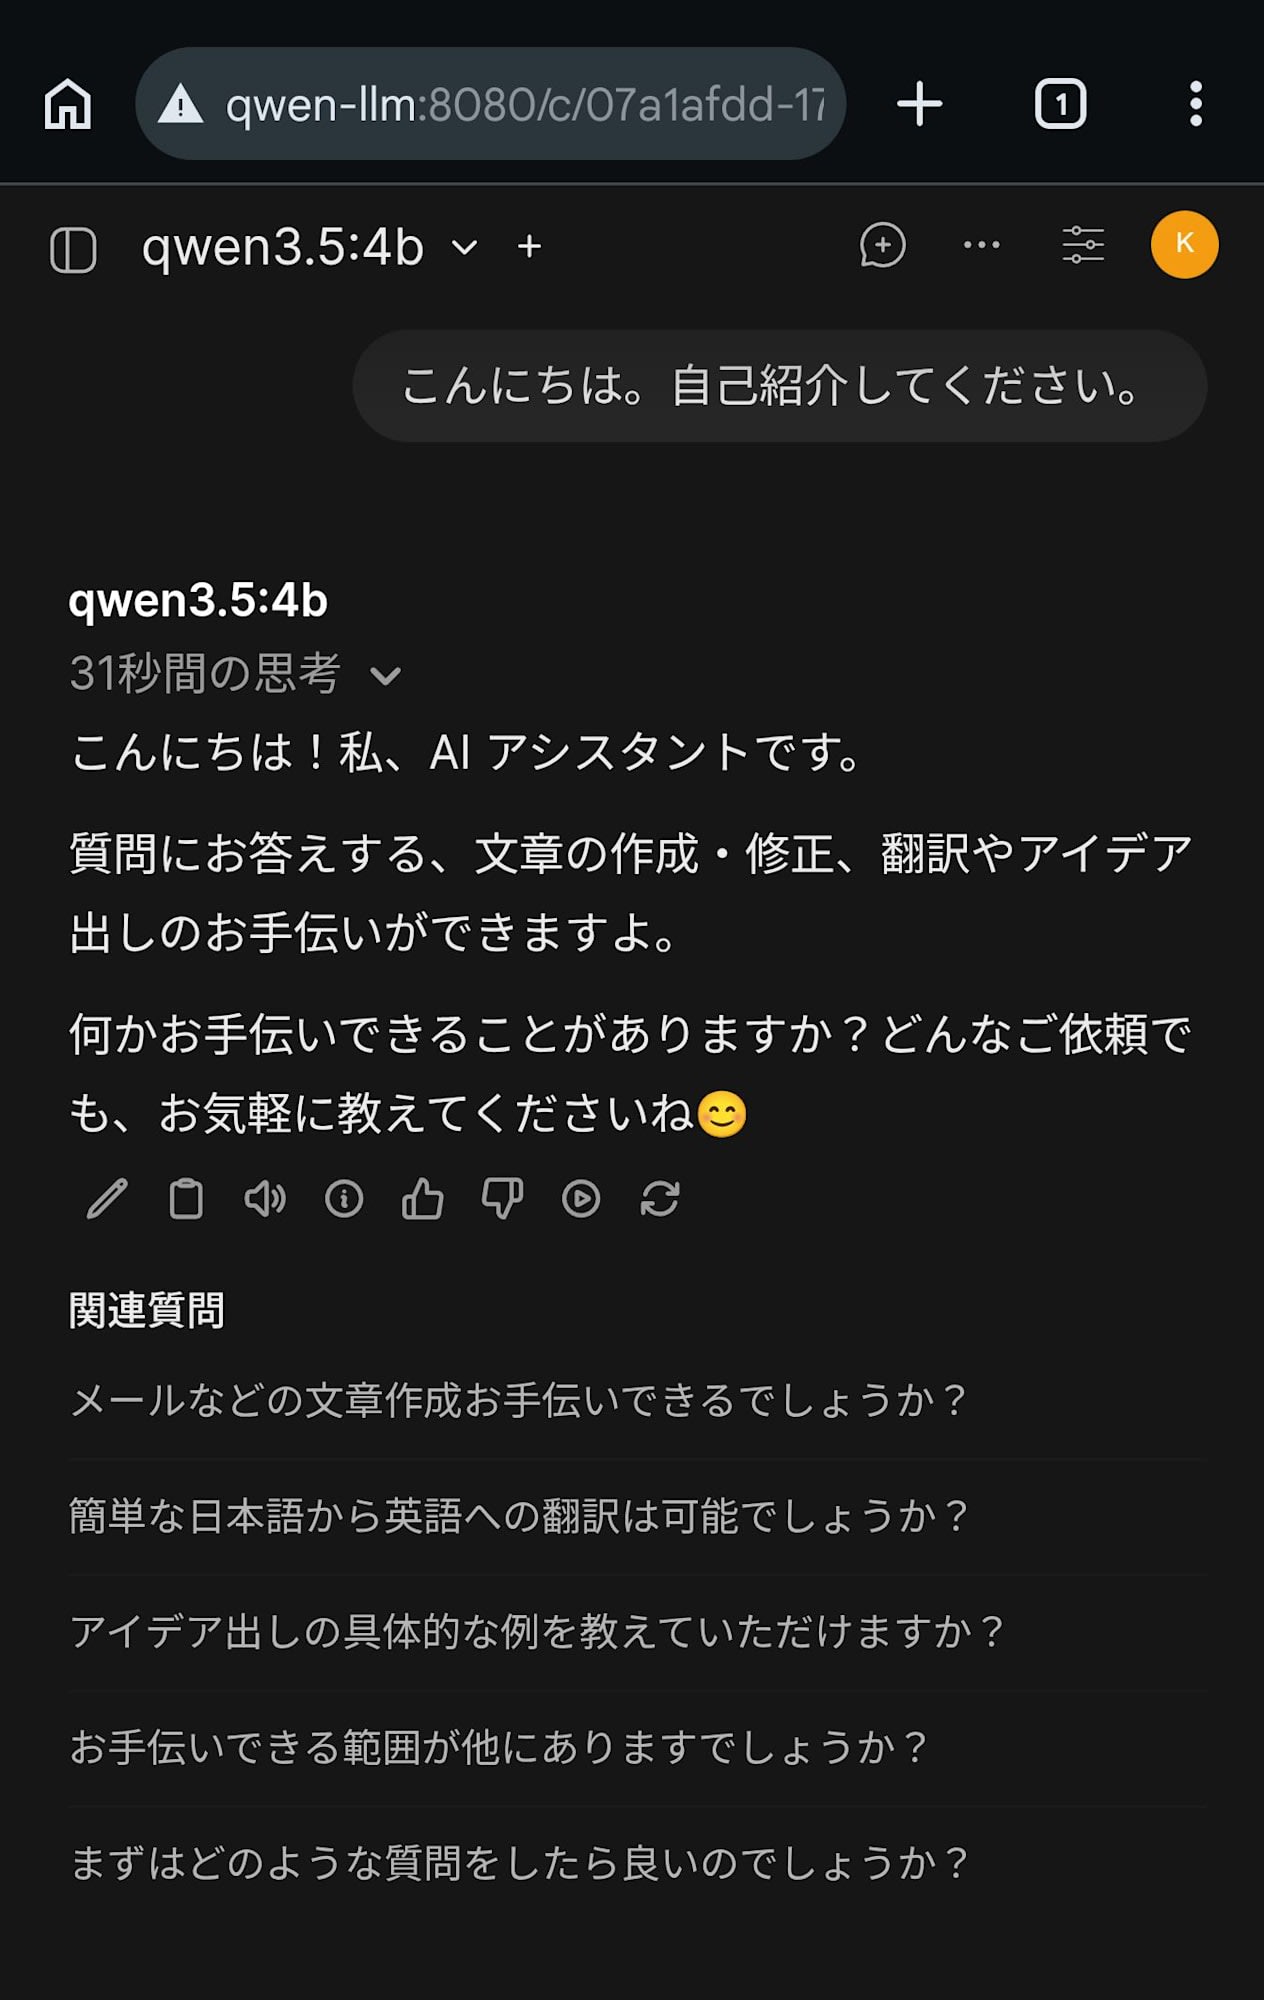
Select the qwen3.5:4b model at the top of the chat screen and send a message.
Chatting from Smartphone
Install the Tailscale app on your Android smartphone and sign in with the same account as your PC.
Open http://qwen-llm:8080 in your smartphone's browser to access the same Open WebUI. Log in with the account you created earlier, and you'll see the chat history from your PC.
Impressions from Use
Beyond just the setup process, I wanted to see if this could serve as a practical backup for cloud LLMs.
Response Speed
Qwen 3.5-4B has thinking mode enabled by default. For technical questions, this thinking mode worked effectively. When I asked it to optimize a C language for loop, it spent 101 seconds analyzing memory access patterns and returned accurate optimization suggestions considering cache locality.
Prompt and full response
次の for 文を高速化してください。
```c
for (i = 0; i < n; i++) {
  for (j = 0; j < n; j++) {
    a[j][i]++;
  }
}
```

----

C の 2 次元配列(または multidimensional array)を高速化するための最も効果的な最適化は、**「メモリアccess パターン(キャッシュローカリティ)」**の改善です。

そのための具体的な手順とコード例を提示します。

### 1. メモリアクセスパターンの問題点
C のマルチディメンション配列は通常、**Row-Major order**(行優先)でメモリに配置されています。つまり、同じ行にある要素同士はメモリ上も隣接して配置されています。

*   **元のコード(高速化前):**
    ```c
    // i を外ループ,j を内ループ
    for (i = 0; i < n; i++) {
        for (j = 0; j < n; j++) {
            a[j][i]++; // 行番号 j は固定されない。列 index i が変わってくる。
        }
    }
    ```
  *   **問題:** `a[j][i]` ここで外ループが `i` (column) を動かすと、内ループで `j` (row) が変更されていき、メモリ上のアクセスは**「列を下から上へ(縦)」**に行きます。これにより、連続したメモリにアクセスせず、キャッシュにミスが発生し、大量のメモリアクセスがサーバーへ送られることになります。

### 2. 高速化後のコード
**内側ループを `i` から `j` に変更する**だけで、メモリ上のアクセスは「行を横から右へ(横)」に変更されます。これにより、連続したメモリ要素へのアクセスが可能になり、キャッシュヒット率が劇的に向上します。

```c
// Optimized Code: Loop Reorder (Row-Major)
int n = /* your size */;
// Assuming a is declared as int a[n][n] or similar contiguous structure.
for (j = 0; j < n; j++) {
    for (i = 0; i < n; i++) {
        // Memory access order: a[j][0], a[j][1], ..., a[j][n-1]
        // This is ROW-MAJORITY traversal.
        a[j][i]++;
    }
}
```

### 3. 高速化の原理:キャッシュ効率
*   **Cache Line:** 一般に CPU のキャッシュラインは 64 bytes (8 words) です。
*   **Row-Major Access:** `a[j][0]...` と並んでアクセスすることで、次の要素が即座にキャッシュから取得できます(Prefetching が効きます)。
*   **Column-Major Access:** `a[0][i], a[1][i]...` はメモリアクセスはランダムになり、データが異なるキャッシュライン上にあればその度にディスクまたは RAM の直接メモリにアクセスする必要が発生します。

### 4. その他の高度な最適化オプション
上記のループ順の変更に加え、以下のオプションを組み合わせるとさらに高速化が期待できます。

#### A. コンパイラフラグ
コンパイラが自動で最適化を行う必要があります。
*   `-O3`: 高度なコード生成(例:関数アンラーリング、内側ループの展開など)。
*   `-march=native`: プロセサー固有の指令セットを使用します(AVX2, AVX-512, SSE などによるベクトル演算が可能に)。

#### B. SIMD / 並列化 (OpenMP)
CPU のコアを同時に活用できますが、`++` 演算子には**「Atomic Operation」**が必要になります。

```c
#pragma omp parallel for reduction(+:sum_variable) if (n > 100) // reduction は不要の場合の省略形は避けるので明示的
for (j = 0; j < n; j++) {
    #pragma omp simd // ベクトル化を指示(CPU が対応していれば有効)
    for (i = 0; i < n; i++) {
        a[j][i]++; // これらは異なるコアが書き込むため、OpenMP で並列化すると各コア内部で atomic な挙動が必要。
        // しかし,単純に a[j][i]++ とした場合、原子性は必要ないのか?
        // 注意:a[j][i]++ は値を読み込み、変更し、書き戻す動作。
        // もし複数のスレッドが同じ a[j][i] にアクセスする必要があるなら atomic な処理が必要。
    }
}
```
※通常、OpenMP で並列化する場合の `reduction` を使用しないと結果が崩れる可能性があります(原子性確保のため)。
しかし、上記コードの場合は「すべてを増す」だけなので、`sum` 計算などは不要です。もし単純に配列全体を増やせば、**ループ分割されたスレッド間でデータ独立性**がある場合は並列化できます。

### まとめ:最優先すべき変更
1. **ループ順序の切り替え**: `for(i...) for(j...)` → `for(j...) for(i...)`。これが最も直接的かつ効果的な最適化です。
2. **コンパイラオプションの適用**: `-O3 -march=native` を使用してください。
3. **メモリアライメント(追加)**: `a[j][i]` にアクセスする場合、`a[j]` はポインタとして扱えますが、動的配列の場合、`int *ptr = &a[j];` として明示的にポインタ演算を行うことでキャッシュヒット率がさらに向上する可能性があります。ただし、静的な `int a[n][n]` の場合も同様です。

最終的なコードは以下のようになります(ループ順の切り替えのみ)。

```c
// Final Optimized Code
for (j = 0; j < n; j++) { // Outer loop for Rows (Cache Locality)
    for (i = 0; i < n; i++) { // Inner loop for Columns (Sequential Access)
        a[j][i]++;
    }
}
```
On the other hand, for daily conversation-level questions like self-introductions, responses return in just seconds. There was no noticeable difference in response speed when accessing from a smartphone.
Response Quality
For everyday conversations and technical questions, it responds in natural Japanese. While there is a noticeable quality difference compared to Claude or ChatGPT, it felt sufficient to serve as a backup during outages.
However, despite not having web search capabilities, in some cases it responded with phrases like "I cannot search for reliable public information sources" or "To improve search accuracy...". This is an example where the model fails to accurately explain its own capabilities. In reality, it has no search functionality at all, so these expressions are inaccurate.
Prompt and full response
DevelopersIO の越井琢巳という執筆者について教えてください。

----

申し訳ありませんが、「DevelopersIO の越井琢巳」という個人について、信頼できる公的な情報源(公式プロフィール、記事、メディアなどの確立されたデータ)を検索できません。

可能性としては以下の通りです:
- **名称や組織名の誤記**:開発者向けのコミュニティや技術系の団体名が類似している場合があるため、より正確な名前(例:「DevelopersIO」ではなく「Devs.io」または別の名称など)と確認をお勧めします。
- **限られた公開情報**:個人が公開活動を行っていない、あるいは情報が非公式なブログや SNS 上でしか存在しない可能性もあります。

正確な情報を提供する際は、名前や所属組織の正しい表記(ローマ字・英字)、または具体的な役割(例:技術作家、プロジェクトリーダーなど)を補足いただけますでしょうか?さらに検索精度を高めるため、以下の点をご確認いただくお手伝いができます。
In thinking mode, the reasoning process is displayed in real-time. It allows you to peek into how a 4B parameter model thinks.
I also observed issues with inference processes in areas where the model's knowledge is vague. When asked "Please tell me the names of all Tokugawa shoguns," it couldn't recall the names of the 4th and subsequent shoguns, falling into an infinite loop of self-questioning dozens of times.
* Actually, the list of Tokugawa Shoguns includes:
1. Ieyasu
2. Hidetada
3. Iemitsu
4. **Iesada**? (Wait, no). It was **Yoshimune**. Wait, no.
* Okay, let's try to recall the names again:
1. Ieyasu
2. Hidetata
3. Iemitsu
4. **Iesada**? (Wait, no). It was **Yoshimune**. Wait, no.
* Actually, there is a specific name "Matsudaira Toshisuke".
* Okay, let's try to find the correct names:
1. Ieyasu
2. Hidetada
3. Iemitsu
4. **Iesada**? (Wait, no). It was **Yoshimune**. Wait, no.
* Actually, there is a common misconception about the count. Let's check if it is 15 or 16.
* Actually, the list of Tokugawa Shoguns includes:
1. Ieyasu
2. Hidetada
3. Iemitsu
4. **Iesada**? (Wait, no). It was **Yoshimune**. Wait, no.
* Actually, there is a specific name "Matsudaira Toshisuke".
* Okay, let's try to find the correct names:
1. Ieyasu
2. Hidetada
3. Iemitsu
4. **Iesada**? (Wait, no). It was **Yoshimune**. Wait, no.
Eventually, it may have reached the token limit, as the process ended with an empty response.
Verification: Auto-shutdown
To avoid costs when not in use, I've implemented a mechanism to automatically stop the instance after 1 hour of idle time.
A shell script run by cron every 5 minutes monitors active TCP connections to Open WebUI using the conntrack command. If no connections are detected for 1 hour, it retrieves its own instance ID from the instance metadata and stops itself using aws ec2 stop-instances.
For TCP connection monitoring, I use conntrack rather than ss. Open WebUI runs in a Docker container, and access via Tailscale is forwarded through iptables DNAT. The ss command on the host side doesn't show connections through Docker NAT, so I chose conntrack which references the Linux kernel's connection tracking table.
Additionally, a @reboot cron entry initializes the timestamp file. On EC2 stop/start, /tmp is preserved because it's on the EBS root volume. If an old timestamp remains when the instance starts, it might be judged as exceeding the threshold immediately and shut down.
I tested with a temporarily reduced threshold of 300 seconds and confirmed that about 10 minutes after closing the browser, the instance state transitioned from stopping to stopped in the AWS console.
Restarting and Recovery After Shutdown
You can restart a stopped instance with the following command:
aws ec2 start-instances --instance-ids <instance-id> --region us-east-1
After restart, Docker containers automatically recover due to the restart: unless-stopped setting. Tailscale also reconnects automatically, so you can access it again at the same URL after a few minutes. Models are retained on the EBS volume, so no re-download is necessary.
Notes
Here are issues I encountered during testing, which may help if you try the same setup:
Initial Response Delay Due to VRAM Unloading
By default, Ollama unloads models from VRAM after 5 minutes of inactivity. After unloading, the first request requires reloading the model, which took 1-2 minutes with this setup.
To address this, I set the OLLAMA_KEEP_ALIVE=-1 environment variable in Docker Compose to keep the model in VRAM permanently. For a single-model configuration, there's no benefit to unloading.
Open WebUI's Auto-generation Tasks Block Responses
After chat responses, Open WebUI sends title generation, tag generation, and related question generation task requests to the same LLM. Since Qwen 3.5 has a thinking mode, these tasks also execute the thinking phase and take time. Other chat requests sent during this time get blocked and remain in a loading state. Setting OLLAMA_NUM_PARALLEL=4 didn't help.
To address this, I disabled all auto-generation features using environment variables in Docker Compose:
ENABLE_TITLE_GENERATION=falseENABLE_TAGS_GENERATION=falseENABLE_SEARCH_QUERY_GENERATION=false
When title auto-generation is disabled, the initial prompt text is used as the chat title. Note that if containers are already running, adding environment variables alone won't take effect. Disable these features from the admin panel or personal settings.
Open WebUI Environment Variables and PersistentConfig
Some Open WebUI settings like ENABLE_TITLE_GENERATION are managed by a PersistentConfig mechanism. Environment variables are only read on first startup; on subsequent starts, values saved in the database take precedence. Therefore, adding environment variables after containers are already running won't take effect. To change settings, use the admin panel or personal settings.
Tailscale Auth Key Expiration
Tailscale auth keys have a default expiration of 90 days. While already joined devices aren't immediately disconnected when an auth key expires (device node keys have a separate 180-day limit), you won't be able to join the Tailscale network when rebuilding the instance after termination. For long-term operation, either periodically update the auth key and modify terraform.tfvars, or consider using Tailscale's OAuth client for automatic renewal.
Spot Instance Interruption Risk
Spot instances can be interrupted by AWS. If interrupted, you'll need to manually restart them.
Waiting for Spot Instance Restart
When restarting a stopped spot instance, start-instances may fail until the spot request state transitions to instance-stopped-by-user. If it's in a marked-for-stop state, wait a few minutes before trying again.
Conclusion
I've set up a self-hosted Qwen 3.5-4B on an AWS GPU instance, creating a private LLM environment accessible from both PC and smartphone via Tailscale. Despite being just a 4B parameter model, it provided practical answers including optimization suggestions considering cache locality for technical questions. While there are challenges like thinking mode infinite loops and hallucinations, it seems sufficient as a backup when Claude or ChatGPT are unavailable. I hope this helps those considering building their own private LLM environment.