
Building and Deploying an A2A Server with Strands Agents + Amazon Bedrock AgentCore
This page has been translated by machine translation. View original
Introduction
Hello, this is Kamino from the consulting department who loves supermarkets.
It feels like the new year just started, but it's already February. Time flies...
Recently, I've been hearing about protocols like A2A more frequently.
This is a protocol for agents built with different frameworks to communicate with each other and execute processes.
I understand that A2A is supported by AgentCore, but I've been increasingly curious about how it actually behaves... So I wrote this article to explain the basics through hands-on experience using AgentCore and Strands Agents!
Prerequisites
Environment & Library Versions
I used the following libraries:
- Python 3.12
- uv 0.9.26
- strands-agents[a2a] >= 1.23.0
- bedrock-agentcore >= 1.2.0
- bedrock-agentcore-starter-toolkit >= 0.2.8
- strands-agents-tools[a2a-client] >= 0.2.19
- AWS CLI properly configured
- Region used
- us-west-2
What is the A2A Protocol?
A2A (Agent-to-Agent) is an open standard protocol aimed at enabling interoperability between AI agents built on different vendors/frameworks. It was initiated by Google and transferred to the Linux Foundation as a hosted project.
Welcome to the official documentation for the Agent2Agent (A2A) Protocol, an open standard designed to enable seamless communication and collaboration between AI agents.
Originally developed by Google and now donated to the Linux Foundation, A2A provides the definitive common language for agent interoperability in a world where agents are built using diverse frameworks and by different vendors.
Key features include:
- Vendor-independent interoperability
- Connects agents across different platforms like LangGraph, CrewAI, Strands Agents
- Communication via JSON-RPC protocol
- Works complementary to MCP (Model Context Protocol)
Clients first retrieve an Agent Card to understand the capabilities of the agent they want to communicate with, then send messages via JSON-RPC.
For more details, check out Google's YouTube video which explains it clearly:
Agent Card
The Agent Card is a key feature of the A2A protocol.
It's a JSON metadata document that agents use to publish information about themselves, available at the /.well-known/agent-card.json endpoint.
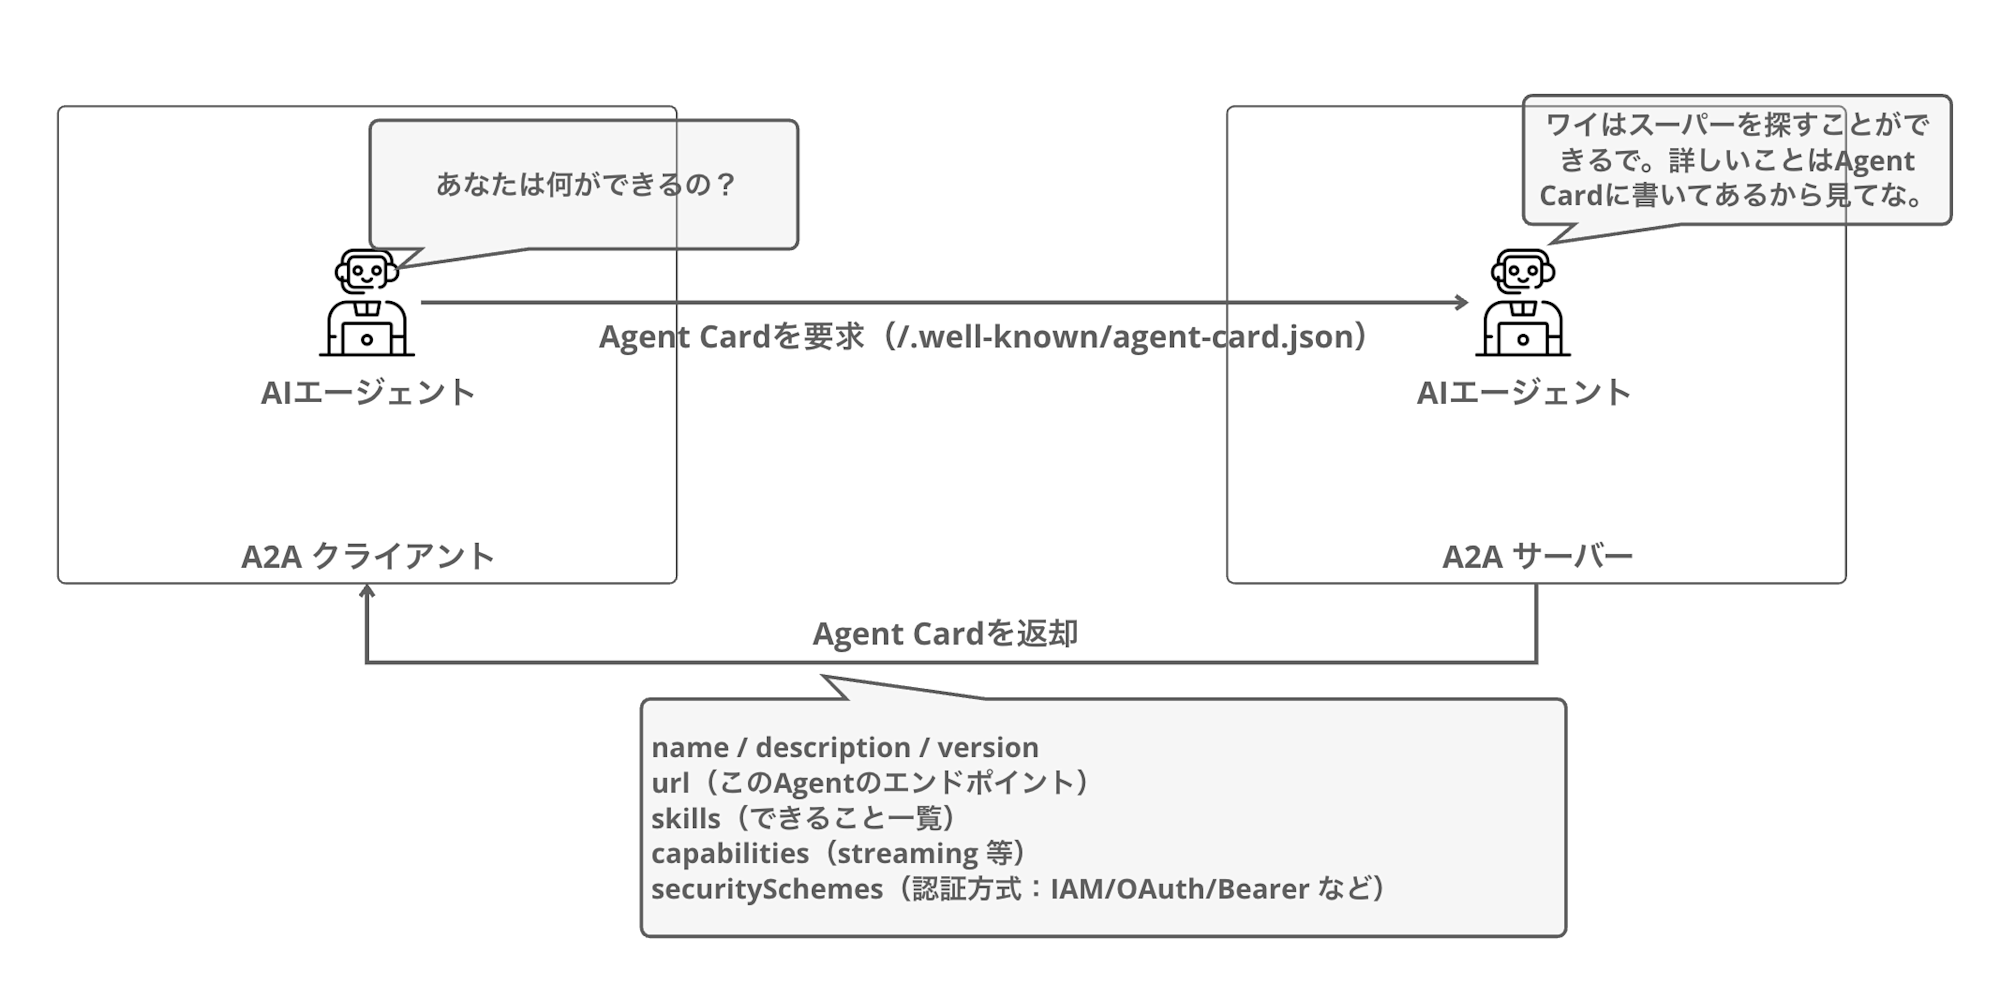
By retrieving the Agent Card, clients can understand what the agent can do and how to authenticate with it. This enables agents to understand each other's capabilities and collaborate appropriately.
An actual Agent Card JSON looks like this:
{
  "name": "Calculator Agent",
  "description": "A calculator agent that can perform basic arithmetic operations.",
  "url": "http://127.0.0.1:9000/",
  "version": "0.0.1",
  "capabilities": {
    "streaming": true,
    "pushNotifications": false
  },
  "skills": [
    {
      "id": "calculator",
      "name": "calculator",
      "description": "Perform basic arithmetic operations",
      "inputModes": ["text"],
      "outputModes": ["text"]
    }
  ],
  "securitySchemes": {
    "bearer": {
      "type": "http",
      "scheme": "bearer"
    }
  },
  "security": ["bearer"]
}
An Agent Card is essentially like a business card for AI agents, which makes it easy to understand.
I vaguely understand the concept, but to fully grasp it, let's dive into implementation.
Implementation
Now we'll implement an A2A server using Strands Agents.
Project Setup
First, let's create the project folder and install the necessary packages using uv:
mkdir a2a-agentcore-demo
cd a2a-agentcore-demo
uv init
Install the required libraries:
uv add 'strands-agents[a2a]' bedrock-agentcore bedrock-agentcore-starter-toolkit strands-agents-tools
A2A Server Implementation
Let's implement an A2A server. We'll create a simple calculator agent.
We'll use the implementation from the official documentation:
import logging
import os
from strands_tools.calculator import calculator
from strands import Agent
from strands.multiagent.a2a import A2AServer
import uvicorn
from fastapi import FastAPI

logging.basicConfig(level=logging.INFO)

# Get URL from environment variable when running in AgentCore Runtime
runtime_url = os.environ.get('AGENTCORE_RUNTIME_URL', 'http://127.0.0.1:9000/')

logging.info(f"Runtime URL: {runtime_url}")

# Create Strands Agent
strands_agent = Agent(
    name="Calculator Agent",
    description="A calculator agent that can perform basic arithmetic operations.",
    tools=[calculator],
    callback_handler=None
)

host, port = "0.0.0.0", 9000

# Wrap with A2AServer
a2a_server = A2AServer(
    agent=strands_agent,
    http_url=runtime_url,
    serve_at_root=True,  # Serve at root path
    enable_a2a_compliant_streaming=True  # A2A-compliant streaming
)

app = FastAPI()

@app.get("/ping")
def ping():
    return {"status": "healthy"}

# Mount A2A server to FastAPI app
app.mount("/", a2a_server.to_fastapi_app())

if __name__ == "__main__":
    uvicorn.run(app, host=host, port=port)
The created Agent is wrapped with the A2AServer class to make it A2A protocol compatible.
It's nice that no complex processing is required to create an A2A server.
For the http_url parameter, we specify the public URL, and when deploying to AgentCore, we retrieve it from an environment variable.
Testing Locally
Let's test the implemented A2A server locally.
Start the Server
uv run my_a2a_server.py
Check the Agent Card
Open another terminal and retrieve the Agent Card:
curl http://localhost:9000/.well-known/agent-card.json | jq .
{
  "capabilities": {
    "streaming": true
  },
  "defaultInputModes": [
    "text"
  ],
  "defaultOutputModes": [
    "text"
  ],
  "description": "A calculator agent that can perform basic arithmetic operations.",
  "name": "Calculator Agent",
  "preferredTransport": "JSONRPC",
  "protocolVersion": "0.3.0",
  "skills": [
    {
      "description": "Calculator powered by SymPy for comprehensive mathematical operations.\n\nThis tool provides advanced mathematical functionality through multiple operation modes,\nincluding expression evaluation, equation solving, calculus operations (derivatives, integrals),\nlimits, series expansions, and matrix operations. Results are formatted with appropriate\nprecision and can be displayed in scientific notation when needed.\n\nHow It Works:\n------------\n1. The function parses the mathematical expression using SymPy's parser\n2. Based on the selected mode, it routes the expression to the appropriate handler\n3. Variables and constants are substituted with their values when provided\n4. The expression is evaluated symbolically and/or numerically as appropriate\n5. Results are formatted based on precision preferences and value magnitude\n6. Rich output is generated with operation details and formatted results\n\nOperation Modes:\n--------------\n- evaluate: Calculate the value of a mathematical expression\n- solve: Find solutions to an equation or system of equations\n- derive: Calculate derivatives of an expression\n- integrate: Find the indefinite integral of an expression\n- limit: Evaluate the limit of an expression at a point\n- series: Generate series expansion of an expression\n- matrix: Perform matrix operations\n\nCommon Usage Scenarios:\n---------------------\n- Basic calculations: Evaluating arithmetic expressions\n- Equation solving: Finding roots of polynomials or systems of equations\n- Calculus: Computing derivatives and integrals for analysis\n- Engineering analysis: Working with scientific notations and constants\n- Mathematics education: Visualizing step-by-step solutions\n- Data science: Matrix operations and statistical calculations\n\nReturns:\n    Dict containing status and response content in the format:\n    {\n        \"status\": \"success|error\",\n        \"content\": [{\"text\": \"Result: <calculated_result>\"}]\n    }\n\n    Success case: Returns the calculation result with appropriate formatting\n    Error case: Returns information about what went wrong during calculation\n\nNotes:\n    - For equation solving, set the expression equal to zero implicitly (x**2 + 1 means x**2 + 1 = 0)\n    - Use 'pi' and 'e' for mathematical constants\n    - The 'wrt' parameter is required for differentiation and integration\n    - Matrix expressions use Python-like syntax: [[1, 2], [3, 4]]\n    - Precision control impacts display only, internal calculations use higher precision\n    - Symbolic results are returned when possible unless force_numeric=True",
      "id": "calculator",
      "name": "calculator",
      "tags": []
    }
  ],
  "url": "http://127.0.0.1:9000/",
  "version": "0.0.1"
}
The Agent Card was returned!
Writing detailed tool descriptions (docstrings) makes them available as capability information to A2A clients. The A2A client can use this information to determine whether this agent can handle calculus or matrix operations.
At first, I was surprised by the large amount of information returned, but it's just the description of the built-in tool.
Sending a Message to the Agent
Let's send a message using the JSON-RPC format:
curl -X POST http://localhost:9000 \
  -H "Content-Type: application/json" \
  -d '{
    "jsonrpc": "2.0",
    "id": "req-001",
    "method": "message/send",
    "params": {
      "message": {
        "role": "user",
        "parts": [
          {
            "kind": "text",
            "text": "what is 101 * 11?"
          }
        ],
        "messageId": "12345678-1234-1234-1234-123456789012"
      }
    }
  }' | jq .
We received a response, which is also quite extensive:
{
  "id": "req-001",
  "jsonrpc": "2.0",
  "result": {
    "artifacts": [
      {
        "artifactId": "f5d3aef1-f914-40c5-a6db-caff80ca4e6c",
        "name": "agent_response",
        "parts": [
          {
            "kind": "text",
            "text": "101 * 11 = 1111\n"
          }
        ]
      }
    ],
    "contextId": "584a8626-1cc5-45ac-9e87-22ea758c007f",
    "history": [
      {
        "contextId": "584a8626-1cc5-45ac-9e87-22ea758c007f",
        "kind": "message",
        "messageId": "12345678-1234-1234-1234-123456789012",
        "parts": [
          {
            "kind": "text",
            "text": "what is 101 * 11?"
          }
        ],
        "role": "user",
        "taskId": "75018576-695b-4e86-919a-2db4f277c23a"
      },
      {
        "contextId": "584a8626-1cc5-45ac-9e87-22ea758c007f",
        "kind": "message",
        "messageId": "ad5f78f5-b9ba-4f6e-b57e-3a10e80ef930",
        "parts": [
          {
            "kind": "text",
            "text": "101 * 11 = "
          }
        ],
        "role": "agent",
        "taskId": "75018576-695b-4e86-919a-2db4f277c23a"
      },
      {
        "contextId": "584a8626-1cc5-45ac-9e87-22ea758c007f",
        "kind": "message",
        "messageId": "417d0a84-00c6-41d1-b59d-f1b85c384c3c",
        "parts": [
          {
            "kind": "text",
            "text": "1111"
          }
        ],
        "role": "agent",
        "taskId": "75018576-695b-4e86-919a-2db4f277c23a"
      }
    ],
    "id": "75018576-695b-4e86-919a-2db4f277c23a",
    "kind": "task",
    "status": {
      "state": "completed",
      "timestamp": "2026-01-28T12:49:50.490302+00:00"
    }
  }
}
Looking at the response structure, we can see it returns much richer information than just the simple answer. Let's organize the fields:
| Field | Description |
|---|---|
| result.artifacts | Final answer. Result stored as text in the parts array |
| result.history | Conversation history. User messages and agent responses in chronological order |
| result.status | Task status. state is completed when processing is done |
| result.contextId | Context ID. Used to continue the same conversation |
| result.id | Task ID. Identifies individual tasks |
It's instructive to see this response structure. When processing responses ourselves, we'll need to keep this structure in mind.
This completes our local testing!
Deploying to AgentCore
Now let's deploy to Amazon Bedrock AgentCore Runtime.
Deployment Configuration
Use the agentcore configure command for deployment configuration.
Specify A2A for the --protocol.
uv run agentcore configure -e my_a2a_server.py --protocol A2A
You can generally proceed with the interactive configuration as is, but we'll use container deployment for this example.
For authentication, we'll use the simplest option: default IAM.
Executing Deployment
Deploy with the deploy command:
uv run agentcore deploy
After deployment completes, the Agent Runtime ARN will be displayed:
Agent Runtime ARN: arn:aws:bedrock-agentcore:us-west-2:123456789012:runtime/my_a2a_server-xyz123
Make note of this ARN for later use.
Testing with AgentCore
Let's call the deployed A2A server.
agentcore invoke Command (IAM Authentication)
You can send a JSON-RPC payload with the agentcore invoke command:
uv run agentcore invoke '{"jsonrpc": "2.0", "id": "req-001", "method": "message/send", "params": {"message": {"role": "user", "parts": [{"kind": "text", "text": "what is 101 * 11?"}], "messageId": "12345678-1234-1234-1234-123456789012"}}}'
The result was returned as follows:
{
  "id": "req-001",
  "jsonrpc": "2.0",
  "result": {
    "artifacts": [
      {
        "artifactId": "19989fb9-05e9-4b3e-9342-8bfd6aaf9020",
        "name": "agent_response",
        "parts": [
          {"kind": "text", "text": "I'll calculate 101 * "},
          {"kind": "text", "text": "11 for you."},
          {"kind": "text", "text": "101"},
          {"kind": "text", "text": " * 11 "},
          {"kind": "text", "text": "= 1111"}
        ]
      }
    ],
    "status": {"state": "completed"}
  }
}
The invocation was successful! We received the same JSON-RPC response as when running locally.
But this doesn't fully demonstrate understanding A2A, since we're simply sending a request and getting a response, without seeing things like the Agent Card.
While it's possible to retrieve the Agent Card with IAM authentication, it requires SigV4 signing on the A2A client side, which is slightly more work than typical A2A clients (which expect Bearer tokens).
So let's modify our approach to use JWT authentication to make it easier for external clients to call.
Let's delete what we've created so far:
# Delete the deployed agent
uv run agentcore destroy
After deletion, we'll deploy with JWT authentication.
Deploying with JWT Authentication
Now we'll create a Cognito User Pool and deploy the agent with JWT authentication. Using JWT authentication allows external A2A clients to call the agent with simple bearer tokens.
Creating a Cognito User Pool
First, run a script to create the Cognito User Pool. Create a file named setup_cognito.sh:
#!/bin/bash

REGION="us-west-2"

# Create User Pool
export POOL_ID=$(aws cognito-idp create-user-pool \
  --pool-name "A2AAgentUserPool" \
  --policies '{"PasswordPolicy":{"MinimumLength":8}}' \
  --region $REGION | jq -r '.UserPool.Id')

# Create App Client (without client secret)
export CLIENT_ID=$(aws cognito-idp create-user-pool-client \
  --user-pool-id $POOL_ID \
  --client-name "A2AAgentClient" \
  --no-generate-secret \
  --explicit-auth-flows "ALLOW_USER_PASSWORD_AUTH" "ALLOW_REFRESH_TOKEN_AUTH" \
  --region $REGION | jq -r '.UserPoolClient.ClientId')

# Create test user
aws cognito-idp admin-create-user \
  --user-pool-id $POOL_ID \
  --username "testuser" \
  --region $REGION \
  --message-action SUPPRESS > /dev/null

# Set password (use a secure password in production)
aws cognito-idp admin-set-user-password \
  --user-pool-id $POOL_ID \
  --username "testuser" \
  --password "TestPassword123!" \
  --region $REGION \
  --permanent > /dev/null

# Get Bearer token
export BEARER_TOKEN=$(aws cognito-idp initiate-auth \
  --client-id "$CLIENT_ID" \
  --auth-flow USER_PASSWORD_AUTH \
  --auth-parameters USERNAME='testuser',PASSWORD='TestPassword123!' \
  --region $REGION | jq -r '.AuthenticationResult.AccessToken')

# Discovery URL
export DISCOVERY_URL="https://cognito-idp.$REGION.amazonaws.com/$POOL_ID/.well-known/openid-configuration"

# Output results
echo "=========================================="
echo "Pool ID: $POOL_ID"
echo "Client ID: $CLIENT_ID"
echo "Discovery URL: $DISCOVERY_URL"
echo "Bearer Token: $BEARER_TOKEN"
echo "=========================================="
Run the script:
source setup_cognito.sh
Note the Discovery URL, Client ID, and Bearer Token from the output for later use.
Deployment Configuration with JWT Authentication
Configure an agent for JWT authentication. It's recommended to use a new name, separate from existing agents:
uv run agentcore configure -e my_a2a_server.py --name my_a2a_server_oauth --protocol A2A
In the interactive configuration, select Yes for "Configure OAuth authorizer instead" and enter:
- Discovery URL: Enter the Cognito
Discovery URL - Allowed clients: Enter the Cognito
Client ID
For the deployment method, choose container deployment as before, with default values for other options.
Execute Deployment
uv run agentcore deploy
After deployment completes, note the Runtime ARN.
Invocation with Bearer Token
You can invoke the JWT-authenticated agent using the --bearer-token option with the access token:
uv run agentcore invoke '{"jsonrpc": "2.0", "id": "req-001", "method": "message/send", "params": {"message": {"role": "user", "parts": [{"kind": "text", "text": "what is 101 * 11?"}], "messageId": "12345678-1234-1234-1234-123456789012"}}}' --bearer-token $BEARER_TOKEN
The response came back successfully:
Response:
{"id":"req-001","jsonrpc":"2.0","result":{"artifacts":[{"artifactId":"362349e7-309b-4b28-836c-3fe0f669225e","name":"agent_response","parts":[{"kind
":"text","text":"I"},{"kind":"text","text":"'ll calculate 101 "},{"kind":"text","text":"* 11 for"},{"kind":"text","text":"
you."},{"kind":"text","text":"The result"},{"kind":"text","text":" of"},{"kind":"text","text":" 101 * "},{"kind":"text","text":"11 is
**1"},{"kind":"text","text":"111**."}]}],"contextId":"7c2f7cce-0af6-4ea9-b85a-fc57c47033db","history":[{"contextId":"7c2f7cce-0af6-4ea9-b85a-fc57c4
7033db","kind":"message","messageId":"12345678-1234-1234-1234-123456789012","parts":[{"kind":"text","text":"what is 101 *
11?"}],"role":"user","taskId":"6ff8b0c0-ed8d-4084-bff6-3dcc38adbd16"}],"id":"6ff8b0c0-ed8d-4084-bff6-3dcc38adbd16","kind":"task","status":{"state":
"completed","timestamp":"2026-02-01T00:49:17.845839+00:00"}}}
The response was almost identical to the local and IAM authentication calls.
Calling from an A2A Client
With JWT authentication configured, it's also possible to call from an A2A client library. Here's code that first retrieves the Agent Card, then uses that information to call the agent:
import asyncio
import os
from uuid import uuid4
import httpx
from a2a.client import A2ACardResolver, ClientConfig, ClientFactory
from a2a.types import Message, Part, Role, TextPart

async def send_message(message: str):
    # Get configuration from environment variables
    runtime_url = os.environ.get('AGENTCORE_RUNTIME_URL')
    bearer_token = os.environ.get('BEARER_TOKEN')
    session_id = str(uuid4())

    # Set JWT authentication headers
    headers = {
        "Authorization": f"Bearer {bearer_token}",
        "X-Amzn-Bedrock-AgentCore-Runtime-Session-Id": session_id
    }

    async with httpx.AsyncClient(timeout=300, headers=headers) as httpx_client:
        # Get Agent Card
        resolver = A2ACardResolver(httpx_client=httpx_client, base_url=runtime_url)
        agent_card = await resolver.get_agent_card()
        print(f"Agent: {agent_card.name}")
        print(f"Skills: {[s.name for s in agent_card.skills]}")

        # Create client and send message
        config = ClientConfig(httpx_client=httpx_client, streaming=False)
        factory = ClientFactory(config)
        client = factory.create(agent_card)

        msg = Message(
            kind="message",
            role=Role.user,
            parts=[Part(TextPart(kind="text", text=message))],
            message_id=uuid4().hex,
        )

        async for event in client.send_message(msg):
            if isinstance(event, Message):
                print(f"Response: {event.model_dump_json(exclude_none=True, indent=2)}")
                return event

if __name__ == "__main__":
    asyncio.run(send_message("what is 101 * 11?"))
So the client can be created using the retrieved Agent Card.
Let's set environment variables and try calling it. Note that the URL requires URL encoding of the ARN.
Here's how to URL encode an ARN, replacing : with %3A and / with %2F:
# Original ARN
arn:aws:bedrock-agentcore:us-west-2:123456789012:runtime/my_a2a_server_oauth-xxxxxxxx

# After URL encoding
arn%3Aaws%3Abedrock-agentcore%3Aus-west-2%3A123456789012%3Aruntime%2Fmy_a2a_server_oauth-xxxxxxxx
You can use urllib.parse.quote in Python to encode:
from urllib.parse import quote

arn = "arn:aws:bedrock-agentcore:us-west-2:123456789012:runtime/my_a2a_server_oauth-xxxxxxxx"
encoded_arn = quote(arn, safe='')
print(encoded_arn)
# Output: arn%3Aaws%3Abedrock-agentcore%3Aus-west-2%3A123456789012%3Aruntime%2Fmy_a2a_server_oauth-xxxxxxxx
Now let's set environment variables and run:
export AGENTCORE_RUNTIME_URL="https://bedrock-agentcore.us-west-2.amazonaws.com/runtimes/arn%3Aaws%3Abedrock-agentcore%3Aus-west-2%3A123456789012%3Aruntime%2Fmy_a2a_server_oauth-xxxxxxxx/invocations/"
export BEARER_TOKEN="<Bearer Token>"
uv run a2a_oauth_client.py
When called, we got the following response:
Agent: Calculator Agent
Skills: ['calculator']

Sending message: what is 101 * 11?

Task status: completed
Response: I'll calculate 101 * 11 for you.The result of 101 * 11 is **1111**.
The calculation was performed correctly!
Now let's try getting agents to communicate with each other.
Let's create an AI agent locally with Strands Agents and call it.
Calling Strands agents (A2AClientToolProvider)
Strands Agents provides a tool called A2AClientToolProvider.
This allows you to call A2A servers as tools from Strands Agents.
First, let's install the additional package.
uv add 'strands-agents-tools[a2a_client]'
Next, create code that calls remote agents using A2AClientToolProvider.
import os
from strands import Agent
from strands_tools.a2a_client import A2AClientToolProvider

# Get settings from environment variables
runtime_url = os.environ.get('AGENTCORE_RUNTIME_URL')
bearer_token = os.environ.get('BEARER_TOKEN')

# Set JWT authentication header
httpx_client_args = {
    "headers": {
        "Authorization": f"Bearer {bearer_token}",
    },
    "timeout": 300
}

# Create A2AClientToolProvider
# Specify remote agent URLs in known_agent_urls
provider = A2AClientToolProvider(
    known_agent_urls=[runtime_url],
    httpx_client_args=httpx_client_args
)

# Create orchestrator agent
# Pass tools provided by A2AClientToolProvider
orchestrator = Agent(
    name="Orchestrator Agent",
    description="Orchestrator that collaborates with remote A2A agents",
    tools=provider.tools
)

# Give instructions to the orchestrator
# It will call the A2A server internally to perform calculations
response = orchestrator("Please use the remote calculation agent to calculate 256 * 16")
The orchestrator agent automatically discovers remote agents using A2AClientToolProvider and delegates tasks to the appropriate agent. With authentication configured, you just need to pass the bearer token in httpx_client_args for authentication.
Now that we've created it, let's run it.
uv run orchestrator_agent.py
We got results back after execution!
I will use the remote calculation agent to calculate 256 × 16. First, I'll check available agents and then execute the calculation.
Tool #1: a2a_list_discovered_agents
The calculation agent is available. Now I'll ask it to calculate 256 × 16.
Tool #2: a2a_send_message
Using the remote calculation agent, the result of **256 × 16 = 4096**.

The calculation agent accurately performed the calculation and returned the result. Using the remote calculation agent, the result is **256 × 16 = 4096**.
Great, the integration is working!!
Looking at the execution results, it first retrieved information about available agents to understand what they can do, then had the remote agent perform the calculation.
The A2AClientToolProvider wraps the process of fetching Agent Cards and calling the target AI agent, which is a nice feature as it handles the integration details so we don't have to write detailed integration code.
Cleanup
Let's delete resources that are no longer needed.
uv run agentcore destroy
This will delete the AgentCore Runtime, ECR repository, IAM roles, etc.
Cognito Cleanup
To delete the Cognito User Pool that's no longer needed, execute the following:
aws cognito-idp delete-user-pool --user-pool-id $POOL_ID --region us-west-2
Conclusion
In this article, we deployed an AI agent to AgentCore using the A2A protocol and confirmed connectivity.
Actually running it deepens understanding. With the convenient library collection in Strands Agents, hosting an A2A Agent and making requests as a client didn't seem too complicated.
When implementing with AgentCore and Strands Agents, agent collaboration can be done using Agent As Tool or Swarm, so there might not be a need to use A2A for integration. However, it's worth considering when you need to integrate with existing A2A servers.
This time we combined an AWS server with a local client, but next time I'd like to check a multi-agent configuration with both sides on AWS! I also want to investigate which authentication schemes are easier to integrate.
I hope this article was helpful!
Thank you for reading until the end!!
Additional Notes
The official documentation lists requirements for hosting agents on AgentCore Runtime using the A2A protocol, which is worth referring to as needed.
I'm including the translated explanation:
Amazon Bedrock AgentCore's A2A (Agent-to-Agent) protocol support acts as a transparent proxy layer, enabling seamless integration with A2A servers.
When configured for A2A, AgentCore assumes that the container runs a stateless and streamable HTTP server on port 9000 at the root path (0.0.0.0:9000/), which complies with the default configuration for A2A servers.This service provides enterprise-grade session isolation while maintaining protocol transparency.
JSON-RPC payloads from the InvokeAgentRuntime API are passed directly to A2A containers without modification.
This architecture allows you to add enterprise authentication (SigV4/OAuth 2.0) and scalability while preserving A2A protocol features such as standard agent discovery via agent cards at "/.well-known/agent-card.json" and JSON-RPC communication.The main differences from other protocols are in port numbers (9000 versus 8080 for HTTP), mount paths ("/" versus "/invocations"), and standardized agent discovery mechanisms.
These features make Amazon Bedrock AgentCore an ideal platform for deploying A2A agents in production environments.Main differences from other protocols:
■ Port
A2A servers operate on port 9000 (versus 8080 for HTTP, 8000 for MCP).■ Path
A2A servers are mounted at the root "/" (versus "/invocations" for HTTP, "/mcp" for MCP).■ Agent Cards
Provides built-in agent discovery through agent cards at "/.well-known/agent-card.json".■ Protocol
Uses JSON-RPC for inter-agent communication.■ Authentication
Supports both SigV4 and OAuth 2.0 authentication schemes.