Tried calling Amazon Bedrock via LiteLLM Proxy from Strands Agents
This page has been translated by machine translation. View original
Introduction
Hello, I'm Jinno from the Consulting Department, and I'm a fan of the supermarket La Mu.
Recently, I've been working with the AI agent framework Strands Agents and encountered a need to centrally manage LLM API calls. For example, there are requirements like restricting models accessible to each team and monitoring usage.
For such multi-provider LLM gateways, AWS has published an official solution.
This official solution has a production-ready configuration with CloudFront + WAF + Route53 + Middleware containers, which is convenient for immediate deployment but feels a bit heavy for simple validation purposes.
So this time, as a learning experience, I tried building a minimal LiteLLM Proxy environment with Terraform and calling Amazon Bedrock's Claude model from Strands Agents through this proxy.
LiteLLM has both an OSS version (MIT license) and an Enterprise version, but I'm using the OSS version here. Features like team management, virtual API keys, and usage tracking are available in the OSS version, so you can try them for free.
I'll walk through creating a team in the LiteLLM admin interface, issuing a virtual API key, and communicating with access control.
For a comprehensive overview of the LiteLLM Proxy admin UI capabilities, our company has published an article. If you want to understand the admin features, please check it out as well.
Prerequisites
Environment
- Python 3.12
- strands-agents 1.29.0 (including litellm extras)
- strands-agents-tools 0.2.22
- LiteLLM Proxy main-v1.81.14-stable (deployed on AWS ECS Fargate)
- Amazon Bedrock (us-east-1)
Communication Flow
From Strands Agents' perspective, LiteLLM Proxy behaves as an OpenAI-compatible API endpoint. Since Bedrock authentication credentials are held by the proxy side (ECS Task Role), the client doesn't need to be aware of AWS authentication.
Building LiteLLM Proxy (Terraform)
I built a simple LiteLLM Proxy environment with Terraform. The complete code is available in my GitHub repository.
Architecture
A simple configuration with VPC + ALB + ECS Fargate + RDS.
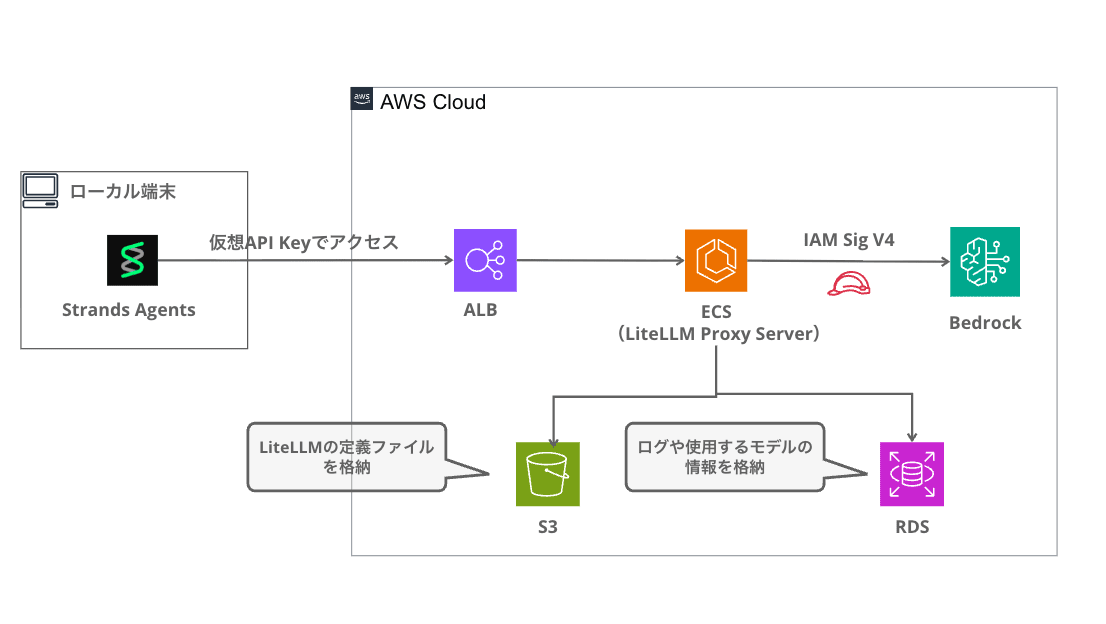
Logs and model information are persisted in RDS, and the LiteLLM configuration file (config.yaml) is stored in S3.
Terraform Module Structure
terraform/
├── main.tf                  # Provider + module configuration
├── variables.tf             # Input variables
├── outputs.tf               # ALB DNS name output
├── terraform.tfvars.example # Sample variables
├── config/
│   └── config.yaml.tpl      # LiteLLM configuration template
└── modules/
    ├── network/              # VPC + public/private subnets + NAT Gateway
    ├── ecs/                  # ECS Fargate + ALB + IAM + S3(config) + SG
    ├── rds/                  # (optional) PostgreSQL 15
    └── redis/                # (optional) ElastiCache Redis 7.1
RDS and Redis can be toggled with the enable_rds / enable_redis variables. For this example, we're enabling RDS to use the Team feature.
Deployment Steps
cd terraform
cp terraform.tfvars.example terraform.tfvars
# Edit terraform.tfvars to set litellm_master_key
terraform init
terraform apply
The terraform.tfvars content looks like this:
aws_region         = "us-east-1"
name_prefix        = "litellm"
litellm_version    = "main-v1.81.14-stable"
litellm_master_key = "sk-your-secret-key-here"

ecs_cpu       = 512
ecs_memory    = 1024
desired_count = 1

enable_rds       = true
enable_redis     = false
The litellm_version sets the LiteLLM image tag. We're using the public image ghcr.io/berriai/litellm directly, so no ECR build/push is needed. The litellm_master_key is the admin API key, and with enable_rds = true, you can use Team / virtual API keys / usage tracking features.
When apply completes, the ALB DNS name is displayed in the output:
Apply complete! Resources: 44 added, 0 changed, 0 destroyed.

Outputs:

alb_dns_name = "litellm-alb-xxxxxxxxx.us-east-1.elb.amazonaws.com"
service_url = "http://litellm-alb-xxxxxxxxx.us-east-1.elb.amazonaws.com"
LiteLLM's config.yaml
The LiteLLM configuration generated by Terraform's templatefile() looks like this:
model_list:
  - model_name: claude-sonnet
    litellm_params:
      model: bedrock/us.anthropic.claude-sonnet-4-5-20250929-v1:0
      aws_region_name: us-east-1

  - model_name: claude-haiku
    litellm_params:
      model: bedrock/us.anthropic.claude-haiku-4-5-20251001-v1:0
      aws_region_name: us-east-1

general_settings:
  store_model_in_db: true
  store_prompts_in_spend_logs: true

litellm_settings:
  drop_params: true
  num_retries: 3

router_settings:
  routing_strategy: usage-based-routing-v2
model_name is the model alias on the proxy, which clients use to invoke models. Setting store_model_in_db: true allows adding/changing models from the admin UI, and store_prompts_in_spend_logs: true lets you view request/response content from the admin interface.
For Bedrock authentication, the ECS Task Role has the bedrock:* IAM policy attached, so no API key configuration is necessary.
Creating Teams and Issuing Virtual API Keys in LiteLLM Admin UI
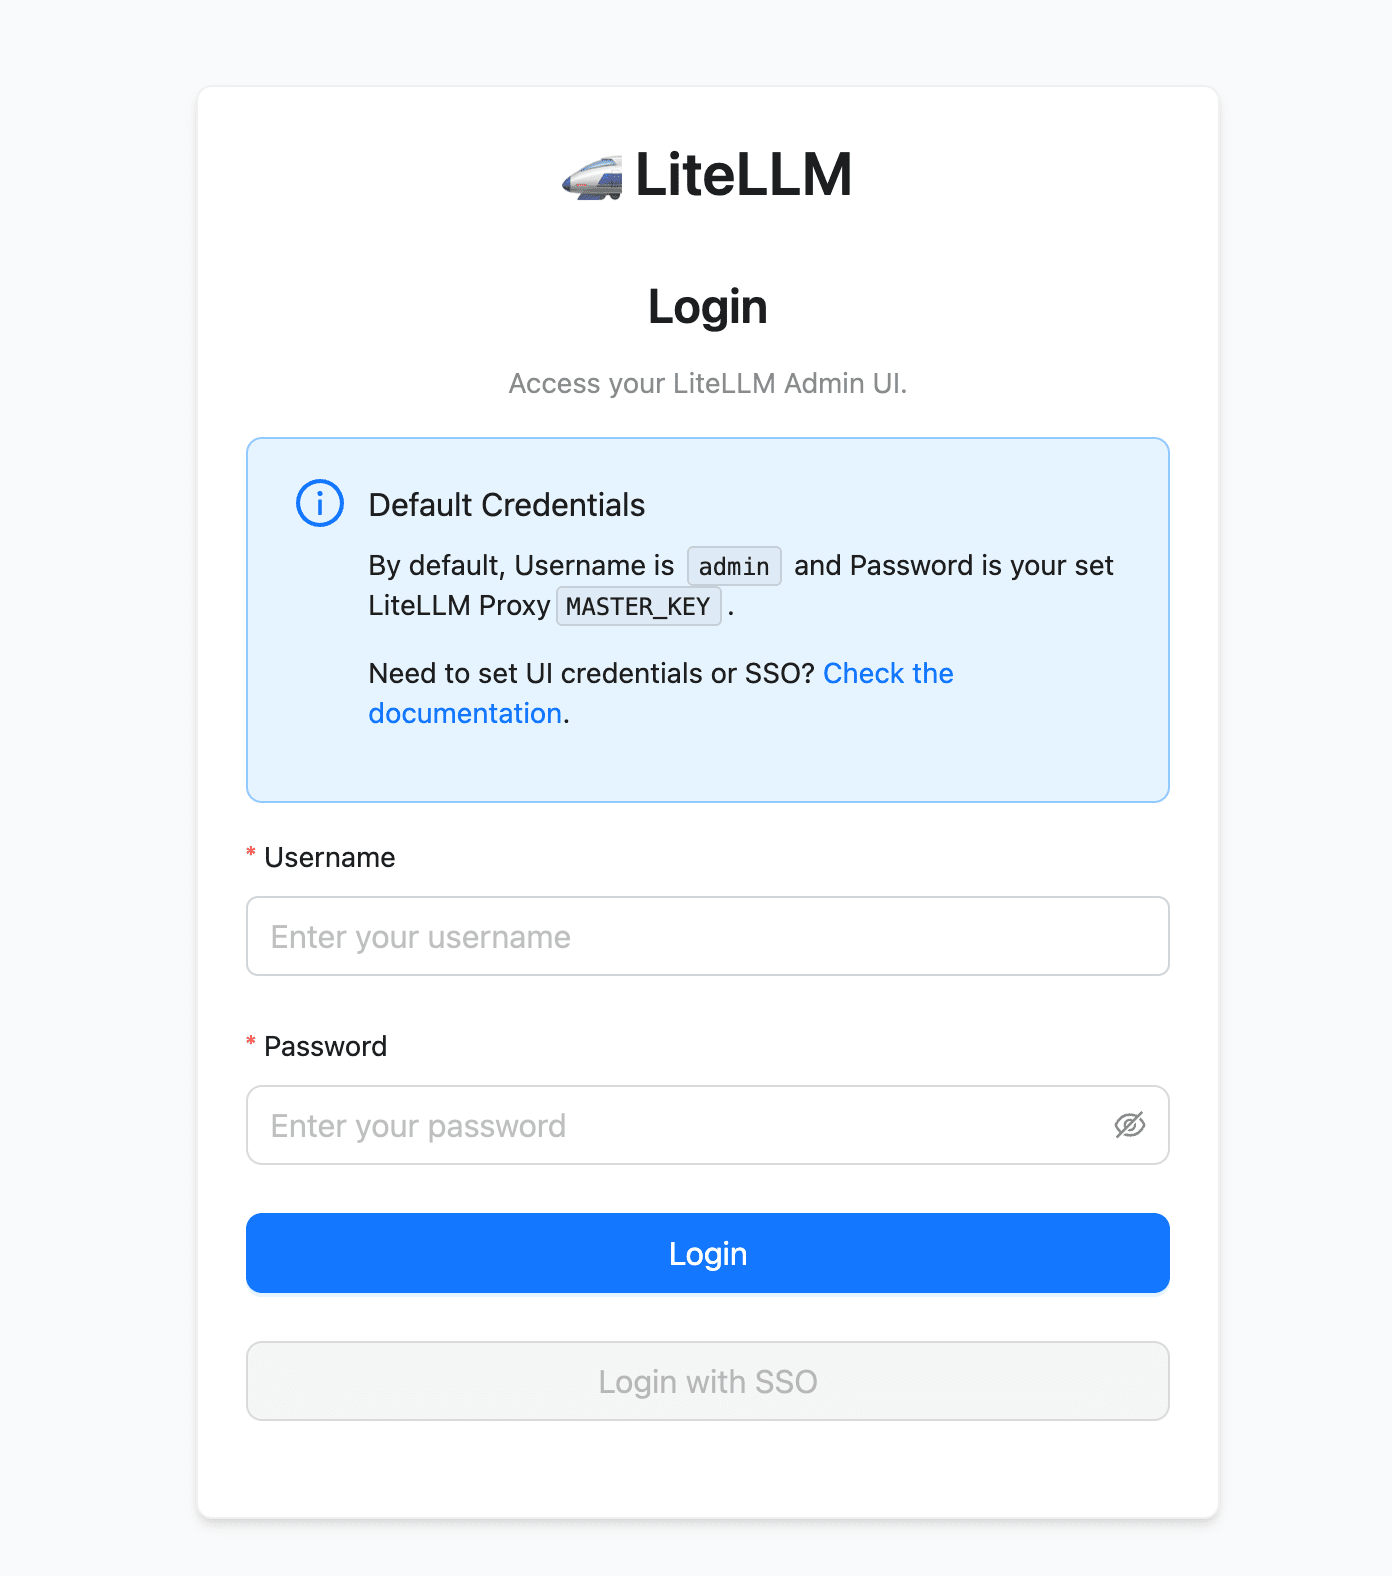
LiteLLM Proxy has a built-in admin interface. Access http://<ALB_DNS>/ui, enter Username admin and the Master Key you set in litellm_master_key as the Password to log in.
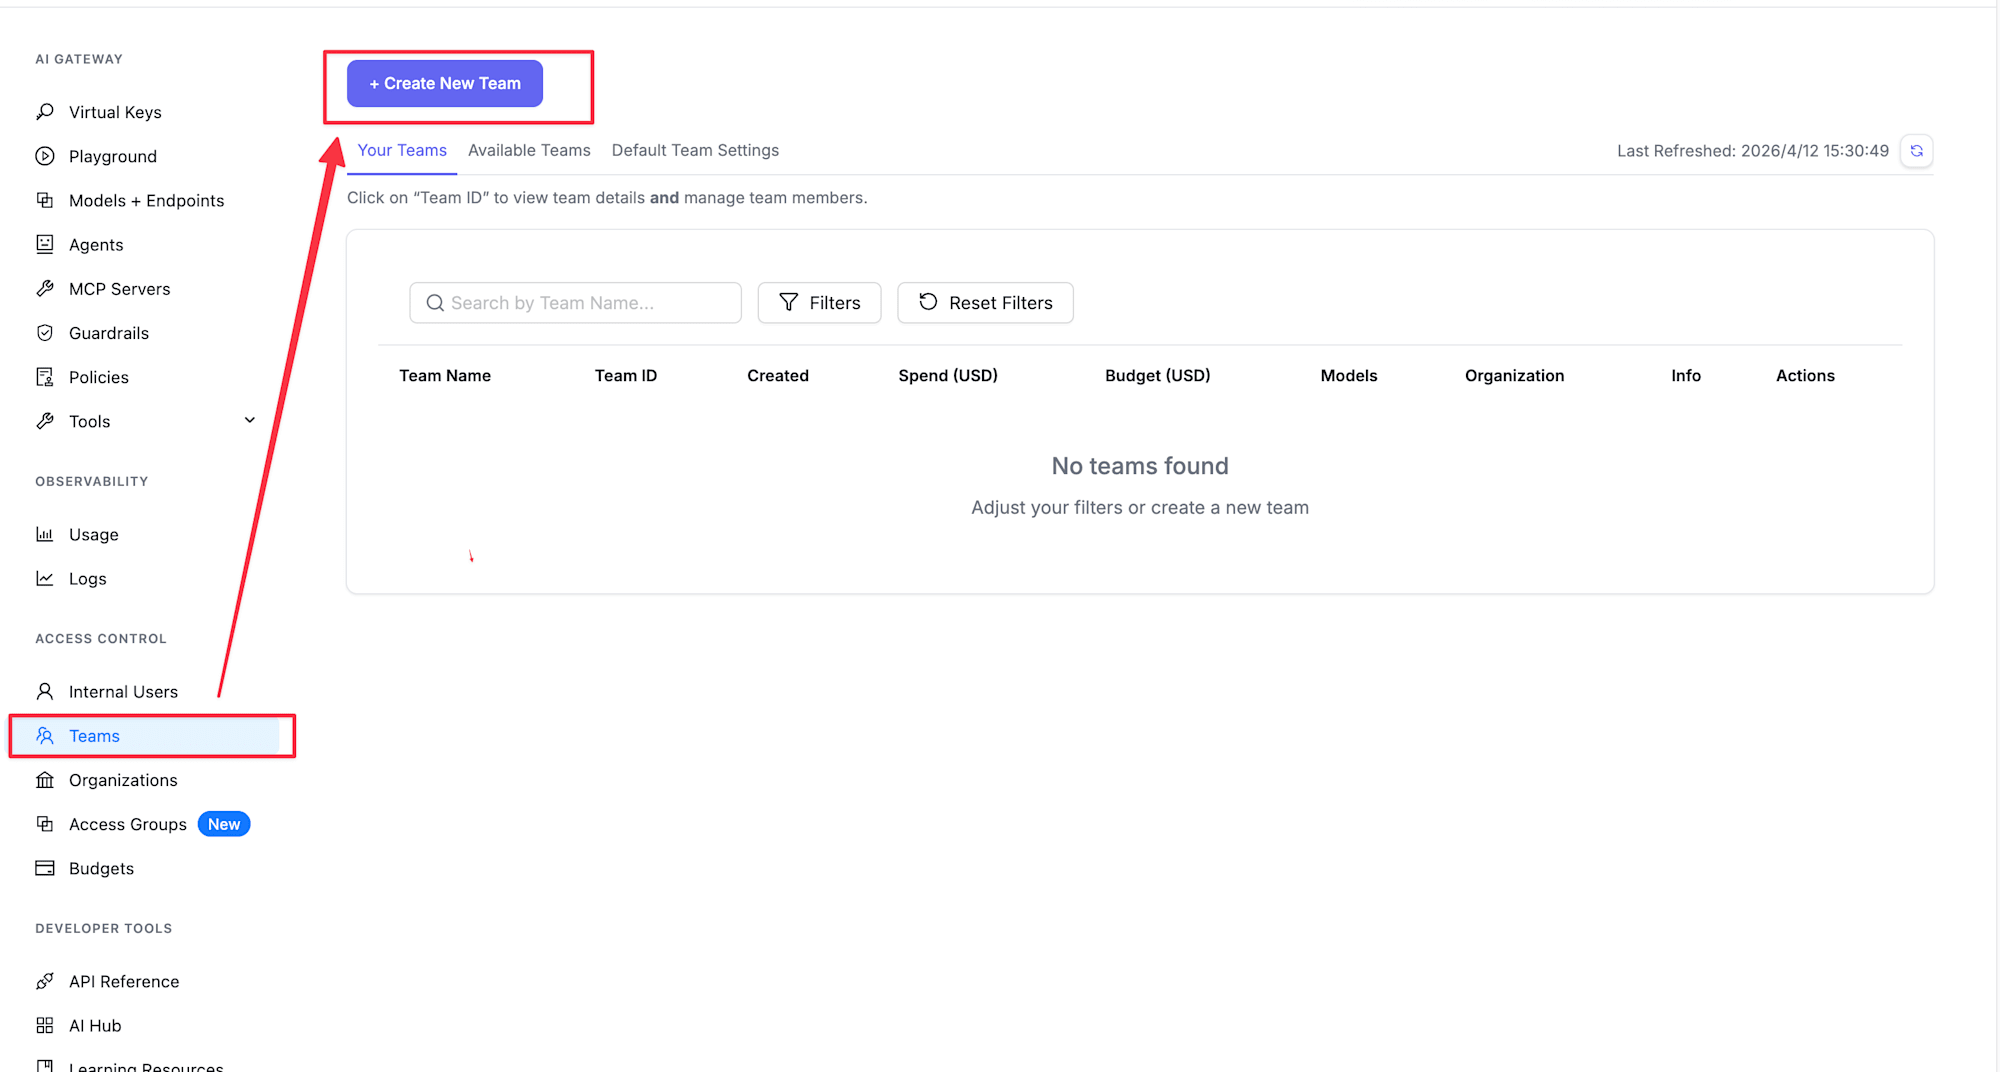
Creating a Team
- Select "Teams" from the sidebar
- Click the "+ Create New Team" button
- Enter the following information:
- Team Name: Any team name (e.g.,
dev-team) - Models: Select models this team can access (e.g., only
claude-haiku)

- Team Name: Any team name (e.g.,
- Click the "Create Team" button
Now the team is created. Only the models configured here will be accessible with API keys belonging to this team.
Although I haven't tested it for this article, Teams can also have Max Budget settings, budget reset periods (daily, monthly, etc.), and TPM/RPM rate limits. When the budget is exceeded, requests are blocked, which can be useful for team-based cost management. Please refer to the official documentation for details.
Issuing a Virtual API Key
- Select "Virtual Keys" from the sidebar
- Click the "+ Create New Key" button
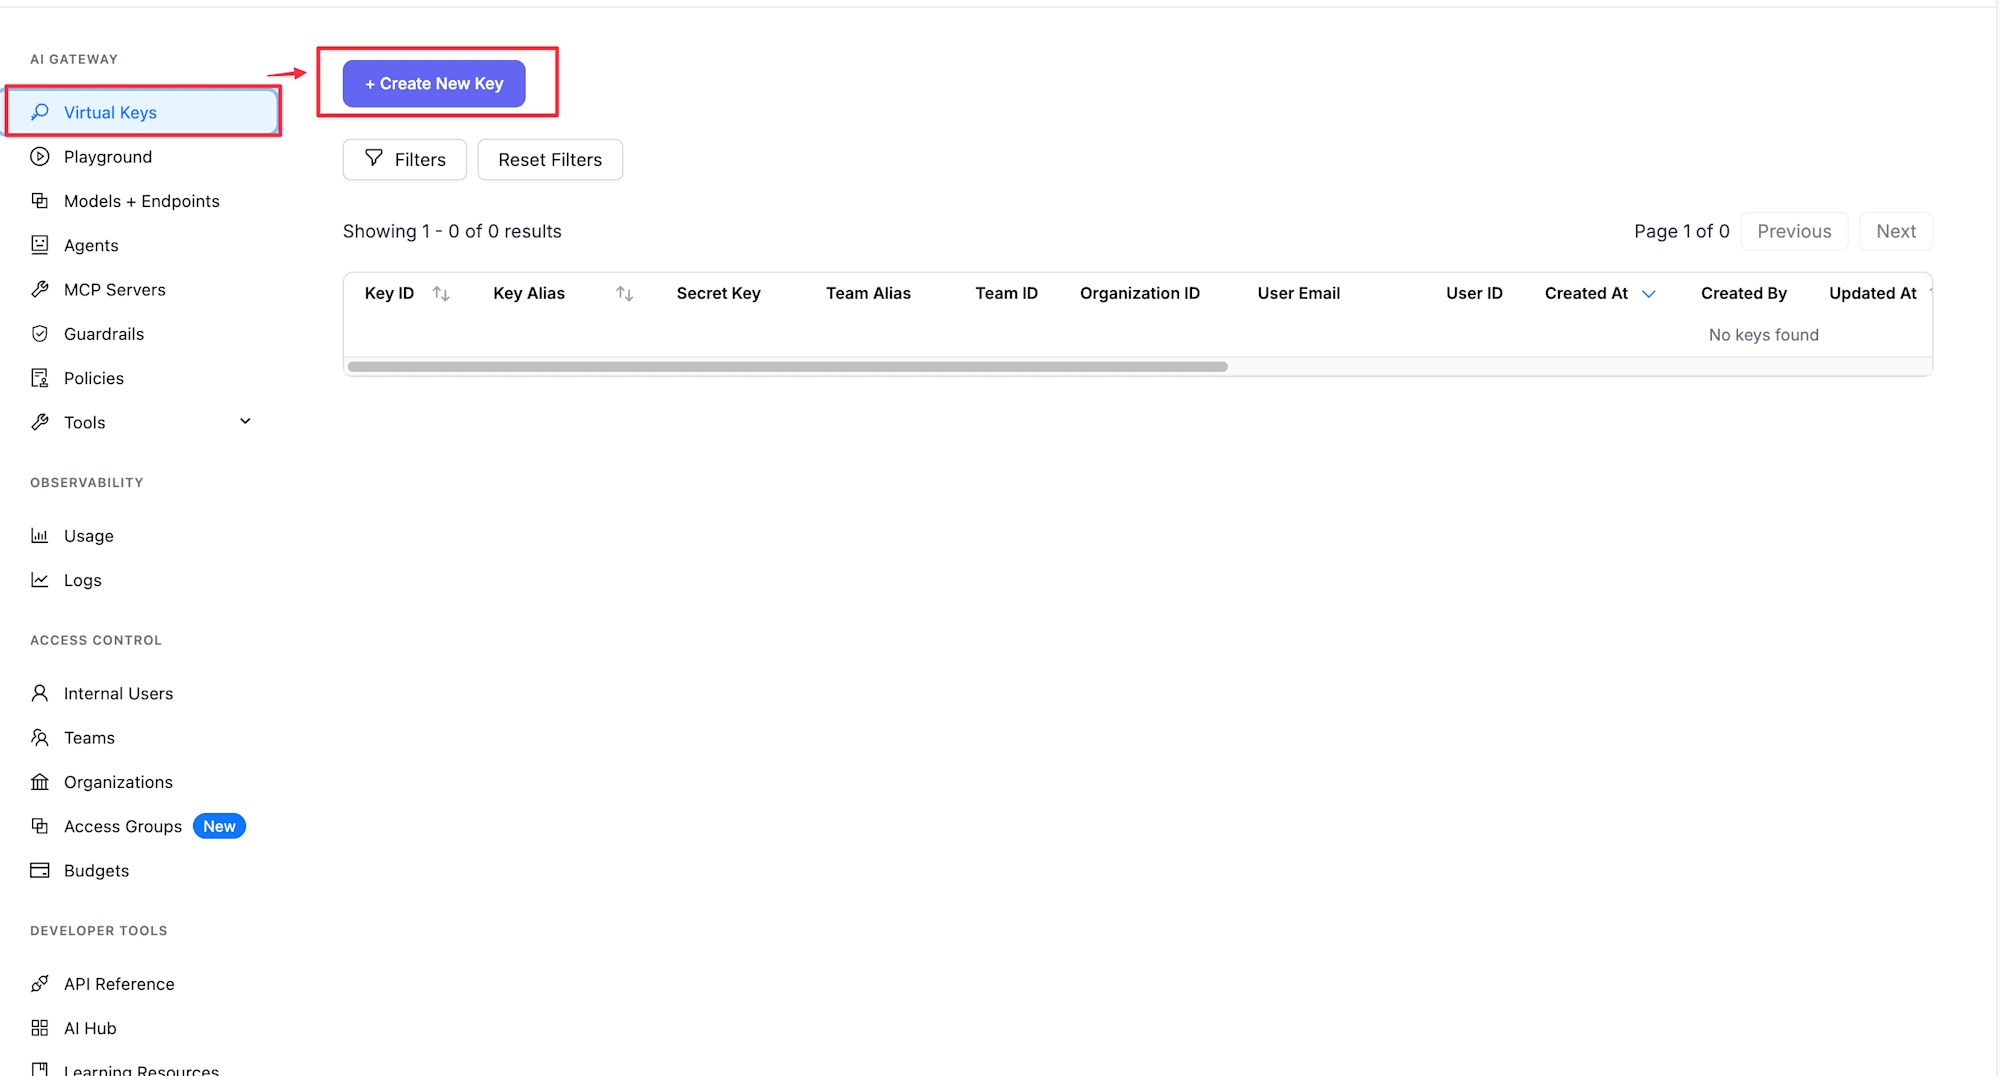
- Enter the following information:
- Key Name: Any key name (e.g.,
dev-team-key) - Team: Select the team you just created (e.g.,
dev-team) - Models: Select
All Team Modelsto inherit from the team
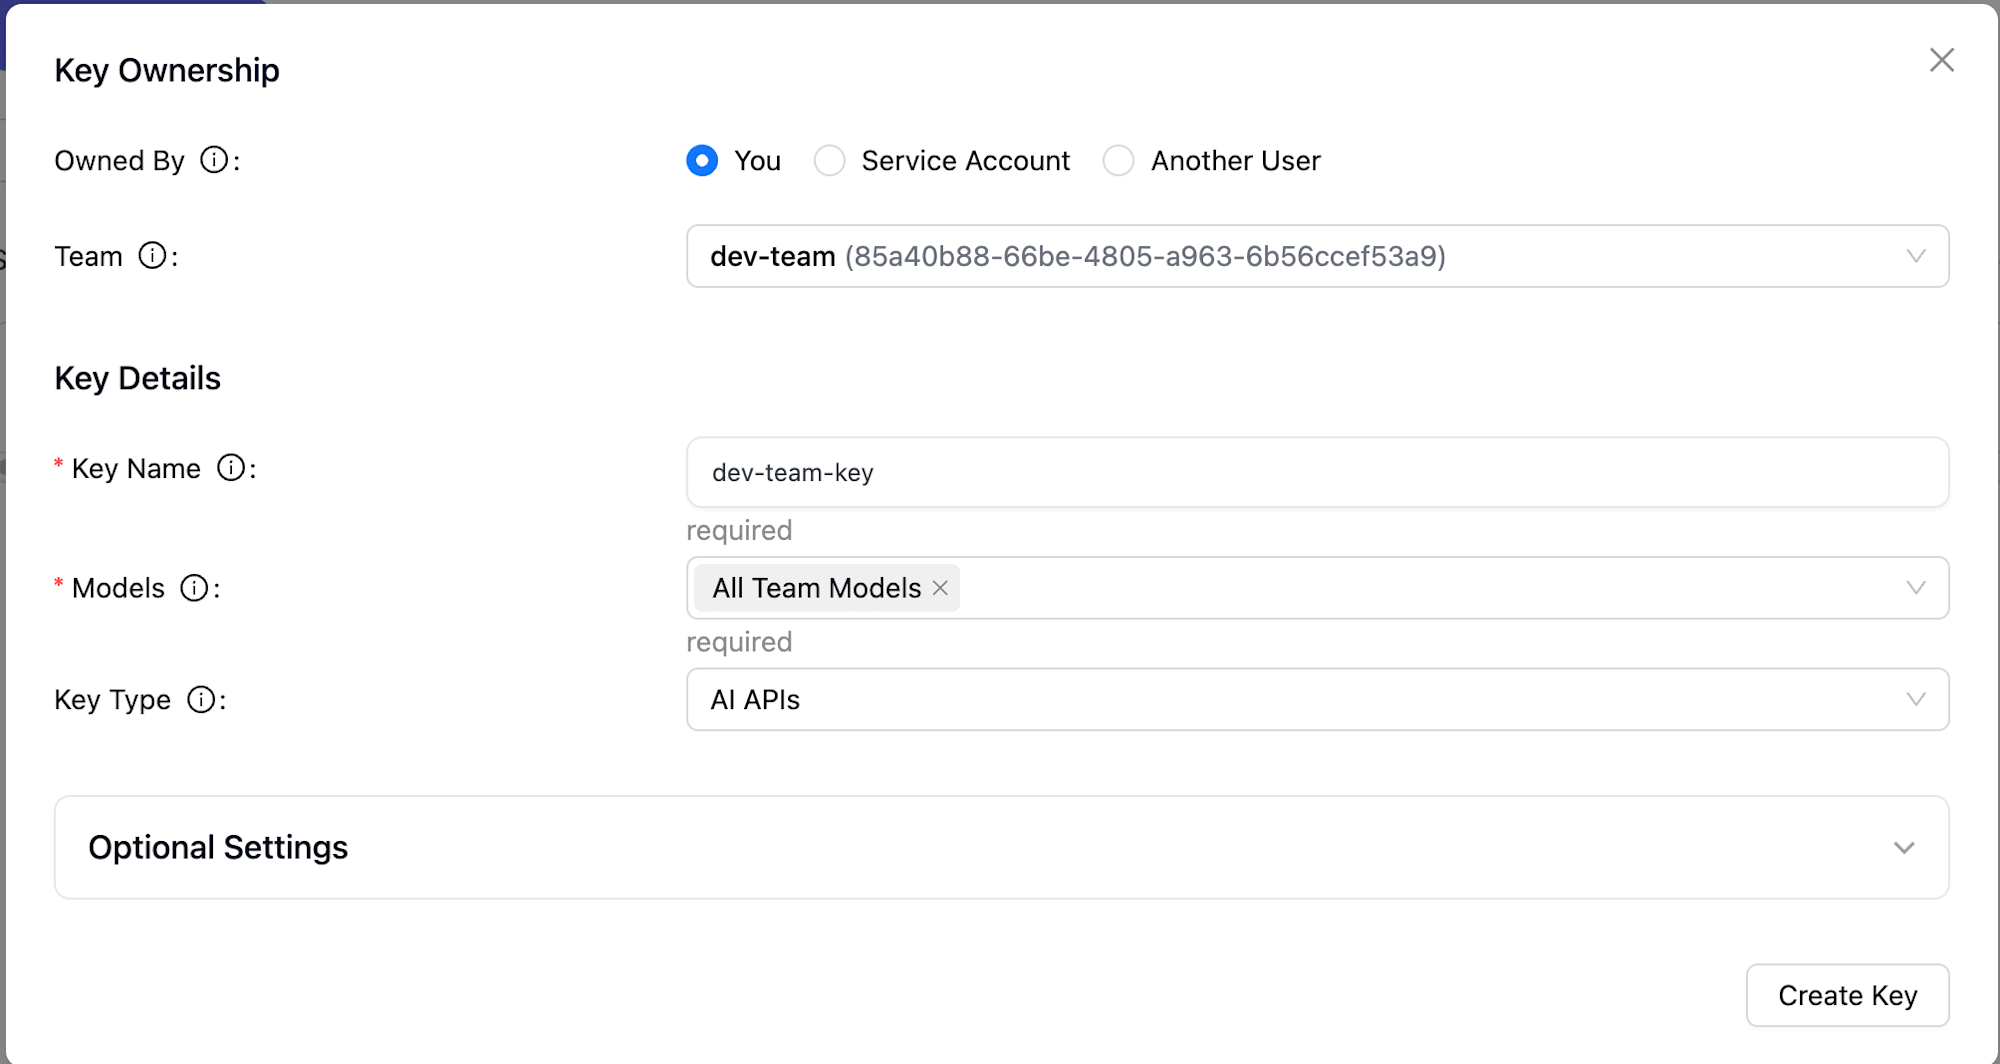
- Key Name: Any key name (e.g.,
- Click the "Create Key" button
- Copy the generated API Key (in the format
sk-xxxxxxxx)
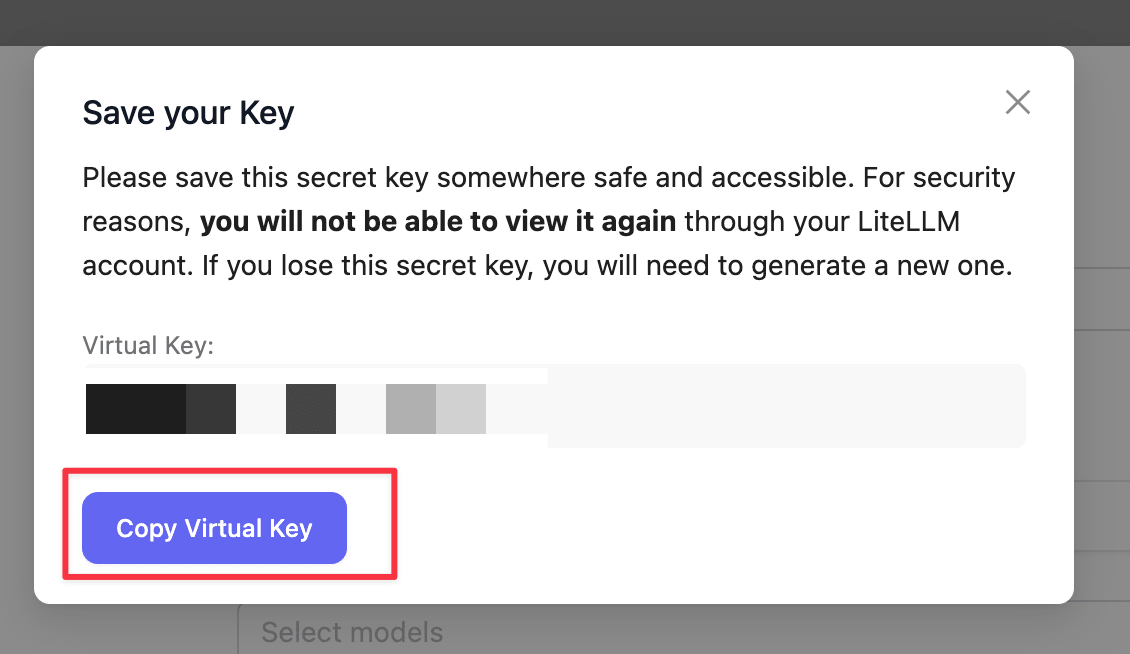
Now we have a virtual API key linked to the team. We'll use this key to access from Strands Agents.
Implementation
Installing Dependencies
First, install the required packages:
uv add 'strands-agents[litellm]' strands-agents-tools
Agent Implementation
Let's implement an agent that calls Bedrock Claude through LiteLLM Proxy.
Strands has built-in support for litellm, so we just need to use it. Very convenient!
"""Strands Agents + LiteLLM Proxy sample."""

from strands import Agent
from strands.models.litellm import LiteLLMModel
from strands_tools import calculator

# LiteLLM Proxy connection info
LITELLM_PROXY_URL = "http://<ALB_DNS>"
LITELLM_PROXY_KEY = "sk-xxxxxxxx"  # The virtual API Key you created

model = LiteLLMModel(
    client_args={
        "api_key": LITELLM_PROXY_KEY,
        "api_base": LITELLM_PROXY_URL,
        "use_litellm_proxy": True,
    },
    model_id="claude-haiku",
    params={
        "max_tokens": 4096,
        "temperature": 0.7,
    },
)

agent = Agent(
    model=model,
    tools=[calculator],
    system_prompt="You are a helpful Japanese assistant. Please use the calculator tool when calculations are needed.",
)

def main():
    print("=== Strands Agent + LiteLLM Proxy Sample ===\n")

    # Simple conversation
    print("--- Conversation Test ---")
    response = agent("What is the capital of Japan?")
    print(f"Answer: {response}\n")

    # Tool usage (calculator)
    print("--- Tool Usage Test ---")
    response = agent("Please calculate 123 * 456 + 789")
    print(f"Answer: {response}\n")

if __name__ == "__main__":
    main()
Setting use_litellm_proxy: True in client_args makes Strands' LiteLLM provider work in proxy mode.
Specify the proxy URL in api_base and the virtual API key in api_key. Note that for model_id, you need to use the model alias defined in config.yaml, not the Bedrock model ID. Use claude-haiku or claude-sonnet as defined on the proxy.
I'm passing strands_tools's calculator as a tool to verify that function calling works through LiteLLM Proxy.
Note
Instead of use_litellm_proxy: True, you can also prefix model_id with litellm_proxy/:
model = LiteLLMModel(
    client_args={
        "api_key": LITELLM_PROXY_KEY,
        "api_base": LITELLM_PROXY_URL,
    },
    model_id="litellm_proxy/claude-haiku",
)
Both methods work, but using use_litellm_proxy seems more explicit and clearer.
Testing
Normal Case: Conversation Test
python main.py
--- Conversation Test ---
The capital of Japan is **Tokyo**.

Tokyo is the political, economic, and cultural center of Japan, where important government institutions like the Prime Minister's Office and the Diet building are located. It's also Japan's largest city by population and is known as one of the world's major metropolitan areas.Answer: The capital of Japan is **Tokyo**.

Tokyo is the political, economic, and cultural center of Japan, where important government institutions like the Prime Minister's Office and the Diet building are located. It's also Japan's largest city by population and is known as one of the world's major metropolitan areas.

--- Tool Usage Test ---
I'll calculate that for you.
Tool #1: calculator
**123 × 456 + 789 = 56,877**

Calculation process:
- 123 × 456 = 56,088
- 56,088 + 789 = 56,877Answer: **123 × 456 + 789 = 56,877**

Calculation process:
- 123 × 456 = 56,088
- 56,088 + 789 = 56,877
Both conversation and tool calling are working fine! (The double display is due to the print statements I added...)
Even though we're going through LiteLLM Proxy, Strands Agents' tool calling works as expected. The proxy transparently relays requests to Bedrock, so the agent implementation is the same as if we were calling Bedrock directly.
Verifying Model Access Control
Let's try calling claude-sonnet with an API key from a team that's only allowed to access claude-haiku:
  model = LiteLLMModel(
      client_args={
          "api_key": LITELLM_PROXY_KEY,
          "api_base": LITELLM_PROXY_URL,
          "use_litellm_proxy": True,
      },
-     model_id="claude-haiku",
+     model_id="claude-sonnet",
  )
litellm.exceptions.AuthenticationError: litellm.AuthenticationError: AuthenticationError: Litellm_proxyException - team not allowed to access model. This team can only access models=['claude-haiku']. Tried to access claude-sonnet
Access to models not allowed for the team is being blocked!
This demonstrates how LiteLLM Proxy's Team feature allows controlling which models can be accessed by each API key. You could, for example, allow development teams to use only Haiku while production environments can use Sonnet as well.
Checking Usage in the Admin Interface
You can check usage and logs in the admin interface (/ui). The OBSERVABILITY section in the sidebar has Usage and Logs tabs.
Team Usage
Select Team Usage in the Usage tab to see team-level usage stats:
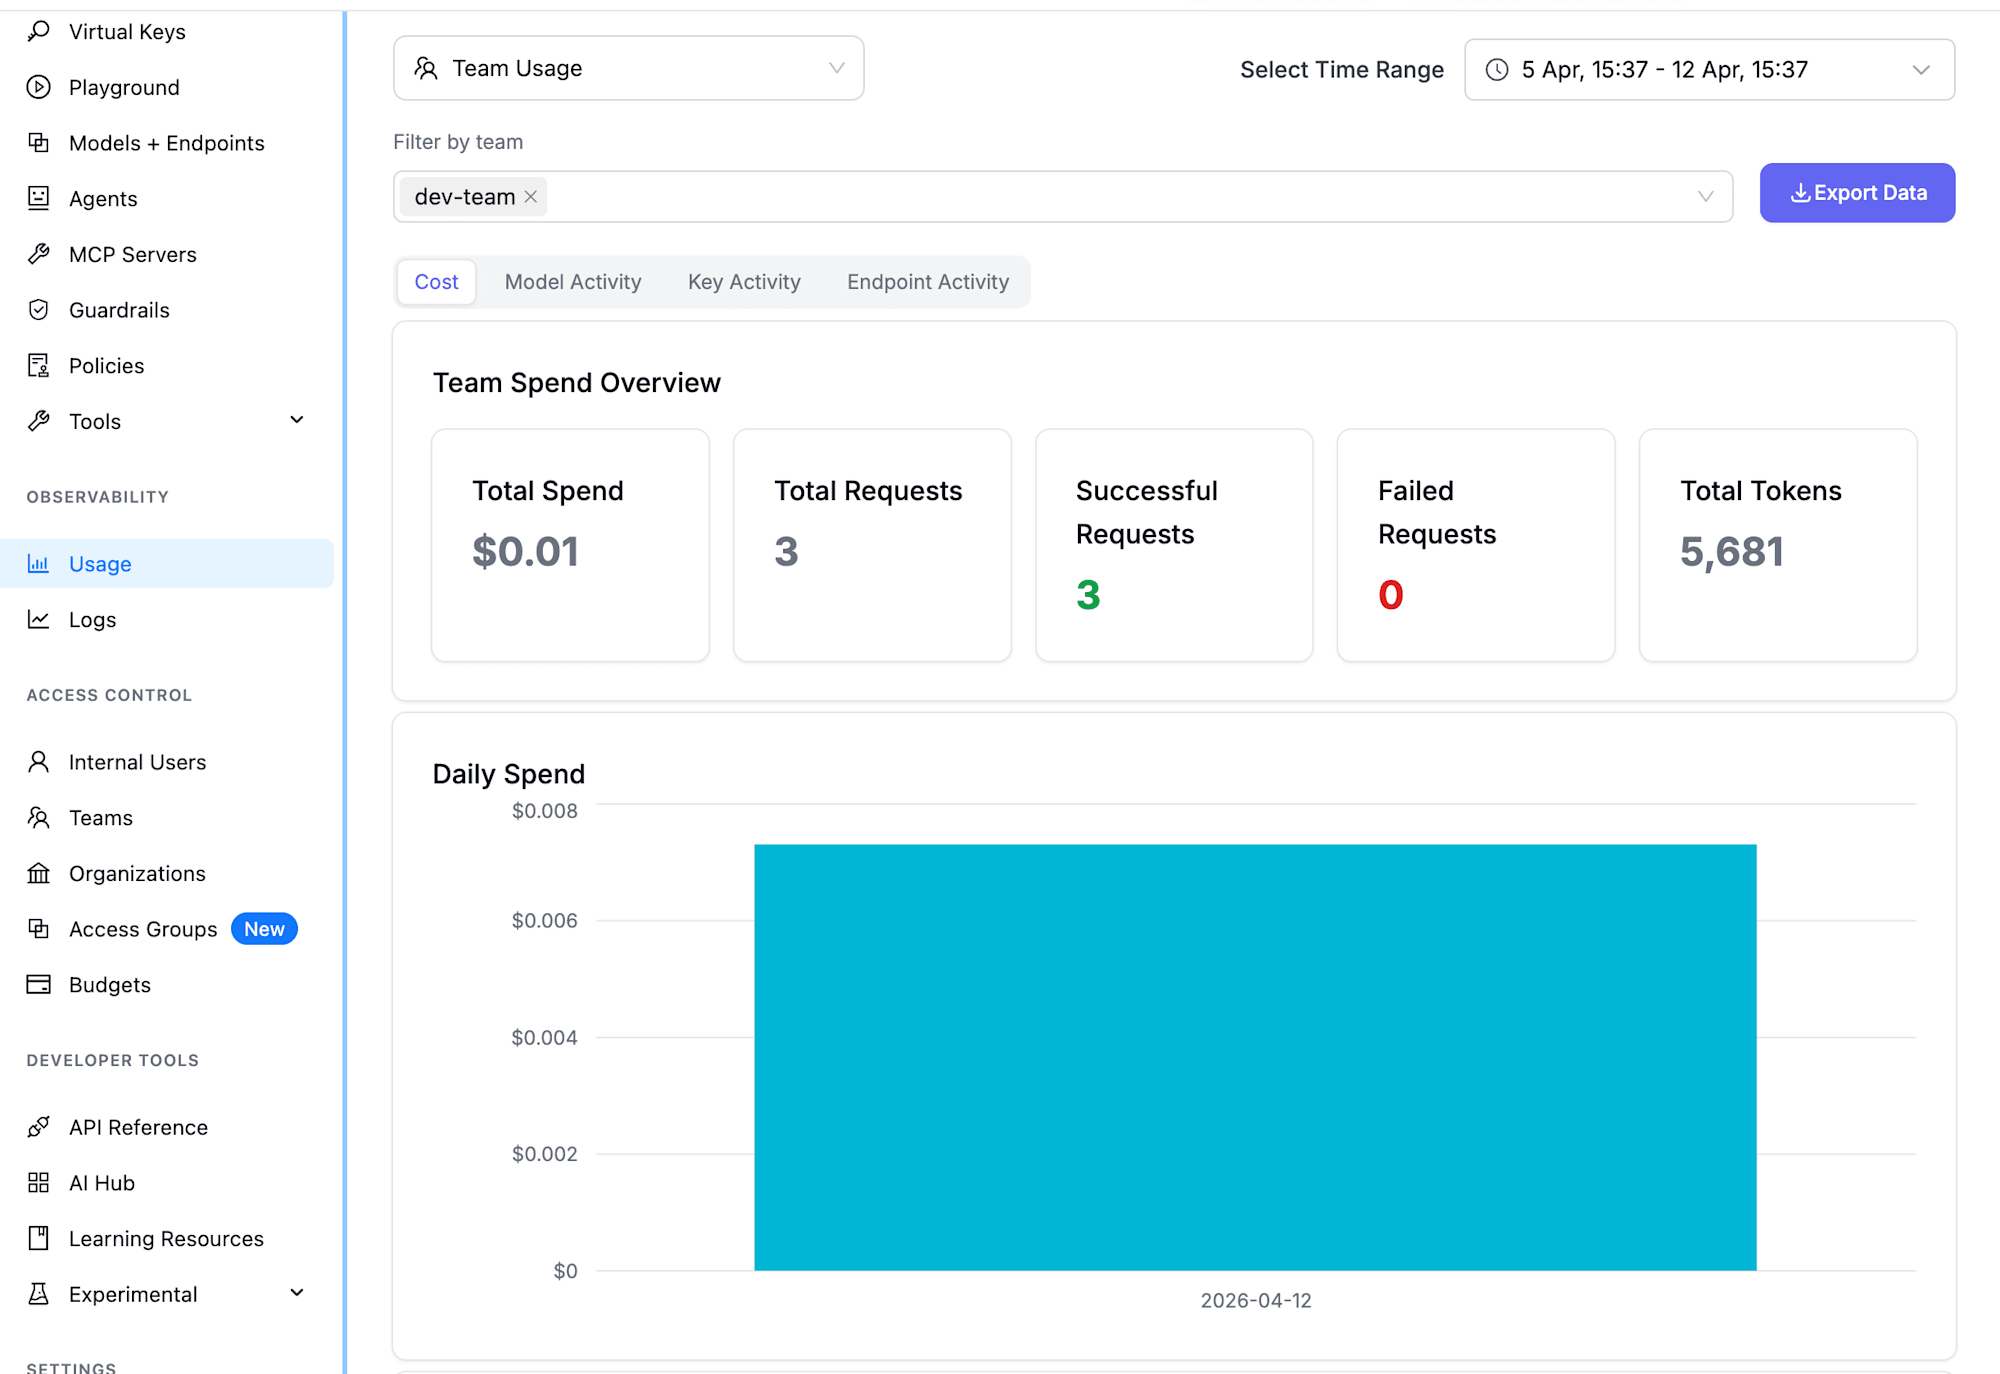
You can see Total Spend, Total Requests, Successful Requests, Failed Requests, and Total Tokens at a glance. The Daily Spend graph shows day-by-day trends.
Key Usage
Switch to the Key Activity tab for more detailed breakdowns by API key:
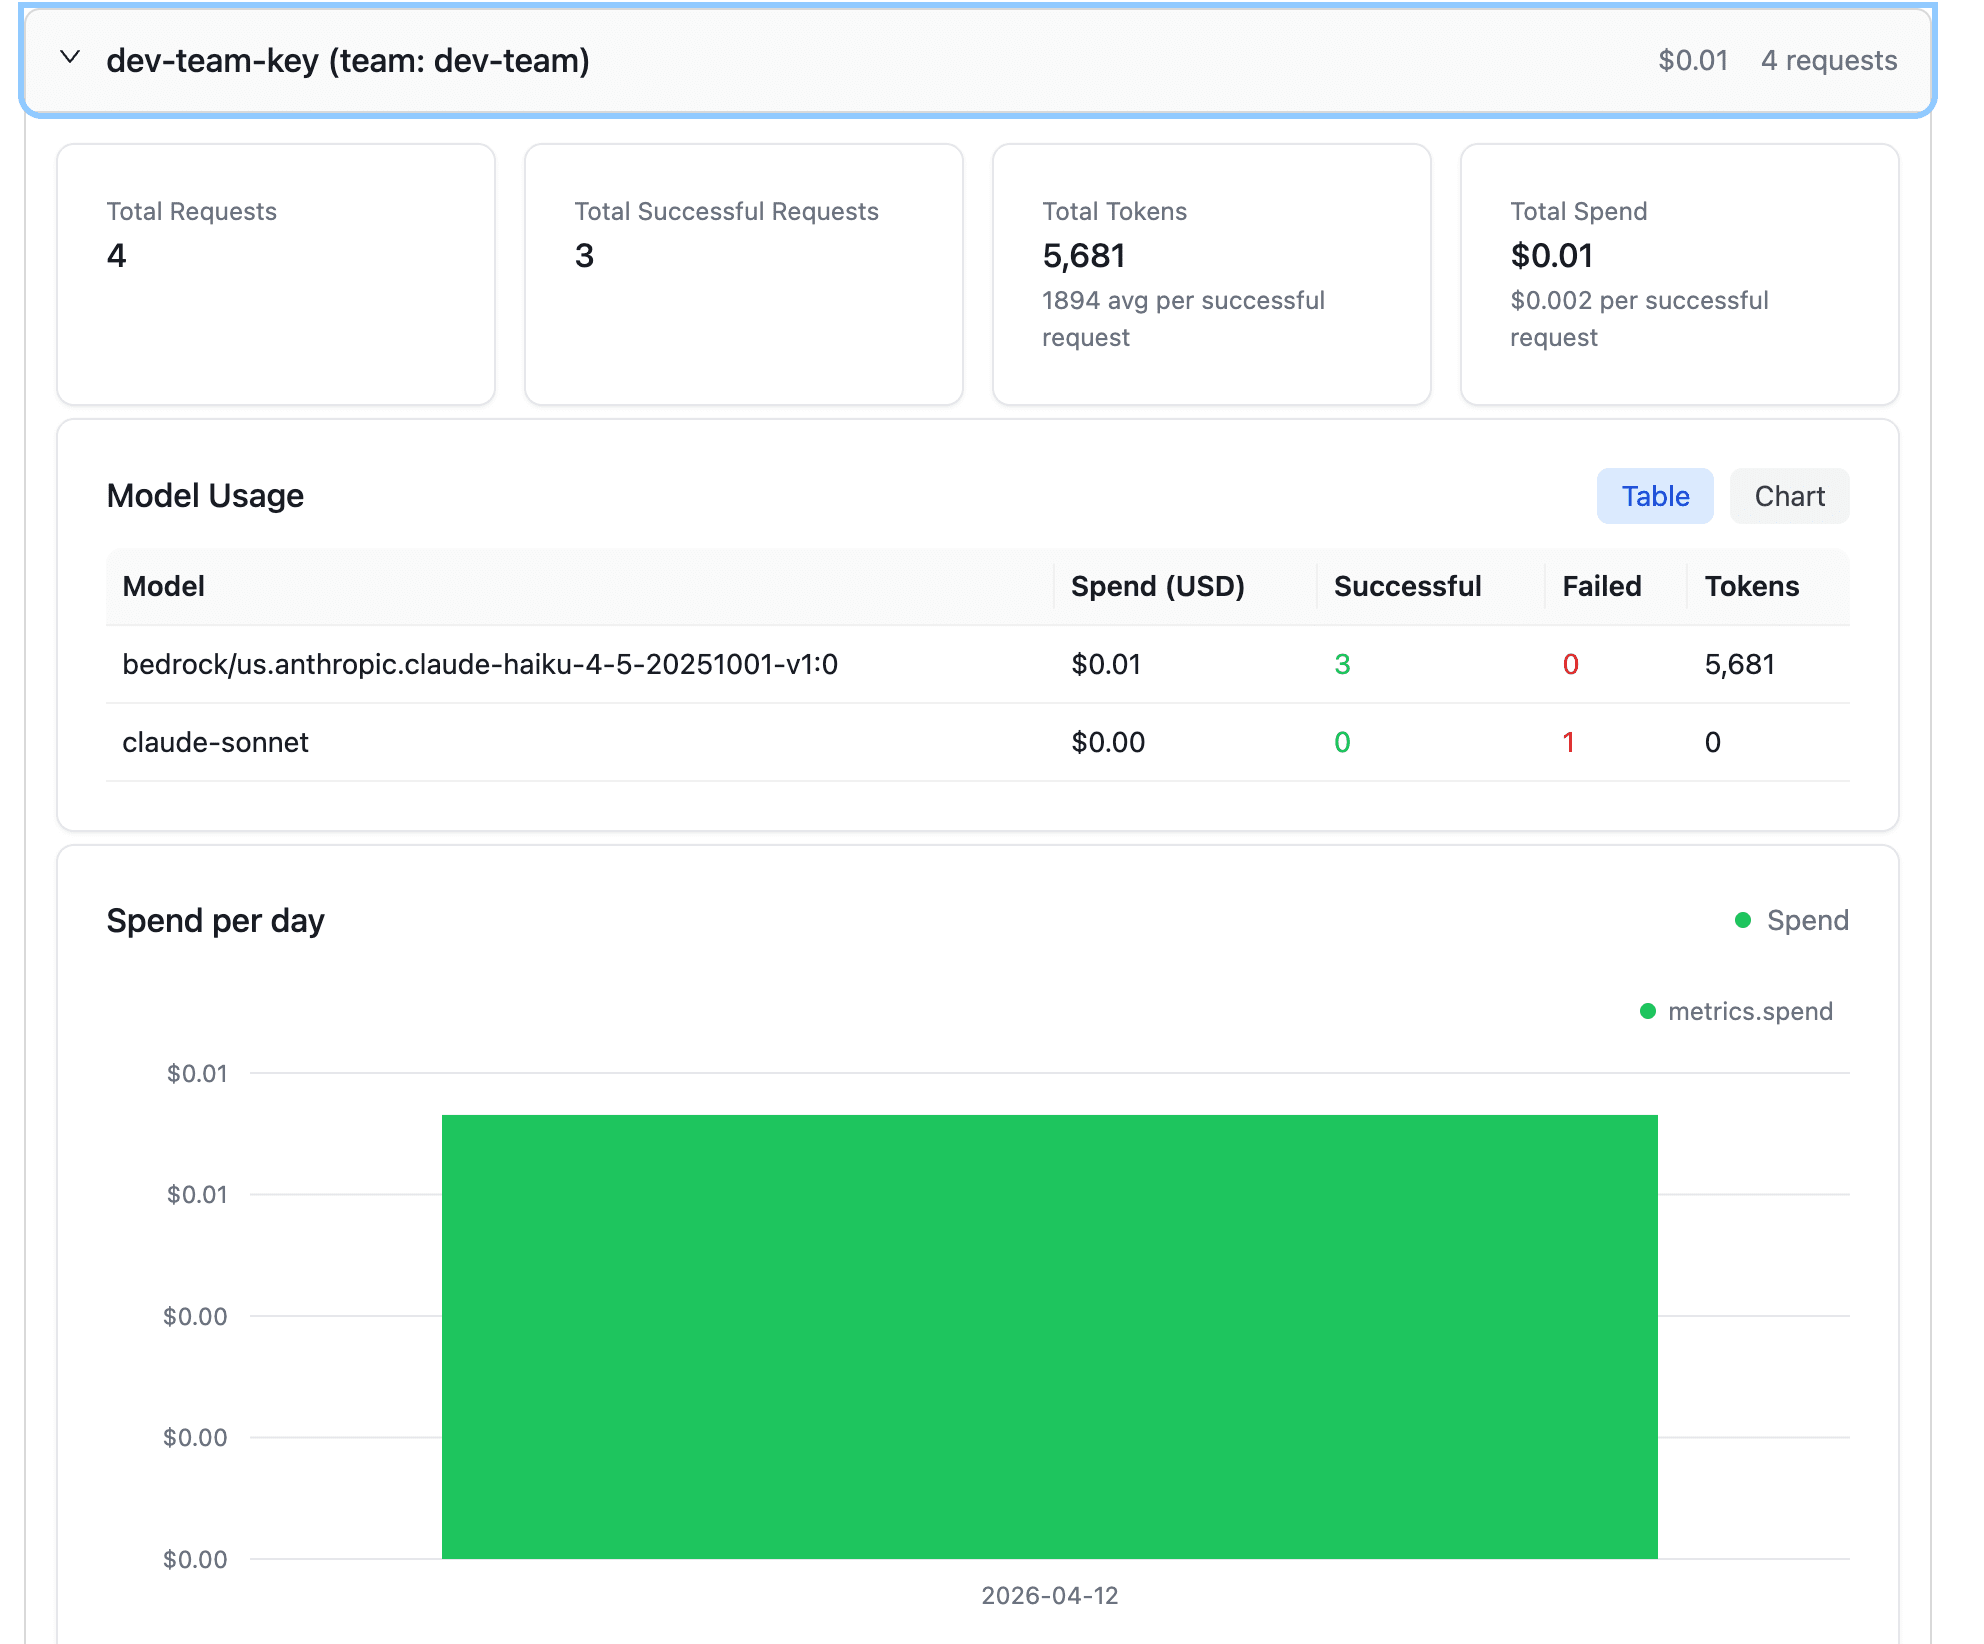
The Model Usage table shows Spend, Successful/Failed requests, and Tokens for each model. The blocked attempt to access claude-sonnet from our test is counted as Failed Requests: 1. The access control is properly reflected in the logs.
Request Logs
In the Logs screen, you can see details of individual requests:
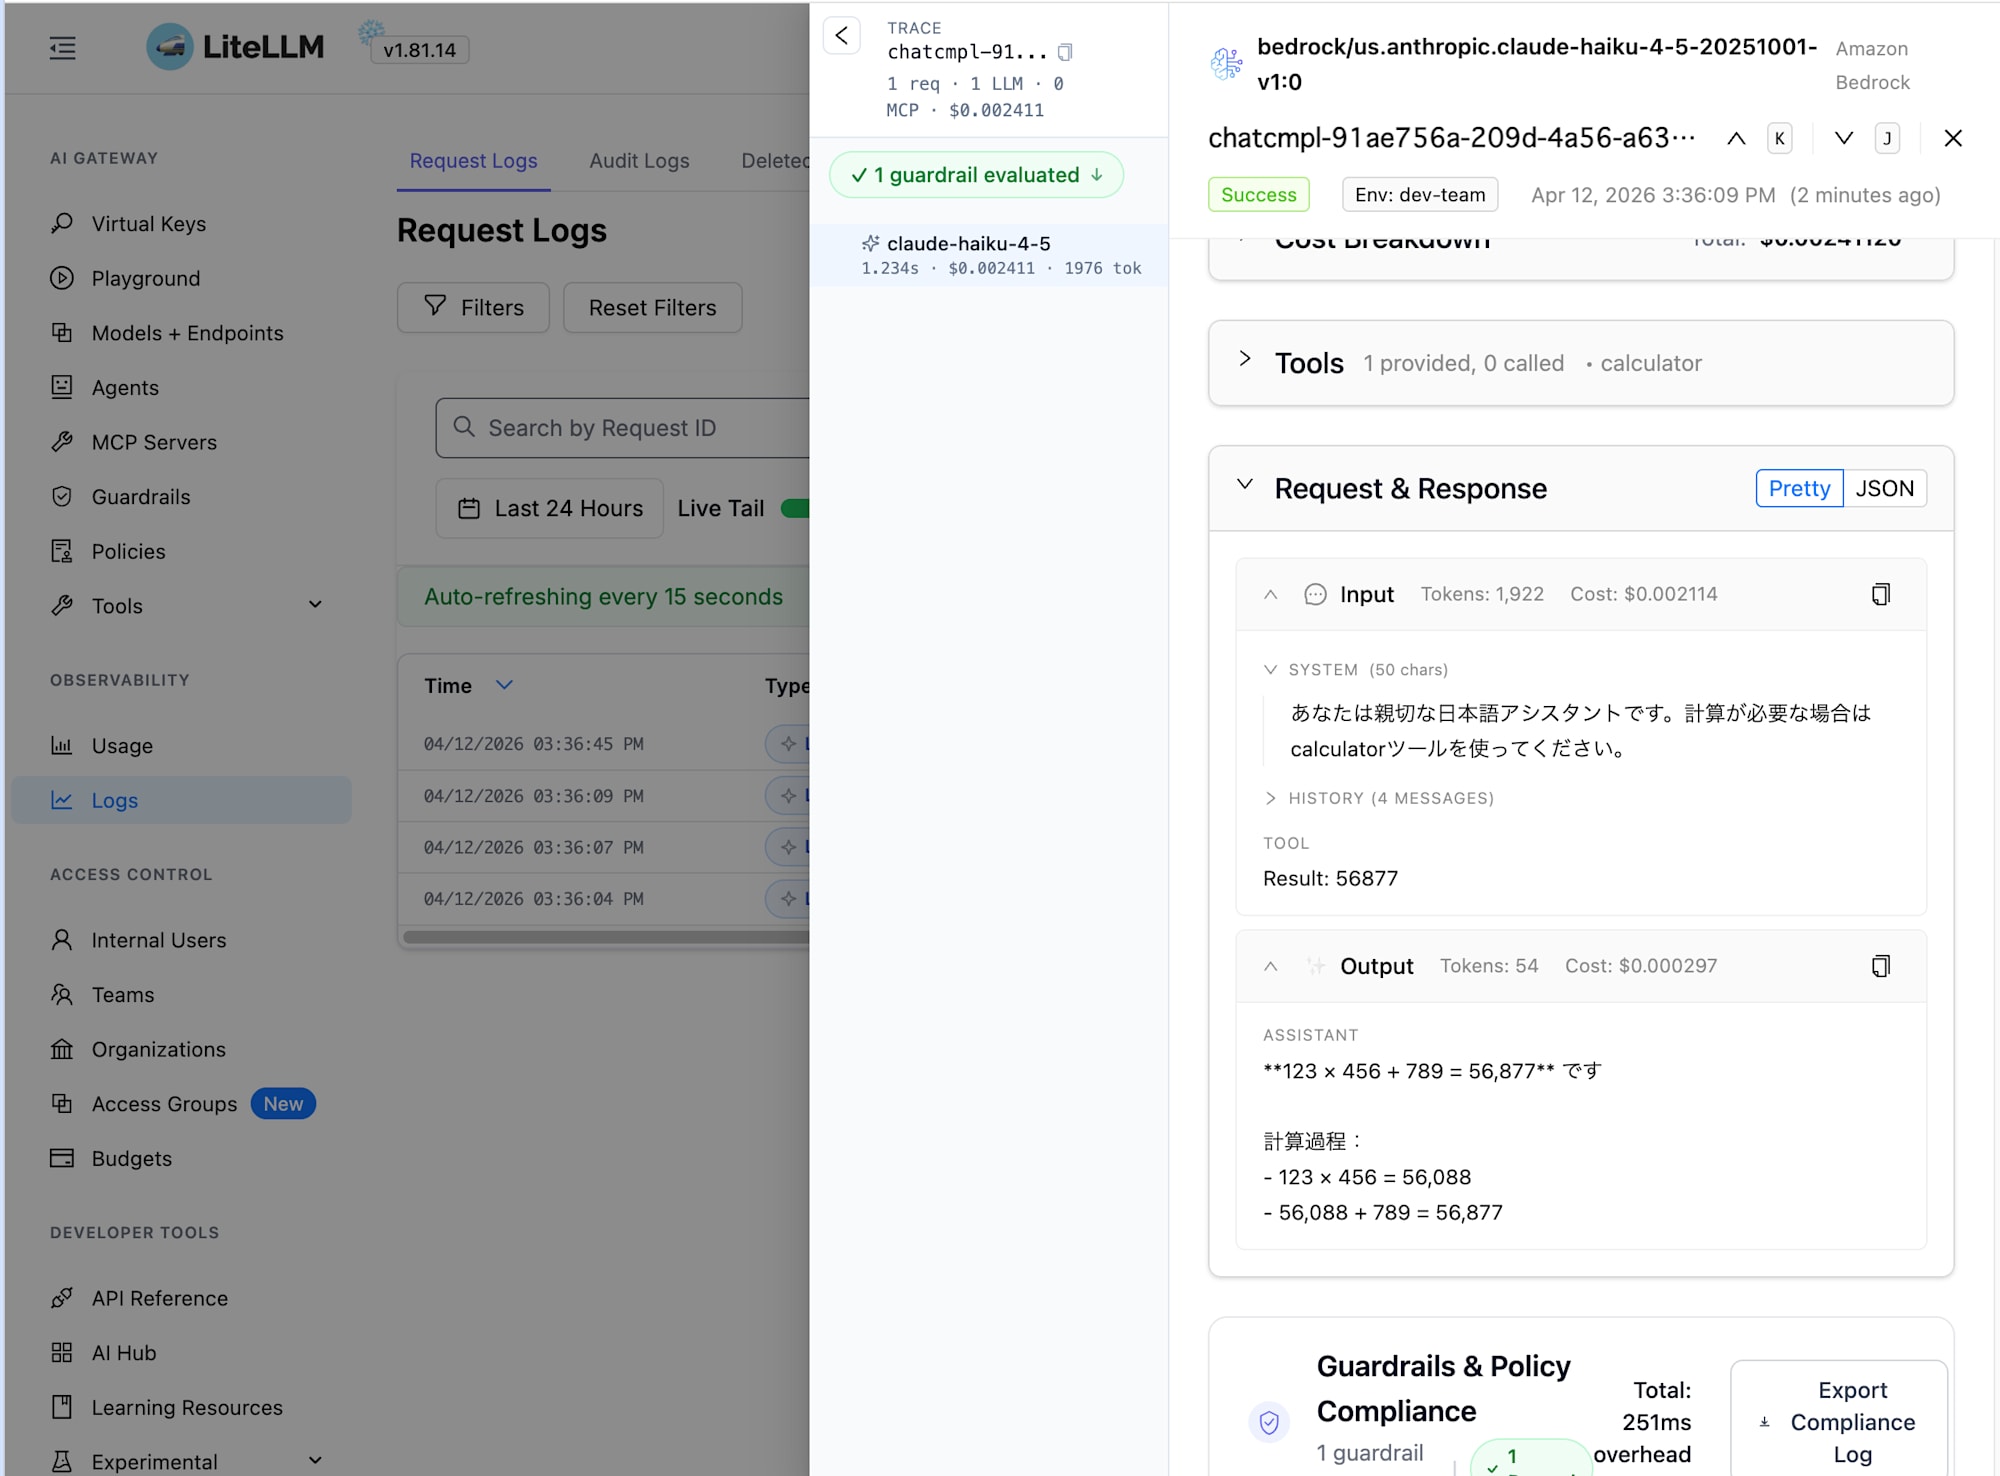
Since we set store_prompts_in_spend_logs: true, you can view the contents of each request's prompt and response. The right panel shows the System Prompt, user input, model response, tool call results (calculator), token counts, and cost breakdown. This is useful for debugging and auditing.
Conclusion
The Strands Agents implementation hardly changed at all - we just needed to pass proxy connection info in client_args. It's simple to use!
By adding LiteLLM Proxy as a gateway, you get model access control via Teams/virtual API keys, usage tracking, and request/response audit logs. If these are requirements for your project, it's worth considering.
By the way, the Terraform modules include a mechanism to integrate Bedrock Guardrails with LiteLLM's guardrail feature. I'd like to introduce that in a separate article.
I hope this article was helpful. Thank you for reading!