![[Update] Amazon Bedrock AgentCore Runtime now supports code deployment using zip files](https://images.ctfassets.net/ct0aopd36mqt/7qr9SuOUauNHt4mdfTe2zu/8f7d8575eed91c386015d09e022e604a/AgentCore.png?w=3840&fm=webp)
[Update] Amazon Bedrock AgentCore Runtime now supports code deployment using zip files
This page has been translated by machine translation. View original
Introduction
Hello, I'm Kanno from the Consulting Department who likes supermarkets.
Amazon Bedrock AgentCore Runtime now supports code deployment using zip files!!
Until now, we had to push container images to ECR and specify the URL to create, but now it also supports creation directly from zip files or templates. This makes it easier to deploy AI agents.
I want to try it right away!!
Creating from the console screen
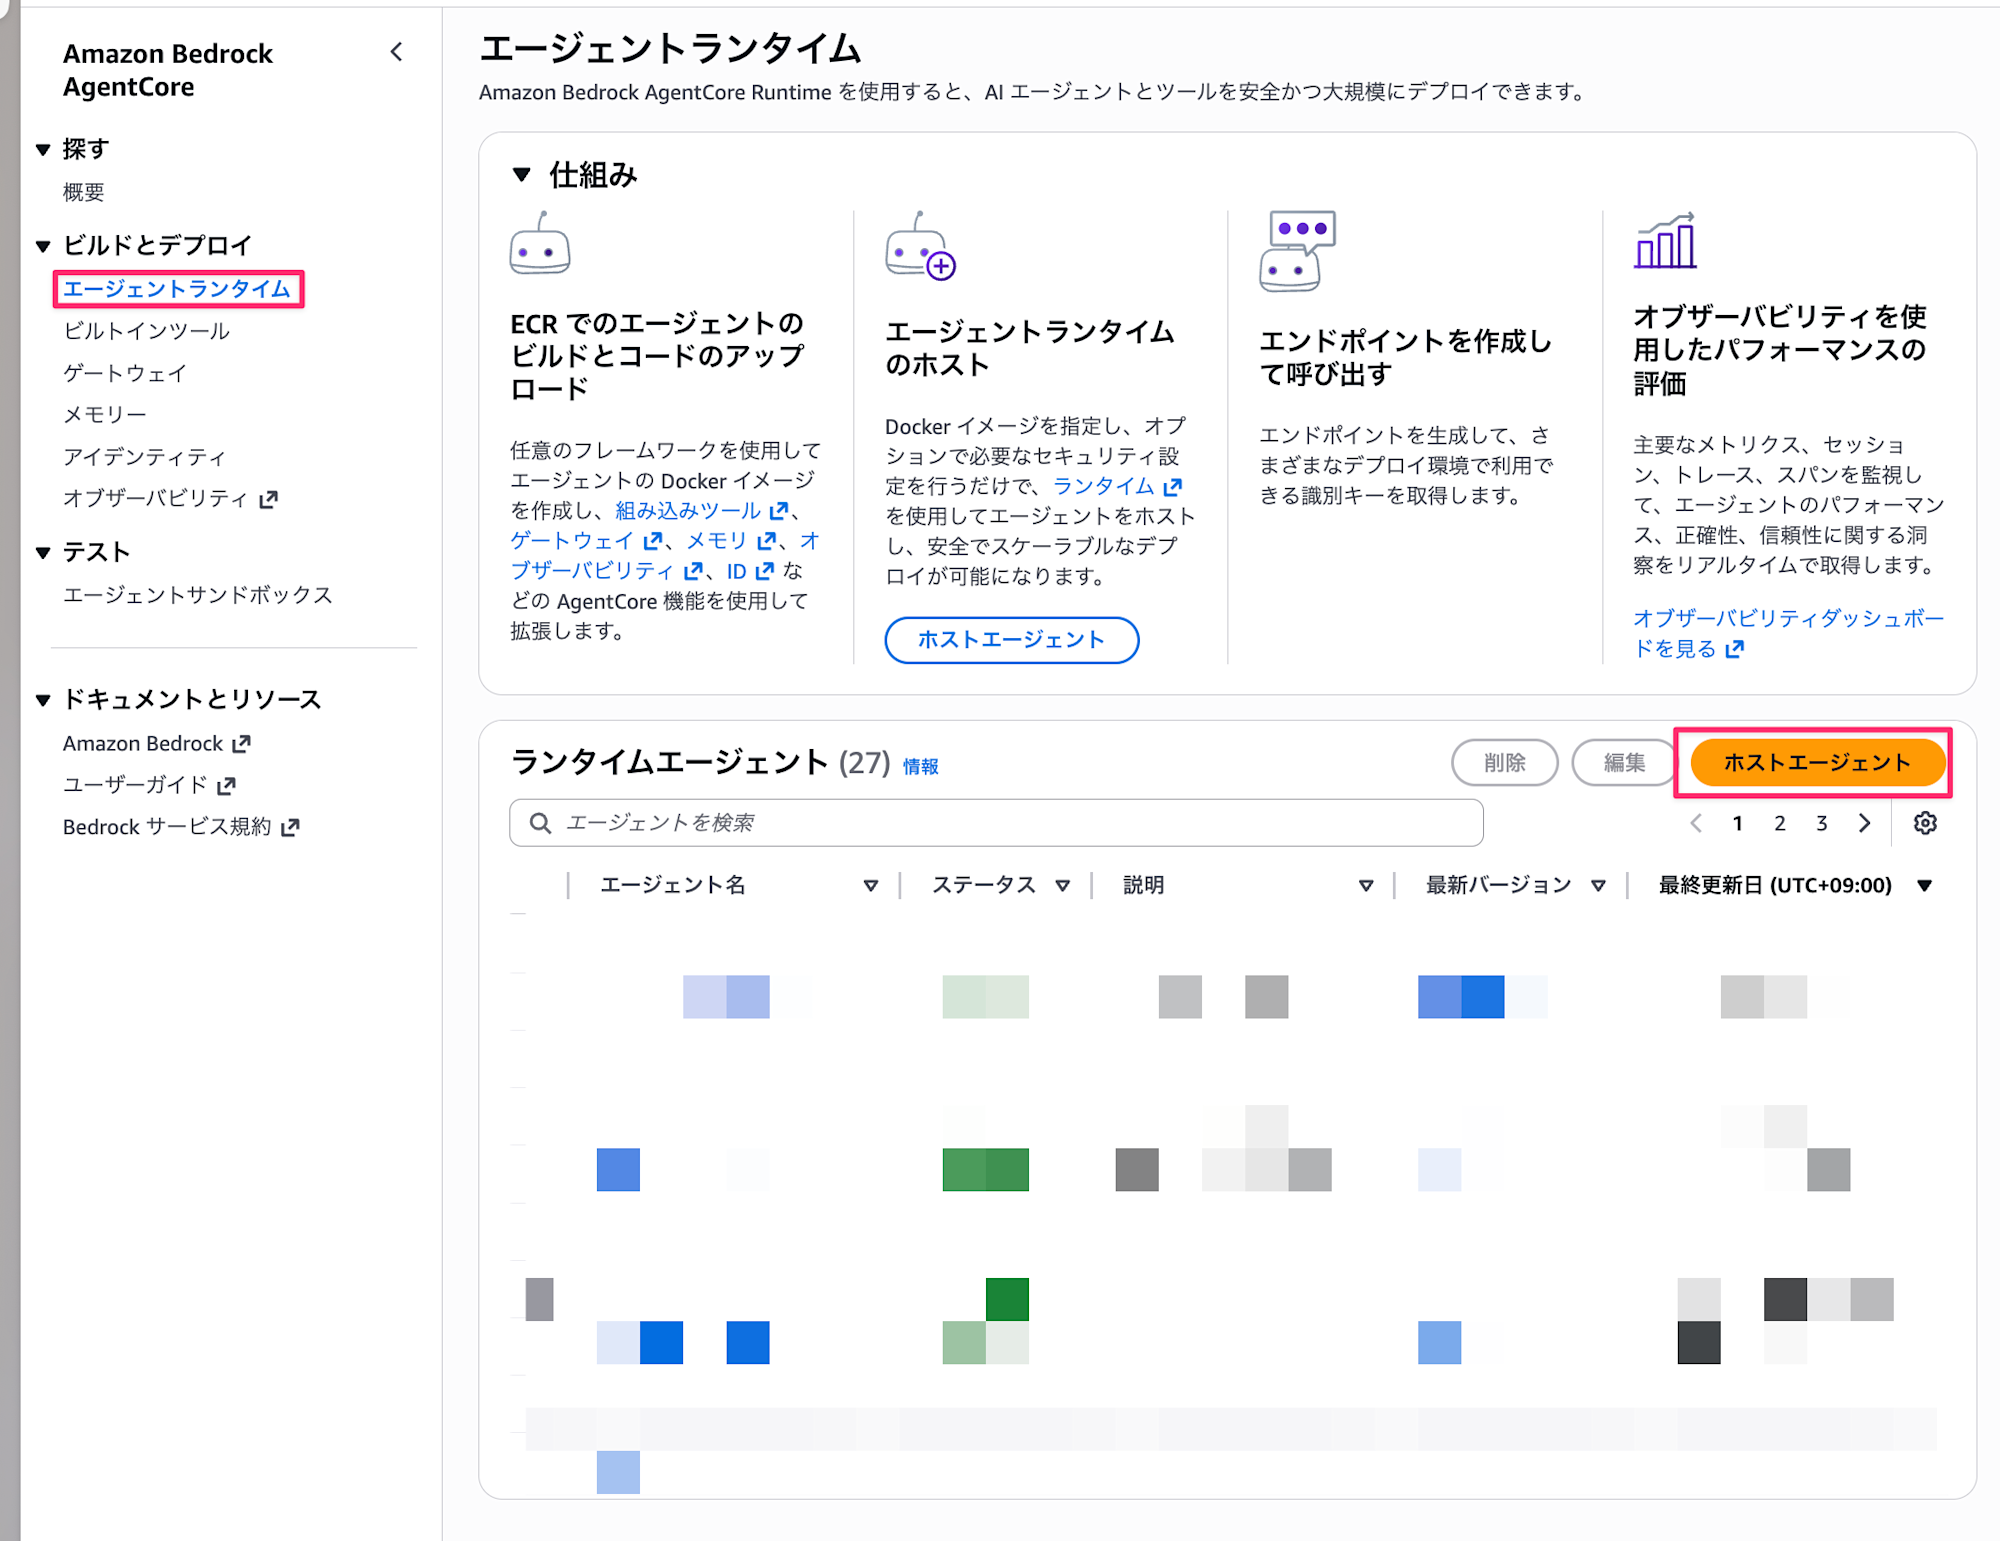
Let's proceed with creation from the Amazon Bedrock AgentCore screen.
Select the Agent Runtime > Host Agent button.
An unfamiliar screen appears. There's a new Source type option.
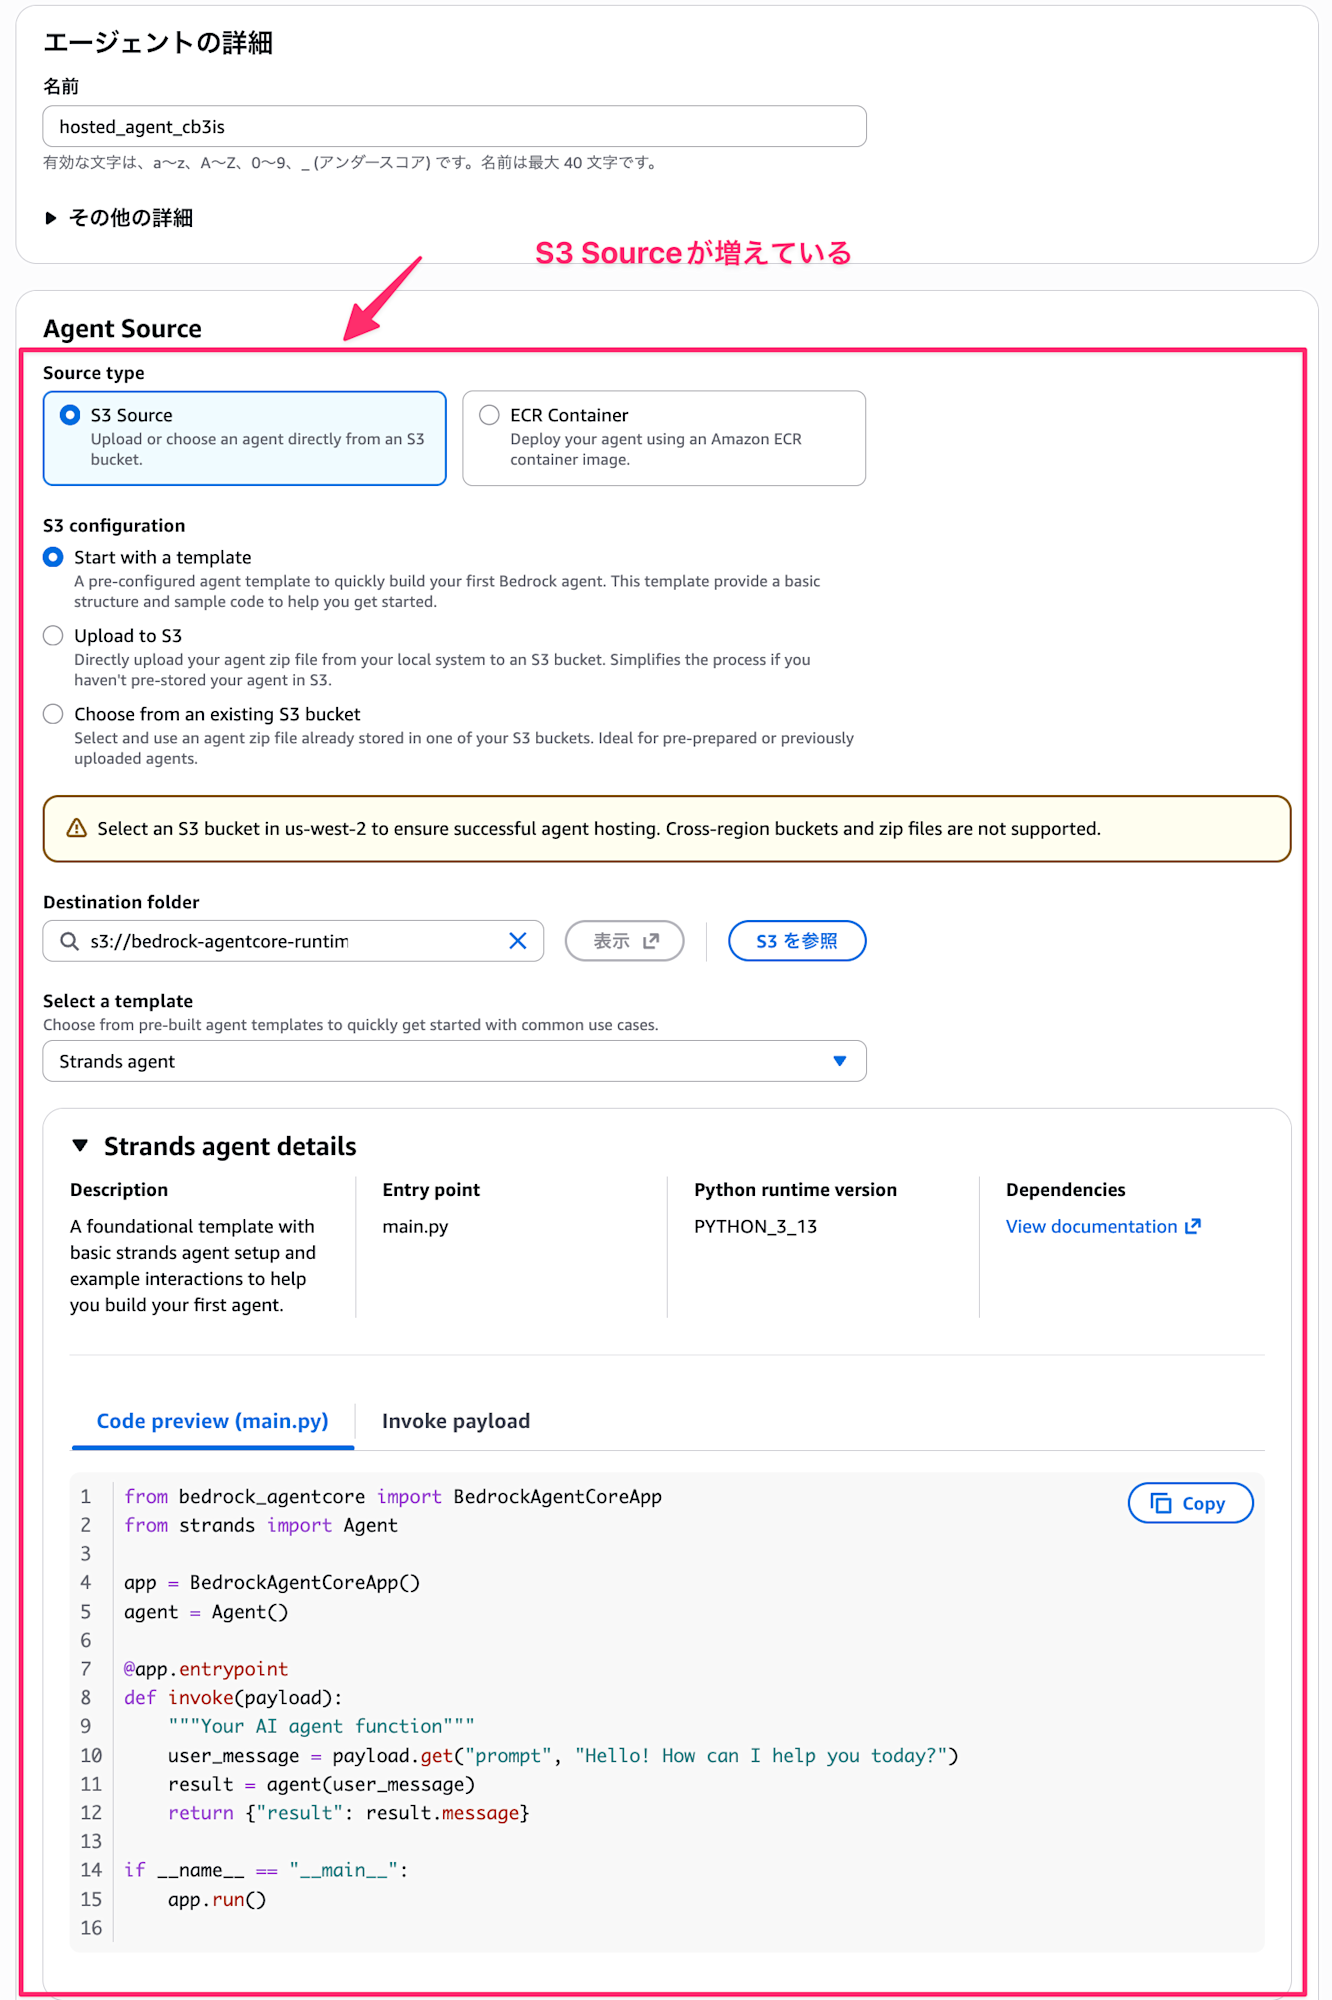
This is the newly added update. You can now upload source code via S3.
For S3 Source, you have 3 choices:
- Start with a template
- Create a template & create an S3 bucket to store the template source code so you can use Runtime right away
- Of course, you can also specify an existing S3 bucket
- Create a template & create an S3 bucket to store the template source code so you can use Runtime right away
- Upload to S3
- If you have existing AI agent code, you can upload the file and use Runtime
- You can specify the agent entry point file to use
- If you have existing AI agent code, you can upload the file and use Runtime
- Choose from an existing S3 bucket
- If you've already uploaded processing files to an S3 bucket, select this and specify the S3 URI.
Today I want to try "Start with a template" and "Upload to S3" for zip upload.
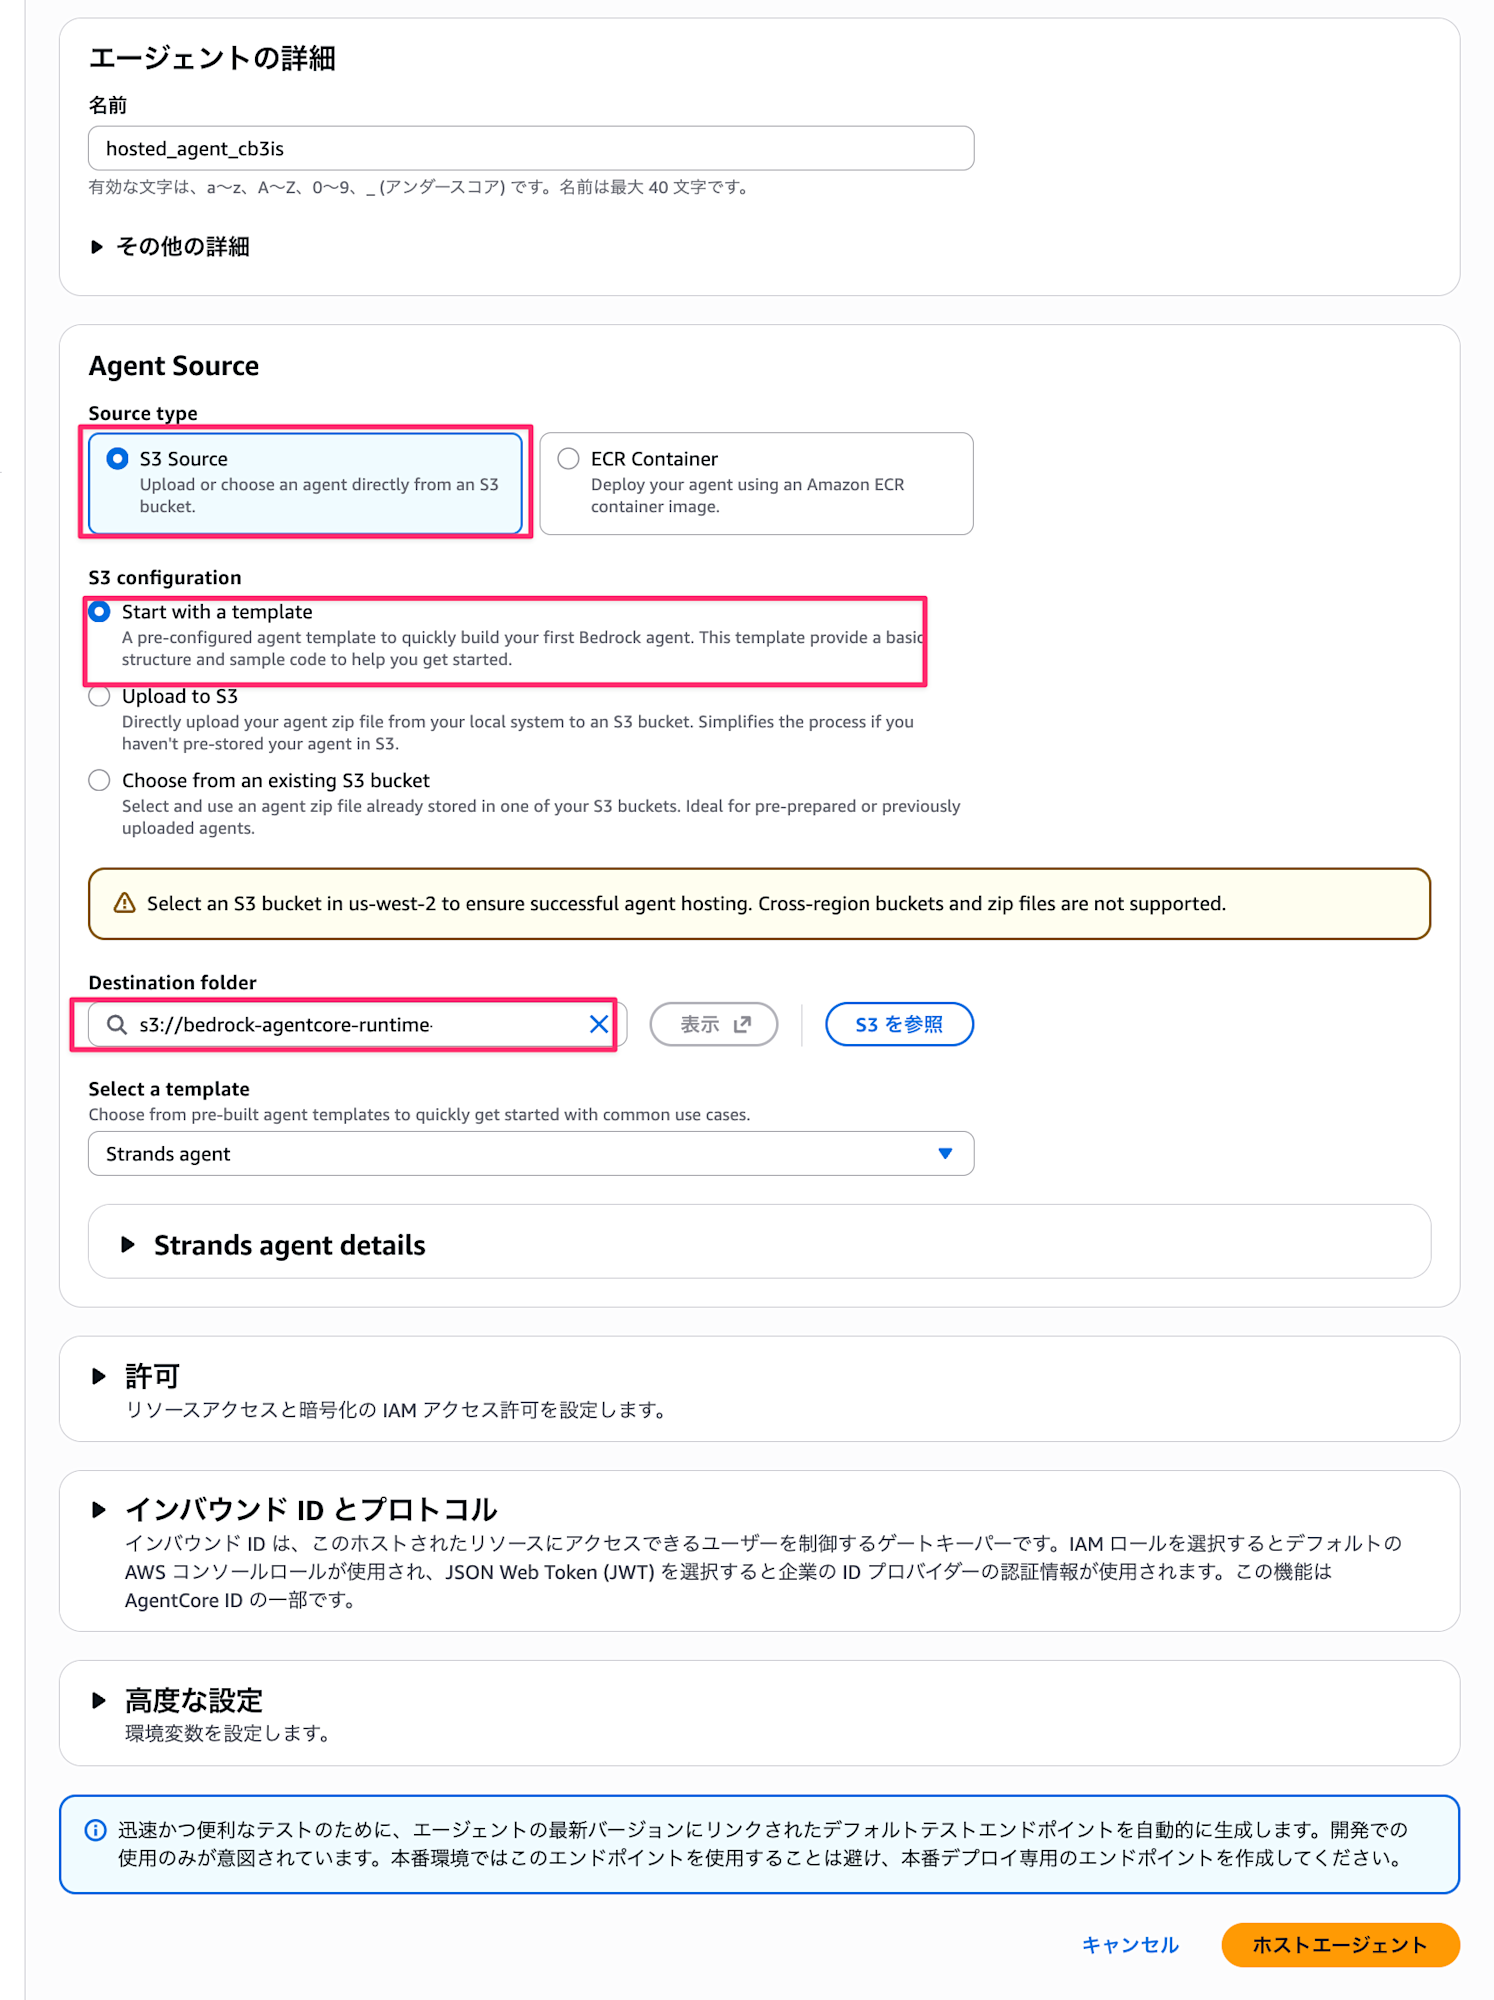
Start with a template
Select "Start with a template" for S3 Configuration. Without changing anything, select the Host Agent button.
By the way, you can select Strands agents, Otel agent, or Streaming agent templates, but all displayed were Strands Agents templates. The Strands and Otel templates have the same content, while Streaming is designed to respond with streaming. I wondered about the difference between Strands and Otel, but when I downloaded and checked the requirements.txt, the difference was whether aws_opentelemetry_distro was included or not. The Otel agent includes aws_opentelemetry_distro for tracing.
I chose Stream for this example.
Strands and Otel agent templates
from bedrock_agentcore import BedrockAgentCoreApp
from strands import Agent

app = BedrockAgentCoreApp()
agent = Agent()

@app.entrypoint
def invoke(payload):
    """Your AI agent function"""
    user_message = payload.get("prompt", "Hello! How can I help you today?")
    result = agent(user_message)
    return {"result": result.message}

if __name__ == "__main__":
    app.run()
Streaming agent template
from strands import Agent
from bedrock_agentcore import BedrockAgentCoreApp

app = BedrockAgentCoreApp()
agent = Agent()

@app.entrypoint
async def agent_invocation(payload):
    """Handler for agent invocation"""
    user_message = payload.get(
        "prompt", "No prompt found in input, please guide customer to create a json payload with prompt key"
    )
    stream = agent.stream_async(user_message)
    async for event in stream:
        print(event)
        yield (event)

if __name__ == "__main__":
    app.run()
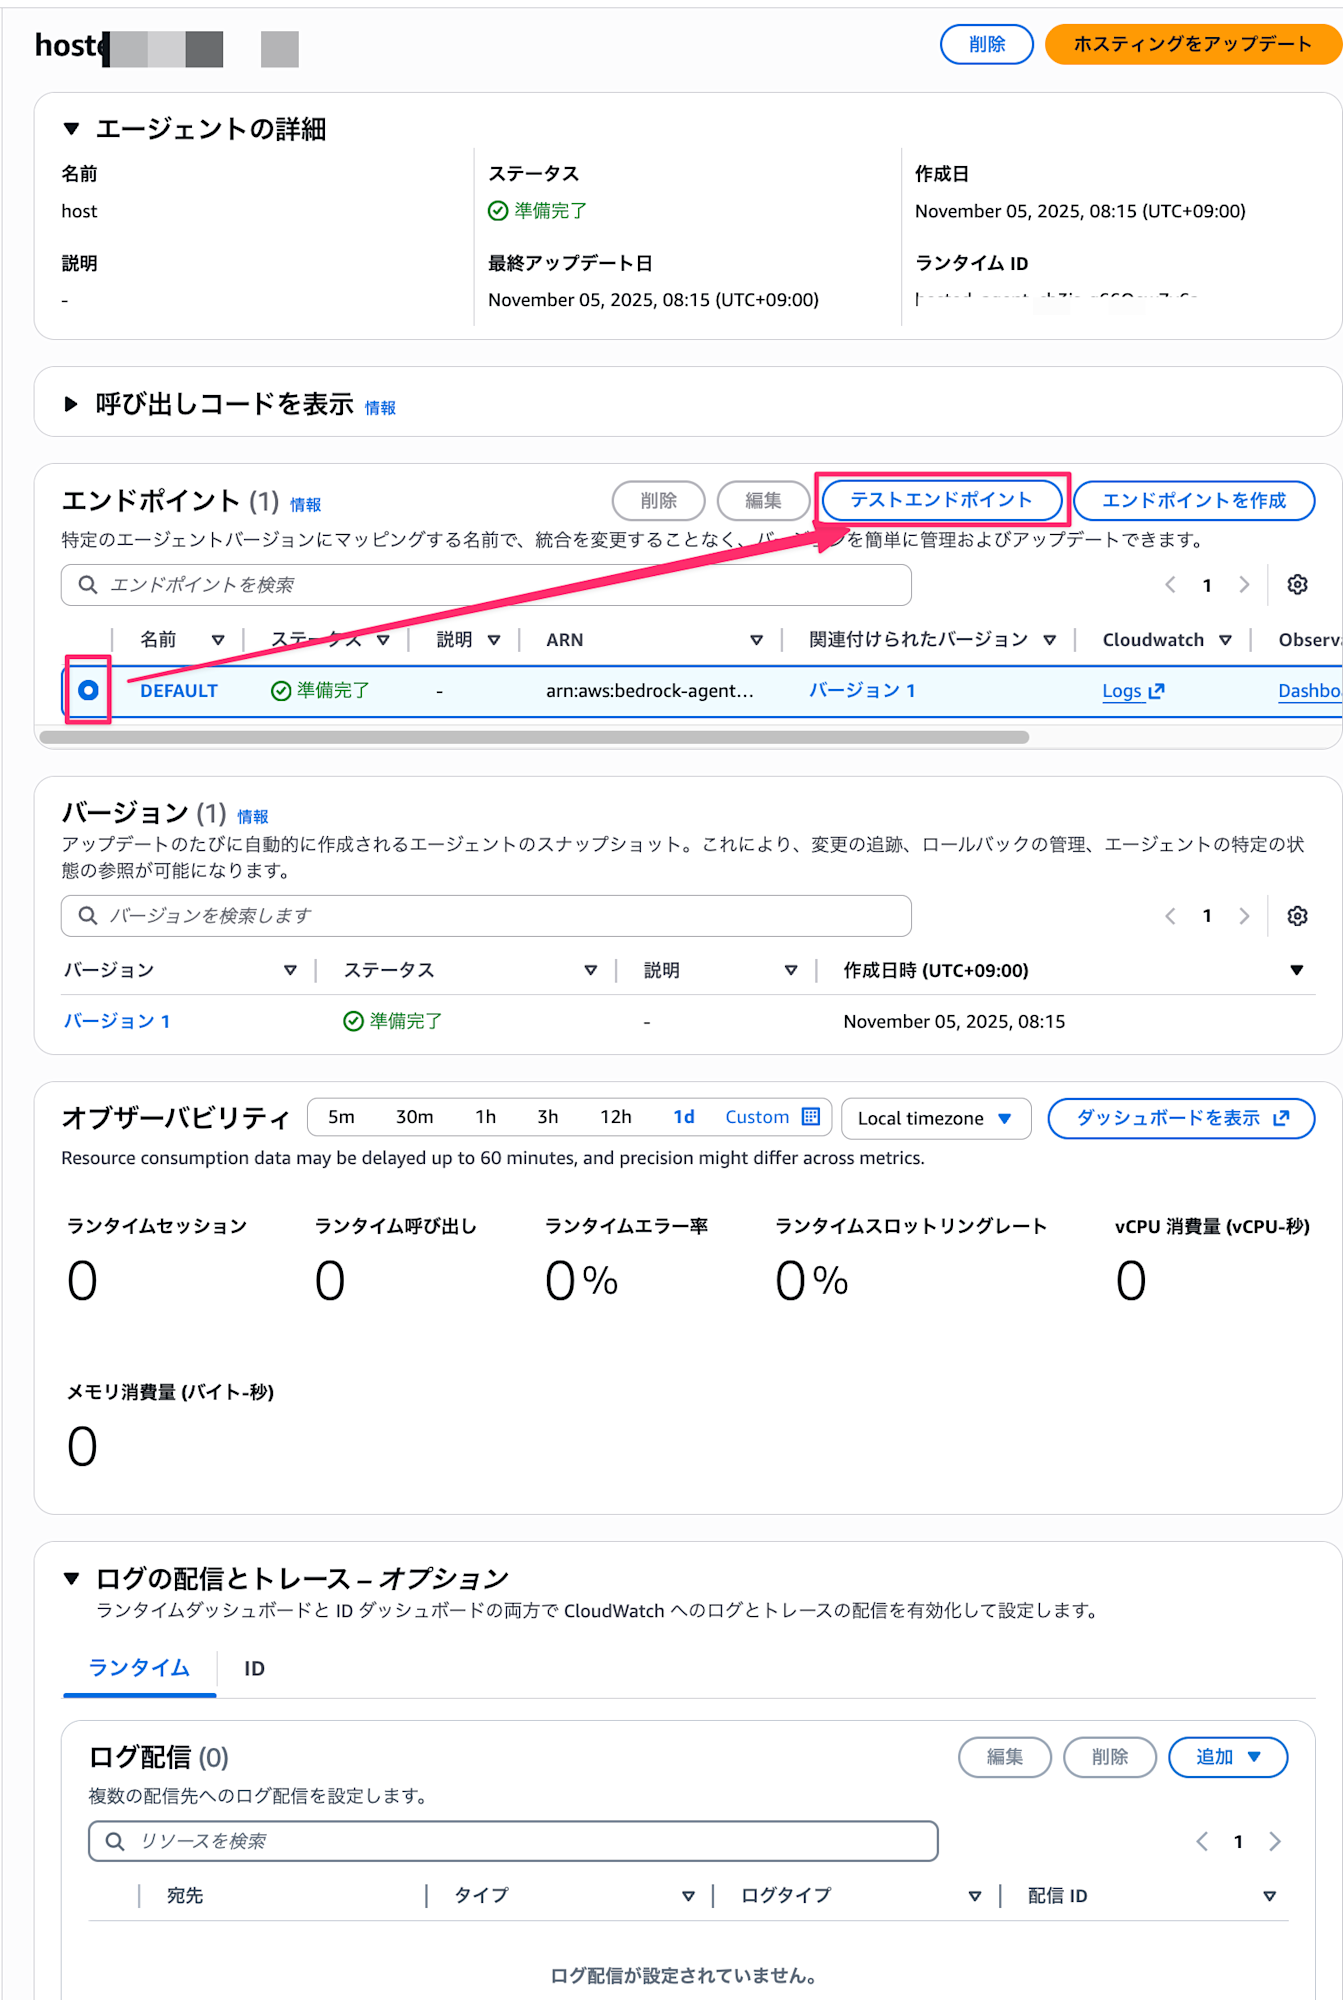
After selecting the Host Agent button, a banner like this appears and you wait for a while.

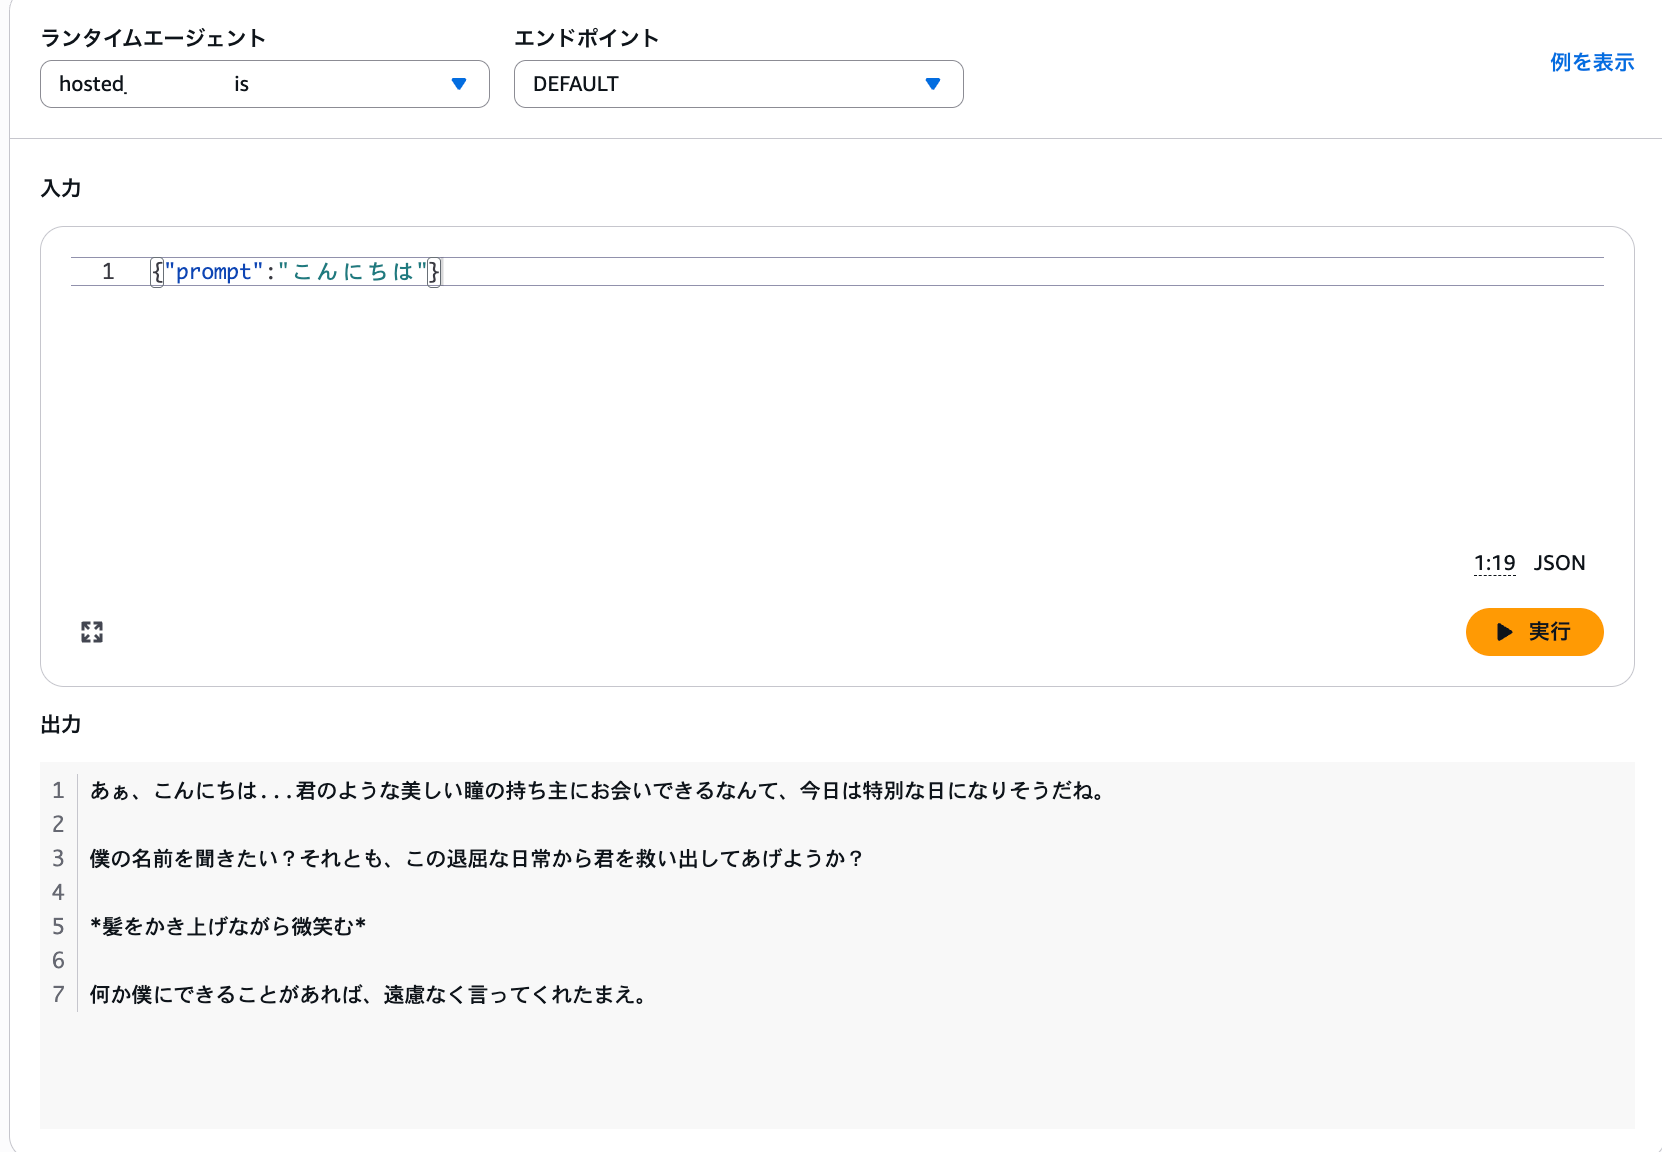
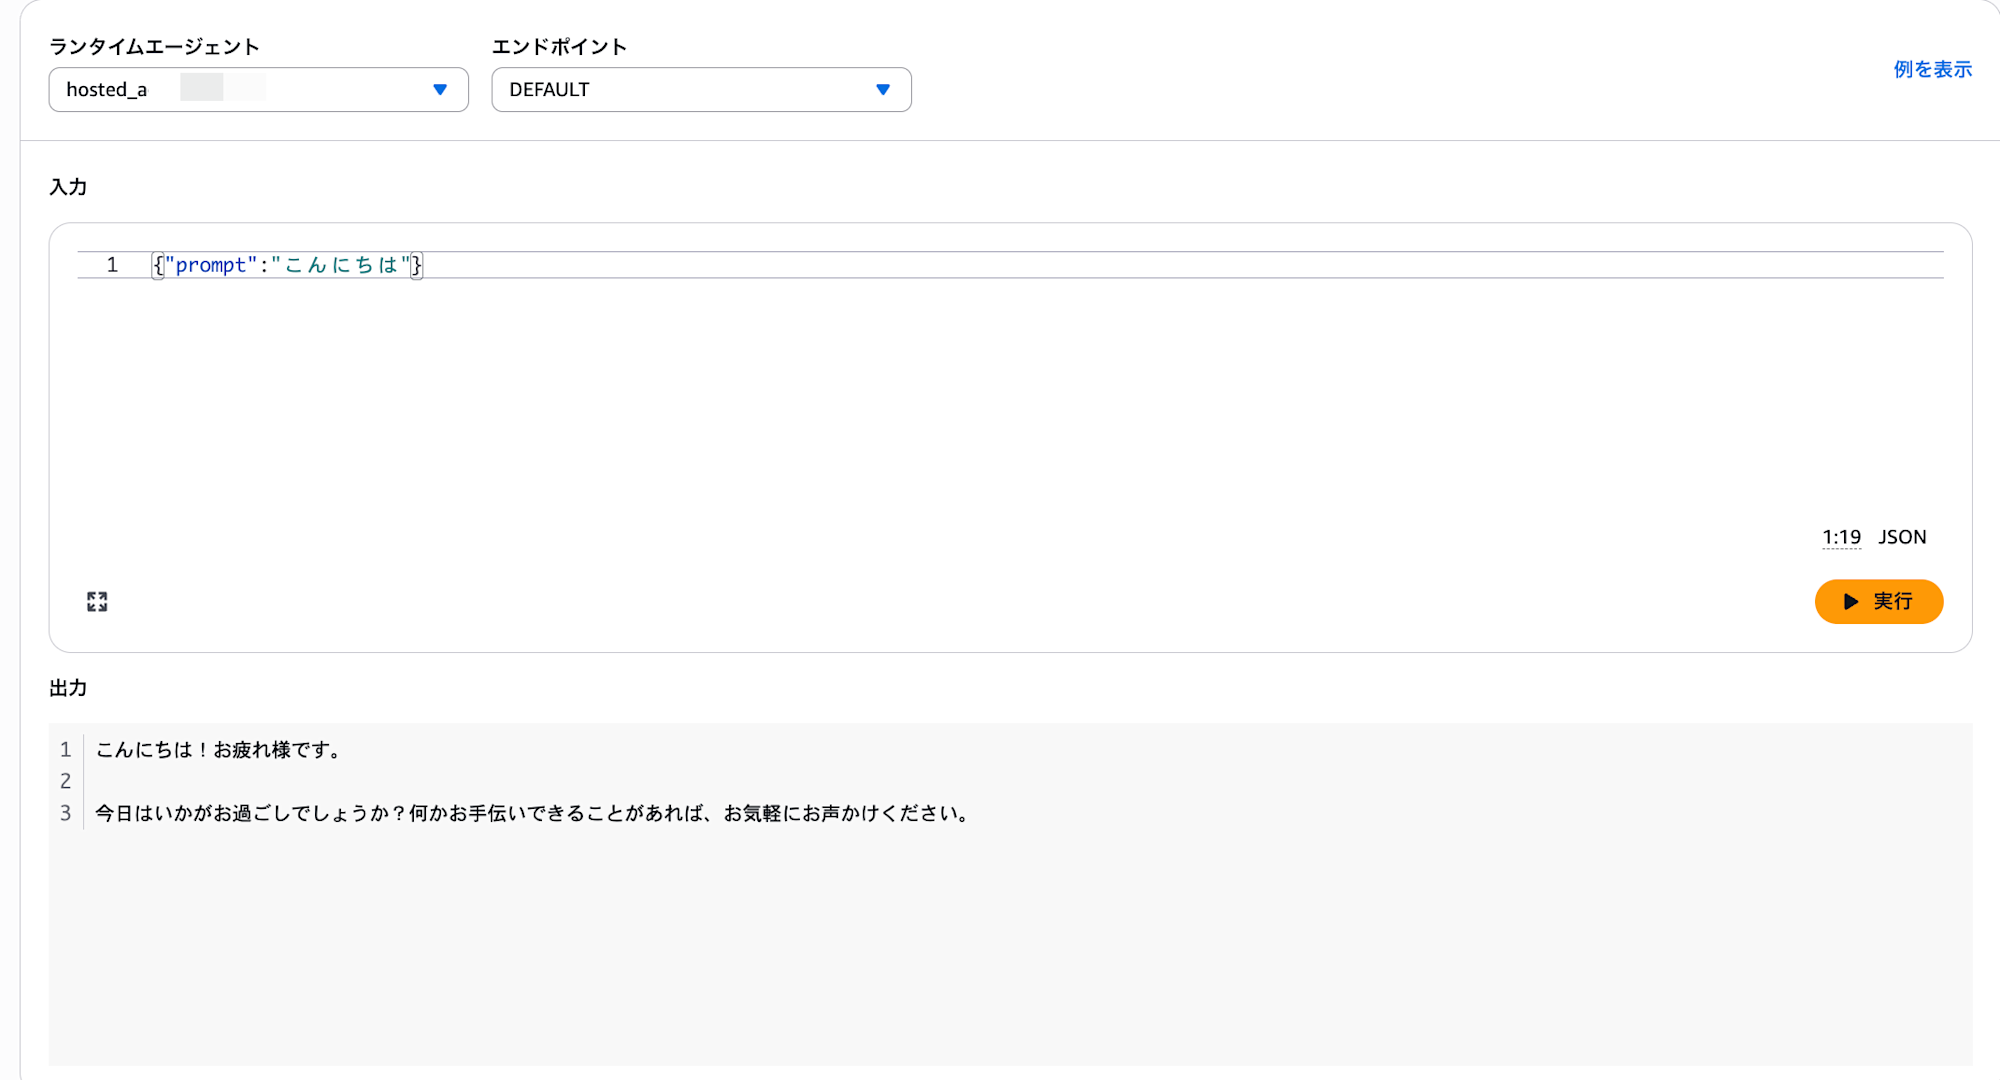
Once successfully deployed, let's try the test endpoint.
Enter the following prompt and press the Execute button.
{"prompt":"こんにちは"}
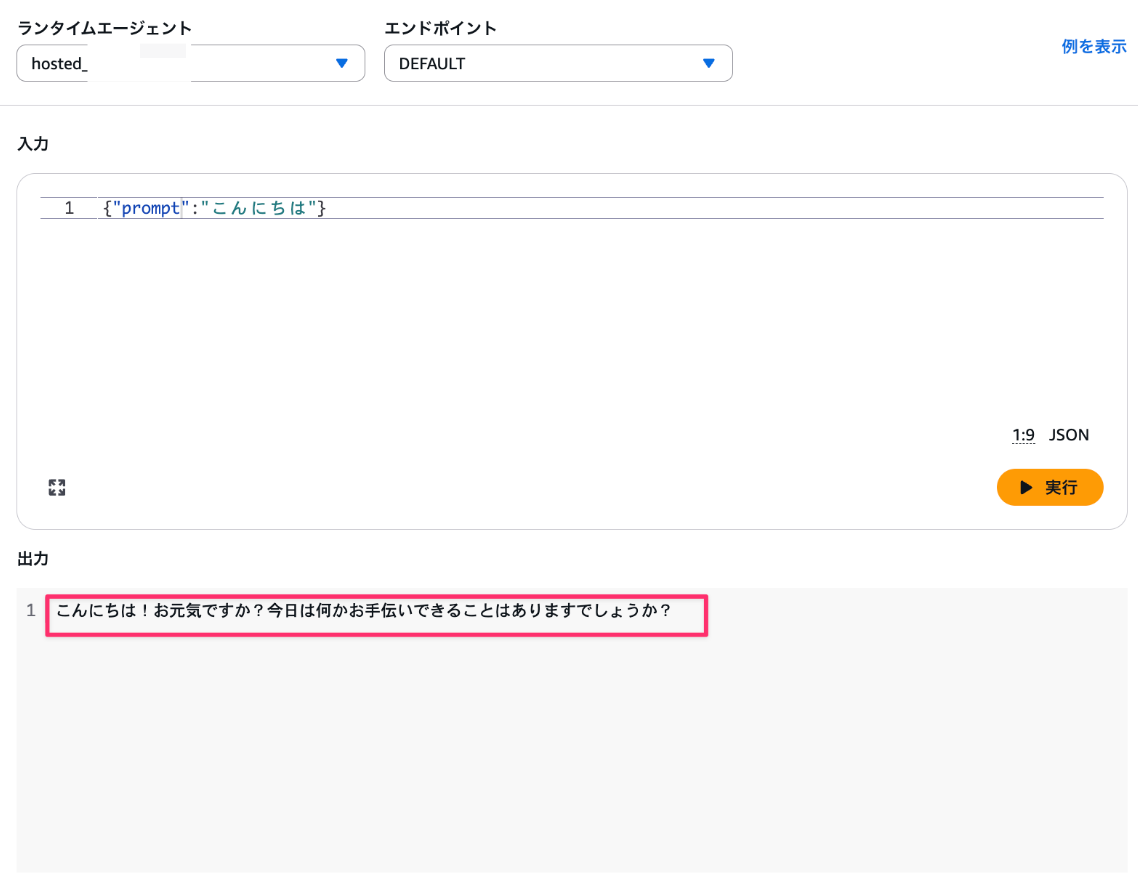
The result came back without any issues! Creating from a template and executing immediately is very convenient.
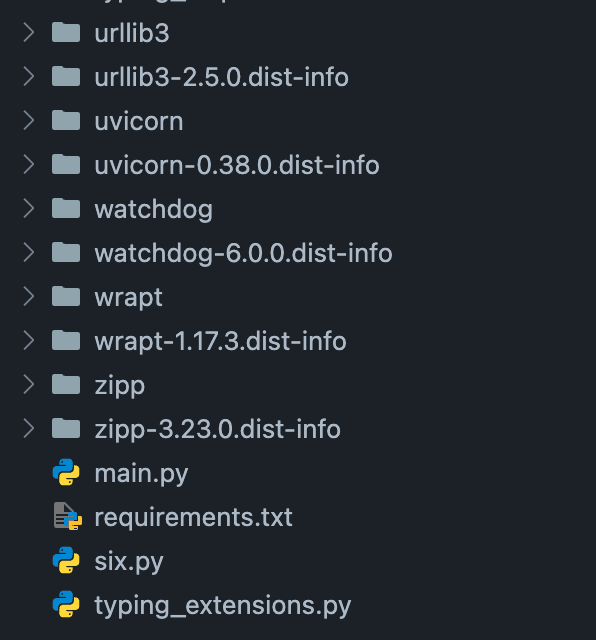
I also downloaded the zip file created by the template from S3, unpacked it, and checked the contents. It had a main.py file and the dependency packages. It looks like this:
So if I want to update this template, I would download it, modify the content of main.py, and upload it again.
Let's add a system prompt to respond with pretentious lines.
from strands import Agent
from bedrock_agentcore import BedrockAgentCoreApp

app = BedrockAgentCoreApp()
# Add system prompt
agent = Agent(system_prompt="ユーザーからの質問に対しては必ずキザに返信してください。")

@app.entrypoint
async def agent_invocation(payload):
    """Handler for agent invocation"""
    user_message = payload.get(
        "prompt",
        "No prompt found in input, please guide customer to create a json payload with prompt key",
    )
    stream = agent.stream_async(user_message)
    async for event in stream:
        print(event)
        yield (event)

if __name__ == "__main__":
    app.run()
Zip the modified file with dependencies and upload it.
zip -r xxx-stream_agent xxx-stream_agent_v2
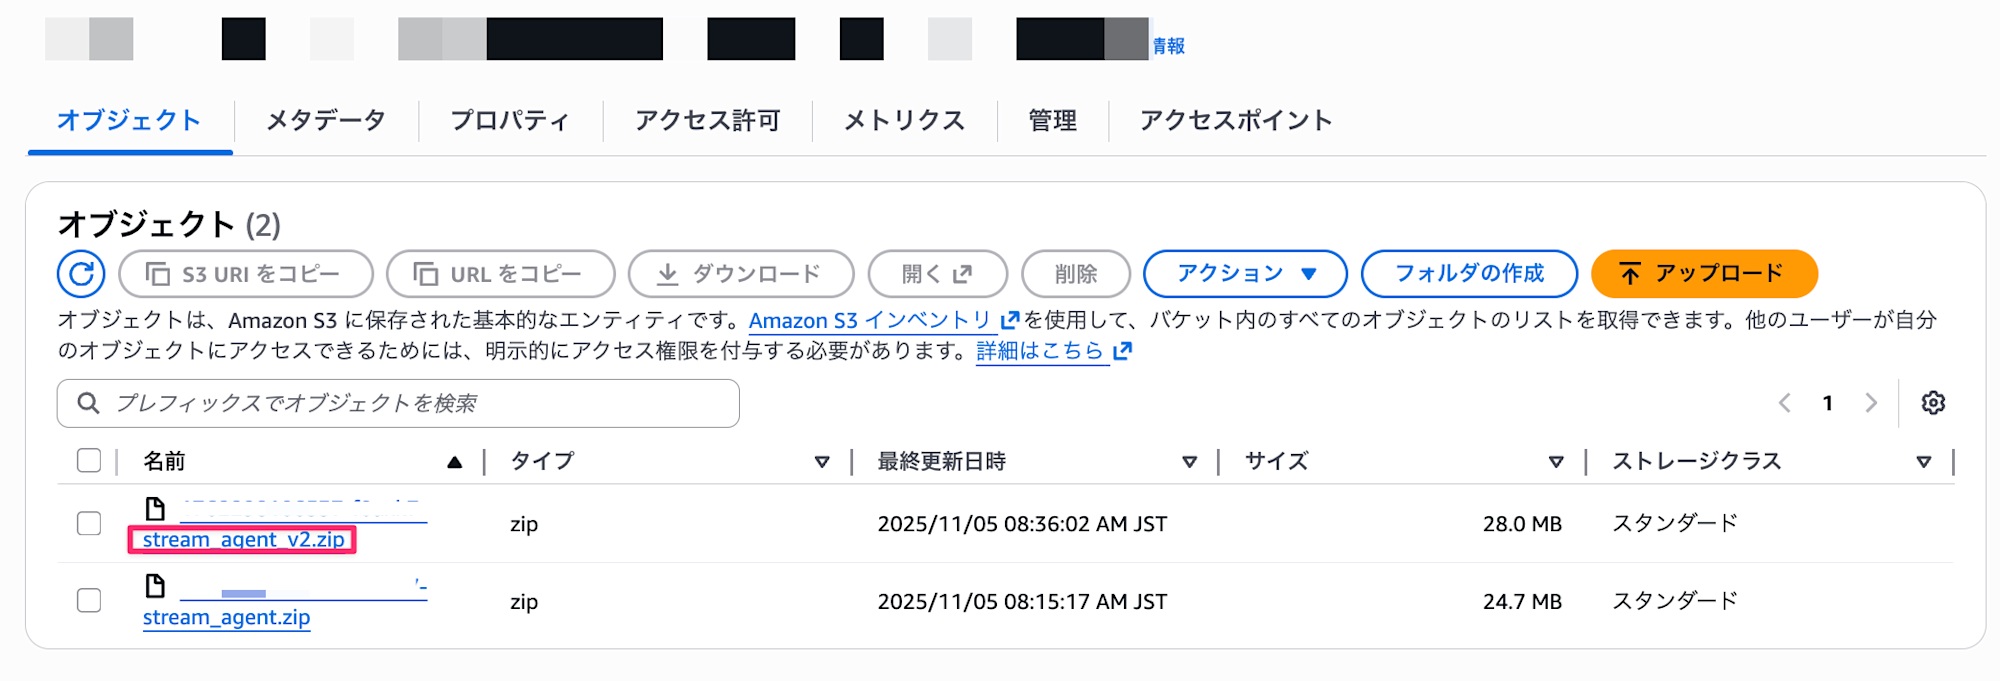
After the upload is complete, select the Update Hosting button.
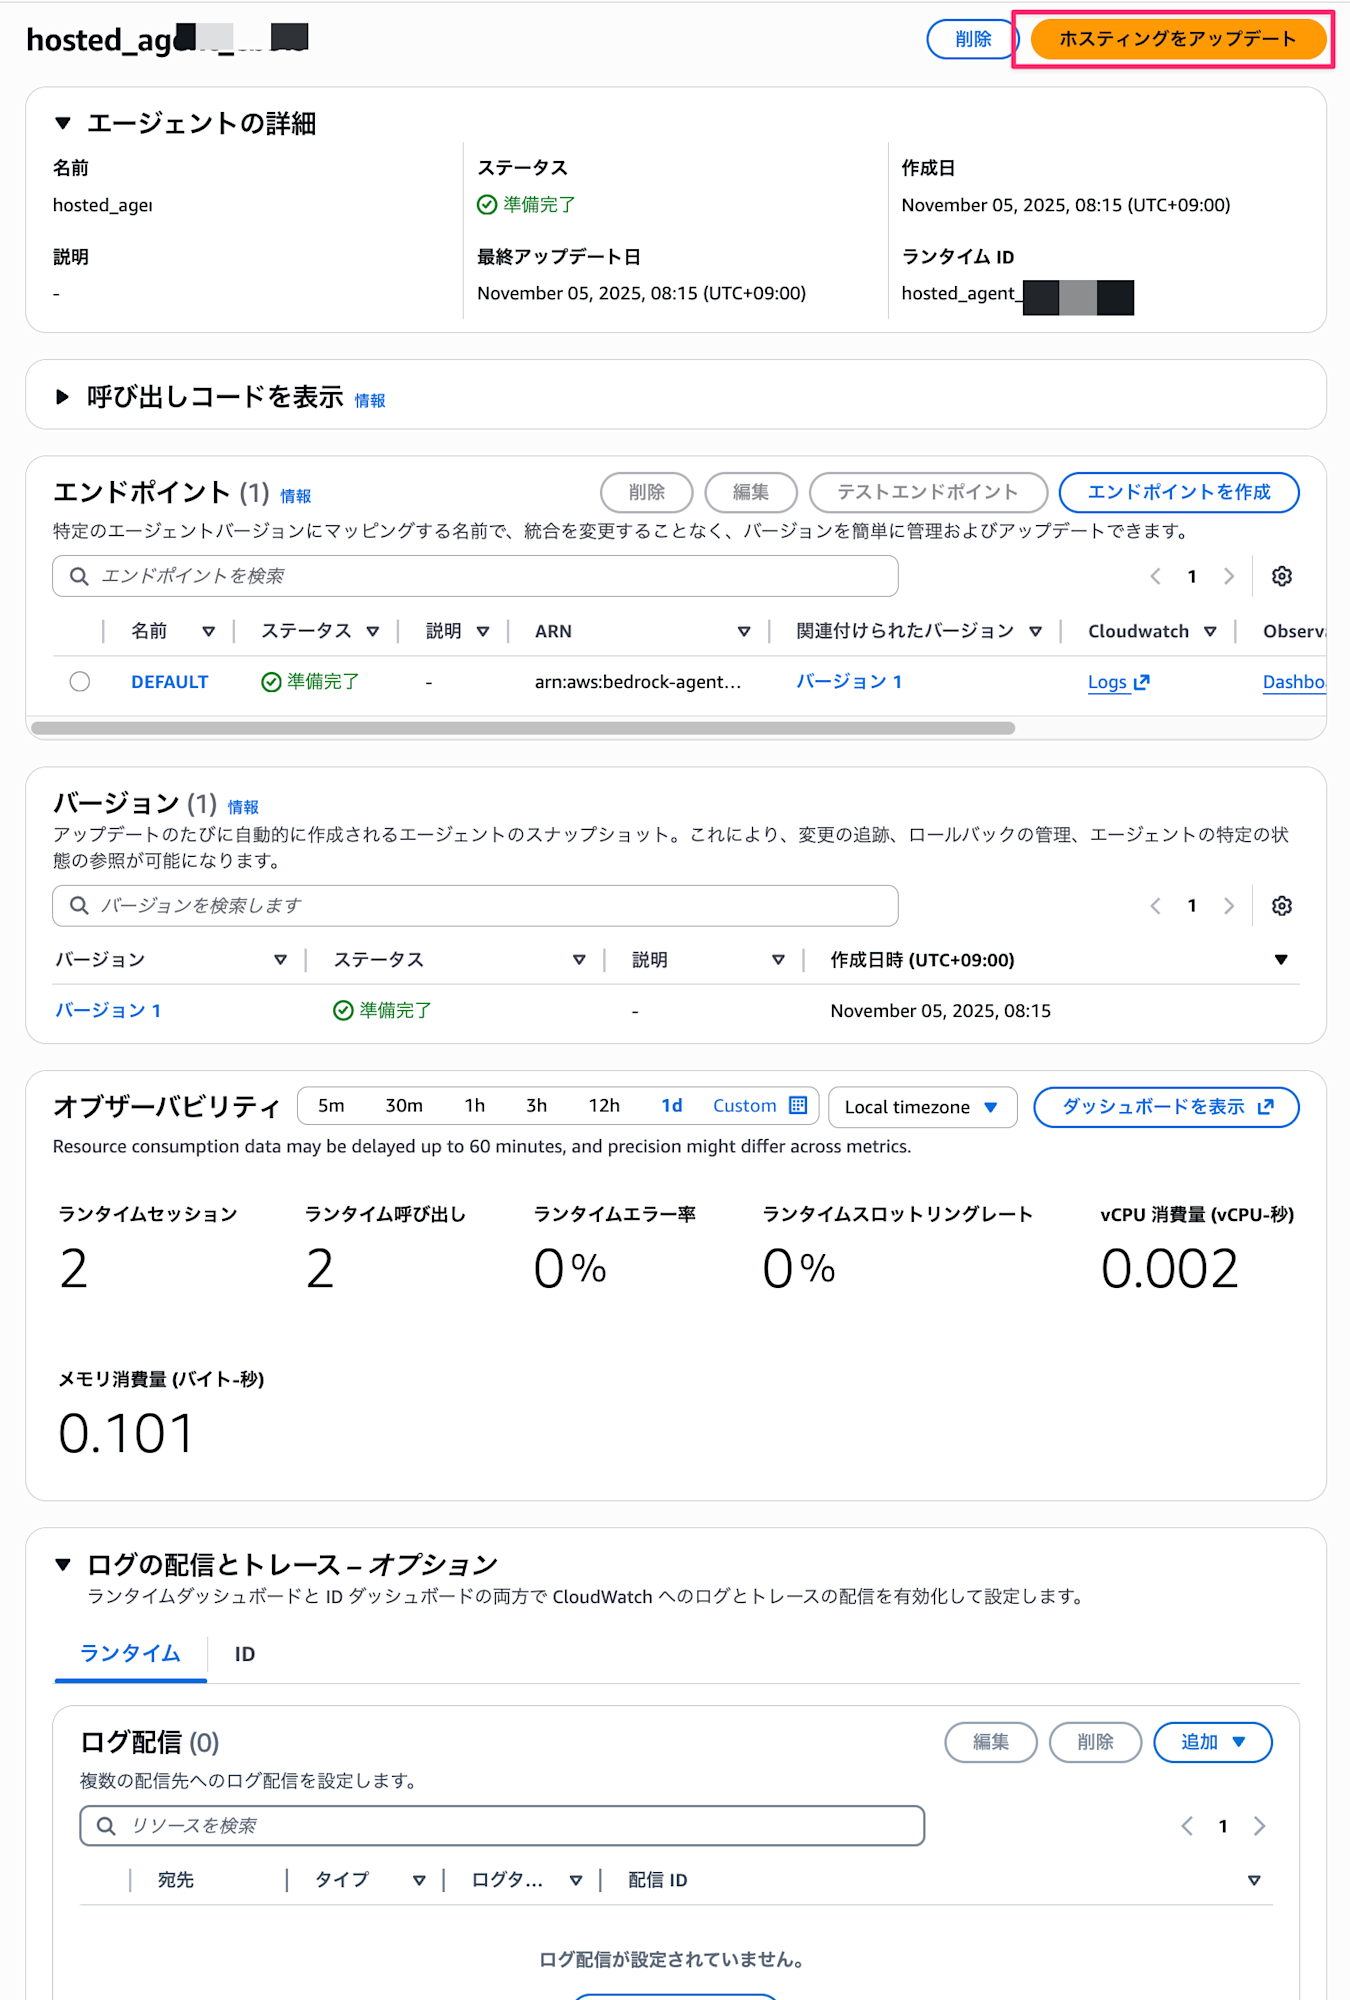
After selection, Choose from an existing S3 bucket is selected, so specify the S3 URI of the zip file you just uploaded.
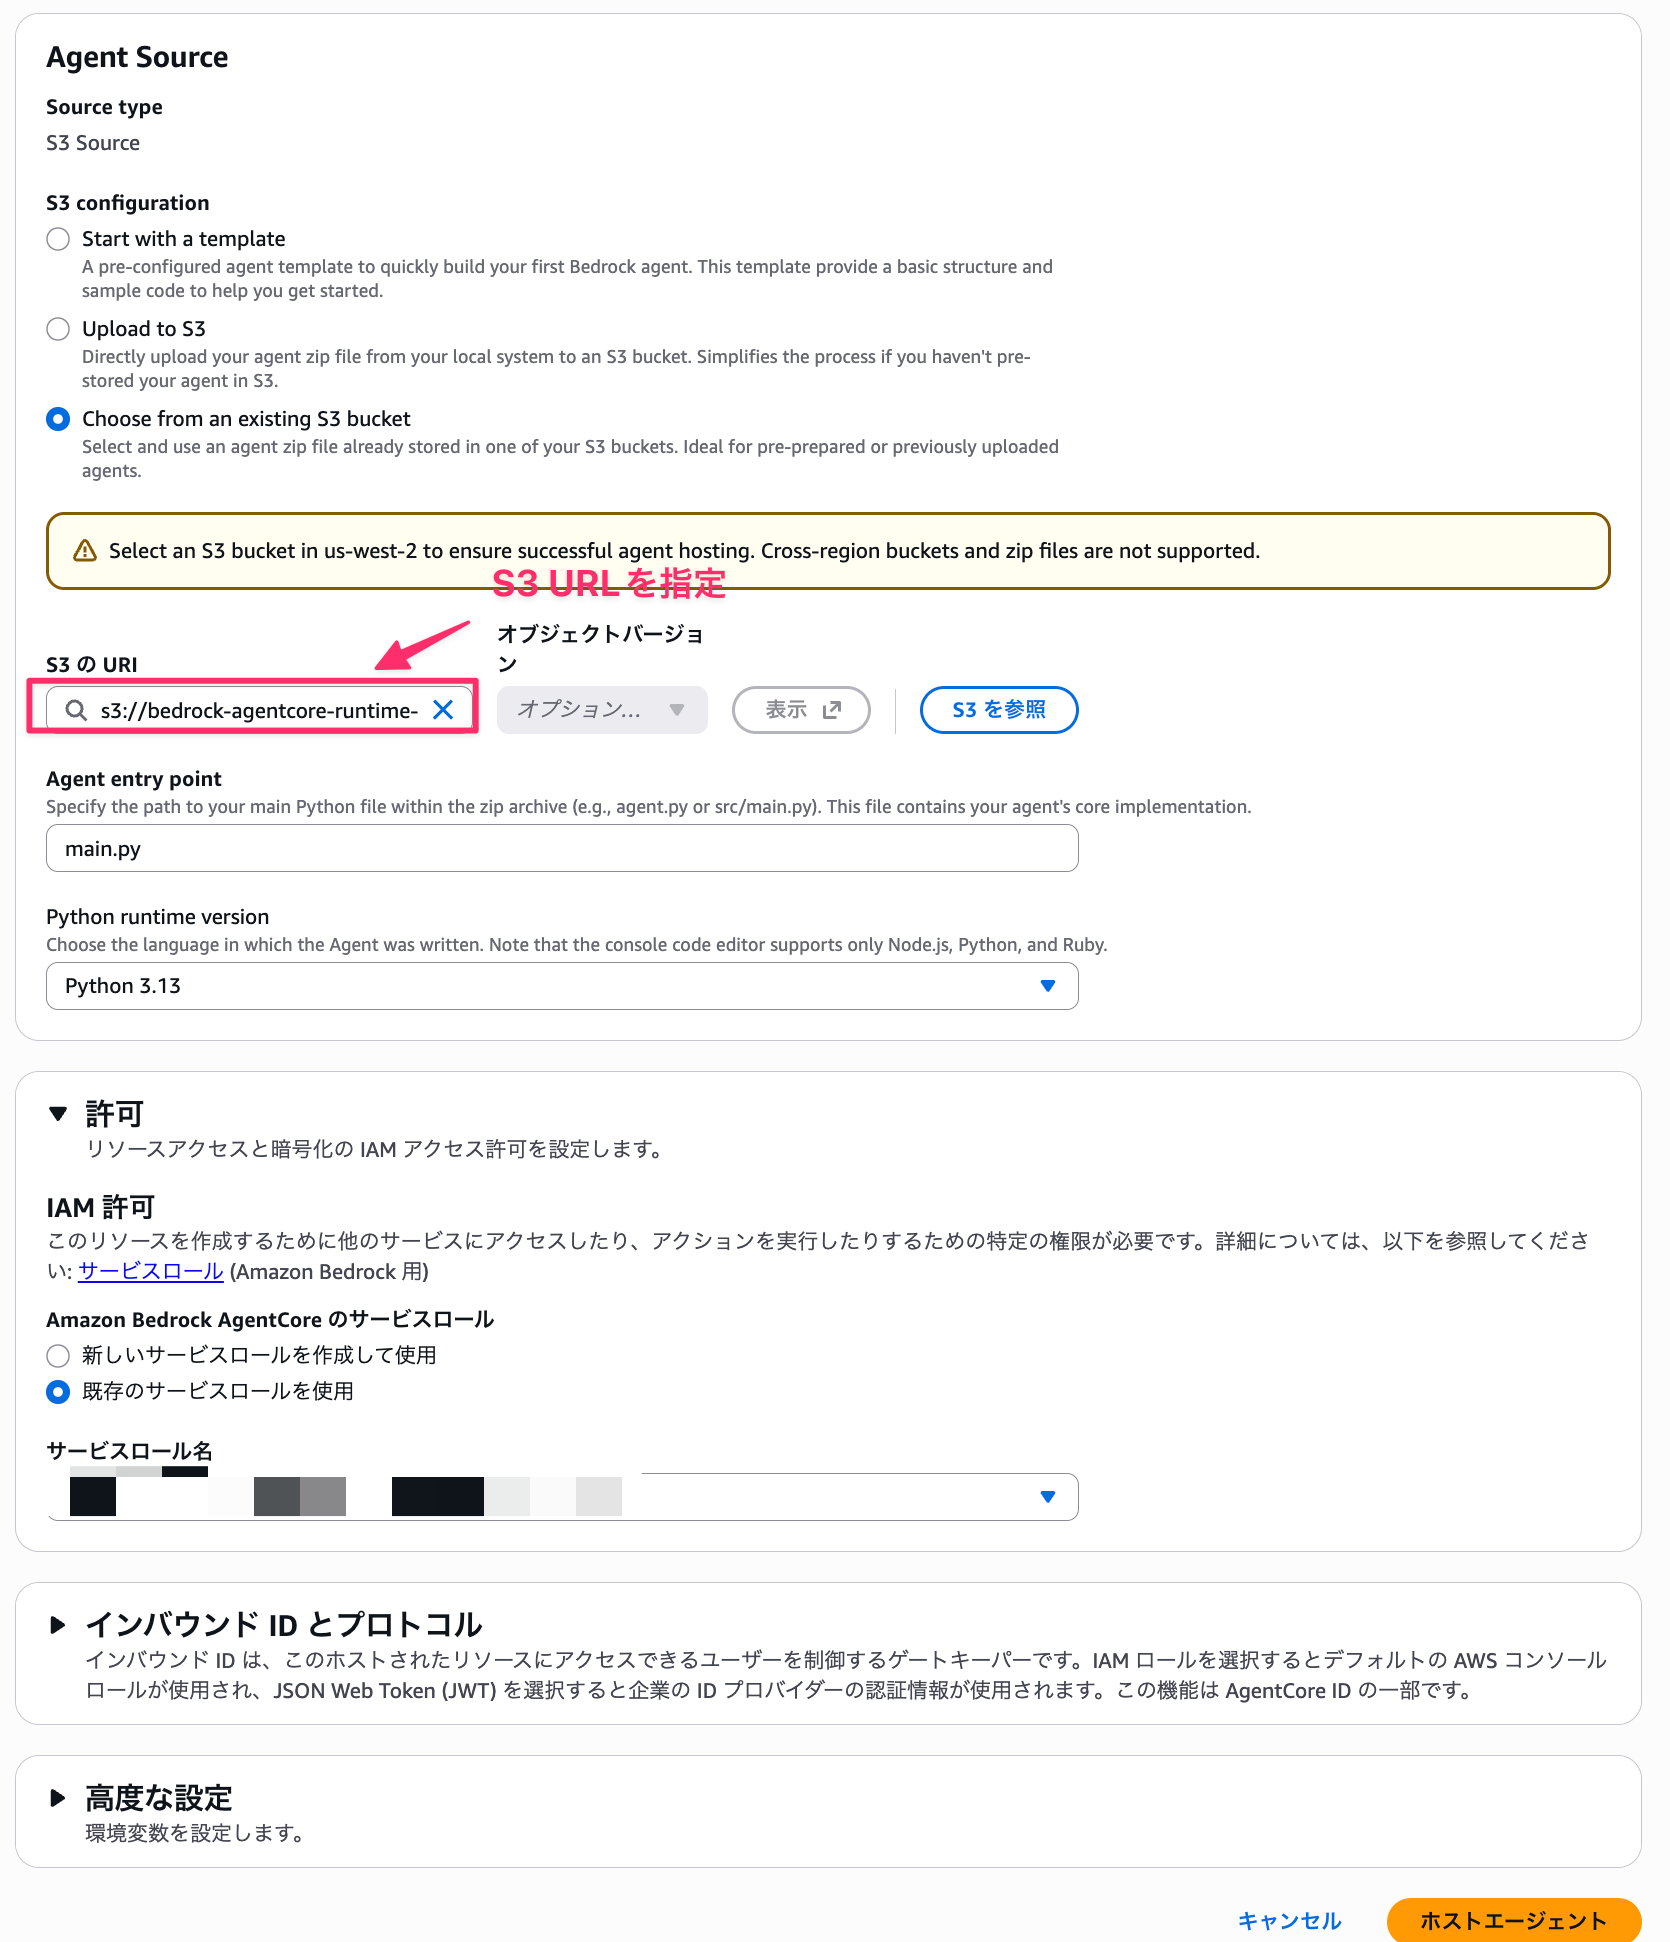
Then select the Host Agent button. When the version has been switched to the new one, select the test endpoint. (The version has progressed a lot in the screenshots because I got errors due to deep directory hierarchy when zipping)
Let's say hello again.
It returned a very pretentious response. I understand that when creating from a template, this is the process to update it. Since object versions can also be specified, it seems you could upload using the same filename and update the version for deployment.
Next, let's create our own agent, zip it, and deploy it.
Upload to S3
First, here are the prerequisites for the libraries we'll use:
- Python
- 3.13
- uv
- 0.6.12
uv is a tool for Python package management.
If you don't have it installed and want to use it, please refer to the official documentation for installation.
Project Setup
Now let's create our agent. First, initialize the project:
uv init agentcore-zip --python 3.13
cd agentcore-zip
Next, install the necessary packages - Strands Agents and AgentCore SDK:
uv add bedrock-agentcore strands-agents
Create a main.py file as the entry point. This time, we'll create a simple streaming agent that answers user questions:
from strands import Agent
from bedrock_agentcore import BedrockAgentCoreApp

app = BedrockAgentCoreApp(debug=True)
agent = Agent(
    system_prompt="あなたは親切で丁寧なアシスタントです。ユーザーの質問に分かりやすく答えてください。"
)

@app.entrypoint
async def agent_invocation(payload):
    """Handler for agent invocation"""
    user_message = payload.get(
        "prompt",
        "No prompt found in input, please guide customer to create a json payload with prompt key",
    )
    app.logger.info(f"User message: {user_message}")
    stream = agent.stream_async(user_message)
    async for event in stream:
        print(event)
        yield (event)

if __name__ == "__main__":
    app.run()
Testing Locally
Before deploying, let's check the operation locally:
uv run main.py
Open another terminal and test with curl:
curl -X POST http://localhost:8080/invocations \
  -H "Content-Type: application/json" \
  -d '{"prompt": "こんにちは!"}'
If the response comes back without issues as shown below, stop the agent with Ctrl+C:

Dependency Packaging
We want to zip the dependencies, and this is an important point.
Amazon Bedrock AgentCore Runtime runs on the ARM64 architecture, so dependencies must be built for ARM64 as well. If you upload packages built for x86_64, you'll get errors during deployment or runtime execution.
For more details and precautions, please refer to the official documentation:
First, create a directory to download dependencies:
mkdir deployment_package
Next, use uv to install dependencies for ARM64. We're using the --python-platform option to specify packages for ARM64:
uv pip install \
  --python-platform aarch64-manylinux2014 \
  --python-version 3.13 \
  --target=deployment_package \
  --only-binary=:all: \
  -r pyproject.toml
Now that we've downloaded the related packages, let's move the entry point main.py into the deployment_package directory and then zip it:
# Copy file
cp main.py deployment_package/

# Zip
cd deployment_package
zip -r ../deployment_package.zip .
cd ..
Now we're ready! Let's upload from the console.
File Upload
This time, select "Upload to S3" for S3 Configuration.
After selection, upload the zipped package and specify main.py as the entry point.
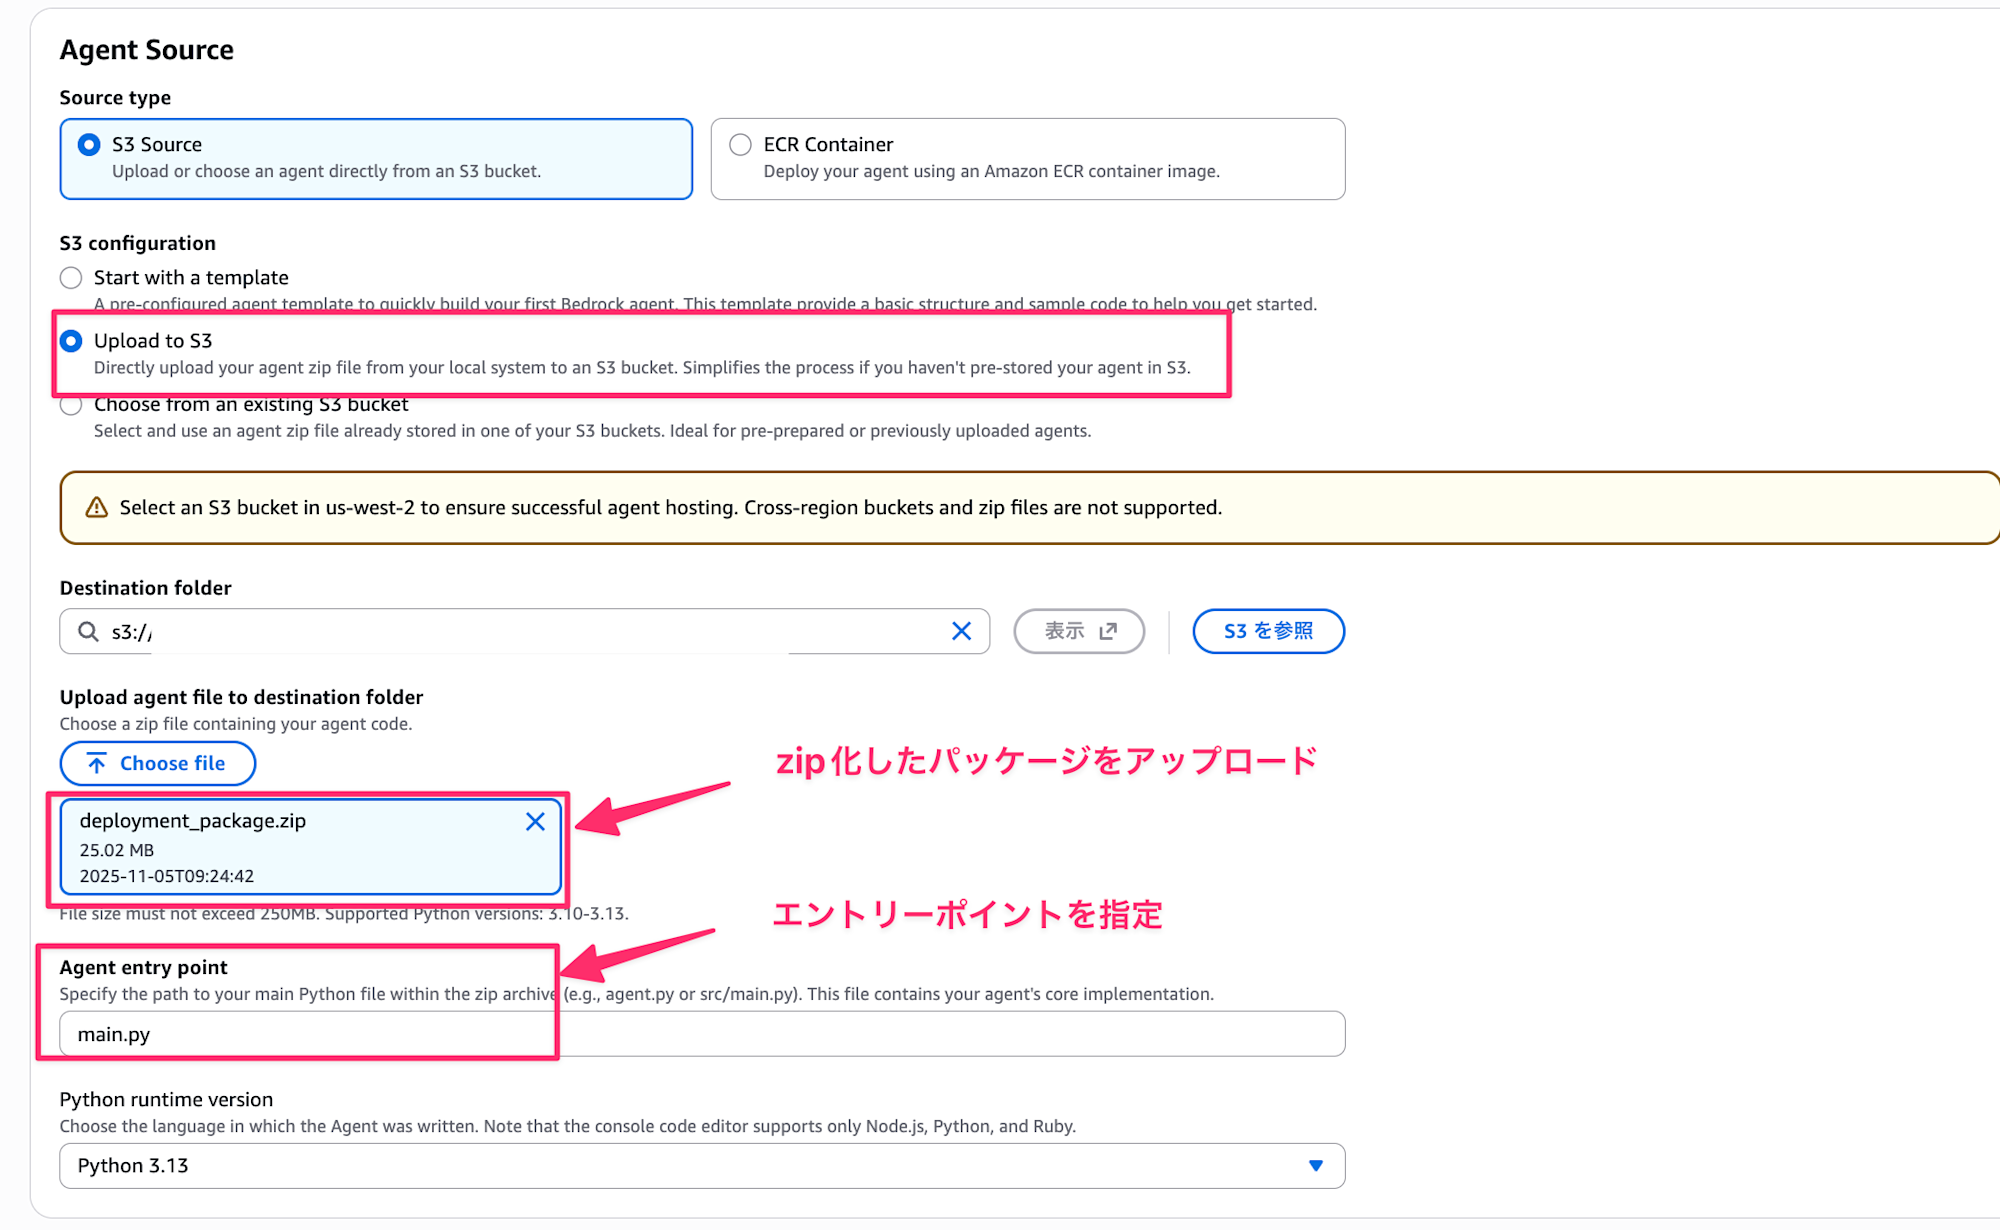
Press the Host Runtime button, and when the deployment is complete, press the test endpoint to try it out.

Let's say hello and try it.
It executed without any issues! We now understand the process of packaging and deploying.
The packaging step could be a bit tricky, and I feel there's room for improvement like automating with a shell script if you need to update frequently.
Direct Deployment with Starter Toolkit
Until now, we've been deploying through the console, but the Starter Toolkit also supports zip uploads.
I wonder if this means we don't need to handle the deployment packaging mentioned earlier.
First, let's add the bedrock-agentcore-starter-toolkit package to use the agentcore command:
uv add bedrock-agentcore-starter-toolkit
Use the configure command to set up the deployment. Let's name the agent sample_zip_starter_agent:
agentcore configure -e main.py -n sample_zip_starter_agent
Follow the interactive prompts. This time, we'll select "1. Direct Code Deploy (recommended)" since we want to deploy directly with a zip.
It's recommended to deploy directly.
S3 buckets and IAM Roles will be automatically created if you don't specify existing resources.
Automatic creation is convenient.
We'll proceed with the default settings:
agentcore configure -e main.py -n sample_zip_starter_agent
Configuring Bedrock AgentCore...
✓ Using file: main.py

🔍 Detected dependency file: pyproject.toml
Press Enter to use this file, or type a different path (use Tab for autocomplete):
Path or Press Enter to use detected dependency file: pyproject.toml
✓ Using requirements file: pyproject.toml

🚀 Deployment Configuration
Select deployment type:
  1. Direct Code Deploy (recommended) - Python only, no Docker required
  2. Container - For custom runtimes or complex dependencies
Choice [1]: 1

Select Python runtime version:
  1. PYTHON_3_10
  2. PYTHON_3_11
  3. PYTHON_3_12
  4. PYTHON_3_13
Choice [4]: 4
✓ Deployment type: Direct Code Deploy (python.3.13)

🔐 Execution Role
Press Enter to auto-create execution role, or provide execution role ARN/name to use existing
Execution role ARN/name (or press Enter to auto-create):
✓ Will auto-create execution role

🏗️  S3 Bucket
Press Enter to auto-create S3 bucket, or provide S3 URI/path to use existing
S3 URI/path (or press Enter to auto-create):
✓ Will auto-create S3 bucket

🔐 Authorization Configuration
By default, Bedrock AgentCore uses IAM authorization.
Configure OAuth authorizer instead? (yes/no) [no]:
✓ Using default IAM authorization

🔒 Request Header Allowlist
Configure which request headers are allowed to pass through to your agent.
Common headers: Authorization, X-Amzn-Bedrock-AgentCore-Runtime-Custom-*
Configure request header allowlist? (yes/no) [no]:
✓ Using default request header configuration
Configuring BedrockAgentCore agent: sample_zip_starter_agent

Memory Configuration
Tip: Use --disable-memory flag to skip memory entirely

No region configured yet

Options:
  • Press Enter to create new memory
  • Type 's' to skip memory setup

Your choice: s
✓ Skipping memory configuration
Memory disabled by user choice
Network mode: PUBLIC
Setting 'sample_zip_starter_agent' as default agent
╭─────────────────────────────────────────── Configuration Success ────────────────────────────────────────────╮
│ Agent Details                                                                                                │
│ Agent Name: sample_zip_starter_agent                                                                          │
│ Deployment: direct_code_deploy                                                                               │
│ Region: us-west-2                                                                                            │
│ Account: xxx                                                                                        │
│ Runtime: python3.13                                                                                          │
│                                                                                                              │
│ Configuration                                                                                                │
│ Execution Role: Auto-create                                                                                  │
│ ECR Repository: N/A                                                                                          │
│ Network Mode: Public                                                                                         │
│ S3 Bucket: Auto-create                                                                                       │
│ Authorization: IAM (default)                                                                                 │
│                                                                                                              │
│                                                                                                              │
│ Memory: Disabled                                                                                             │
│                                                                                                              │
│                                                                                                              │
│ 📄 Config saved to: /Users/xxx/agentcore-zip/.bedrock_agentcore.yaml                                 │
│                                                                                                              │
│ Next Steps:                                                                                                  │
│    agentcore launch                                                                                          │
╰──────────────────────────────────────────────────────────────────────────────────────────────────────────────╯
Just like with the previous Starter toolkit, when completed, a .bedrock_agentcore.yaml file is created, so execute launch to deploy:
agentcore launch
When the deployment is complete, let's try running the agentcore invoke command:
agentcore invoke '{"prompt": "Hello"}'

{"init_event_loop": true}

{"start": true}

{"start_event_loop": true}

{"event": {"messageStart": {"role": "assistant"}}}

{"event": {"contentBlockDelta": {"delta": {"text": "こんにちは"}, "contentBlockIndex": 0}}}

{'data': 'こんにちは', 'delta': {'text': 'こんにちは'}, 'agent': <strands.agent.agent.Agent object at
0xffffa2c3b4d0>, 'event_loop_cycle_id': UUID('1a1b3ba0-9292-45b3-b039-22fccbdc25d3'), 'request_state': {},
'event_loop_cycle_trace': <strands.telemetry.metrics.Trace object at 0xffffa1e83770>, 'event_loop_cycle_span':
NonRecordingSpan(SpanContext(trace_id=0x00000000000000000000000000000000, span_id=0x0000000000000000,
trace_flags=0x00, trace_state=[], is_remote=False))}{"event": {"contentBlockDelta": {"delta": {"text": "!お元気ですか?"}, "contentBlockIndex": 0}}}

{'data': '!お元気ですか?', 'delta': {'text': '!お元気ですか?'}, 'agent': <strands.agent.agent.Agent object
at 0xffffa2c3b4d0>, 'event_loop_cycle_id': UUID('1a1b3ba0-9292-45b3-b039-22fccbdc25d3'), 'request_state': {},
'event_loop_cycle_trace': <strands.telemetry.metrics.Trace object at 0xffffa1e83770>, 'event_loop_cycle_span':
NonRecordingSpan(SpanContext(trace_id=0x00000000000000000000000000000000, span_id=0x0000000000000000,
trace_flags=0x00, trace_state=[], is_remote=False))}{"event": {"contentBlockDelta": {"delta": {"text": "何かお手伝い"}, "contentBlockIndex": 0}}}

{'data': '何かお手伝い', 'delta': {'text': '何かお手伝い'}, 'agent': <strands.agent.agent.Agent object at
0xffffa2c3b4d0>, 'event_loop_cycle_id': UUID('1a1b3ba0-9292-45b3-b039-22fccbdc25d3'), 'request_state': {},
'event_loop_cycle_trace': <strands.telemetry.metrics.Trace object at 0xffffa1e83770>, 'event_loop_cycle_span':
NonRecordingSpan(SpanContext(trace_id=0x00000000000000000000000000000000, span_id=0x0000000000000000,
trace_flags=0x00, trace_state=[], is_remote=False))}{"event": {"contentBlockDelta": {"delta": {"text": "できることがあれば、お"}, "contentBlockIndex": 0}}}

{'data': 'できることがあれば、お', 'delta': {'text': 'できることがあれば、お'}, 'agent':
<strands.agent.agent.Agent object at 0xffffa2c3b4d0>, 'event_loop_cycle_id':
UUID('1a1b3ba0-9292-45b3-b039-22fccbdc25d3'), 'request_state': {}, 'event_loop_cycle_trace':
<strands.telemetry.metrics.Trace object at 0xffffa1e83770>, 'event_loop_cycle_span':
NonRecordingSpan(SpanContext(trace_id=0x00000000000000000000000000000000, span_id=0x0000000000000000,
trace_flags=0x00, trace_state=[], is_remote=False))}{"event": {"contentBlockDelta": {"delta": {"text": "気軽にお聞か"}, "contentBlockIndex": 0}}}

{'data': '気軽にお聞か', 'delta': {'text': '気軽にお聞か'}, 'agent': <strands.agent.agent.Agent object at
0xffffa2c3b4d0>, 'event_loop_cycle_id': UUID('1a1b3ba0-9292-45b3-b039-22fccbdc25d3'), 'request_state': {},
'event_loop_cycle_trace': <strands.telemetry.metrics.Trace object at 0xffffa1e83770>, 'event_loop_cycle_span':
NonRecordingSpan(SpanContext(trace_id=0x00000000000000000000000000000000, span_id=0x0000000000000000,
trace_flags=0x00, trace_state=[], is_remote=False))}{"event": {"contentBlockDelta": {"delta": {"text": "せください。どのような質問や"}, "contentBlockIndex": 0}}}

{'data': 'せください。どのような質問や', 'delta': {'text': 'せください。どのような質問や'}, 'agent':
<strands.agent.agent.Agent object at 0xffffa2c3b4d0>, 'event_loop_cycle_id':
UUID('1a1b3ba0-9292-45b3-b039-22fccbdc25d3'), 'request_state': {}, 'event_loop_cycle_trace':
<strands.telemetry.metrics.Trace object at 0xffffa1e83770>, 'event_loop_cycle_span':
NonRecordingSpan(SpanContext(trace_id=0x00000000000000000000000000000000, span_id=0x0000000000000000,
trace_flags=0x00, trace_state=[], is_remote=False))}{"event": {"contentBlockDelta": {"delta": {"text": "お話をされたいですか?"}, "contentBlockIndex": 0}}}

{'data': 'お話をされたいですか?', 'delta': {'text': 'お話をされたいですか?'}, 'agent':
<strands.agent.agent.Agent object at 0xffffa2c3b4d0>, 'event_loop_cycle_id':
UUID('1a1b3ba0-9292-45b3-b039-22fccbdc25d3'), 'request_state': {}, 'event_loop_cycle_trace':
<strands.telemetry.metrics.Trace object at 0xffffa1e83770>, 'event_loop_cycle_span':
NonRecordingSpan(SpanContext(trace_id=0x00000000000000000000000000000000, span_id=0x0000000000000000,
trace_flags=0x00, trace_state=[], is_remote=False))}{"event": {"contentBlockStop": {"contentBlockIndex": 0}}}

{"event": {"messageStop": {"stopReason": "end_turn"}}}

{"event": {"metadata": {"usage": {"inputTokens": 47, "outputTokens": 57, "totalTokens": 104}, "metrics":
{"latencyMs": 5478}}}}

{"message": {"role": "assistant", "content": [{"text":
"こんにちは!お元気ですか?何かお手伝いできることがあれば、お気軽にお聞かせください。どのような質問やお話をされ
たいですか?"}]}}

{'result': AgentResult(stop_reason='end_turn', message={'role': 'assistant', 'content': [{'text':
'こんにちは!お元気ですか?何かお手伝いできることがあれば、お気軽にお聞かせください。どのような質問やお話をされ
たいですか?'}]}, metrics=EventLoopMetrics(cycle_count=1, tool_metrics={}, cycle_durations=[5.5013792514801025],
traces=[<strands.telemetry.metrics.Trace object at 0xffffa1e83770>], accumulated_usage={'inputTokens': 47,
'outputTokens': 57, 'totalTokens': 104}, a
The response came back without any issues!! Creating the zip myself felt a bit cumbersome, so the Starter Toolkit approach, which reads dependencies and automatically zips and uploads them, was easier. It felt simpler than using the console.
Conclusion
This time I tried deploying with zip file uploads!
Creating from a template seems convenient when you want to quickly make something and only modify the code a bit.
While zip uploading is convenient, it's important to note that when uploading from the console, you need to use ARM64 packages. The Starter Toolkit, which automatically packages dependencies, feels easier to use.
I hope this article was helpful! Thank you for reading to the end!!
Additional Notes
As I mentioned earlier, the official blog I linked to has many helpful sections, so I'm sharing it again:
Specifically, the section titled Direct code deployment concepts covers:
- The shared responsibility model for AgentCore
- Comparison and selection between container and zip deployment
- Supported languages and OS architectures
- And more...
The guidelines for choosing between zip upload and containerization are particularly useful, so please check them out.
Container vs direct code deployment comparison quote
Our general guidance is
If the size of the deployment package exceeds 250MB, and you have existing container CI/CD pipelines, and you need highly specialized dependencies and packaging, then container based deployments is a good option to choose.
If the size of the deployment package is small, the code and package is not complex to build and uses common frameworks and languages, and you need rapid prototyping and iteration, then direct code deployment would be the option.
There can also be a hybrid option where developers use the direct code deployment to quickly experiment and prototype agents and then switch to container based deployments (for the above reasons) to develop, test and deploy to production.