
Building a Bastion Server with Windows Server 2025
This page has been translated by machine translation. View original
Introduction
Hello everyone, my name is Akaike.
Have you ever wanted to set up a bastion server with Windows Server 2025? I have.
You might think, "Wait, isn't there SSM Session Manager for that?"
(I think so too)
However, in reality, there are cases where you can't adopt SSM Session Manager because security policies don't allow the installation of SSM agents, or existing operational workflows are based on RDP.
That's when you need the traditional RDP-based bastion server.
But when it comes to actually building a bastion server, there are surprisingly many items to consider, such as OS basic settings, RDP session settings, and security policies, making manual configuration quite labor-intensive.
So this time, I've compiled a solution to build everything in one go using Terraform and user data, including setting up RD Gateway (Remote Desktop Gateway) to enable RDP connections via HTTPS (443).
The complete Terraform code is available in the GitHub repository, so in this article, I'll excerpt and explain the instance configuration and user data settings.
Overview of the Configuration
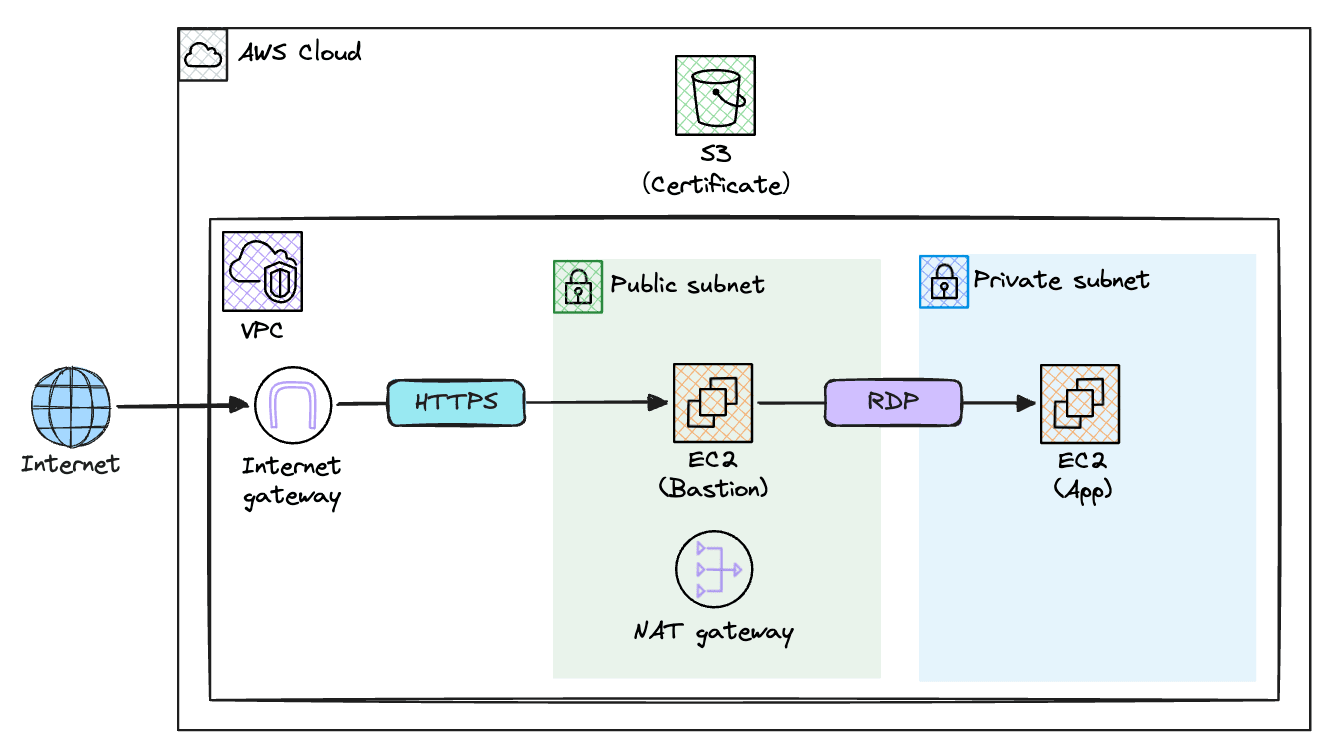
I've set up public and private subnets within a VPC, with a bastion server (configured with RD Gateway) placed in the public subnet.
Clients connect to the bastion server via HTTPS (443) over the internet, and from there connect to the application server (App) in the private subnet using RDP (3389).
Additionally, the RD Gateway's self-signed certificate is uploaded to an S3 bucket for distribution to client PCs.
What settings should be configured?
Before diving into the user data content, let's organize "what should be configured."
The items to consider for a Windows Server bastion server can be broadly divided into two categories: "Common Windows Server settings" and "Bastion server-specific settings."
Here are some examples, but these are just examples.
When actually building, please set appropriate values according to your project's security requirements and operational rules.
Also, since this article focuses on building a bastion server, I'm omitting items necessary for actual operation such as Active Directory integration and audit log settings.
Common Windows Server Settings
Items you'd want to set regardless of purpose when setting up a Windows Server.
| Setting Item | Example Setting | Reason |
|---|---|---|
| Computer Name | Any hostname | Default random names are difficult to manage |
| Time Zone | Tokyo Standard Time | Default is UTC, need to change for operation in Japan |
| Password Policy | Min 12 chars, complexity enabled, lockout threshold 5 | Set appropriately for security requirements |
| Password Expiration | No expiration | Often set to no expiration to reduce operational burden |
| Windows Update | Automatic updates disabled | Prevent updates at unintended times |
Bastion Server-Specific Settings
Settings specific to bastion servers. These can be divided into RDP (Remote Desktop) session settings and RD Gateway settings.
RDP Session Settings
| Setting Item | Example | Reason |
|---|---|---|
| Session Timeout | 180 min | Prevent abandoned sessions from consuming resources |
| Simultaneous Connections | 2 sessions | Allow multiple people to use the bastion simultaneously |
| Clipboard Sharing | Allow | Enable text copy & paste between local PC and server |
| Drive Redirection | Allow | Allow access to local PC drives from the bastion server |
Note that clipboard sharing and drive redirection are points where decisions may differ based on security requirements.
If you want to strictly manage information export risks, consider disabling both.
RD Gateway Settings
| Setting Item | Example | Reason |
|---|---|---|
| SSL Certificate | Self-signed certificate (10-year validity) | Required for HTTPS communication. Proper CA certificate recommended for production |
| Connection Authorization Policy (CAP) | Allow Administrators, Remote Desktop Users | Define user groups allowed to connect to RD Gateway |
| CAP Idle Timeout | 180 min | Prevent idle connections via RD Gateway from being abandoned |
| Resource Authorization Policy (RAP) | Restrict destination servers with gateway management group | Finely control which servers can be connected to via RD Gateway |
About RD Gateway
RD Gateway (Remote Desktop Gateway) is one of Microsoft's Windows Server roles that tunnels RDP connections via HTTPS (443).
While normal RDP connections use TCP port 3389, RD Gateway encapsulates the communication in HTTPS (443).
Therefore, RD Gateway is often used in cases where "security requirements don't allow exposing RDP to the internet..."
Terraform Configuration (Excerpt)
Please refer to the GitHub repository for the complete Terraform code.
Here I'll excerpt the EC2 instance configuration and user data call-out section.
EC2 Instance Configuration
The templatefile function passes Terraform variables to the user data template.
For example, values like hostname and s3_bucket are referenced as ${hostname} in the template.
resource "aws_instance" "bastion" {
  ami                         = data.aws_ami.windows2025.id
  instance_type               = "t3.large"
  key_name                    = aws_key_pair.bastion.key_name
  subnet_id                   = aws_subnet.public.id
  private_ip                  = var.bastion_private_ip
  vpc_security_group_ids      = [aws_security_group.bastion.id]
  iam_instance_profile        = aws_iam_instance_profile.bastion.name
  associate_public_ip_address = true
  disable_api_termination     = false
  disable_api_stop            = false
  monitoring                  = false

  metadata_options {
    http_endpoint = "enabled"
    http_tokens   = "required"
  }

  root_block_device {
    volume_size           = 50
    volume_type           = "gp3"
    encrypted             = true
    delete_on_termination = true
  }

  user_data = templatefile("${path.module}/templates/userdata_bastion.ps1.tpl", {
    hostname           = "${var.name_prefix}-bastion01"
    s3_bucket          = aws_s3_bucket.cert.bucket
    aws_region         = var.aws_region
    allowed_server_ips = [var.bastion_private_ip, var.app_private_ip]
  })

  tags = {
    Name = "${var.name_prefix}-bastion"
  }
}
Security Group Configuration
In the bastion server's security group, only HTTPS (443) is allowed in the inbound rules.
Since the RD Gateway configuration is executed in the user data described later, there's no need to expose RDP (3389) to the internet.
resource "aws_security_group_rule" "bastion_ingress_https" {
  type              = "ingress"
  security_group_id = aws_security_group.bastion.id
  from_port         = 443
  to_port           = 443
  protocol          = "tcp"
  cidr_blocks       = [local.my_ip_cidr]
  description       = "HTTPS access for RD Gateway from my IP"
}
User Data
Now let's explore the actual user data content.
This user data is divided into six major phases:
- Basic OS settings
- RDP session settings
- RD Gateway installation
- Self-signed certificate creation
- RD Gateway configuration (CAP/RAP)
- Certificate upload to S3
As mentioned earlier, this is written assuming variables will be embedded using Terraform's templatefile function.
Expressions like ${hostname} are variables passed from Terraform.
1. Basic OS Settings
Computer Name Setting
# Set computer name (applied after reboot)
Rename-Computer -NewName "${hostname}" -Force
The Rename-Computer cmdlet changes the computer name.
By default, EC2 assigns a random name based on the instance ID, so changing it to a more manageable name is recommended.
Note that the computer name change takes effect after OS restart, which is why we perform a restart at the end of the user data.
Timezone Setting
# Set timezone to Tokyo Standard Time
Set-TimeZone -Id "Tokyo Standard Time"
The default timezone for Windows Server is UTC.
If you're using it in Japan, changing it to JST (Tokyo Standard Time) is important to avoid confusion with log timestamps during operation.
Password Policy Setting
# Password policy: min 12 chars, lockout threshold 5, no expiration
net accounts /MINPWLEN:12 /LOCKOUTTHRESHOLD:5 /MAXPWAGE:UNLIMITED
The net accounts command sets multiple password policy settings at once. The options mean:
| Option | Value | Meaning |
|---|---|---|
/MINPWLEN |
12 | Sets minimum password length to 12 characters |
/LOCKOUTTHRESHOLD |
5 | Account gets locked after 5 incorrect password attempts |
/MAXPWAGE |
UNLIMITED | Sets password expiration to unlimited |
Password Complexity Setting
# Enable password complexity (3 of 4 types: upper/lower/digit/symbol)
secedit /export /cfg C:\Windows\Temp\secpol.cfg
(Get-Content C:\Windows\Temp\secpol.cfg) -replace 'PasswordComplexity = 0','PasswordComplexity = 1' |
    Set-Content C:\Windows\Temp\secpol.cfg
secedit /configure /db C:\Windows\security\local.db /cfg C:\Windows\Temp\secpol.cfg /areas SECURITYPOLICY
Remove-Item C:\Windows\Temp\secpol.cfg
This enables password complexity requirements.
When enabled, passwords must include at least 3 out of 4 types: uppercase letters, lowercase letters, numbers, and symbols.
Since this setting can't be changed with the net accounts command, we're directly editing the local security policy with the secedit command.
The process flow is:
- Export current security policy to a temporary file
- Replace
PasswordComplexityvalue from0(disabled) to1(enabled) - Apply the modified policy to the system
- Delete the temporary file to clean up
Setting Administrator Password to Never Expire
# Set Administrator password to never expire
Set-LocalUser -Name "Administrator" -PasswordNeverExpires $true
This sets the built-in Administrator account's password to never expire.
We previously set the OS default policy for password expiration to unlimited with net accounts /MAXPWAGE:UNLIMITED.
This, however, is an individual setting for the Administrator account.
Setting this ensures that the existing Administrator account definitely has no password expiration.
Disabling Windows Update Auto-Update
# Disable Windows Update auto-update (manual only)
$wuPath = "HKLM:\SOFTWARE\Policies\Microsoft\Windows\WindowsUpdate\AU"
if (-not (Test-Path $wuPath)) {
    New-Item -Path $wuPath -Force | Out-Null
}
Set-ItemProperty -Path $wuPath -Name "NoAutoUpdate" -Value 1 -Type DWord
This disables Windows Update automatic updates.
This depends on your operational approach, but if you're managing updates manually or on a schedule, disabling auto-updates is common.
The code checks if the registry key exists, and creates it with New-Item before setting the value if it doesn't.
2. RDP Session Settings
New-Item -Path "HKLM:\SOFTWARE\Policies\Microsoft\Windows NT\Terminal Services" -Force | Out-Null
# Session idle timeout: 180 min (10800000 ms)
Set-ItemProperty -Path "HKLM:\SOFTWARE\Policies\Microsoft\Windows NT\Terminal Services" -Name "MaxIdleTime" -Value 10800000 -Type DWord
# Max concurrent sessions: 2
Set-ItemProperty -Path "HKLM:\SOFTWARE\Policies\Microsoft\Windows NT\Terminal Services" -Name "MaxInstanceCount" -Value 2 -Type DWord
# Clipboard sharing: allow (0=allow)
Set-ItemProperty -Path "HKLM:\SOFTWARE\Policies\Microsoft\Windows NT\Terminal Services" -Name "fDisableClip" -Value 0 -Type DWord
# Drive redirection: allow (0=allow)
Set-ItemProperty -Path "HKLM:\SOFTWARE\Policies\Microsoft\Windows NT\Terminal Services" -Name "fDisableCdm" -Value 0 -Type DWord
Various RDP settings are managed in the registry under HKLM:\SOFTWARE\Policies\Microsoft\Windows NT\Terminal Services.
We're setting each registry key's value using Set-ItemProperty.
| Registry Name | Value | Meaning |
|---|---|---|
MaxIdleTime |
10800000 | Idle session timeout (milliseconds). 180 minutes = 10,800,000 milliseconds |
MaxInstanceCount |
2 | Maximum number of simultaneous RDP connections |
fDisableClip |
0 | Clipboard sharing disable flag. 0=allow, 1=deny |
fDisableCdm |
0 | Drive redirection disable flag. 0=allow, 1=deny |
Note that fDisableClip and fDisableCdm are disable flags, so the value 0 means "allow" and 1 means "deny". This is a bit counter-intuitive.
3. RD Gateway Installation
Install-WindowsFeature RDS-Gateway -IncludeAllSubFeature -IncludeManagementTools
This installs the RD Gateway role on Windows Server.
-IncludeAllSubFeature includes all related sub-features, and -IncludeManagementTools installs management tools as well.
4. Self-Signed Certificate Creation
Import-Module RemoteDesktopServices

# Get public IP (EIP) via IMDSv2 and use as certificate DnsName
$token = Invoke-RestMethod -Method PUT -Uri "http://169.254.169.254/latest/api/token" -Headers @{"X-aws-ec2-metadata-token-ttl-seconds" = "21600"}
$dnsName = Invoke-RestMethod -Uri "http://169.254.169.254/latest/meta-data/public-ipv4" -Headers @{"X-aws-ec2-metadata-token" = $token}
$cert = New-SelfSignedCertificate -CertStoreLocation Cert:\LocalMachine\My -DnsName $dnsName -NotAfter (Get-Date).AddYears(10)
RD Gateway communicates via HTTPS, so an SSL certificate is required.
In production environments, using a proper CA certificate is recommended, but for this demonstration, we're creating and applying a self-signed certificate.
The certificate's -DnsName needs to specify the address clients will connect to, so we're dynamically retrieving the EC2 instance's assigned EIP (public IP) using IMDSv2 (Instance Metadata Service v2).
We're also setting the certificate validity period to 10 years with -NotAfter (Get-Date).AddYears(10).
5. RD Gateway Configuration
Applying the SSL Certificate
# Bind SSL certificate
Set-Location RDS:\GatewayServer\SSLCertificate
Set-Item .\Thumbprint -Value $cert.Thumbprint
This applies the created self-signed certificate to RD Gateway.
We're specifying the certificate's Thumbprint to bind it.
Creating Connection Authorization Policy (CAP)
# Create Connection Authorization Policy (CAP)
New-Item -Path RDS:\GatewayServer\CAP -Name "Default-CAP" `
    -UserGroups @("administrators@BUILTIN", "Remote Desktop Users@BUILTIN") `
    -AuthMethod 1
Connection Authorization Policy (CAP) defines "who can connect to the RD Gateway".
| Parameter | Value | Description |
|---|---|---|
| Name | Default-CAP | Policy name |
| UserGroups | administrators@BUILTIN, Remote Desktop Users@BUILTIN | User groups allowed to connect |
| AuthMethod | 1 | Password authentication |
This allows users in the local Administrators group and Remote Desktop Users group to connect using password authentication.
Creating Resource Authorization Policy (RAP)
# Create managed computer group for allowed servers
New-Item -Path RDS:\GatewayServer\GatewayManagedComputerGroups -Name "Allowed-Servers" `
    -Description "Servers accessible via RD Gateway" `
    -Computers @(${join(", ", [for ip in allowed_server_ips : "\"${ip}\""])})
Set-Item -Path "RDS:\GatewayServer\CAP\Default-CAP\IdleTimeout" -Value 180

# Create Resource Authorization Policy (RAP)
New-Item -Path RDS:\GatewayServer\RAP -Name "Default-RAP" `
    -UserGroups @("administrators@BUILTIN", "Remote Desktop Users@BUILTIN") `
    -ComputerGroupType 0 `
    -ComputerGroup "Allowed-Servers"
Resource Authorization Policy (RAP) defines "which servers can be connected to via RD Gateway".
First, we create a management group "Allowed-Servers" for destination servers.
The -Computers parameter receives IP addresses of destination servers expanded from the allowed_server_ips variable via Terraform's templatefile function.
Next, we set the IdleTimeout for the previously created CAP to 180 minutes to automatically disconnect idle sessions.
Then we create a RAP allowing connections to the Allowed-Servers group.
| Parameter | Value | Description |
|---|---|---|
| ComputerGroupType | 0 | Use RD Gateway managed group |
| ComputerGroup | Allowed-Servers | Destination server group name |
Service Restart
# Restart RD Gateway service to apply settings
Restart-Service TSGateway
This restarts the RD Gateway service to apply the settings.
6. Certificate Upload to S3
# Export certificate for client distribution (public key only)
$cerPath = "C:\Windows\Temp\rdgateway.cer"
$cert | Export-Certificate -FilePath $cerPath -Force -Type CERT

# Upload to S3 (AWS.Tools.S3 is pre-installed on Windows AMIs)
Import-Module AWS.Tools.S3
Write-S3Object -BucketName "${s3_bucket}" -File $cerPath -Key "certs/rdgateway.cer" -Region "${aws_region}"
Remove-Item $cerPath -Force
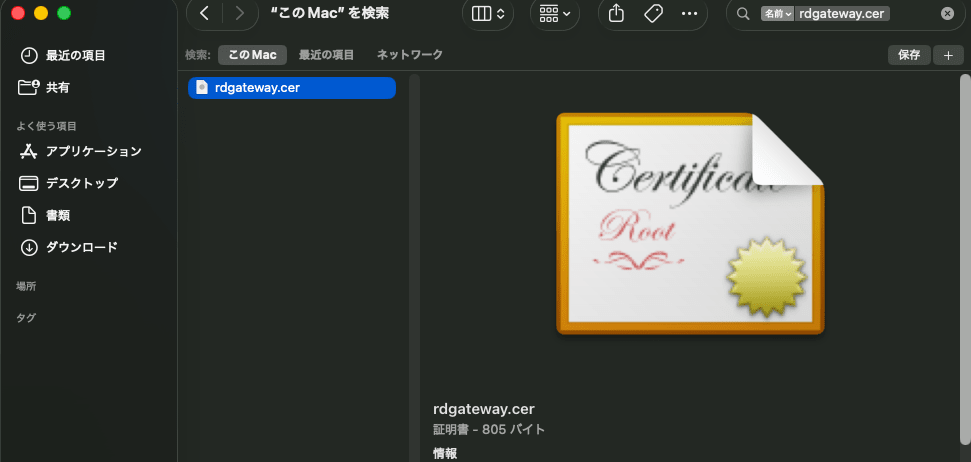
When using a self-signed certificate, it needs to be imported to the client PC.
To avoid the hassle of manually downloading the certificate from the server, we upload it to an S3 bucket.
The AWS.Tools.S3 module comes pre-installed on Windows Server 2025 AMIs, so it can be used without additional installation.
Note that the EC2 instance needs an IAM role (instance profile) configured to access S3.
Restart
# Reboot to apply computer name change
Restart-Computer -Force
Finally, we restart the OS. This is necessary to apply the computer name change.
Complete User Data
The full user data combining all the sections explained above is as follows:
<powershell>
# ============================================================================
# Phase 1: Basic OS Configuration
# ============================================================================

# Set computer name (applied after reboot)
Rename-Computer -NewName "${hostname}" -Force

# Set timezone to Tokyo Standard Time
Set-TimeZone -Id "Tokyo Standard Time"

# Password policy: min 12 chars, lockout threshold 5, no expiration
net accounts /MINPWLEN:12 /LOCKOUTTHRESHOLD:5 /MAXPWAGE:UNLIMITED

# Enable password complexity (3 of 4 types: upper/lower/digit/symbol)
secedit /export /cfg C:\Windows\Temp\secpol.cfg
(Get-Content C:\Windows\Temp\secpol.cfg) -replace 'PasswordComplexity = 0','PasswordComplexity = 1' |
    Set-Content C:\Windows\Temp\secpol.cfg
secedit /configure /db C:\Windows\security\local.db /cfg C:\Windows\Temp\secpol.cfg /areas SECURITYPOLICY
Remove-Item C:\Windows\Temp\secpol.cfg

# Set Administrator password to never expire
Set-LocalUser -Name "Administrator" -PasswordNeverExpires $true

# Disable Windows Update auto-update (manual only)
$wuPath = "HKLM:\SOFTWARE\Policies\Microsoft\Windows\WindowsUpdate\AU"
if (-not (Test-Path $wuPath)) {
    New-Item -Path $wuPath -Force | Out-Null
}
Set-ItemProperty -Path $wuPath -Name "NoAutoUpdate" -Value 1 -Type DWord

# ============================================================================
# Phase 2: RDP Session Settings
# ============================================================================

New-Item -Path "HKLM:\SOFTWARE\Policies\Microsoft\Windows NT\Terminal Services" -Force | Out-Null
# Session idle timeout: 180 min (10800000 ms)
Set-ItemProperty -Path "HKLM:\SOFTWARE\Policies\Microsoft\Windows NT\Terminal Services" -Name "MaxIdleTime" -Value 10800000 -Type DWord
# Max concurrent sessions: 2
Set-ItemProperty -Path "HKLM:\SOFTWARE\Policies\Microsoft\Windows NT\Terminal Services" -Name "MaxInstanceCount" -Value 2 -Type DWord
# Clipboard sharing: allow (0=allow)
Set-ItemProperty -Path "HKLM:\SOFTWARE\Policies\Microsoft\Windows NT\Terminal Services" -Name "fDisableClip" -Value 0 -Type DWord
# Drive redirection: allow (0=allow)
Set-ItemProperty -Path "HKLM:\SOFTWARE\Policies\Microsoft\Windows NT\Terminal Services" -Name "fDisableCdm" -Value 0 -Type DWord

# ============================================================================
# Phase 3: Install RD Gateway Role
# ============================================================================

Install-WindowsFeature RDS-Gateway -IncludeAllSubFeature -IncludeManagementTools

# ============================================================================
# Phase 4: Create Self-Signed Certificate
# ============================================================================

Import-Module RemoteDesktopServices

# Get public IP (EIP) via IMDSv2 and use as certificate DnsName
$token = Invoke-RestMethod -Method PUT -Uri "http://169.254.169.254/latest/api/token" -Headers @{"X-aws-ec2-metadata-token-ttl-seconds" = "21600"}
$dnsName = Invoke-RestMethod -Uri "http://169.254.169.254/latest/meta-data/public-ipv4" -Headers @{"X-aws-ec2-metadata-token" = $token}
$cert = New-SelfSignedCertificate -CertStoreLocation Cert:\LocalMachine\My -DnsName $dnsName -NotAfter (Get-Date).AddYears(10)

# ============================================================================
# Phase 5: Configure RD Gateway
# ============================================================================

# Bind SSL certificate
Set-Location RDS:\GatewayServer\SSLCertificate
Set-Item .\Thumbprint -Value $cert.Thumbprint

# Create Connection Authorization Policy (CAP)
New-Item -Path RDS:\GatewayServer\CAP -Name "Default-CAP" `
    -UserGroups @("administrators@BUILTIN", "Remote Desktop Users@BUILTIN") `
    -AuthMethod 1

# Create managed computer group for allowed servers
New-Item -Path RDS:\GatewayServer\GatewayManagedComputerGroups -Name "Allowed-Servers" `
    -Description "Servers accessible via RD Gateway" `
    -Computers @(${join(", ", [for ip in allowed_server_ips : "\"${ip}\""])})
Set-Item -Path "RDS:\GatewayServer\CAP\Default-CAP\IdleTimeout" -Value 180

# Create Resource Authorization Policy (RAP)
New-Item -Path RDS:\GatewayServer\RAP -Name "Default-RAP" `
    -UserGroups @("administrators@BUILTIN", "Remote Desktop Users@BUILTIN") `
    -ComputerGroupType 0 `
    -ComputerGroup "Allowed-Servers"

# Restart RD Gateway service to apply settings
Restart-Service TSGateway

# ============================================================================
# Phase 6: Export Certificate to S3
# ============================================================================

# Export certificate for client distribution (public key only)
$cerPath = "C:\Windows\Temp\rdgateway.cer"
$cert | Export-Certificate -FilePath $cerPath -Force -Type CERT

# Upload to S3 (AWS.Tools.S3 is pre-installed on Windows AMIs)
Import-Module AWS.Tools.S3
Write-S3Object -BucketName "${s3_bucket}" -File $cerPath -Key "certs/rdgateway.cer" -Region "${aws_region}"
Remove-Item $cerPath -Force

# Reboot to apply computer name change
Restart-Computer -Force
</powershell>
Client-Side Connection Settings
Certificate Download
Because we're using a self-signed certificate, it needs to be imported to the client PC.
So download rdgateway.cer from the S3 bucket and import it.
Setting up Remote Desktop Connection
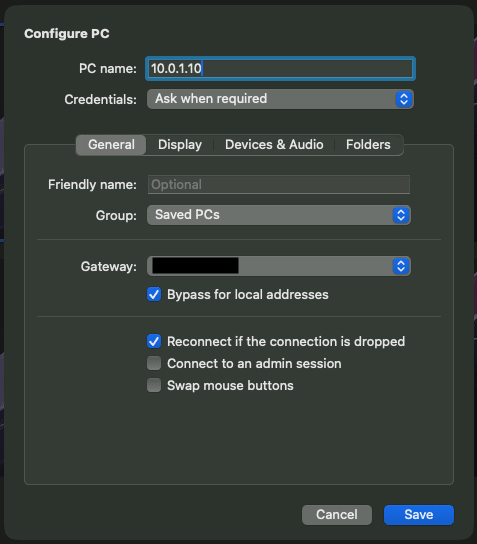
Here we will explain using Windows App (formerly: Microsoft Remote Desktop) as an example.
In the connection settings screen, enter the private IP of the destination server in "PC name" and the EIP of the bastion server in "Gateway".
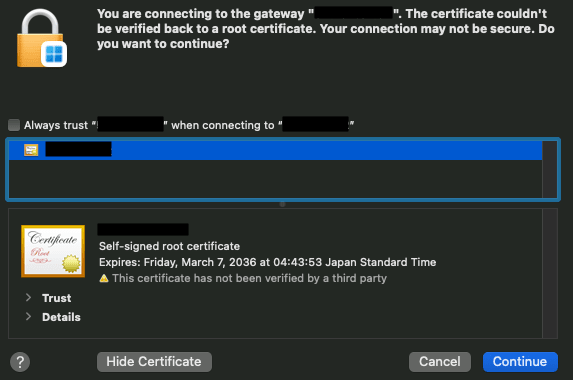
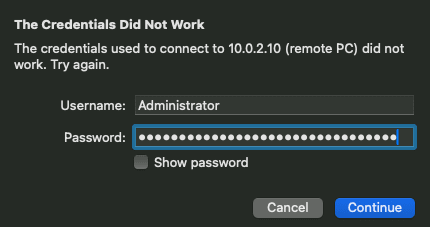
When connecting, you will be asked for RD Gateway authentication credentials.
Please enter your username and password.

Next, a warning about certificate trust will be displayed, if there's no problem, click Continue
When connecting to the destination server via the RD Gateway, you will be asked for the destination server's authentication credentials again.
Please enter the username and password for the destination server.
Bonus: How to check the execution results of user data
Do you ever want to check if your user data ran properly?
In Windows Server EC2 instances, files related to user data execution are stored at the following paths:
| Type | Path |
|---|---|
| User data itself | C:\Windows\System32\config\systemprofile\AppData\Local\Temp\EC2Launch<random value>\UserScript.ps1 |
| Standard output | C:\Windows\System32\config\systemprofile\AppData\Local\Temp\EC2Launch<random value>\output.tmp |
| Error output | C:\Windows\System32\config\systemprofile\AppData\Local\Temp\EC2Launch<random value>\err.tmp |
If an error occurs during user data execution, you can check err.tmp to find the cause.
The <random value> in the path differs with each execution, so check the folders in the relevant directory to find it.
Finally
That's it for creating initial setup of a bastion server and RD Gateway configuration all at once using Windows Server 2025 user data.
Configuring these settings manually can be disheartening no matter how many times you do it, but by using user data, you can deploy everything at once when combined with Terraform, making it much easier.
I hope this article is helpful to someone.