CDKを使用したマルチオリジンへのOAC設定!
この記事は公開されてから1年以上経過しています。情報が古い可能性がありますので、ご注意ください。
こんにちは、CX事業本部の稲葉です。
さっそくですが、今回は最近触れる機会があったOrigin Access Control(以下OAC)をCDKを使って、マルチオリジンに設定していきたいと思います!
背景
そもそも何故、Origin Access Identity(OAI)ではなく、OACを使うのかについて、説明したいと思います。
簡単に言いますと、AWS公式がOACを推奨しているためです。
OAC は以下をサポートしているため、OAC の使用をお勧めします。
- すべての AWS リージョンのすべての Amazon S3 バケット (2022 年 12 月以降に開始されたオプトインリージョンを含む)
- AWS KMS による Amazon S3 サーバー側の暗号化 (SSE-KMS)
- Amazon S3 に対する動的なリクエスト (
PUTとDELETE)OAI は上記のリストのシナリオでは機能しないか、それらのシナリオでは追加の回避策が必要です。
そういった経緯から、今回はOACを使用して構築していきたいと思います。
S3バケット定義
import {
  RemovalPolicy,
  Stack,
  StackProps,
  aws_cloudfront,
  aws_cloudfront_origins,
  aws_iam,
  aws_s3,
} from "aws-cdk-lib";
import { Construct } from "constructs";

export class CdkOacStack extends Stack {
  constructor(scope: Construct, id: string, props?: StackProps) {
    super(scope, id, props);

    const appBucket = new aws_s3.Bucket(this, "oac-app-bucket", {
      bucketName: "oac-app-bucket",
      versioned: true,
      removalPolicy: RemovalPolicy.DESTROY,
      blockPublicAccess: aws_s3.BlockPublicAccess.BLOCK_ALL,

      cors: [
        {
          allowedMethods: [aws_s3.HttpMethods.GET, aws_s3.HttpMethods.HEAD],
          allowedOrigins: ["*"],
          allowedHeaders: ["*"],
        },
      ],
    });
    const mediaBucket = new aws_s3.Bucket(this, "oac-media-bucket", {
      bucketName: "oac-media-bucket",
      blockPublicAccess: aws_s3.BlockPublicAccess.BLOCK_ALL,
      removalPolicy: RemovalPolicy.DESTROY,
      versioned: true,
      cors: [
        {
          allowedMethods: [aws_s3.HttpMethods.GET, aws_s3.HttpMethods.HEAD],
          allowedOrigins: ["*"],
          allowedHeaders: ["*"],
        },
      ],
    });
画面部分を表示するためのファイルを配信するバケットと画像などを配信するバケットを定義。
また、どちらもblockPublicAccess: aws_s3.BlockPublicAccess.BLOCK_ALLでパブリックアクセスをブロックします。
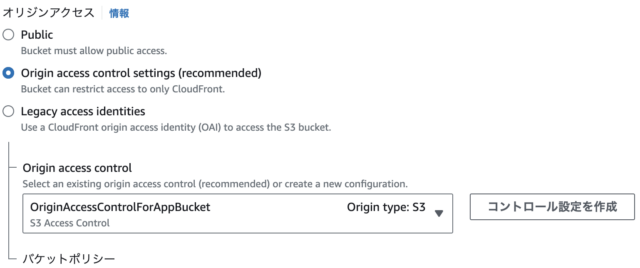
OACを定義
次にOACを定義していきます。今回OACの実装にはL1コンストラクタを使用します。理由はまだL2コンストラクタではサポートされていないからです。(2023/8月16日時点)引用:https://github.com/aws/aws-cdk/issues/21771
// OAC
    const cfnOriginAccessControl = new aws_cloudfront.CfnOriginAccessControl(
      this,
      "OriginAccessControl",
      {
        originAccessControlConfig: {
          name: "OriginAccessControlForAppBucket",
          originAccessControlOriginType: "s3",
          signingBehavior: "always",
          signingProtocol: "sigv4",
          description: "S3 Access Control",
        },
      }
    );
コンソールの [Sign requests (recommended)] (署名リクエスト (推奨))、または API、CLI、および AWS CloudFormation の
alwaysという設定を使用することをお勧めします。この設定では、CloudFront は S3 バケットオリジンに送信するすべてのリクエストに常に署名します。
そのため、signingBehaviorにはalwaysを設定します。
signingProtocolは以下の理由から、sigv4を設定。
SigningProtocolThe signing protocol of the origin access control, which determines how CloudFront signs (authenticates) requests. The only valid value is
sigv4.CloudFrontがどのようにリクエストに署名(認証)するかを決定する、オリジンアクセスコントロールの署名プロトコル。有効な値は sigv4 のみです。
マルチオリジンへの設定
最後にCloudFrontのマルチオリジンに対するOACの設定を行っていきます。
// CloudFront
    const distribution = new aws_cloudfront.Distribution(this, "Distribution", {
      comment: "distribution.",
      defaultBehavior: {
        origin: new aws_cloudfront_origins.S3Origin(appBucket),
      },
      additionalBehaviors: {
        "/images/*": {
          origin: new aws_cloudfront_origins.S3Origin(mediaBucket),
        },
      },
      defaultRootObject: "index.html",
    });

    // Additional settings for origin 0 and 1(0:appBucket, 1:mediaBucket)
    const cfnDistribution = distribution.node
      .defaultChild as aws_cloudfront.CfnDistribution;
    // Delete OAI
    cfnDistribution.addOverride(
      "Properties.DistributionConfig.Origins.0.S3OriginConfig.OriginAccessIdentity",
      ""
    );
    cfnDistribution.addOverride(
      "Properties.DistributionConfig.Origins.1.S3OriginConfig.OriginAccessIdentity",
      ""
    );
    // OAC does not require CustomOriginConfig
    cfnDistribution.addPropertyDeletionOverride(
      "DistributionConfig.Origins.0.CustomOriginConfig"
    );
    cfnDistribution.addPropertyDeletionOverride(
      "DistributionConfig.Origins.1.CustomOriginConfig"
    );
    // By default, the s3 WebsiteURL is set and an error occurs, so set the S3 domain name
    cfnDistribution.addPropertyOverride(
      "DistributionConfig.Origins.0.DomainName",
      appBucket.bucketRegionalDomainName
    );
    cfnDistribution.addPropertyOverride(
      "DistributionConfig.Origins.1.DomainName",
      mediaBucket.bucketRegionalDomainName
    );

    // OAC settings
    cfnDistribution.addPropertyOverride(
      "DistributionConfig.Origins.0.OriginAccessControlId",
      cfnOriginAccessControl.getAtt("Id")
    );
    cfnDistribution.addPropertyOverride(
      "DistributionConfig.Origins.1.OriginAccessControlId",
      cfnOriginAccessControl.getAtt("Id")
    );
}
まず、CloudFrontに先ほど定義した2つのS3バケットをオリジン設定します。
続いて、DistributionにOACの設定を記述。
先ほど述べたようにOACのサポートがまだされていないため、.addPropertyOverride()などでプロパティを直接設定します。
ここで注意して欲しいのが、マルチオリジンの場合は、Origins.0,1のようにインデックスを指定して設定します。
今回の場合は0:appBucket, 1:mediaBucketです。
// OAC settings

cfnDistribution.addPropertyOverride( "DistributionConfig.Origins.0.OriginAccessControlId", cfnOriginAccessControl.getAtt("Id") );

cfnDistribution.addPropertyOverride( "DistributionConfig.Origins.1.OriginAccessControlId", cfnOriginAccessControl.getAtt("Id") );
最後は、CloudFrontに対するバケットポリシーを設定して完了です!
const appBucketPolicyStatement = new aws_iam.PolicyStatement({
      actions: ["s3:GetObject"],
      effect: aws_iam.Effect.ALLOW,
      principals: [new aws_iam.ServicePrincipal("cloudfront.amazonaws.com")],
      resources: [`${appBucket.bucketArn}/*`],
      conditions: {
        StringEquals: {
          "AWS:SourceArn": `arn:aws:cloudfront::${this.account}:distribution/${distribution.distributionId}`,
        },
      },
    });
    const mediaBucketPolicyStatement = new aws_iam.PolicyStatement({
      actions: ["s3:GetObject"],
      effect: aws_iam.Effect.ALLOW,
      principals: [new aws_iam.ServicePrincipal("cloudfront.amazonaws.com")],
      resources: [`${mediaBucket.bucketArn}/*`],
      conditions: {
        StringEquals: {
          "AWS:SourceArn": `arn:aws:cloudfront::${this.account}:distribution/${distribution.distributionId}`,
        },
      },
    });

    appBucket.addToResourcePolicy(appBucketPolicyStatement);
    mediaBucket.addToResourcePolicy(mediaBucketPolicyStatement);
それでは早速、StackをデプロイしてOACが設定されているか確かめてみましょう。
まとめ
今回はCDKを使用したマルチオリジンへのOAC設定を行いました。
cdk初心者と言うこともあり、マルチオリジンでのOAC設定は手こずりました。(ドキュメントもほとんどない)
今回この方法で実装しましたが、この方法はL2コンストラクタではサポートされていない現時点(2023/8/16)での実装方法だという事をご留意頂けると幸いです。
参考
AWS CDK(TypeScript)のL2 Constructで設定できないプロパティを設定する方法