CDKTFを使ってAuth0のテナントにアプリケーションを作成してみた
この記事は公開されてから1年以上経過しています。情報が古い可能性がありますので、ご注意ください。
リテールアプリ共創部@大阪の岩田です。
Auth0のアプリケーションをIaCで管理したい場面がありました。terraformを利用する方法については色々と情報があったのですが、CDKTFを使った例を見かけなかったので試しにやってみました。
環境
今回利用した各種ツールのバージョンは以下のとおりです。
-
cdktf:0.20.9
-
cdktf-cli: 0.20.9
-
terraform-provider-auth0: v1.7.3
-
Node.js: v20.11.1
-
npm: 10.8.3
やってみる
それでは早速やっていきましょう。
CDKTFプロジェクトの準備
まず以下のコマンドでプロジェクトを初期化します。
npx cdktf-cli init
対話形式でいくつか質問されるので、質問に答えていきます。
Welcome to CDK for Terraform!

By default, cdktf allows you to manage the state of your stacks using Terraform Cloud for free.
cdktf will request an API token for app.terraform.io using your browser.

If login is successful, cdktf will store the token in plain text in
the following file for use by subsequent Terraform commands:
    /Users/...略/.terraform.d/credentials.tfrc.json

Note: The local storage mode isn't recommended for storing the state of your stacks.

? Do you want to continue with Terraform Cloud remote state management? no
? What template do you want to use? typescript

Initializing a project using the typescript template.
? Project Name cdktf-auth0
? Project Description CDK TFでAuth0のリソースを作ってみるサンプル
? Do you want to start from an existing Terraform project? no
? Do you want to send crash reports to the CDKTF team? Refer to https://developer.hashicorp.com/terraform/cdktf/create-and-deploy/configuration-file#enable-crash-reporting-for-the-cli for more information no
Note: You can always add providers using 'cdktf provider add' later on
? What providers do you want to use?

added 2 packages, and audited 58 packages in 1s

12 packages are looking for funding
  run `npm fund` for details

found 0 vulnerabilities
========================================================================================================

  Your CDKTF TypeScript project is ready!
...略
  You can also build any module or provider locally. Learn more https://cdk.tf/modules-and-providers

========================================================================================================
初期化が完了したら必要なライブラリをインストールします。
npm install
added 1 package, and audited 352 packages in 549ms

43 packages are looking for funding
  run `npm fund` for details

found 0 vulnerabilities
cdktf-cliはグローバルインストールが前提になっているようで、ここまでの手順だとインストールされませんでした。明示的にインストールしておきます。
npm install cdktf-cli
added 405 packages, and audited 757 packages in 15s

117 packages are looking for funding
  run `npm fund` for details

found 0 vulnerabilities
続いてcdktf initした時に生成されたcdktf.jsonを編集し、terraformProvidersに"auth0/auth0@~> 1.7"を追加します。
{
  "language": "typescript",
  "app": "npx ts-node main.ts",
  "projectId": "cd3d8616-7dc6-46c9-978f-a2851a2c3cdd",
  "sendCrashReports": "false",
  "terraformProviders": [
    "auth0/auth0@~> 1.7"
  ],
  "terraformModules": [],
  "context": {
  }
}
cdktf.jsonが編集できたら以下のコマンドでAuth0 Provider関連のコードを生成します。
npx cdktf get
生成が完了すると以下のように出力されます。
Generated typescript constructs in the output directory: .gen
lsで自動生成されたコードを簡単に確認しておきましょう。
ls .gen/providers/auth0/
action						data-auth0-custom-domain			guardian					provider
attack-protection				data-auth0-flow					hook						resource-server
branding					data-auth0-flow-vault-connection		index.ts					resource-server-scope
branding-theme					data-auth0-form					lazy-index.ts					resource-server-scopes
client						data-auth0-organization				log-stream					role
client-credentials				data-auth0-pages				organization					role-permission
client-grant					data-auth0-prompt-screen-partials		organization-client-grant			role-permissions
connection					data-auth0-resource-server			organization-connection				rule
connection-client				data-auth0-role					organization-connections			rule-config
connection-clients				data-auth0-self-service-profile			organization-member				self-service-profile
connection-scim-configuration			data-auth0-signing-keys				organization-member-role			tenant
custom-domain					data-auth0-tenant				organization-member-roles			trigger-action
custom-domain-verification			data-auth0-user					organization-members				trigger-actions
data-auth0-attack-protection			email-provider					pages						user
data-auth0-branding				email-template					prompt						user-permission
data-auth0-branding-theme			encryption-key-manager				prompt-custom-text				user-permissions
data-auth0-client				flow						prompt-partials					user-role
data-auth0-connection				flow-vault-connection				prompt-screen-partial				user-roles
data-auth0-connection-scim-configuration	form						prompt-screen-partials
これでCDKTFのコードからAuth0関連のコンストラクトを使う準備が整いました。
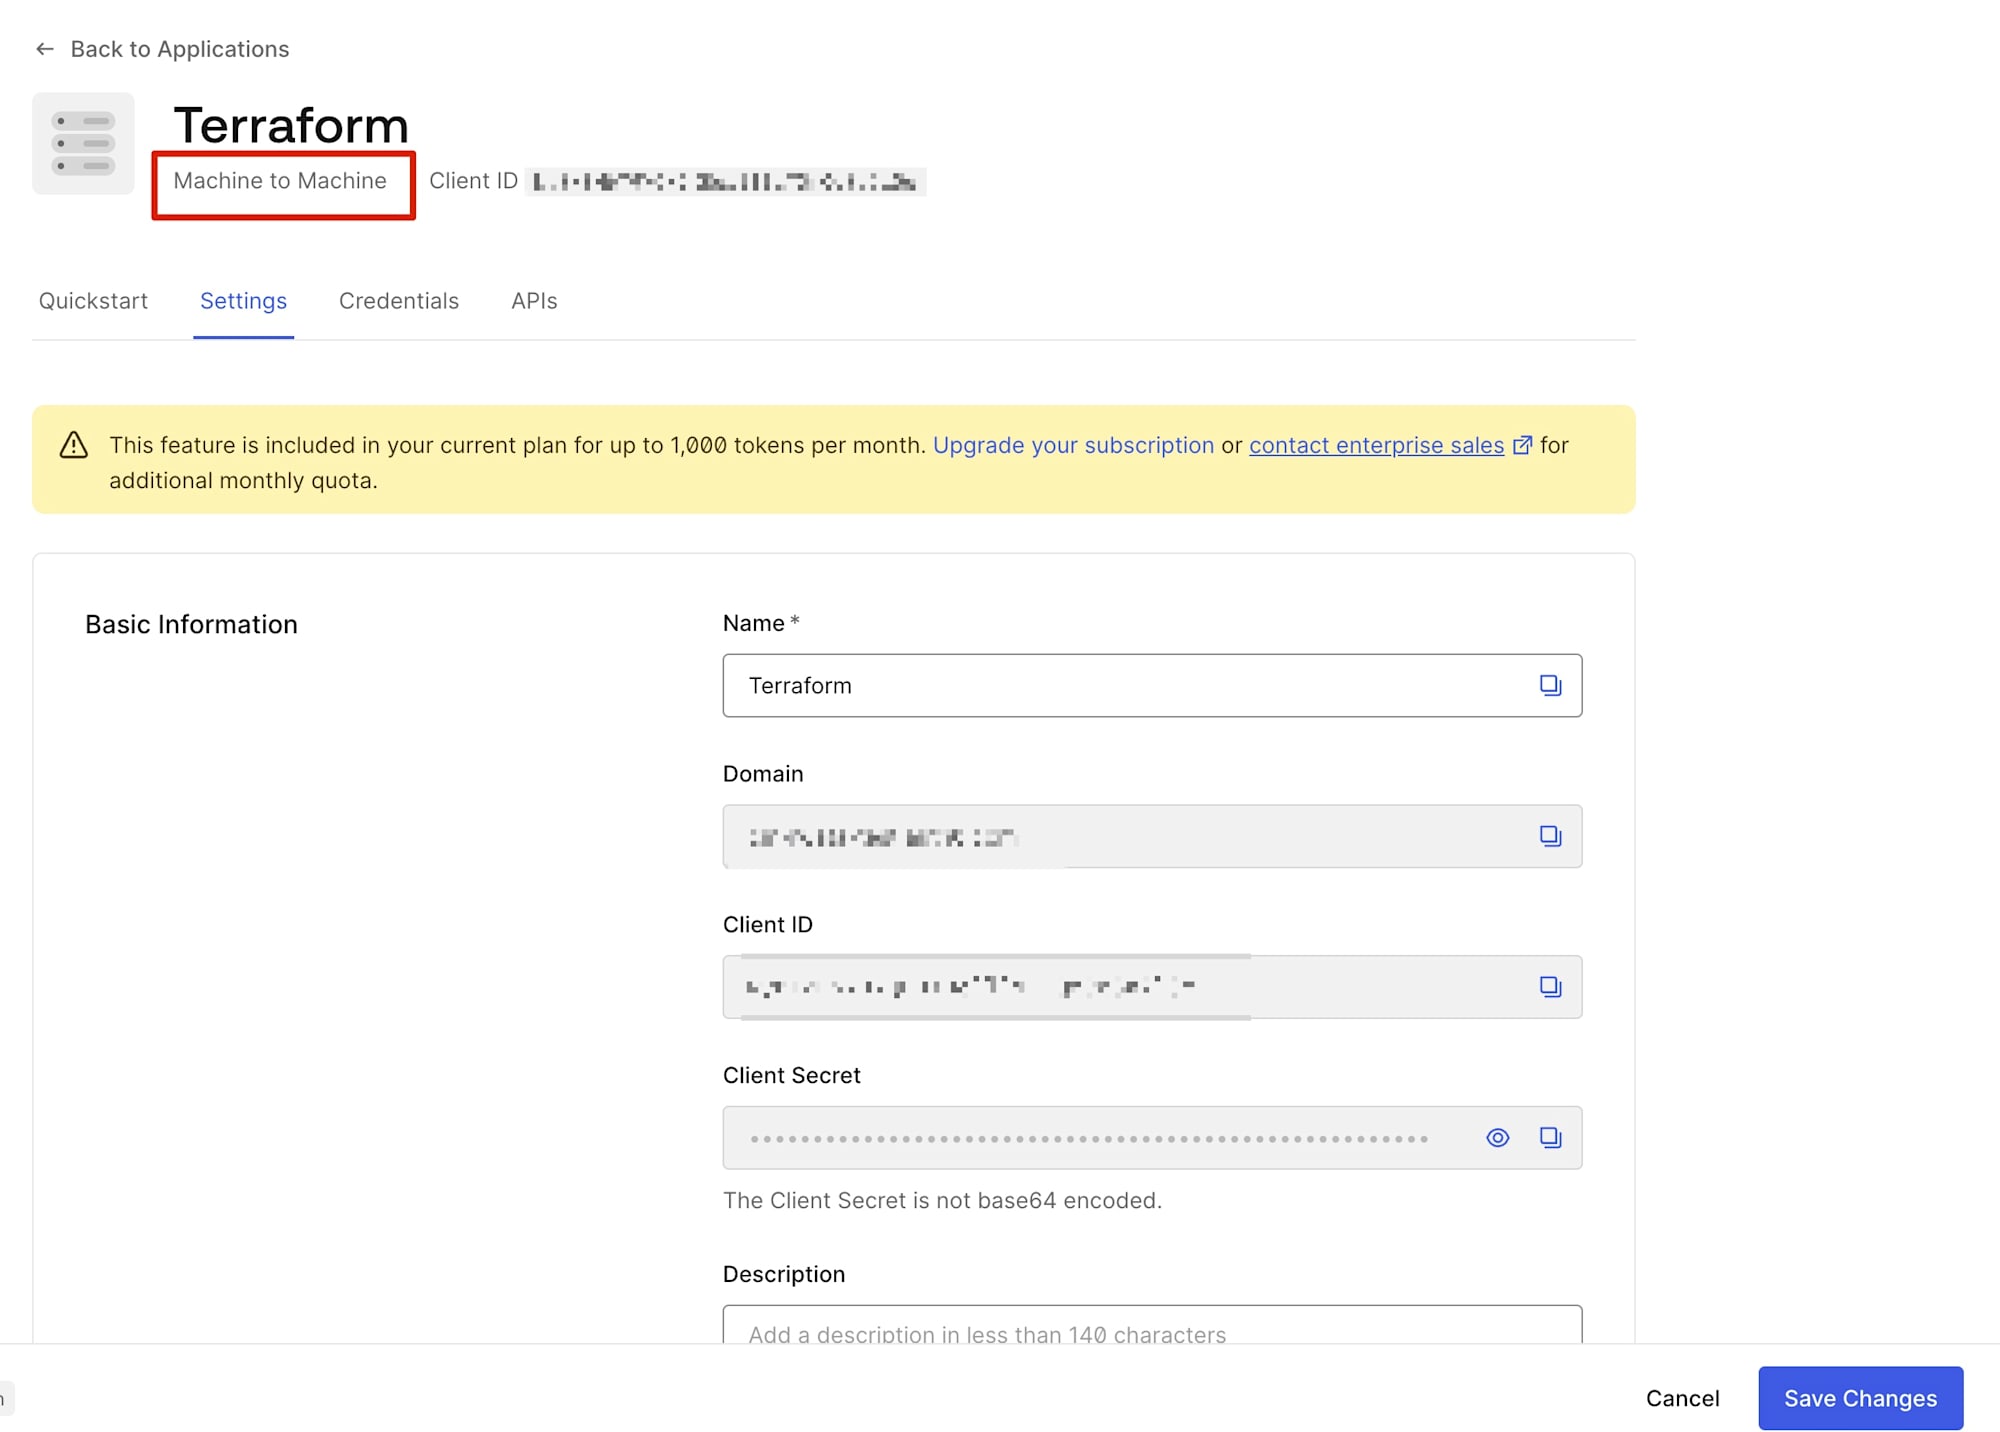
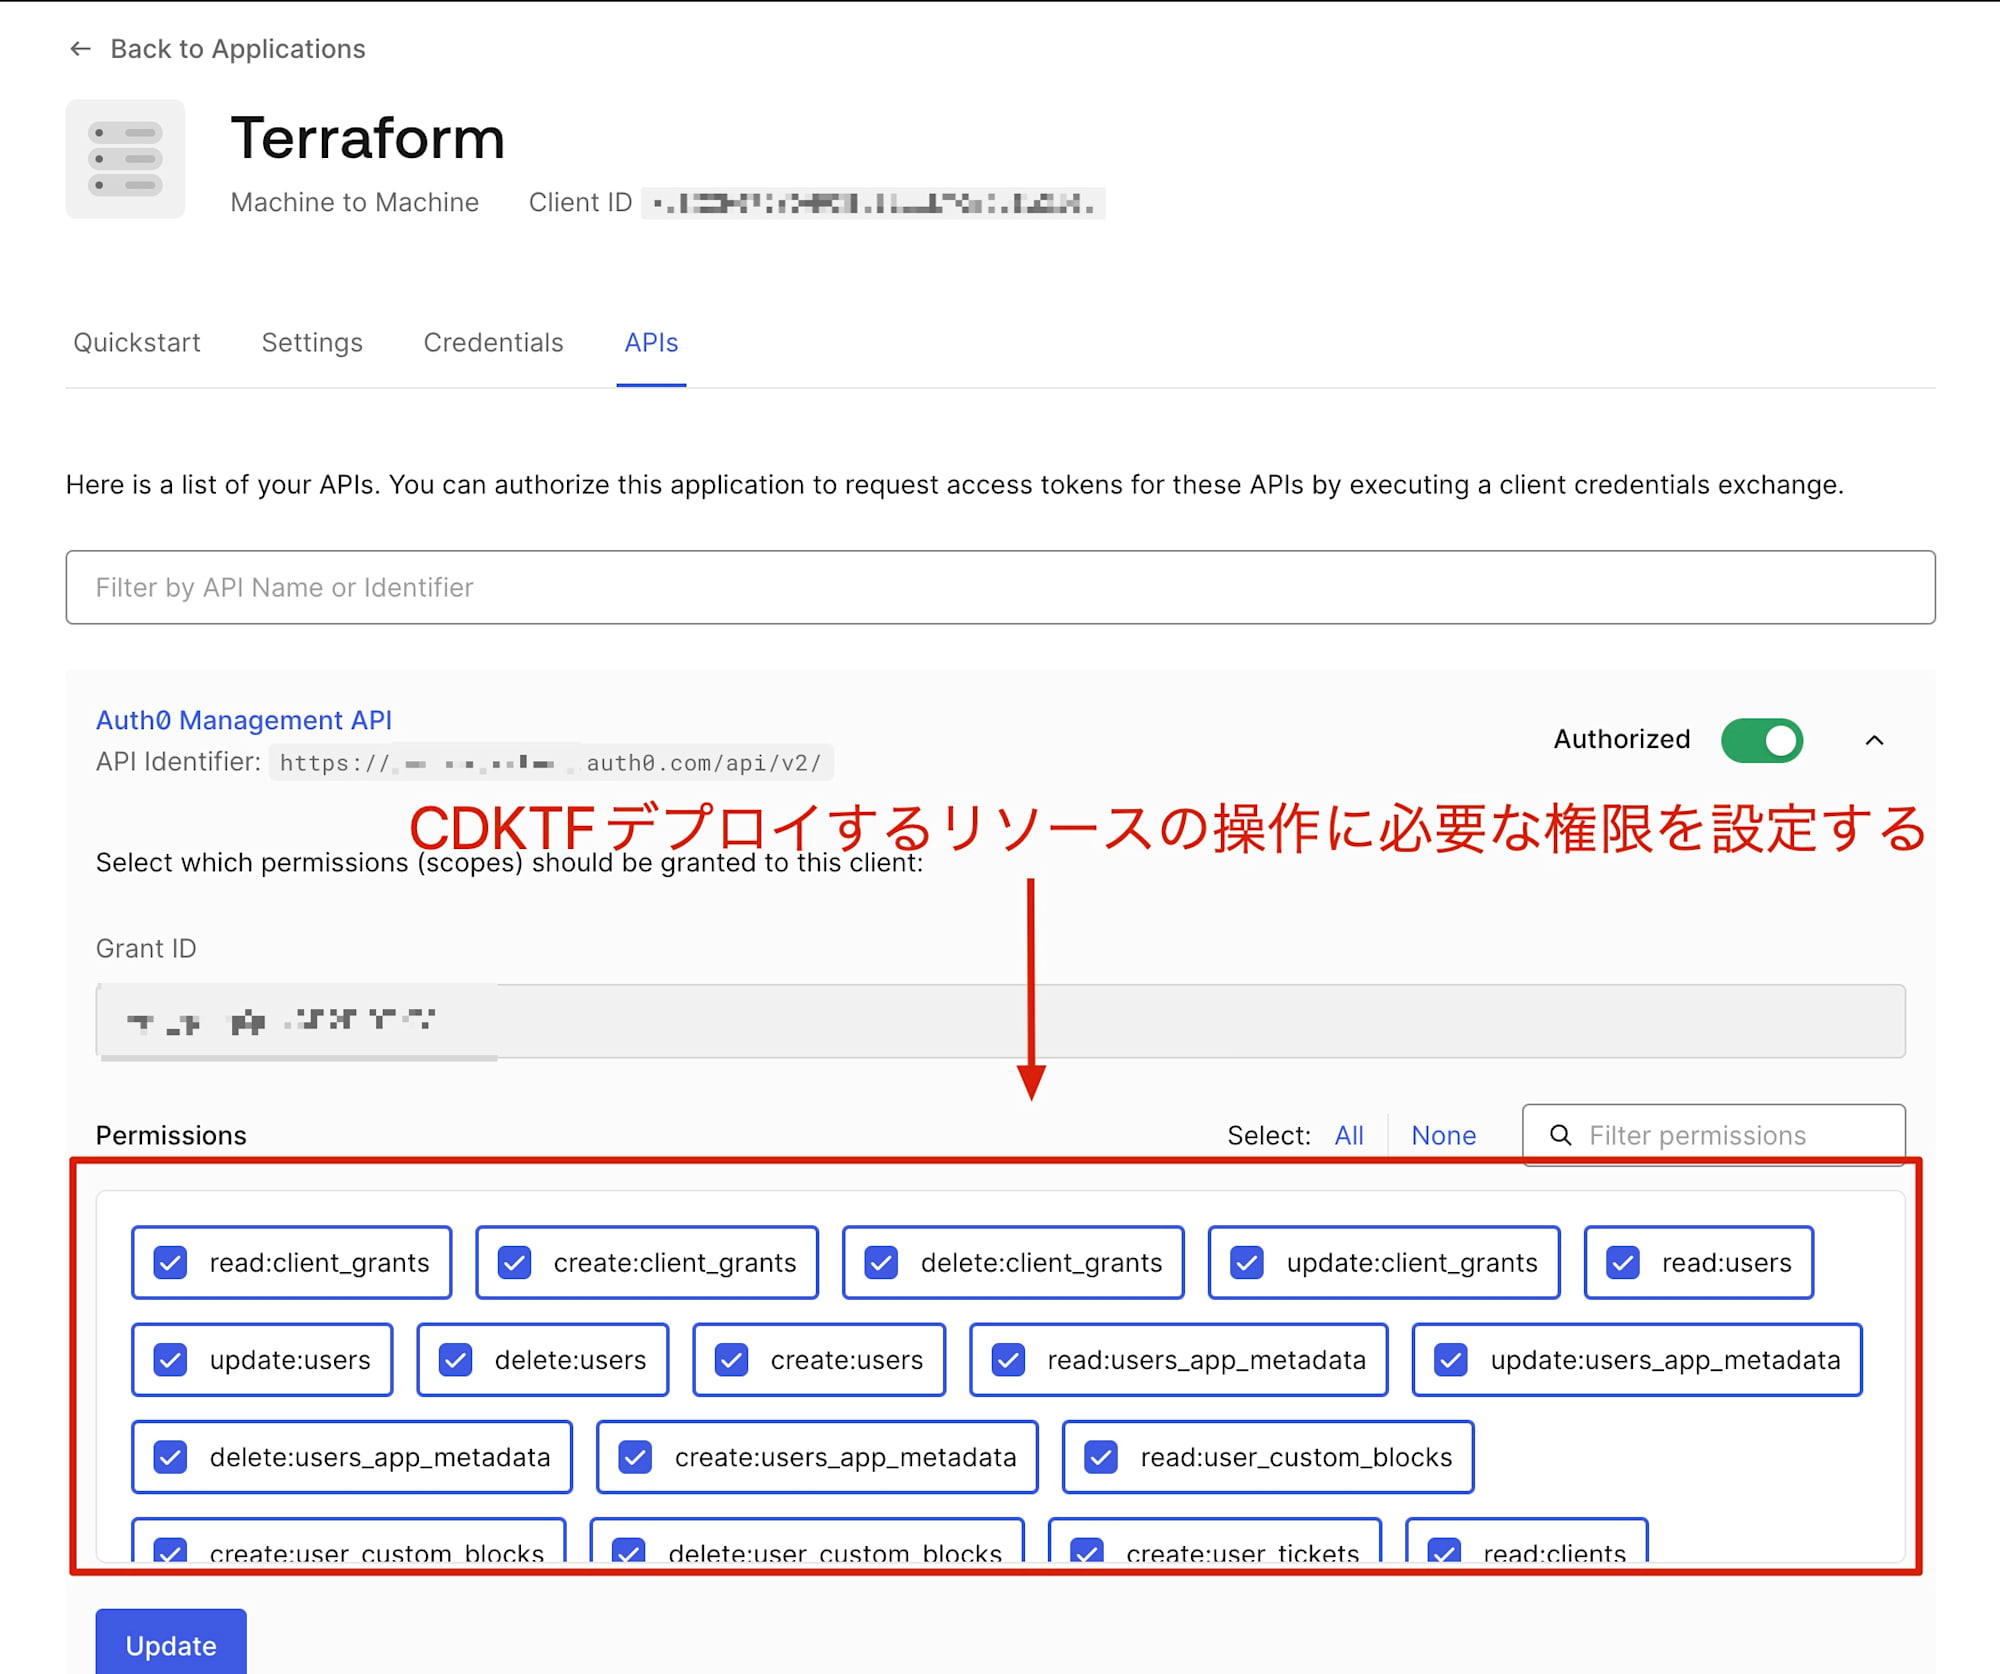
続いて.envファイルを用意してAuth0のシークレット情報を記載します。事前にAuth0側でMachine to Machineのアプリケーションを作成しておき、そのアプリケーションのクライアントIDとシークレットを控えておいてください。このアプリケーションはAuth0 Management APIにアクセスできるよう権限を設定しておいてください。
AUTH0_DOMAIN=<Auth0のドメイン>
AUTH0_CLIENT_ID=<デプロイ用アプリケーションのクライアントID>
AUTH0_CLIENT_SECRET=<デプロイ用アプリケーションのシークレット>


CDKTFのコードを実装
準備ができたのでCDKTFのコードを実装します。今回はSingle Page Applicationのアプリケーションをデプロイするコードを書いてみます。
import { Construct } from "constructs";
import { App, TerraformStack } from "cdktf";
import { Auth0Provider } from "./.gen/providers/auth0/provider";
import { Client as Auth0Client } from "./.gen/providers/auth0/client";

class Auth0Stack extends TerraformStack {
  constructor(scope: Construct, id: string) {
    super(scope, id);

    new Auth0Provider(this, "auth0provider", {
      domain: process.env.AUTH0_DOMAIN,
      clientId: process.env.AUTH0_CLIENT_ID,
      clientSecret: process.env.AUTH0_CLIENT_SECRET
    })

    new Auth0Client(this, "auth0client", {
      name: "sample-react-app",
      description: "ブログ用サンプル",
      appType: "spa",
      callbacks: ["http://localhost:3000"],
      allowedOrigins: ["http://localhost:3000"],
      allowedLogoutUrls: ["http://localhost:3000"],
      oidcConformant: true,
      grantTypes: ["authorization_code", "refresh_token"],
    })
  }
}

const app = new App();
new Auth0Stack(app, "cdk-tf-auth0-prj");
app.synth();
new Auth0ProviderでAuth0 Providerを利用するために必要な情報を設定した後、new Auth0Client(...の部分でアプリケーションの設定値を指定していきます。
このあたりのプロパティは通常のTerraformと同様になります。
デプロイしてみる
コードが準備できたのでデプロイしてみましょう。dotenvxを使って.envファイルから環境変数を読み込み、cdktf synthしてみます。
dotenvx run -- npx cdktf synth
以下のように出力されれば準備OKです。
[dotenvx@1.22.0] injecting env (3) from .env

⠋  Starting
[2024-11-06T12:27:21.481] [WARN] default - WARNING: Found NODE_OPTIONS environment variable without a setting for --max-old-space-size
The synthesizing step for TypeScript may need an increased amount of memory if multiple large providers
are used with locally generated bindings. You can ignore this if you don't use CDKTF with TypeScript.
If not present, the cdktf-cli sets it to NODE_OPTIONS="--max-old-space-size=4096" by default. But as

Generated Terraform code for the stacks: cdk-tf-auth0-prj
ではデプロイしてみましょう。
dotenvx run -- npx cdktf deploy --auto-approve
以下のように出力され、しばらく待つとデプロイ完了です!
[dotenvx@1.22.0] injecting env (3) from .env

⠋  Starting
[2024-11-06T12:28:16.732] [WARN] default - WARNING: Found NODE_OPTIONS environment variable without a setting for --max-old-space-size
The synthesizing step for TypeScript may need an increased amount of memory if multiple large providers
are used with locally generated bindings. You can ignore this if you don't use CDKTF with TypeScript.
If not present, the cdktf-cli sets it to NODE_OPTIONS="--max-old-space-size=4096" by default. But as
cdk-tf-auth0-prj  Initializing the backend...
cdk-tf-auth0-prj
                  Successfully configured the backend "local"! Terraform will automatically
                  use this backend unless the backend configuration changes.
cdk-tf-auth0-prj  Initializing provider plugins...
                  - Finding auth0/auth0 versions matching "1.7.3"...
cdk-tf-auth0-prj  - Installing auth0/auth0 v1.7.3...
cdk-tf-auth0-prj  - Installed auth0/auth0 v1.7.3 (self-signed, key ID 54AD762CC918A590)

                  Partner and community providers are signed by their developers.
                  If you'd like to know more about provider signing, you can read about it here:
                  https://www.terraform.io/docs/cli/plugins/signing.html
cdk-tf-auth0-prj  Terraform has created a lock file .terraform.lock.hcl to record the provider
                  selections it made above. Include this file in your version control repository
                  so that Terraform can guarantee to make the same selections by default when
                  you run "terraform init" in the future.

                  Terraform has been successfully initialized!

                  You may now begin working with Terraform. Try running "terraform plan" to see
                  any changes that are required for your infrastructure. All Terraform commands
                  should now work.

                  If you ever set or change modules or backend configuration for Terraform,
                  rerun this command to reinitialize your working directory. If you forget, other
                  commands will detect it and remind you to do so if necessary.
cdk-tf-auth0-prj  - Fetching auth0/auth0 1.7.3 for linux_amd64...
cdk-tf-auth0-prj  - Retrieved auth0/auth0 1.7.3 for linux_amd64 (self-signed, key ID 54AD762CC918A590)
                  - Obtained auth0/auth0 checksums for linux_amd64; Additional checksums for this platform are now tracked in the lock file
cdk-tf-auth0-prj  Success! Terraform has updated the lock file.

                  Review the changes in .terraform.lock.hcl and then commit to your
                  version control system to retain the new checksums.
cdk-tf-auth0-prj  Terraform used the selected providers to generate the following execution plan.
                  Resource actions are indicated with the following symbols:
                    + create

                  Terraform will perform the following actions:
cdk-tf-auth0-prj    # auth0_client.auth0client (auth0client) will be created
                    + resource "auth0_client" "auth0client" {
                        + allowed_logout_urls                 = [
                            + "http://localhost:3000",
                          ]
                        + allowed_origins                     = [
                            + "http://localhost:3000",
                          ]
                        + app_type                            = "spa"
                        + callbacks                           = [
                            + "http://localhost:3000",
                          ]
                        + client_id                           = (known after apply)
                        + custom_login_page_on                = (known after apply)
                        + description                         = "ブログ用サンプル"
                        + grant_types                         = [
                            + "authorization_code",
                            + "refresh_token",
                          ]
cdk-tf-auth0-prj  + id                                  = (known after apply)
                        + is_first_party                      = (known after apply)
                        + is_token_endpoint_ip_header_trusted = (known after apply)
                        + name                                = "sample-react-app"
                        + oidc_conformant                     = true
                        + signing_keys                        = (sensitive value)
                      }

                  Plan: 1 to add, 0 to change, 0 to destroy.
cdk-tf-auth0-prj  auth0_client.auth0client: Creating...
cdk-tf-auth0-prj  auth0_client.auth0client: Creation complete after 1s [id=Lc5nI4scstKsNxHg40QLTzMeeorrskDR]
cdk-tf-auth0-prj
                  Apply complete! Resources: 1 added, 0 changed, 0 destroyed.

No outputs found.
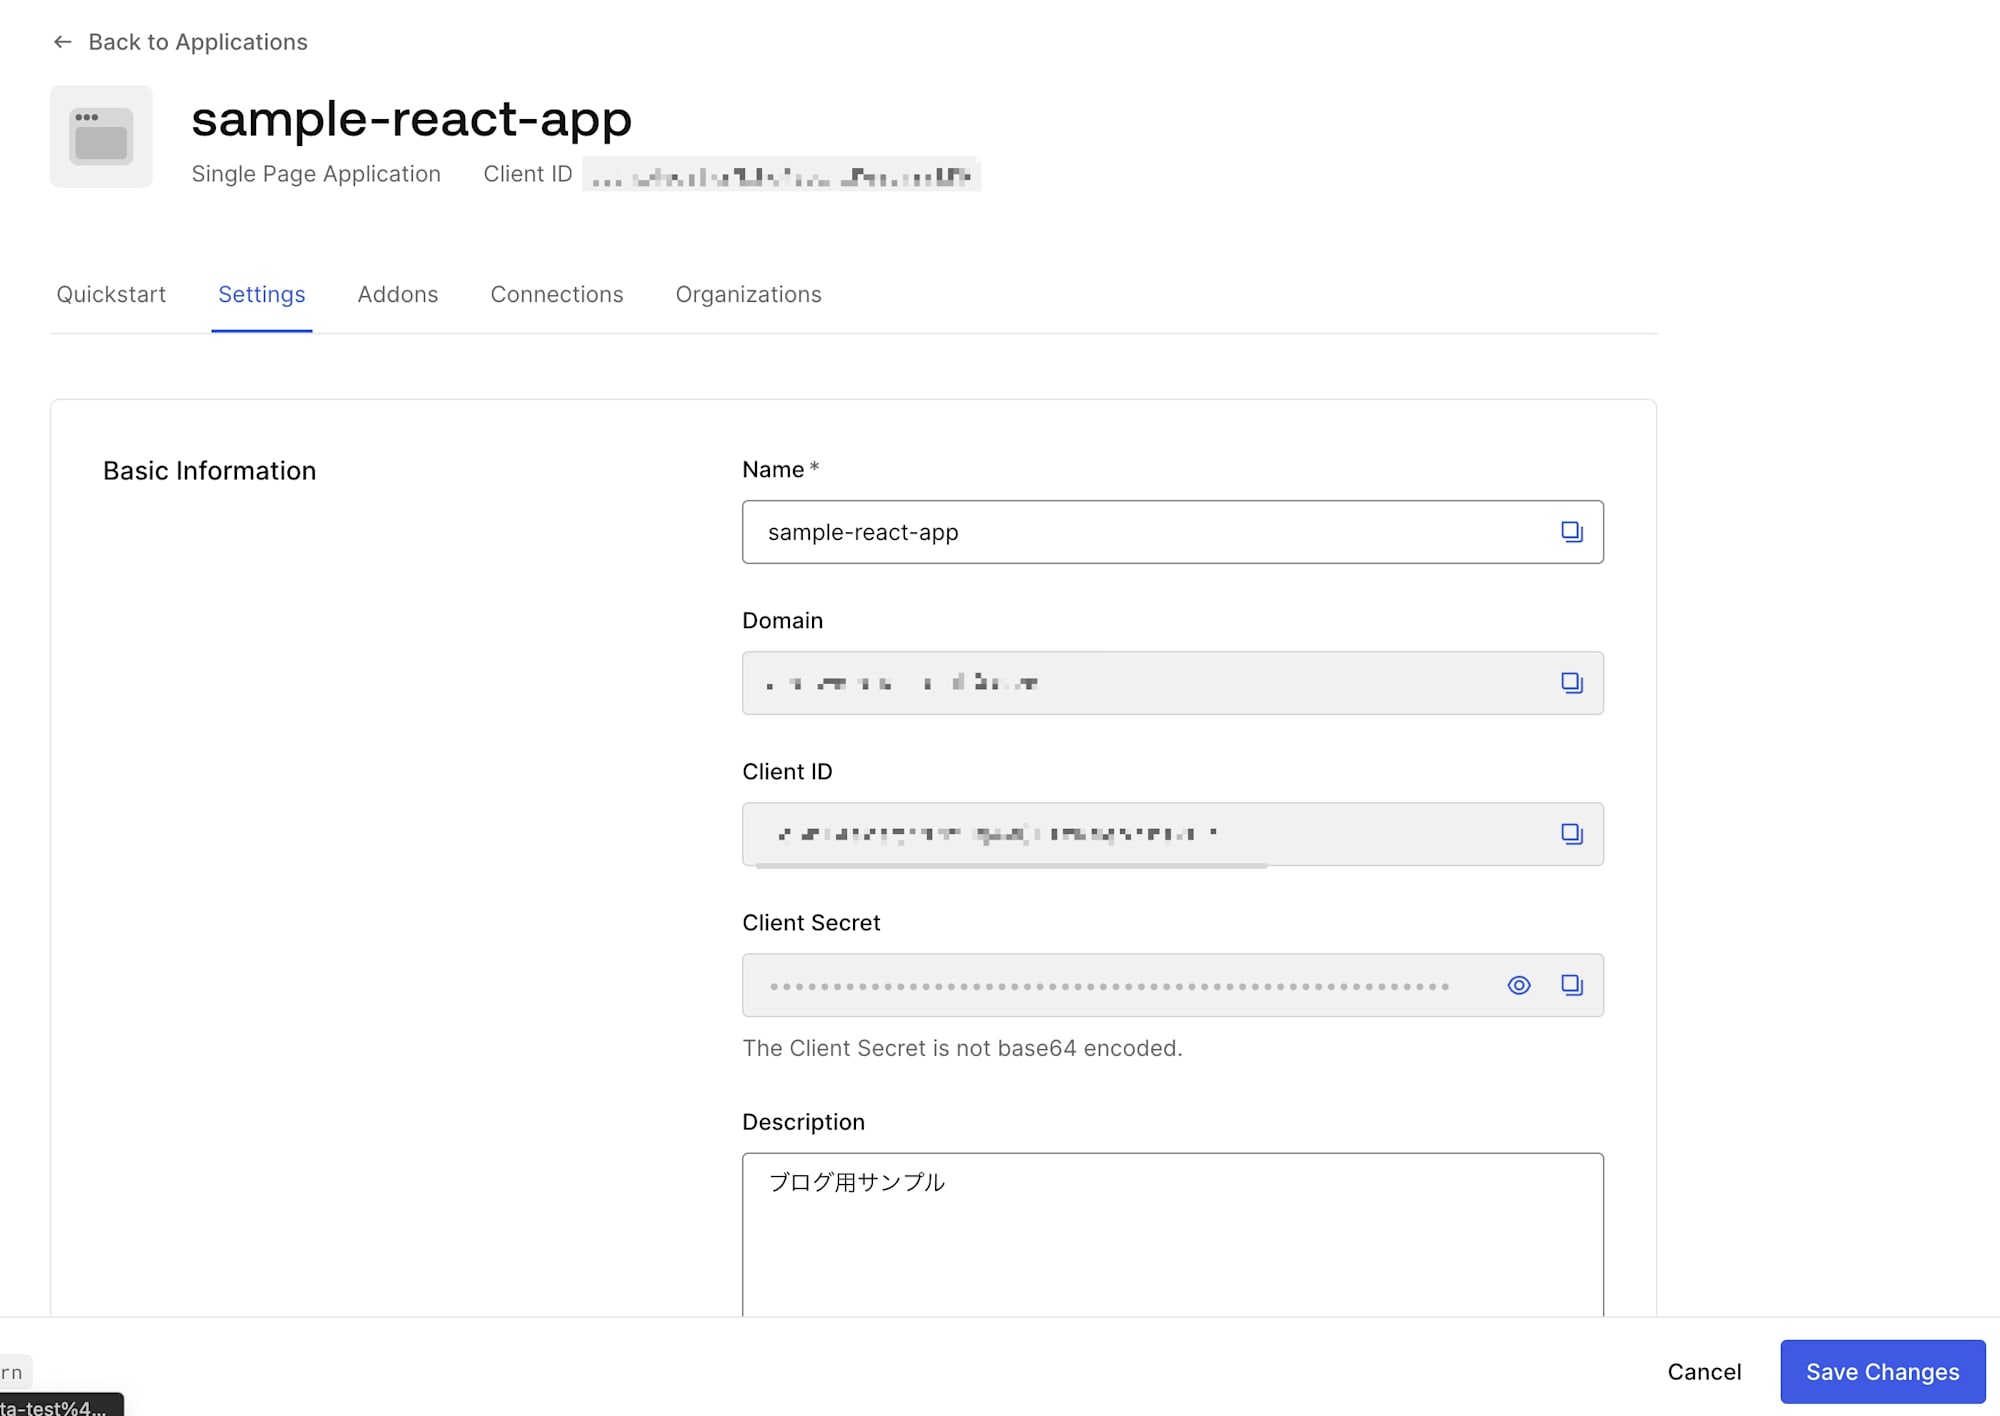
Auth0の管理画面を確認するとデプロイしたアプリケーションの情報が確認できました。

無事にデプロイ完了です。
まとめ
CDKTFを使ってAuth0のテナントにアプリケーションを作成してみました。
CDKTFを使うと生でterraformを使う場合に比べてif文による条件分岐などがより柔軟に実装可能です。要件次第ではCDKTFを利用するのも良い選択肢になるのではないでしょうか。


