![[Update] I tried out the newly available custom visual transforms in Amazon SageMaker Unified Studio](https://images.ctfassets.net/ct0aopd36mqt/wp-thumbnail-4e6e510f2f74e1cc7d0ec360f38d138a/c00e9d7f4e47022543b37632bc20bcc0/amazon-sagemaker?w=3840&fm=webp)
[Update] I tried out the newly available custom visual transforms in Amazon SageMaker Unified Studio

This page has been translated by machine translation. View original
This is Ishikawa from the Cloud Business Division. Custom visual transforms can now be created, shared, and reused in the Visual ETL of Amazon SageMaker Unified Studio, so I tried it out.
In the Visual ETL of Amazon SageMaker Unified Studio, data transformation flows were previously built by combining pre-prepared transforms. With this update, you can now add your own transforms to the transform library by preparing a JSON configuration file and a Python implementation file.
In the AWS announcement, use cases mentioned include a transform for standardizing customer phone numbers, a transform for masking personally identifiable information (PII), and a transform for applying organization-standard data quality checks. The same logic can be reused across multiple ETL jobs, reducing duplicated work and making it easier to maintain consistency in results.
What Are Custom Visual Transforms
Custom visual transforms are a mechanism that allows users to define their own Visual ETL transform nodes. You define the transform's name, description, and parameters in a JSON config file, and implement the transformation logic in a Python file. By uploading these two files to the transforms folder under the project's Amazon S3 shared folder, they appear in the Visual ETL transform library.
A similar concept has existed in AWS Glue Studio since 2022, and the official documentation states that if you have already created custom visual transforms for AWS Glue within the same account, those are also available in the Visual ETL of Amazon SageMaker Unified Studio.
Trying It Out
Prerequisites
- An Amazon SageMaker Unified Studio domain and project must already be created
- Verification environment: ap-northeast-1, AWS CLI v2.36.2
I went through the process from placing files, confirming the display on Visual ETL, checking the generated script, and then actually running the ETL job to verify the transformed data.
Step 1. Check the Amazon S3 Shared Folder of the Project
The official documentation guides you to check the Amazon S3 path from the Storage section of the project settings. You can also retrieve it with the AWS CLI, so I'll introduce that method here.
First, get the list of domains.
% aws datazone list-domains \
    --region ap-northeast-1 \
    --query "items[].{id:id,name:name,status:status}" \
    --output table
----------------------------------------------------------------
|                          ListDomains                         |
+---------------------+---------------------------+------------+
|         id          |           name            |  status    |
+---------------------+---------------------------+------------+
|  dzd-d3w2uawk8vo7a1 |  Default_05252026_Domain  |  AVAILABLE |
+---------------------+---------------------------+------------+
Next, get the project and environment IDs.
% aws datazone list-projects \
    --domain-identifier dzd-d3w2uawk8vo7a1 \
    --region ap-northeast-1 \
    --query "items[].{id:id,name:name}" \
    --output table
--------------------------------------------------
|                  ListProjects                  |
+-----------------+------------------------------+
|       id        |            name              |
+-----------------+------------------------------+
|  c778yzrdr7zy55 |  admin-project-123456789012  |
+-----------------+------------------------------+

% aws datazone list-environments \
    --domain-identifier dzd-d3w2uawk8vo7a1 \
    --project-identifier c778yzrdr7zy55 \
    --region ap-northeast-1 \
    --query "items[].{id:id,name:name,status:status}" \
    --output table
---------------------------------------------------------------------------------
|                               ListEnvironments                                |
+----------------+---------------------------------------------------+----------+
|       id       |                       name                        | status   |
+----------------+---------------------------------------------------+----------+
|  crcf629vztrvh5|  AmazonSagemakerEnvironmentConfig-axosp8fvbr1dnd  |  ACTIVE  |
|  4jxormz9fjcgpl|  AmazonSagemakerEnvironmentConfig-602yfhroojlyop  |  ACTIVE  |
+----------------+---------------------------------------------------+----------+
Two environments were returned. The Amazon S3 shared folder path is included in the environment details under the name s3BucketPath, but only one of them has it. Since I don't know which one it is, I check each environment in order.
% for E in $(aws datazone list-environments \
    --domain-identifier dzd-d3w2uawk8vo7a1 \
    --project-identifier c778yzrdr7zy55 \
    --region ap-northeast-1 --query 'items[].id' --output text); do
  echo -n "${E}: "
  aws datazone get-environment \
      --domain-identifier dzd-d3w2uawk8vo7a1 \
      --identifier "$E" \
      --region ap-northeast-1 \
      --query "provisionedResources[?name=='s3BucketPath'].value" \
      --output text
done
crcf629vztrvh5: s3://amazon-sagemaker-123456789012-ap-northeast-1-c778yzrdr7zy55/shared
4jxormz9fjcgpl:
The shared folder path was found in crcf629vztrvh5. This blueprint provisions the foundational resources for the project, and the shared folder is also created here. The bucket name follows the naming convention amazon-sagemaker-<account-ID>-<region>-<project-ID>, and shared beneath it is the shared folder.
At this point, the transforms folder did not yet exist.
% aws s3 ls s3://amazon-sagemaker-123456789012-ap-northeast-1-c778yzrdr7zy55/shared/ --recursive
2026-05-25 02:49:28          0 shared/
2026-05-25 02:49:28        424 shared/.libs.json
Step 2. Create the JSON Config File
The files to be created are placed together in a local transforms directory. In Step 4, this entire directory will be uploaded.
% mkdir transforms
The subject will be PII masking. I defined a transform that masks a specified column, with one required parameter and two optional parameters.
Save as transforms/mask_pii_column.json.
{
  "name": "mask_pii_column",
  "displayName": "Mask PII Column (Custom)",
  "description": "Masks the values of the specified column. Optionally keeps the last N characters visible.",
  "functionName": "mask_pii_column",
  "parameters": [
    {
      "name": "colName",
      "displayName": "Column name",
      "type": "str",
      "description": "Name of the column that holds the value to mask"
    },
    {
      "name": "maskChar",
      "displayName": "Mask character",
      "type": "str",
      "isOptional": true,
      "description": "Character used for masking. Defaults to *"
    },
    {
      "name": "keepLastN",
      "displayName": "Keep last N characters",
      "type": "int",
      "isOptional": true,
      "description": "Number of trailing characters to keep visible. Defaults to 0"
    }
  ]
}
The fields that can be specified are as follows.
| Field | Required | Description |
|---|---|---|
name |
Required | System name of the transform. Must follow Python naming conventions |
displayName |
Optional | Display name in the Visual ETL editor. If omitted, name is used |
description |
Optional | Description displayed in Visual ETL. Used as search target |
functionName |
Required | Name of the Python function to call |
parameters |
Optional | Array of parameter objects |
Each object in parameters can specify name (required), displayName, type (required: str / int / float / list / bool), isOptional, and description.
Step 3. Create the Python Implementation File
Create a Python file with the same base name as the JSON file. The function name must match functionName.
Save as transforms/mask_pii_column.py.
from pyspark.sql import functions as F

def mask_pii_column(self, colName, maskChar="*", keepLastN=0):
    """Masks the values of the specified column. If keepLastN is specified, only the last N characters are kept visible.

    When Visual ETL runs with an isOptional parameter left empty, it does not omit the argument
    but explicitly passes an empty string. Therefore, the default argument in the function definition is not applied.
    The first 2 lines replace the value with the default.
    """
    maskChar = maskChar or "*"
    keepLastN = int(keepLastN or 0)

    masked_head = F.regexp_replace(
        F.expr(f"left(`{colName}`, greatest(length(`{colName}`) - {keepLastN}, 0))"),
        ".",
        maskChar,
    )
    tail = F.expr(f"right(`{colName}`, {keepLastN})")
    return self.withColumn(colName, F.concat(masked_head, tail))
At this point, the local structure is as follows. We have prepared the JSON configuration file and Python implementation file needed to add our own transform to the transform library.
transforms/
├── mask_pii_column.json
└── mask_pii_column.py
Step 4. Upload to the transforms Folder
Upload the two created files to the transforms folder under the shared folder. If the transforms folder does not exist, it will be created automatically during upload.
% aws s3 cp transforms/ \
    s3://amazon-sagemaker-123456789012-ap-northeast-1-c778yzrdr7zy55/shared/transforms/ \
    --recursive \
    --exclude "*" --include "*.json" --include "*.py" \
    --region ap-northeast-1
upload: transforms/mask_pii_column.json to s3://amazon-sagemaker-123456789012-ap-northeast-1-c778yzrdr7zy55/shared/transforms/mask_pii_column.json
upload: transforms/mask_pii_column.py to s3://amazon-sagemaker-123456789012-ap-northeast-1-c778yzrdr7zy55/shared/transforms/mask_pii_column.py
Step 5. Prepare Sample Data
Create a CSV file containing phone numbers for operation verification.
customer_id,customer_name,phone_number,email
1001,Taro Yamada,090-1234-5678,taro.yamada@example.com
1002,Hanako Suzuki,080-9876-5432,hanako.suzuki@example.com
1003,Jiro Sato,070-1111-2222,jiro.sato@example.com
1004,Yuki Tanaka,090-3333-4444,yuki.tanaka@example.com
1005,Kenji Ito,080-5555-6666,kenji.ito@example.com
1006,Aoi Watanabe,070-7777-8888,aoi.watanabe@example.com
1007,Sora Nakamura,090-2468-1357,sora.nakamura@example.com
1008,Rin Kobayashi,080-1357-2468,rin.kobayashi@example.com
Upload it to the shared folder.
% aws s3 cp sample-data/customers.csv \
    s3://amazon-sagemaker-123456789012-ap-northeast-1-c778yzrdr7zy55/shared/sample-data/customers.csv \
    --region ap-northeast-1
upload: sample-data/customers.csv to s3://amazon-sagemaker-123456789012-ap-northeast-1-c778yzrdr7zy55/shared/sample-data/customers.csv
Step 6. Add a Data Source
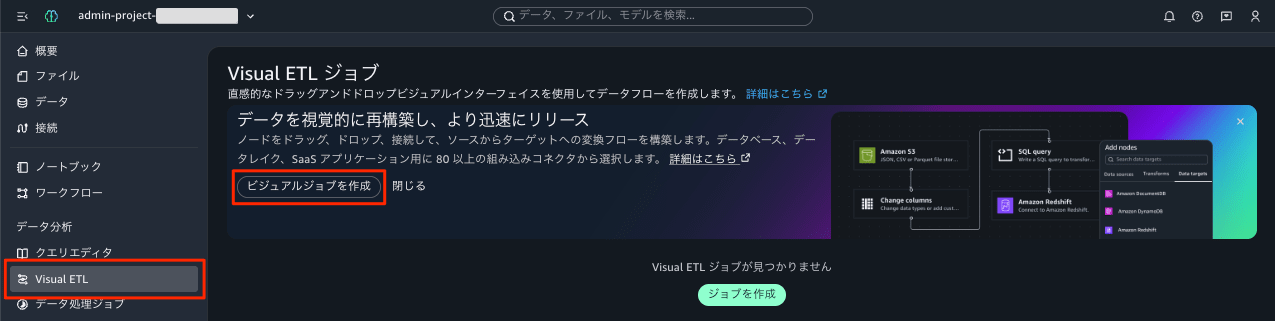
Sign in to the Amazon SageMaker Unified Studio portal, open Visual ETL from the left menu, and select Create job.
First, place the data source. Open the Add nodes menu from the Add (+) icon, and select Amazon S3 in the Data sources tab.
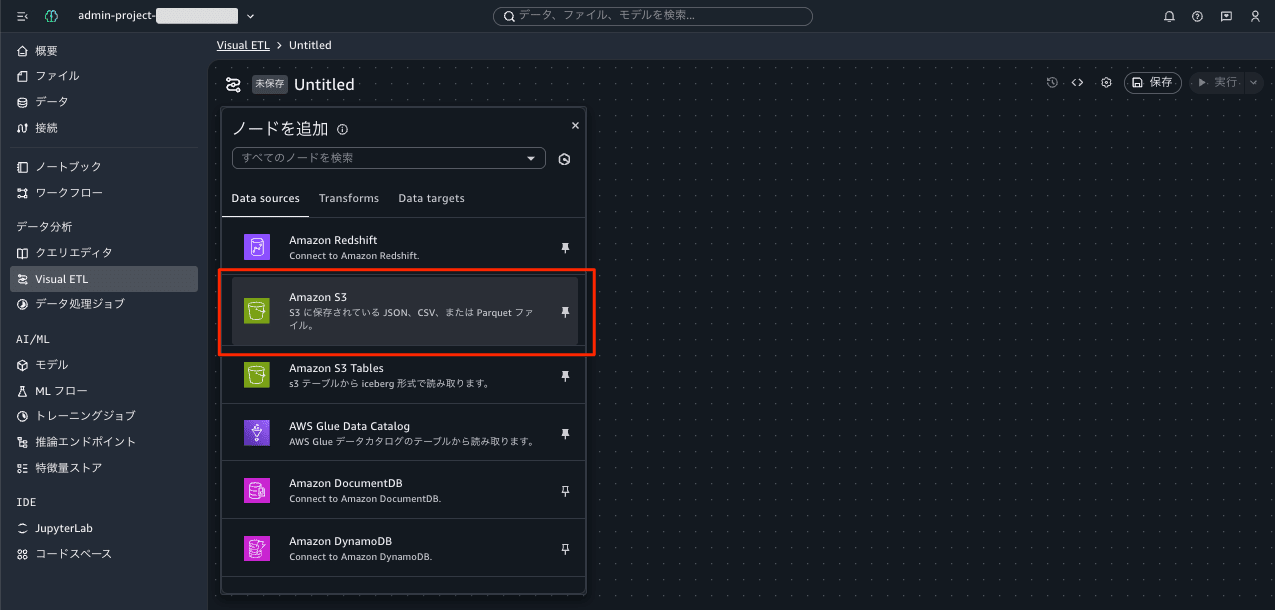
You can also place the transform first, but since a transform node requires a parent node as its source, placing it alone will cause an error in the data preview. It is smoother to start with the data source.
Select the placed node and enter the path of the CSV uploaded in Step 5 (s3://amazon-sagemaker-123456789012-ap-northeast-1-c778yzrdr7zy55/shared/sample-data/customers.csv) in S3 URI. After a moment, the contents appeared in the data preview.
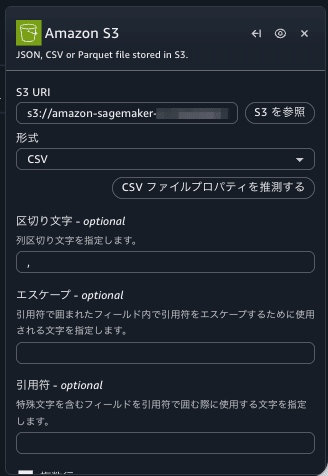
The header row is recognized as column names, and customer_id is inferred as LONG type.
Step 7. Add a Transform
When you select the placed Amazon S3 node, a ⊕ icon appears on the right side of the node. Clicking this opens a menu to choose a node to add downstream.
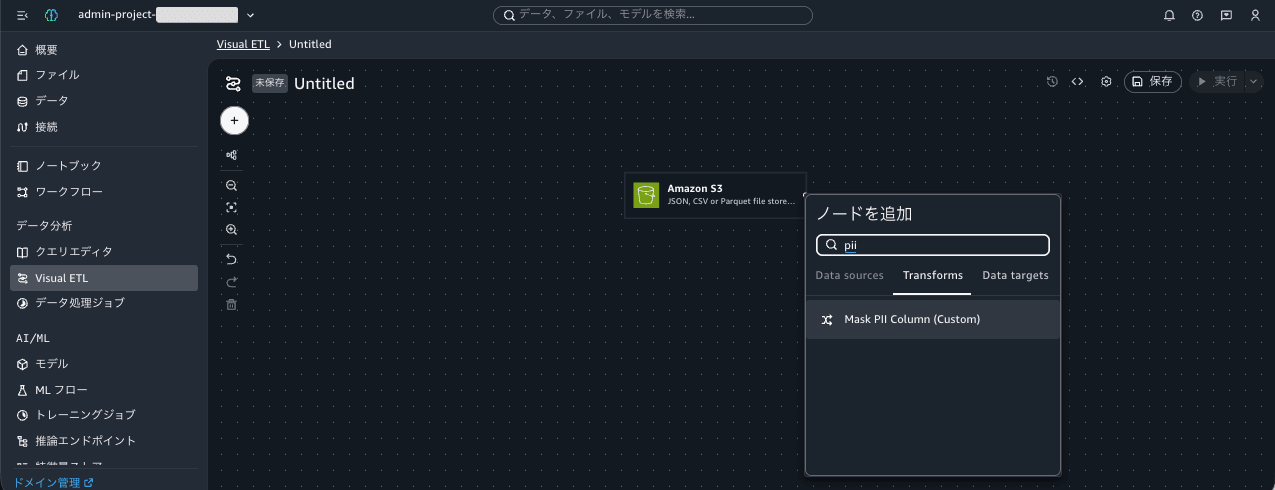
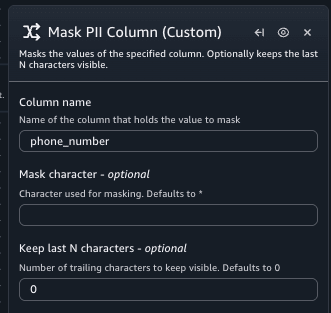
The menu opens with the Transforms tab selected. Among the built-in transforms such as Add current timestamp and Aggregate, my custom transforms were listed. Entering pii shows only Mask PII Column (Custom). No special operation is required after uploading; it is reflected as soon as Visual ETL is opened.
Specify the column name to mask: phone_number.
Step 8. Add a Data Target
First, place the data target. Open the Add nodes menu from the Add (+) icon, and select Amazon S3 in the Data sources tab.
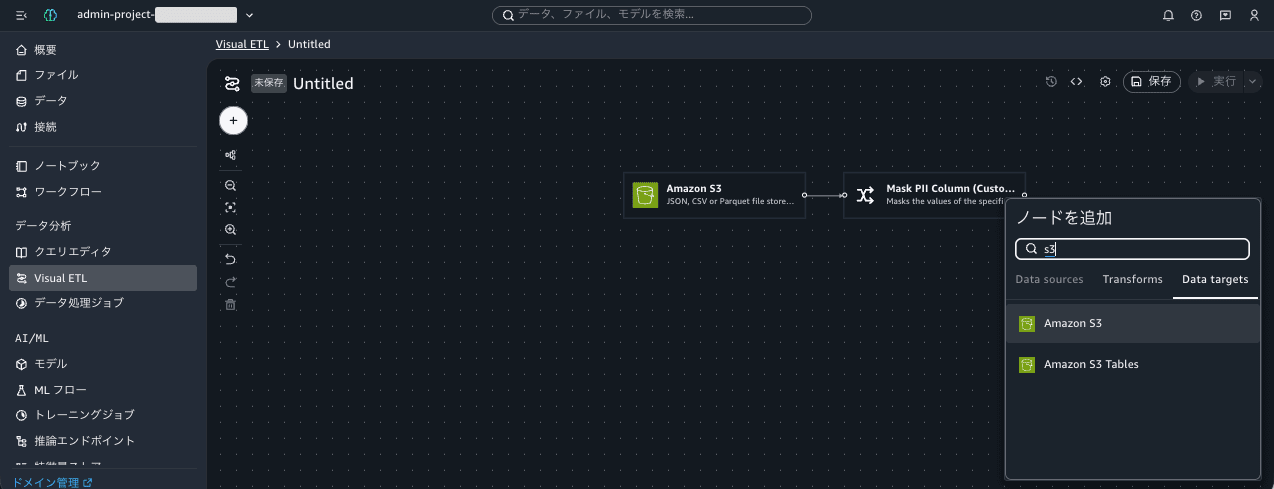
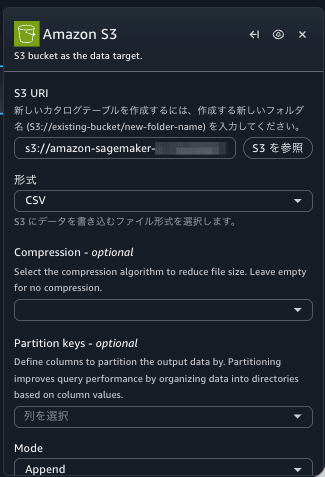
Select the placed node and enter the CSV output path (s3://amazon-sagemaker-517444948157-ap-northeast-1-c778yzrdr7zy55/shared/output/masked-customers/) in S3 URI.
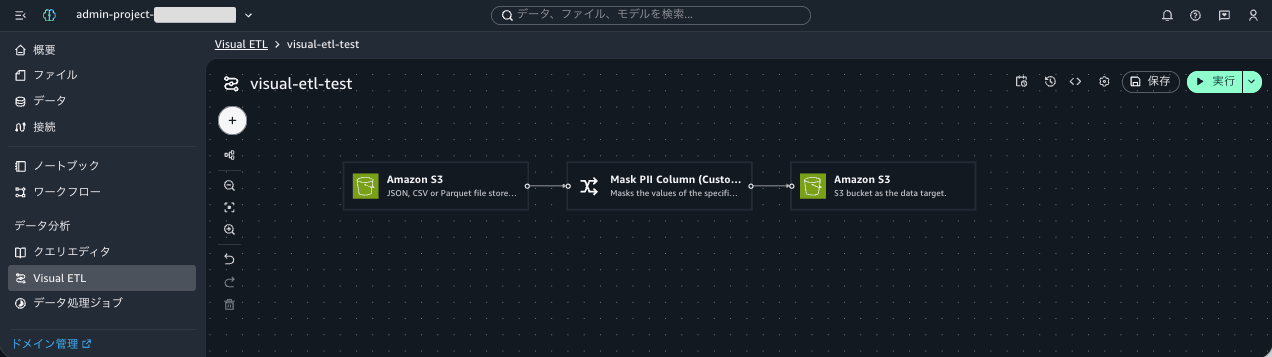
The final flow looks like this.
Step 9. Check the Generated Script
In Visual ETL, a Python script for execution is generated from the assembled flow. Click the [Save] button in the upper right of the screen. The following is an excerpt from the generated script related to the custom transform.
import sys
from pyspark.context import SparkContext
from pyspark.sql import SparkSession
from mask_pii_column import mask_pii_column
from pyspark.sql.dataframe import DataFrame
import pyspark.sql.functions as F

sc = SparkContext.getOrCreate()
spark = SparkSession.builder.getOrCreate()

# Script generated for node S3DataSource
S3DataSource_1785076328528 = spark.read.format("csv") \
    .option("inferschema", "true") \
    .option("multiLine", "true") \
    .option("header", "true") \
    .option("recursiveFileLookup", "false") \
    .option("sep", ",") \
    .load("s3://amazon-sagemaker-123456789012-ap-northeast-1-c778yzrdr7zy55/shared/sample-data/customers.csv")

def is_blank_df(df):
    # Indicates if the DataFrame has no schema and no rows.
    return not df.schema.fieldNames() and not df.take(1)
def enrich_df(name, function):
    def transform_df(self, *args, **kwargs):
        if is_blank_df(self):
            return self  # No data to transform, return as is
        return function(self, *args, **kwargs)
    setattr(DataFrame, name, transform_df)
# Script generated for node CustomTransformTransform
enrich_df('mask_pii_column', mask_pii_column)
params_mask_pii_column = {"colName": "phone_number", "maskChar": "", "keepLastN": 0}
CustomTransformTransform_1785076404196 = S3DataSource_1785076328528.mask_pii_column(**params_mask_pii_column)

# Script generated for node S3DataSink
CustomTransformTransform_1785076404196.write.format("csv") \
    .option("header", True) \
    .mode("append") \
    .save("s3://amazon-sagemaker-123456789012-ap-northeast-1-c778yzrdr7zy55/shared/output/masked-customers/")
Step 10. Run the Job and Verify the Results
Click the [Run job] button in the upper right of the screen to run the job.
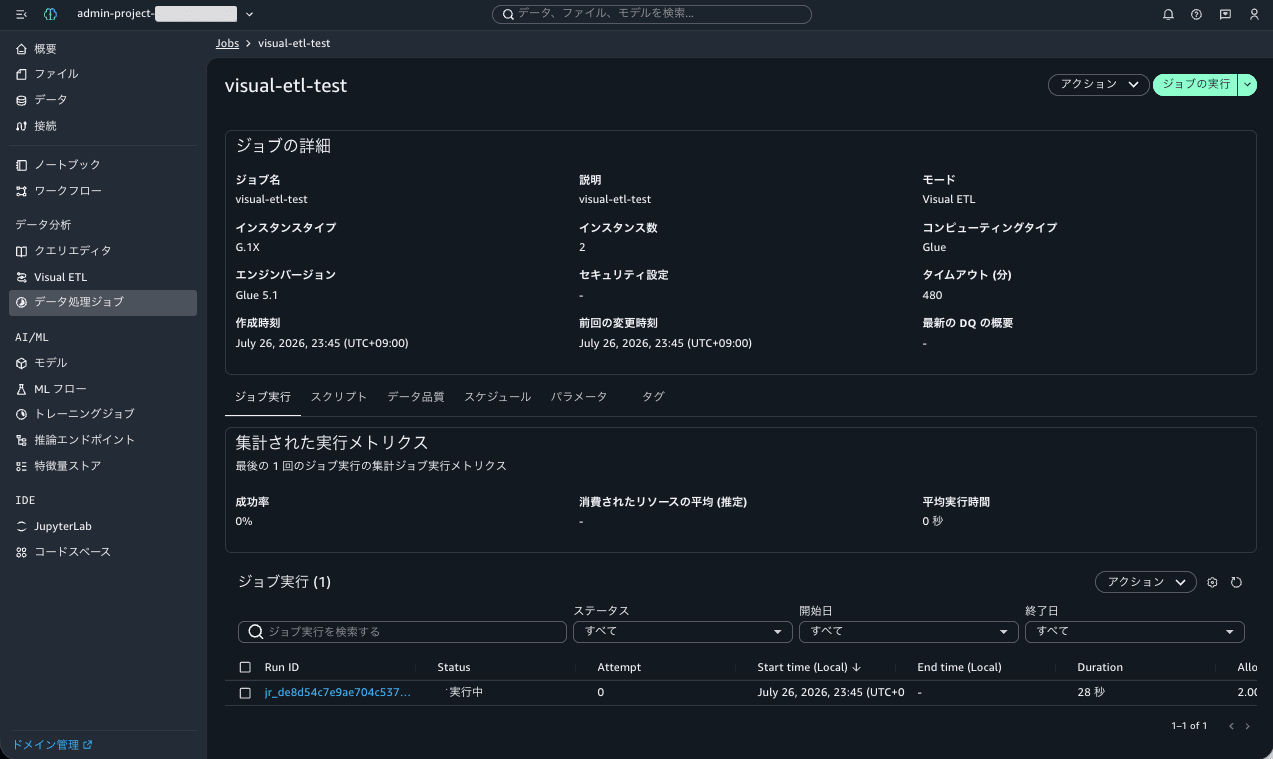
The job succeeded. Let's look at the output data.
% aws s3 cp s3://amazon-sagemaker-123456789012-ap-northeast-1-c778yzrdr7zy55/shared/output/masked-customers-fixed/part-00000-xxxxxxxx-c000.csv - \
    --region ap-northeast-1
customer_id,customer_name,phone_number,email
1001,Taro Yamada,*********5678,taro.yamada@example.com
1002,Hanako Suzuki,*********5432,hanako.suzuki@example.com
1003,Jiro Sato,*********2222,jiro.sato@example.com
1004,Yuki Tanaka,*********4444,yuki.tanaka@example.com
1005,Kenji Ito,*********6666,kenji.ito@example.com
1006,Aoi Watanabe,*********8888,aoi.watanabe@example.com
1007,Sora Nakamura,*********1357,sora.nakamura@example.com
1008,Rin Kobayashi,*********2468,rin.kobayashi@example.com
The phone numbers were masked, with only the last 4 digits remaining. The custom transform I created is working as expected. The fact that masking was done with * even though Mask character was left blank is proof that the guard in Step 3 worked.
Closing
Custom visual transforms can now be created, shared, and reused in the Visual ETL of Amazon SageMaker Unified Studio. Simply placing the JSON config file and Python implementation file in the transforms folder of the project's Amazon S3 shared folder is all it takes for your custom nodes to appear in the Visual ETL transform library. No special deployment operation was required.
This enables a division of labor where a data engineer who can write Python implements the transformation logic, and members who build ETL flows through the GUI simply select it as a node. The more the process is prone to implementation inconsistencies that have downstream impact — such as PII masking or data quality checks — the more effective this feature becomes.
Alternative approaches for achieving similar processing include the built-in Custom code node in Visual ETL and implementation in notebooks. However, since those confine the implementation within each individual job, custom visual transforms are considered more suitable for logic that an organization wants to standardize.
Why not start by picking one transformation process that you've implemented repeatedly across existing ETL jobs and placing it in the transforms folder? I hope this article is helpful to someone.