![[Update] I tried out the new feature that allows automatic delivery of Amazon Redshift system tables to Amazon S3 Tables](https://images.ctfassets.net/ct0aopd36mqt/wp-thumbnail-63f1274931b942e9a92e601c1127ad73/cfe87ec6d62fa2fc3c474ed4cb2f6c2e/amazon-redshift?w=3840&fm=webp)
[Update] I tried out the new feature that allows automatic delivery of Amazon Redshift system tables to Amazon S3 Tables

This page has been translated by machine translation. View original
This is Ishikawa from the Cloud Business Division. "System table integration with S3 Tables," which enables long-term retention of Amazon Redshift and Amazon Redshift Serverless system tables in Amazon S3 Tables, has become available, so I tried it out with Amazon Redshift Serverless.
The other day, the API update came out first, so I had been proceeding with API verification. I considered changing the approach later to introduce setup via the Management Console, but since I believe understanding the internal mechanisms is essential for production operations, I will explain primarily using the AWS CLI.
What Are Amazon Redshift System Tables
Amazon Redshift exposes operational information such as query execution history, connection history, and automatic optimization results through monitoring views called SYS_*. Available for both provisioned clusters and Amazon Redshift Serverless, they serve as the starting point for performance analysis and troubleshooting.
However, this data is only retained within the data warehouse for 7 days. For analysis over longer periods, it was previously necessary to build a separate custom mechanism using UNLOAD or similar approaches to archive the data.
What's New in This Update
With this update, Amazon Redshift can now automatically deliver data from selected SYS_* system tables to Amazon S3 Tables.
The main changes are as follows:
- A new log destination type called
s3tablehas been added to existing logging-related APIs - When enabled, Amazon Redshift automatically creates an S3 table bucket named
aws-redshiftin your account - The creation of the S3 table bucket, namespace, and tables; schema definition and evolution; writing in Apache Iceberg format; compaction; and snapshot management are all handled by AWS (service-managed)
- There is no infrastructure to build or maintain, and there is no impact on existing workloads
- Data is delivered in batches at regular intervals, and each record is delivered exactly once (exactly-once)
- Only records that have reached a final state are delivered (queries in progress are not delivered until they reach a final state such as completed, aborted, or cancelled)
- Delivered data is immutable and cannot be modified or deleted via Amazon Redshift
The official documentation lists the following as expected use cases:
- Meeting compliance and audit requirements: Retain query history, connection history, and change history for months to years
- Centralized fleet-wide monitoring: Aggregate monitoring data from multiple data warehouses in the same account and region for cross-warehouse analysis
- Eliminating custom ETL pipelines: Stop building and maintaining jobs that export system tables to S3 for long-term retention
- Investigating past incidents: Use historical data beyond the 7-day window for root cause analysis, post-incident reviews, and workload trend analysis
Supported System Tables
The following 28 SYS_* monitoring views can be selected as delivery targets:
SYS_ANALYZE_COMPRESSION_HISTORY / SYS_ANALYZE_HISTORY / SYS_AUTOMATIC_OPTIMIZATION / SYS_AUTO_TABLE_OPTIMIZATION / SYS_CHILD_QUERY_TEXT / SYS_CONNECTION_LOG / SYS_COPY_JOB_INFO / SYS_COPY_REPLACEMENTS / SYS_DATASHARE_CHANGE_LOG / SYS_DATASHARE_USAGE_CONSUMER / SYS_DATASHARE_USAGE_PRODUCER / SYS_DATASHARE_WRITE_HISTORY / SYS_EXTERNAL_QUERY_ERROR / SYS_INTEGRATION_ACTIVITY / SYS_MV_STATE / SYS_PROCEDURE_MESSAGES / SYS_QUERY_DETAIL / SYS_QUERY_EXPLAIN / SYS_QUERY_HISTORY / SYS_QUERY_TEXT / SYS_SCHEMA_QUOTA_VIOLATIONS / SYS_SESSION_HISTORY / SYS_SPATIAL_SIMPLIFY / SYS_STREAM_SCAN_ERRORS / SYS_STREAM_SCAN_STATES / SYS_UNLOAD_DETAIL / SYS_USERLOG / SYS_VACUUM_HISTORY
You can select them individually, or choose "all supported system tables." If you select all, any views added in the future will automatically be included without any configuration changes.
Note that SYS_CHILD_QUERY_TEXT, SYS_COPY_REPLACEMENTS, SYS_EXTERNAL_QUERY_ERROR, SYS_PROCEDURE_MESSAGES, SYS_QUERY_DETAIL, SYS_QUERY_EXPLAIN, SYS_SPATIAL_SIMPLIFY, and SYS_UNLOAD_DETAIL — 8 tables in total — require patch P203 or later. If enabled on a data warehouse running an earlier patch, the tables will be created with the correct schema, but no data will be populated until the warehouse is updated to P203 or later.
Metadata Columns Added
In addition to all columns from the original SYS_* view, each S3 table has 5 metadata columns added to identify the origin and delivery timing of each row.
| Column Name | Type | Description |
|---|---|---|
warehouse_account_id |
string | The AWS account that owns the original data warehouse |
warehouse_region_name |
string | The AWS region where the original data warehouse operates |
warehouse_namespace_arn |
string | The namespace ARN of the original data warehouse. A unique identifier that remains stable across renames and recreations |
warehouse_name |
string | The name of the original data warehouse (cluster name or workgroup name) |
s3_tables_ingestion_time |
timestamp(6), UTC | The time Amazon Redshift committed the row to S3 Tables. This is the delivery time, not the event occurrence time |
Two Deployment Models
You can choose from 2 patterns for the delivery destination configuration. A single data warehouse can only use one of them at a time.
| Deployment Model | Description |
|---|---|
| Per-warehouse | Writes to a dedicated set of S3 tables for each data warehouse. The S3 Tables namespace name contains a data warehouse-specific identifier, providing physical isolation |
| Consolidated | Writes data from multiple data warehouses in the same account and region to a shared set of S3 tables. The namespace name contains the AWS account number, and rows are distinguished by the warehouse_namespace_arn / warehouse_name columns |
Both are supported within a single AWS account and a single AWS region. If you want to analyze data across regions or accounts, you join the results of tables in each region and account at query time. You can use the AWS Glue Data Catalog sharing feature for cross-account access.
Supported Regions
Available for Amazon Redshift provisioned RA3/RG instances and Amazon Redshift Serverless, and provided in all AWS commercial regions where both Amazon Redshift and Amazon S3 Tables are supported.
Pricing Impact
Writing system table data to Amazon S3 Tables is free. The following two items are subject to charges:
- Standard Amazon S3 Tables storage and maintenance fees for retained data
- Charges for the query engine used to read data (according to each engine's pricing model)
How to Use
Required Permissions
The principal enabling, modifying, or disabling this feature needs the following permissions:
redshift:EnableLogging(provisioned cluster) orredshift-serverless:UpdateNamespace(Amazon Redshift Serverless)s3tables:CreateTableBuckets3tables:PutTableBucketEncryptions3tables:PutTableBucketPolicy
When enabling, Amazon Redshift creates and configures the S3 table bucket using the identity of the principal performing the operation. After the bucket is created, the creation of namespaces and tables is handled through the service trust relationship between Amazon Redshift and Amazon S3 Tables, so no additional permissions are required for the enabling principal.
Trying It Out
Prerequisites
- Region: ap-northeast-1 (Tokyo)
- AWS CLI 2.36.27 or later
- Amazon S3 Tables and AWS Glue Data Catalog integration enabled (once per account per region)
System Configuration
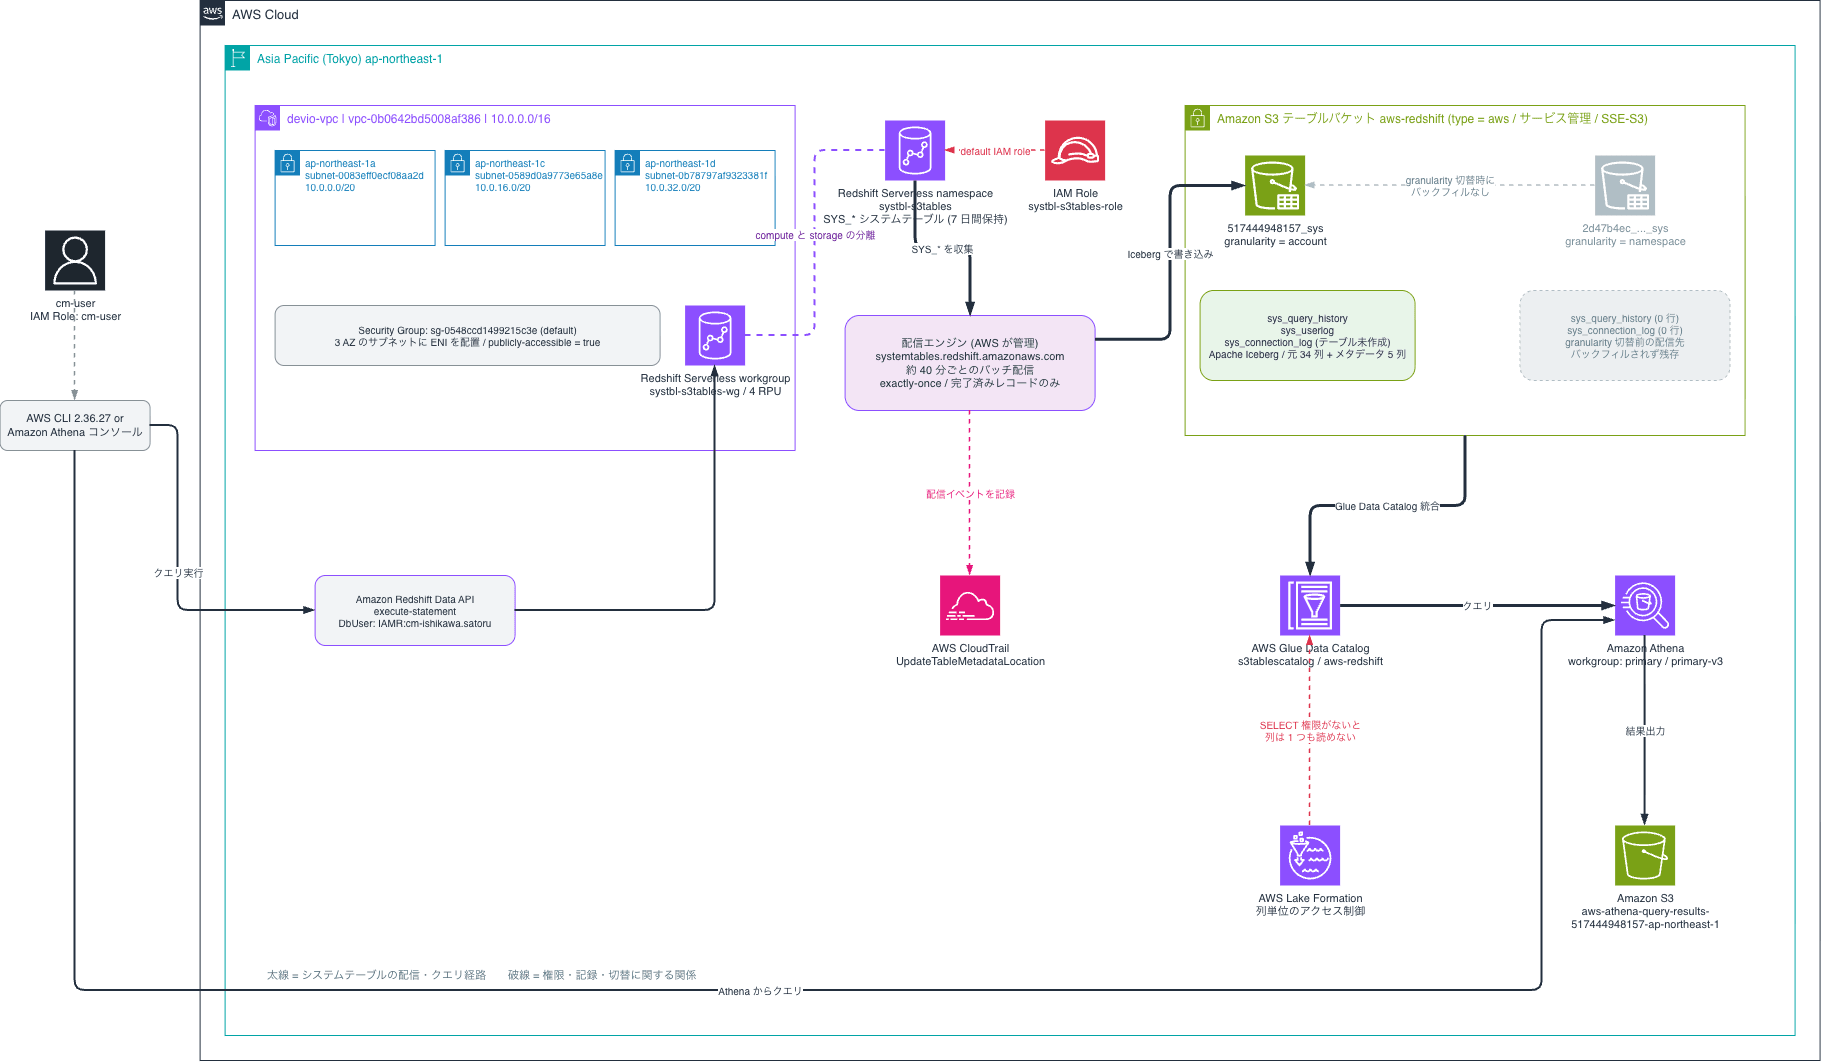
Creating a Namespace
First, create the Amazon Redshift Serverless namespace that will serve as the delivery source.
$ aws redshift-serverless create-namespace \
    --namespace-name systbl-s3tables \
    --db-name dev \
    --tags "key=owner,value=ishikawa-satoru" "key=purpose,value=feature-verification"
{
    "namespace": {
        "adminUsername": "admin",
        "creationDate": "2026-08-20T09:45:22.599000+00:00",
        "dbName": "dev",
        "iamRoles": [],
        "kmsKeyId": "AWS_OWNED_KMS_KEY",
        "lakehouseRegistrationStatus": "NOT_REGISTERED",
        "logExports": [],
        "namespaceArn": "arn:aws:redshift-serverless:ap-northeast-1:123456789012:namespace/2d47b4ec-cae8-4d74-bdf5-bb7f05149b3d",
        "namespaceId": "2d47b4ec-cae8-4d74-bdf5-bb7f05149b3d",
        "namespaceName": "systbl-s3tables",
        "status": "AVAILABLE"
    }
}
The response does not include s3TablePublishStatus. As documented, it is not returned for namespaces where S3 Tables delivery has never been configured.
Enabling the Feature
Enable with the correct parameters.
% aws redshift-serverless update-namespace \
    --namespace-name systbl-s3tables \
    --log-destination-type s3table \
    --s3-table-action Enable \
    --s3-table-granularity namespace \
    --s3-table-names sys_query_history sys_connection_log
{
    "namespace": {
        "adminUsername": "admin",
        "creationDate": "2026-08-20T09:45:22.599000+00:00",
        "dbName": "dev",
        "iamRoles": [],
        "kmsKeyId": "AWS_OWNED_KMS_KEY",
        "lakehouseRegistrationStatus": "NOT_REGISTERED",
        "logExports": [],
        "namespaceArn": "arn:aws:redshift-serverless:ap-northeast-1:123456789012:namespace/2d47b4ec-cae8-4d74-bdf5-bb7f05149b3d",
        "namespaceId": "2d47b4ec-cae8-4d74-bdf5-bb7f05149b3d",
        "namespaceName": "systbl-s3tables",
        "s3TablePublishStatus": {
            "enabledAll": false,
            "s3TableGranularity": "namespace",
            "s3TableNamespace": "2d47b4ec_cae8_4d74_bdf5_bb7f05149b3d_sys",
            "s3Tables": [
                "sys_connection_log",
                "sys_query_history"
            ]
        },
        "status": "MODIFYING"
    }
}
2d47b4ec_cae8_4d74_bdf5_bb7f05149b3d_sys was assigned as the s3TableNamespace. It is formatted by replacing the hyphens in the namespace ID with underscores and appending _sys.
After it returns to AVAILABLE, check the status with get-namespace.
% aws redshift-serverless get-namespace --namespace-name systbl-s3tables
{
    "namespace": {
        "adminUsername": "admin",
        "creationDate": "2026-08-20T09:45:22.599000+00:00",
        "dbName": "dev",
        "iamRoles": [],
        "kmsKeyId": "AWS_OWNED_KMS_KEY",
        "lakehouseRegistrationStatus": "NOT_REGISTERED",
        "logExports": [],
        "namespaceArn": "arn:aws:redshift-serverless:ap-northeast-1:123456789012:namespace/2d47b4ec-cae8-4d74-bdf5-bb7f05149b3d",
        "namespaceId": "2d47b4ec-cae8-4d74-bdf5-bb7f05149b3d",
        "namespaceName": "systbl-s3tables",
        "s3TablePublishStatus": {
            "enabledAll": false,
            "lastIngestionTimes": {},
            "s3TableGranularity": "namespace",
            "s3TableNamespace": "2d47b4ec_cae8_4d74_bdf5_bb7f05149b3d_sys",
            "s3Tables": [
                "sys_connection_log",
                "sys_query_history"
            ]
        },
        "status": "AVAILABLE"
    }
}
lastIngestionTimes is an empty map. No records have been delivered yet.
Checking in the Management Console
The settings configured via CLI can also be confirmed in the Management Console. A new menu called System table integrations has been added under Integrations in the Amazon Redshift Serverless navigation pane.
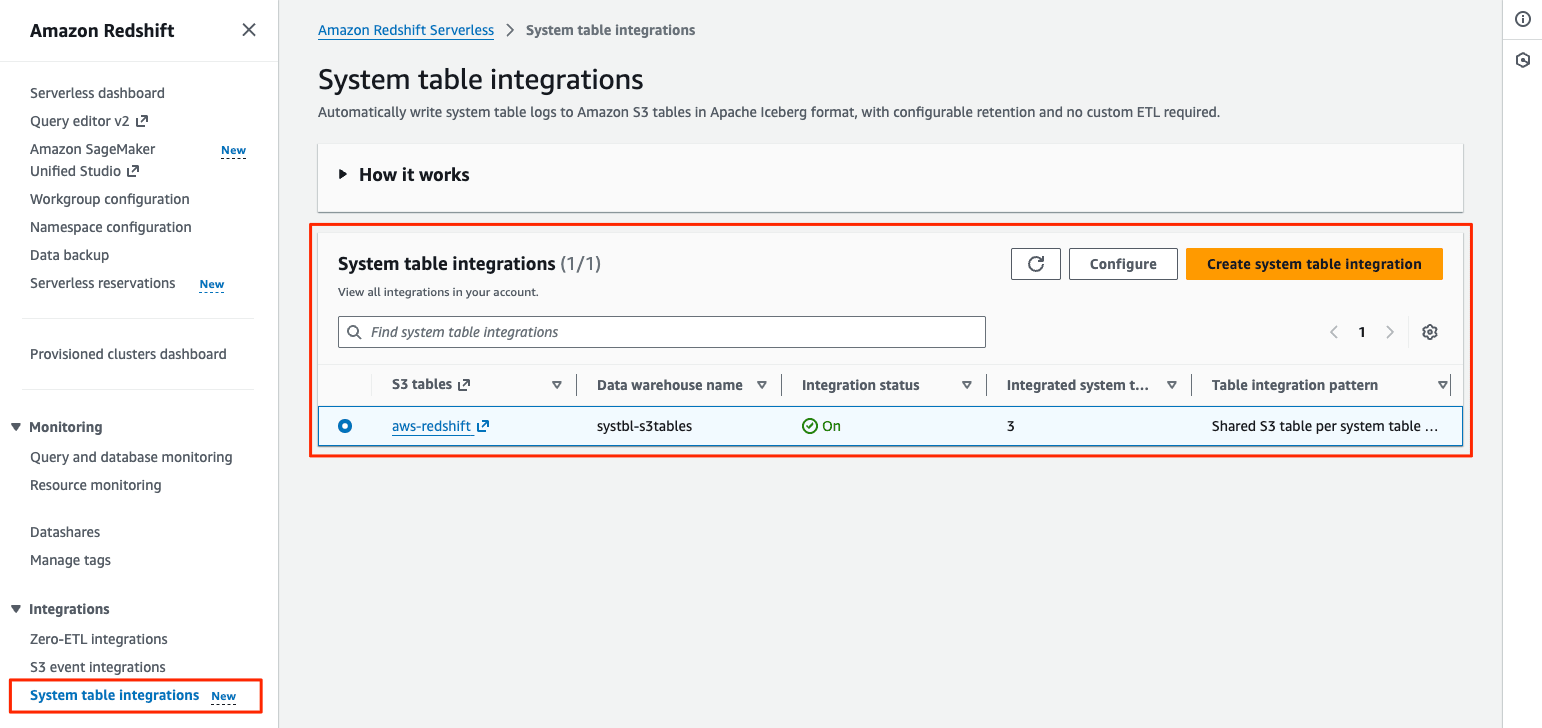
The list shows the destination S3 table bucket (aws-redshift), data warehouse name (systbl-s3tables), integration status, number of system tables being delivered, and the table integration pattern.
In the namespace detail screen, there is a System table integration section at the bottom of the Integrations tab.
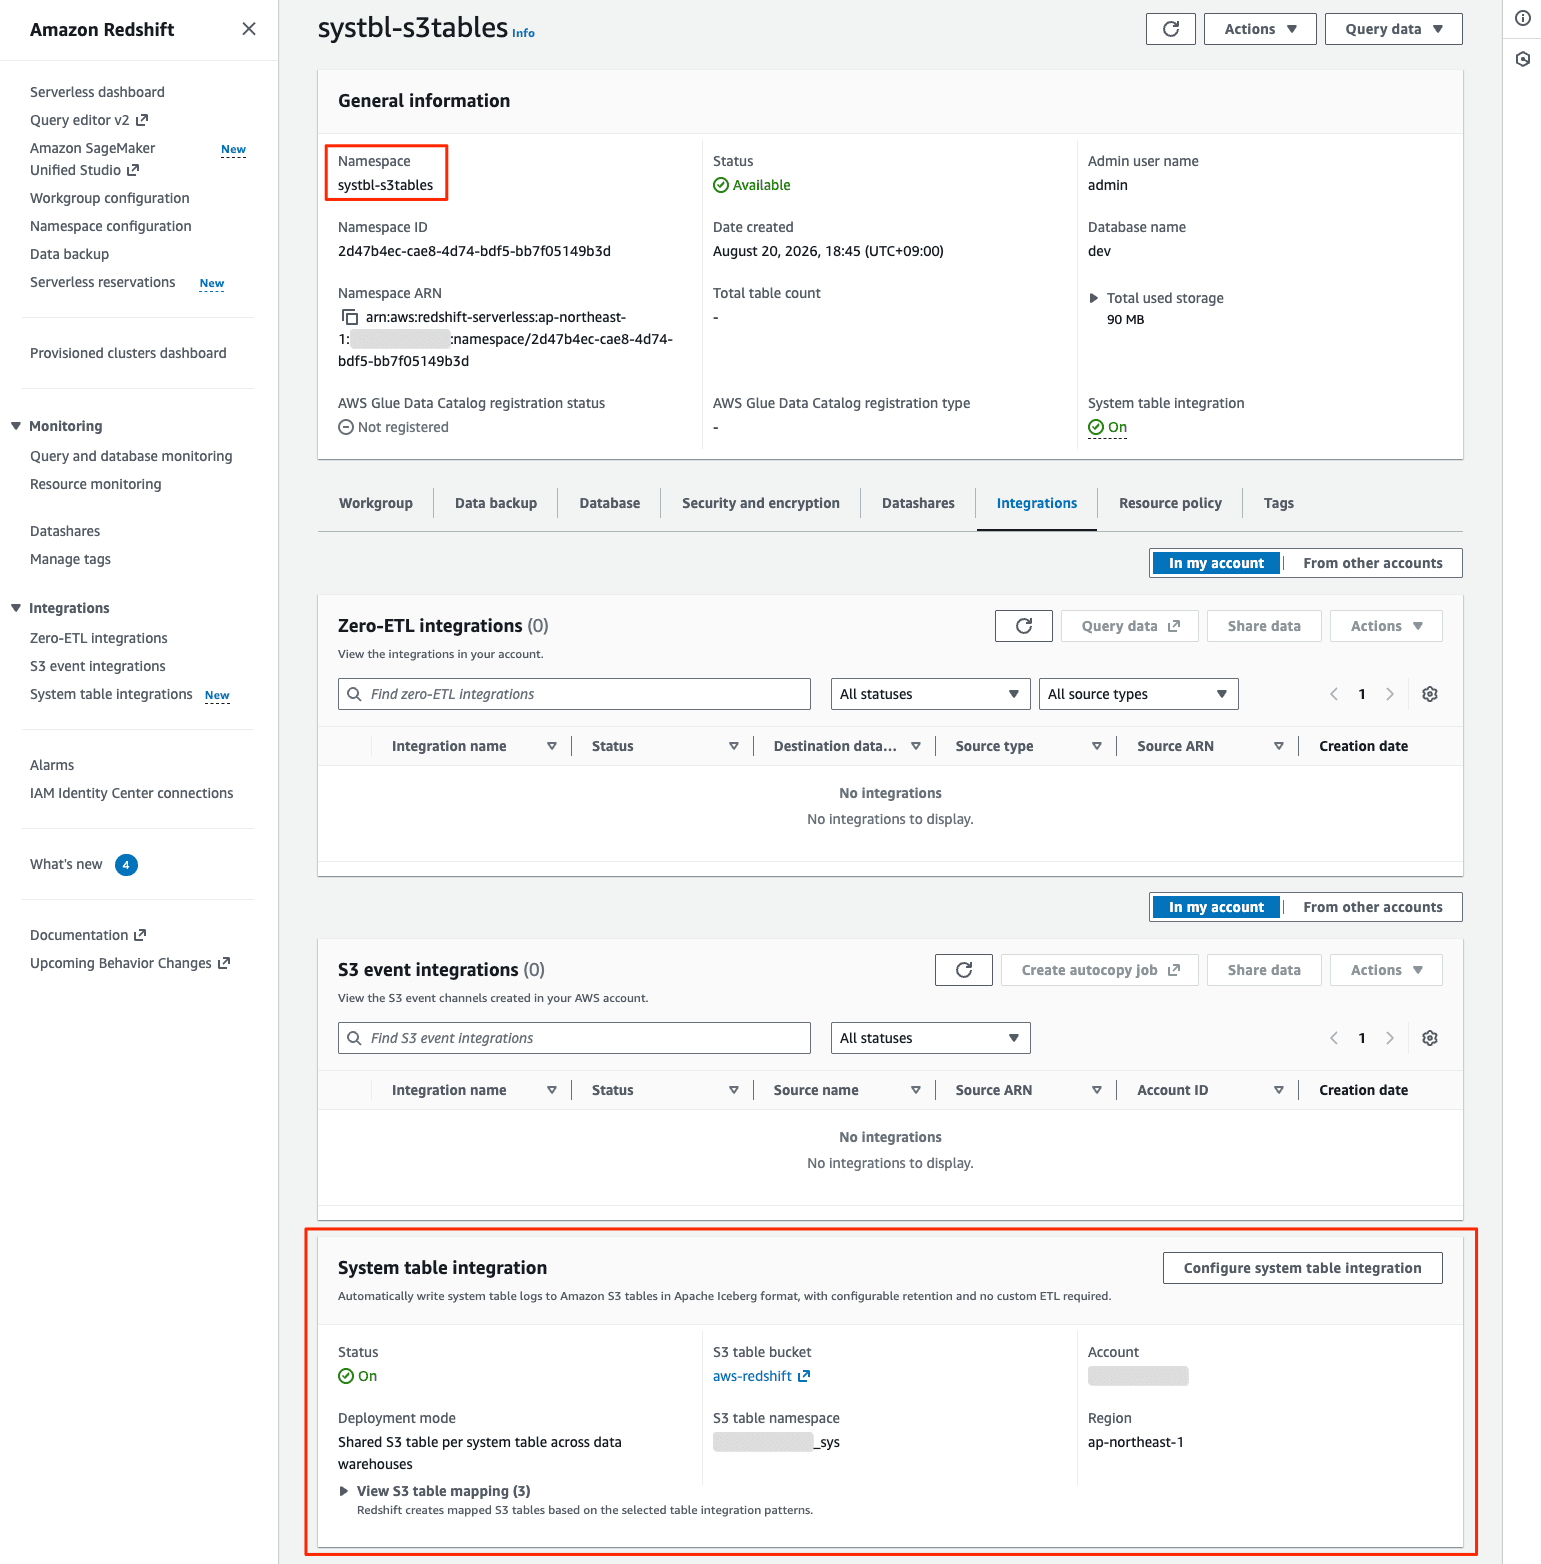
The consolidated model configured with --s3-table-granularity account is displayed in the console as Shared S3 table per system table across data warehouses. For namespace granularity, it shows Individual S3 table per system table per data warehouse. Expanding View S3 table mapping lets you see the mapping between each system table and its corresponding S3 table.
Checking What Was Created on the S3 Side
Now that we've enabled it, let's look at the S3 Tables side.
% aws s3tables list-table-buckets
{
    "tableBuckets": [
        {
            "arn": "arn:aws:s3tables:ap-northeast-1:123456789012:bucket/aws-redshift",
            "name": "aws-redshift",
            "ownerAccountId": "123456789012",
            "createdAt": "2026-08-20T09:45:52.783798+00:00",
            "tableBucketId": "10a5b3d4-07b2-4faa-bdf6-8f9d6831fb05",
            "type": "aws"
        },
        {
            "arn": "arn:aws:s3tables:ap-northeast-1:123456789012:bucket/aws-s3",
            "name": "aws-s3",
            "ownerAccountId": "123456789012",
            "createdAt": "2026-06-17T01:29:37.502295+00:00",
            "tableBucketId": "4898d078-d55c-49a4-9b03-a7097812d0e0",
            "type": "aws"
        },
        {
            "arn": "arn:aws:s3tables:ap-northeast-1:123456789012:bucket/variant-demo-911235df",
            "name": "variant-demo-911235df",
            "ownerAccountId": "123456789012",
            "createdAt": "2026-07-28T23:00:52.436774+00:00",
            "tableBucketId": "6b132cfc-74f5-495d-b1fd-a28037ecffb1",
            "type": "customer"
        }
    ]
}
Just 2 seconds after the enable command was submitted at 09:45:50, the aws-redshift bucket was automatically created at 09:45:52. The type is aws, which distinguishes it from the customer type buckets I created myself.
You can see the same thing from the Amazon S3 console under Table buckets.
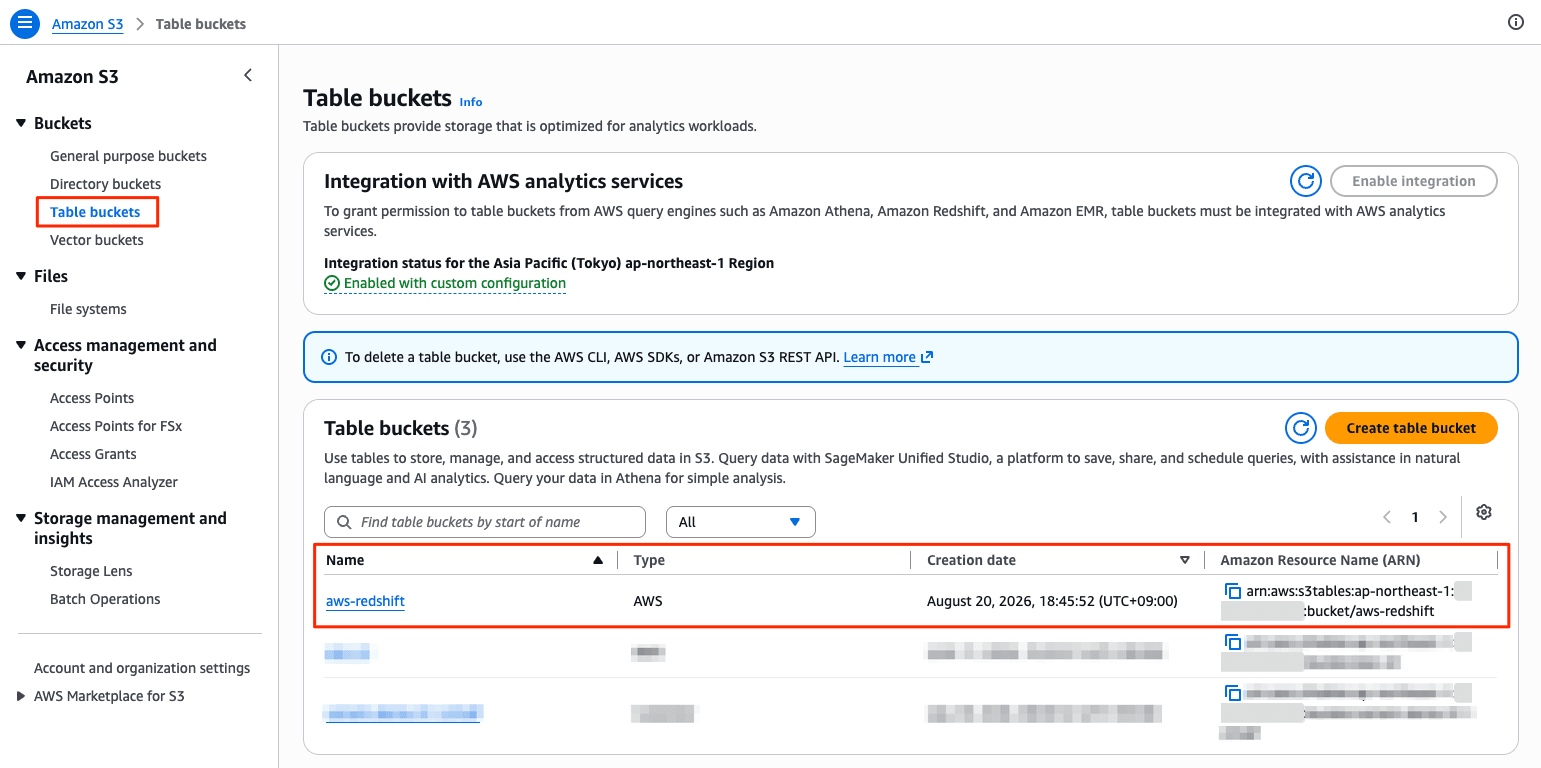
The bucket with AWS in the Type column is the service-managed bucket. The creation date of 18:45:52 (JST) confirms it was created the moment the feature was enabled.
Let's check the namespace.
% aws s3tables list-namespaces \
    --table-bucket-arn arn:aws:s3tables:ap-northeast-1:123456789012:bucket/aws-redshift
{
    "namespaces": [
        {
            "namespace": [
                "2d47b4ec_cae8_4d74_bdf5_bb7f05149b3d_sys"
            ],
            "createdAt": "2026-08-20T09:45:53.179659+00:00",
            "createdBy": "123456789012",
            "ownerAccountId": "123456789012",
            "namespaceId": "ee9d3b1a-3902-48b5-86d1-8111ef3498ec",
            "tableBucketId": "10a5b3d4-07b2-4faa-bdf6-8f9d6831fb05"
        }
    ]
}
Tables have also been created.
% aws s3tables list-tables \
    --table-bucket-arn arn:aws:s3tables:ap-northeast-1:123456789012:bucket/aws-redshift
{
    "tables": [
        {
            "namespace": [
                "2d47b4ec_cae8_4d74_bdf5_bb7f05149b3d_sys"
            ],
            "name": "sys_connection_log",
            "type": "aws",
            "tableARN": "arn:aws:s3tables:ap-northeast-1:123456789012:bucket/aws-redshift/table/cd5ec41a-ee1b-4191-9f66-54e689aa7b05",
            "createdAt": "2026-08-20T09:45:54.470424+00:00",
            "modifiedAt": "2026-08-20T09:45:54.675308+00:00",
            "managedByService": "redshift.amazonaws.com"
        },
        {
            "namespace": [
                "2d47b4ec_cae8_4d74_bdf5_bb7f05149b3d_sys"
            ],
            "name": "sys_query_history",
            "type": "aws",
            "tableARN": "arn:aws:s3tables:ap-northeast-1:123456789012:bucket/aws-redshift/table/a1c12246-54f9-4864-903d-faa9e5f4b9b6",
            "createdAt": "2026-08-20T09:45:53.693431+00:00",
            "modifiedAt": "2026-08-20T09:45:54.094134+00:00",
            "managedByService": "redshift.amazonaws.com"
        }
    ]
}
managedByService is redshift.amazonaws.com, indicating these are service-managed tables. Let's also look at the individual table details.
% aws s3tables get-table \
    --table-bucket-arn arn:aws:s3tables:ap-northeast-1:123456789012:bucket/aws-redshift \
    --namespace 2d47b4ec_cae8_4d74_bdf5_bb7f05149b3d_sys \
    --name sys_query_history
{
    "name": "sys_query_history",
    "type": "aws",
    "tableARN": "arn:aws:s3tables:ap-northeast-1:123456789012:bucket/aws-redshift/table/a1c12246-54f9-4864-903d-faa9e5f4b9b6",
    "namespace": [
        "2d47b4ec_cae8_4d74_bdf5_bb7f05149b3d_sys"
    ],
    "namespaceId": "ee9d3b1a-3902-48b5-86d1-8111ef3498ec",
    "versionToken": "479231881b03bc883f64",
    "metadataLocation": "s3://a1c12246-54f9-4864-49ajcub6nguupkns5wc7fj4xckn4wapn1b--table-s3/metadata/00000-cbe5ea3d-cc05-43b1-9a45-2dabe8b108c0.metadata.json",
    "warehouseLocation": "s3://a1c12246-54f9-4864-49ajcub6nguupkns5wc7fj4xckn4wapn1b--table-s3",
    "createdAt": "2026-08-20T09:45:53.693431+00:00",
    "createdBy": "123456789012",
    "managedByService": "redshift.amazonaws.com",
    "modifiedAt": "2026-08-20T09:45:54.094134+00:00",
    "ownerAccountId": "123456789012",
    "format": "ICEBERG",
    "tableBucketId": "10a5b3d4-07b2-4faa-bdf6-8f9d6831fb05"
}
The encryption setting was the default SSE-S3.
aws s3tables get-table-bucket-encryption \
    --table-bucket-arn arn:aws:s3tables:ap-northeast-1:123456789012:bucket/aws-redshift
{
    "encryptionConfiguration": {
        "sseAlgorithm": "AES256"
    }
}
A bucket policy was also automatically applied.
aws s3tables get-table-bucket-policy \
    --table-bucket-arn arn:aws:s3tables:ap-northeast-1:123456789012:bucket/aws-redshift
{
    "resourcePolicy": "{\"Version\":\"2012-10-17\",\"Id\":\"AWS System Tables Policy\",\"Statement\":[{\"Sid\":\"Default AWS System Tables Statement\",\"Effect\":\"Allow\",\"Principal\":{\"Service\":\"systemtables.redshift.amazonaws.com\"},\"Action\":\"s3tables:*\",\"Resource\":\"*\",\"Condition\":{\"StringEquals\":{\"aws:SourceAccount\":\"123456789012\"}}}]}"
}
Formatted for readability, you can see the service principal responsible for delivery is explicitly specified.
{
  "Version": "2012-10-17",
  "Id": "AWS System Tables Policy",
  "Statement": [
    {
      "Sid": "Default AWS System Tables Statement",
      "Effect": "Allow",
      "Principal": { "Service": "systemtables.redshift.amazonaws.com" },
      "Action": "s3tables:*",
      "Resource": "*",
      "Condition": { "StringEquals": { "aws:SourceAccount": "123456789012" } }
    }
  ]
}
Maintenance settings were also automatically configured. First, at the table level:
% aws s3tables get-table-maintenance-configuration \
    --table-bucket-arn arn:aws:s3tables:ap-northeast-1:123456789012:bucket/aws-redshift \
    --namespace 123456789012_sys \
    --name sys_query_history
{
    "tableARN": "arn:aws:s3tables:ap-northeast-1:123456789012:bucket/aws-redshift/table/c27c7524-ab3e-4237-b11f-e85fbf652666",
    "configuration": {
        "icebergCompaction": {
            "status": "enabled",
            "settings": {
                "icebergCompaction": {
                    "targetFileSizeMB": 512,
                    "strategy": "auto"
                }
            }
        },
        "icebergSnapshotManagement": {
            "status": "enabled",
            "settings": {
                "icebergSnapshotManagement": {
                    "minSnapshotsToKeep": 1,
                    "maxSnapshotAgeHours": 120
                }
            }
        }
    }
}
Let's also check the bucket-level settings.
% aws s3tables get-table-bucket-maintenance-configuration \
    --table-bucket-arn arn:aws:s3tables:ap-northeast-1:123456789012:bucket/aws-redshift
{
    "tableBucketARN": "arn:aws:s3tables:ap-northeast-1:123456789012:bucket/aws-redshift",
    "configuration": {
        "icebergUnreferencedFileRemoval": {
            "status": "enabled",
            "settings": {
                "icebergUnreferencedFileRemoval": {
                    "unreferencedDays": 3,
                    "nonCurrentDays": 10
                }
            }
        }
    }
}
Looking at CloudTrail, PutTableRecordExpirationConfiguration was called when the tables were created.
% aws cloudtrail lookup-events \
    --start-time 2026-08-20T09:45:00Z --end-time 2026-08-20T09:55:00Z \
    --lookup-attributes AttributeKey=EventName,AttributeValue=PutTableRecordExpirationConfiguration \
    --max-items 5
Extracting the key points from the events, the following 4 calls were recorded:
2026-08-20T09:51:30Z PutTableRecordExpirationConfiguration redshift-serverless.amazonaws.com
  requestParameters: {"tableArn": "arn:aws:s3tables:ap-northeast-1:123456789012:bucket/aws-redshift/table/39551070-3476-4a0c-9239-29e0dfa626a9"}

2026-08-20T09:50:13Z PutTableRecordExpirationConfiguration redshift-serverless.amazonaws.com
  requestParameters: {"tableArn": "arn:aws:s3tables:ap-northeast-1:123456789012:bucket/aws-redshift/table/c27c7524-ab3e-4237-b11f-e85fbf652666"}

2026-08-20T09:45:54Z PutTableRecordExpirationConfiguration redshift-serverless.amazonaws.com
  requestParameters: {"tableArn": "arn:aws:s3tables:ap-northeast-1:123456789012:bucket/aws-redshift/table/a1c12246-54f9-4864-903d-faa9e5f4b9b6"}

2026-08-20T09:45:54Z PutTableRecordExpirationConfiguration redshift-serverless.amazonaws.com
  requestParameters: {"tableArn": "arn:aws:s3tables:ap-northeast-1:123456789012:bucket/aws-redshift/table/cd5ec41a-ee1b-4191-9f66-54e689aa7b05"}
Now let's check what was actually configured.
% aws s3tables get-table-record-expiration-configuration \
    --table-arn arn:aws:s3tables:ap-northeast-1:123456789012:bucket/aws-redshift/table/c27c7524-ab3e-4237-b11f-e85fbf652666
{
    "configuration": {
        "status": "disabled"
    }
}
It was disabled. This is consistent with the documentation's statement that "data is retained indefinitely unless an expiration policy is configured."
Checking the Table Schema
We will check the schema of the destination table via AWS Glue Data Catalog.
$ aws glue get-table \
    --catalog-id "123456789012:s3tablescatalog/aws-redshift" \
    --database-name 123456789012_sys \
    --name sys_query_history \
    --query 'Table.StorageDescriptor.Columns[*].[Name,Type]' --output text
warehouse_account_id	string
warehouse_region_name	string
warehouse_name	string
warehouse_namespace_arn	string
s3_tables_ingestion_time	timestamp
user_id	int
query_id	bigint
query_label	string
transaction_id	bigint
session_id	int
database_name	string
query_type	string
status	string
result_cache_hit	boolean
start_time	timestamp
end_time	timestamp
elapsed_time	bigint
queue_time	bigint
execution_time	bigint
error_message	string
returned_rows	bigint
returned_bytes	bigint
query_text	string
redshift_version	string
usage_limit	string
compute_type	string
compile_time	bigint
planning_time	bigint
lock_wait_time	bigint
service_class_id	int
service_class_name	string
query_priority	string
short_query_accelerated	string
user_query_hash	string
generic_query_hash	string
query_hash_version	int
result_cache_query_id	bigint
username	string
result_offloaded	string
The 5 metadata columns described in the documentation were added as the first 5 columns of the table, before the columns of the original view. In the case of sys_query_history, this results in a total of 39 columns, including the original 34 columns.
We will also check the parameters as an Iceberg table.
% aws glue get-table \
    --catalog-id "123456789012:s3tablescatalog/aws-redshift" \
    --database-name 123456789012_sys \
    --name sys_query_history \
    --query '{TableType:Table.TableType, Parameters:Table.Parameters}'
{
    "TableType": "aws",
    "Parameters": {
        "createdBy": "123456789012",
        "s3TableArn": "arn:aws:s3tables:ap-northeast-1:123456789012:bucket/aws-redshift/table/a1c12246-54f9-4864-903d-faa9e5f4b9b6",
        "ownerAccountId": "123456789012",
        "metadata_location": "s3://a1c12246-54f9-4864-49ajcub6nguupkns5wc7fj4xckn4wapn1b--table-s3/metadata/00000-cbe5ea3d-cc05-43b1-9a45-2dabe8b108c0.metadata.json",
        "format": "ICEBERG",
        "warehouse_location": "s3://a1c12246-54f9-4864-49ajcub6nguupkns5wc7fj4xckn4wapn1b--table-s3",
        "client.region": "ap-northeast-1",
        "table_type": "ICEBERG"
    }
}
Creating a Workgroup and Running Queries
We will create a workgroup to generate the data to be delivered. We specified the minimum RPU value of 4.
% aws redshift-serverless create-workgroup \
    --workgroup-name systbl-s3tables-wg \
    --namespace-name systbl-s3tables \
    --base-capacity 4 \
    --publicly-accessible \
    --subnet-ids subnet-0083eff0ecf08aa2d subnet-0589d0a9773e65a8e subnet-0b78797af9323381f \
    --security-group-ids sg-0548ccd1499215c3e \
    --tags "key=owner,value=ishikawa-satoru" "key=purpose,value=feature-verification"
{
    "workgroup": {
        "workgroupName": "systbl-s3tables-wg",
        "workgroupArn": "arn:aws:redshift-serverless:ap-northeast-1:123456789012:workgroup/ae2746e7-763d-4bdd-86f5-6474082e4855",
        "workgroupId": "ae2746e7-763d-4bdd-86f5-6474082e4855",
        "namespaceName": "systbl-s3tables",
        "baseCapacity": 4,
        "maxCapacity": null,
        "status": "CREATING",
        "subnetIds": [
            "subnet-0b78797af9323381f",
            "subnet-0589d0a9773e65a8e",
            "subnet-0083eff0ecf08aa2d"
        ],
        "securityGroupIds": [
            "sg-0548ccd1499215c3e"
        ],
        "publiclyAccessible": true,
        "creationDate": "2026-08-20T09:46:45.848000+00:00",
        "port": null,
        "pricePerformanceTarget": {
            "status": "DISABLED"
        }
    }
}
The minimum value for base-capacity is 4 RPU. According to the documentation, you can specify 4 RPU, or 8 or more in multiples of 8 (8, 16, 24 ... 512).
It became AVAILABLE in about 2 and a half minutes.
% aws redshift-serverless get-workgroup --workgroup-name systbl-s3tables-wg \
    --query 'workgroup.{workgroupName:workgroupName,status:status,baseCapacity:baseCapacity,endpoint:endpoint.address}'
{
    "workgroupName": "systbl-s3tables-wg",
    "status": "AVAILABLE",
    "baseCapacity": 4,
    "endpoint": "systbl-s3tables-wg.123456789012.ap-northeast-1.redshift-serverless.amazonaws.com"
}
We will run a query with a comment via the Amazon Redshift Data API so it can be identified later.
% aws redshift-data execute-statement \
    --workgroup-name systbl-s3tables-wg --database dev \
    --sql "/* s3tables_probe_20260820_01 */ SELECT 1 AS probe_one"
{
    "Id": "284c5156-8b9b-4979-88d5-95c279151517",
    "CreatedAt": "2026-08-20T20:50:41.949000+09:00",
    "DbUser": "IAMR:cm-user",
    "Database": "dev",
    "WorkgroupName": "systbl-s3tables-wg"
}
% aws redshift-data describe-statement --id 284c5156-8b9b-4979-88d5-95c279151517
{
    "Id": "284c5156-8b9b-4979-88d5-95c279151517",
    "DbUser": "IAMR:cm-user",
    "Database": "dev",
    "Duration": 27183305,
    "Status": "FINISHED",
    "CreatedAt": "2026-08-20T20:50:41.949000+09:00",
    "UpdatedAt": "2026-08-20T20:50:42.648000+09:00",
    "RedshiftPid": 1073905765,
    "HasResultSet": true,
    "QueryString": "/* s3tables_doc_20260820 */ SELECT 1 AS probe_one",
    "ResultRows": 1,
    "ResultSize": 11,
    "RedshiftQueryId": 0,
    "WorkgroupName": "systbl-s3tables-wg",
    "ResultFormat": "json"
}
Using the same approach, we executed a total of 8 queries with sequential numbered comments. The SQL executed is as follows.
aws redshift-data execute-statement --workgroup-name systbl-s3tables-wg --database dev \
    --sql "/* s3tables_probe_20260820_01 */ SELECT 1 AS probe_one"
aws redshift-data execute-statement --workgroup-name systbl-s3tables-wg --database dev \
    --sql "/* s3tables_probe_20260820_02 */ SELECT current_user, current_database(), version()"
aws redshift-data execute-statement --workgroup-name systbl-s3tables-wg --database dev \
    --sql "/* s3tables_probe_20260820_03 */ SELECT count(*) AS n FROM pg_catalog.pg_class"
aws redshift-data execute-statement --workgroup-name systbl-s3tables-wg --database dev \
    --sql "/* s3tables_probe_20260820_04 */ SELECT generate_series AS n FROM generate_series(1,100)"
aws redshift-data execute-statement --workgroup-name systbl-s3tables-wg --database dev \
    --sql "/* s3tables_probe_20260820_05 */ SELECT count(*) FROM sys_query_history"
aws redshift-data execute-statement --workgroup-name systbl-s3tables-wg --database dev \
    --sql "/* s3tables_probe_20260820_06 */ SELECT count(*) FROM pg_catalog.pg_tables"
aws redshift-data execute-statement --workgroup-name systbl-s3tables-wg --database dev \
    --sql "/* s3tables_probe_20260820_07 */ SELECT count(*) FROM pg_catalog.pg_tables"
aws redshift-data execute-statement --workgroup-name systbl-s3tables-wg --database dev \
    --sql "/* s3tables_probe_20260820_08 */ SELECT count(*) FROM pg_catalog.pg_tables"
All of them showed a Status of FINISHED in describe-statement.
Checking the Delivery Status
The delivery status can be checked with get-namespace.
% aws redshift-serverless get-namespace --namespace-name systbl-s3tables \
    --query 'namespace.s3TablePublishStatus'
{
    "enabledAll": false,
    "lastIngestionTimes": {
        "sys_query_history": "2026-08-20T09:55:31Z",
        "sys_userlog": "2026-08-20T09:55:33Z"
    },
    "s3TableGranularity": "account",
    "s3TableNamespace": "123456789012_sys",
    "s3Tables": [
        "sys_connection_log",
        "sys_query_history",
        "sys_userlog"
    ]
}
There is one point to note when checking. When lastIngestionTimes is an empty map, extracting only that value with --query results in an empty string output.
% aws redshift-serverless get-namespace --namespace-name systbl-s3tables \
    --query 'namespace.s3TablePublishStatus.lastIngestionTimes' --output json
echo "(exit=$?)"
(exit=0)
Measuring the Delivery Interval
The documentation only states that data is "delivered in batches at a fixed frequency," and the specific interval is not disclosed. So we polled lastIngestionTimes and measured the actual cycle. The 3 detected batches were as follows.
1st: 2026-08-20T09:55:31Z
2nd: 2026-08-20T10:35:30Z (39 minutes 59 seconds after previous)
3rd: 2026-08-20T11:15:24Z (39 minutes 54 seconds after previous)
4th: 2026-08-20T11:55:28Z (40 minutes 04 seconds after previous)
Grouping by s3_tables_ingestion_time from Athena makes the batch boundaries more clearly visible.
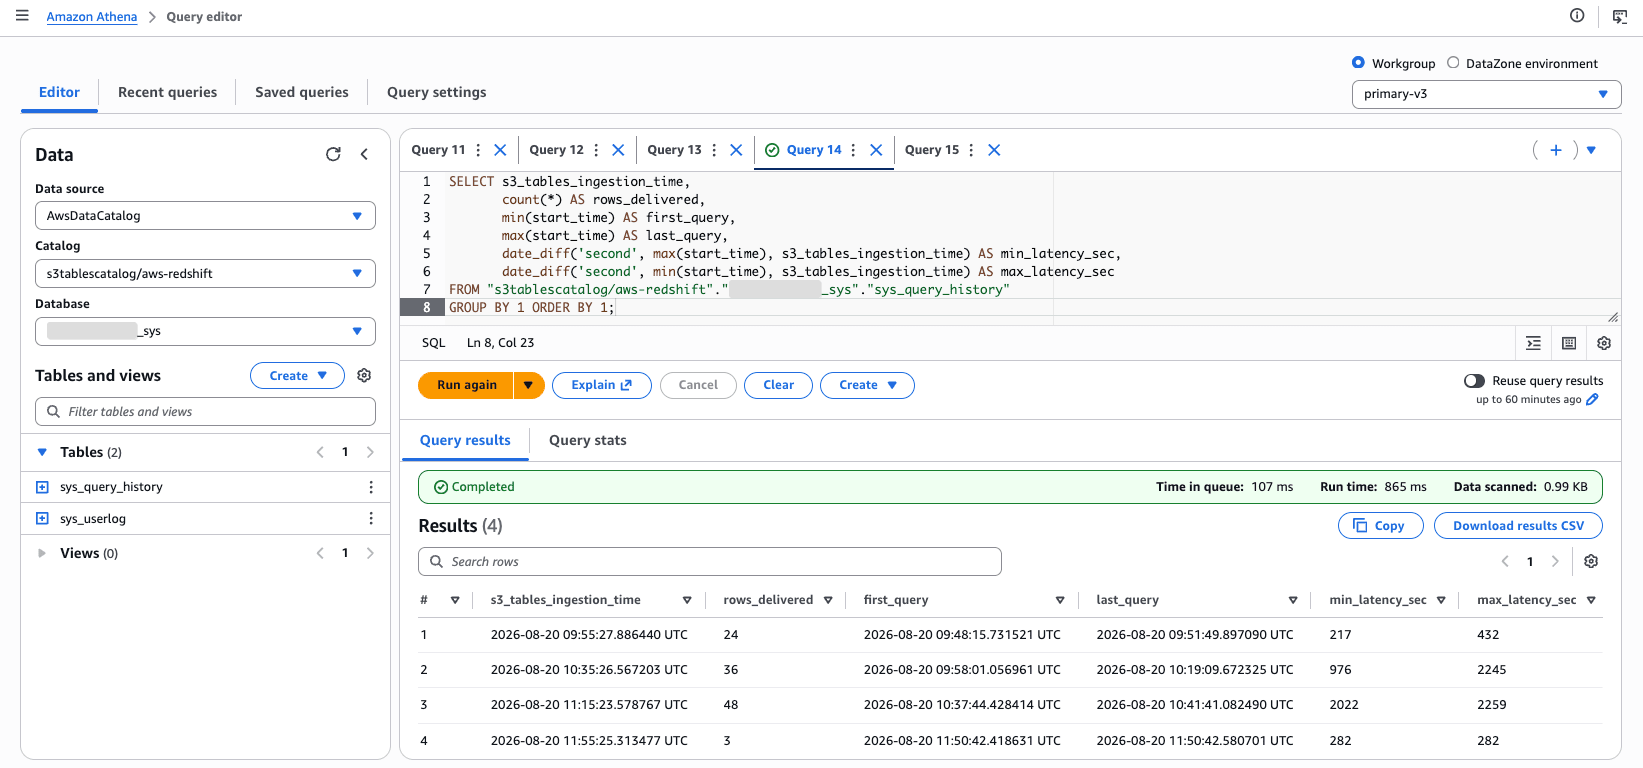
The intervals between delivery times were 39 minutes 58.7 seconds, 39 minutes 57.0 seconds, and 40 minutes 1.7 seconds. In this verification environment, delivery occurs approximately every 40 minutes.
The observed delivery latency ranged from a minimum of 217 seconds (3 minutes 37 seconds) to a maximum of 2259 seconds (37 minutes 39 seconds). Queries executed just before a batch are delivered quickly, while queries executed immediately after a batch will wait up to about 40 minutes until the next batch. Naturally, this is not suitable for real-time monitoring use cases.
Traces of the delivery were also found in CloudTrail.
% aws cloudtrail lookup-events \
    --start-time 2026-08-20T09:40:00Z --end-time 2026-08-20T10:35:00Z \
    --lookup-attributes AttributeKey=EventSource,AttributeValue=s3tables.amazonaws.com \
    --max-items 60
2026-08-20T09:50:12Z CreateNamespace                        | redshift-serverless.amazonaws.com
2026-08-20T09:50:12Z CreateTable                            | redshift-serverless.amazonaws.com
2026-08-20T09:50:12Z CreateTableBucket                      | redshift-serverless.amazonaws.com
2026-08-20T09:50:12Z GetTableMetadataLocation               | redshift-serverless.amazonaws.com
2026-08-20T09:50:12Z PutTableBucketPolicy                   | redshift-serverless.amazonaws.com
2026-08-20T09:50:13Z GetTableRecordExpirationConfiguration  | redshift-serverless.amazonaws.com
2026-08-20T09:50:13Z PutTableRecordExpirationConfiguration  | redshift-serverless.amazonaws.com
2026-08-20T09:50:13Z UpdateTableMetadataLocation            | redshift-serverless.amazonaws.com
2026-08-20T09:55:24Z GetTableMetadataLocation               | systemtables.redshift.amazonaws.com
2026-08-20T09:55:26Z GetTableMetadataLocation               | systemtables.redshift.amazonaws.com
2026-08-20T09:55:30Z GetTableMetadataLocation               | systemtables.redshift.amazonaws.com
2026-08-20T09:55:30Z GetTableMetadataLocation               | systemtables.redshift.amazonaws.com
2026-08-20T09:55:30Z UpdateTableMetadataLocation            | systemtables.redshift.amazonaws.com
2026-08-20T09:55:31Z GetTableMetadataLocation               | systemtables.redshift.amazonaws.com
2026-08-20T09:55:32Z GetTableMetadataLocation               | systemtables.redshift.amazonaws.com
2026-08-20T09:55:33Z GetTableMetadataLocation               | systemtables.redshift.amazonaws.com
2026-08-20T09:55:33Z GetTableMetadataLocation               | systemtables.redshift.amazonaws.com
2026-08-20T09:55:33Z UpdateTableMetadataLocation            | systemtables.redshift.amazonaws.com
When events are sorted by time, you can see that systemtables.redshift.amazonaws.com commits the Iceberg metadata exactly at the delivery time. When you want to determine whether a delivery has arrived, tracking this service principal in CloudTrail is the most reliable approach.
Querying from Athena (The Lake Formation Barrier)
The IAM role used in this verification has fairly strong permissions within the account, but read access management is the responsibility of the user side, and Amazon Redshift does not apply read permissions on behalf of users. We will grant SELECT permissions in AWS Lake Formation.
% aws lakeformation grant-permissions \
    --principal DataLakePrincipalIdentifier=arn:aws:iam::123456789012:role/cm-user \
    --resource '{"Table":{"CatalogId":"123456789012:s3tablescatalog/aws-redshift","DatabaseName":"123456789012_sys","Name":"sys_query_history"}}' \
    --permissions SELECT DESCRIBE
After querying again, we were now able to read the data.
You can also check from the Athena query editor in the same way. Selecting s3tablescatalog/aws-redshift as the catalog will display the delivery target tables in the list.
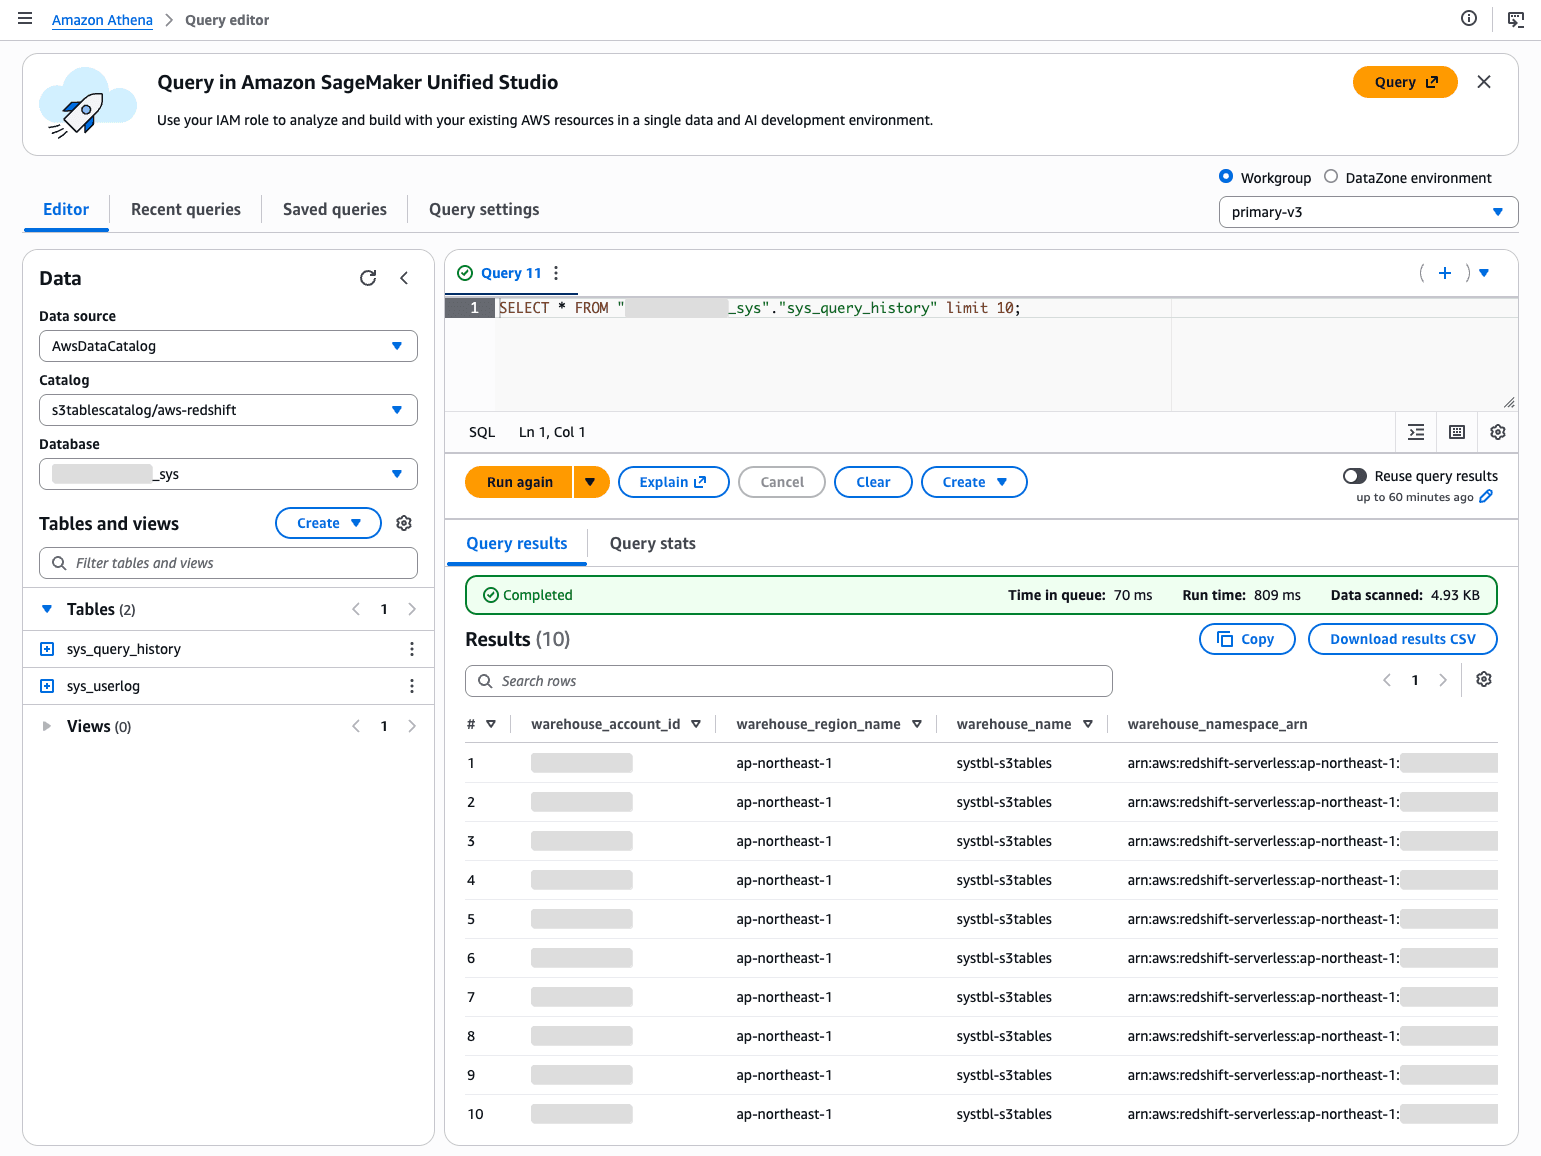
sys_userlog can also be read in the same way. It contained 3 rows.
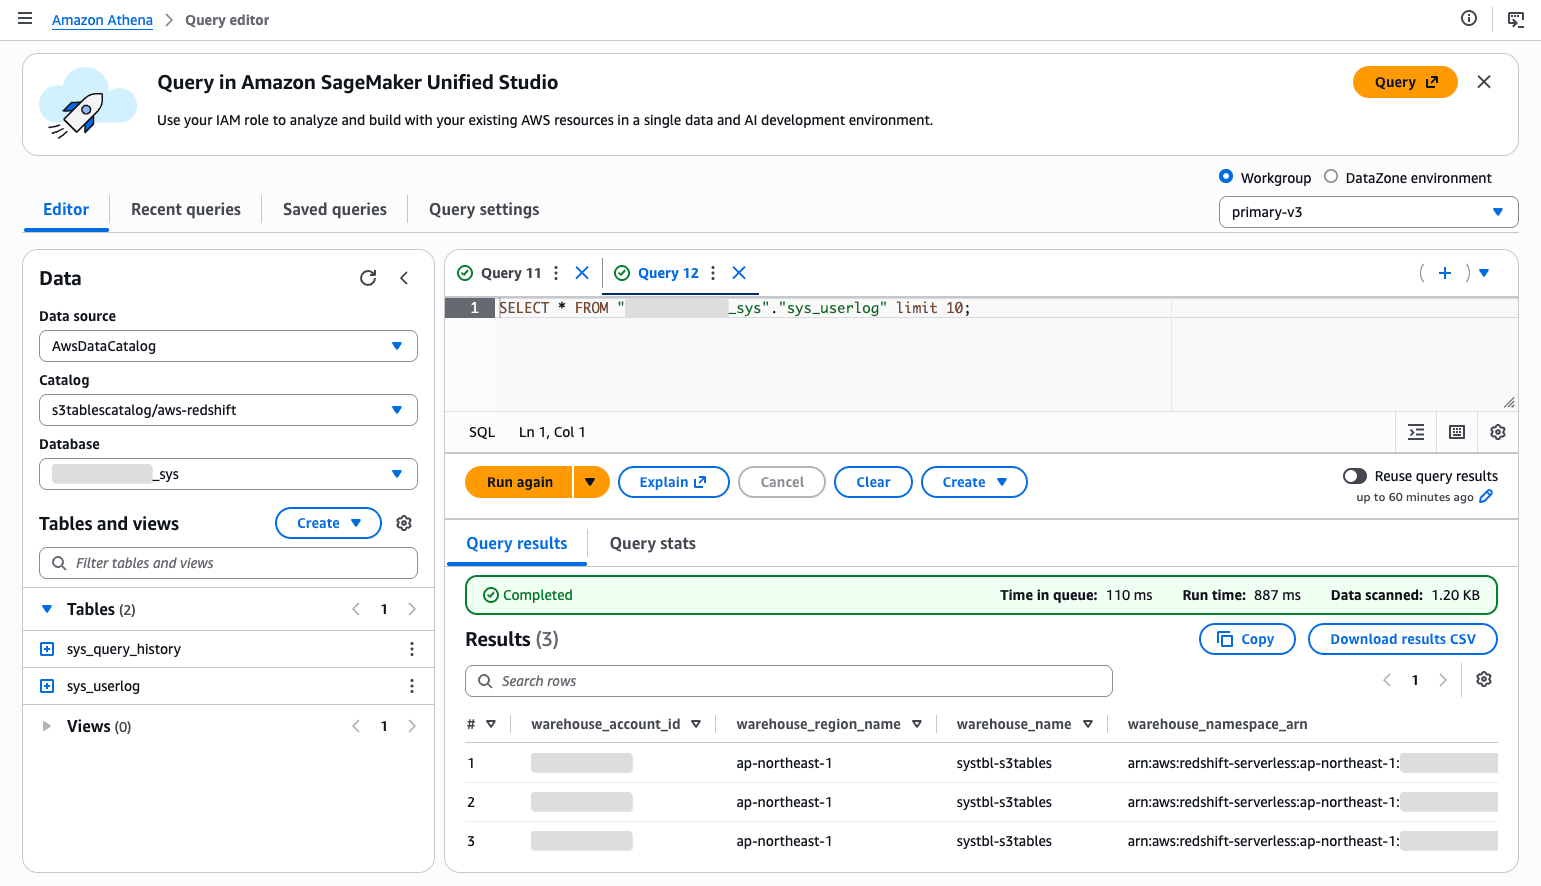
Both of these screenshots show the state after granting SELECT permissions in Lake Formation. Before granting, running the same query from the same screen would fail with Relation contains no accessible columns.
Looking at the metadata columns, warehouse_name contains systbl-s3tables, which is the namespace name. Since the workgroup name in this case is systbl-s3tables-wg, this differs from the documentation's description of "cluster name or workgroup name" — it appears that in Amazon Redshift Serverless, the namespace name is recorded instead.
What Happens When You Switch the Deployment Model
Let's try switching --s3-table-granularity from namespace to account.
% aws redshift-serverless update-namespace \
    --namespace-name systbl-s3tables \
    --log-destination-type s3table \
    --s3-table-action Enable \
    --s3-table-granularity account \
    --s3-table-names sys_query_history
{
    "enabledAll": false,
    "lastIngestionTimes": {},
    "s3TableGranularity": "account",
    "s3TableNamespace": "123456789012_sys",
    "s3Tables": [
        "sys_connection_log",
        "sys_query_history"
    ]
}
After switching, a new namespace was added to the S3 table bucket.
% aws s3tables list-namespaces \
    --table-bucket-arn arn:aws:s3tables:ap-northeast-1:123456789012:bucket/aws-redshift
{
    "namespaces": [
        {
            "namespace": [
                "2d47b4ec_cae8_4d74_bdf5_bb7f05149b3d_sys"
            ],
            "createdAt": "2026-08-20T09:45:53.179659+00:00",
            "createdBy": "123456789012",
            "ownerAccountId": "123456789012",
            "namespaceId": "ee9d3b1a-3902-48b5-86d1-8111ef3498ec",
            "tableBucketId": "10a5b3d4-07b2-4faa-bdf6-8f9d6831fb05"
        },
        {
            "namespace": [
                "123456789012_sys"
            ],
            "createdAt": "2026-08-20T09:50:12.270424+00:00",
            "createdBy": "123456789012",
            "ownerAccountId": "123456789012",
            "namespaceId": "af94ccca-e6db-4f7e-8f38-f2cdd0d99416",
            "tableBucketId": "10a5b3d4-07b2-4faa-bdf6-8f9d6831fb05"
        }
    ]
}
In the aggregation model, the namespace name becomes AWS account number-based (123456789012_sys). The namespace and table from before the switch remained as-is.
% aws s3tables list-tables \
    --table-bucket-arn arn:aws:s3tables:ap-northeast-1:123456789012:bucket/aws-redshift \
    --query 'tables[].[namespace[0],name,createdAt]' --output text
2d47b4ec_cae8_4d74_bdf5_bb7f05149b3d_sys	sys_connection_log	2026-08-20T09:45:54.470424+00:00
2d47b4ec_cae8_4d74_bdf5_bb7f05149b3d_sys	sys_query_history	2026-08-20T09:45:53.693431+00:00
123456789012_sys	sys_query_history	2026-08-20T09:50:12.866435+00:00
Then, when we counted the number of rows in the pre-switch table, it showed 0 rows.
SELECT count(*) AS cnt
FROM "s3tablescatalog/aws-redshift"."2d47b4ec_cae8_4d74_bdf5_bb7f05149b3d_sys"."sys_query_history";
It remained at 0 rows. Queries executed during the approximately 4 and a half minutes between activation and the switch were all delivered to the post-switch aggregation table. The documentation's statement that "backfill is not performed" was confirmed with actual data. If you are considering a switch, you will need to design with the assumption of joining both the old and new tables at query time.
One more point: let's also verify the behavior of --s3-table-names. We will try enabling with only sys_userlog specified.
% aws redshift-serverless update-namespace \
    --namespace-name systbl-s3tables \
    --log-destination-type s3table \
    --s3-table-action Enable \
    --s3-table-granularity account \
    --s3-table-names sys_userlog \
    --query 'namespace.s3TablePublishStatus'
{
    "enabledAll": false,
    "s3TableGranularity": "account",
    "s3TableNamespace": "123456789012_sys",
    "s3Tables": [
        "sys_connection_log",
        "sys_query_history",
        "sys_userlog"
    ]
The specified table was added to the existing selection rather than replacing it. If you want to remove a table from the targets, you need to use --s3-table-action Disable.
Setting the Retention Period
The retention period is configured not on the Amazon Redshift side, but via record expiration settings in Amazon S3 Tables. This is specified per table.
First, let's check the parameter format using --generate-cli-skeleton.
% aws s3tables put-table-record-expiration-configuration --generate-cli-skeleton
{
    "tableArn": "",
    "value": {
        "status": "enabled",
        "settings": {
            "days": 0
        }
    }
}
We will configure 30 days using this format.
% aws s3tables put-table-record-expiration-configuration \
    --table-arn arn:aws:s3tables:ap-northeast-1:123456789012:bucket/aws-redshift/table/c27c7524-ab3e-4237-b11f-e85fbf652666 \
    --value '{"status":"enabled","settings":{"days":30}}'
% aws s3tables get-table-record-expiration-configuration \
    --table-arn arn:aws:s3tables:ap-northeast-1:123456789012:bucket/aws-redshift/table/c27c7524-ab3e-4237-b11f-e85fbf652666
{
    "configuration": {
        "status": "enabled",
        "settings": {
            "days": 30
        }
    }
}
Note that the table is specified directly with --table-arn rather than the combination of --table-bucket-arn and --namespace / --name. The table ARN can be obtained from the tableARN in aws s3tables list-tables, or from the Glue table parameter s3TableArn.
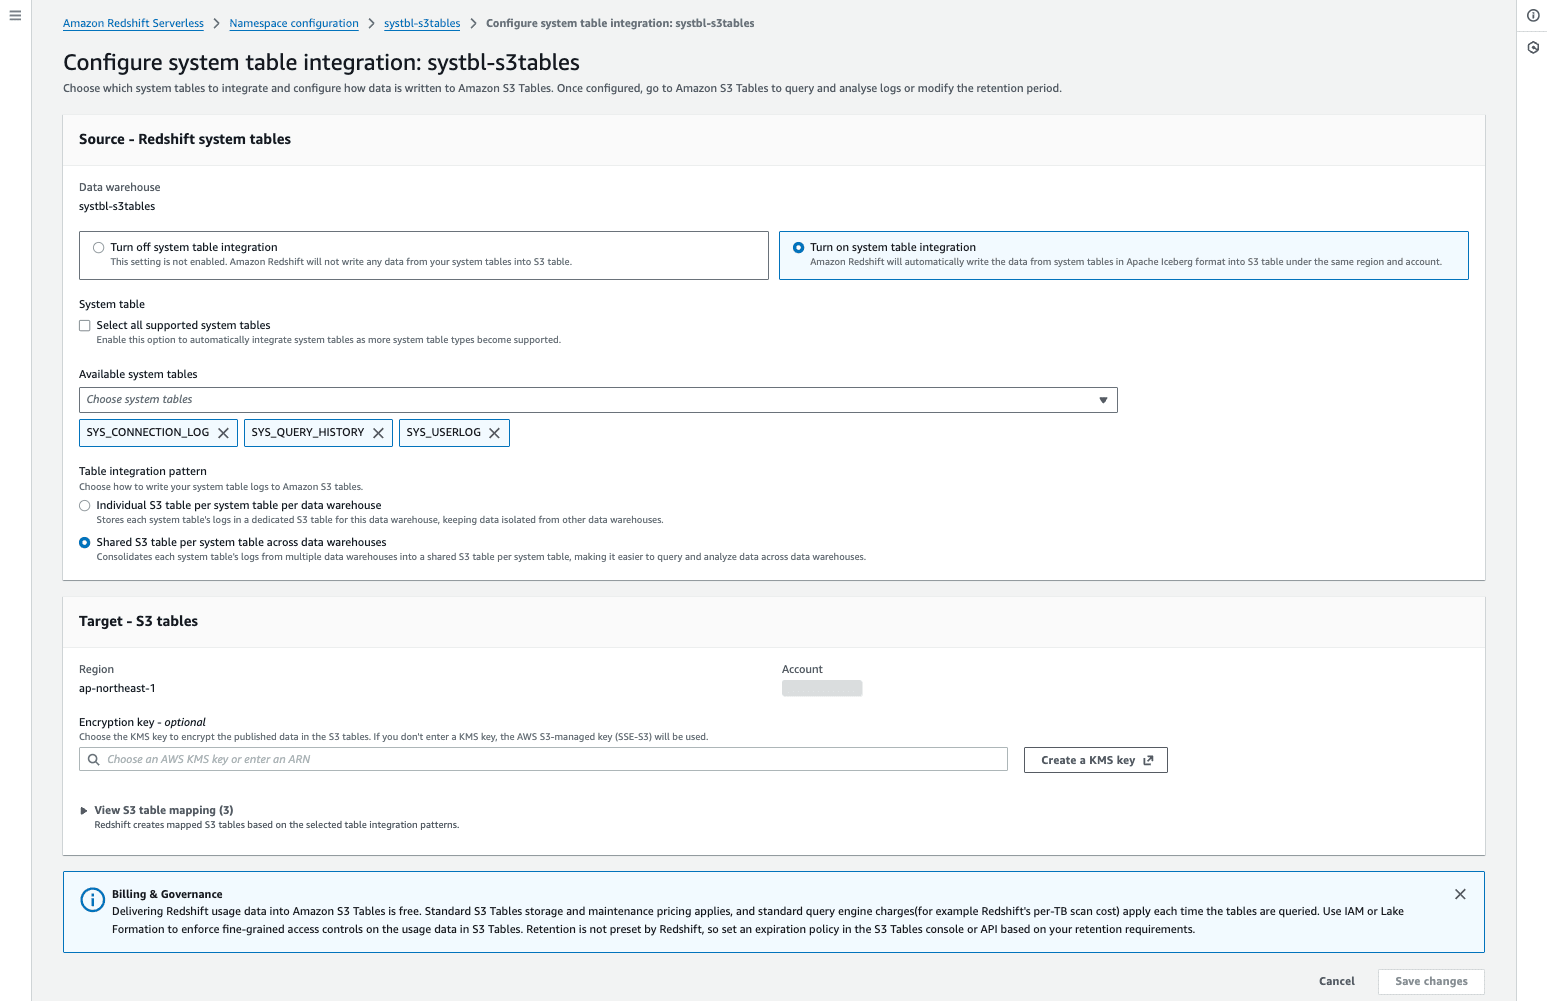
Supplement: Configuration of System Tables to Integrate
Managing the addition and removal of system tables to integrate is likely easier through the management console.
Discussion
Here we organize what we learned from actually trying this out.
Delivery was a batch cycle of approximately 40 minutes
The official documentation only says "at a fixed frequency," and the interval is not disclosed. In this environment, 4 consecutive batches ran on approximately a 40-minute cycle (39 minutes 57 seconds to 40 minutes 2 seconds). This is a measured value from a single environment and is not a guaranteed value, but as an order of magnitude, it should be considered "tens of minutes" rather than "a few minutes." If delivery doesn't arrive immediately after activation, there is no need to doubt your configuration — it is reasonable to wait at least 1 hour.
The biggest pitfall is Lake Formation permissions
Even if delivery itself is working normally, without SELECT permissions in Lake Formation, not a single column can be read. Moreover, since count(*) works, you end up in a confusing state where "you can see the row count but cannot read the data." When deploying, it is best to plan delivery verification and access permission granting as separate tasks. Conversely, this means that for system tables containing sensitive information, you start from a state where no one can read them by default, which is a desirable design from a governance perspective.
The scope of service-managed resources is broad
Everything was automatically configured: the S3 table bucket, namespace, table, bucket policy, encryption settings, and maintenance settings for compaction and snapshot management. The speed at which the bucket is generated in 2 seconds from a single activation command is impressive. On the other hand, these resources will appear as resources that users have no memory of creating, so organizations with S3 table bucket inventory rules should notify their teams in advance. Since the type becomes aws, they can be distinguished from customer type buckets.
Switching the deployment model does not backfill
After switching from namespace to account, the pre-switch table was left with 0 rows. Even if you are aware of the spec that backfill is not performed, actually seeing 0 rows makes the impact feel real. The deployment model should be decided from the start.
Make sure verification scripts don't suppress errors
The approach of extracting only the target value with --query is concise, but since an empty string is returned even on API errors, you cannot distinguish between an authentication expiration and "no delivery yet." During verification, I actually made a misdiagnosis because of this. When automating monitoring, implement it in a way that retrieves the raw JSON and explicitly checks for errors.
Costs are extremely small
The Amazon Redshift Serverless compute consumed in this verification was a total of 137 RPU-seconds according to CloudWatch's ComputeSeconds. At the Tokyo Region rate of $0.494/RPU-Hr, this works out to approximately $0.02. Since namespaces and workgroups are not charged when idle, costs do not accumulate even during long wait times. On the other hand, since data is delivered in batches at a fixed frequency, this is not suitable for use cases requiring real-time responsiveness.
Conclusion
Amazon Redshift system tables can now be retained long-term in Amazon S3 Tables, beyond the 7-day retention period within the cluster. Since AWS manages everything from table creation to schema evolution, compaction, and snapshot management, there is a possibility of eliminating custom ETL pipelines that were previously built for long-term retention.
When actually trying it out, the activation itself was completed with a single CLI command, and the S3-side resources were automatically generated in 2 seconds. On the other hand, there are points that may cause confusion without prior knowledge, such as delivery occurring in approximately 40-minute batch cycles and the inability to read columns without Lake Formation permissions.
As a starting point, we recommend enabling only the necessary system tables such as sys_query_history in a small namespace-granularity configuration, and then proceeding to design the data volume and retention period.