I tried validating document-level ACL for S3 knowledge bases in Amazon Q - Serving confidential documents differently per user

This page has been translated by machine translation. View original
This is Ishikawa from the Cloud Business Division. Previously, when creating an Amazon Quick knowledge base in an environment where department materials and company-wide materials are stored in the same S3 bucket, the only options were to either separate the knowledge bases or not index confidential documents. With document-level ACL, you can now set ALLOW / DENY per user or group for individual documents within an S3 knowledge base, so let's actually try it out.
What is Document-Level ACL
There are two ways to configure document-level ACL. One is a global ACL configuration file that centrally manages permissions per folder, and the other is placing a metadata file for each document. Also, ACL can only be enabled at knowledge base creation time and cannot be changed later. The document-level ACL for Amazon Quick S3 knowledge bases is "pre-filter" only.
In ACL-enabled knowledge bases, Quick retains the permission information read at ingestion time together with the index, and evaluates it at each search. If permissions cannot be evaluated, rather than returning unfiltered results, no documents are returned at all.
Global ACL Configuration File
This is a JSON file listing ACL entries per S3 key prefix. You specify the S3 URI of this file at knowledge base creation time.
[
  {
    "keyPrefix": "s3://BUCKETNAME/prefix1/",
    "aclEntries": [
      {
        "Name": "user1@example.com",
        "Type": "USER",
        "Access": "ALLOW"
      },
      {
        "Name": "group1",
        "Type": "GROUP",
        "Access": "DENY"
      }
    ]
  }
]
Name is the email address of a user registered in Quick for USER, or the Quick group name for GROUP. This is suited for organizations with stable permission structures, and changing the file requires re-indexing the entire relevant prefix.
Document-Level Metadata File
This method involves preparing a <document name>.<extension>.metadata.json for each document and writing ACL entries in the AccessControlList field.
{
  "DocumentId": "meta-allow-incident-4210",
  "Title": "Security Incident Report #4210",
  "ContentType": "MD",
  "AccessControlList": [
    {
      "Name": "user1@example.com",
      "Type": "USER",
      "Access": "ALLOW"
    }
  ]
}
Only documents whose permissions have changed need to be re-indexed, making this approach suitable when permissions change frequently.
Trying It Out
Prerequisites
- AWS Account: Quick ENTERPRISE subscription already in place (authentication type: IDENTITY_POOL)
- Verification region: ap-northeast-1
- AWS CLI: aws-cli/2.36.40
Verification Configuration
Six documents were placed in a single S3 bucket to compare how ACL behaves. Each file has an identification control number embedded in it.
The ACL settings were configured as follows. quick-acl-blog-group is a group created for verification, and I am not a member of it.
| Document | Control Number | xxxxxxxxxx@classmethod.jp | quick-acl-blog-group |
|---|---|---|---|
| global/allow/holiday-policy.md | ALPHA-GLOBAL-ALLOW | ALLOW | - |
| global/deny/exec-compensation.md | BRAVO-GLOBAL-DENY | DENY | ALLOW |
| global/noacl/uncontrolled-memo.md | CHARLIE-GLOBAL-NOACL | No ACL entry | No ACL entry |
| meta/allow/incident-report.md | DELTA-META-ALLOW | ALLOW | - |
| meta/deny/ma-valuation.md | ECHO-META-DENY | DENY | ALLOW |
| meta/noacl/orphan-note.md | FOXTROT-META-NOACL | No metadata file | No metadata file |
docs
├── acl
│   └── acl.json
├── global
│   ├── allow
│   │   └── holiday-policy.md
│   ├── deny
│   │   └── exec-compensation.md
│   └── noacl
│       └── uncontrolled-memo.md
└── meta
    ├── allow
    │   ├── incident-report.md
    │   └── incident-report.md.metadata.json
    ├── deny
    │   ├── ma-valuation.md
    │   └── ma-valuation.md.metadata.json
    └── noacl
        └── orphan-note.md
Step 1: Place Documents and ACL Files in S3
The contents of the global ACL file are as follows. Only two prefixes, global/allow/ and global/deny/, are listed, and global/noacl/ is intentionally omitted.
ACL file: acl/acl.json
[
  {
    "keyPrefix": "s3://quick-acl-blog-1b5c2683/global/allow/",
    "aclEntries": [
      {
        "Name": "xxxxxxxxxx@classmethod.jp",
        "Type": "USER",
        "Access": "ALLOW"
      }
    ]
  },
  {
    "keyPrefix": "s3://quick-acl-blog-1b5c2683/global/deny/",
    "aclEntries": [
      {
        "Name": "quick-acl-blog-group",
        "Type": "GROUP",
        "Access": "ALLOW"
      },
      {
        "Name": "xxxxxxxxxx@classmethod.jp",
        "Type": "USER",
        "Access": "DENY"
      }
    ]
  }
]
global/deny/ grants ALLOW to the group and DENY to myself. The file name is arbitrary, and the path is specified with aclConfigurationFilePath at knowledge base creation time. This time it was placed at acl/acl.json. Since the acl/ prefix is not included in the crawl targets, the ACL file itself will not be indexed.
Upload the documents and ACL files to S3.
% aws s3 sync work/docs/ s3://quick-acl-blog-1b5c2683/
upload: work/docs/global/allow/holiday-policy.md to s3://quick-acl-blog-1b5c2683/global/allow/holiday-policy.md
upload: work/docs/meta/noacl/orphan-note.md to s3://quick-acl-blog-1b5c2683/meta/noacl/orphan-note.md
upload: work/docs/acl/acl.json to s3://quick-acl-blog-1b5c2683/acl/acl.json
upload: work/docs/global/noacl/uncontrolled-memo.md to s3://quick-acl-blog-1b5c2683/global/noacl/uncontrolled-memo.md
upload: work/docs/meta/deny/ma-valuation.md.metadata.json to s3://quick-acl-blog-1b5c2683/meta/deny/ma-valuation.md.metadata.json
upload: work/docs/global/deny/exec-compensation.md to s3://quick-acl-blog-1b5c2683/global/deny/exec-compensation.md
upload: work/docs/meta/allow/incident-report.md to s3://quick-acl-blog-1b5c2683/meta/allow/incident-report.md
upload: work/docs/meta/allow/incident-report.md.metadata.json to s3://quick-acl-blog-1b5c2683/meta/allow/incident-report.md.metadata.json
upload: work/docs/meta/deny/ma-valuation.md to s3://quick-acl-blog-1b5c2683/meta/deny/ma-valuation.md
The metadata files were placed in the same folder as the documents. If you want to consolidate them in a separate folder, you need to maintain the same directory structure as the document side.
Step 2: Create a Data Source for the S3 Knowledge Base
Before creating the knowledge base, create a data source pointing to the S3 bucket.
% aws quicksight create-data-source \
  --aws-account-id 123456789012 \
  --data-source-id quick-acl-blog-s3-1b5c2683 \
  --name "quick-acl-blog-s3-integration" \
  --type S3_KNOWLEDGE_BASE \
  --data-source-parameters '{"S3KnowledgeBaseParameters":{"BucketUrl":"s3://quick-acl-blog-1b5c2683"}}'
{
    "Status": 202,
    "Arn": "arn:aws:quicksight:ap-northeast-1:123456789012:datasource/quick-acl-blog-s3-1b5c2683",
    "DataSourceId": "quick-acl-blog-s3-1b5c2683",
    "CreationStatus": "CREATION_IN_PROGRESS"
}
It reached CREATION_SUCCESSFUL within a few seconds. This data source will be shared across three knowledge bases. This is because multiple knowledge bases can be created from a single S3 data source.
From here, Steps 3 through 5 will create the knowledge bases for verification.
Step 3: Create a Knowledge Base with ACL Enabled (Global ACL Method)
To enable ACL, two settings are required. One is accessControlConfiguration.crawlAcl on the connector side, and the other is --access-control-configuration isACLEnabled on the knowledge base side.
First, save the connector-side settings as kb-a-global.json.
{
  "templateConfiguration": {
    "template": {
      "type": "S3V2",
      "connectionConfiguration": {
        "bucketName": "quick-acl-blog-1b5c2683",
        "bucketOwnerAccountId": "123456789012"
      },
      "filterConfiguration": {
        "inclusionPrefixes": ["global/"]
      },
      "accessControlConfiguration": {
        "crawlAcl": true,
        "aclConfigurationFilePath": "s3://quick-acl-blog-1b5c2683/acl/acl.json"
      }
    }
  }
}
This file, passed to --knowledge-base-configuration, defines how the connector crawls and indexes the bucket. The role of each field is as follows.
| Field | Role |
|---|---|
type |
Connector type. Amazon S3 uses S3V2. This value determines what can be written under connectionConfiguration |
connectionConfiguration |
Specifies the connection target. For S3, bucketName and bucketOwnerAccountId are required |
filterConfiguration |
Narrows down crawl targets. In addition to inclusionPrefixes, you can specify exclusionPrefixes, inclusionPatterns, exclusionPatterns, and maxFileSizeInMegaBytes |
accessControlConfiguration |
Document-level ACL settings added in this update |
Setting crawlAcl to true causes the connector to read and apply ACL. Specify the S3 URI of the global ACL file in aclConfigurationFilePath. Omitting this path switches to the metadata file method.
There is also defaultAccessType, which determines how prefixes not listed in the ACL configuration are handled, but the only supported value is ALLOW. It is not specified this time.
inclusionPrefixes is set to global/ in order to create three separate knowledge bases from the same bucket.
% aws quicksight create-knowledge-base \
  --aws-account-id 123456789012 \
  --knowledge-base-id kb-acl-global-1b5c2683 \
  --name "quick-acl-blog-global-acl" \
  --data-source-arn arn:aws:quicksight:ap-northeast-1:123456789012:datasource/quick-acl-blog-s3-1b5c2683 \
  --knowledge-base-configuration file://kb-a-global.json \
  --access-control-configuration isACLEnabled=true
{
    "Status": 202,
    "KnowledgeBaseArn": "arn:aws:quicksight:ap-northeast-1:123456789012:knowledge-base/kb-acl-global-1b5c2683",
    "KnowledgeBaseId": "kb-acl-global-1b5c2683",
    "CreationStatus": "CREATING"
}
The CLI help states regarding these two settings: "Enabling only one of the two settings does not produce a fully ACL-enforced knowledge base." ACL will not be fully applied with only one of them enabled.
Step 4: Create a Knowledge Base Using the Metadata Method
The second is a knowledge base using the document metadata method. Only crawlAcl is set to true, without specifying aclConfigurationFilePath. The target prefix is meta/. This was saved as kb-b-metadata.json.
{
  "templateConfiguration": {
    "template": {
      "type": "S3V2",
      "connectionConfiguration": {
        "bucketName": "quick-acl-blog-1b5c2683",
        "bucketOwnerAccountId": "123456789012"
      },
      "filterConfiguration": {
        "inclusionPrefixes": ["meta/"]
      },
      "accessControlConfiguration": {
        "crawlAcl": true
      }
    }
  }
}
Create the knowledge base quick-acl-blog-metadata-acl.
% aws quicksight create-knowledge-base \
  --aws-account-id 123456789012 \
  --knowledge-base-id kb-acl-meta-1b5c2683 \
  --name "quick-acl-blog-metadata-acl" \
  --data-source-arn arn:aws:quicksight:ap-northeast-1:123456789012:datasource/quick-acl-blog-s3-1b5c2683 \
  --knowledge-base-configuration file://kb-b-metadata.json \
  --access-control-configuration isACLEnabled=true
{
    "Status": 202,
    "KnowledgeBaseArn": "arn:aws:quicksight:ap-northeast-1:123456789012:knowledge-base/kb-acl-meta-1b5c2683",
    "KnowledgeBaseId": "kb-acl-meta-1b5c2683",
    "CreationStatus": "CREATING"
}
The data source created in Step 2 is being reused. The --data-source-arn is the same as in Step 3.
Step 5: Create a Knowledge Base Without ACL Enabled (For Comparison)
The third is a knowledge base without ACL enabled. It is created without writing accessControlConfiguration and without specifying --access-control-configuration. The target prefixes are both global/ and meta/. This was saved as kb-c-noacl.json.
{
  "templateConfiguration": {
    "template": {
      "type": "S3V2",
      "connectionConfiguration": {
        "bucketName": "quick-acl-blog-1b5c2683",
        "bucketOwnerAccountId": "123456789012"
      },
      "filterConfiguration": {
        "inclusionPrefixes": ["global/", "meta/"]
      }
    }
  }
}
% aws quicksight create-knowledge-base \
  --aws-account-id 123456789012 \
  --knowledge-base-id kb-noacl-1b5c2683 \
  --name "quick-acl-blog-no-acl" \
  --data-source-arn arn:aws:quicksight:ap-northeast-1:123456789012:datasource/quick-acl-blog-s3-1b5c2683 \
  --knowledge-base-configuration file://kb-c-noacl.json
{
    "Status": 202,
    "KnowledgeBaseArn": "arn:aws:quicksight:ap-northeast-1:123456789012:knowledge-base/kb-noacl-1b5c2683",
    "KnowledgeBaseId": "kb-noacl-1b5c2683",
    "CreationStatus": "CREATING"
}
This knowledge base was prepared as a comparison baseline. When an ACL-enabled knowledge base chat refuses to answer, it is impossible to tell just from that whether "ACL took effect" or "the search simply didn't return any hits." Having a knowledge base with the same bucket, same documents, and same user but differing only in ACL enables us to confirm that the difference in results is due to ACL.
Step 6: Grant Owner Permissions to the Knowledge Bases
Knowledge bases created from the CLI have no owner set unless --primary-owner-arn is specified, and Permissions in describe-knowledge-base-permissions will be empty. In this state, they cannot be selected from the console chat, so permissions were granted to all three that were created.
The permissions to grant are written in grant.json. Principal is not an IAM user but a Quick user ARN in the format user/<namespace>/<username>.
[
  {
    "Principal": "arn:aws:quicksight:ap-northeast-1:123456789012:user/default/xxxxxxxxxx/xxxxxxxxxx",
    "Actions": [
      "quicksight:DescribeKnowledgeBase",
      "quicksight:DescribeKnowledgeBasePermissions",
      "quicksight:UpdateKnowledgeBase",
      "quicksight:UpdateKnowledgeBasePermissions",
      "quicksight:DeleteKnowledgeBase",
      "quicksight:CreateKnowledgeBaseRefreshSchedule",
      "quicksight:DescribeKnowledgeBaseRefreshSchedule",
      "quicksight:ListKnowledgeBaseRefreshSchedules",
      "quicksight:UpdateKnowledgeBaseRefreshSchedule",
      "quicksight:DeleteKnowledgeBaseRefreshSchedule",
      "quicksight:CreateKnowledgeBaseIngestion",
      "quicksight:CancelKnowledgeBaseIngestion",
      "quicksight:DescribeKnowledgeBaseIngestion",
      "quicksight:ListKnowledgeBaseIngestions"
    ]
  }
]
This combination of actions was copied from running describe-knowledge-base-permissions on an existing knowledge base that had already been created from the console, and taking exactly what was assigned to its owner. It is the same permission set granted to the owner when created from the console.
This is run against all three knowledge bases created in Steps 3 through 5.
% for KB in kb-acl-global-1b5c2683 kb-acl-meta-1b5c2683 kb-noacl-1b5c2683; do
    aws quicksight update-knowledge-base-permissions \
      --aws-account-id 123456789012 \
      --knowledge-base-id "${KB}" \
      --grant-permissions file://grant.json
  done
{
    "Status": 200,
    "KnowledgeBaseArn": "arn:aws:quicksight:ap-northeast-1:123456789012:knowledge-base/kb-acl-global-1b5c2683",
    "KnowledgeBaseId": "kb-acl-global-1b5c2683",
    "Permissions": [
        {
            "Principal": "arn:aws:quicksight:ap-northeast-1:123456789012:user/default/xxxxxxxxxx/xxxxxxxxxx",
            "Actions": [
                ...
            ]
        }
    ]
}
...
All three return Status: 200, and my user ARN appears in Permissions. This allows the knowledge bases to be selected from the console chat.
Note that quicksight:CreateKnowledgeBaseIngestion is included in this list of actions, which comes into play in Step 12 later.
Step 7: Compare Ingestion Results
The three knowledge bases automatically started their first ingestion immediately after creation. They completed in about 2 minutes, so let's compare DocumentCount.
% aws quicksight list-knowledge-bases --aws-account-id 123456789012
KnowledgeBaseId                Name                            Docs
kb-acl-global-1b5c2683         quick-acl-blog-global-acl          2
kb-acl-meta-1b5c2683           quick-acl-blog-metadata-acl        2
kb-noacl-1b5c2683              quick-acl-blog-no-acl              6
Of the 3 documents placed in the target prefix for each of the two ACL-enabled knowledge bases, only 2 were ingested. uncontrolled-memo.md without ACL entries and orphan-note.md without a metadata file were dropped. On the other hand, all 6 documents were ingested in the ACL-disabled knowledge base. This confirmed the behavior stated in the What's New: "Documents not associated with ACL entries will not be ingested."
The .metadata.json files themselves are not counted as documents. Even in the ACL-disabled knowledge base, the count was 6 rather than 8 including the 2 metadata files, so metadata files appear to be automatically excluded from indexing targets.
There was also a difference in ingestion status.
% aws quicksight describe-knowledge-base \
  --aws-account-id 123456789012 \
  --knowledge-base-id kb-acl-global-1b5c2683

Status          : ACTIVE
DocumentCount   : 2
ACL             : {"isACLEnabled": true}
acc in template : {"crawlAcl": true, "aclConfigurationFilePath": "s3://quick-acl-blog-1b5c2683/acl/acl.json"}
filter          : {"inclusionPrefixes": ["global/"]}
LatestIngestionSummary  {"IngestionId": "d113464a-...", "IngestionStatus": "INCOMPLETE", "StartTime": "2026-09-11T10:22:43+09:00", "EndTime": "2026-09-11T10:24:44+09:00"}
The two ACL-enabled knowledge bases showed INCOMPLETE, while the ACL-disabled one showed COMPLETED. The console list also displays "Completed with issues."

Since having documents that could not be ingested prevents a successful status, in ACL operations, "missing ACL entries" will appear as sync status warnings.
Step 8: Check the Reason for Failed Ingestion in the Sync Report
The knowledge base detail screen in the console has a Sync reports tab where you can check results per document.


uncontrolled-memo.md showed FAILED, with an error type of VALIDATION_ERROR and the following error message.
No ACL entries found for document in ACL-enabled data source. Please ensure the document has valid ACL entries either via per-document metadata or the global ACL file.
Since the reason for failure is explicitly shown per document, missing ACL entries can be identified on this screen.
Step 9: Verify ACL Effectiveness via Chat
From here, we verify using Quick's chat. First, let's ask about ALPHA-GLOBAL-ALLOW, which was given ALLOW.
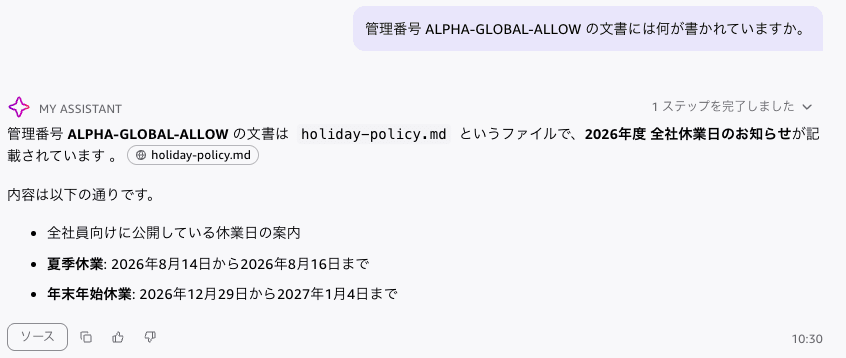
It cited holiday-policy.md and returned the holiday content.
Next, let's ask about BRAVO-GLOBAL-DENY, where I was set to DENY.
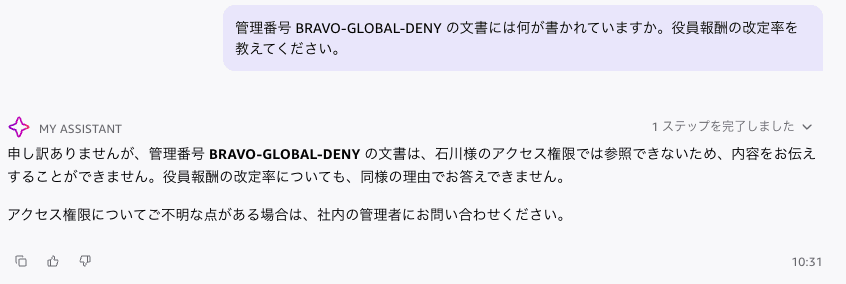
I'm sorry, but the document with control number BRAVO-GLOBAL-DENY cannot be referenced with your access permissions, so I am unable to share its contents. Regarding the executive compensation revision as well, I cannot answer for the same reason.
Not only does it refuse to answer the content, but it also explicitly states that access permissions are the reason. No source citations are displayed either.
I also checked what happens with CHARLIE-GLOBAL-NOACL, which had no ACL entries and was not ingested.
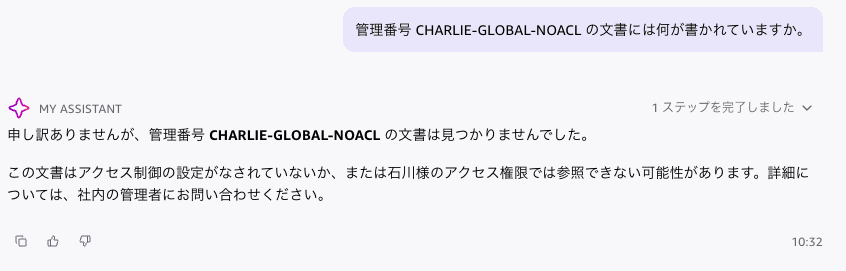
This returned a response saying "the document was not found." The wording differs from the DENY case, but in either case no content is returned.
For the metadata-based knowledge base, I asked about both ALLOW and DENY in a single question.
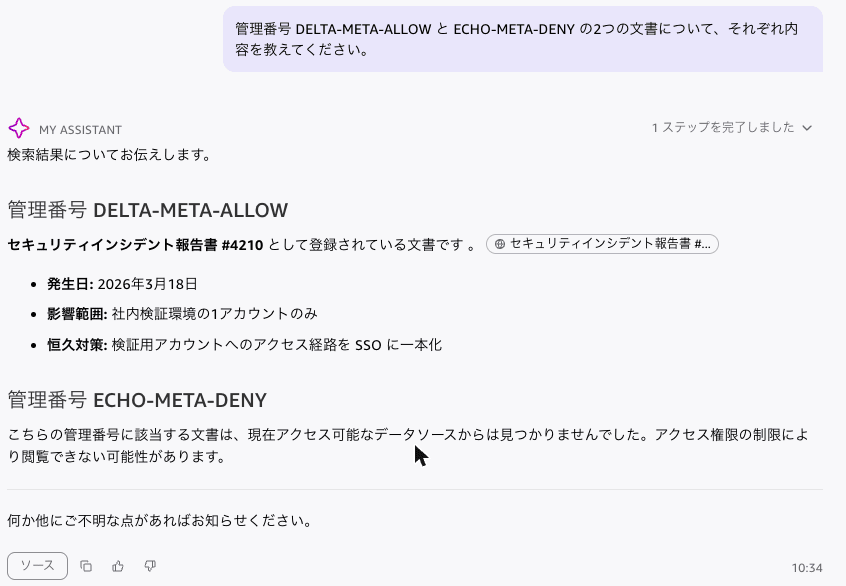
DELTA-META-ALLOW returned the incident report content, and ECHO-META-DENY returned "access may be restricted due to permission limitations." There was no difference in behavior between the two configuration methods.
Step 10: Compare with the ACL-Disabled Knowledge Base
To confirm that ACL is truly taking effect, let's ask about the same documents against the ACL-disabled knowledge base.
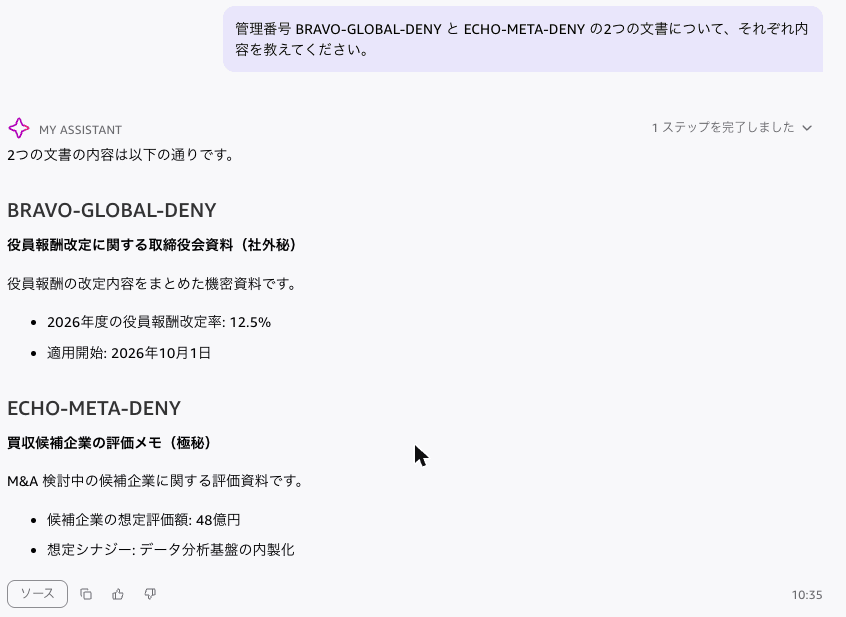
Both the 12.5% executive compensation revision rate from BRAVO-GLOBAL-DENY and the estimated valuation of 4.8 billion yen from ECHO-META-DENY were returned as-is. Since the results differed with the same S3 bucket, same documents, and same user, the only difference is the ACL configuration.
Step 11: ACL settings cannot be changed after the fact
The documentation states that "ACL settings are permanent." I verified how this is expressed in the API.
First, I tried disabling an ACL-enabled knowledge base.
aws quicksight update-knowledge-base \
  --aws-account-id 123456789012 \
  --knowledge-base-id kb-acl-global-1b5c2683 \
  --access-control-configuration isACLEnabled=false
An error occurred (InvalidRequestException) when calling the UpdateKnowledgeBase operation: Update request must include at least one of: name, description, media extraction configuration, knowledge base configuration or isEmailNotificationOptedForIngestionFailures.
The access control configuration is not included in the list of updatable items. --access-control-configuration is accepted but does not count as an update target.
Next, I tried specifying it together with a name change.
aws quicksight update-knowledge-base \
  --aws-account-id 123456789012 \
  --knowledge-base-id kb-acl-global-1b5c2683 \
  --name "quick-acl-blog-global-acl-renamed" \
  --access-control-configuration isACLEnabled=false
An error occurred (InvalidRequestException) when calling the UpdateKnowledgeBase operation: ACL configuration in template did not match ACL configuration in request
This time I got an error saying it conflicted with crawlAcl: true on the template side. The name change was not applied either.
So I tried updating with crawlAcl set to false on the template side. kb-a-disable-crawlacl.json is kb-a-global.json with crawlAcl set to false and aclConfigurationFilePath removed.
aws quicksight update-knowledge-base \
  --aws-account-id 123456789012 \
  --knowledge-base-id kb-acl-global-1b5c2683 \
  --knowledge-base-configuration file://kb-a-disable-crawlacl.json
An error occurred (InvalidRequestException) when calling the UpdateKnowledgeBase operation: ACL enablement cannot be changed
The error was a clear ACL enablement cannot be changed. The same applies in the direction of enabling ACL on a disabled knowledge base. As stated in the documentation, the presence or absence of ACL decided at creation time cannot be changed later.
Another point revealed by the error message is that when updating a knowledge base with --knowledge-base-configuration, the ACL settings in the template must match --access-control-configuration. Even if you only want to change the prefix in an ACL-enabled knowledge base, you need to pass both as follows.
aws quicksight update-knowledge-base \
  --aws-account-id 123456789012 \
  --knowledge-base-id kb-acl-global-1b5c2683 \
  --knowledge-base-configuration file://kb-a-global.json \
  --access-control-configuration isACLEnabled=true
Step 12: Update the ACL and apply the changes
To change permissions, update the ACL file and re-sync. I rewrote the global/deny/ setting from DENY to ALLOW.
aws s3 cp acl.json s3://quick-acl-blog-1b5c2683/acl/acl.json
The issue here was how to re-sync. As of September 11, 2026, aws quicksight has no command to initiate a knowledge base sync. create-ingestion is for datasets and requires --data-set-id.
I tried running update-knowledge-base with the same settings thinking it would trigger a re-sync, but after polling for 6 minutes, no new ingestion had started. The IngestionId in LatestIngestionSummary remained from the initial run.
In the end, I performed a manual sync using the [Sync now] button on the knowledge base detail screen in the console. quicksight:CreateKnowledgeBaseIngestion exists as an owner-level action, so I look forward to CLI support being added in the future.
Note that the ACL settings configured via CLI are displayed as-is in the Advanced settings in the console.
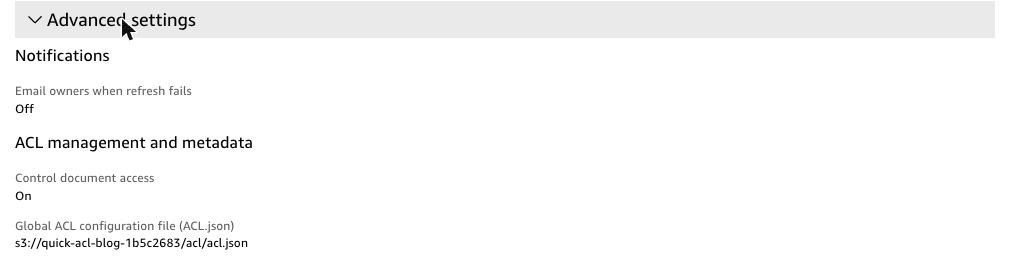
The manual sync completed in about 2 minutes. Looking at the sync report reveals how documents with only ACL changes were handled.

exec-compensation.md was MODIFIED, while holiday-policy.md, whose ACL was not changed, was UNMODIFIED. Since the file contents were not changed at all, this shows that a change to the ACL alone causes a document to be treated as updated.
Step 13: Check access permissions with Permission Checker
Each document in the sync report has "View Access Details," which allows you to check access permissions on a per-user basis using the Permission Checker. Here are the results from testing with exec-compensation.md before the ACL update.
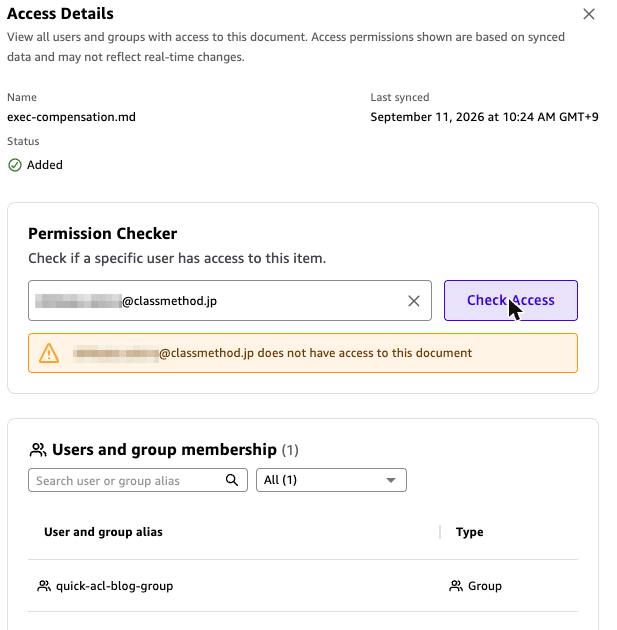
It shows does not have access to this document, and I can also confirm that only quick-acl-blog-group has access.
After updating the ACL to ALLOW and syncing, the display on the same screen changed.
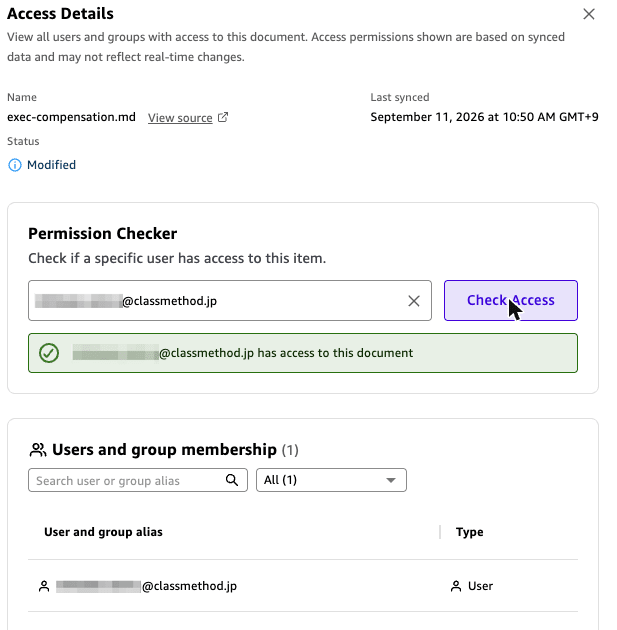
It changed to has access to this document, and the Users and group membership was also replaced with my own email address. This means the permissions have been updated in the index.
However, asking the chat at the same time yielded different results.
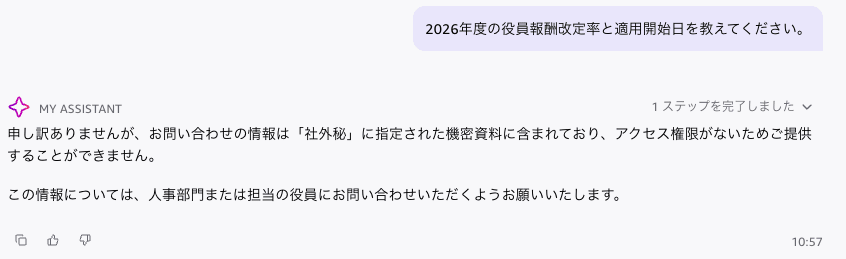
About 7 minutes after sync completion, even asking in a new conversation, the response was still denied with "I cannot provide this as you do not have access permissions." There is a discrepancy between what the Permission Checker shows and the chat behavior.
The documentation states that "Quick syncs changes to IDs and document permissions on the knowledge base refresh schedule (default every 24 hours)." I was unable to investigate further due to time constraints during this verification, but it seems safe not to assume that "updating the ACL file and performing a manual sync will be immediately reflected in chat."
Discussion
Here is a summary of what I learned from the verification.
ACL works at two layers: ingestion and search
Documents without ACL entries are not indexed in the first place. This is a design that prevents accidents such as accidentally ingesting confidential documents. On the other hand, documents that have ACL entries but are set to DENY are indexed and then filtered at search time. The former can be confirmed as FAILED in the sync report, and the latter can be confirmed with the Permission Checker.
There is a time lag in reflecting permissions
Updates to the ACL file are not reflected until the next sync. In addition, this time the chat responses did not change for about 7 minutes after sync completion. In situations where you need to urgently revoke access rights, it is necessary to use other means in combination, such as removing the knowledge base sharing settings, rather than relying solely on updating the ACL file. The documentation also explicitly states that knowledge base sharing and document access rights are separate controls.
ACL enablement cannot be changed without recreating the knowledge base
As the error ACL enablement cannot be changed indicates, changing the policy after the fact requires recreating the knowledge base. Since rebuilding the index takes both time and index capacity, it is safer to either enable ACL from the start or test with a verification knowledge base before creating the production one.
Don't forget to protect the ACL file itself
Anyone who can rewrite the ACL file can grant themselves access to any document. The AWS blog also recommends restricting s3:PutObject to the ACL file to a limited set of administrators, and using S3 versioning to retain a change history. I placed it in the same bucket for verification purposes, but in production use, write permissions to the ACL file should be separated.
Operational considerations
The official documentation also lists several limitations not covered in this verification.
- ACL-enabled knowledge bases are not compatible with Quick Research
- If multiple users within the same namespace share the same email address, all users with that email address will be denied access
- ACL is resolved within the namespace of the knowledge base creator
- Email address matching is case-insensitive
Some parts cannot be completed via CLI
Knowledge base creation, settings confirmation, and deletion can be completed via CLI, but manual sync and ACL verification (Permission Checker) required the console. When managing knowledge bases with IaC, the initial sync runs automatically, but subsequent operational tasks will require using the console in conjunction.
Frequently Asked Questions
Q. How do I choose between the global ACL method and the metadata method?
A. In this verification, there was no behavioral difference between the global ACL file and the metadata file. The selection criteria lie on the operational side. The difference is whether the scope of re-indexing when permissions change covers the entire prefix or only the target document. When using a global ACL file in an environment with a large number of documents, it is important to be aware that a single-line change can trigger large-scale re-indexing.
Q. What happens when something is missed in the configuration?
A. Document-level ACL is a mechanism that determines who gets which documents returned within that knowledge base. Unlike S3 object ACLs, permissions are not attached to the files themselves; they only take effect when the knowledge base reads them during ingestion. The reason uncontrolled-memo.md could be read from the ACL-disabled knowledge base in Step 10 is that the knowledge base was not reading the ACL.
In other words, a user who can create a knowledge base can create an ACL-less knowledge base against the same bucket and read out all documents, including confidential ones. Simply configuring document-level ACL cannot close this pathway.
The official documentation describes a method for restricting the S3 buckets that can be used to create knowledge bases on a per-user or per-group basis using Quick's IAM policy assignment. This allows you to control who can create knowledge bases from which buckets, including ACL-enabled ones. IAM policies assigned via Quick take precedence over AWS resource-level policies.
Q. What happens when ALLOW and DENY settings conflict?
A. If both ALLOW and DENY are specified for the same user or group targeting the same document or prefix, DENY takes precedence. This is intended for use cases where you grant broad ALLOW access to an entire team and then restrict specific documents or folders with DENY. This allows you to create exceptions without restructuring the entire ACL configuration.
Prefixes and documents not listed in the ACL configuration are denied even without explicitly writing DENY. The reason uncontrolled-memo.md and orphan-note.md were not ingested in this verification is due to this behavior.
However, this priority is stated in the AWS blog, and it does not appear to be described in the user guide. Also, since in this verification my DENY setting and the quick-acl-blog-group ALLOW setting did not overlap, I did not test the case where the same user has both ALLOW and DENY applied simultaneously.
Closing
I tested document-level ACL in Amazon Quick's S3 knowledge base using both the AWS CLI and the console.
I was able to confirm the difference between an ACL-enabled knowledge base, where the content of a DENY-configured document was not returned, and an ACL-disabled knowledge base, where it was returned, for the same document in the same bucket. Documents without ACL entries are not ingested in the first place, and the reason is explicitly shown in the sync report.
In environments where documents of different sensitivity levels coexist in the same bucket, the only option until now was to separate knowledge bases. With this update, you can consolidate everything into a single knowledge base while still serving content on a per-user or per-group basis.
On the other hand, ACL enablement can only be decided at creation time, and there is also a time lag in reflecting permission changes. The safe approach is to first map your organization's permission structure into an ACL file using a verification knowledge base, confirm with the Permission Checker that it resolves as intended, and then deploy to production.