
aws-vault vs Granted: A Comparison of Tools for Securely Managing AWS Credentials on macOS
This page has been translated by machine translation. View original
Introduction
When developing on AWS, are you storing access keys in plain text in ~/.aws/credentials? This poses a high security risk, and if the file is leaked, your AWS account could be misused.
This article compares two tools for securely managing AWS credentials on macOS — "aws-vault" and "Granted" — covering setup procedures, everyday usage, and workflows for multi-account operations.
Why Plain Text Credentials Are Dangerous
When you run the default aws configure, your access key is stored in plain text in ~/.aws/credentials.
[default]
aws_access_key_id = AKIAIOSFODNN7EXAMPLE
aws_secret_access_key = wJalrXUtnFEMI/K7MDENG/bPxRfiCYEXAMPLEKEY
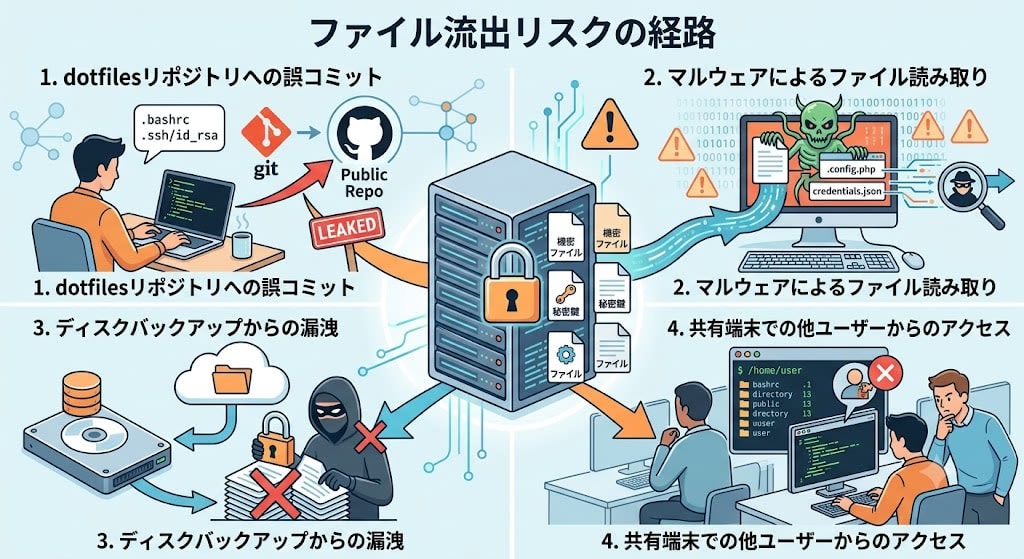
This file risks being leaked through the following channels:
- Accidental commits to a dotfiles repository
- File reading by malware
- Leakage from disk backups
- Access by other users on shared terminals
Both aws-vault and Granted solve this problem by encrypting credentials in the OS keychain and generating temporary credentials with STS.
Prerequisites & Environment
- macOS (with Keychain Access support)
- Homebrew installed
- AWS CLI installed
- IAM user access key (with MFA configured)
Creating an AWS Access Key
To register credentials with aws-vault or Granted, you need an IAM user access key. If you haven't created one yet, follow these steps to create one from the AWS console.
-
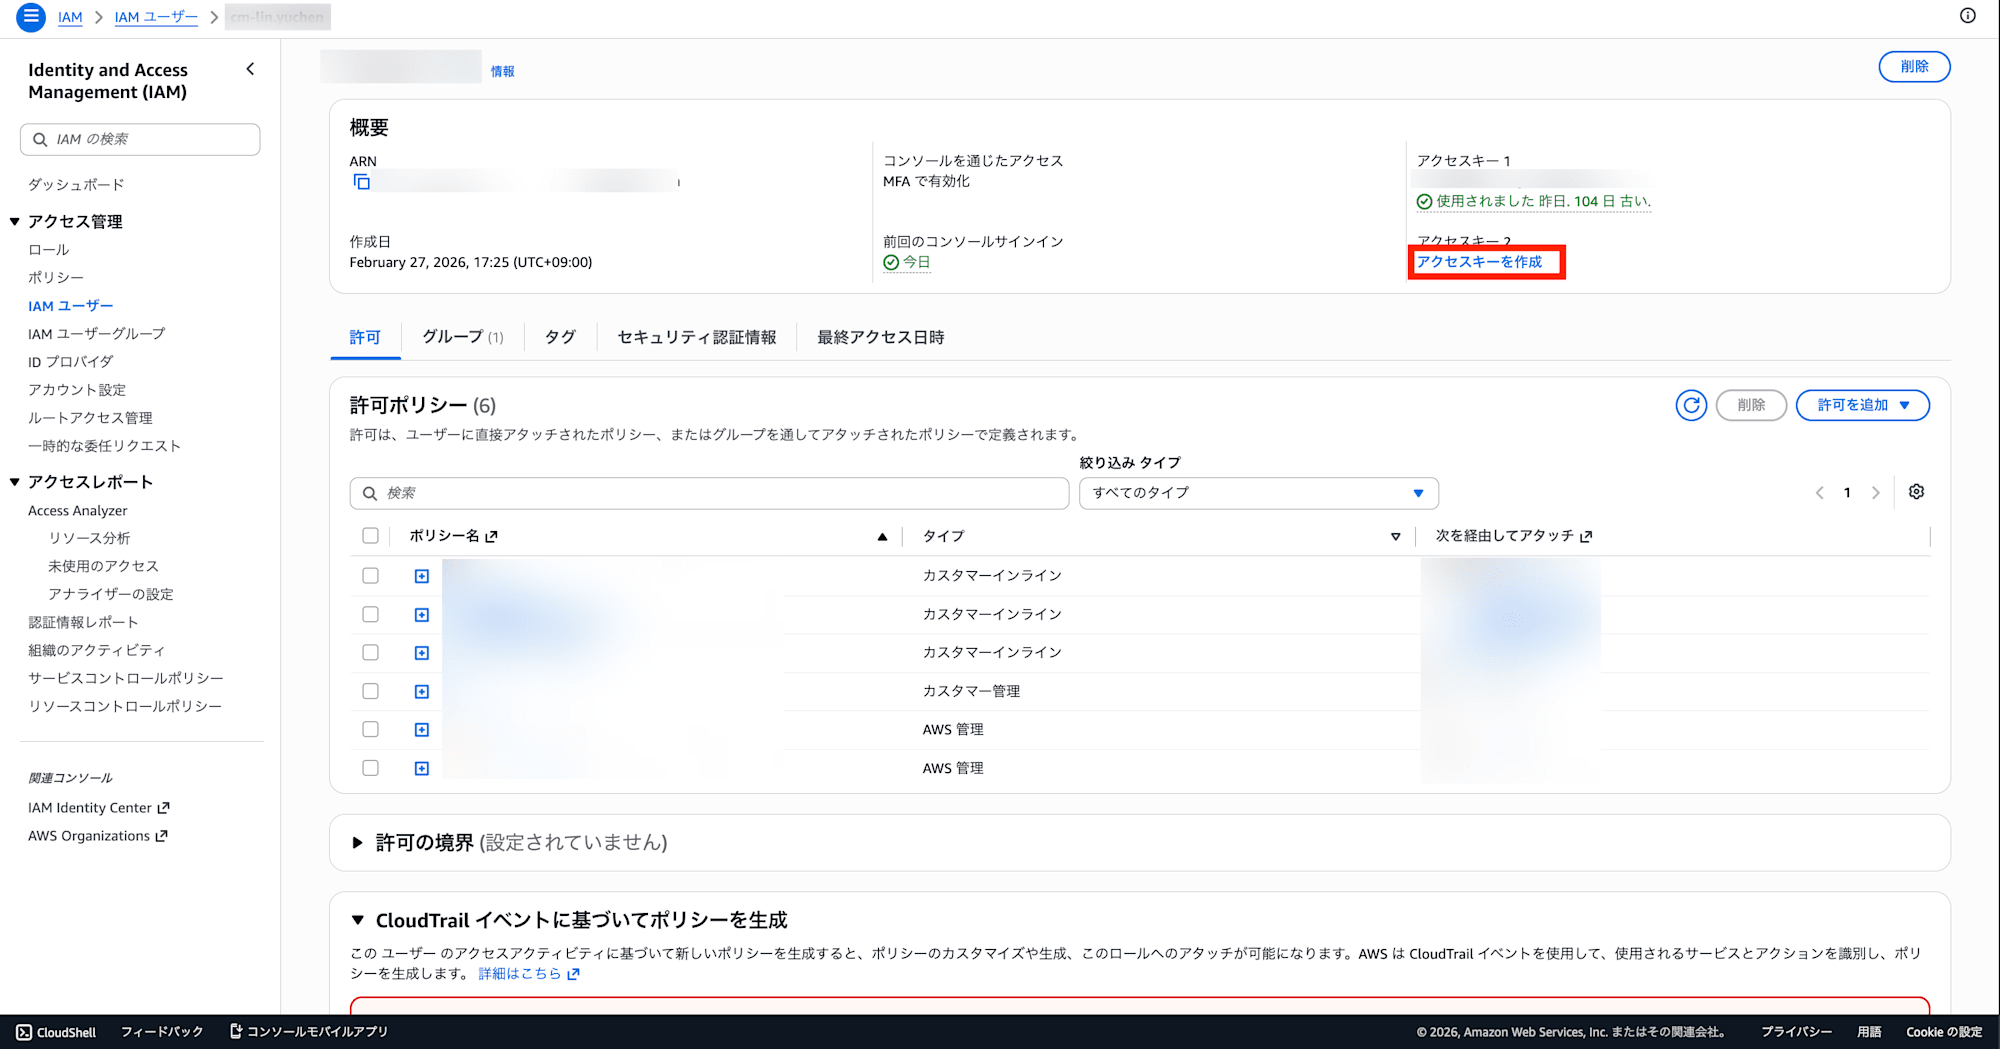
Log in to the AWS Management Console and click IAM → Users → your username
-
Open the Security credentials tab and click "Create access key"
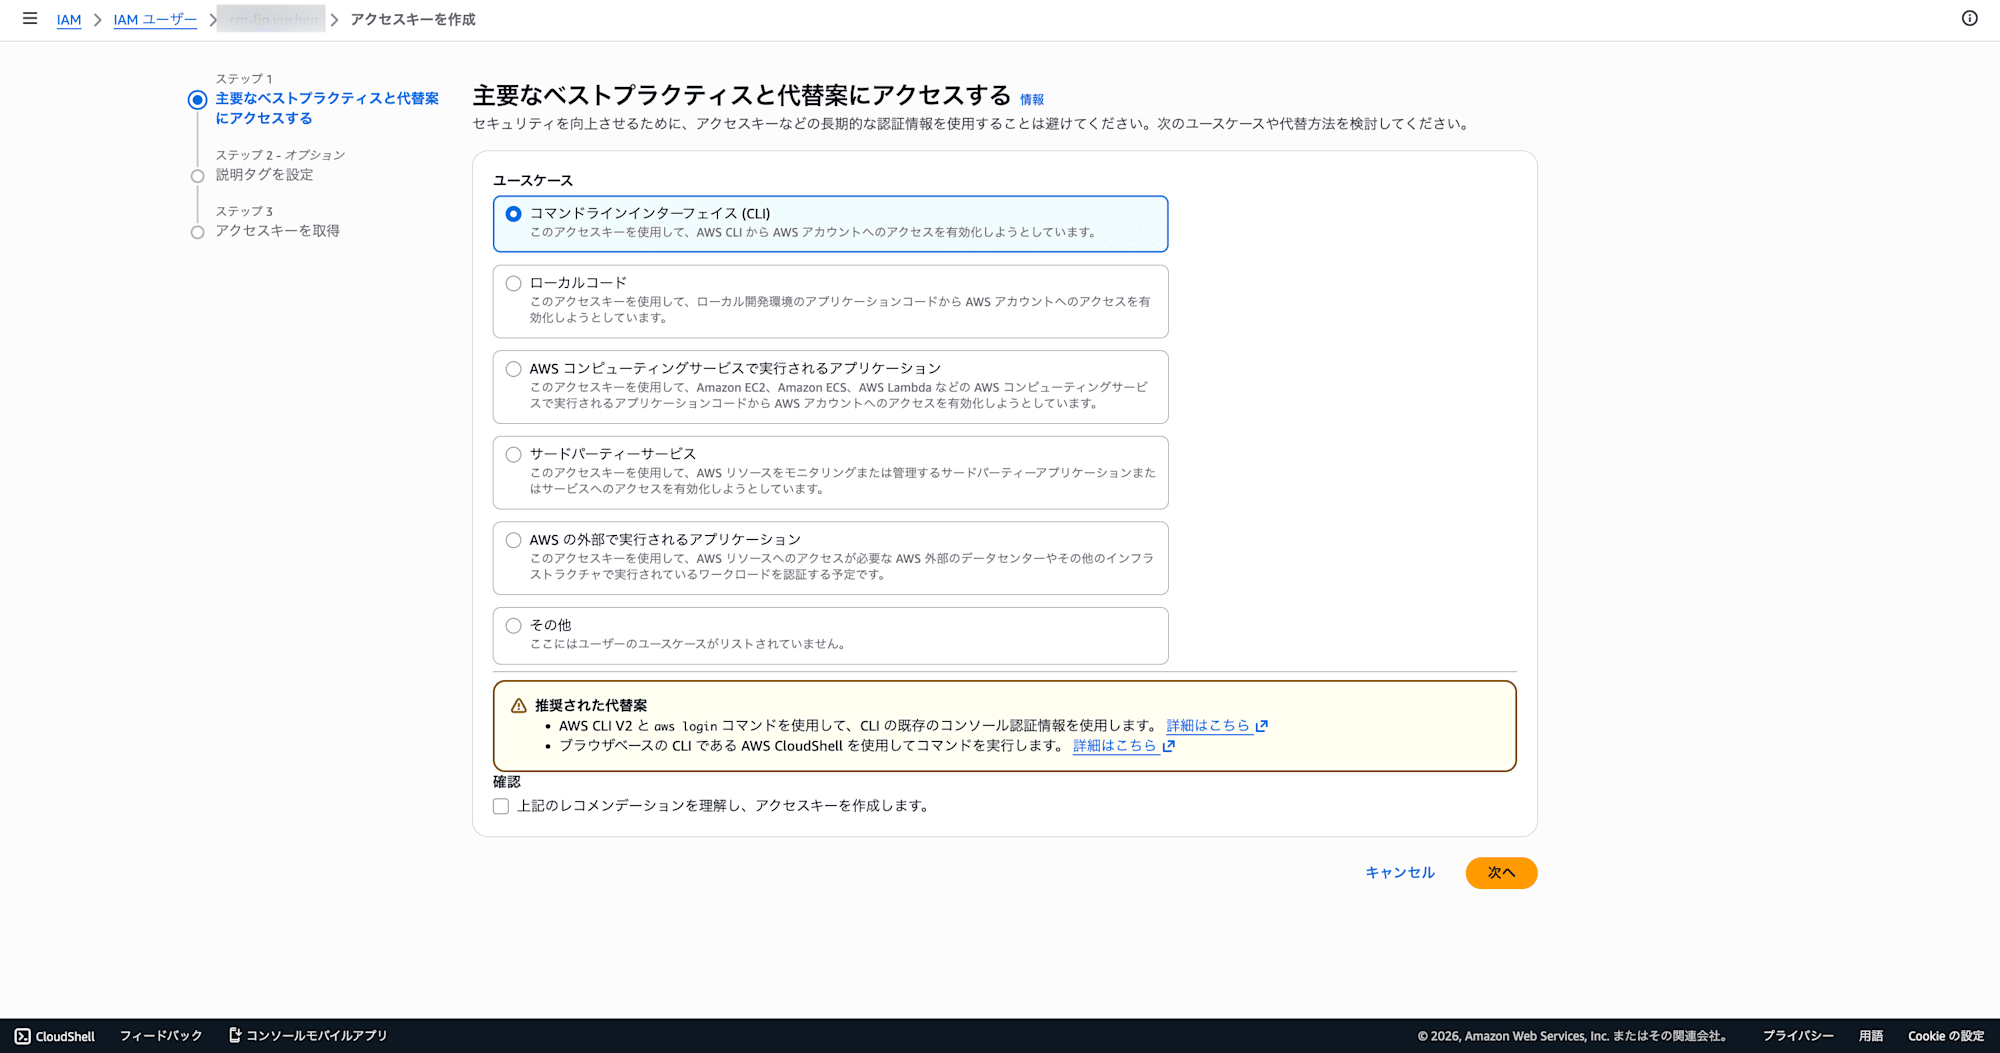
-
Select "Command Line Interface (CLI)" for the use case, check the confirmation checkbox, and click "Next"
-
Set a description tag (optional) and click "Create access key"
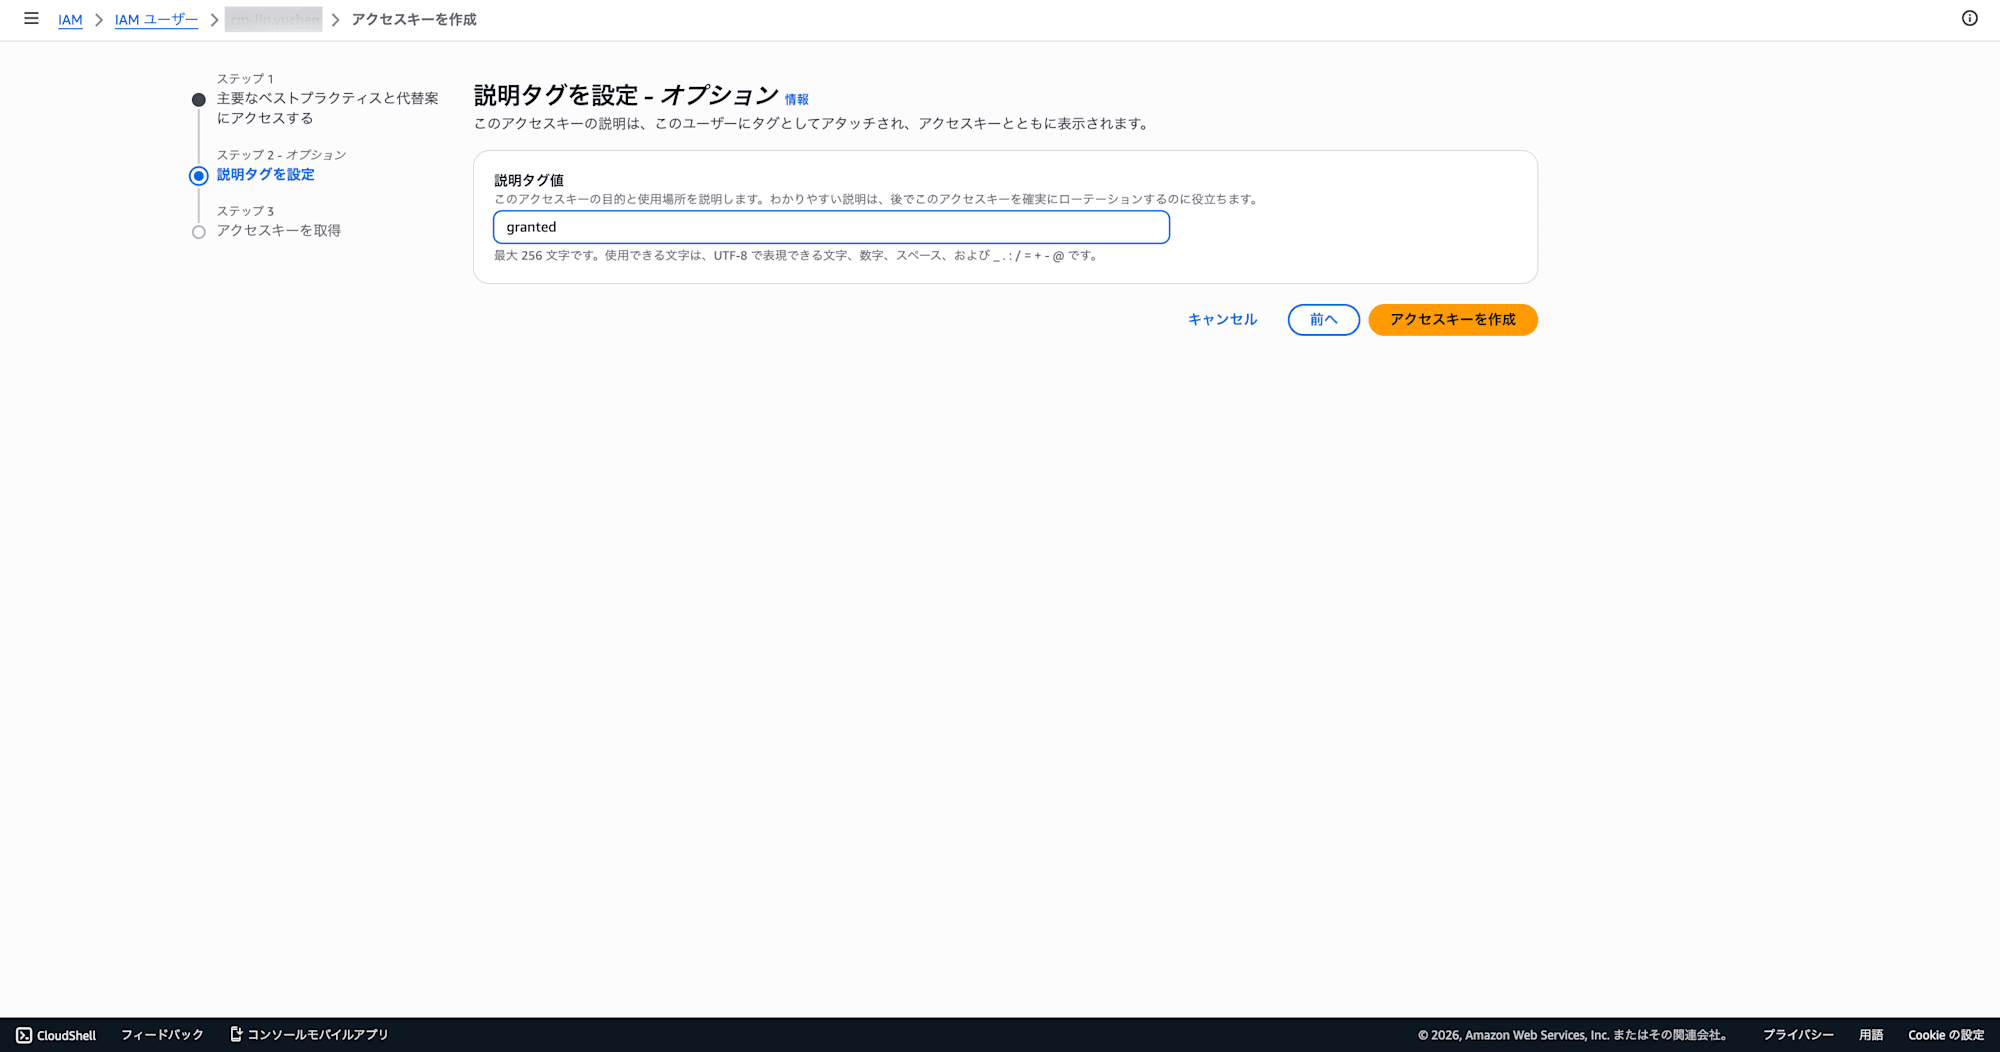
-
Your Access key ID and Secret access key will be displayed — copy both and store them somewhere safe
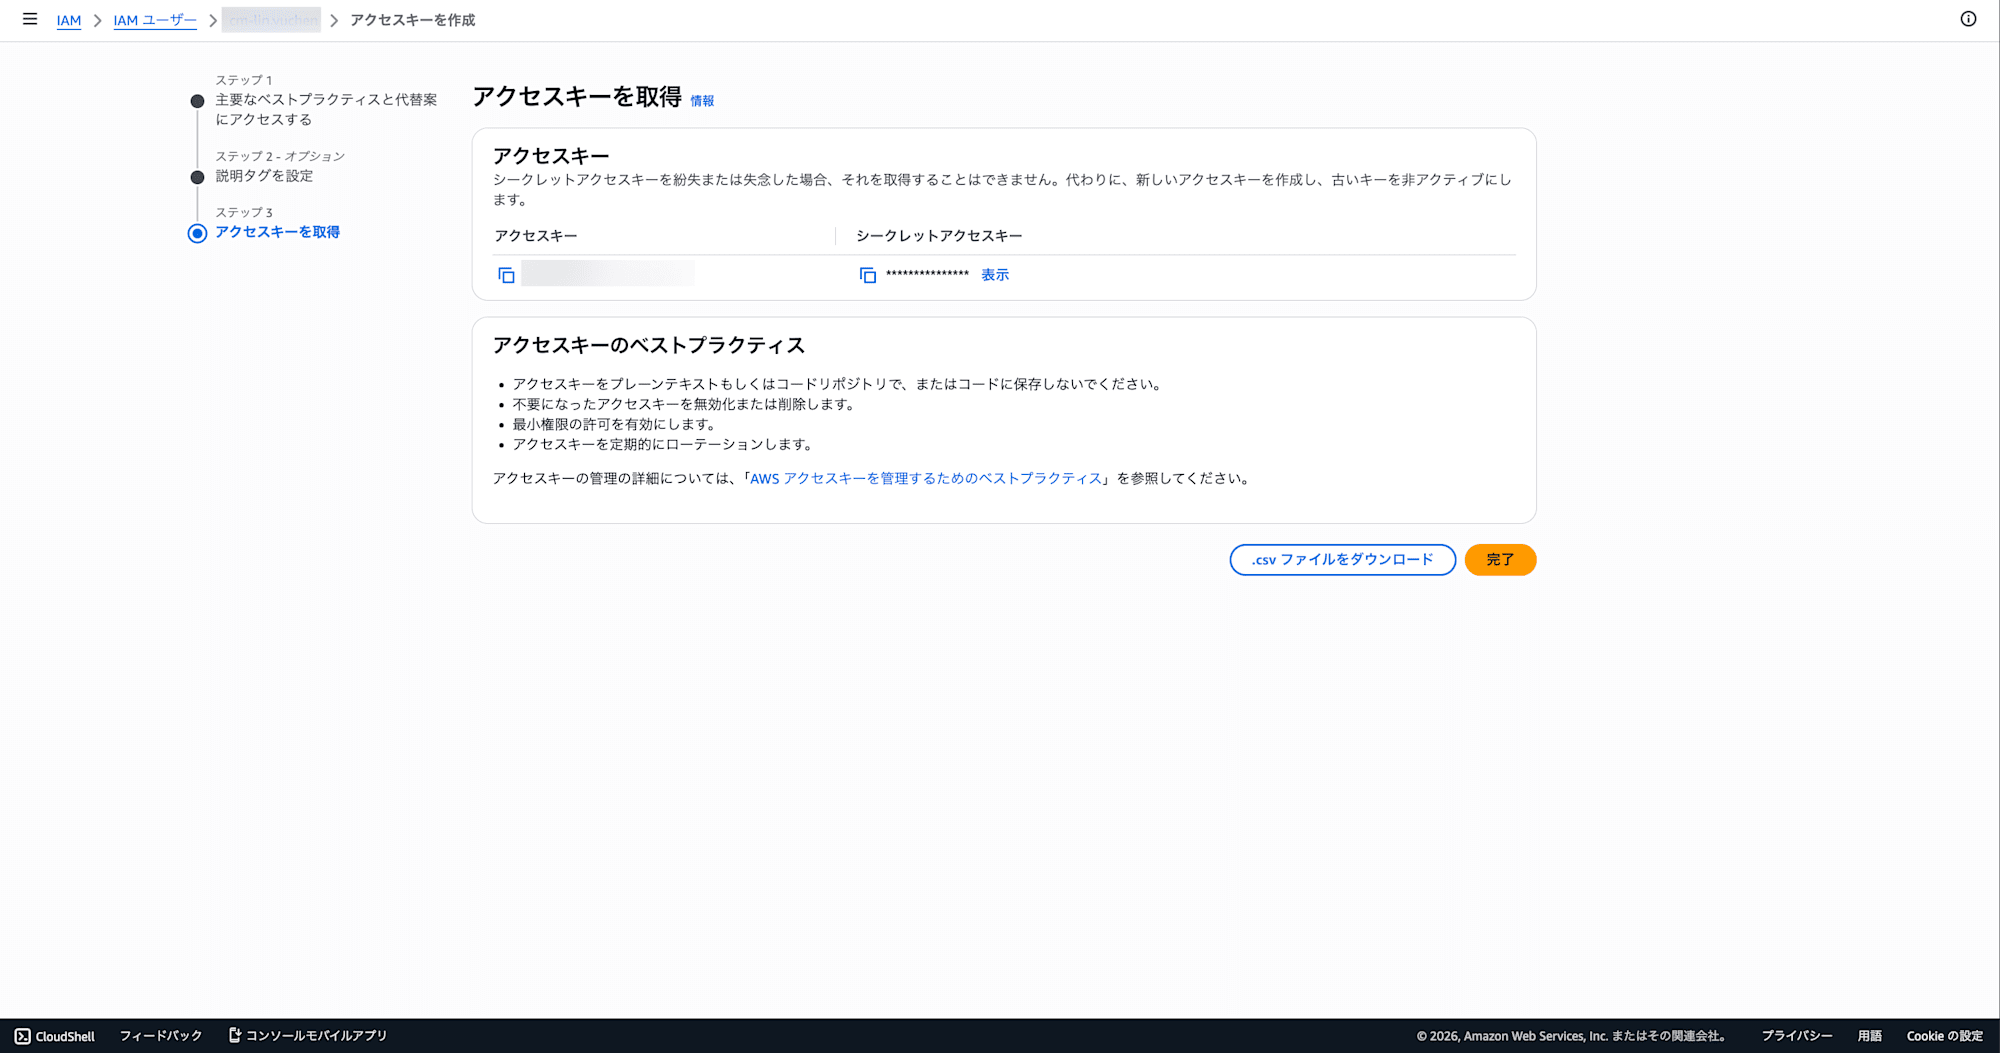
Important: The secret access key can only be viewed on this screen. If lost, you will need to create a new key. Since each IAM user can have up to 2 access keys, the safe approach when migrating tools is to create a new key, then disable → delete the old key after migration is complete.
How the Tools Work (Common)
Both aws-vault and Granted manage credentials using the same principle. Before diving into individual tool explanations, let's cover the shared mechanism.
A Wrapper for Credential Management
aws-vault and Granted are not replacements for the AWS CLI or SDK — they are wrappers that only handle credential retrieval and management. Actual AWS operations (S3, EC2, Lambda, etc.) are still performed by the AWS CLI/SDK as usual.
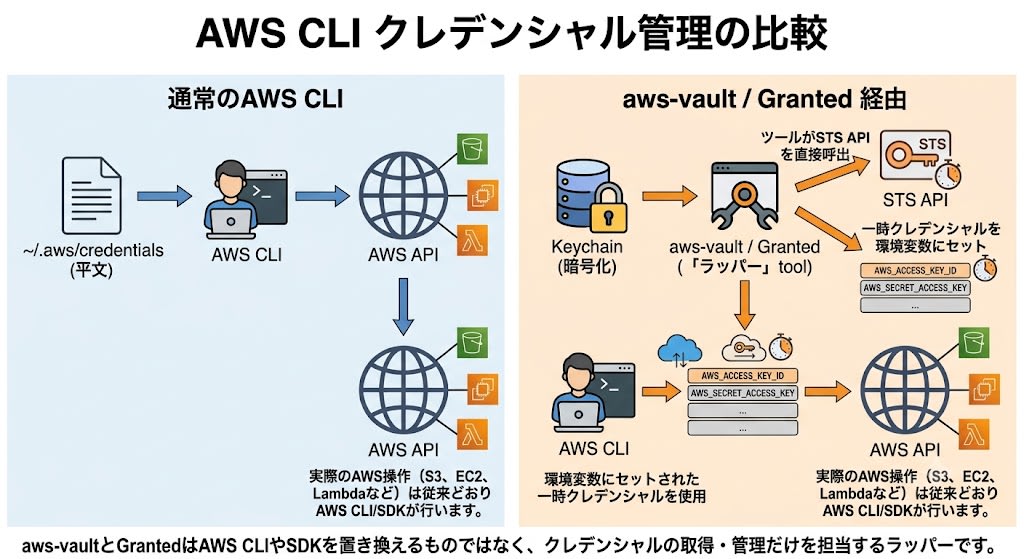
The tools themselves are standalone Go binaries that directly call the STS API using the AWS Go SDK internally (without going through the AWS CLI). They set the retrieved temporary credentials as environment variables (AWS_ACCESS_KEY_ID, AWS_SECRET_ACCESS_KEY, AWS_SESSION_TOKEN), which the AWS CLI/SDK then reads. Since the AWS CLI resolves credentials by checking environment variables first, ~/.aws/credentials is never used at all.
macOS Keychain Integration
Both aws-vault and Granted use the macOS Keychain to securely manage credentials.
- Dedicated keychain: Credentials are encrypted and stored in a dedicated keychain (e.g.,
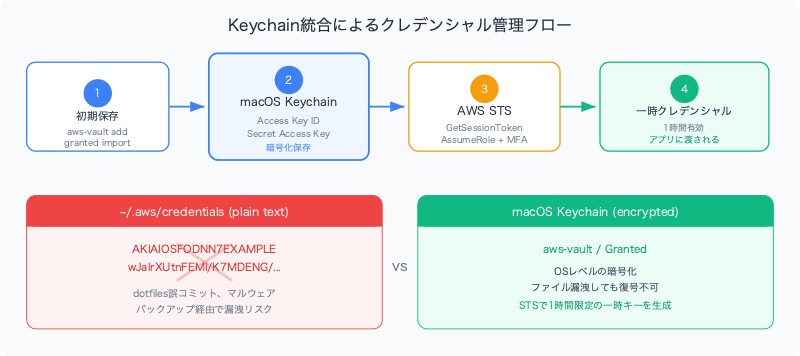
~/Library/Keychains/aws-vault.keychain-db), not the login keychain. Unlike plain-text storage in~/.aws/credentials, even if the file is leaked it cannot be decrypted - Temporary credentials: Temporary credentials are generated from stored long-term credentials via STS
GetSessionToken(valid for 1 hour by default). Only temporary credentials are passed to applications - Code signing: macOS release builds of both tools are code-signed, preventing repeated password prompts when accessing Keychain
Tool-specific storage method: aws-vault stores credentials in Keychain with
aws-vault add <profile>, and Granted withgranted credentials add <profile>.
Configuring ~/.aws/config
Both aws-vault and Granted read ~/.aws/config. The configuration format is shared, and the same file can be used interchangeably between tools.
[profile my-profile]
region = ap-northeast-1
output = json

[profile my-profile-admin]
source_profile = my-profile
role_arn = arn:aws:iam::123456789012:role/AdminRole
mfa_serial = arn:aws:iam::123456789012:mfa/my-iam-username
region = ap-northeast-1
output = json
source_profile: Specifies the name of the base profile that holds the credentialsrole_arn: The ARN of the role to AssumeRole intomfa_serial: The ARN of the MFA device (check in the "Security credentials" tab in the IAM console). For virtual MFA, the identifier is usually the same as the IAM usernameregion: The default AWS regionoutput: CLI output format. Choose fromjson(default),text,table, oryaml
The Relationship Between Source Profiles and AssumeRole
The configuration above contains two types of profiles:
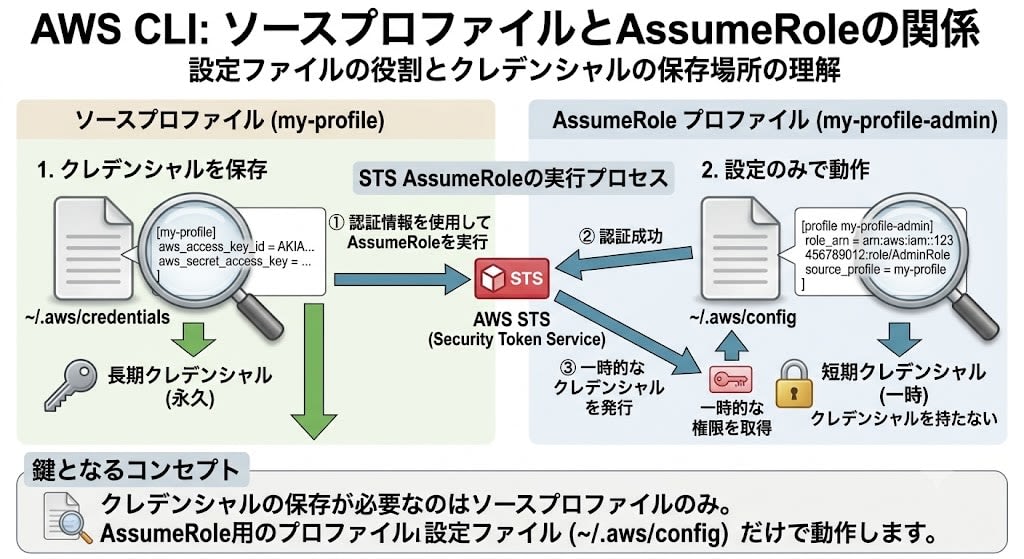
- Source profile (
my-profile) — The base profile holding the IAM user's long-term credentials. Credential registration in Keychain is required - AssumeRole profile (
my-profile-admin) — Holds no credentials; uses the source profile's credentials viasource_profileto execute STSAssumeRole. Works with just the~/.aws/configconfiguration
In other words, credential registration is only required for the source profile. No matter how many AssumeRole profiles you add, no additional credential registration is needed.
When You Have Multiple Source Profiles
Even if you have different IAM users for different organizations, registering credentials once per source profile is enough for all AssumeRole profiles under them to work.
# Source profile ①: IAM user for classmethod
[profile classmethod]
region = ap-northeast-1

[profile project-a-prod]
source_profile = classmethod
role_arn = arn:aws:iam::111111111111:role/AdminRole
mfa_serial = arn:aws:iam::000000000000:mfa/my-user

# Source profile ②: IAM user for foo-corp
[profile foo-corp]
region = ap-northeast-1

[profile project-c-stg]
source_profile = foo-corp
role_arn = arn:aws:iam::222222222222:role/DevRole
mfa_serial = arn:aws:iam::333333333333:mfa/my-user
Only two credentials need to be registered: classmethod and foo-corp. Switching from project-a-prod to project-c-stg can be done with the same operation, even though the source profiles differ.
aws-vault
Overview
aws-vault is a Go-based CLI tool developed by 99designs. It encrypts and stores AWS credentials in the OS keychain, then uses STS GetSessionToken and AssumeRole to generate temporary credentials.
Installation
brew install --cask aws-vault
Initial Setup
1. Storing Credentials
aws-vault add my-profile
You will be prompted to enter your access key ID and secret key. The entered information is encrypted and stored in the macOS Keychain.
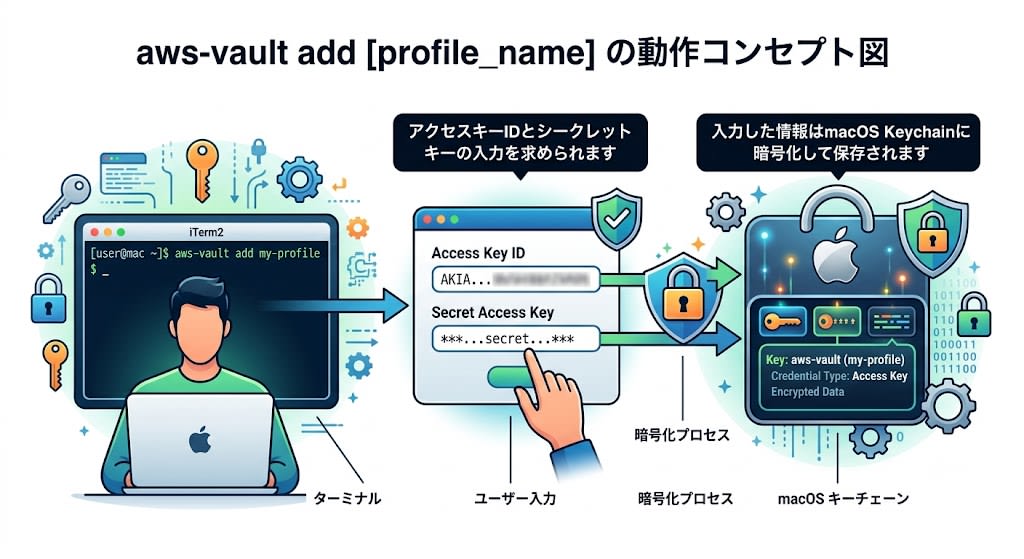
This command only saves to Keychain and does not write to ~/.aws/credentials or ~/.aws/config at all. Saved profiles can be confirmed with aws-vault list.
2. Verifying Operation
aws-vault exec my-profile-admin -- aws sts get-caller-identity
You will be prompted to enter an MFA token, and on success you will see output like this:
{
    "UserId": "AROA3XFRBF23EXAMPLE:session-name",
    "Account": "123456789012",
    "Arn": "arn:aws:sts::123456789012:assumed-role/AdminRole/session-name"
}
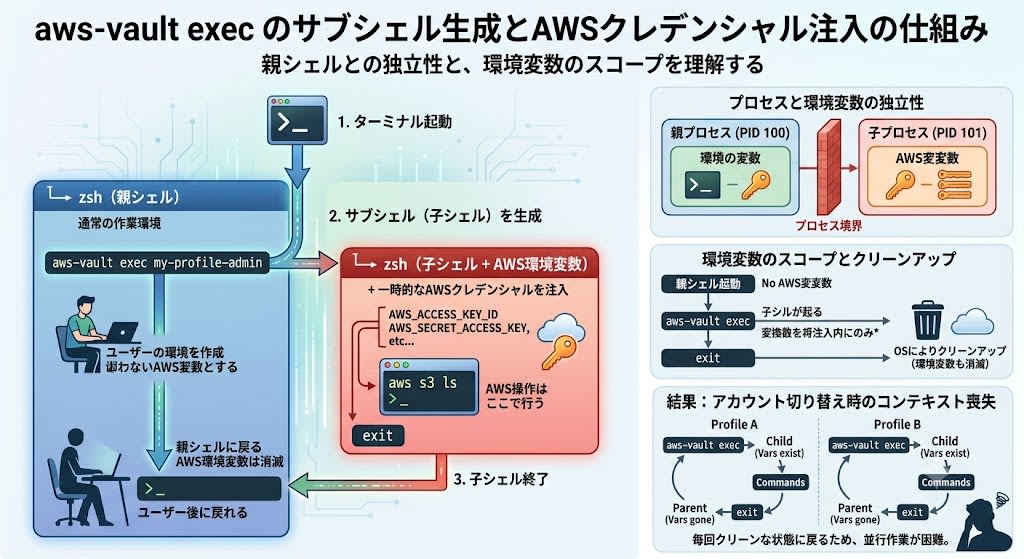
aws-vault's exec command spawns a subshell (child shell process) and injects the AWS credentials into it. Understanding this mechanism will make the troubleshooting and comparison with Granted described later easier to follow.
Terminal launch
└── zsh (parent shell)                    ← Normal working environment
    └── aws-vault exec my-profile-admin  ← Spawns a subshell
        └── zsh (child shell + AWS env vars)  ← AWS operations happen here
            exit                          ← Child shell exits
    ← Returns to parent shell (AWS env vars are gone)
The subshell is an independent process from the parent shell. AWS credentials exist only in the child shell's environment variables, so when the child shell exits with exit, the credentials disappear along with it. This is why aws-vault causes "context loss every time you switch accounts."
Contrast: Granted's
assumeloads a script with thesourcecommand and sets environment variables directly in the current shell. Since no subshell is spawned,exitis not needed, and the shell's context (current directory, command history, etc.) is fully preserved.
Commonly Used Commands
| Command | Description |
|---|---|
aws-vault add <profile> |
Save credentials to Keychain |
aws-vault exec <profile> -- <cmd> |
Execute a single command with temporary credentials |
aws-vault exec <profile> |
Open a subshell with temporary credentials |
aws-vault list |
Show profile list and session expiration times |
aws-vault login <profile> |
Log in to the AWS console in a browser |
aws-vault rotate <profile> |
Automatically rotate access keys |
aws-vault remove <profile> |
Delete stored credentials |
aws-vault clear <profile> |
Clear cached sessions |
Common Troubleshooting
If a session expires inside a subshell, exit the subshell with exit and run exec again (MFA re-entry required). This is usually sufficient.
exit                                # Exit the subshell
aws-vault exec my-profile-admin   # Obtain a new session (re-enter MFA)
exitis not an aws-vault-specific command — it's a shell builtin. Because aws-vault'sexeclaunches a nested shell process, runningexitterminates that shell and returns you to the parent shell.
If you run aws-vault exec my-profile-admin directly without first running exit, you will get the following error.
aws-vault: error: exec: running in an existing aws-vault subshell
You are already inside an aws-vault subshell, so you need to exit it with exit first.
In rare cases where errors persist even after running exec again, the cause may be a stale cached session. Use clear to explicitly delete the cache.
aws-vault clear my-profile-admin  # Delete the cached session
aws-vault exec my-profile-admin   # Obtain a new session
Granted
Overview
Granted is a Go-based CLI tool developed by Common Fate. Like aws-vault, it encrypts and stores credentials in Keychain, but its biggest feature is that it can switch credentials directly in the current shell without using a subshell.
Installation
brew tap common-fate/granted  # Add the Common Fate tap
brew install granted
After installation, verify the version.
granted -v
On first run, you will be prompted to add an alias to your shell profile. This enables the assume command. Restart your terminal after configuration.
Initial Setup
1. Securely Storing IAM Credentials
granted credentials add my-profile
You will be prompted to enter your access key ID and secret key, which are saved directly to the keychain. At the same time, the credential_process configuration is automatically appended to ~/.aws/config.
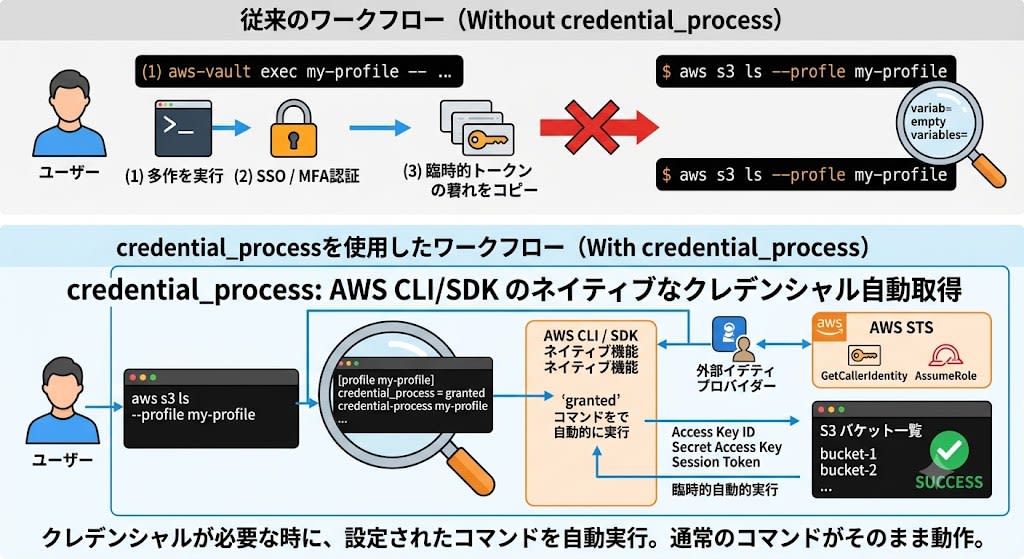
[profile my-profile]
credential_process = granted credential-process --profile=my-profile
region = ap-northeast-1
output = json
credential_process is a native feature of the AWS CLI/SDK that automatically runs the specified command to retrieve credentials whenever they are needed. With this configuration, regular AWS CLI commands like aws s3 ls --profile my-profile work as-is, without needing to use assume or aws-vault exec. aws-vault does not have this auto-append feature, making it a Granted-specific advantage.
If you already have credentials stored in plain text in ~/.aws/credentials, you can migrate them all to Keychain at once with the following command.
granted credentials import
2. Verifying Operation
assume my-profile-admin
Running assume alone without specifying a profile lets you select a profile interactively with fuzzy search.
assume
# → Profile list is displayed with fuzzy search
Commonly Used Commands
| Command | Description |
|---|---|
assume |
Interactively select a profile and AssumeRole |
assume <profile> |
AssumeRole with the specified profile (exports environment variables to the current shell) |
assume -c <profile> |
Open the AWS console in a browser (can log in to multiple accounts simultaneously) |
granted credentials add <profile> |
Save credentials to Keychain |
granted credentials list |
Show a list of profiles saved in Keychain |
granted credentials import |
Import from ~/.aws/credentials into Keychain |
granted sso populate |
Automatically generate profiles from SSO configuration |
Common Troubleshooting
source: no such file or directory: assumed
This occurs when the shell alias configuration is incorrect. Check that the following alias is set in ~/.zshrc (or ~/.zshenv).
# Correct alias
alias assume="source assume"

# Incorrect alias (may be generated by older versions of Granted)
# alias assume="source assumed"  ← extra "d"
Older versions used a binary named assumed, so after an update the alias may remain outdated. Restart your terminal after fixing it.
[✘] a profile with name my-profile already exists
Since granted credentials add simultaneously creates a new profile and saves credentials, it will error if the profile already exists in ~/.aws/config.
To add credentials to an existing profile, use granted credentials import. Temporarily write the source profile's (the base profile holding credentials) authentication information in ~/.aws/credentials, then import it.
# 1. Temporarily write the source profile's credentials
# Add [my-profile] section to ~/.aws/credentials

# 2. Run import
granted credentials import my-profile

# 3. Delete the plain-text credentials from ~/.aws/credentials
Key point: Profiles for AssumeRole (those with
role_arnandsource_profile) do not need credential registration. Importing only the source profile's credentials will automatically make all child profiles work.
aws-vault vs Granted Comparison
Basic Comparison
| Item | aws-vault | Granted |
|---|---|---|
| Developer | 99designs | Common Fate |
| Language | Go | Go |
| Credential storage | macOS Keychain | macOS Keychain |
| Temporary credentials | STS GetSessionToken / AssumeRole | STS GetSessionToken / AssumeRole |
| Shell behavior | Spawns a subshell | Exports environment variables to the current shell |
| SSO support | Basic (requires manual configuration) | First-class support |
| Profile selection | Must type the profile name exactly | Interactive selection with fuzzy search |
Shell Behavior Design Philosophy and Multi-Account Operations
The difference in shell behavior between the two tools is not just a UX distinction — it is a design decision based on the trade-off between security and convenience. This difference manifests as a significant workflow gap when handling multiple projects × environments (stg/prod).
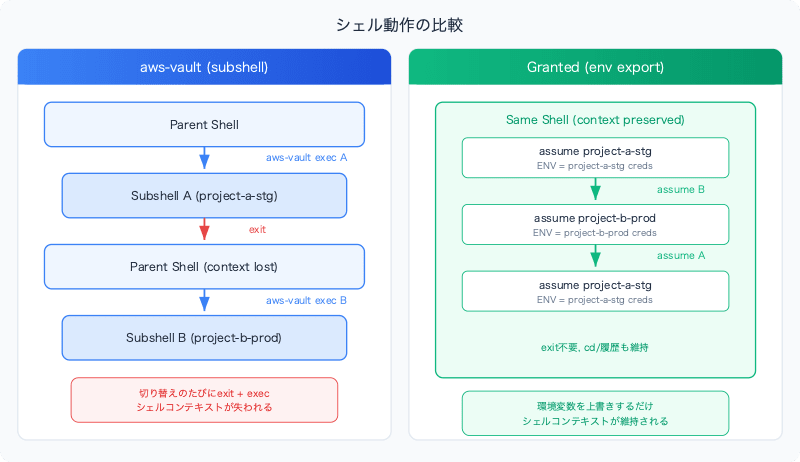
aws-vault: Credential isolation via subshell
aws-vault exec project-a-stg      # Subshell 1 (source: classmethod)
# Do work...
exit                                # Exit the subshell
aws-vault exec project-c-stg      # Subshell 2 (source: foo-corp)
# Do work...
exit
aws-vault exec project-a-stg      # Return (re-enter MFA if session expired)
- Credentials exist only in the subshell (child process) environment variables and are wiped from memory along with the process when
exitis called - No risk of accidentally running a command with the wrong profile's credentials
- No shell configuration changes (adding aliases, etc.) needed — works as-is in any shell
- However, every switch requires
exit→exec, and the shell context (current directory, command history) is lost
Granted: Workflow efficiency via environment variable export
assume project-a-stg              # Set environment variables (source: classmethod)
# Do work...
assume project-c-stg              # Overwrite environment variables (source: foo-corp)
# Do work...
assume project-a-stg              # Return — no exit needed
- Since no subshell is used, you can switch with a single
assumewhile maintaining the shell context - However, credentials persist in the current shell, so if you forget to run
assume, you may operate under the previous profile
Neither approach is "correct" — it's a matter of priorities. If security is paramount, aws-vault's process isolation is preferable; if you frequently switch between many accounts, Granted's efficiency shines.
Differences in AWS Console Access
# aws-vault: 1 browser session per 1 account
aws-vault login project-a-stg     # Open console in browser
aws-vault login project-b-prod    # Logs out from the previous session

# Granted: Multiple accounts can be opened in the browser simultaneously
assume -c project-a-stg           # Tab 1: project-a-stg console
assume -c project-b-prod          # Tab 2: project-b-prod console (separate container)
assume -c project-c-dev           # Tab 3: project-c-dev console
Granted uses browser container features to allow simultaneous login to multiple AWS accounts. This is extremely convenient for multi-account operations.
Differences in Session Renewal
With an IAM + MFA configuration, behavior when a session expires differs as follows.
| Operation | aws-vault | Granted |
|---|---|---|
| Re-authentication flow | Exit subshell with exit → run exec again → enter MFA |
Re-run assume → enter MFA |
| Shell context | Lost (new subshell) | Preserved (same shell) |
| SSO re-authentication | Manual | Browser opens automatically with --auto-login |
Note: Entering the MFA token itself cannot be skipped with either tool. The difference is whether the shell context is preserved during re-authentication.
About awsume
awsume is a Python-based tool that, like Granted, exports environment variables to the current shell. It has excellent features such as automatic refresh via autoawsume and a plugin system, but for the following reasons this article recommends choosing between aws-vault and Granted:
- Credentials are stored in plain text in
~/.aws/credentials(no Keychain integration) - Python dependency (requires runtime installation and version management)
- Slower CLI startup compared to Go binaries
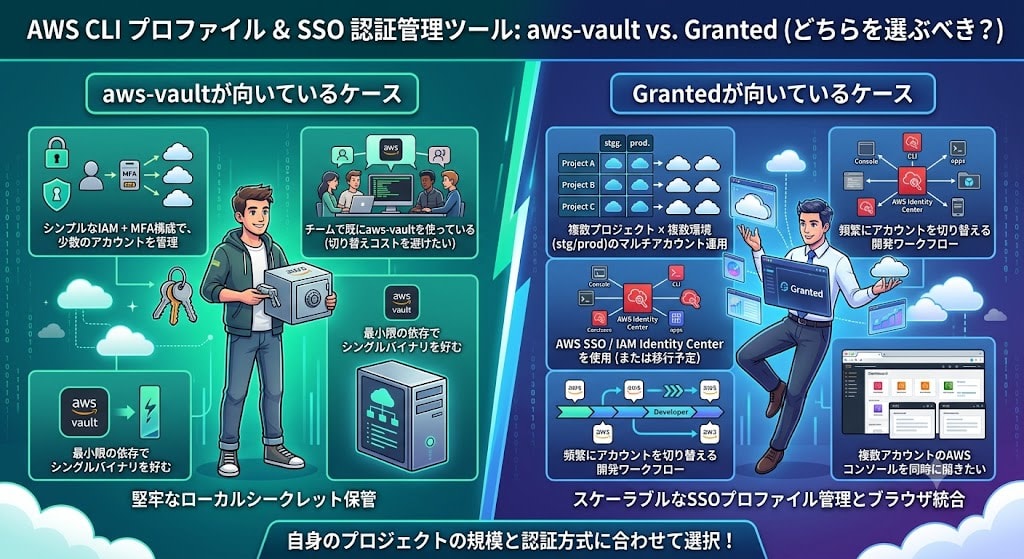
Which Should You Choose?
Cases Where aws-vault Is a Good Fit
- Simple IAM + MFA configuration managing a small number of accounts
- Your team is already using aws-vault (want to avoid switching costs)
- You prefer a single binary with minimal dependencies
Cases Where Granted Is a Good Fit
- Multi-account operations across multiple projects × multiple environments (stg/prod)
- Using AWS SSO / IAM Identity Center (or planning to migrate)
- Development workflow with frequent account switching
- Want to open AWS consoles for multiple accounts simultaneously
About Migration
Migrating from aws-vault to Granted is relatively straightforward. The ~/.aws/config settings can be shared as-is. However, there is no way to directly migrate credentials from aws-vault's Keychain to Granted's secure storage. The safest approach is to create a new access key in the IAM console and register it with granted credentials add. Disable → delete the old key after migration. It is also possible to have both tools installed simultaneously.
Integration with Claude Code
aws-vault and Granted can be combined with AI coding agents like Claude Code to further streamline AWS operations. Using Claude Code's "skills" feature, you can build secure AWS operation workflows that wrap credential management tools.
Constraints in Non-Interactive Environments
Claude Code executes commands non-interactively, so it cannot "enter a subshell and do work." Since each command runs as an independent process, environment variables inside a subshell are not passed to the next command.
# ✗ Subshell approach does not work
aws-vault exec my-profile          # Subshell opens, but next command is a separate process
aws s3 ls                            # ← Credentials don't exist here

# ✓ Use the command wrapper approach
aws-vault exec my-profile -- aws s3 ls  # Completes in 1 command
Similarly, Granted's assume sets shell environment variables, but since each command runs in a new shell process in Claude Code, environment variables set by assume will not persist to the next command.
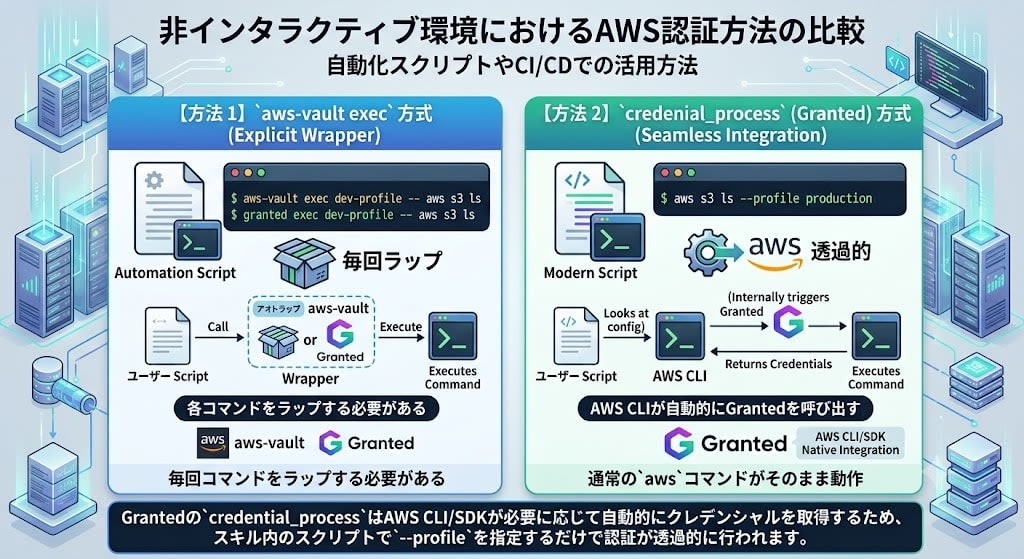
Therefore, the following two methods can be used in non-interactive environments:
- exec method — Wrap commands with
aws-vault exec/granted exec. Requires a prefix every time, but works with either tool - credential_process method — AWS CLI automatically calls Granted. Regular
awscommands work as-is (Granted only)
| Method | Tool | Description |
|---|---|---|
aws-vault exec <profile> -- <cmd> |
aws-vault | Commands must be wrapped every time |
granted exec <profile> -- <cmd> |
Granted | Same wrapper approach as aws-vault |
credential_process |
Granted | AWS CLI automatically calls Granted, so regular aws commands work as-is |
Since Granted's credential_process has AWS CLI/SDK automatically retrieve credentials as needed, authentication happens transparently just by specifying --profile in the skill's scripts.
Example Skill Structure
Below is an example of a Bedrock Knowledge Base operations skill using aws-vault.
.claude/skills/bedrock-ops/
├── SKILL.md              # Skill definition (command list, safety rules)
├── scripts/
│   ├── session.py        # Session management (check / create / ensure)
│   ├── aws_safe.py       # AWS command execution with safety guards
│   └── setup_project.py  # Project initial setup
├── aws-project.json      # Profile, account ID, safety rules (commit target)
└── aws-project.local.json # TOTP secret (.gitignore target)
The key point is the separation of concerns: the credential management tool handles authentication, and the skill handles the workflow and safety guardrails.
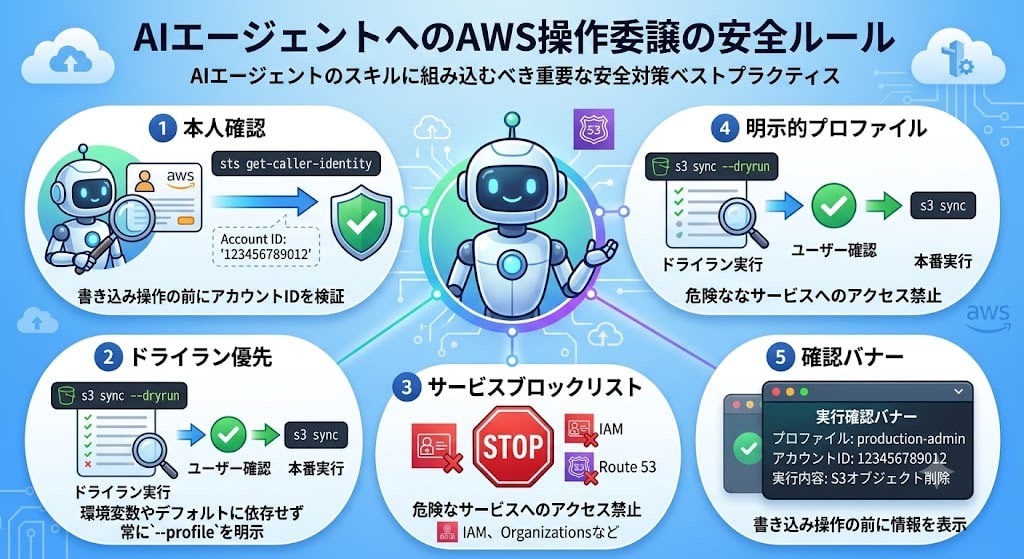
Safety Guardrail Design
When delegating AWS operations to an AI agent, it is important to incorporate the following safety rules into the skill.
| Rule | Description |
|---|---|
| Identity verification | Verify the account ID with sts get-caller-identity before write operations |
| Dry run first | Always run a dry run first for mutating operations like S3 sync, then proceed with the actual run after user confirmation |
| Service blocklist | Prohibit access to dangerous services such as IAM and Organizations |
| Explicit profile | Always specify --profile explicitly rather than relying on environment variables or defaults |
| Confirmation banner | Display profile name, account ID, and action details before write operations |
# Example: Upload files to S3
/bedrock-ops s3 sync ./data s3://my-bucket/knowledge-base/

# → A dry run is executed first and the changes are displayed
# → After user confirmation, run with --execute for the actual operation
By establishing a session with aws-vault's exec or Granted's assume and then having the skill operate AWS resources within a safe scope, you can confidently delegate AWS operations to an AI agent.
Summary
Both aws-vault and Granted are excellent tools that securely store AWS credentials in Keychain and allow you to operate with temporary credentials.
- Security is equivalent: Both use Keychain encryption + STS temporary authentication
- The difference shows in day-to-day workflow: Subshell approach (aws-vault) vs. environment variable export approach (Granted)
- Granted wins for multi-account use: Ease of account switching, fuzzy search, and simultaneous multi-console login are very convenient
If you're setting up now, especially in a multi-account environment, Granted is recommended. If you're already using aws-vault with a single account, there's no need to force a migration.