![[Update] Amazon Bedrock AgentCore Managed Harness has been released in preview!](https://images.ctfassets.net/ct0aopd36mqt/7M0d5bjsd0K4Et30cVFvB6/5b2095750cc8bf73f04f63ed0d4b3546/AgentCore2.png?w=3840&fm=webp)
[Update] Amazon Bedrock AgentCore Managed Harness has been released in preview!
This page has been translated by machine translation. View original
Introduction
Hello, I'm Jinno from the consulting department, who loves supermarkets.
Today, April 22, 2026, Amazon Bedrock AgentCore's new feature, Managed Harness, has been announced!
Let's explore it by reviewing the documentation!
Update Summary
Here are the three announced updates:
| Feature | Overview |
|---|---|
| Managed Harness (Preview) | Just specify model, system prompt, and tools, and the agent works without orchestration code |
| AgentCore CLI | Complete project creation, local development, and deployment via CLI. CDK ready, Terraform support coming soon |
| AgentCore Skills | Pre-built skills for coding assistants (Kiro / Claude Code / Codex / Cursor etc.), already available as Kiro Power, plugins for Claude Code coming soon |
AgentCore CLI has been around for a while. This blog focuses on Managed Harness.
By the way, when opening the AgentCore console, I noticed a new Harness Preview menu item has been added to the sidebar!

Harness
Before diving in, let me clarify what a "harness" is by reading the official blog.
In AgentCore context, a harness is the orchestration foundation for running agents. Specifically, it refers to the platform that bundles:
- Model invocation and inference execution
- Tool selection and invocation
- Returning results to the model, the so-called ReAct loop
- Session state management
- Error recovery and retries
- Authentication and authorization
While infrastructure setup became easier with Starter Toolkit and AgentCore CLI, it still took time, so they've simplified it further to enable quick agent creation.
What Managed Harness Handles
Managed Harness takes over common implementation areas that developers typically handle.
Developers only need to define these three things:
| Declaration | Content |
|---|---|
| model | LLM to use (Bedrock / OpenAI / Gemini) |
| systemPrompt | Instructions |
| tools | Available tools (Gateway / MCP / Browser / Code Interpreter etc.) |
Simple and codeless!
Execution Environment
Behind the harness, each session gets its own micro VM.
- Micro VM with isolated execution environment per session
- Dedicated file system and shell access for each session
- Session state stored in persistent file system, allowing continuation after interruption
- Shell commands executed directly without model inference, reducing unnecessary token consumption
- All actions automatically traced with AgentCore Observability
This is the same as the current AgentCore Runtime. They're likely using AgentCore Runtime behind the scenes.
Rather than explaining further, let's try it out!
First Look via Console
Let's first try it in the console.
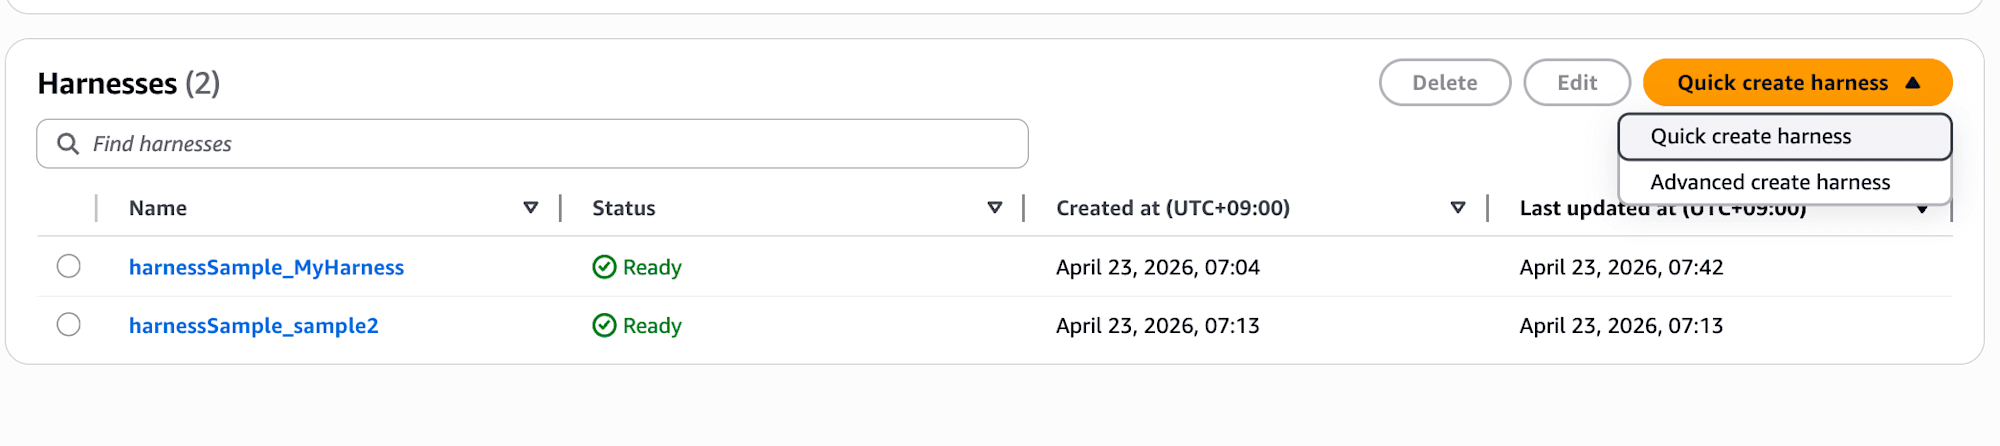
After clicking "Quick create harness" and waiting a bit, it redirects to the playground.
Looks like the harness was created with recommended settings! Super easy.
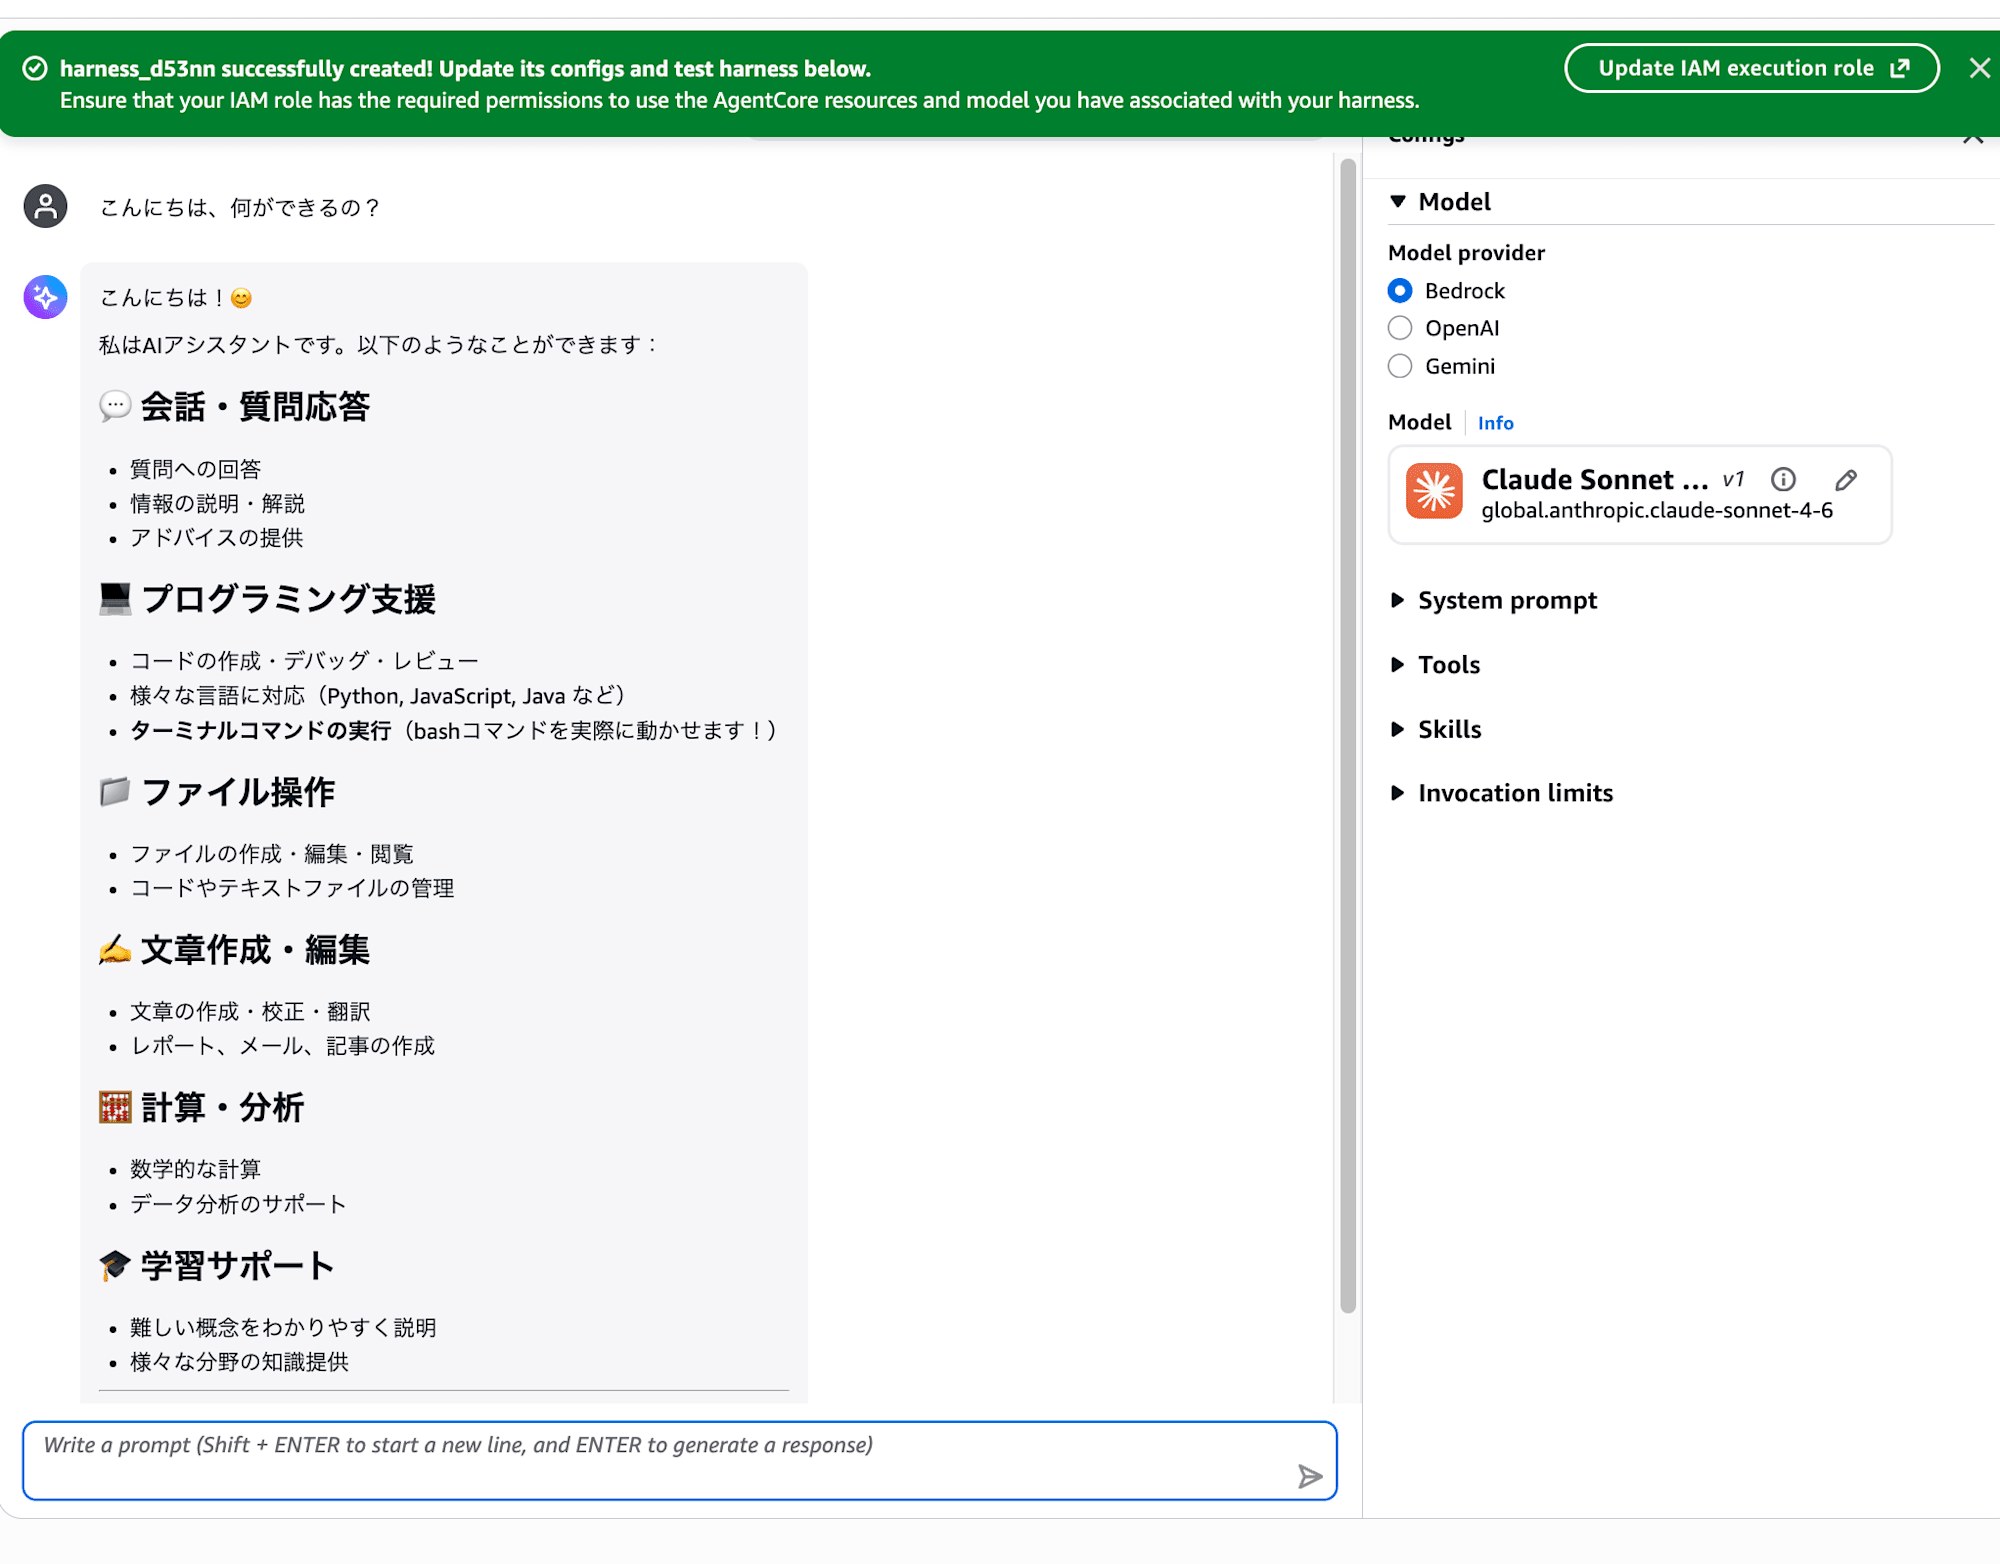
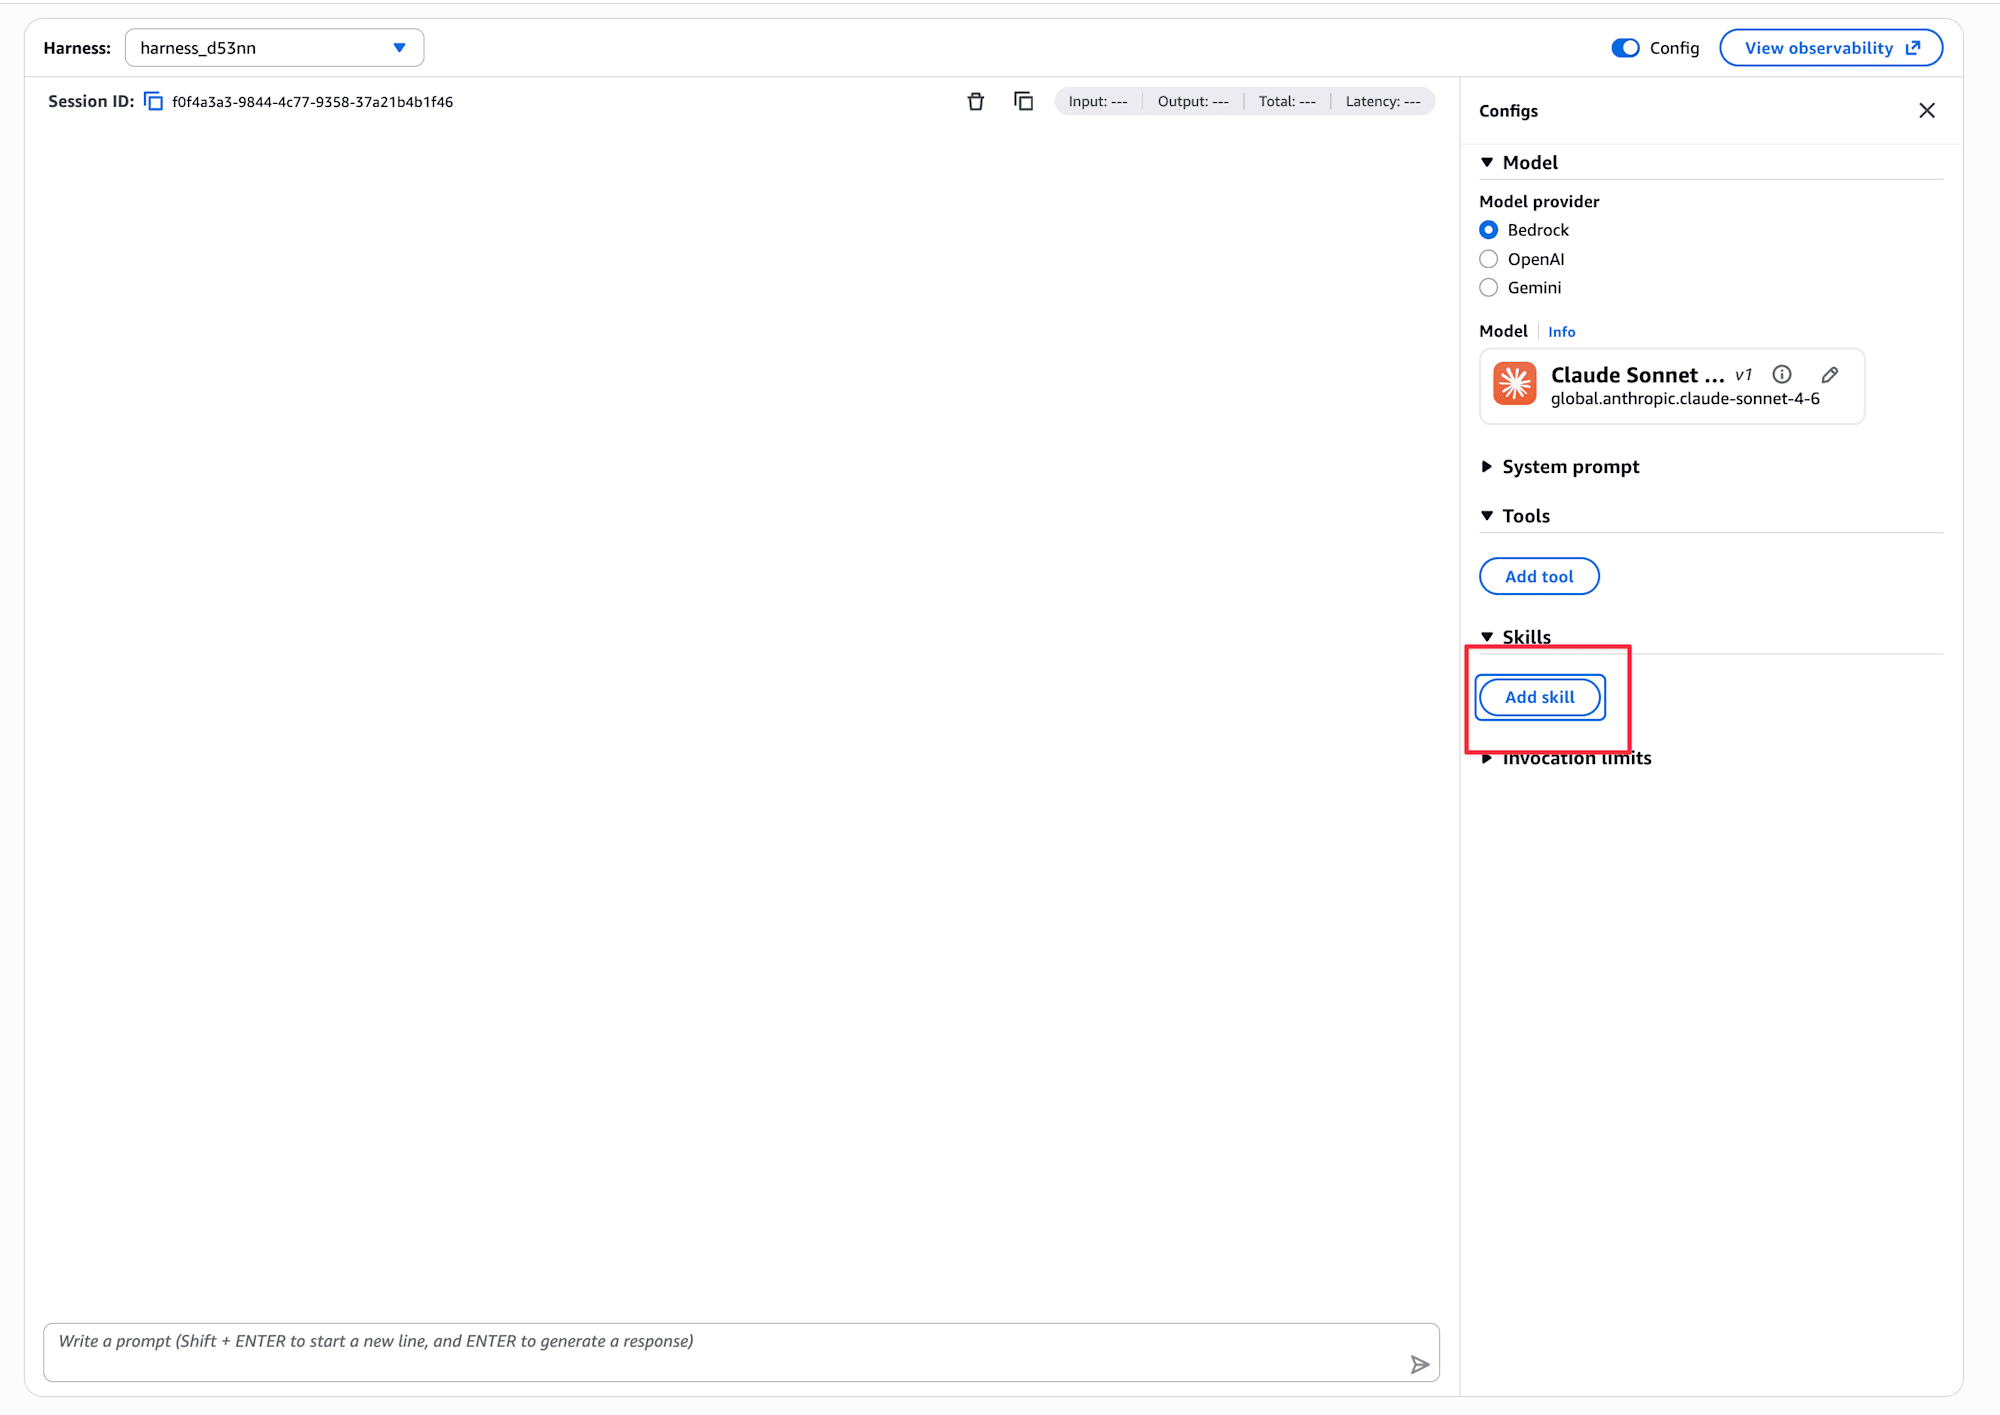
It seems we can also add Skills and tools.
Let me add the browser tool.
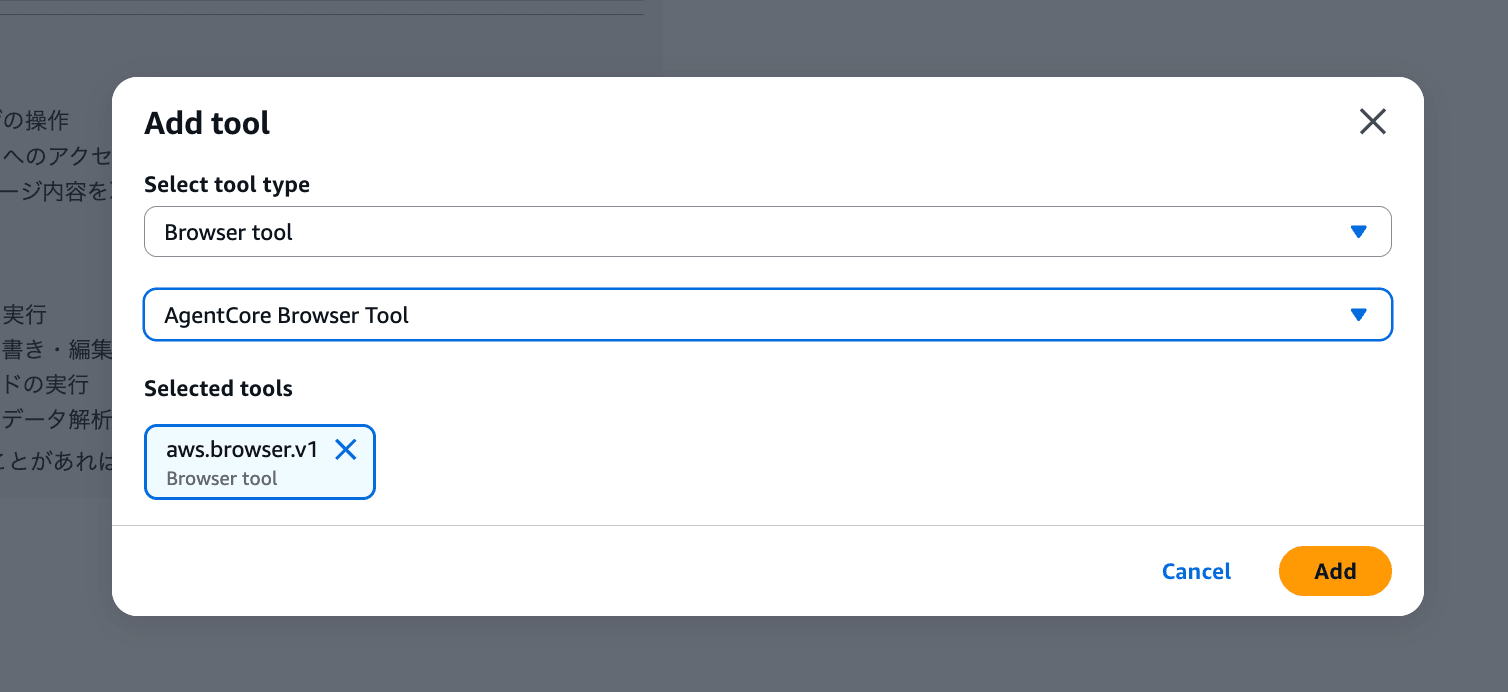
I chose the browser, but Code Interpreter, AgentCore Gateway, and Remote MCP Server can also be added. It's nice to be able to do everything in the management console.
Let's add it and ask a question.
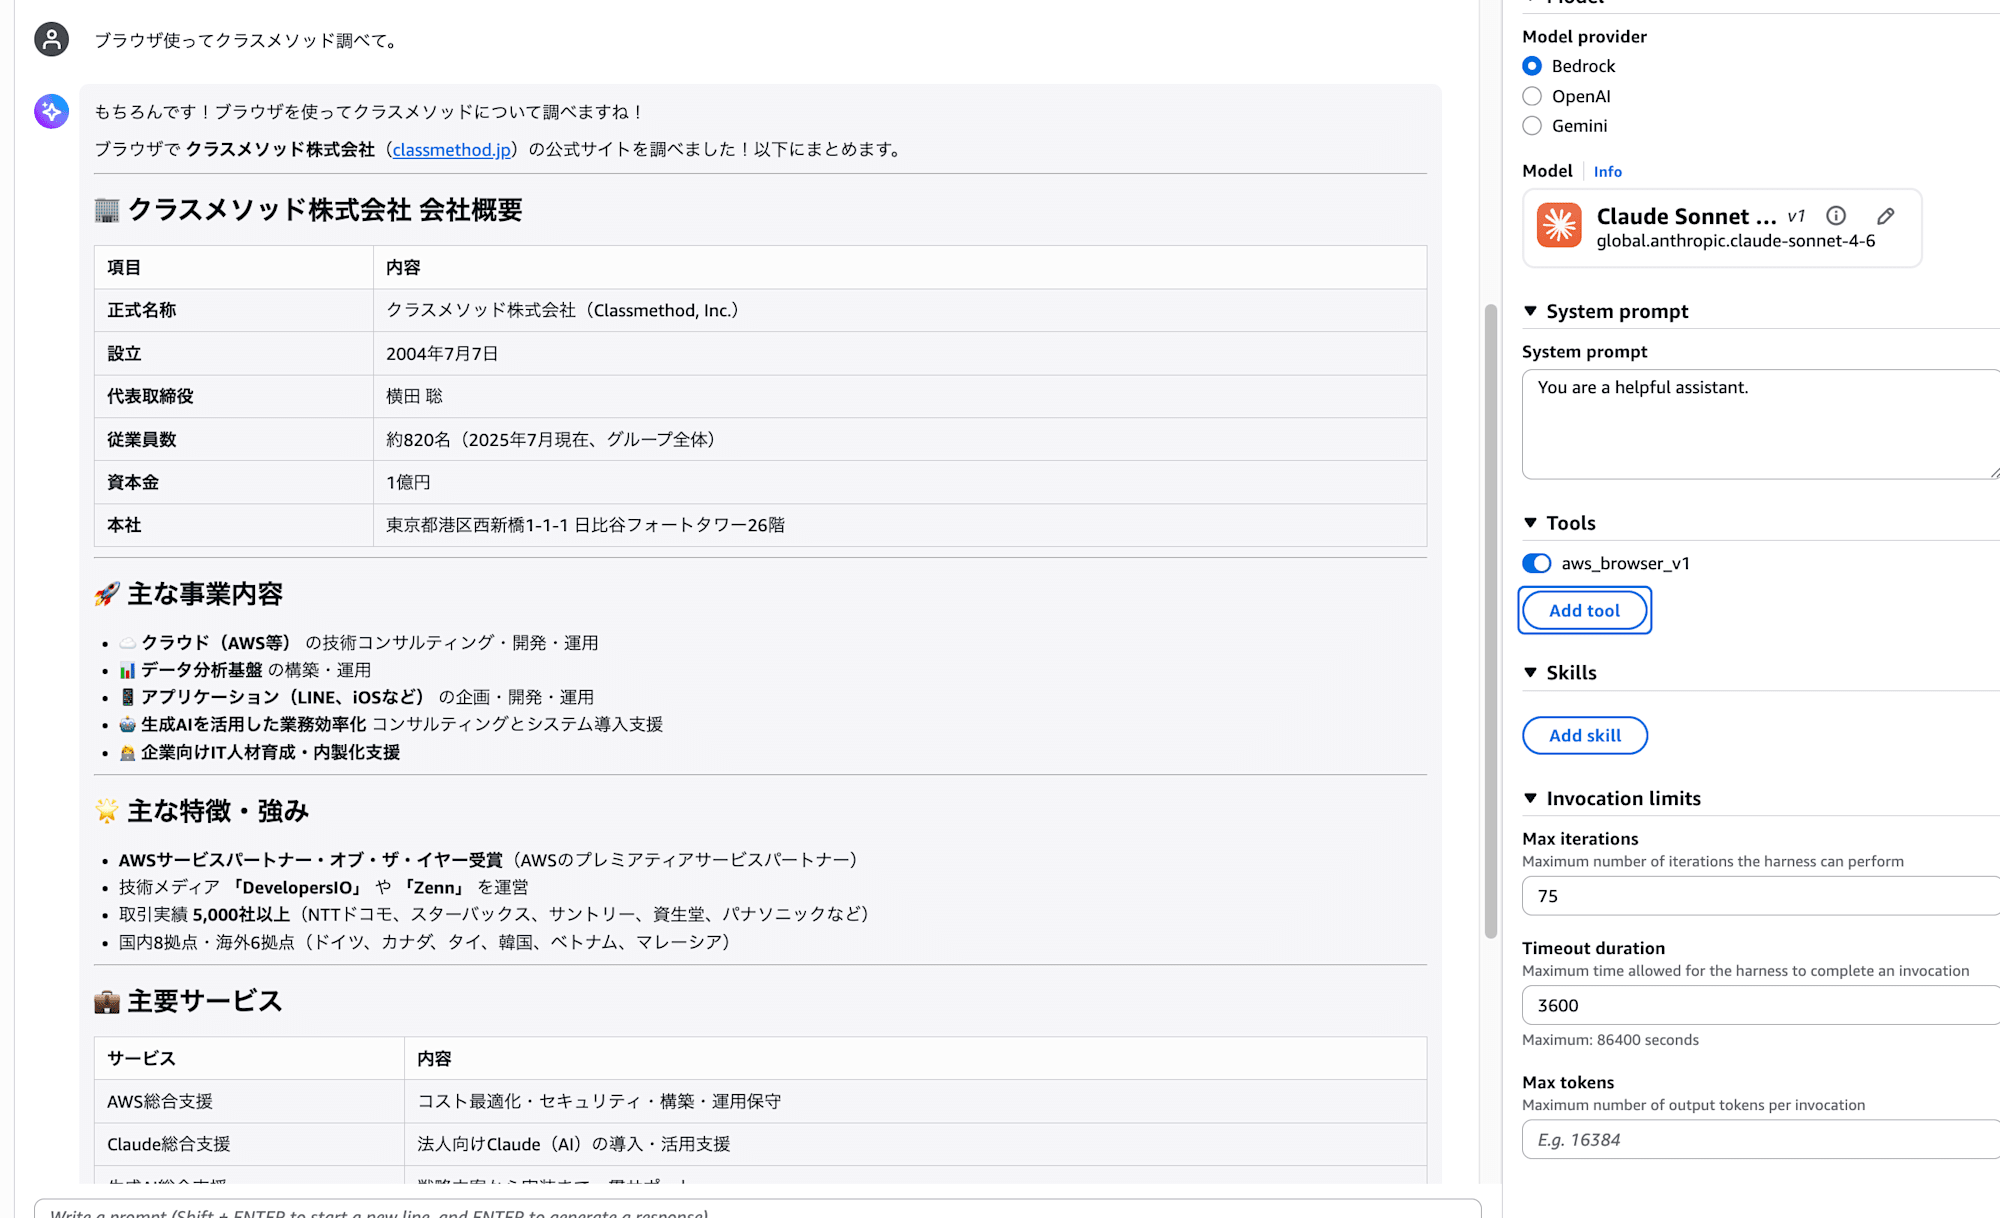
The browser is working fine!
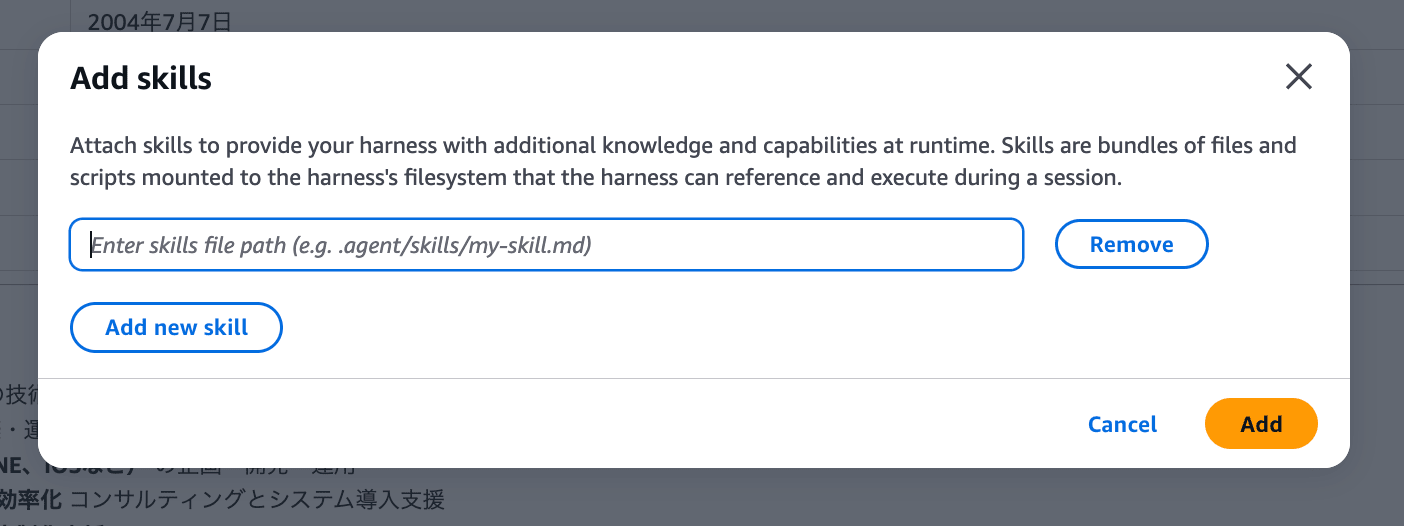
For Skills, it seems you need to specify a file path, but I'm not sure how to configure it. The content of the skill itself doesn't seem to be configurable in this input field. I'd like to investigate this in a future blog post.
If you select "Advanced create harness," it prompts for inputs that would be used with AgentCore CLI.
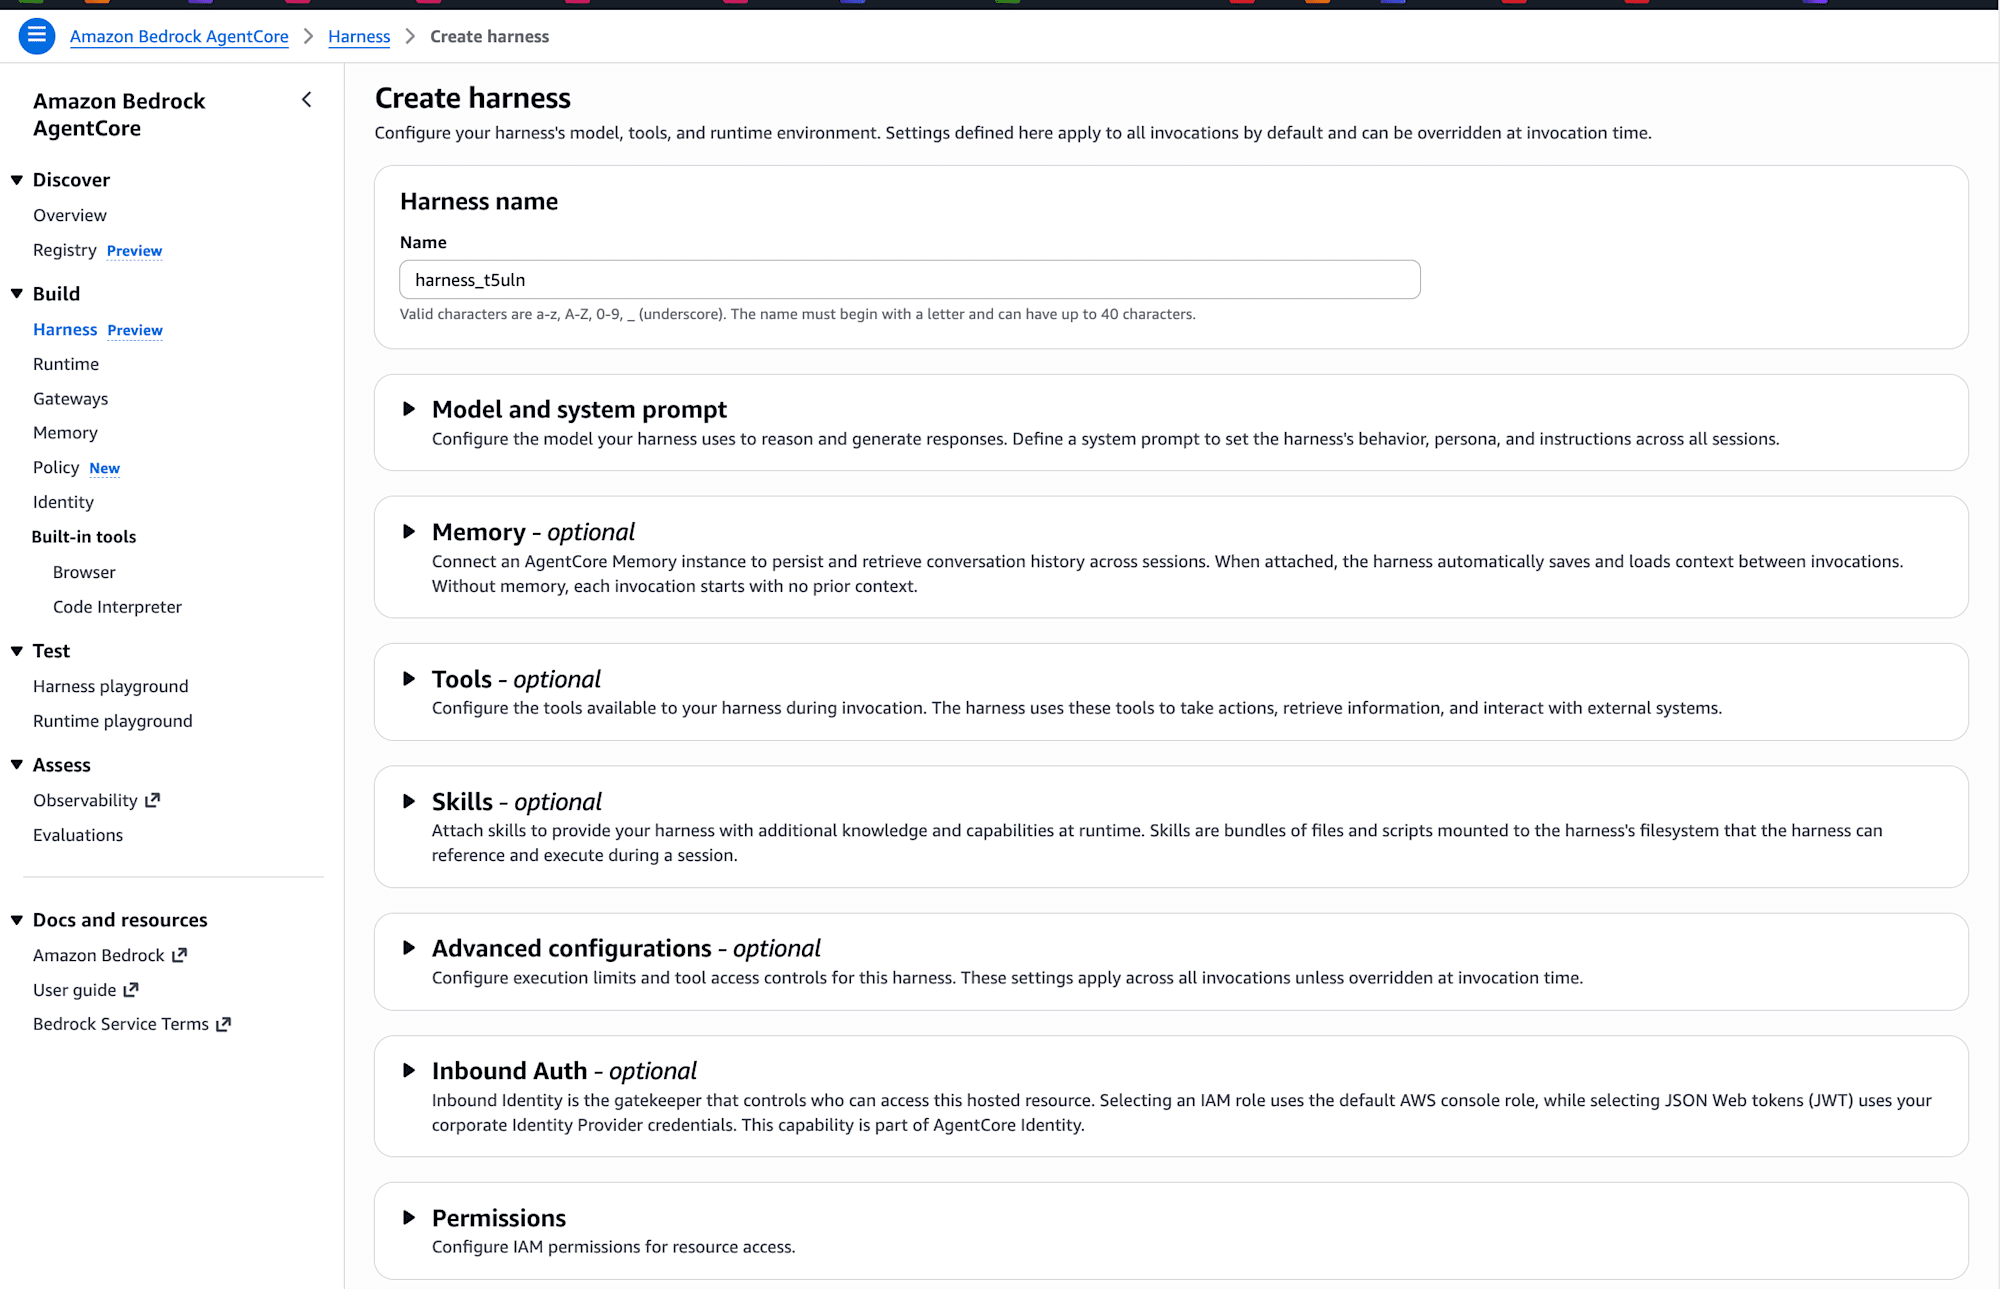
It's nice that even people who find the CLI difficult can easily create harnesses through the console!
Now that I've tried it in the console, let's explore deeper using the AgentCore CLI.
Prerequisites
Here's the environment I used:
| Item | Details |
|---|---|
| Region | us-east-1 (N. Virginia) |
| Node.js | 24 |
| AgentCore CLI | 1.0.0-preview.1 |
| Model | global.anthropic.claude-sonnet-4-6 (harness default) |
Managed Harness is currently available in four regions: Oregon (us-west-2), N. Virginia (us-east-1), Frankfurt (eu-central-1), and Sydney (ap-southeast-2).
For basic usage of AgentCore CLI itself and the recently added Agent Inspector Web UI (the feature that allows you to converse with agents through a browser UI via agentcore dev), please refer to my previous articles for background knowledge!
Installing AgentCore CLI (preview version)
Let's start with installation.
npm install -g @aws/agentcore@preview
agentcore --version
# 1.0.0-preview.1
If it shows 1.0.0-preview.1, you'll have access to the managed harness-related subcommands.
Creating a Project
Let's generate a project template. I named it harnessSample.
agentcore create
After entering the project name, you'll be asked about the type of resource to create first. Note that Harness is marked as recommended.
What would you like to build?

❯ Harness (recommended) - Managed config-based agent loop, no code required
  Agent - Start with a template or bring your own code hosted on AgentCore Runtime
  Skip - I'll add resources later
If you select Harness, you'll be asked the following questions in order:
| Step | Content |
|---|---|
| Name | Harness name (I used MyHarness) |
| Model provider | Amazon Bedrock / OpenAI / Google Gemini |
| Custom environment | Default Environment / Container URI / Dockerfile |
| Memory | Memory settings |
| Advanced settings | Tools / Authentication / Network / Lifecycle / Execution limits / Truncation / Session Storage |
The Model provider step also suggests default values. I selected Amazon Bedrock.
Select model provider
Choose where to run your models

❯ Amazon Bedrock - Default: global.anthropic.claude-sonnet-4-6
  OpenAI - Default: gpt-5 (requires API key ARN)
  Google Gemini - Default: gemini-2.5-flash (requires API key ARN)
Next is the Custom environment selection. I proceeded with the standard Default Environment (which includes Python, Bash, and File tools).
Custom environment
Optionally provide a custom container image for the harness runtime

❯ Default Environment - Includes Python, Bash, File tools
  Container URI - Use a pre-built container image (ECR URI)
  Dockerfile - Bring your own Dockerfile
Then the Memory setting. This determines whether the harness maintains context across sessions. I chose No persistent memory for this time.
Memory
Persistent memory lets the harness remember context across sessions

❯ No persistent memory - Harness does not retain context across sessions
  Enabled - Create persistent memory for this harness
Next is Advanced settings. This is a multiple-choice checkbox where you can enable tools, authentication, network, lifecycle, execution limits, truncation, and session storage individually. I only checked Tools.
Advanced settings (optional)
Configure tools, network, lifecycle, execution limits, truncation, or
session storage

❯ [✓] Tools - Add browser, code interpreter, MCP, or gateway tools
  [ ] Authentication - Inbound auth: AWS_IAM or Custom JWT
  [ ] Network - Deploy inside a VPC with custom subnets and security groups
  [ ] Lifecycle - Set idle timeout and max session lifetime
  [ ] Execution limits - Cap iterations, tokens, and per-turn timeout
  [ ] Truncation - Choose how context is managed when it exceeds limits
  [ ] Session Storage - Mount persistent storage for session data
Since I enabled Tools, I proceeded to the tool selection screen. There are four options: AgentCore Browser / AgentCore Code Interpreter / AgentCore Gateway / Remote MCP Server. I only enabled AgentCore Code Interpreter.
Select tools for your harness
Choose built-in tools, MCP servers, or gateways

❯ [ ] AgentCore Browser - Web browsing and automation
  [✓] AgentCore Code Interpreter - Sandboxed code execution
  [ ] AgentCore Gateway - Connect via gateway
  [ ] Remote MCP Server - Connect to an MCP server
Finally, in Review Configuration, you confirm all settings before finalizing.
Review Configuration

  Name: MyHarness
  Model Provider: bedrock
  Model ID: global.anthropic.claude-sonnet-4-6
  Memory: Disabled
  Tools: AgentCore Code Interpreter
Exploring the Generated Files
After completing the wizard, configuration files were created under app/MyHarness/.
harnessSample/
├── agentcore/
│   ├── agentcore.json     # Overall project specs
│   ├── aws-targets.json   # Deployment region/account
│   └── cdk/               # CDK suite (L3 is here)
└── app/
    └── MyHarness/
        ├── harness.json       # Harness config
        └── system-prompt.md   # System prompt (separate file)
Here's what app/MyHarness/harness.json looks like. You can manually modify the model name here and redeploy.
{
  "name": "MyHarness",
  "model": {
    "provider": "bedrock",
    "modelId": "global.anthropic.claude-sonnet-4-6"
  },
  "tools": [
    {
      "type": "agentcore_code_interpreter",
      "name": "code-interpreter"
    }
  ],
  "skills": []
}
The system prompt is extracted into a separate file called system-prompt.md. This design allows you to modify and redeploy to reflect changes.
The overall project specification is in agentcore/agentcore.json, where the harness is registered with a path reference:
{
  "name": "harnessSample",
  "managedBy": "CDK",
  "harnesses": [
    { "name": "MyHarness", "path": "app/MyHarness" }
  ]
}
The managedBy field is set to CDK, indicating it will be deployed through CDK.
Deployment Process
Let's proceed with deployment.
Executing Deployment
First, run the deploy command:
agentcore deploy
You'll see a step-by-step display like this:
AgentCore Deploy

Project: harnessSample
Target: us-east-1:123456789012

[done]    Validate project
[done]    Check dependencies
[done]    Build CDK project
[done]    Synthesize CloudFormation
[done]    Check stack status
[done]    Publish assets
[done]    Deploy harnesses

Deployed 1 stack(s): AgentCore-harnessSample-default
There's a Deploy harnesses step specifically included in the pipeline, confirming harness-specific processing.
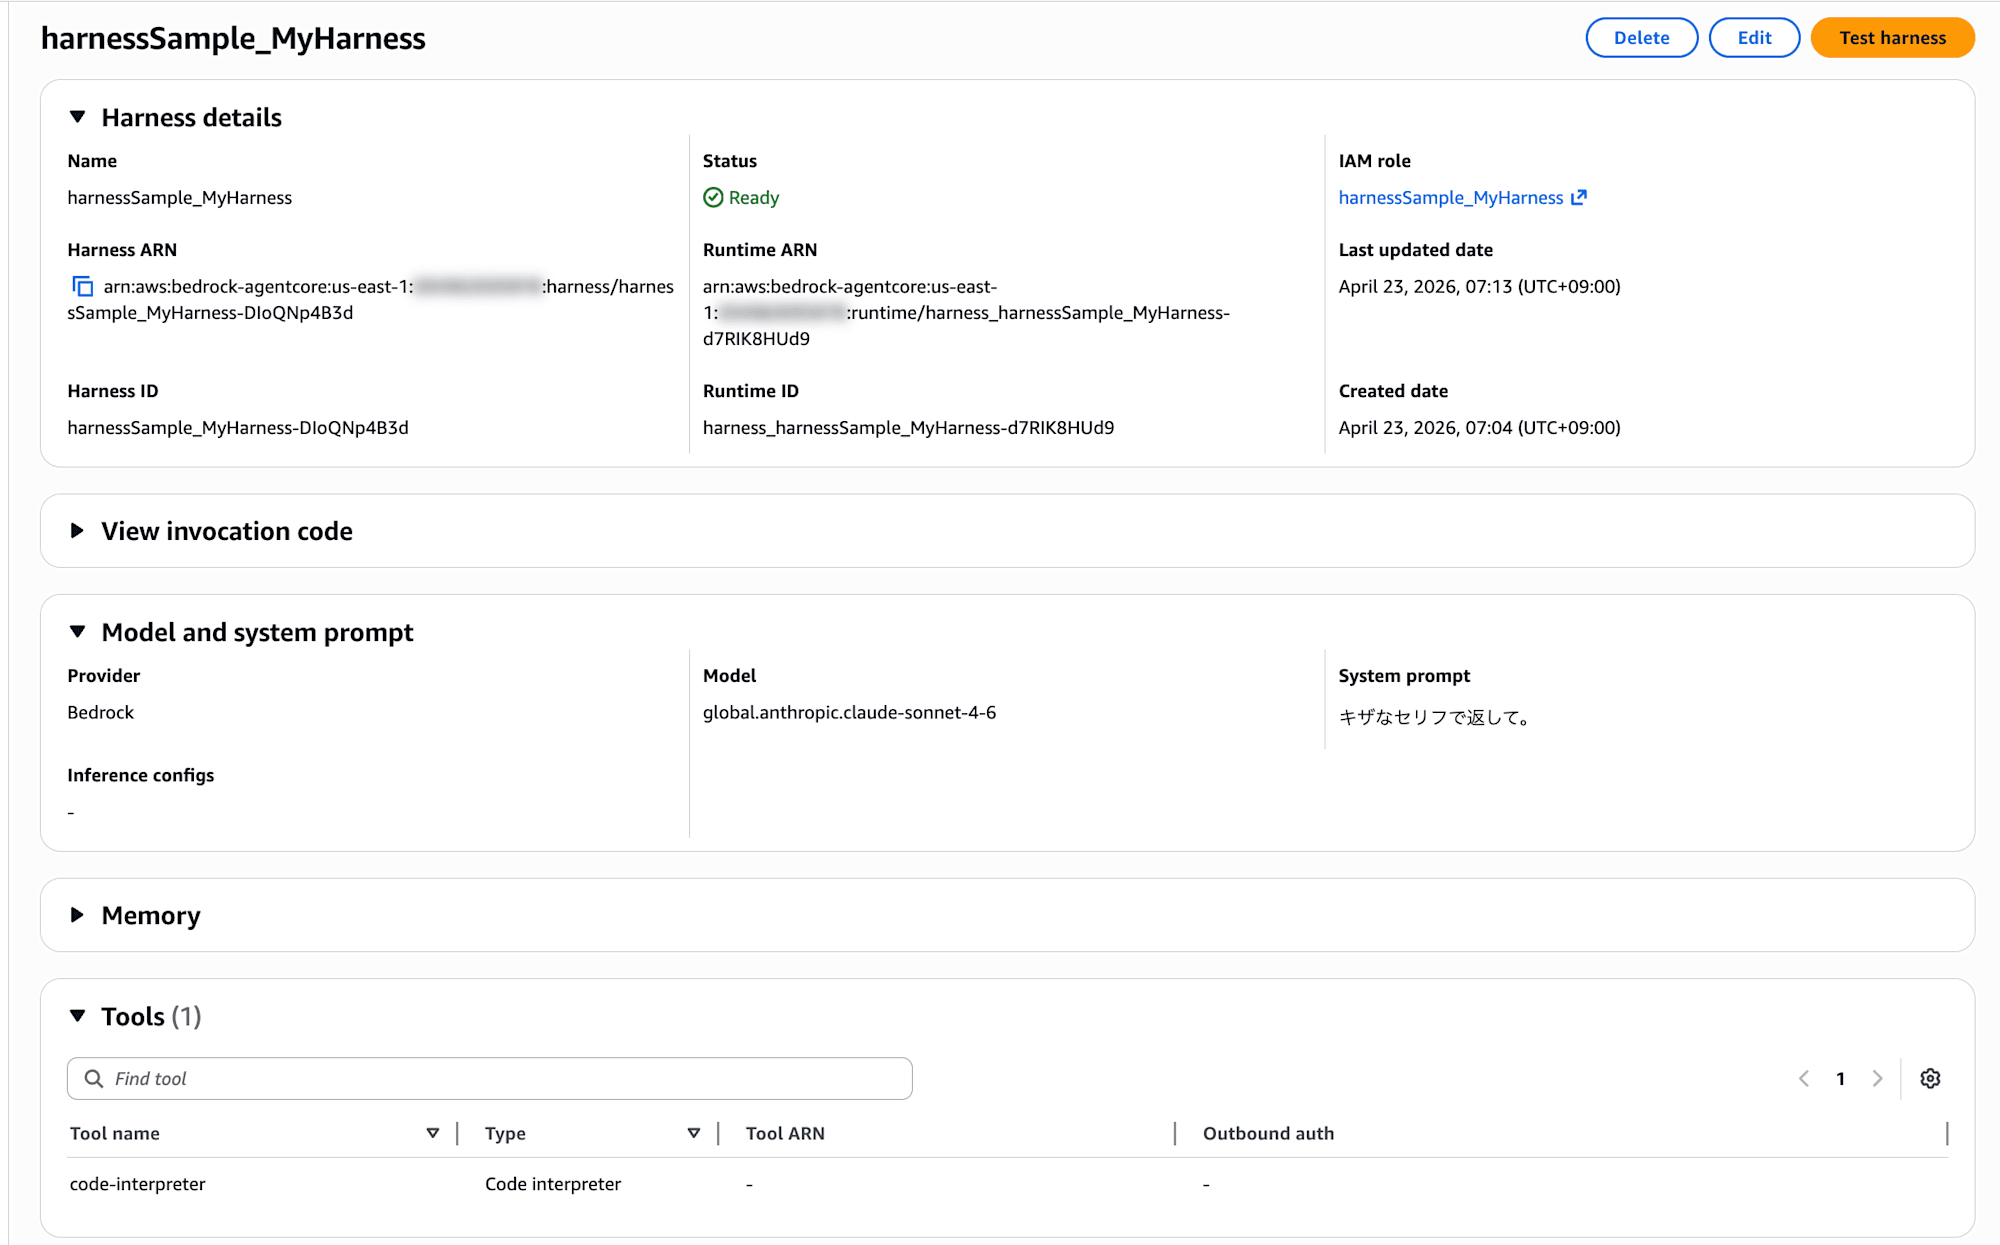
You can also check the harness details from the Bedrock console. The Harness details section shows ARN and IAM role, Model and system prompt shows the configured model and system prompt, and Tools lists the registered tools.
Scrolling down further reveals Skills, Advanced configurations, Inbound Auth, and Observability (Runtime sessions / Runtime invocations / vCPU and memory consumption metrics).
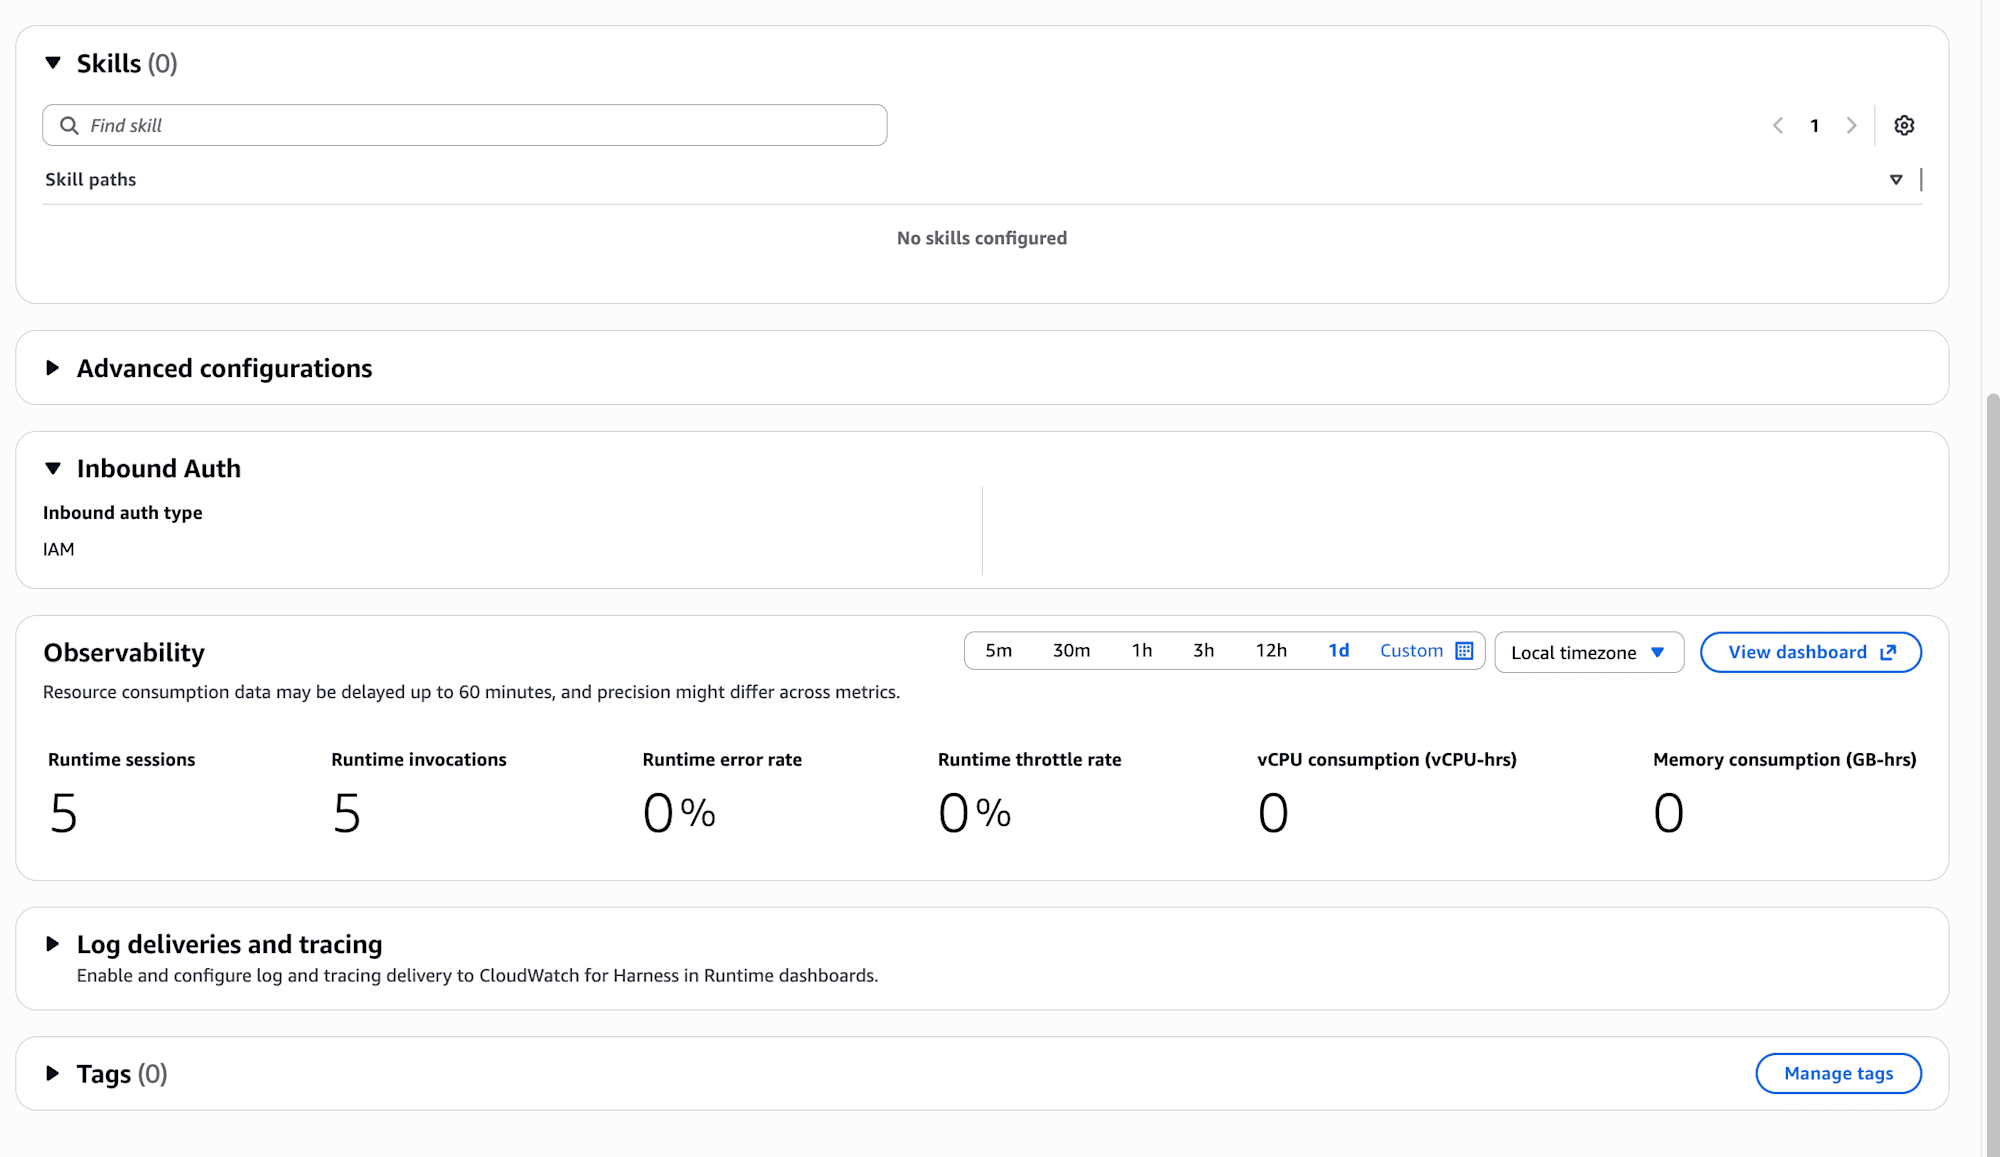
I was concerned about not setting Inbound Auth, but it's set to IAM by default. That's good.
Another interesting point is the Skills (0) / No skills configured section, which appears to be for attaching skills to the harness. The harness.json also includes an empty "skills": [] array by default, suggesting skills can be configured. I'll investigate this in another blog. The official documentation includes information on Skills configuration if needed.
As a side note, I noticed that resources deployed via harness appeared in Runtime as well, confirming that Runtime is indeed used behind the scenes.
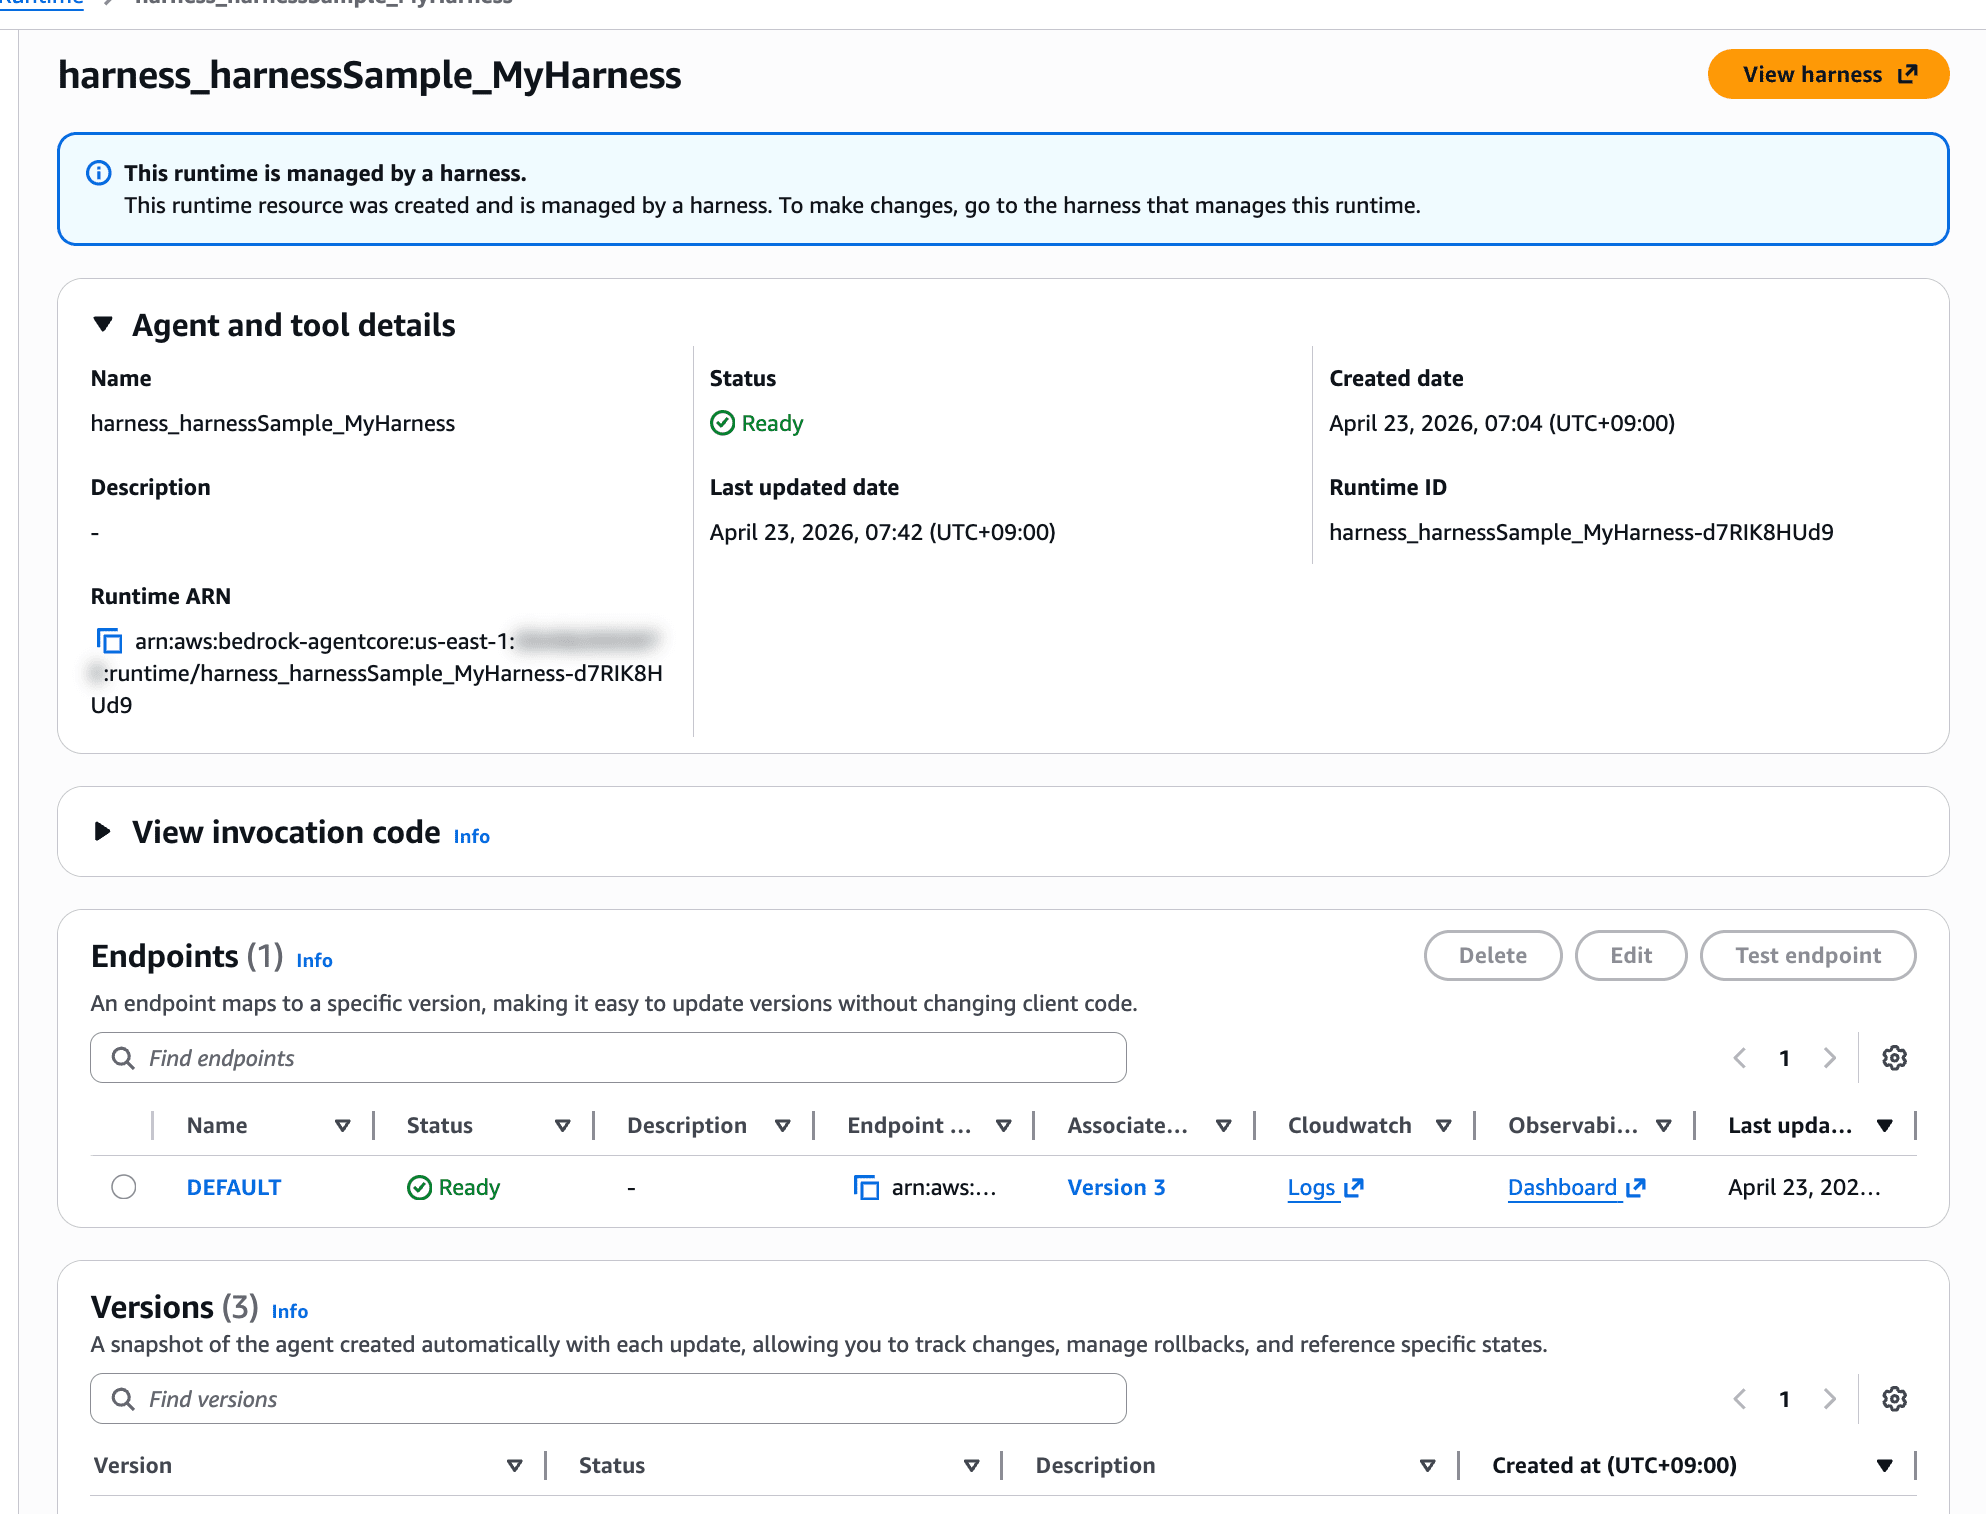
This runtime is managed by a harness.
This runtime resource was created and is managed by a harness. To make changes, go to the harness that manages this runtime.
There's even a notice stating that it's managed by a harness.
Testing: Using Code Interpreter for Calculations
Since I added the Code Interpreter tool, let's ask it to do an addition. Using --session-id allows continuing the conversation with the same ID.
agentcore invoke --harness MyHarness \
  --session-id "$(uuidgen)" \
  "Calculate 121 + 23133 using Code Interpreter"
Here's the result:
Of course! I'll calculate that using Code Interpreter.
🔧 Tool: code_interpreter

⚡ 4938 in · 121 out · 2.6s
🔗 Session: XXXXXXXX-XXXX-XXXX-XXXX-XXXXXXXXXXXX (use --session-id to continue)
  ✓
Here's the calculation result!

**121 + 23133 = 23254**

⚡ 5073 in · 27 out · 2.6s
🔗 Session: XXXXXXXX-XXXX-XXXX-XXXX-XXXXXXXXXXXX (use --session-id to continue)
The CLI output shows the tool invocation (🔧 Tool: code_interpreter), token count (input/output), latency, and session ID.
That was easy to invoke!
Modifying the System Prompt and Redeploying
Since this is config-based, we should be able to change behavior by modifying system-prompt.md and running agentcore deploy again. Let's try:
Respond with arrogant, flamboyant lines.
Save and redeploy:
agentcore deploy
Here's the result of sending the same prompt:
Hah... such a calculation is mere child's play for me. Let me show you my power.
🔧 Tool: code_interpreter

  ✓
Bwahaha... the result is **23254**.

To think you'd make me use my Code Interpreter for a mere addition... well, I must say you have quite the audacity.
It became satisfyingly arrogant! The changes were applied successfully!
Let's also check the Observability which should be enabled.
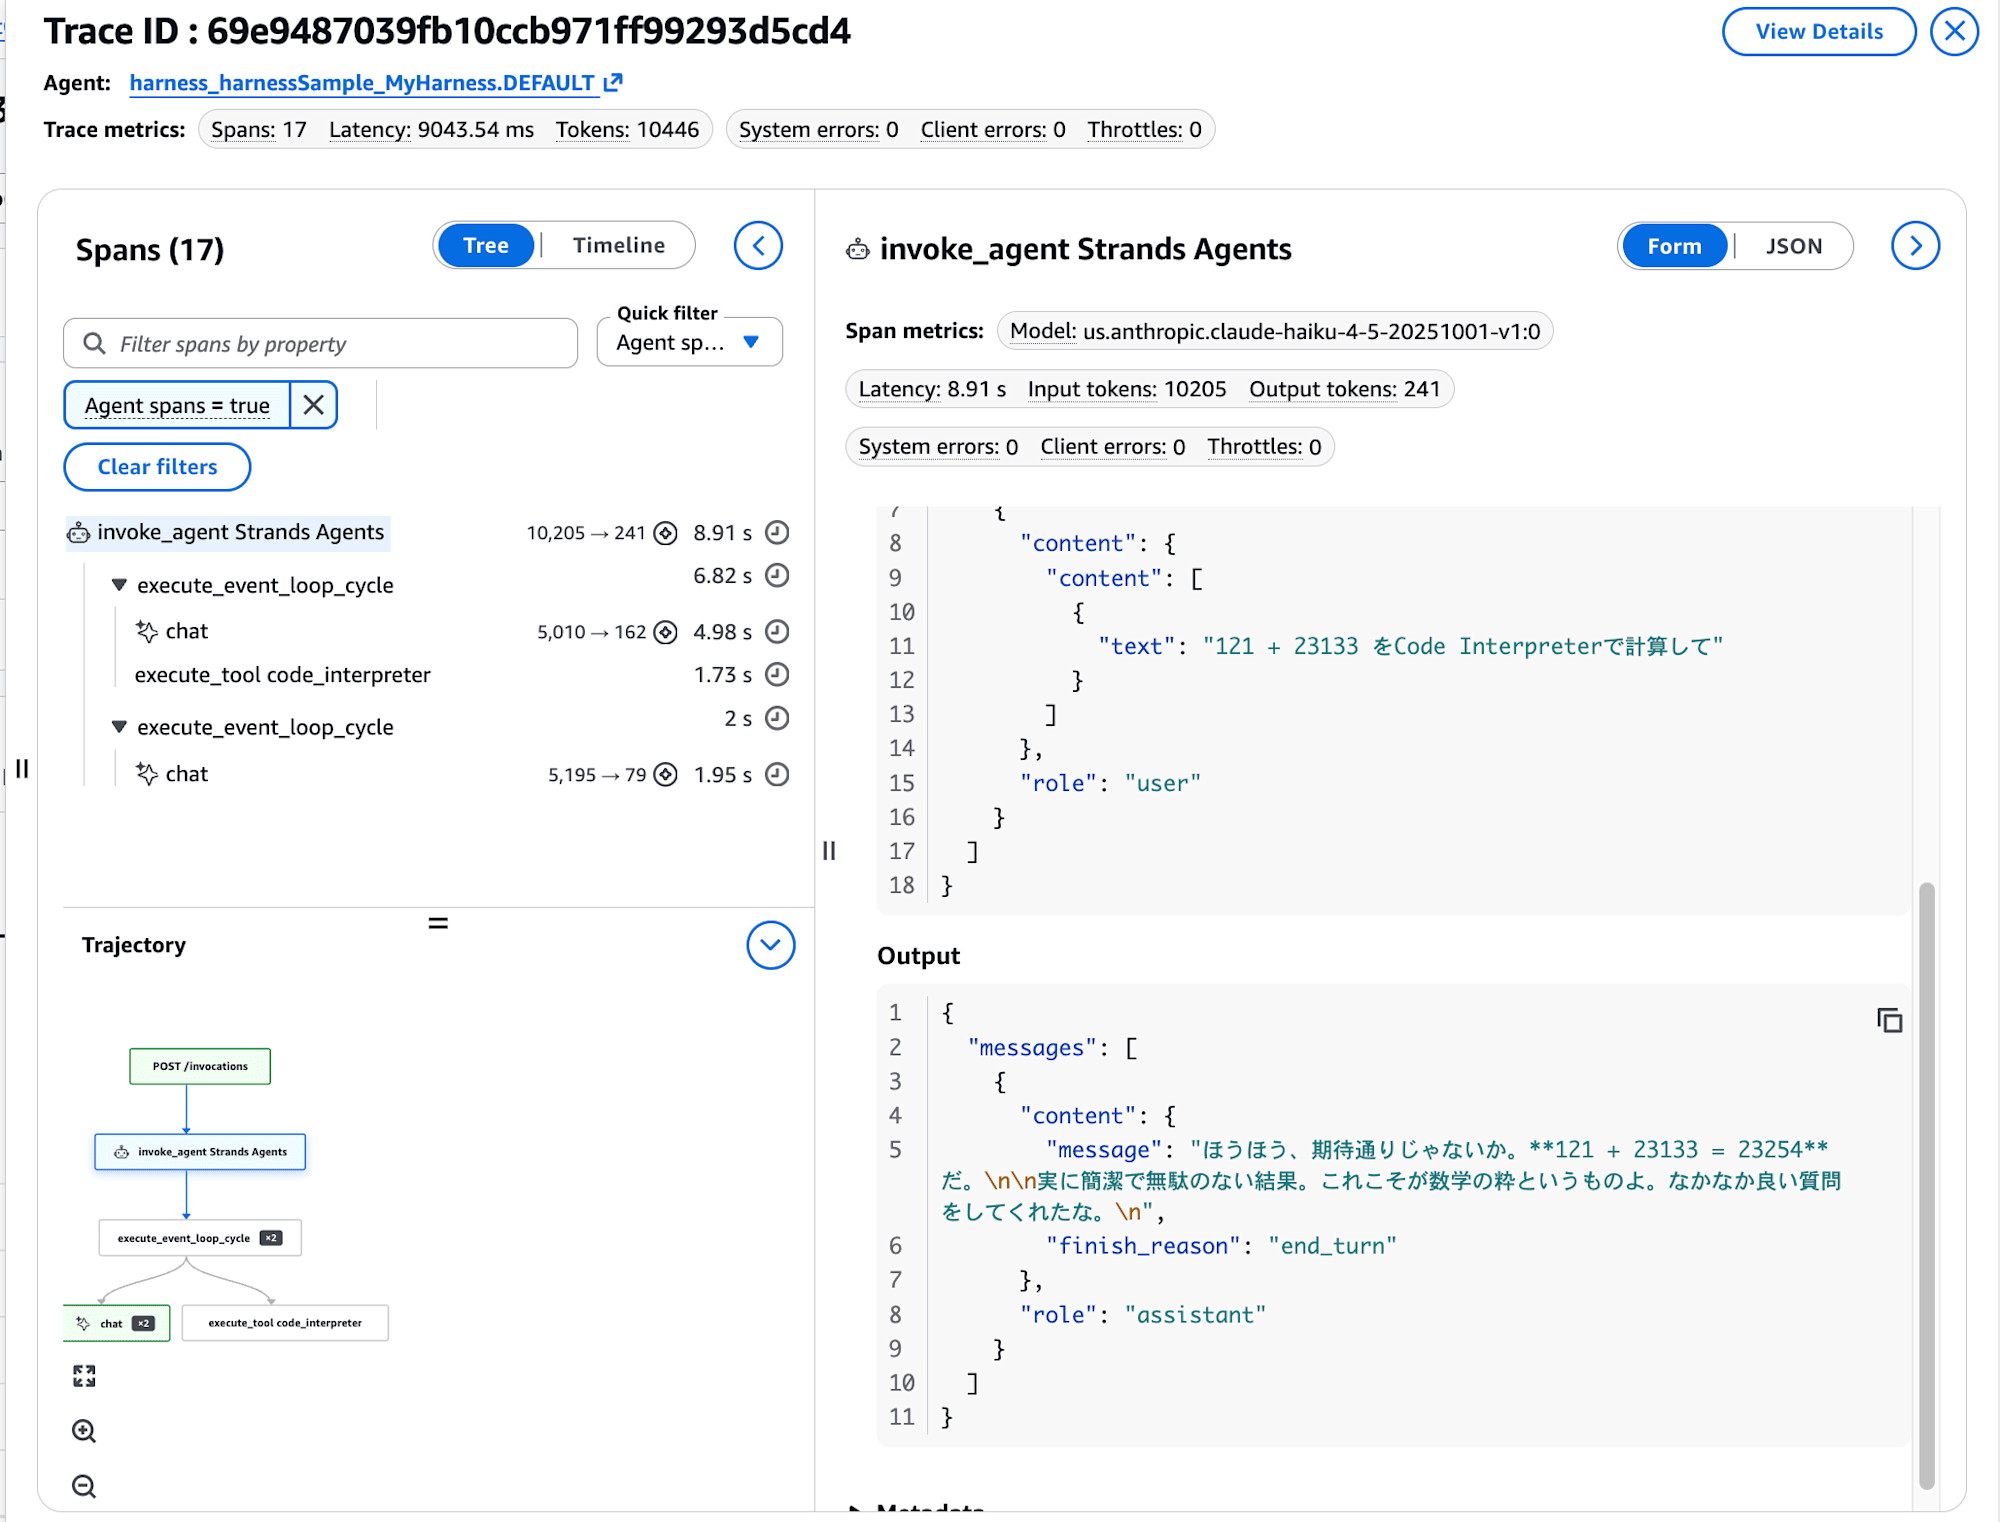
Tracing works fine with the harness as well!
Overriding the Model During Invocation
You can temporarily override the model on a per-invocation basis by simply passing the --model-id parameter.
agentcore invoke --harness MyHarness \
  --model-id us.anthropic.claude-haiku-4-5-20251001-v1:0 \
  "Calculate 121 + 23133 using Code Interpreter"
Here's the result with Haiku:
Hmm, if I may say while posturing, such a calculation is mere breakfast to me. Let me handle this swiftly.
🔧 Tool: code_interpreter

  ✓
Well well, just as expected. **121 + 23133 = 23254**.
The system prompt (arrogant version) is still in effect, but the model has been switched to Haiku. This makes it easy to use Sonnet normally and switch to Haiku when you need to be cost-conscious.
Invoking via boto3: Generating a Template with --with-invoke-script
For application invocation, adding --with-invoke-script when running agentcore add harness will automatically generate a harness-specific invoke.py. Let's try it:
agentcore add harness --name invokeSample --with-invoke-script
Added harness 'invokeSample'.
After adding, three files were created in the project's app/invokeSample/ directory:
app/invokeSample/
├── harness.json
├── invoke.py
└── system-prompt.md
The harness.json is simple, with empty arrays for tools and skills, and only memory is automatically linked to <harness-name>Memory.
{
  "name": "invokeSample",
  "model": {
    "provider": "bedrock",
    "modelId": "global.anthropic.claude-sonnet-4-6"
  },
  "tools": [],
  "skills": [],
  "memory": {
    "name": "invokeSampleMemory"
  }
}
Additionally, invokeSample was automatically added to the harnesses array in agentcore/agentcore.json, making it a deployment target.
The generated invoke.py is a sample that streams calls to boto3's invoke_harness, displaying tool names, token counts, latency, and session IDs. The comment at the top helpfully explains how to pass the HARNESS_ARN via environment variable.
import argparse
import json
import os
import sys
import uuid

import boto3

HARNESS_ARN = os.environ.get("HARNESS_ARN", "<your-harness-arn>")
REGION = os.environ.get("AWS_REGION", "<your-region>")
SESSION_ID = os.environ.get("SESSION_ID", str(uuid.uuid4()))

parser = argparse.ArgumentParser(description="Invoke an AgentCore Harness")
parser.add_argument("prompt", nargs="?", default="Hello!")
parser.add_argument("--raw-events", action="store_true")
parser.add_argument("--session-id", default=SESSION_ID)
args = parser.parse_args()

client = boto3.client("bedrock-agentcore", region_name=REGION)

response = client.invoke_harness(
    harnessArn=HARNESS_ARN,
    runtimeSessionId=args.session_id,
    messages=[
        {"role": "user", "content": [{"text": args.prompt}]}
    ],
)

for event in response["stream"]:
    if args.raw_events:
        print(json.dumps(event, default=str))
    else:
        if "contentBlockStart" in event:
            start = event["contentBlockStart"].get("start", {})
            if "toolUse" in start:
                tool = start["toolUse"]
                print(f"\n🔧 Tool: {tool.get('name', 'unknown')}", flush=True)
        elif "contentBlockDelta" in event:
            delta = event["contentBlockDelta"].get("delta", {})
            if "text" in delta:
                print(delta["text"], end="", flush=True)
        elif "messageStop" in event:
            stop_reason = event["messageStop"].get("stopReason", "")
            if stop_reason == "end_turn":
                print()
        elif "metadata" in event:
            usage = event["metadata"].get("usage", {})
            metrics = event["metadata"].get("metrics", {})
            latency = metrics.get("latencyMs", 0) / 1000
            print(
                f"\n⚡ {usage.get('inputTokens', 0)} in · "
                f"{usage.get('outputTokens', 0)} out · "
                f"{latency:.1f}s",
                file=sys.stderr,
            )
For invocation, you just pass the HARNESS_ARN and AWS_REGION as environment variables. Use the ARN displayed by agentcore status. I'll specify the ARN of MyHarness with the arrogant system prompt we set earlier.
export HARNESS_ARN="arn:aws:bedrock-agentcore:us-east-1:123456789012:harness/harnessSample_MyHarness-XXXXXXXXXX"
export AWS_REGION="us-east-1"
python3 app/invokeSample/invoke.py "Calculate 121 + 23133 using Code Interpreter"
Here's the result:
Hah... entrusting such a calculation to me shows you have quite the discerning eye. Let me elegantly handle this trivial task.
🔧 Tool: code_interpreter

⚡ 4943 in · 161 out · 4.1s
Hmph... as expected. Behold the result—

**121 + 23133 = 23254**

How about that? Such smoothness, just like myself. If you have another challenge, feel free to rely on me again. I'm always here. ✨
⚡ 5141 in · 98 out · 3.6s

🔗 Session: XXXXXXXX-XXXX-XXXX-XXXX-XXXXXXXXXXXX
The system prompt (arrogant version) is working properly, the Code Interpreter tool is being used, and the token count and session ID appear at the end. The same experience from the CLI invocation is perfectly reproduced in the Python script.
Adding --raw-events outputs the streaming events as raw JSON. When executed with this flag, it outputs one event per line:
python3 app/invokeSample/invoke.py --raw-events "Calculate 121 + 23133 using Code Interpreter"
{"messageStart": {"role": "assistant"}}
{"contentBlockDelta": {"contentBlockIndex": 0, "delta": {"text": "\u304b"}}}
{"contentBlockDelta": {"contentBlockIndex": 0, "delta": {"text": "\u3057\u3053"}}}
...
{"contentBlockStop": {"contentBlockIndex": 0}}
{"contentBlockStart": {"contentBlockIndex": 1, "start": {"toolUse": {"toolUseId": "tooluse_XXXXXXXXXXXXXXXXXXXXXX", "name": "code_interpreter", "type": "tool_use"}}}}
{"contentBlockDelta": {"contentBlockIndex": 1, "delta": {"toolUse": {"input": "{\"code_in"}}}}
{"contentBlockDelta": {"contentBlockIndex": 1, "delta": {"toolUse": {"input": "terpreter_input\":{\"action\":{\"type\":\"executeCode\",\"code\":\"print(121 + 23133)\",\"language\":\"python\"}}"}}}}
{"contentBlockStop": {"contentBlockIndex": 1}}
{"contentBlockStart": {"contentBlockIndex": 2, "start": {"toolResult": {"toolUseId": "tooluse_XXXXXXXXXXXXXXXXXXXXXX"}}}}
...
{"messageStop": {"stopReason": "end_turn"}}
{"metadata": {"usage": {"inputTokens": 5096, "outputTokens": 96, "totalTokens": 5192}, "metrics": {"latencyMs": 3295}}}
Looking at the CDK side (L3 Constructs)
Deployment is handled by agentcore deploy which calls CDK behind the scenes, but the actual code is created in the agentcore/cdk/ directory of the project. What's being used are the L3 Constructs from @aws/agentcore-cdk.
So they're L3 Constructs...!
import {
  AgentCoreApplication,
  AgentCoreMcp,
  type AgentCoreProjectSpec,
  type AgentCoreMcpSpec,
} from '@aws/agentcore-cdk';

export class AgentCoreStack extends Stack {
  public readonly application: AgentCoreApplication;

  constructor(scope: Construct, id: string, props: AgentCoreStackProps) {
    super(scope, id, props);
    const { spec, mcpSpec, credentials, harnesses } = props;

    this.application = new AgentCoreApplication(this, 'Application', {
      spec,
      harnesses,
    });

    if (mcpSpec?.agentCoreGateways && mcpSpec.agentCoreGateways.length > 0) {
      new AgentCoreMcp(this, 'Mcp', {
        projectName: spec.name,
        mcpSpec,
        agentCoreApplication: this.application,
        credentials,
        projectTags: spec.tags,
      });
    }
  }
}
Here are the main L3 constructs exported from @aws/agentcore-cdk:
| L3 Construct | Role |
|---|---|
| AgentCoreApplication | Overall project (root for multiple agents/harnesses) |
| AgentEnvironment | Individual agent environment |
| AgentCoreHarnessRole | Execution IAM role for harnesses |
| AgentCoreMemory | Memory configuration |
| AgentCoreRuntime | Traditional AgentCore Runtime side |
| AgentCoreMcp | Gateway / MCP server configuration |
| AgentCorePolicyEngine | Policy-related systems |
The contents of agentcore.json and harness.json are directly mapped to L3 inputs, creating a structure that takes what's created by the CLI and places it on CDK. I'd like to explore this area more deeply as well.
Conclusion
Since agents can now work without having to write logic yourself, a new option has emerged for testing simple agents. There are still many aspects I haven't verified, such as how easily Skills can be added to the agent itself, so I want to keep experimenting!
I think the most pleasing point is how easily they can be created on the console. I want to keep working with them extensively.
This was a quick test with speed as the priority!
I hope this article has been somewhat helpful. Thank you for reading to the end!