Building a Simple Generative AI Chatbot with Amazon Bedrock AgentCore (1): Deploying a Strands Agent on the Runtime

This page has been translated by machine translation. View original
List of articles in this series:
- Running Strands agents on Runtime (this article)
- Putting FastAPI BFF on ECS Fargate and relaying Runtime with Server-Sent Events (SSE)
- Serving SPA from S3 + CloudFront and running chat in the browser
- Adding authentication with Cognito to complete the baseline
- Persisting conversations with AgentCore Memory
- Observing agents with AgentCore Observability
Hello, I'm Simon from the Consulting Division.
Have you ever wanted to build a generative AI chatbot from scratch inside your own AWS account? I have.
In this series, I'll share the steps to build a generative AI chatbot usable from a browser on AWS using Amazon Bedrock AgentCore. We'll start by creating a minimal working configuration and then grow it by adding AgentCore features.
In this first article, I'll introduce the overall architecture of the series, then walk through deploying the agent itself to Amazon Bedrock AgentCore Runtime and getting a response back from the CLI.
What is Amazon Bedrock AgentCore
AgentCore is a collection of managed services for running AI agents in production. It includes Runtime (agent hosting), Memory (persisting conversations and knowledge), Gateway (turning existing APIs into tools), Identity (agent authentication and authorization), Observability (traces and metrics), and more — each of which can be adopted individually as needed. Since it's framework-agnostic, you can run Strands Agents, LangGraph, CrewAI, or any other framework on the same Runtime.
In this series, we'll adopt only what we need, one step at a time. We'll start by running the agent serverlessly on Runtime, then persist conversations with Memory, and track internal behavior with Observability.
What We're Building in This Series
Throughout the series, we'll build a chatbot with the following architecture.
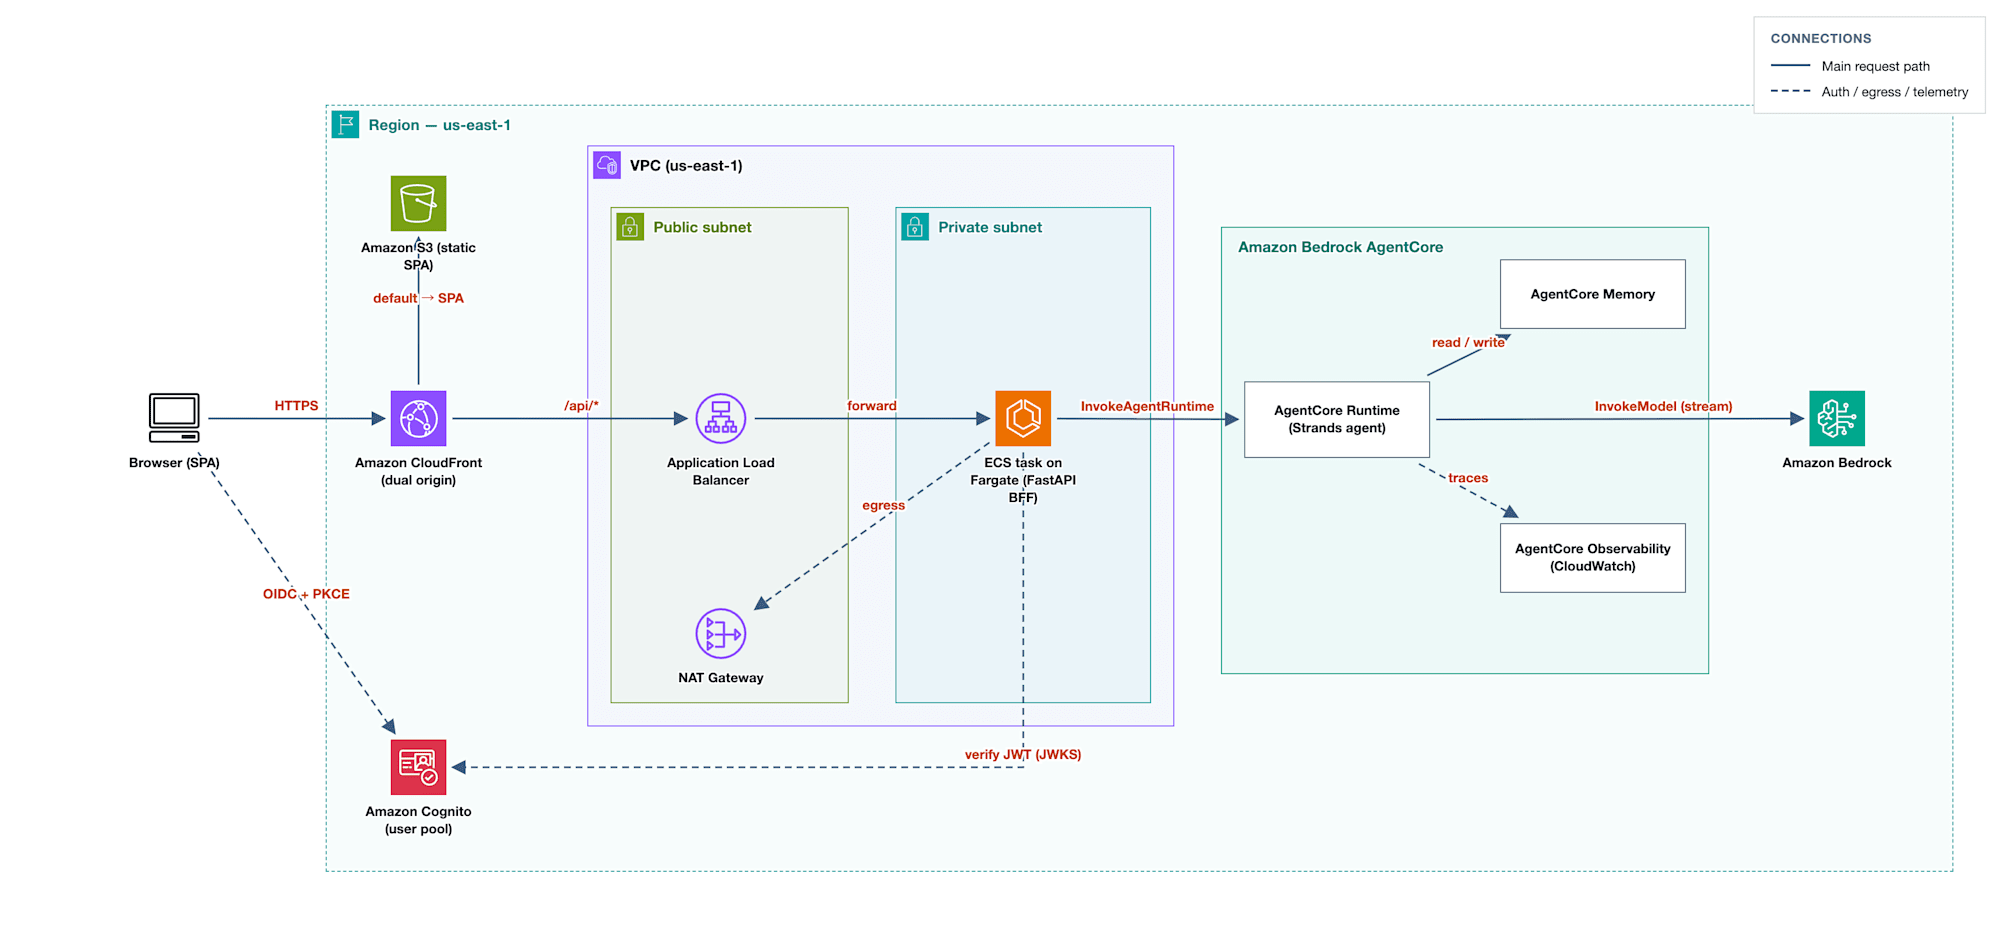
- AgentCore Runtime: Hosts agent containers serverlessly
- Strands Agents: An OSS framework for writing the agent itself
- BFF (FastAPI on ECS Fargate): An application that proxies Runtime invocations, since we can't place AWS credentials in the browser (Part 2)
- Amazon S3 + CloudFront: Serves the static SPA (Part 3)
- Amazon Cognito: Handles user authentication. The SPA obtains tokens via Authorization Code Flow + PKCE, and the BFF validates them (Part 4)
- AgentCore Memory: Retains conversation history and carries context across sessions (Part 5)
- AgentCore Observability: Sends agent execution traces to CloudWatch (Part 6)
Requirements and Prerequisites (Entire Series)
The following are used throughout the series. For Part 1, you only need the AWS CLI, Docker, and Python.
- An AWS account with permissions to create and delete resources used in this series
- Region: us-east-1
- Model: Kimi K2.5 (model ID
moonshotai.kimi-k2.5), though any model will work - Local development environment (versions are approximate)
- AWS CLI v2
- Docker (able to run
docker buildanddocker push; machines other than Apple Silicon also need a cross-build environment for arm64) - Python 3.12 or higher
- Node.js 20 or higher and npm (for the SPA, used in Part 3)
- Git
Sample Code Repository
The code for this series is in the following repository. The code as of this article can be referenced with the entry-1 tag.
Writing a Minimal Chat Agent with Strands
Let's implement the AI agent in agent/app.py from the repository above.
An AI agent is software that determines its next action autonomously and continues processing until it fulfills the user's request. If the model can answer through reasoning, it does so; if it determines that external information or operations are needed, it calls a tool. The result of the call is returned to the model, which then decides the next action again. The loop of repeating this until the answer is ready is called the agent loop.
Strands Agents is an OSS agent framework published by AWS that provides an implementation of this loop. The developer only needs to supply the model, system prompt, and tools.
A minimal agent looks like this:
from strands import Agent
from strands.models import BedrockModel

model = BedrockModel(model_id="moonshotai.kimi-k2.5", region_name="us-east-1")
agent = Agent(model=model, system_prompt="You are a helpful assistant. Answer concisely.")

print(agent("Hello!"))
Agent holds the agent loop, and BedrockModel handles model invocation. Since we're hosting on Amazon Bedrock this time, strands.models uses BedrockModel.
Strands itself is not tied to any specific model host. Providers are available for Amazon Bedrock, Anthropic, OpenAI, Ollama, various vendors via LiteLLM, and others — you can change the host simply by swapping out the model object passed to Agent.
Adding One Tool
We'll prepare a tool to demonstrate agent-like behavior. For simplicity in this article, we'll use a mock that returns a fixed string instead of calling an external API.
from strands import tool

@tool
def get_weather(location: str) -> str:
    """Get the current weather for a location.

    Args:
        location: The city or place to look up.
    """
    # Mock implementation for the sample: always sunny.
    return f"{location} is sunny"
A function decorated with @tool becomes a tool as-is. Then we register it with Agent.
agent = Agent(
    model=model,
    system_prompt="You are a helpful assistant. Answer concisely.",
    tools=[get_weather],
)
How the Model Chooses a Tool
When @tool is applied, Strands extracts the following three elements from the function to build the tool definition:
- Name: the function name (
get_weather) - Description: the docstring (
Get the current weather for a location.) - Argument schema: type hints and the
Args:section (locationis a string)
The tool definitions registered with Agent are sent to the model along with the user's input on every call. In other words, the model's basis for choosing a tool is the function name, docstring, and argument types.
The model compares the input with the tool definitions and decides whether to answer on its own or call a tool. If it decides to call a tool, the model returns a request like "I want to call get_weather with location="Tokyo"."
Strands handles the tool execution. It calls the Python function, returns the return value as the tool execution result to the model, and the loop returns to the agent loop where the model decides the next action.
Therefore, docstrings are not comments — they are interface specifications for the model. If they are vague, the tool may not be called when it should be.
In our implementation example, when asked "What's the weather in Tokyo?", the model selects get_weather, Strands receives Tokyo is sunny and passes it to the model, and the model formats it into a sentence and returns it. Whether the tool call actually occurred will be confirmed as a trace in Part 6 with Observability.
Wrapping for AgentCore Runtime
AgentCore Runtime is a resource created by specifying a container image placed in ECR. When invoked, it starts a container from that image, passes requests via HTTP, and returns responses. Runtime works as long as it behaves as an HTTP server in the specified format.
The four requirements are as follows:
- Listen for HTTP on
0.0.0.0:8080 - Respond to health checks at
GET /ping - Accept invocations at
POST /invocations - Image architecture must be linux/arm64
The BedrockAgentCoreApp from the bedrock-agentcore SDK handles the first three. The developer implements the agent processing in a function decorated with @app.entrypoint.
from bedrock_agentcore.runtime import BedrockAgentCoreApp

# HTTP application with /ping and /invocations
app = BedrockAgentCoreApp()

@app.entrypoint  # This function becomes the implementation of /invocations
async def invoke(payload):
    """Stream the agent's answer to the prompt in the request payload."""
    user_message = payload.get("prompt")
    if not user_message:
        yield {"error": "Missing 'prompt' in request payload."}
        return

    async for event in agent.stream_async(user_message):
        if "data" in event:
            yield event["data"]

if __name__ == "__main__":
    app.run()  # Bind to 0.0.0.0:8080 and start accepting requests.
Returning Responses as a Stream
Making the entry point an async def asynchronous generator causes each yielded value to flow to the client in order. AgentCore Runtime returns this as SSE.
SSE is an HTTP mechanism where the server keeps the response open and sends data in small pieces as it becomes ready. A normal HTTP response returns all at once once the entire body is ready, but SSE returns the headers first, then streams the body in fragments, closing the connection when there's nothing more to send.
Streaming has two advantages:
- First response comes back faster: Since display can begin as soon as the model generates the first text fragment, the time until the first character of the answer appears is shorter compared to waiting for all inference to complete
- Less time with no communication: Connections with no activity for tens of seconds may be judged as timed out by intermediate routes or clients. While text is flowing, that judgment is less likely (during tool execution, no text flows, so that period will have no communication)
    async for event in agent.stream_async(user_message):
        # Strands emits many event types; forward only the text deltas.
        if "data" in event:
            yield event["data"]
agent.stream_async() emits many types of events as the agent loop progresses — text fragments being generated, tool call starts and ends, loop boundaries, and so on. Since we only need the characters to display on screen, we forward only the events that have a data key containing text fragments.
The agent file is now complete! The full file is in agent/app.py in the repository referenced above.
The relay to deliver this streaming to the browser is covered in Part 2, and the SPA implementation where characters appear the moment the model starts writing is covered in Part 3.
Building the arm64 Image
We prepare agent/Dockerfile. It exposes port 8080 and sets PYTHONUNBUFFERED=1 so logs flow to CloudWatch Logs without delay.
Build it:
docker build --platform linux/arm64 --tag agentcore-chatbot-sample-agent:latest agent
The --platform linux/arm64 flag is needed because AgentCore Runtime only accepts arm64 images. On Apple Silicon machines, arm64 is native and can be built as-is. On Intel machines, cross-build setup is required.
Creating Resources with CloudFormation
There are three resources to create: an ECR repository to store the image, an execution role for the Runtime, and the Runtime itself.
Since the Runtime is created by specifying an image URI, the image must already exist in ECR at creation time. The order is: create the repository, push the image, then create the Runtime — but the push can't be inserted in the middle of a CloudFormation deployment. So we split into two templates and create the repository and Runtime in separate stacks.
ECR Repository
infra/ecr.yaml is a template that simply creates one repository. Deploy it:
aws cloudformation deploy \
  --region us-east-1 \
  --stack-name agentcore-chatbot-sample-ecr \
  --template-file infra/ecr.yaml \
  --parameter-overrides RepositoryName=agentcore-chatbot-sample-agent
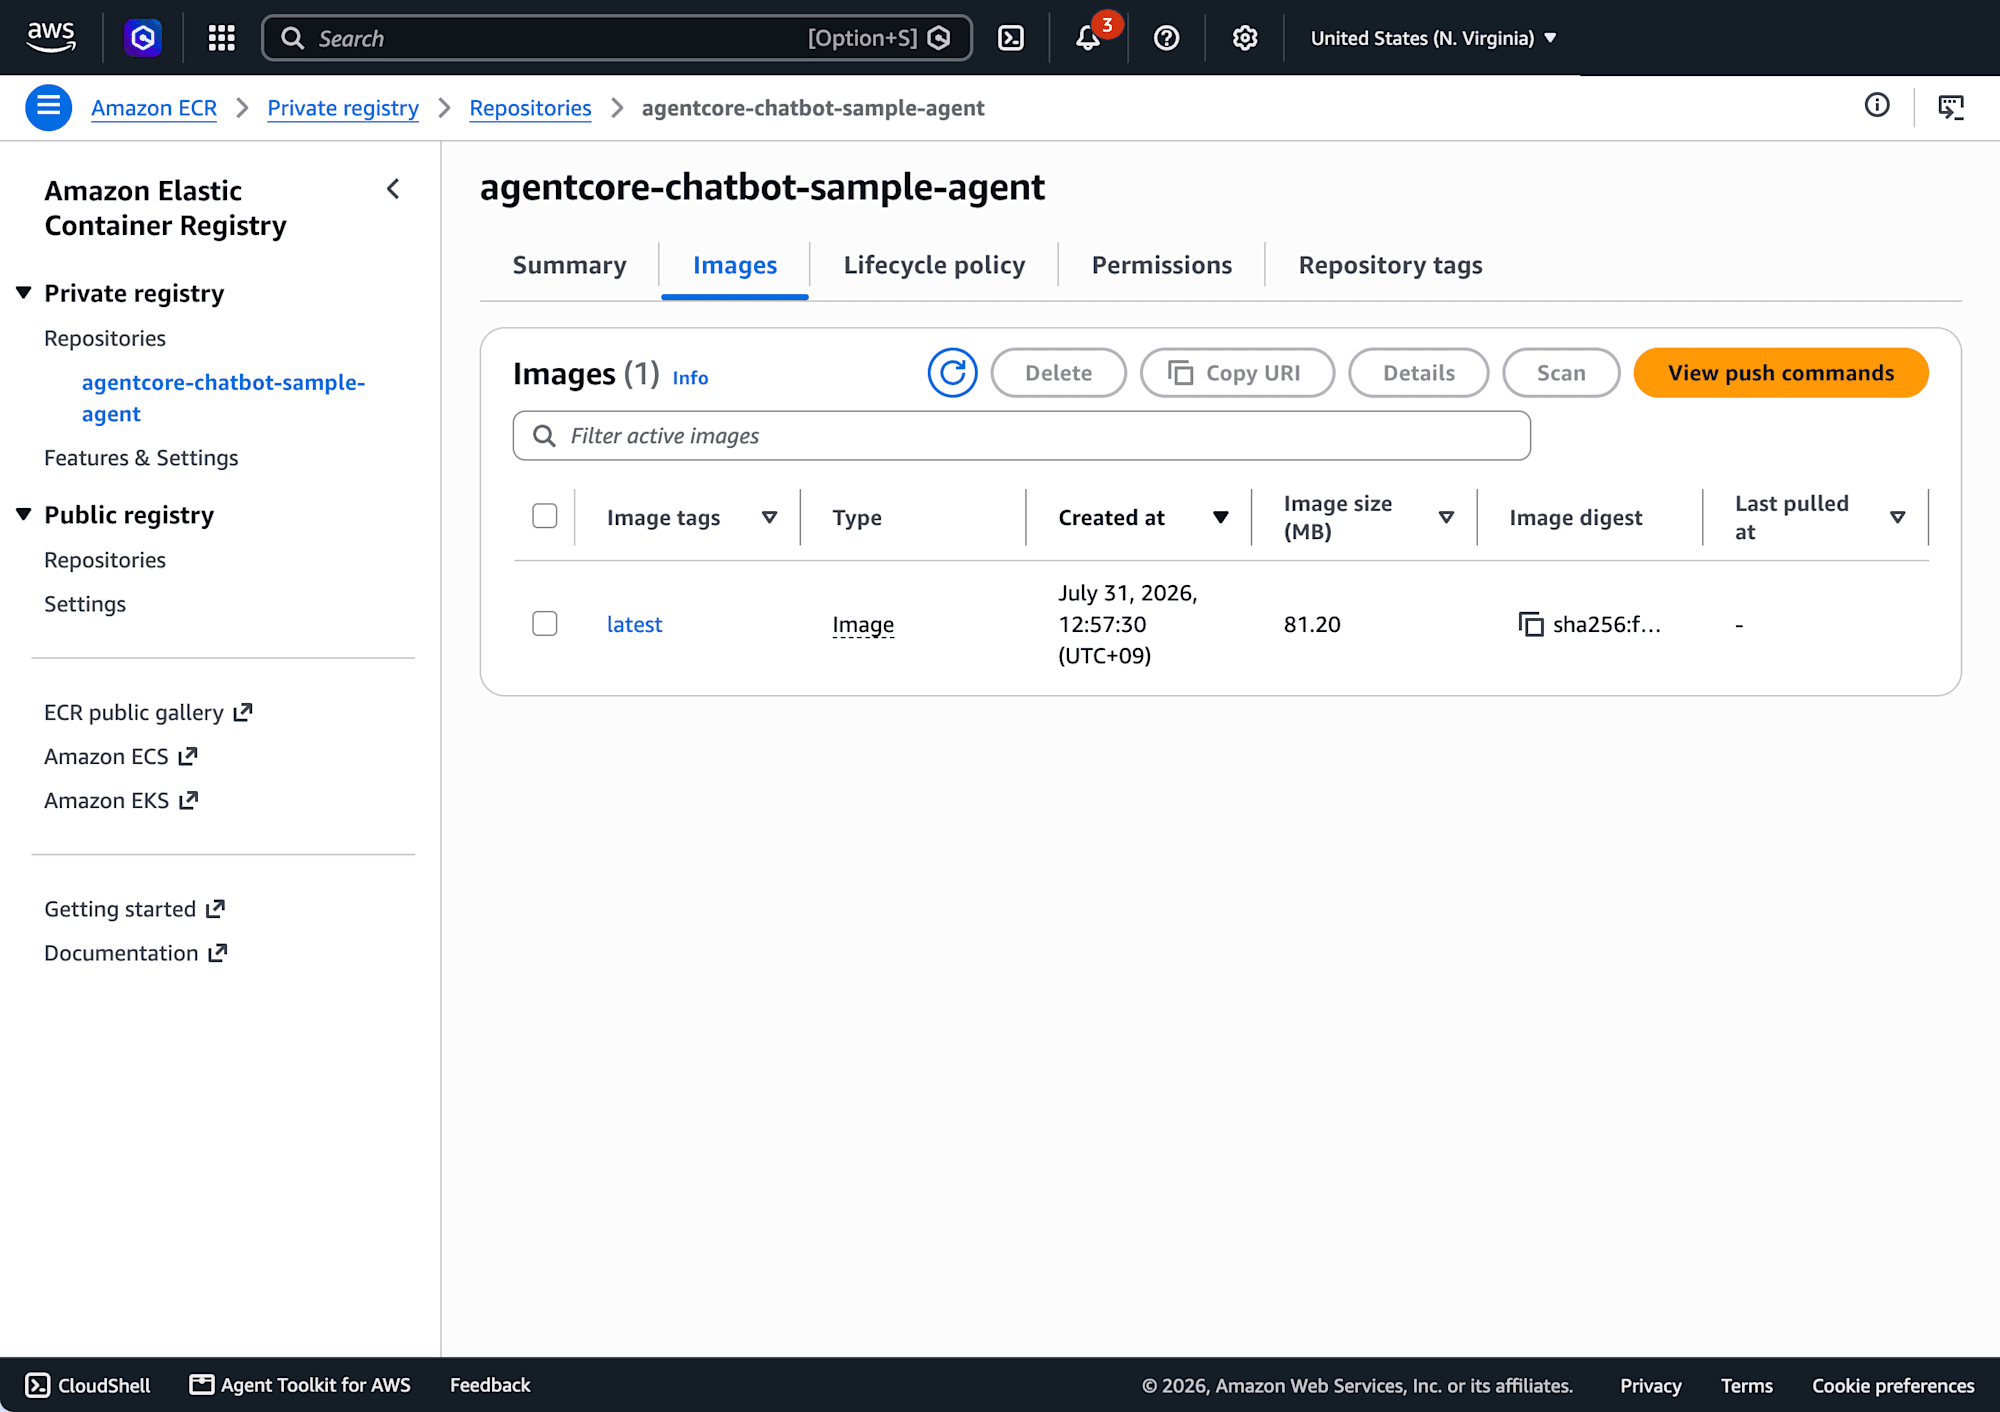
Now that the repository is ready, push the image we built earlier.
ACCOUNT_ID="$(aws sts get-caller-identity --query Account --output text)"
REGISTRY="${ACCOUNT_ID}.dkr.ecr.us-east-1.amazonaws.com"
IMAGE_URI="${REGISTRY}/agentcore-chatbot-sample-agent:latest"

aws ecr get-login-password --region us-east-1 \
  | docker login --username AWS --password-stdin "${REGISTRY}"

docker tag agentcore-chatbot-sample-agent:latest "${IMAGE_URI}"
docker push "${IMAGE_URI}"
Pass this IMAGE_URI to the next Runtime stack.
Runtime Execution Role and Runtime Itself
Define in infra/runtime.yaml and deploy:
aws cloudformation deploy \
  --region us-east-1 \
  --stack-name agentcore-chatbot-sample-runtime \
  --template-file infra/runtime.yaml \
  --capabilities CAPABILITY_IAM \
  --parameter-overrides \
    RuntimeName=agentcore_chatbot_sample_agent \
    ContainerUri="${IMAGE_URI}" \
    ModelId=moonshotai.kimi-k2.5 \
    RepositoryName=agentcore-chatbot-sample-agent
The role trusts bedrock-agentcore.amazonaws.com, and the code inside the container runs with this role's permissions. The required permissions are as follows:
- ECR:
ecr:BatchGetImageandecr:GetDownloadUrlForLayerneeded for image pull (scoped to this repository only), plusecr:GetAuthorizationToken - CloudWatch Logs: Limited to creating and writing to log groups and log streams under
/aws/bedrock-agentcore/runtimes/ bedrock:InvokeModelandbedrock:InvokeModelWithResponseStream: For model invocations. Two resources are specified: the destination foundation model atarn:aws:bedrock:*::foundation-model/*, and the inference profile itself at the region-qualifiedarn:aws:bedrock:${AWS::Region}:${AWS::AccountId}:*. Since specifying a cross-region inference profile routes to foundation models in multiple regions, both are needed- X-Ray trace submission and
cloudwatch:PutMetricDatascoped to thebedrock-agentcorenamespace: Used in Part 6 with AgentCore Observability. We include these from the start so we don't need to recreate the role at that time
There was no code in the agent to pass credentials. Since BedrockModel resolves credentials in the same order as boto3, the execution role is used as-is on Runtime, so no handling code is needed.
The agent side receives the model ID and region from environment variables (os.environ.get("BEDROCK_MODEL_ID", "moonshotai.kimi-k2.5") and os.environ.get("AWS_REGION", "us-east-1")). The Runtime's EnvironmentVariables passes the template parameter ModelId value directly as BEDROCK_MODEL_ID. To change the model, you only need to change ModelId and update the stack — no image build or push required.
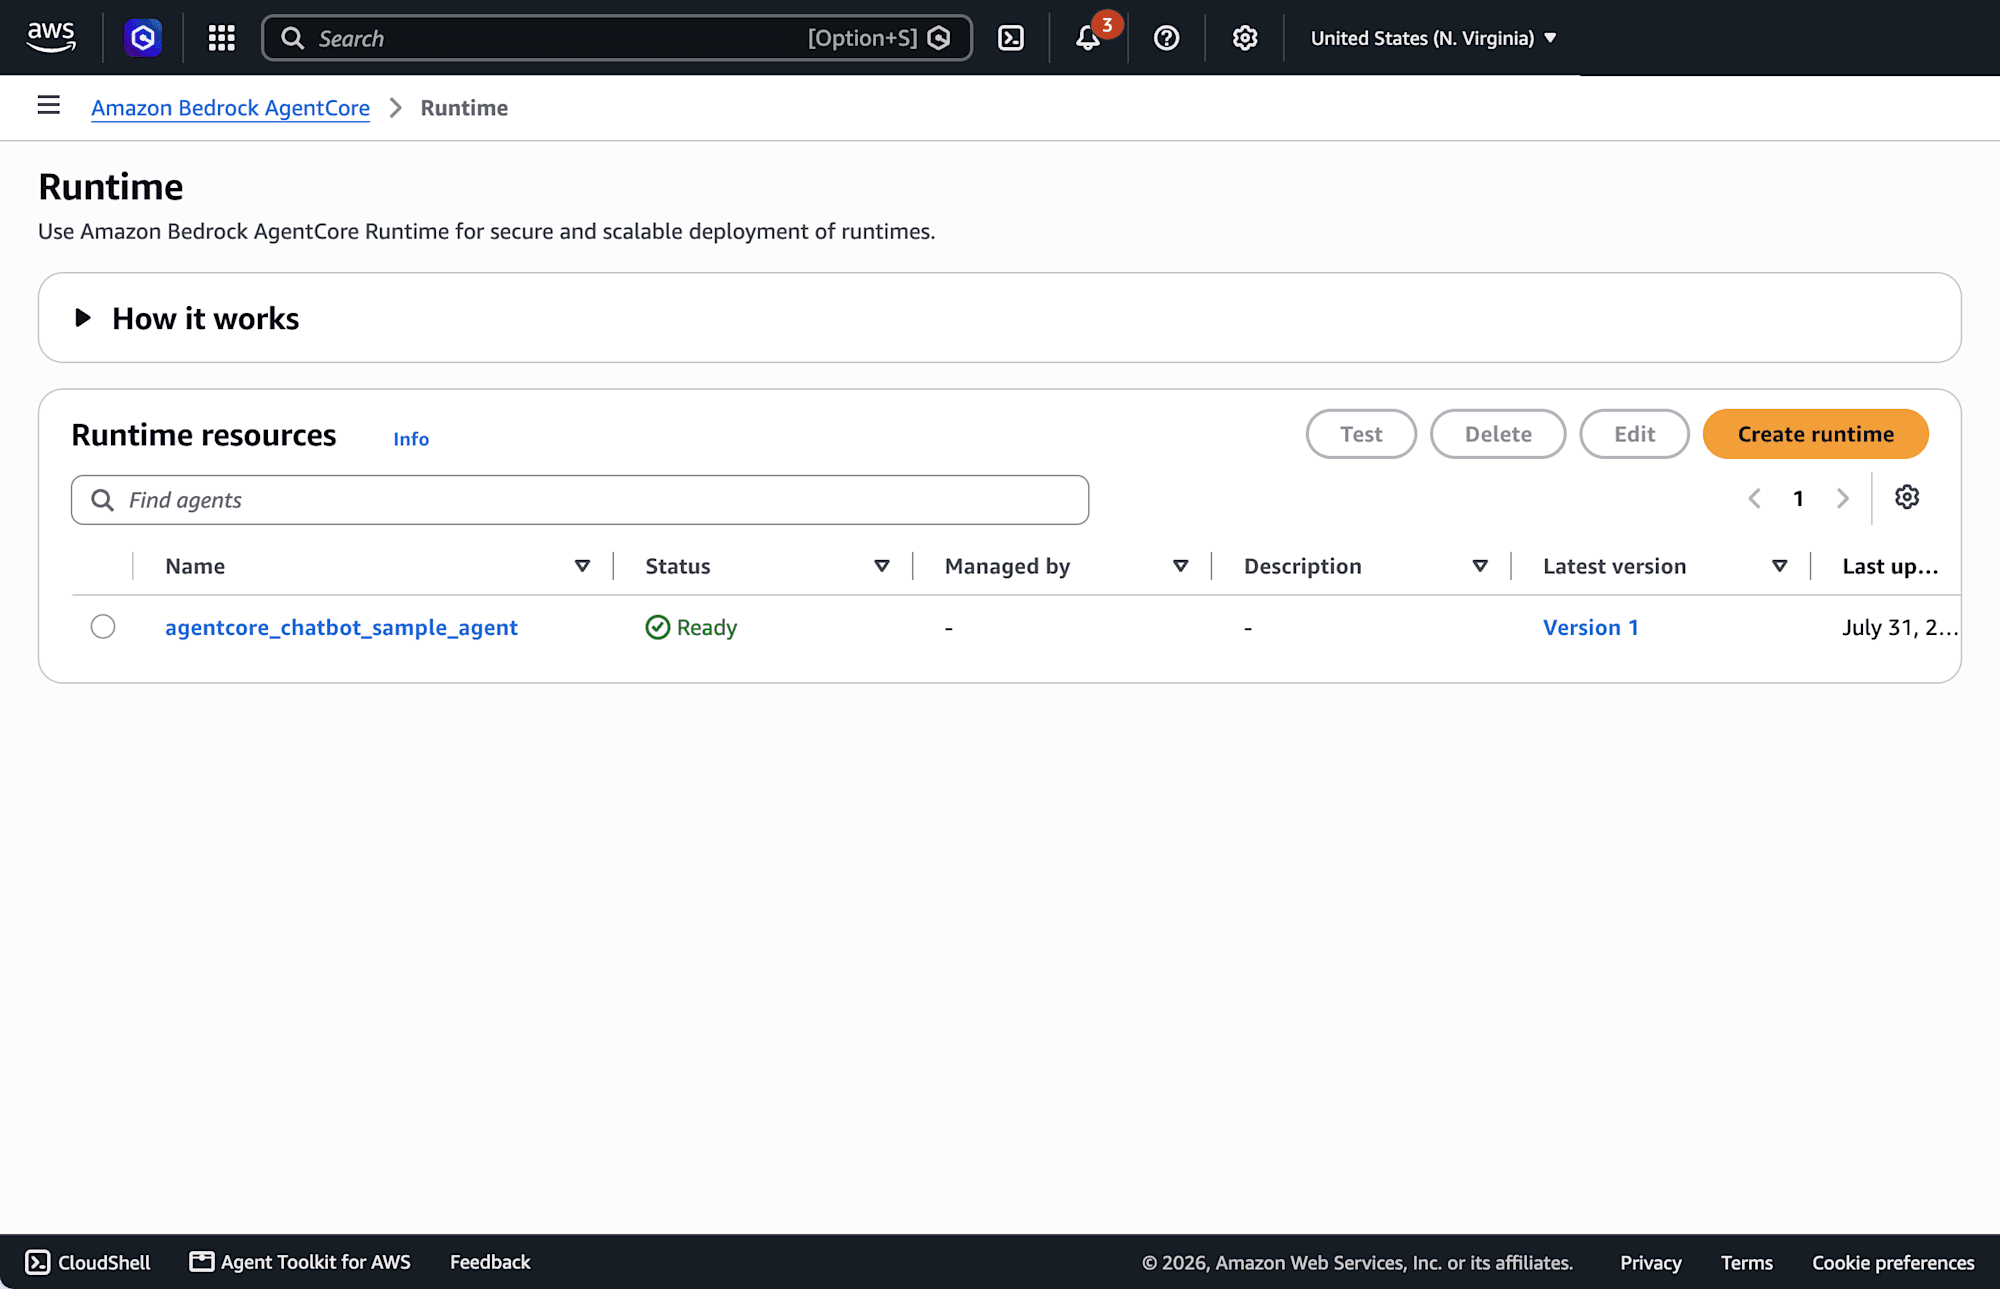
The Runtime is now ready!
The ARN used for invocations can be retrieved from the stack output:
RUNTIME_ARN="$(aws cloudformation describe-stacks \
  --region us-east-1 \
  --stack-name agentcore-chatbot-sample-runtime \
  --query "Stacks[0].Outputs[?OutputKey=='RuntimeArn'].OutputValue" \
  --output text)"
Invoking from the CLI and Verifying Tool Calls
Let's invoke the agent from the CLI. You can also run it from the agent's test screen in the console.
aws bedrock-agentcore invoke-agent-runtime \
  --region us-east-1 \
  --agent-runtime-arn "${RUNTIME_ARN}" \
  --runtime-session-id "$(openssl rand -hex 20)" \
  --cli-binary-format raw-in-base64-out \
  --content-type "application/json" \
  --payload '{"prompt": "日本のような四季とは異なるシーズンを持つ国の例をいくつか教えてください。"}' \
  /dev/stdout
Running this outputs the response to /dev/stdout. Since the AWS CLI treats --payload as base64 by default, --cli-binary-format raw-in-base64-out is needed to pass raw JSON directly. Without it, the raw JSON is interpreted as base64 as-is, causing the request to fail.
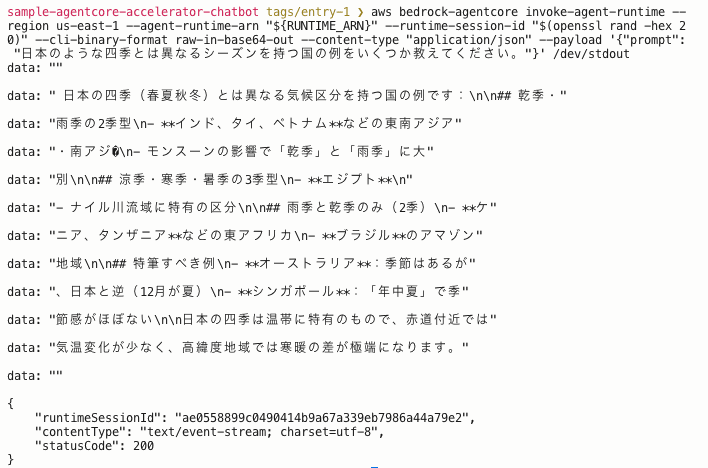
We confirmed that responses to a Japanese prompt come back in a streaming fashion!
Next, let's make it call a tool:
aws bedrock-agentcore invoke-agent-runtime \
  --region us-east-1 \
  --agent-runtime-arn "${RUNTIME_ARN}" \
  --runtime-session-id "$(openssl rand -hex 20)" \
  --cli-binary-format raw-in-base64-out \
  --content-type "application/json" \
  --payload '{"prompt": "What is the weather in Tokyo?"}' \
  /dev/stdout
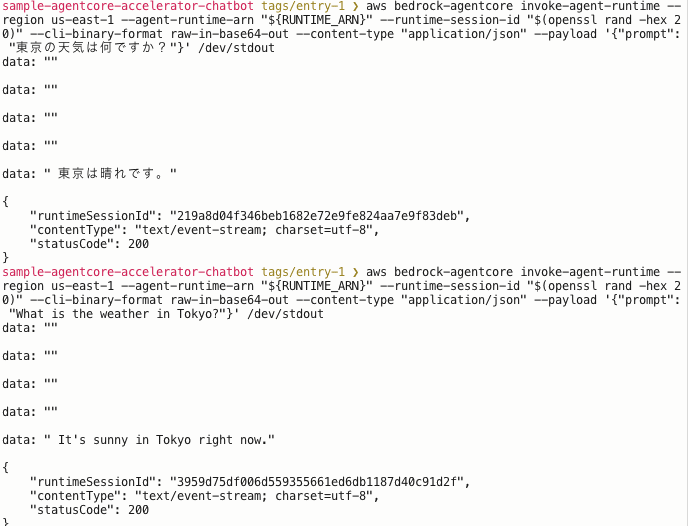
We confirmed that the response reflects Tokyo is sunny returned by the mock get_weather! Without the tool, a response saying it cannot answer because it cannot retrieve external information would have been returned.
If you're not getting the expected response, check the agent's standard output in CloudWatch Logs under /aws/bedrock-agentcore/runtimes/.
Consolidating Deployment and Invocation into Scripts
We've been running commands one at a time to follow what's happening at each step. For actual work, scripts combining these steps are available in scripts/ in the repository. Values such as region, stack name, and model ID are consolidated in scripts/config.sh, which each script reads.
Deployment is done with a single command. It runs ECR stack creation, image build and push, and Runtime stack creation in order:
./scripts/agent-deploy.sh
Invocation is the same. Pass an argument to use it as the prompt:
./scripts/agent-invoke.sh
./scripts/agent-invoke.sh "What is the weather in Tokyo?"
Deleting Created Resources
Delete when done. The script deletes the Runtime stack followed by the ECR stack:
./scripts/agent-teardown.sh
The ECR repository has EmptyOnDelete: true, so it can be deleted even if images remain.
The resources created this time won't incur significant costs if left running. However, from Part 2 onward, resources that are billed continuously while running will increase — such as Fargate tasks running the BFF, the ALB in front of them, and NAT gateways for external container communication. Please delete them as appropriate when not in use.
Containers Are Allocated Per Session and Then Stopped
So far, we got the agent running simply by providing a container. Let's review when that container starts and when it stops. The unit from start to stop — the session — is determined by the --runtime-session-id passed at invocation time.
AgentCore Runtime allocates a dedicated execution environment (microVM) per session and starts the container within it. A session takes one of three states: Active (processing), Idle (waiting), or Stopped (compute has been destroyed). Below we trace the transitions between these three.
aws bedrock-agentcore invoke-agent-runtime \
  --region us-east-1 \
  --agent-runtime-arn "${RUNTIME_ARN}" \
  --runtime-session-id "$(openssl rand -hex 20)" \
  --content-type "application/json" \
  --payload '{"prompt": "What is the weather in Tokyo?"}' \
  /dev/stdout
The Environment Is Created on the First Invocation
When invoke-agent-runtime is called with a new session ID, AgentCore Runtime allocates a dedicated microVM for that session, pulls the image from ECR using the execution role's permissions, and starts the container. The session becomes Active at this point.
The allocated environment is isolated per session. CPU, memory, and the filesystem are separated, and the data of one session's container is not visible from another session's container.
GET /ping is sent to the started container. Only after Healthy is returned does the request get passed to POST /invocations. The reason you don't need to write the /ping implementation yourself is that the SDK responds to this health check.
Therefore, the first invocation takes longer than subsequent ones.
Subsequent Invocations Reuse the Same Environment
Calling with the same session ID delivers to the same container. Since the filesystem and process memory remain intact, the state created in the previous invocation can be carried over.
While not processing a request, the session becomes Idle. Since the environment remains allocated, the next invocation starts without waiting for startup.
Conditions for Container Shutdown
The container stops and the session becomes Stopped under any of the following conditions:
- No activity has continued (default: 15 minutes)
- The elapsed time since session start has reached the limit (default: 8 hours)
- Explicitly stopped via the
StopRuntimeSessionAPI - Determined to be abnormal by a health check
When stopped, the microVM is destroyed and any state held inside the container is lost. To retain conversation context across sessions, the state must be stored outside the session — which is why we use AgentCore Memory in Part 5.
Re-calling a Stopped Session ID Creates a New Environment
The session itself remains valid until the Runtime is deleted. Re-calling a stopped session ID returns it to Active and allocates a new environment. Just like the first call, it starts from scratch, so data that was held inside is not restored.
If another invocation is sent to the same session while the environment is being allocated or during the stop process, HTTP 409 RetryableConflictException is returned. This is expected behavior, with the assumption that the caller retries with a short backoff.
No CPU Charges During Wait Time
Billing is calculated per second over the entire session lifetime based on CPU and memory consumption. Since CPU is not consumed while waiting for model or tool responses, no CPU charges occur during wait time as long as no background processing is running. This is significant for agents, which tend to have long wait times due to back-and-forth between LLMs and tools.
Memory, on the other hand, is billed for the entire duration the session is allocated. Memory charges continue even during the 15-minute idle period.
Mapping Session IDs to Users Is the Caller's Responsibility
Managing which user uses which session ID is not AgentCore's responsibility. This, including limits on the number of sessions per user, is the responsibility of the calling side. One of the roles of the BFF we'll build in Part 2 is exactly this.
Summary
We deployed an agent written with Strands to AgentCore Runtime and confirmed that responses come back from the CLI. Since the Runtime handles server provisioning and per-session isolation, all you need to provide is a single container image.
However, with this configuration, only those with AWS credentials can make calls. Since we can't place AWS credentials in the browser, we need an intermediary to proxy the calls.
In the next article, we'll build a BFF with FastAPI, deploy it on ECS Fargate, and relay the Runtime's streaming responses via SSE.
Thank you for reading to the end.