Getting ready for iPhone 17! Converted physical SIM to eSIM on the device

This article was published more than one year ago. Please be aware that the information may be outdated.
This page has been translated by machine translation. View original
On September 10, 2025, Apple announced the iPhone 17 series, in which all models have eliminated the physical SIM slot and support eSIM only. The removal of physical SIM, which had previously only been implemented in the United States, has finally expanded to Japan as well.
I am currently using a physical SIM on my iPhone 13 Pro. Until a little while ago (around the time of the iPhone 12), even though dual SIM was supported, it was only a combination of one physical SIM and one eSIM, and two eSIMs were not supported. For that reason, I had continued using a physical SIM as my main line and an eSIM as my sub line.
However, thinking about migrating to the iPhone 17, I need to convert from a physical SIM to an eSIM in advance. So I decided to try the eSIM conversion right away.
In this article, I will introduce the steps to convert a physical SIM to an eSIM using only an iPhone.
Two Methods for Switching from Physical SIM to eSIM
There are mainly two methods for switching from a physical SIM to an eSIM.
- Automatic conversion using iPhone alone: A feature added in iOS 16 and later that allows direct conversion on the iPhone without contacting the carrier
- Exchange by contacting the carrier: The conventional method, where you contact the carrier and request issuance of an eSIM profile
This time, I tried the first method, which requires no interaction with the carrier and is quick.
Test Environment
- iPhone 13 Pro
- iOS 18.6.2
- povo 2.0 (physical SIM)
- Stable Wi-Fi environment
Preparation
The following conditions must be met for eSIM conversion using iPhone alone.
- iOS 16 or later is installed
- Compatible iPhone model (iPhone XS/XR or later)
- An active physical SIM is inserted
- The carrier supports this feature
Detailed methods for switching from a physical SIM to an eSIM are also introduced in Apple's official documentation.
Steps for eSIM Conversion Using iPhone Alone
Step 1: Open the Settings App
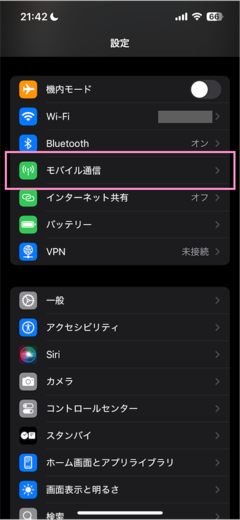
- Tap "Settings" from the home screen
- Select "Mobile Service"
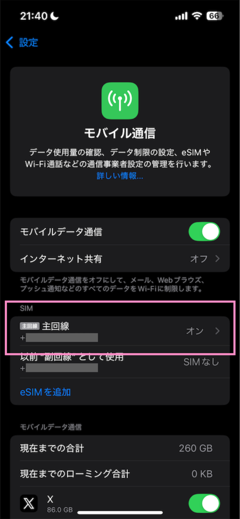
Step 2: Select the SIM Line
The currently used physical SIM line will be displayed, so tap it. Usually "Primary Line" or the carrier name (Docomo, KDDI, SoftBank, etc.) will be displayed (the displayed content varies depending on the carrier and settings you are using).
Step 3: Check the eSIM Conversion Option
On the physical SIM line detail screen, one of the following options will be displayed.
- "Switch to eSIM"
- "Convert to eSIM"
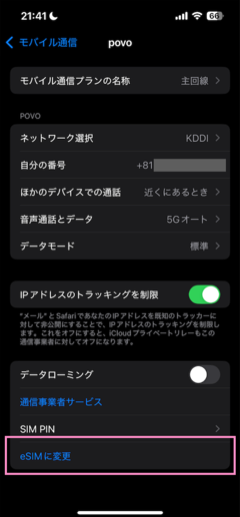
Note: If this option is not displayed
The carrier may not support this automatic conversion feature. In that case, method 2 (contacting the carrier) will be necessary.
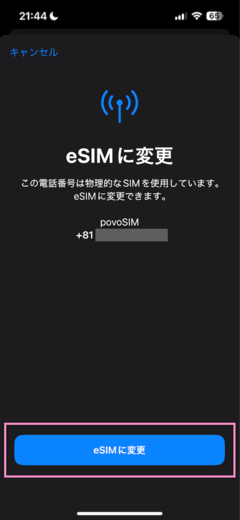
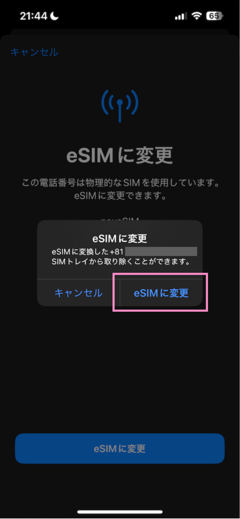
Step 4: Confirm Execution of the Conversion Process
- Tap "Switch to eSIM"
- Select "Switch to eSIM" in the confirmation dialog
| 1. Switch to eSIM | 2. Make further selection in the dialog |
|---|---|
 |
 |
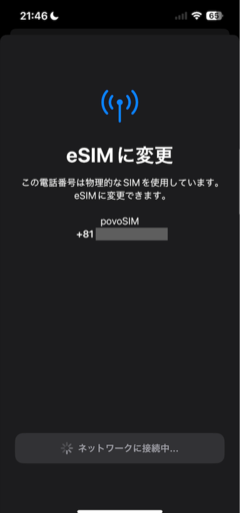
Step 5: Execute the Conversion Process
A final confirmation will be performed. Double-click the side button to approve the execution.
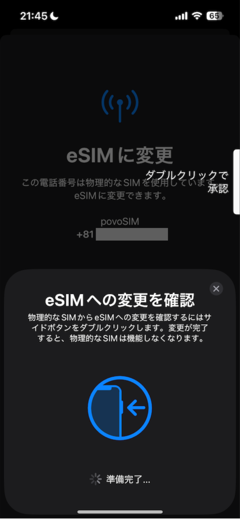
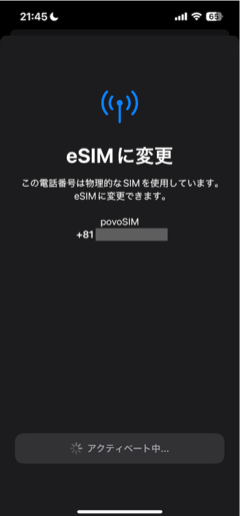
Activation will be completed in approximately 2 to 5 minutes. During this time, communication may be temporarily interrupted.
- The iPhone automatically connects to the carrier's server
- The physical SIM information is converted to an eSIM profile
| During activation | Connecting to network |
|---|---|
 |
 |
Step 6: Completion of the Conversion Process
The conversion process is complete and the conversion to eSIM has finished. Tap the "Done" button to end the conversion process.
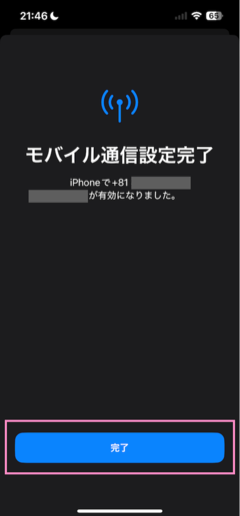
Step 7: Confirming Conversion Completion
Once activation is complete, the physical SIM will be automatically deactivated and communication will switch to the eSIM. To confirm that communication is working correctly via eSIM, I performed the following operations.
- Turn off the device's power and remove the physical SIM
- Turn the power on, turn off Wi-Fi, and confirm that communication is possible
- Confirm that it is displayed as an eSIM under "Settings" > "Mobile Service"
I was able to confirm that communication worked without any issues even with the physical SIM removed.
Summary
Converting from a physical SIM to an eSIM was easy using the iOS 16 and later feature. In the case of povo 2.0, the entire process was completed with operations on the iPhone alone, and no interaction with the carrier was required at all.
This means that when the iPhone 17 arrives in my hands, I am now ready to easily migrate to the new iPhone using the "Quick eSIM Transfer" feature.
With the arrival of the iPhone 17, eSIM usage is expected to spread even further in Japan. Those who are currently using a physical SIM have a good chance of being able to convert easily using the method introduced this time. However, since some carriers may not support it, in that case it will be necessary to contact the carrier as before.
Furthermore, the iPhone 17 will allow up to 8 eSIMs to be registered, enabling more flexible SIM usage than ever before. You can expect even greater convenience, such as switching between multiple carriers or easily adding a local SIM when traveling abroad.
For those considering switching from a physical SIM to an eSIM, please do give this method a try.