I tried building a Google Chat Bot with minimal configuration using Cloud Functions + Python + uv

This page has been translated by machine translation. View original
Introduction
I wanted to create a simple bot in Google Chat for an organization using Google Workspace, so I built a minimal echo bot using Cloud Functions (2nd generation).
In this article, I'll cover everything from setting up the gcloud CLI to deployment, as well as the pitfalls I ran into and how I resolved them.
I'll also touch on the differences in GCP authentication from the perspective of an AWS user.
Configuration
| Item | Choice |
|---|---|
| Runtime | Cloud Functions 2nd generation |
| Language | Python 3.14 |
| Package manager | uv |
| Trigger | HTTPS endpoint |
| Region | asia-northeast1 (Tokyo) |
Prerequisites
- You have an account belonging to Google Workspace
- A GCP project has been created and billing is enabled
- macOS environment (assuming Homebrew is available)
gcloud CLI Setup
Installation
brew install --cask google-cloud-sdk
Authentication
GCP authentication is simpler compared to AWS. You don't need tools like aws-vault — the gcloud CLI itself manages credentials.
# CLI authentication (opens a browser)
gcloud auth login

# Set up Application Default Credentials (ADC)
gcloud auth application-default login
Note that there are two types of authentication here.
| Command | Purpose |
|---|---|
gcloud auth login |
Authentication for the gcloud command itself |
gcloud auth application-default login |
Authentication when code running locally calls GCP APIs |
gcloud auth login is for the CLI tool, and gcloud auth application-default login is for code. Running the latter generates a file at ~/.config/gcloud/application_default_credentials.json, which Google client libraries automatically reference.
Quota Project Configuration
When setting up ADC, you may see the following warning.
WARNING:
Cannot find a quota project to add to ADC. You might receive a "quota exceeded" or "API not enabled" error.
This is because API usage quota is not linked to a project. Resolve it with the following:
gcloud auth application-default set-quota-project YOUR_PROJECT_ID
Project and API Configuration
# Set default project
gcloud config set project YOUR_PROJECT_ID

# Enable required APIs
gcloud services enable cloudfunctions.googleapis.com \
  cloudbuild.googleapis.com \
  chat.googleapis.com \
  run.googleapis.com
Cloud Functions 2nd generation runs internally on Cloud Run, so run.googleapis.com is also required. Also, cloudbuild.googleapis.com is used to build the container image during deployment.
Switching Between Multiple Projects
gcloud has configurations as the equivalent of AWS --profile.
# Create a new configuration
gcloud config configurations create my-other-project
gcloud config set project other-project-id
gcloud auth login

# List configurations
gcloud config configurations list

# Switch
gcloud config configurations activate my-other-project
ADC can similarly be switched per project.
# Switch ADC quota project
gcloud auth application-default set-quota-project other-project-id
However, since the ADC credential itself (~/.config/gcloud/application_default_credentials.json) is a single file per account, if you want to use ADC with a different Google account, you need to re-run gcloud auth application-default login.
Cloud Functions Natively Supports uv and Python 3.14
After looking into it, I found that the Python 3.14 runtime in Cloud Functions has adopted uv as the default package manager.
This means:
pyproject.tomlis read directly — no need to generaterequirements.txt- Dependencies locked with
uvare deployed as-is
However, note that if both pyproject.toml and requirements.txt exist, requirements.txt takes priority.
Project Structure
google-chat-bot/
├── main.py              # Cloud Function entry point
├── pyproject.toml       # uv-managed dependencies
├── uv.lock              # uv lock file
├── .python-version      # Python version
└── .gitignore
Project Initialization
# Initialize project with uv
uv init --no-readme
rm hello.py  # Remove auto-generated file

# Add dependencies
uv add functions-framework
uv add --dev pytest
Bot Code
main.py:
import json
import sys

import functions_framework
from flask import jsonify

def create_message(text):
    """Wrap text in the Google Workspace Add-ons response format"""
    return {
        "hostAppDataAction": {
            "chatDataAction": {
                "createMessageAction": {
                    "message": {
                        "text": text,
                    }
                }
            }
        }
    }

@functions_framework.http
def handle_chat(request):
    """Entry point for the Google Chat bot"""
    body = request.get_json(silent=True)

    if not body:
        return jsonify(create_message("Empty request"))

    chat = body.get("chat", {})
    message_payload = chat.get("messagePayload", {})
    message = message_payload.get("message", {})
    user_text = message.get("text", "")
    sender = message.get("sender", {}).get("displayName", "someone")

    return jsonify(create_message(f"Hello {sender}! You said: {user_text}"))
The key here is the request and response format. I'll explain this in detail in the troubleshooting section below.
Local Testing
Using functions-framework, you can start the Cloud Function locally and test it.
uv run functions-framework --target=handle_chat --port=8080
From another terminal:
curl -X POST http://localhost:8080 \
  -H "Content-Type: application/json" \
  -d '{"chat": {"messagePayload": {"message": {"text": "hello", "sender": {"displayName": "Test User"}}}}}'
Deployment
gcloud functions deploy google-chat-bot \
  --gen2 \
  --runtime=python314 \
  --region=asia-northeast1 \
  --source=. \
  --entry-point=handle_chat \
  --trigger-http \
  --no-allow-unauthenticated
| Flag | Meaning |
|---|---|
--gen2 |
Use 2nd generation Cloud Functions |
--runtime=python314 |
Python 3.14 runtime |
--entry-point=handle_chat |
The function name in main.py to call |
--trigger-http |
HTTPS trigger |
--no-allow-unauthenticated |
Allow authenticated access only (recommended) |
After deployment, a URL like the following will be issued:
https://asia-northeast1-YOUR_PROJECT_ID.cloudfunctions.net/google-chat-bot
Google Chat API Configuration
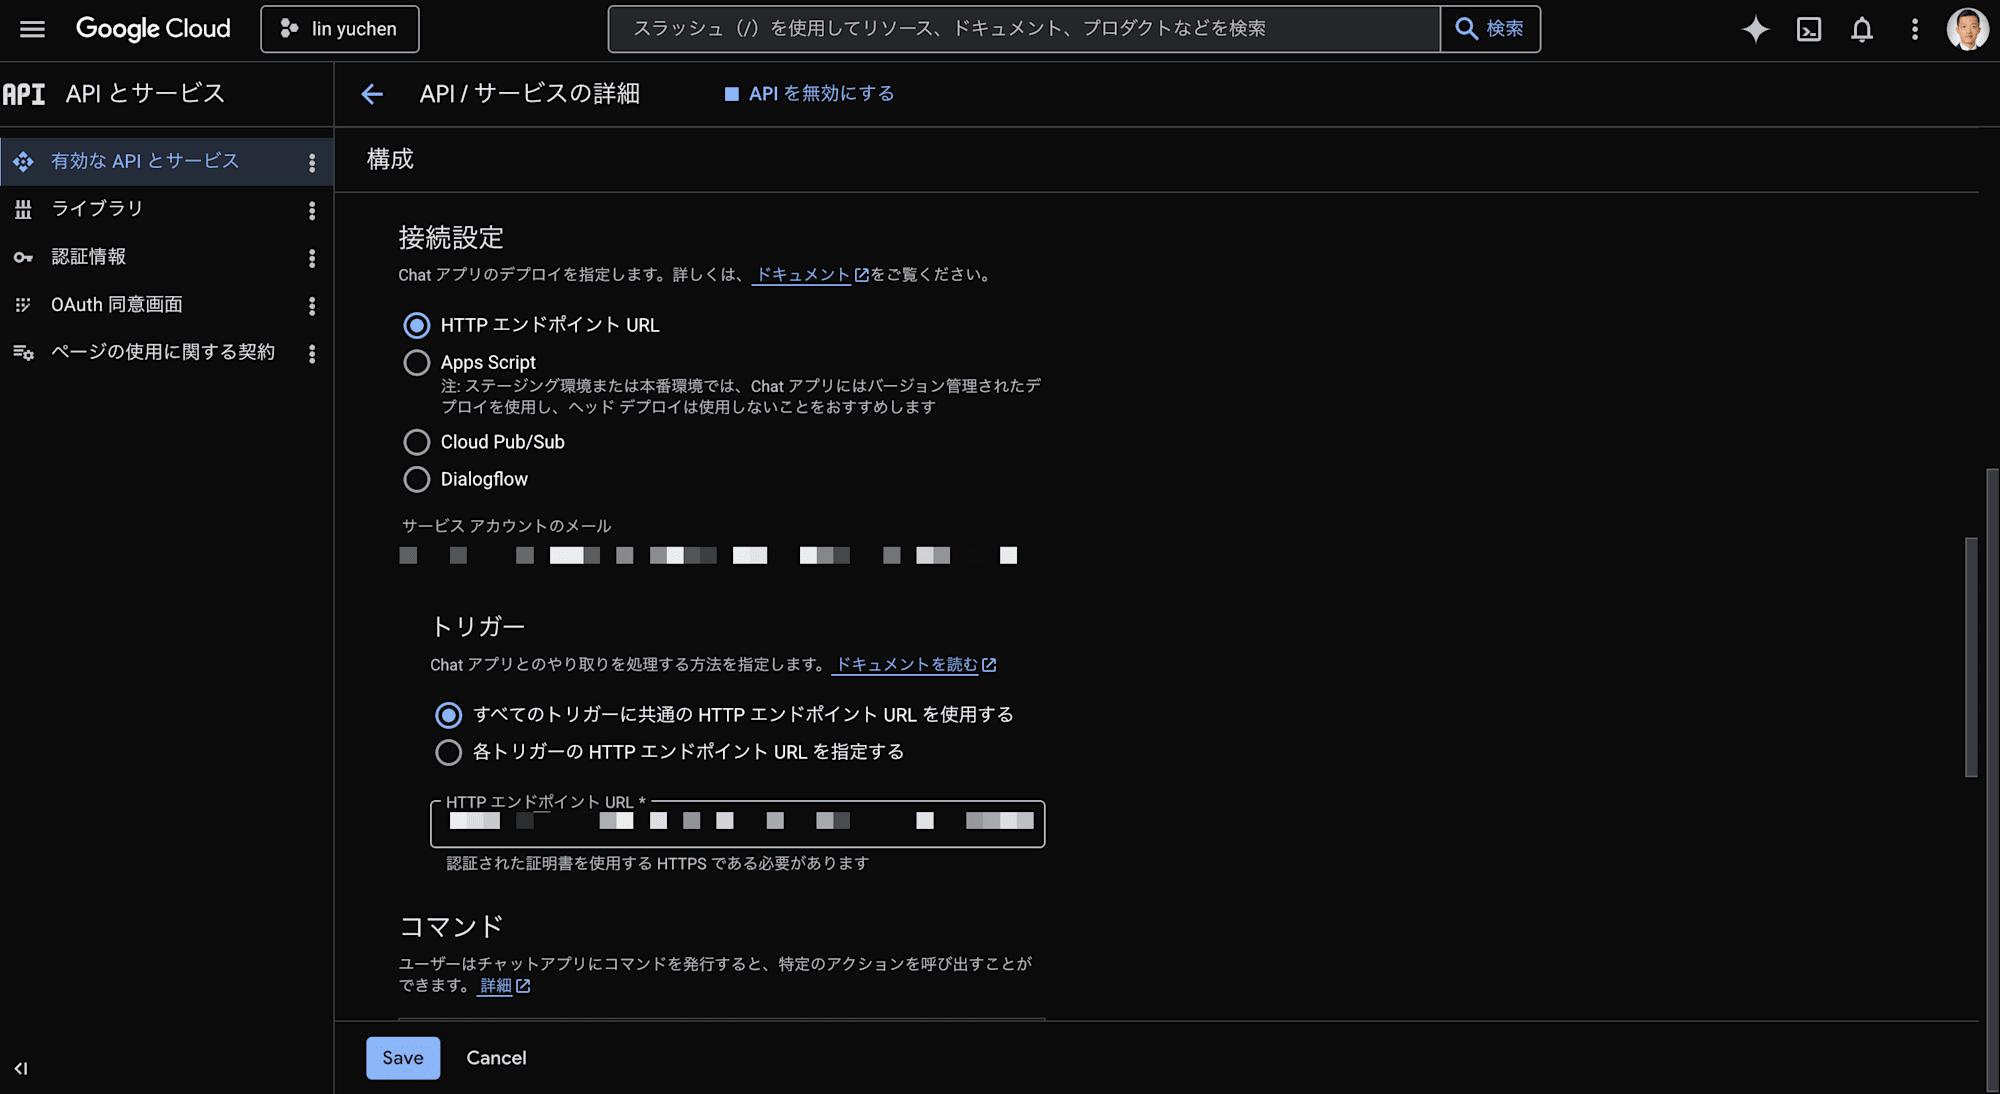
Manual configuration in the GCP Console is required. This cannot be done with the gcloud CLI.
Open Google Chat API Configuration and select the Configuration tab.
Configure the following:
| Item | Value |
|---|---|
| App name | Any bot name you like |
| Avatar url | Avatar image for the app |
| Description | Description of the bot |
Trigger Configuration
For Connection settings (triggers), there are two options:
- Use a common HTTP endpoint URL for all triggers — Handle all events with a single URL
- Specify HTTP endpoint URLs for each trigger — Set different URLs per event type
Since this is an echo bot, handling all events with a single Cloud Function is sufficient. Select "Use a common HTTP endpoint URL for all triggers" and paste the Cloud Function URL issued during deployment:
https://asia-northeast1-YOUR_PROJECT_ID.cloudfunctions.net/google-chat-bot
Visibility Configuration
| Item | Value |
|---|---|
| Visibility | Select "Make this app available to specific people and groups" and add your email address |
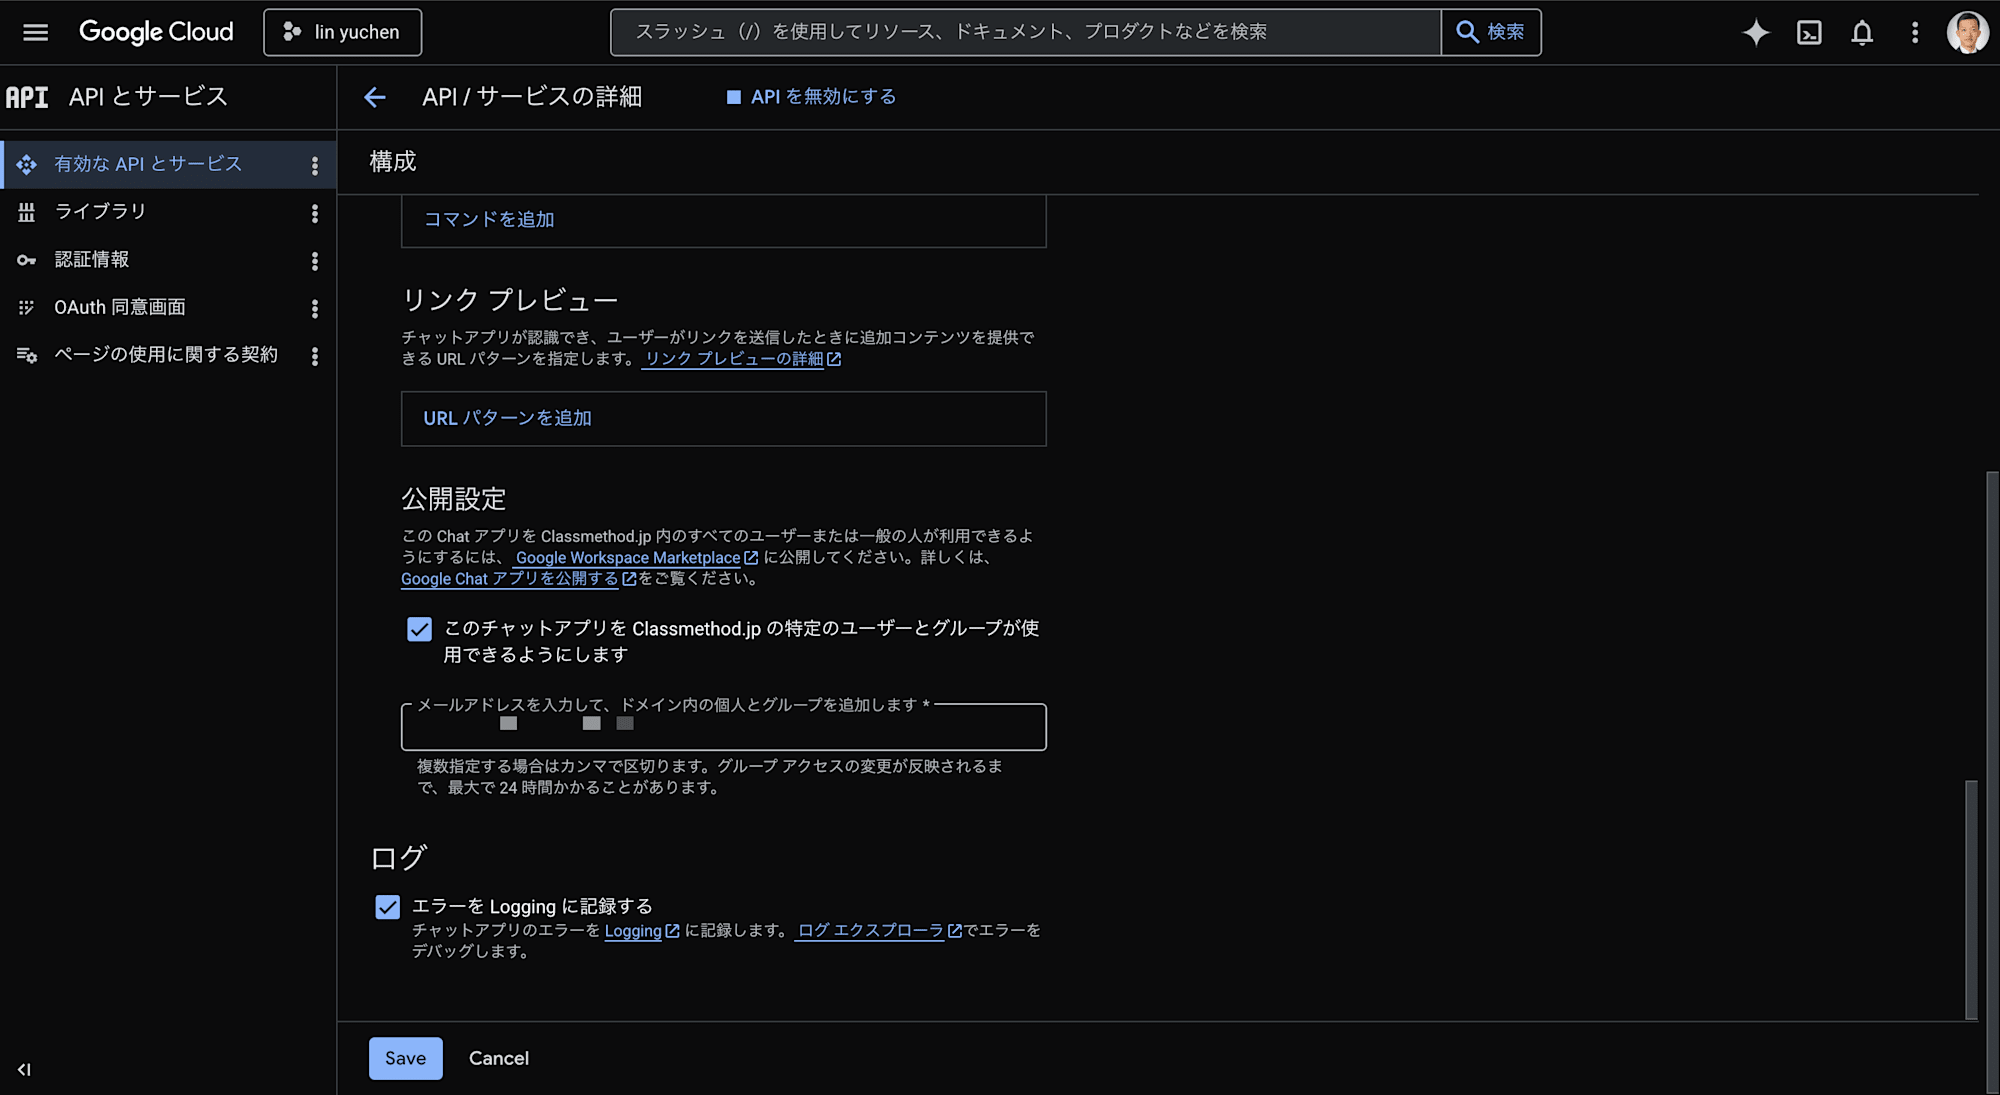
Click Save. It may take a few minutes to take effect.
Verification
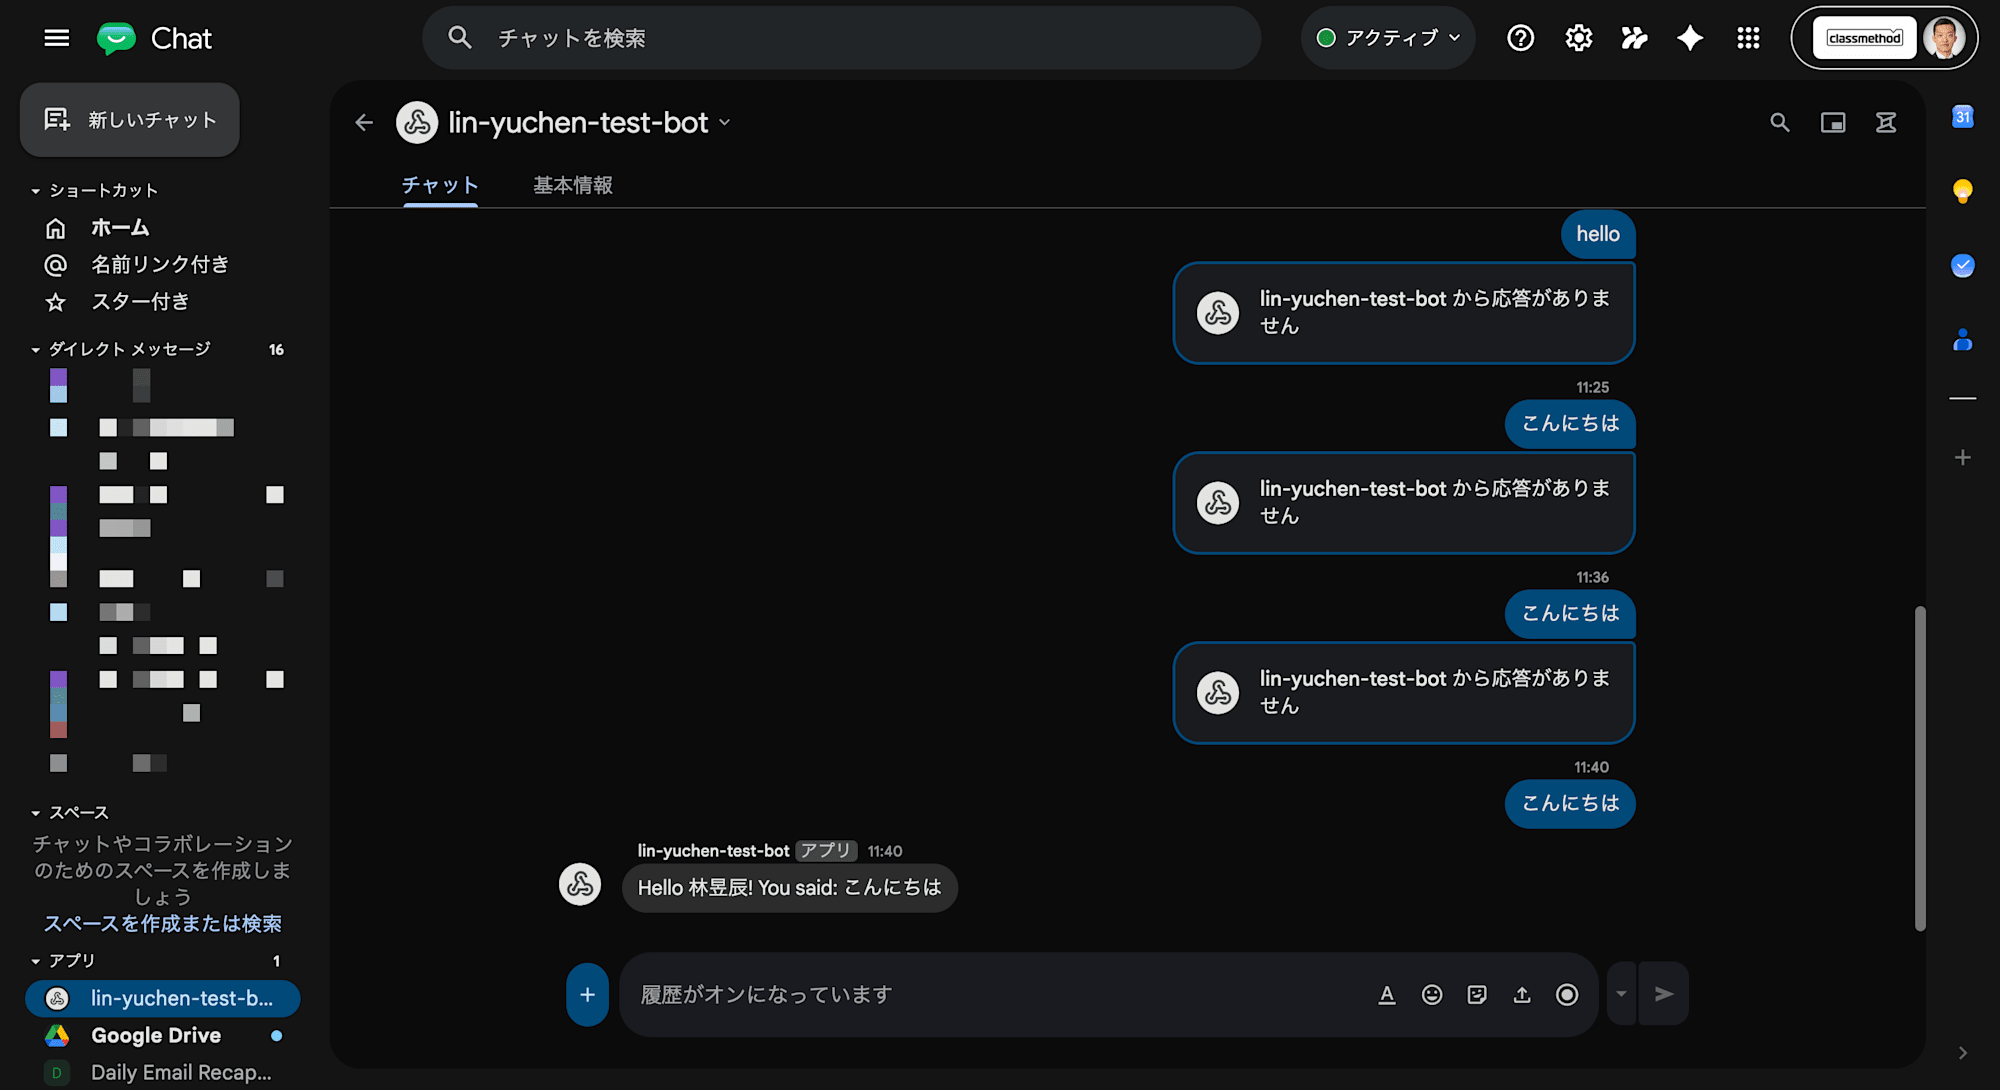
Once the Google Chat API settings are saved, send a message to the bot to verify it works.
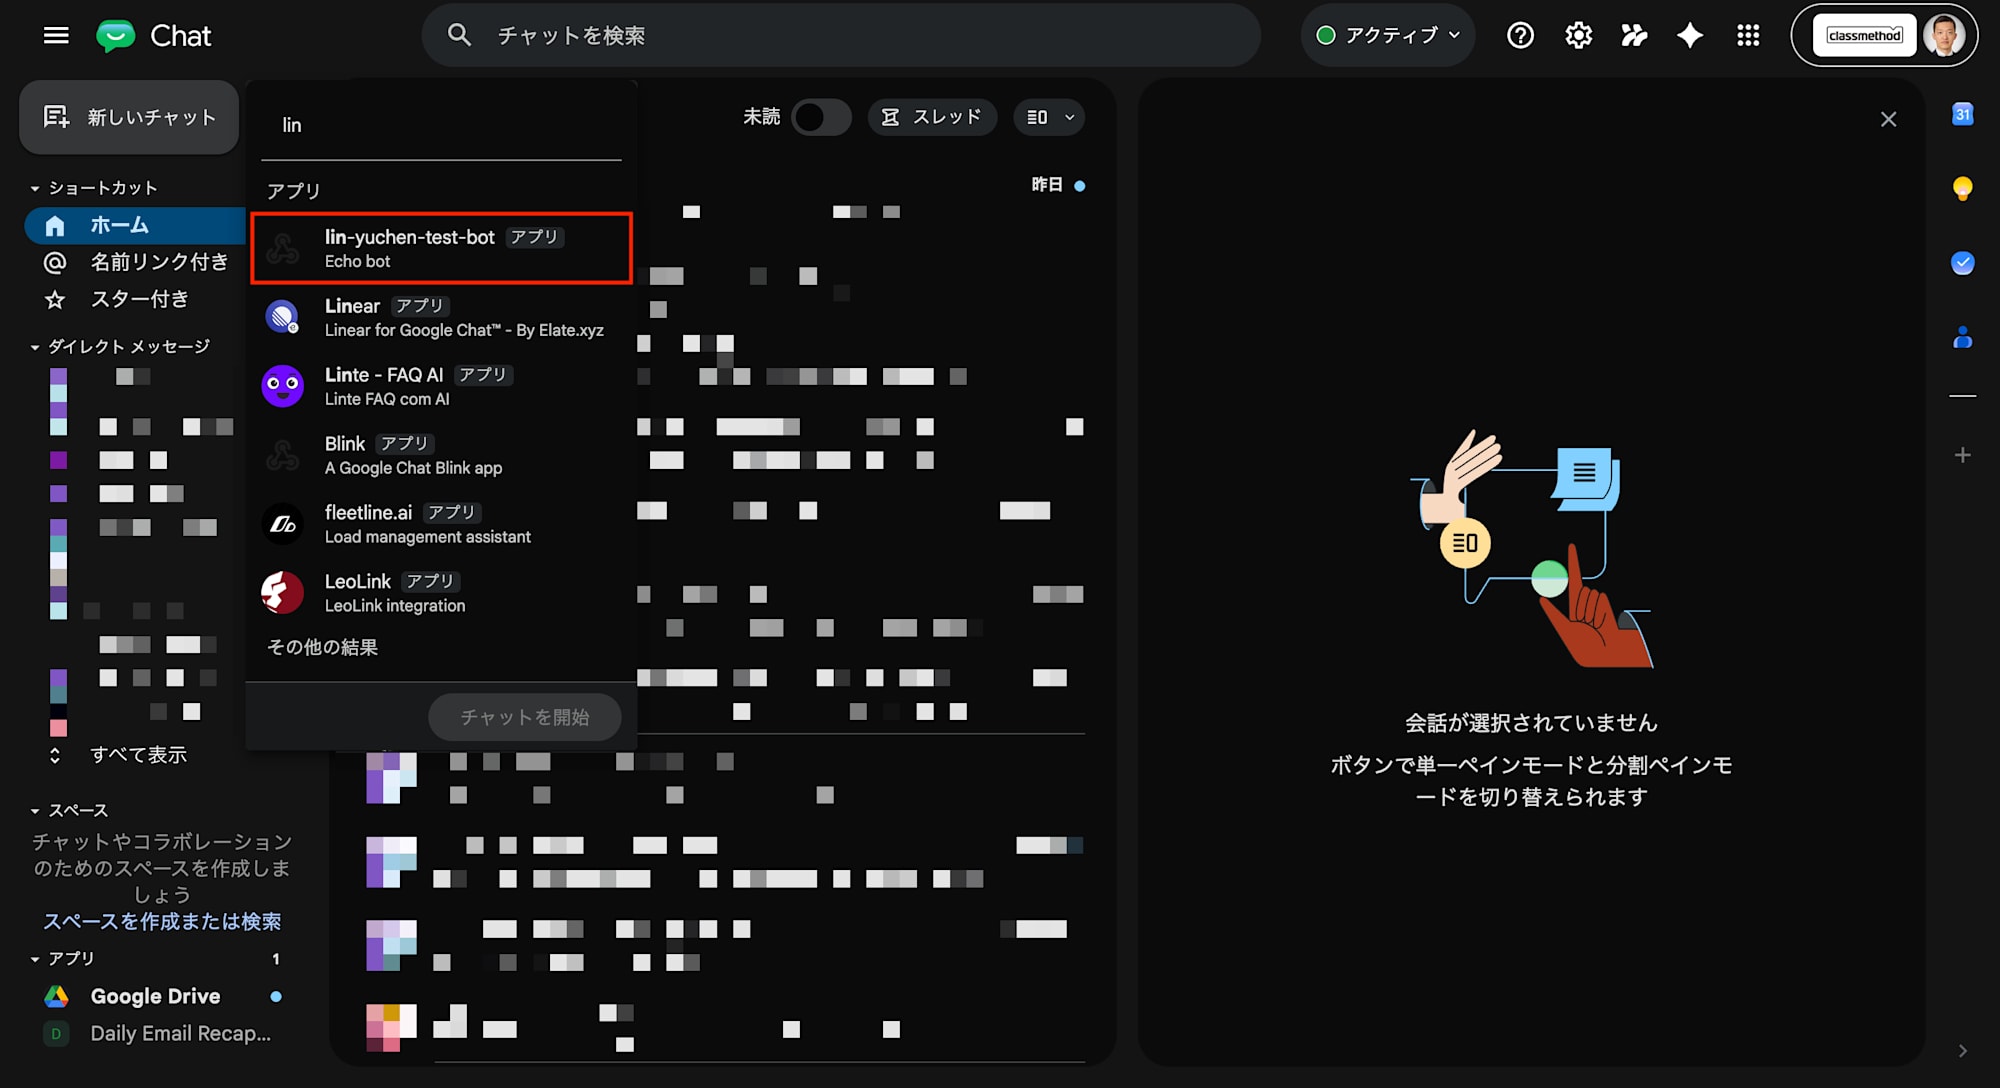
- Open Google Chat
- Click "New chat" in the left sidebar
- Search for the bot name (the App name you configured) and select it
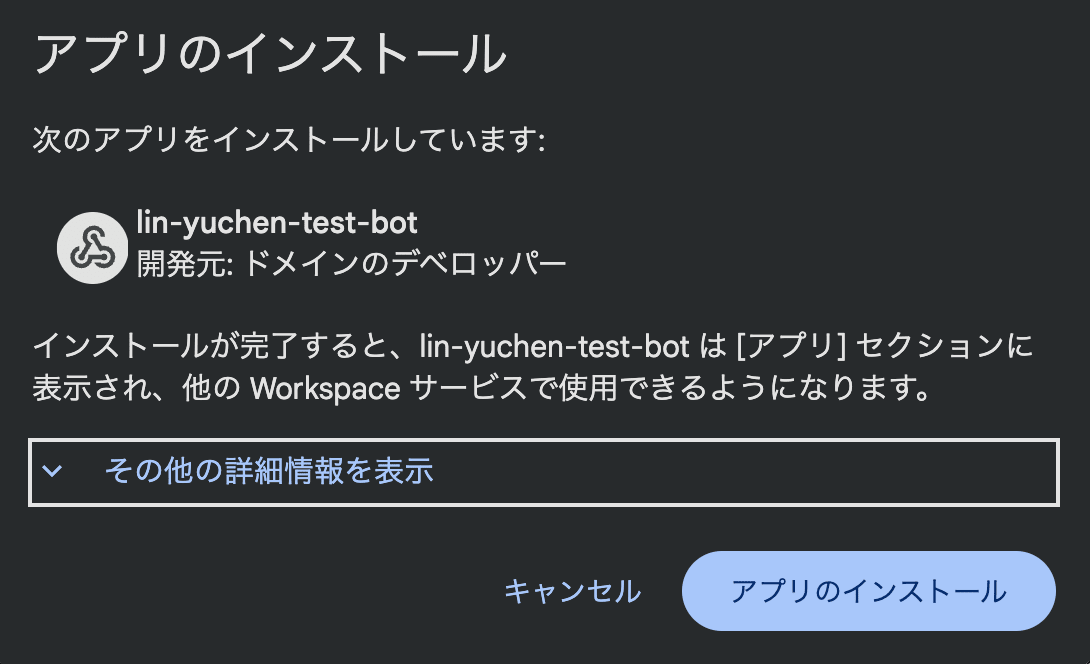
- If prompted to install the bot, click Install
- Once the chat screen opens, send a message (e.g.,
hello) - If the bot replies with something like
Hello YourName! You said: hello, it's working
If the bot doesn't appear in search results, the settings may take a few minutes to propagate, so wait a bit and try searching again.
Pitfall: Bot Shows "No Response"
This is the most important part of this article. After deployment, when I sent a message to the bot in Google Chat, it displayed "No response from ○○".
Hitting the Cloud Function directly with curl returned a normal response, but going through Google Chat resulted in no response. Here's the process I went through to identify the cause.
Cause 1: IAM Configuration with the Wrong Service Account
Initially I deployed with --allow-unauthenticated, allowing anyone to access it, but checking the Google Chat documentation, the recommended approach is authenticated — meaning only granting invoker permissions to the Google Chat service account.
Based on information I found online, I granted invoker permissions to chat@system.gserviceaccount.com, but 403 errors kept occurring.
The cause was the wrong service account. The current Google Chat uses the Google Workspace Add-ons mechanism for HTTP endpoint mode, and the service account sending requests is not chat@system.gserviceaccount.com but:
service-PROJECT_NUMBER@gcp-sa-gsuiteaddons.iam.gserviceaccount.com
There are two ways to find the correct service account:
- Google Chat API Configuration page — Open Configuration and the service account email address is shown in the Service account field
- Decode the JWT token — Retrieve the
Authorizationheader from a request in the Cloud Run logs, and decoding the JWT lets you check the actual caller via theemailfield
# Redeploy with authentication
gcloud functions deploy google-chat-bot \
  --gen2 \
  --runtime=python314 \
  --region=asia-northeast1 \
  --source=. \
  --entry-point=handle_chat \
  --trigger-http \
  --no-allow-unauthenticated

# Grant invoker permissions to the Google Chat service account
gcloud run services add-iam-policy-binding google-chat-bot \
  --region=asia-northeast1 \
  --member="service-PROJECT_NUMBER@gcp-sa-gsuiteaddons.iam.gserviceaccount.com" \
  --role="roles/run.invoker"
After granting invoker permissions to the correct service account, the authenticated deployment worked without issues.
Cause 2 (The Real Cause): Different Request/Response Format
After checking the Cloud Function logs, I found that the format of requests sent by Google Chat differed from what most tutorials describe.
Commonly Described (Old) Format
{
  "type": "MESSAGE",
  "message": {
    "text": "hello",
    "sender": {"displayName": "User"}
  }
}
Actual Format Received
{
  "commonEventObject": { ... },
  "authorizationEventObject": { ... },
  "chat": {
    "messagePayload": {
      "message": {
        "text": "hello",
        "sender": {"displayName": "林昱辰"}
      }
    }
  }
}
The message was nested at body["chat"]["messagePayload"]["message"], not at body["message"].
Furthermore, the response format was also different.
Commonly Described (Old) Response
{"text": "Hello!"}
Actually Expected Response
{
  "hostAppDataAction": {
    "chatDataAction": {
      "createMessageAction": {
        "message": {
          "text": "Hello!"
        }
      }
    }
  }
}
This is because the Google Chat API has migrated to the Google Workspace Add-ons format. With the current HTTP endpoint approach, both requests and responses must use the Workspace Add-ons format.
Debugging Tips
When checking Cloud Functions logs, output from Python's logging module may not appear. Using print(..., file=sys.stderr, flush=True) caused it to show up in the logs.
print(f"REQUEST BODY: {json.dumps(body, ensure_ascii=False)}", file=sys.stderr, flush=True)
Command to check Cloud Run logs:
gcloud logging read \
  'resource.type="cloud_run_revision" AND resource.labels.service_name="google-chat-bot"' \
  --limit=10 \
  --format="table(timestamp,severity,textPayload)" \
  --project=YOUR_PROJECT_ID
Summary
- Built a Google Chat bot using Cloud Functions 2nd generation + Python 3.14 + uv
- The Python 3.14 runtime in Cloud Functions natively supports
uv, allowing direct deployment frompyproject.toml - The current Google Chat HTTP endpoint uses the Google Workspace Add-ons format. The old
{"text": "..."}format from tutorials will not work - Retrieve the message from the request at
body["chat"]["messagePayload"]["message"] - Responses must be returned in the
hostAppDataAction.chatDataAction.createMessageAction.messageformat - For debugging, using
print(..., file=sys.stderr, flush=True)is the reliable way to output to Cloud Run logs