![[Update] IAM Policy Autopilot now supports Terraform plan files](https://images.ctfassets.net/ct0aopd36mqt/wp-thumbnail-7bf2dfb6b7a0dd9b7561e87b396ccdc3/018019c86ac567eceba7268550750d9f/aws-iam?w=3840&fm=webp)
[Update] IAM Policy Autopilot now supports Terraform plan files

This page has been translated by machine translation. View original
Introduction
Hello everyone, this is Akaike.
Does the IAM role used when running Terraform have effectively Admin or PowerUser equivalent permissions?
Mine does.
Since Terraform touches resources across many different services, identifying every required action one by one and building a least-privilege role is, honestly, quite a tedious task.
So in the end, I've had the experience many times of thinking "let's just attach AdministratorAccess (or PowerUserAccess) for now and tighten it up later!" and then leaving it untouched for months. (Still doing it.)
In the meantime, there was an update announcing that IAM Policy Autopilot now supports Terraform plan files.
It supposedly generates the necessary IAM policies from a plan, which sounds pretty useful.
So this time, I'll try it out all the way through generating an IAM policy from a Terraform plan.
I'll also introduce the pattern of using it via an MCP server.
What is IAM Policy Autopilot?
IAM Policy Autopilot is an open-source IAM policy auto-generation tool announced at re:Invent 2025.
It deterministically performs static analysis of AWS SDK calls and Terraform plans, generating a "draft" policy scoped down to the necessary permissions.
This means there's no need to execute code or accumulate CloudTrail logs — the analysis completes locally. (No additional charges either.)
The CLI has three commands, which can be used to generate IAM policies tailored to your code's content.
generate-policies- Generates IAM policies from source code or Terraform plans
fix-access-denied- Analyzes AccessDenied errors and generates/applies the necessary policies
mcp-server- Starts an MCP server (for integration with Claude Desktop, Kiro, etc.)
Previous Limitations
Previously, the analysis target was application source code that calls the AWS SDK.
(Supported languages include Python's Boto3, Go/Java/JavaScript/TypeScript SDKs, etc.)
For example, it would look at boto3's s3.put_object() and derive that s3:PutObject is required.
In other words, what was generated were permissions required at runtime by the application.
Newly Added Functionality
With this update, generation from Terraform plan files is now supported.
A plan contains everything about "which resources to create/modify/delete and with what configuration." Passing a plan (JSON) to generate-policies generates a policy scoped to the necessary actions based on its contents.
Moreover, it references specific resource ARNs wherever possible rather than wildcards.
In other words, it reverse-engineers the permissions needed to run terraform apply from the plan. Let's try it out.
Trying It Out (CLI Edition)
Prerequisites (Installing uv)
IAM Policy Autopilot can be installed in several ways, but this time I'll use uv (uvx), which can be run without any additional installation.
If uv is not installed, use the official installer to set it up.
# macOS / Linux
curl -LsSf https://astral.sh/uv/install.sh | sh
Using uvx, you can run packages directly without explicitly installing them.
uvx iam-policy-autopilot
However, the above command gave me version 0.2.3 in my environment, so I specified the official PyPI as the index to get the latest version.
(In this blog post, I'll be adding the --default-index https://pypi.org/simple option to uvx going forward.)
uvx --default-index https://pypi.org/simple iam-policy-autopilot version
You're good to go if 0.3.0 is retrieved.
iam-policy-autopilot 0.3.0
Preparing a Terraform Configuration for Testing
This time I prepared a simple configuration that just creates an S3 bucket and a DynamoDB table.
terraform {
  required_version = ">= 1.15"

  required_providers {
    aws = {
      source  = "hashicorp/aws"
      version = "~> 6.0"
    }
  }
}

provider "aws" {
  region = "ap-northeast-1"
}

resource "aws_s3_bucket" "app" {
  bucket = "autopilot-demo-bucket"
}

resource "aws_dynamodb_table" "app" {
  name         = "autopilot-demo-table"
  billing_mode = "PAY_PER_REQUEST"
  hash_key     = "id"

  attribute {
    name = "id"
    type = "S"
  }
}
Generating a Plan and Converting It to JSON
IAM Policy Autopilot accepts plan files in JSON format.
Save the plan with terraform plan, then convert it to JSON with terraform show -json.
# Initialize
terraform init

# Save the plan to a file
terraform plan -out=plan.tfplan

# Convert the saved plan to JSON
terraform show -json plan.tfplan > plan.json
This produces plan.json.
Generating the Policy
Now let's pass the generated plan.json to IAM Policy Autopilot.
There's no need to specify the input type — the tool automatically determines it.
(--pretty is an option to format the output JSON.)
uvx --default-index https://pypi.org/simple iam-policy-autopilot generate-policies plan.json --pretty
The actually generated JSON was as follows.
{
  "Policies": [
    {
      "Policy": {
        "Id": "IamPolicyAutopilot",
        "Version": "2012-10-17",
        "Statement": [
          {
            "Effect": "Allow",
            "Action": [
              "dynamodb:AssociateTableReplica",
              "dynamodb:BatchWriteItem",
              "dynamodb:CreateGlobalTableWitness",
              "dynamodb:CreateTable",
              "dynamodb:CreateTableReplica",
              "dynamodb:DeleteGlobalTableWitness",
              "dynamodb:DeleteItem",
              "dynamodb:DescribeContinuousBackups",
              "dynamodb:DescribeImport",
              "dynamodb:DescribeTable",
              "dynamodb:DescribeTimeToLive",
              "dynamodb:GetItem",
              "dynamodb:ImportTable",
              "dynamodb:ListTagsOfResource",
              "dynamodb:PutItem",
              "dynamodb:PutResourcePolicy",
              "dynamodb:Query",
              "dynamodb:ReadDataForReplication",
              "dynamodb:ReplicateSettings",
              "dynamodb:RestoreTableFromBackup",
              "dynamodb:Scan",
              "dynamodb:TagResource",
              "dynamodb:UntagResource",
              "dynamodb:UpdateContinuousBackups",
              "dynamodb:UpdateItem",
              "dynamodb:UpdateTable",
              "dynamodb:UpdateTimeToLive",
              "dynamodb:WriteDataForReplication"
            ],
            "Resource": [
              "arn:*:dynamodb:*:*:table/autopilot-demo-table",
              "arn:*:dynamodb:*:*:table/autopilot-demo-table/backup/*",
              "arn:*:dynamodb:*:*:table/autopilot-demo-table/import/*",
              "arn:*:dynamodb:*:*:table/autopilot-demo-table/index/*",
              "arn:*:dynamodb:*:*:table/autopilot-demo-table/stream/*"
            ]
          },
          {
            "Effect": "Allow",
            "Action": [
              "iam:PassRole"
            ],
            "Resource": [
              "*"
            ],
            "Condition": {
              "StringEquals": {
                "iam:PassedToService": [
                  "s3.amazonaws.com"
                ]
              }
            }
          },
          {
            "Effect": "Allow",
            "Action": [
              "kms:CreateGrant",
              "kms:DescribeKey"
            ],
            "Resource": [
              "arn:*:kms:*:*:key/*"
            ],
            "Condition": {
              "StringLike": {
                "kms:ViaService": [
                  "dynamodb.*.amazonaws.com"
                ]
              }
            }
          },
          {
            "Effect": "Allow",
            "Action": [
              "s3:CreateBucket",
              "s3:DeleteBucketPolicy",
              "s3:DeleteBucketWebsite",
              "s3:GetAccelerateConfiguration",
              "s3:GetBucketAcl",
              "s3:GetBucketCORS",
              "s3:GetBucketLogging",
              "s3:GetBucketObjectLockConfiguration",
              "s3:GetBucketPolicy",
              "s3:GetBucketRequestPayment",
              "s3:GetBucketTagging",
              "s3:GetBucketVersioning",
              "s3:GetBucketWebsite",
              "s3:GetEncryptionConfiguration",
              "s3:GetLifecycleConfiguration",
              "s3:GetReplicationConfiguration",
              "s3:ListBucket",
              "s3:PutAccelerateConfiguration",
              "s3:PutBucketAcl",
              "s3:PutBucketCORS",
              "s3:PutBucketLogging",
              "s3:PutBucketObjectLockConfiguration",
              "s3:PutBucketOwnershipControls",
              "s3:PutBucketPolicy",
              "s3:PutBucketRequestPayment",
              "s3:PutBucketTagging",
              "s3:PutBucketVersioning",
              "s3:PutBucketWebsite",
              "s3:PutEncryptionConfiguration",
              "s3:PutLifecycleConfiguration",
              "s3:PutReplicationConfiguration"
            ],
            "Resource": [
              "arn:*:s3:*:*:accesspoint/*",
              "arn:*:s3:::akaike-autopilot-demo-bucket"
            ]
          },
          {
            "Effect": "Allow",
            "Action": [
              "s3:DeleteObjectTagging",
              "s3:DeleteObjectVersionTagging",
              "s3:GetObjectTagging",
              "s3:GetObjectVersionTagging",
              "s3:PutObjectTagging",
              "s3:PutObjectVersionTagging"
            ],
            "Resource": [
              "arn:*:s3:*:*:accesspoint/*/object/*",
              "arn:*:s3:::akaike-autopilot-demo-bucket/*"
            ]
          },
          {
            "Effect": "Allow",
            "Action": [
              "s3-object-lambda:DeleteObjectTagging",
              "s3-object-lambda:GetObjectTagging",
              "s3-object-lambda:PutObjectTagging"
            ],
            "Resource": [
              "arn:*:s3:*:*:accesspoint/*/object/*",
              "arn:*:s3:::*/*"
            ]
          },
          {
            "Effect": "Allow",
            "Action": [
              "s3express:GetLifecycleConfiguration",
              "s3express:PutLifecycleConfiguration"
            ],
            "Resource": [
              "arn:*:s3:::*"
            ]
          }
        ]
      },
      "PolicyType": "Identity"
    }
  ],
  "Warnings": [
    {
      "WarningType": "WildcardResource",
      "Location": {
        "PolicyIndex": 0,
        "StatementIndex": 1
      },
      "Message": "Statement could not be scoped to specific resources and uses Resource \"*\". Review whether broad resource access is intended."
    }
  ]
}
It's great that Resource is properly scoped to specific resource names (autopilot-demo-table and autopilot-demo-bucket).
It looks like the bucket name and table name written in the plan are reflected directly in the ARNs.
Also, regarding the Warnings at the end — for cases where scoping to a specific resource was not possible and Resource: "*" was used (in this case, iam:PassRole), it provides a warning saying "please verify whether broad resource access is intentional."
It's helpful that it points out exactly which parts need to be reviewed.
Making ARNs More Specific with region / account
In the previous output, the region and account ID in the ARNs were wildcards like arn:*:dynamodb:*:*:....
By specifying --region and --account, these are replaced with concrete values.
uvx --default-index https://pypi.org/simple iam-policy-autopilot generate-policies plan.json \
  --region ap-northeast-1 \
  --account XXXXXXXXXXXX \
  --pretty
This brings the policy closer to least privilege, so if a more secure configuration is desired, it's a good idea to specify the deployment target's region and account.
arn:aws:dynamodb:ap-northeast-1:XXXXXXXXXXXX:table/autopilot-demo-table
Creating the Generated Policy Directly in IAM with upload-policies
Rather than just printing the generated policy to standard output, you can add --upload-policies to create it as an IAM policy on the spot.
Internally, iam:CreatePolicy is called.
# Create with the default name
uvx --default-index https://pypi.org/simple iam-policy-autopilot generate-policies plan.json --upload-policies

# Create with a specified prefix
uvx --default-index https://pypi.org/simple iam-policy-autopilot generate-policies plan.json --upload-policies TerraformDeployRole
The policy name that gets created will be IamPolicyAutopilotGeneratedPolicy_1 if no prefix is specified, or <prefix>_1 with a sequential number if one is specified.
(It automatically selects a number that doesn't conflict with existing policies.)
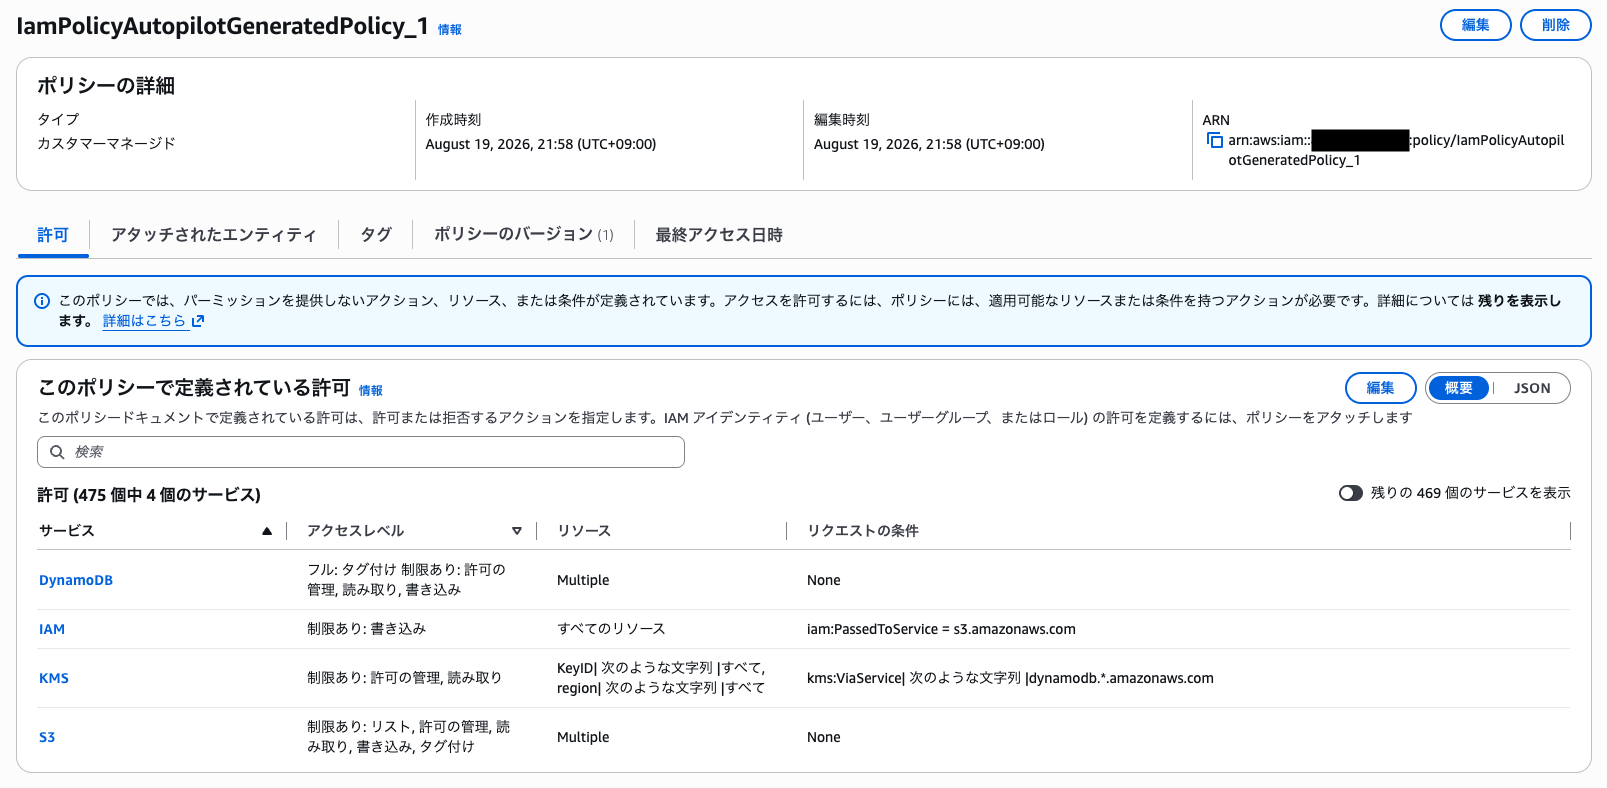
Note: Using an aws login profile causes an error
At this point I encountered an error.
Error: Failed to upload policies to AWS IAM
  Caused by: AWS IAM list policies error: dispatch failure
  Caused by: the credentials provider was not properly configured
  Caused by: ProfileFile provider could not be built: This behavior requires following cargo feature(s) enabled: credentials-login. In order to use an active login session, the `credentials-login` feature must be enabled.
This was not an IAM permissions issue, but a problem with the credential retrieval method.
My profile was authenticated using aws login.
IAM Policy Autopilot is written in Rust (AWS SDK for Rust), and reading a profile that uses login_session requires building the SDK with the credentials-login feature enabled.
Looking at IAM Policy Autopilot's Cargo.toml, aws-config had no such feature specified, which is presumably why the error occurs. (This is my assumption.)
The solution is to pass static credentials via environment variables that the tool can read.
The AWS CLI's export-credentials can export the current session as environment variables.
# Replace the profile name with your own
# With credentials available from environment variables, the error will be resolved
eval "$(aws configure export-credentials --profile default --format env)"
Update added 2026/08/21
After I filed an issue, it was quickly fixed and will apparently be included in the next release.
So it seems that aws login will work without issues before long.
Trying It Out (MCP Edition)
IAM Policy Autopilot also works as an MCP (Model Context Protocol) server.
This time I'll use Claude Code as an example.
Registering with Claude Code
Either register using the claude mcp add command,
claude mcp add iam-policy-autopilot \
  --env AWS_PROFILE=default \
  --env AWS_REGION=ap-northeast-1 \
  -- uvx --default-index https://pypi.org/simple iam-policy-autopilot mcp-server
or if configuring at the project level, write it in .mcp.json or similar.
{
  "mcpServers": {
    "iam-policy-autopilot": {
      "command": "uvx",
      "args": [
        "--default-index",
        "https://pypi.org/simple",
        "iam-policy-autopilot",
        "mcp-server"
      ],
      "env": {
        "AWS_PROFILE": "default",
        "AWS_REGION": "ap-northeast-1"
      }
    }
  }
}
Tools Exposed by the MCP Server
When I actually connected to the MCP server and called tools/list, the following three tools were exposed.
The Terraform plan, which is the theme of this article, can be handled by the main generate_application_policies tool.
| Tool Name | Role |
|---|---|
generate_application_policies |
Generates IAM policies from source code or Terraform plans (main tool) |
generate_policy_for_access_denied |
Generates the necessary policies from an AccessDenied error message |
fix_access_denied |
Applies the generated AccessDenied policy to the actual AWS account |
How to Use It
After registering, simply ask Claude Code as follows.
Please create an IAM policy with the permissions needed to apply terraform.
Claude Code will then call the generate_application_policies tool and present the generated policy JSON.
The result is the same as calling the CLI directly, but the convenience is being able to proceed with review and modification discussions all within the chat flow.
Note that the --upload-policies feature available in the CLI for directly creating IAM policies did not appear to be supported.
After trying it a few times, it seems the MCP version simply doesn't support it.
(It doesn't appear to be implemented at all.)
Conclusion
That wraps up my exploration of IAM Policy Autopilot's Terraform plan file support.
I found it quite practical that the tool automatically scopes and generates "the permissions needed for the Terraform execution role" — something I used to hunt for by bouncing ideas off an AI based on a plan.
It also seems like it could save a fair amount of AI tokens, so I plan to start using it going forward.
If you've created a Terraform execution role in CI/CD with Admin-equivalent permissions and left it there, or if you're struggling with IAM permission design, why not give it a try?