I tried auto-registering local containers with AWS IoT Fleet Provisioning

This page has been translated by machine translation. View original
Introduction
When connecting IoT devices to AWS IoT Core, it becomes easier to manage them by giving each device a unique identity and allowing only the necessary operations. However, manually preparing Things and certificates one by one becomes more work as the number of devices increases.
This time, I'll use Provisioning by claim from AWS IoT Fleet Provisioning. I'll start a local Linux container with a shared claim certificate for the first time, and have AWS automatically create a Thing and device-specific certificate.
Verification Environment
- macOS Tahoe 26.6.2
- Podman 5.7.0
- Node.js 24.12.0
- pnpm 10.23.0
- Container image:
node:24-bookworm-slim - AWS IoT Core:
ap-northeast-1(Tokyo)
I used Podman for building and running containers. Since the Containerfile is composed of common container image instructions, it can also be used with Docker by adjusting the run options and volume specifications.
Configuration to Try This Time
With Fleet Provisioning, instead of distributing unique certificates to each device from the start, you can use a claim certificate dedicated to registration. Devices authenticate with the claim certificate on first connection and obtain a unique certificate for subsequent normal connections.
The AWS official documentation summarizes the Provisioning by claim flow in Provisioning devices that don't have device certificates using fleet provisioning.
The relationships between resources appearing this time are as follows.
Initial Registration

[Local Container]
  |
  +-- Uses --> [claim certificate + private key]
  |                |
  |                +-- already attached --> [IoT Policy for claim]
  |
  +-- CreateKeysAndCertificate --> [Device-specific certificate + private key]
  |
  +-- RegisterThing --> [provisioning template]
                           |
                           +-- AWS IoT Core uses provisioning IAM role
                           +-- Creates Thing
                           +-- Activates device-specific certificate and associates it with Thing
                           +-- Attaches runtime IoT Policy to device-specific certificate

Normal Communication

[Device-specific certificate saved to /identity]
                 |
                 v
       [Local Container] --MQTT Publish--> [AWS IoT Core]
The key point is to separate the IoT Policy for claim from the one for runtime.
- Claim certificate: Common bootstrap identity used only for initial registration
- IoT Policy for claim: Allows only the MQTT operations needed for certificate creation and
RegisterThing - Provisioning template: Defines Thing name, certificate status, and the runtime Policy to associate
- Provisioning IAM role: Used by AWS IoT Core to create Things and associate certificates
- Device-specific certificate: Identity used for normal connections after registration
- Runtime IoT Policy: Allows connection with the Thing name as Client ID and Publish to that Thing's dedicated Topic
Attaching the runtime Policy to the claim certificate would allow sending normal telemetry with the shared bootstrap identity. In this case, I clearly separated the two.
Preparing the AWS Side
Creating the Claim Certificate
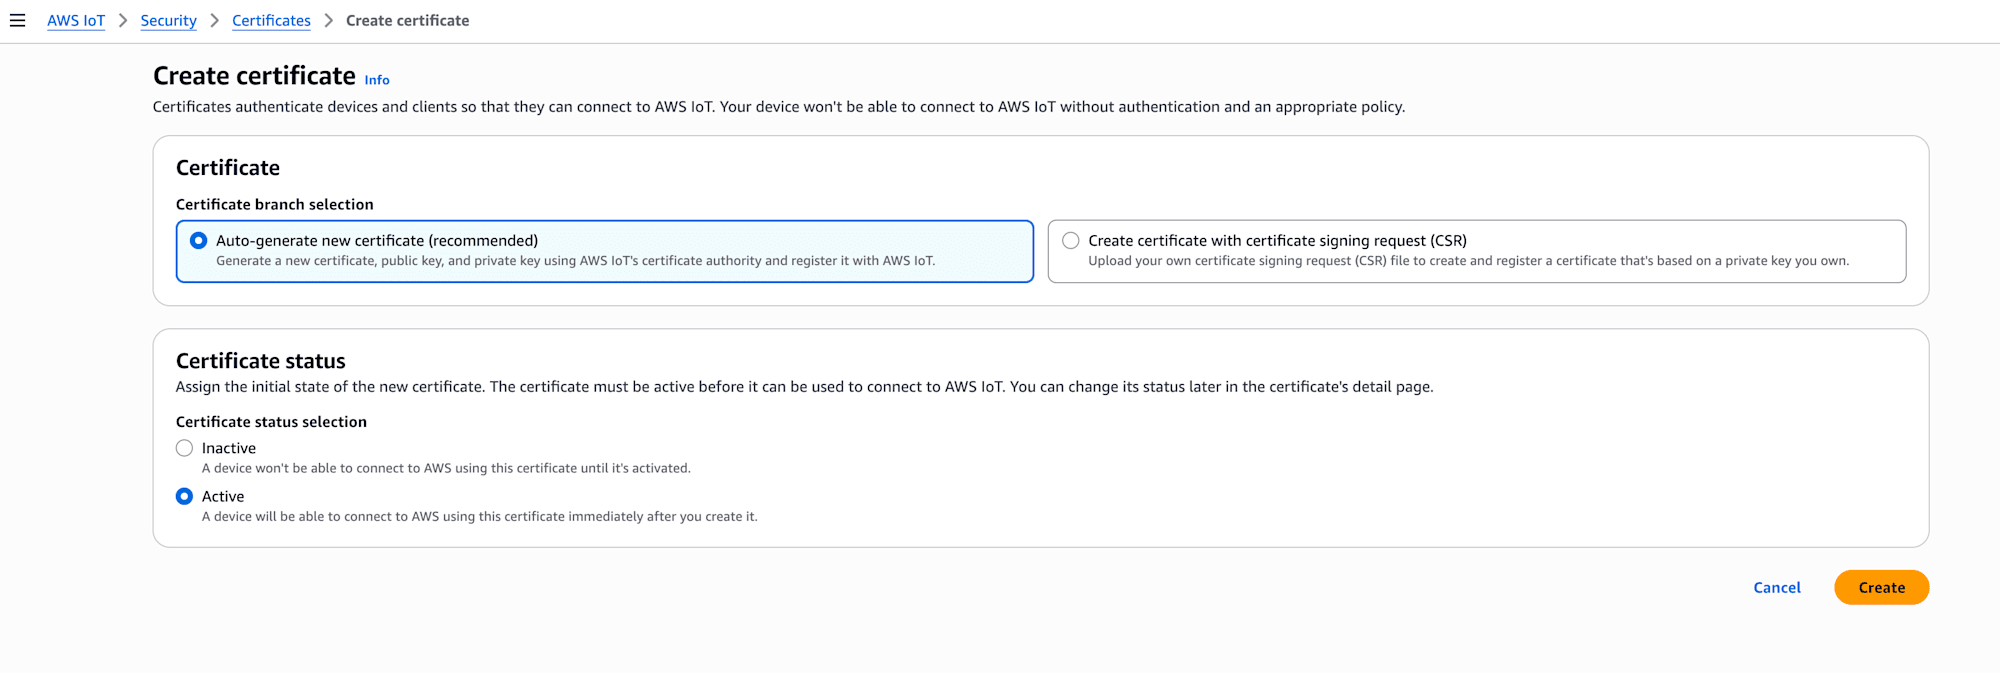
First, I created the certificate for the claim from AWS IoT Core > Security > Certificates.
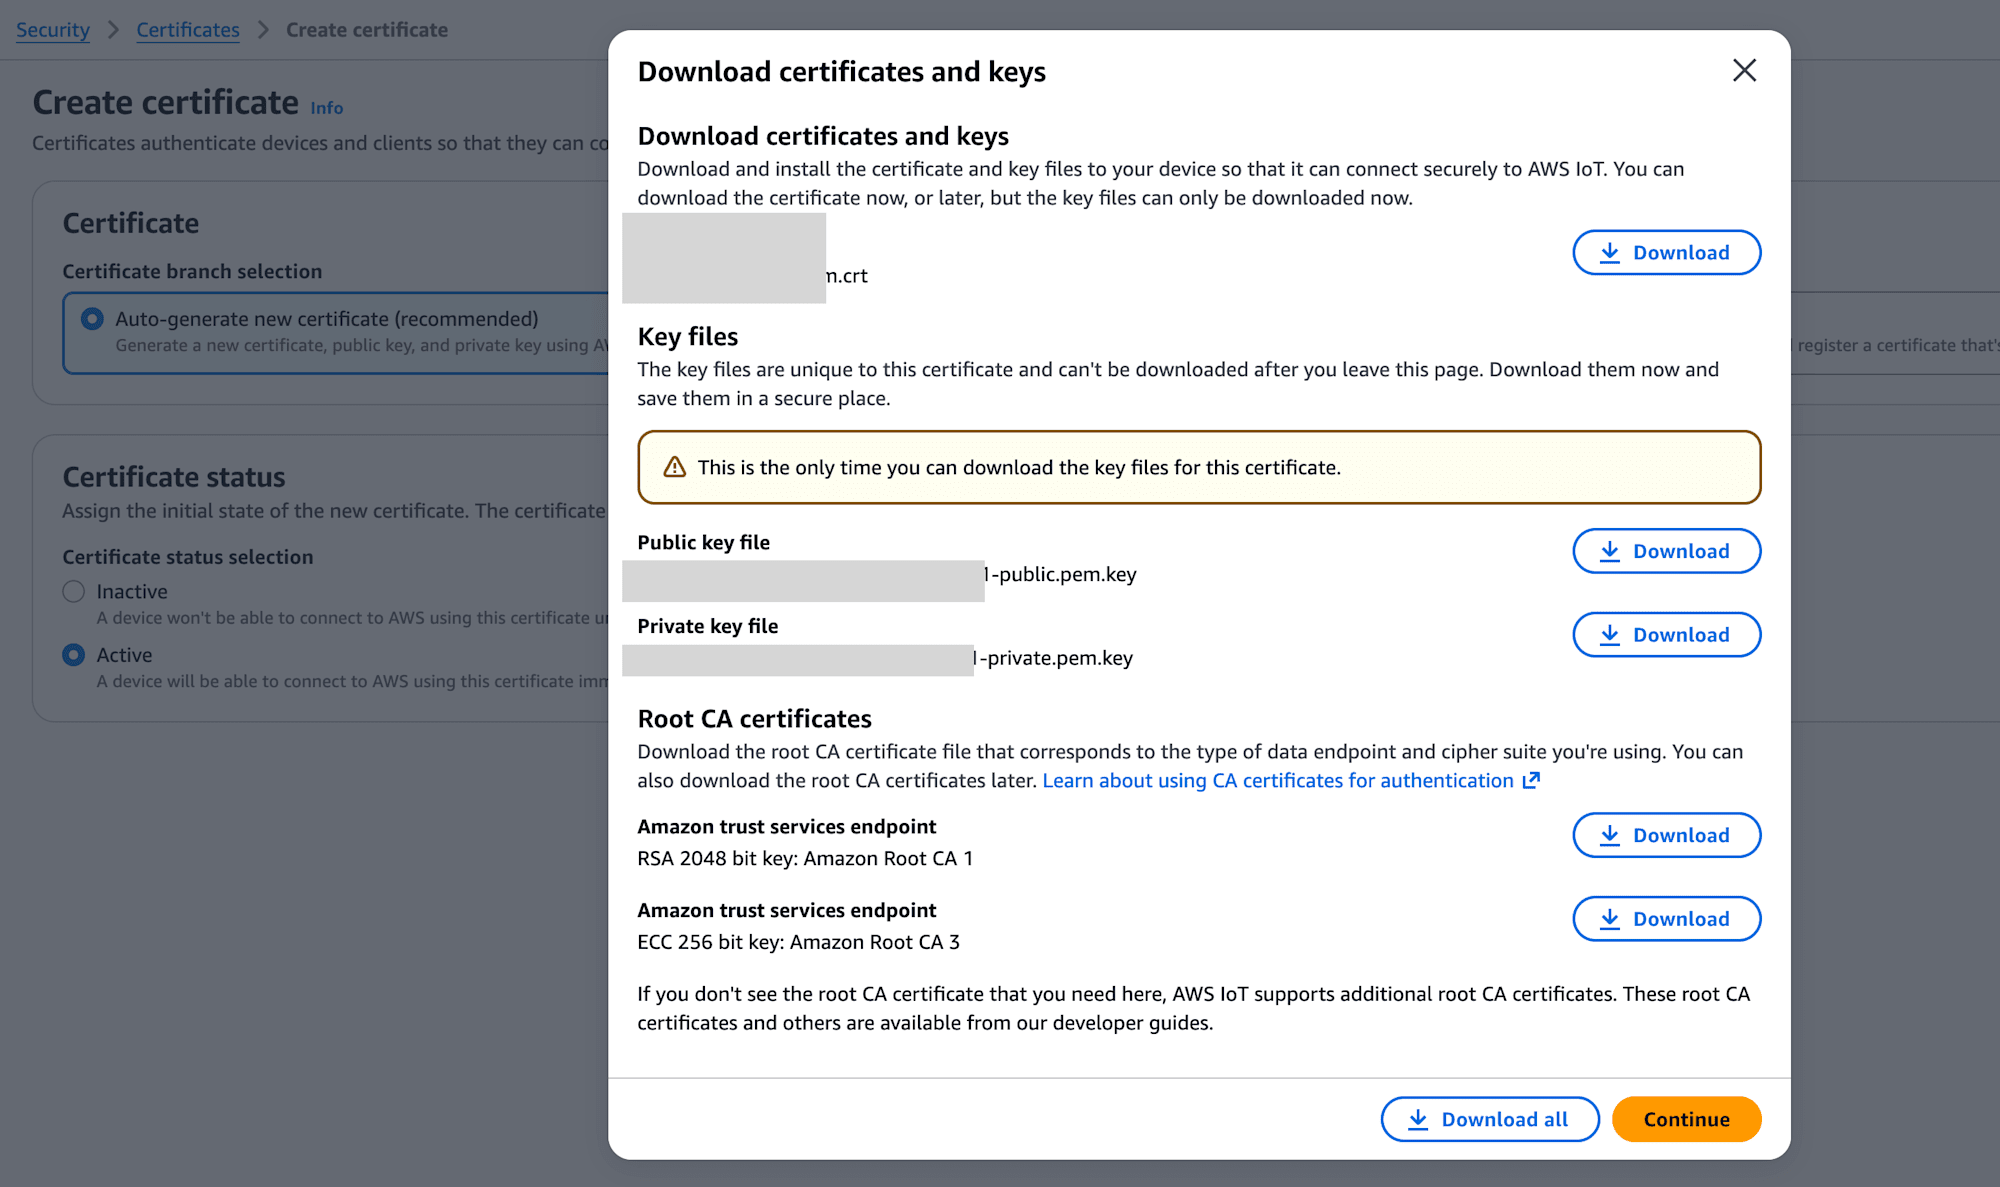
From the certificate creation screen, I saved the following 5 files.
- Claim certificate
- Public key
- Private key
AmazonRootCA1.pemAmazonRootCA3.pem
The three files directly used in this program are the claim certificate, private key, and AmazonRootCA1.pem. The public key and AmazonRootCA3.pem are not loaded in this configuration.
Since the private key can only be obtained at certificate creation time, save it in a secure location without including it in Git or container images. AmazonRootCA1.pem is public information, so if you don't have it on hand, you can re-obtain it from the Amazon Trust Services repository.
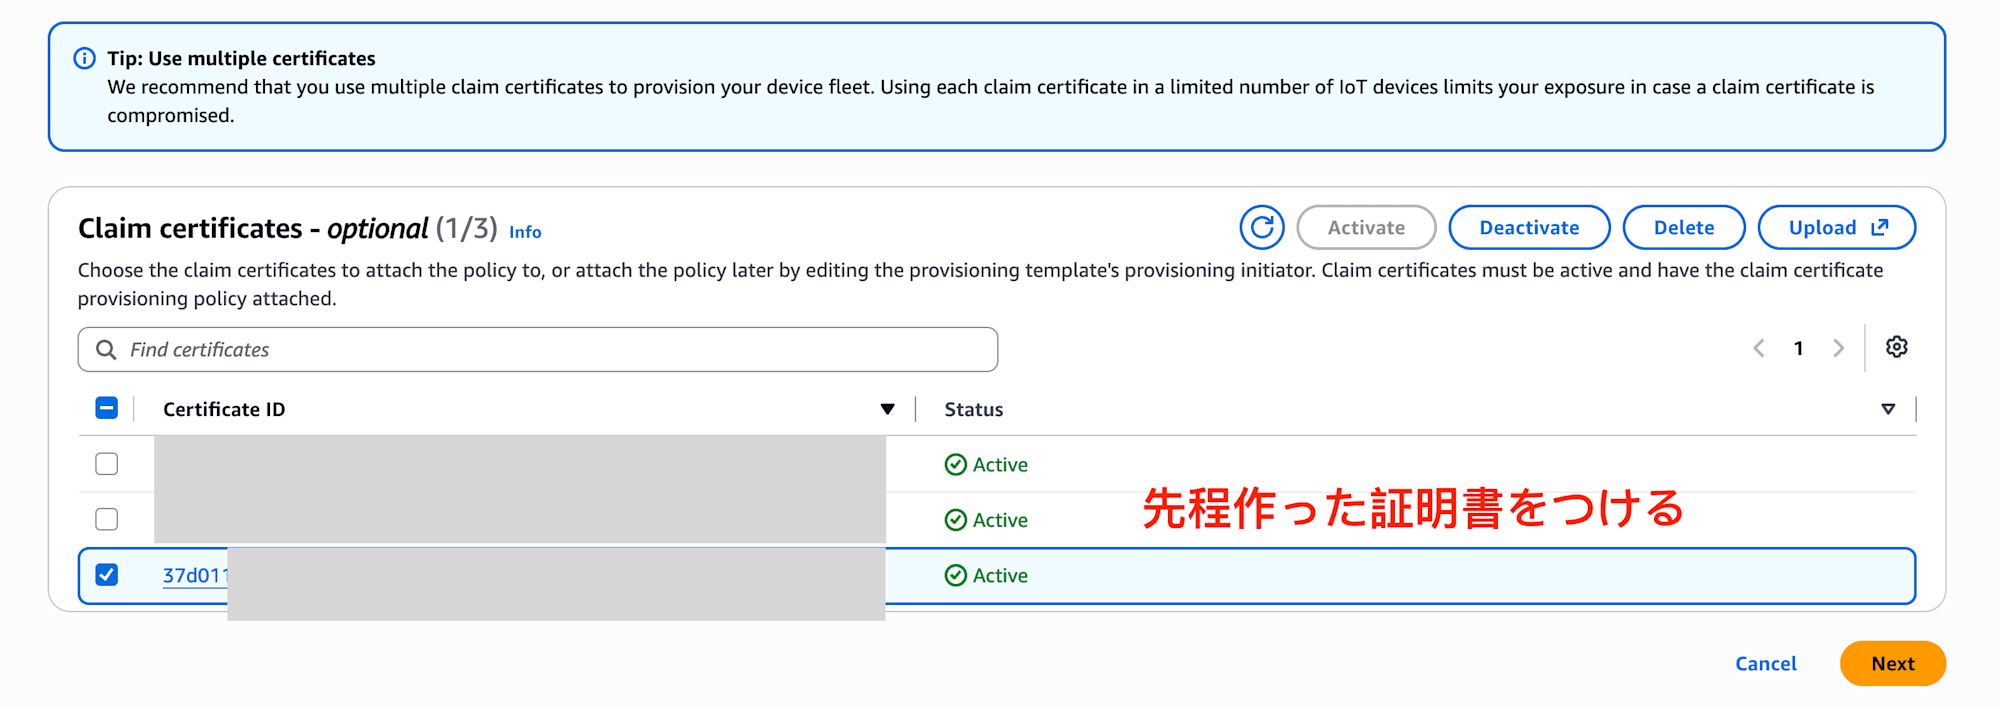
I activated the claim certificate, but did not attach it to a Thing. The association with the IoT Policy for claim is done on the provisioning template creation screen later.
Creating the Runtime IoT Policy
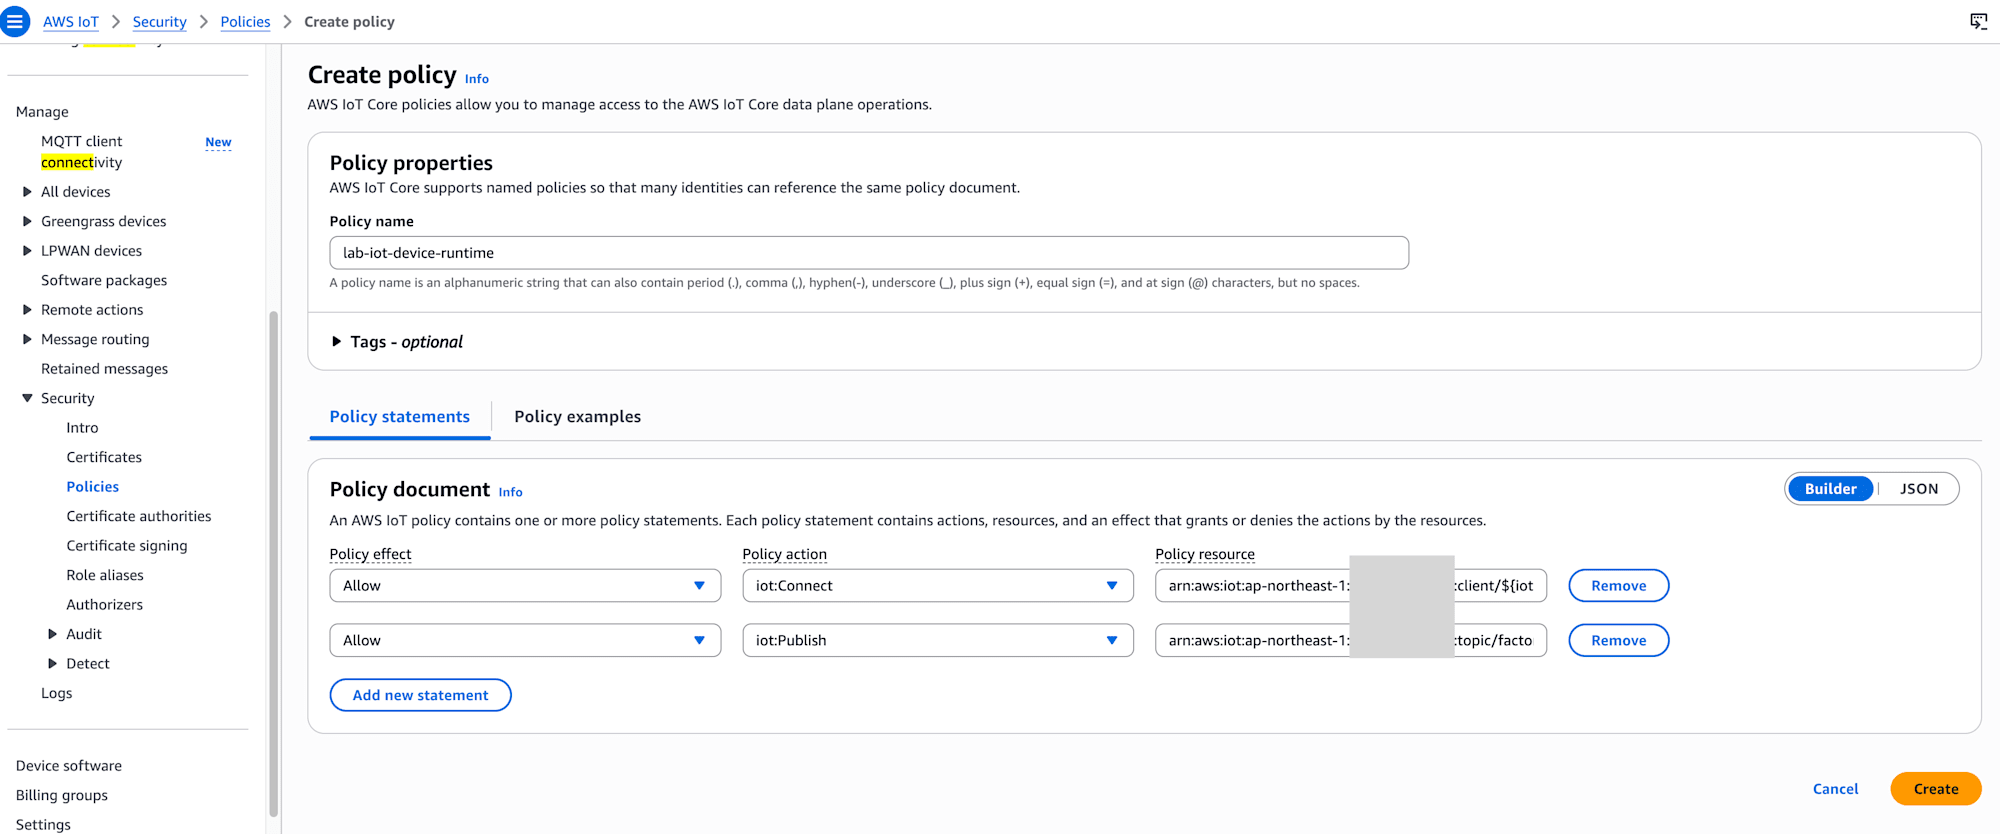
Next, I created the Policy used by registered devices from AWS IoT Core > Security > Policies > Create policy.
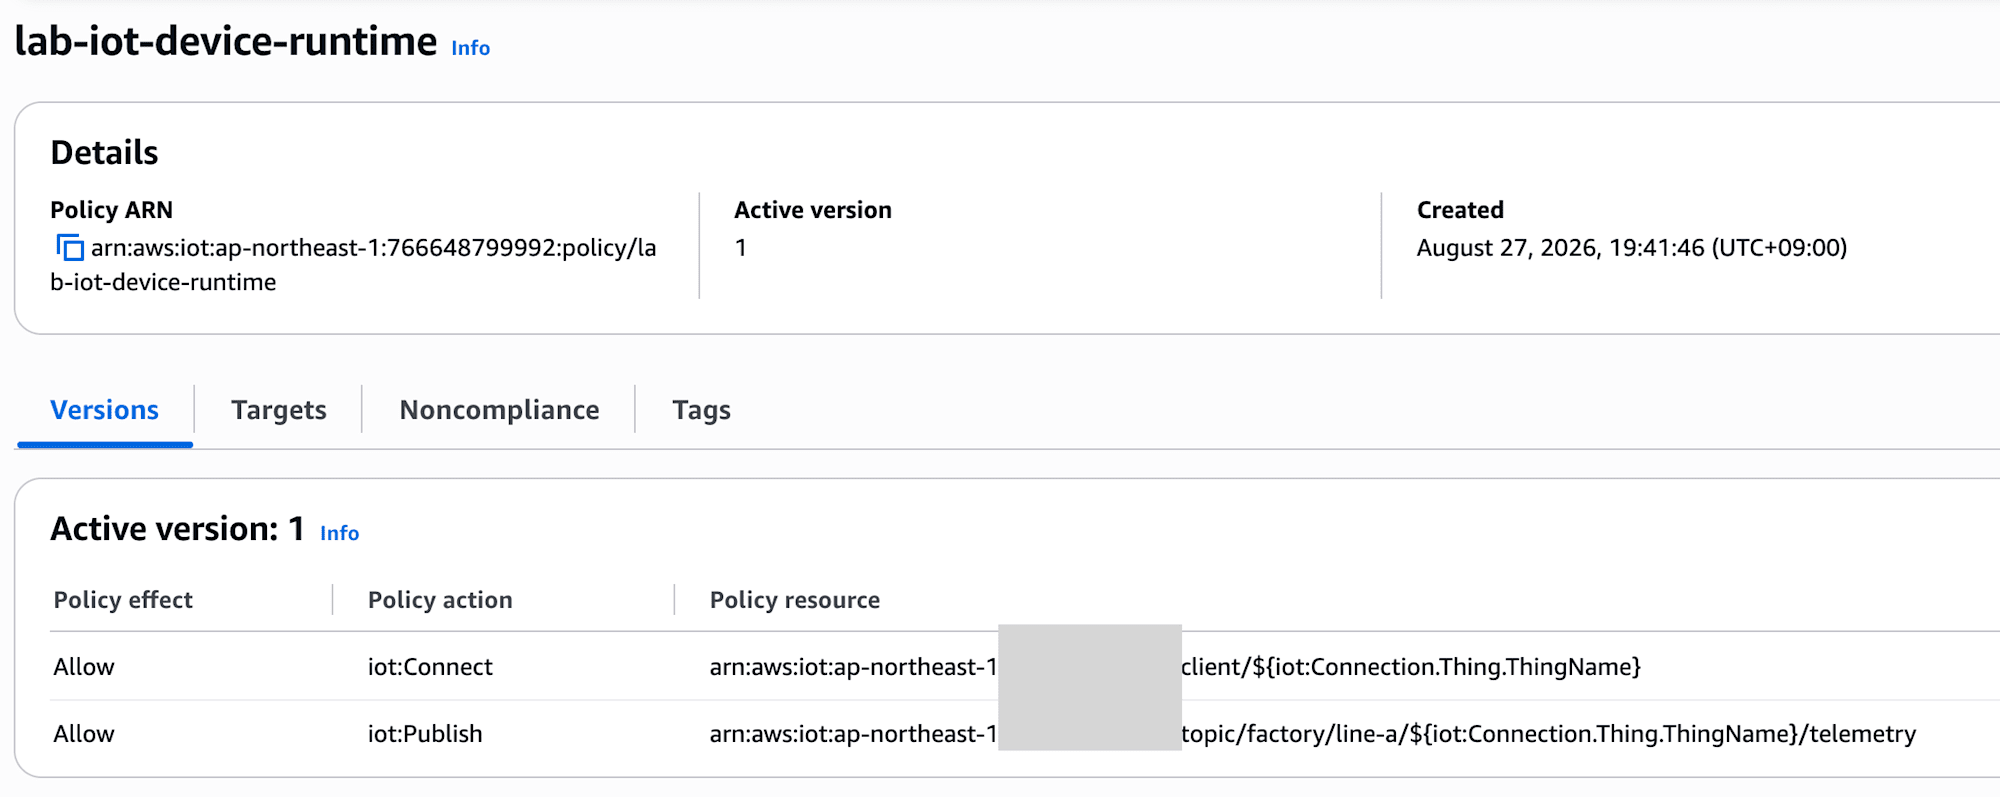
The Policy name is lab-iot-device-runtime. It only allows connection with the same Client ID as the Thing name and Publish to that Thing's dedicated Topic.
Copy the following Policy into the JSON editing screen. Replace <ACCOUNT_ID> with the AWS account ID you are using.
{
  "Version": "2012-10-17",
  "Statement": [
    {
      "Effect": "Allow",
      "Action": "iot:Connect",
      "Resource": "arn:aws:iot:ap-northeast-1:<ACCOUNT_ID>:client/${iot:Connection.Thing.ThingName}"
    },
    {
      "Effect": "Allow",
      "Action": "iot:Publish",
      "Resource": "arn:aws:iot:ap-northeast-1:<ACCOUNT_ID>:topic/factory/line-a/${iot:Connection.Thing.ThingName}/telemetry"
    }
  ]
}
By using ${iot:Connection.Thing.ThingName}, you can reuse the same Policy without creating one per device. The Thing name in this case is lab-iot-machine-02, so the same value is used as the Client ID.
This Policy is not attached to the claim certificate. The provisioning template attaches it to the generated device certificate.
Creating the Claim IoT Policy
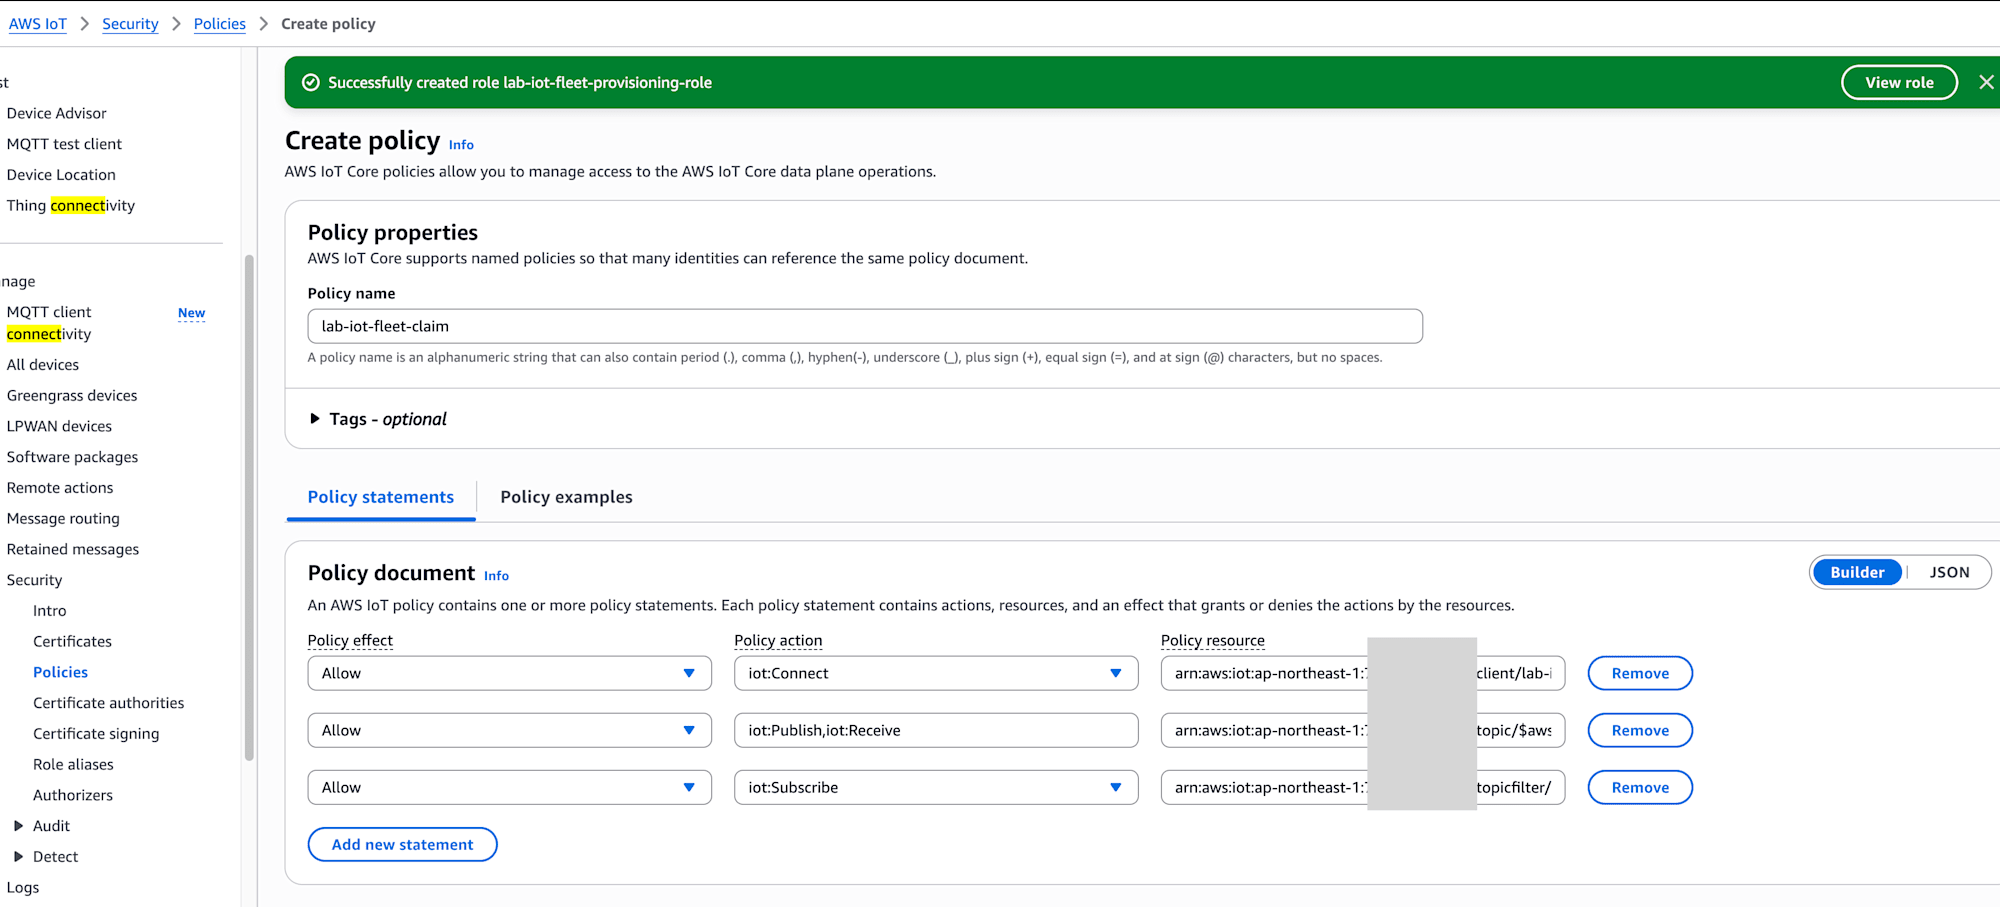
Create a Policy dedicated to the claim certificate from the same Security > Policies, and name the Policy lab-iot-fleet-claim.
This Policy only allows connection with the claim Client ID and the following two types of Fleet Provisioning Topics.
$aws/certificates/create/*$aws/provisioning-templates/lab-iot-fleet-provisioning/provision/*
Copy the following Policy into the JSON editing screen. Again, replace <ACCOUNT_ID> with the AWS account ID you are using.
{
  "Version": "2012-10-17",
  "Statement": [
    {
      "Effect": "Allow",
      "Action": "iot:Connect",
      "Resource": "arn:aws:iot:ap-northeast-1:<ACCOUNT_ID>:client/lab-iot-provision-*"
    },
    {
      "Effect": "Allow",
      "Action": [
        "iot:Publish",
        "iot:Receive"
      ],
      "Resource": [
        "arn:aws:iot:ap-northeast-1:<ACCOUNT_ID>:topic/$aws/certificates/create/*",
        "arn:aws:iot:ap-northeast-1:<ACCOUNT_ID>:topic/$aws/provisioning-templates/lab-iot-fleet-provisioning/provision/*"
      ]
    },
    {
      "Effect": "Allow",
      "Action": "iot:Subscribe",
      "Resource": [
        "arn:aws:iot:ap-northeast-1:<ACCOUNT_ID>:topicfilter/$aws/certificates/create/*",
        "arn:aws:iot:ap-northeast-1:<ACCOUNT_ID>:topicfilter/$aws/provisioning-templates/lab-iot-fleet-provisioning/provision/*"
      ]
    }
  ]
}
client/ is specified for iot:Connect, topic/ for iot:Publish and iot:Receive, and topicfilter/ for iot:Subscribe. Also, the template name must exactly match lab-iot-fleet-provisioning, which will be created later.
This Policy does not include normal telemetry Topics.
Creating the Fleet Provisioning Template
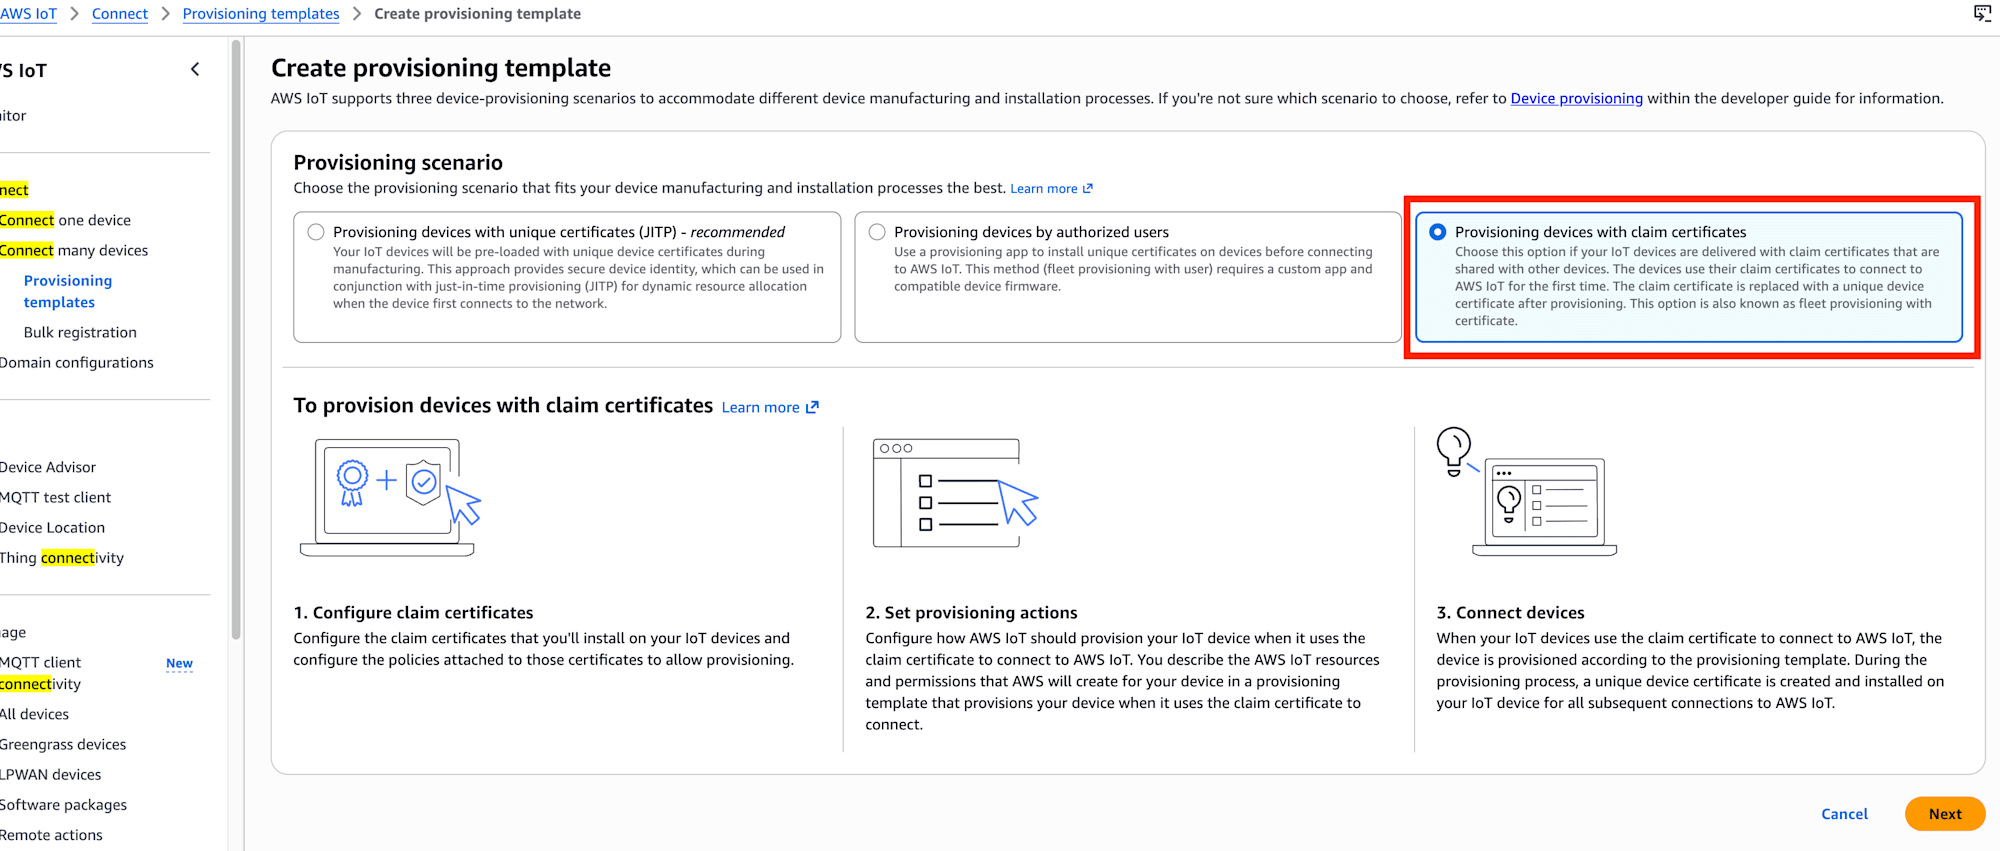
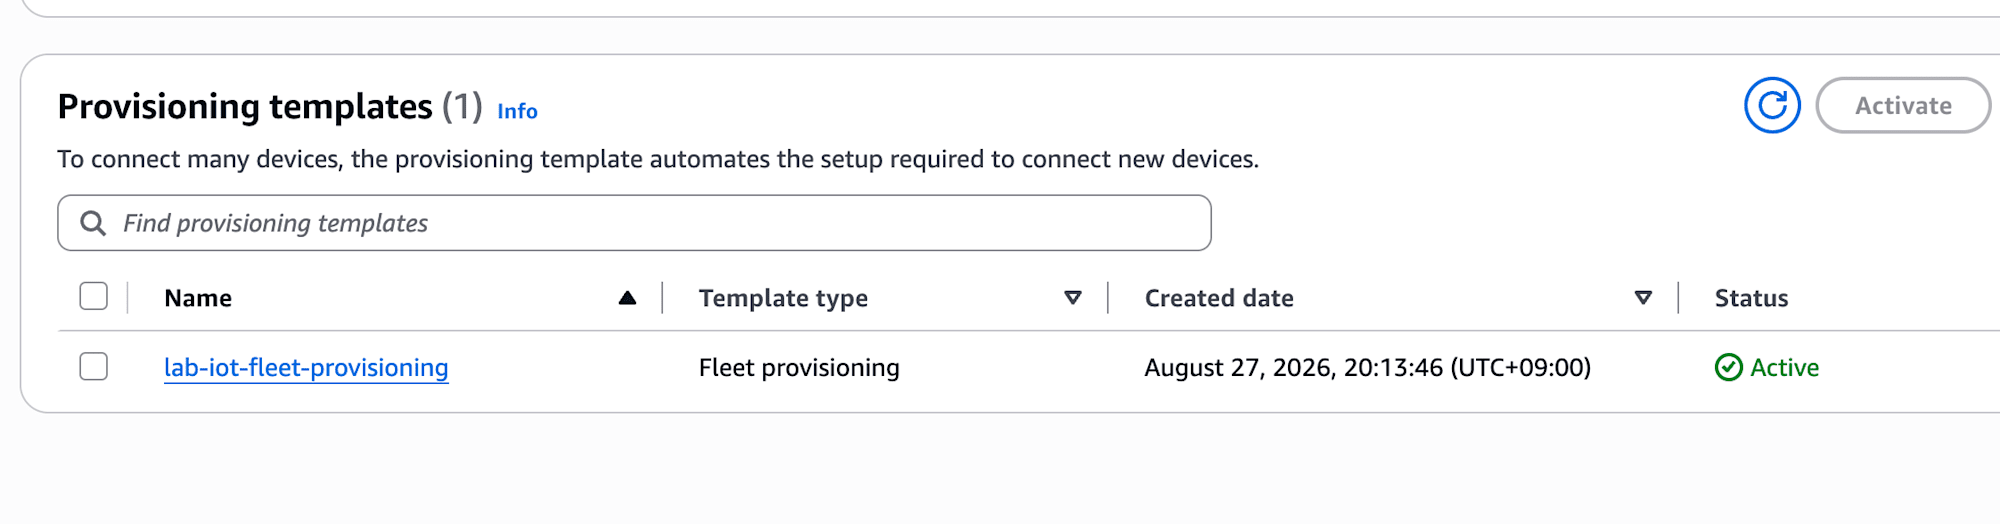
From AWS IoT Core > Connect many devices > Provisioning templates, I created a Fleet Provisioning template for scenarios where devices don't have device-specific certificates.
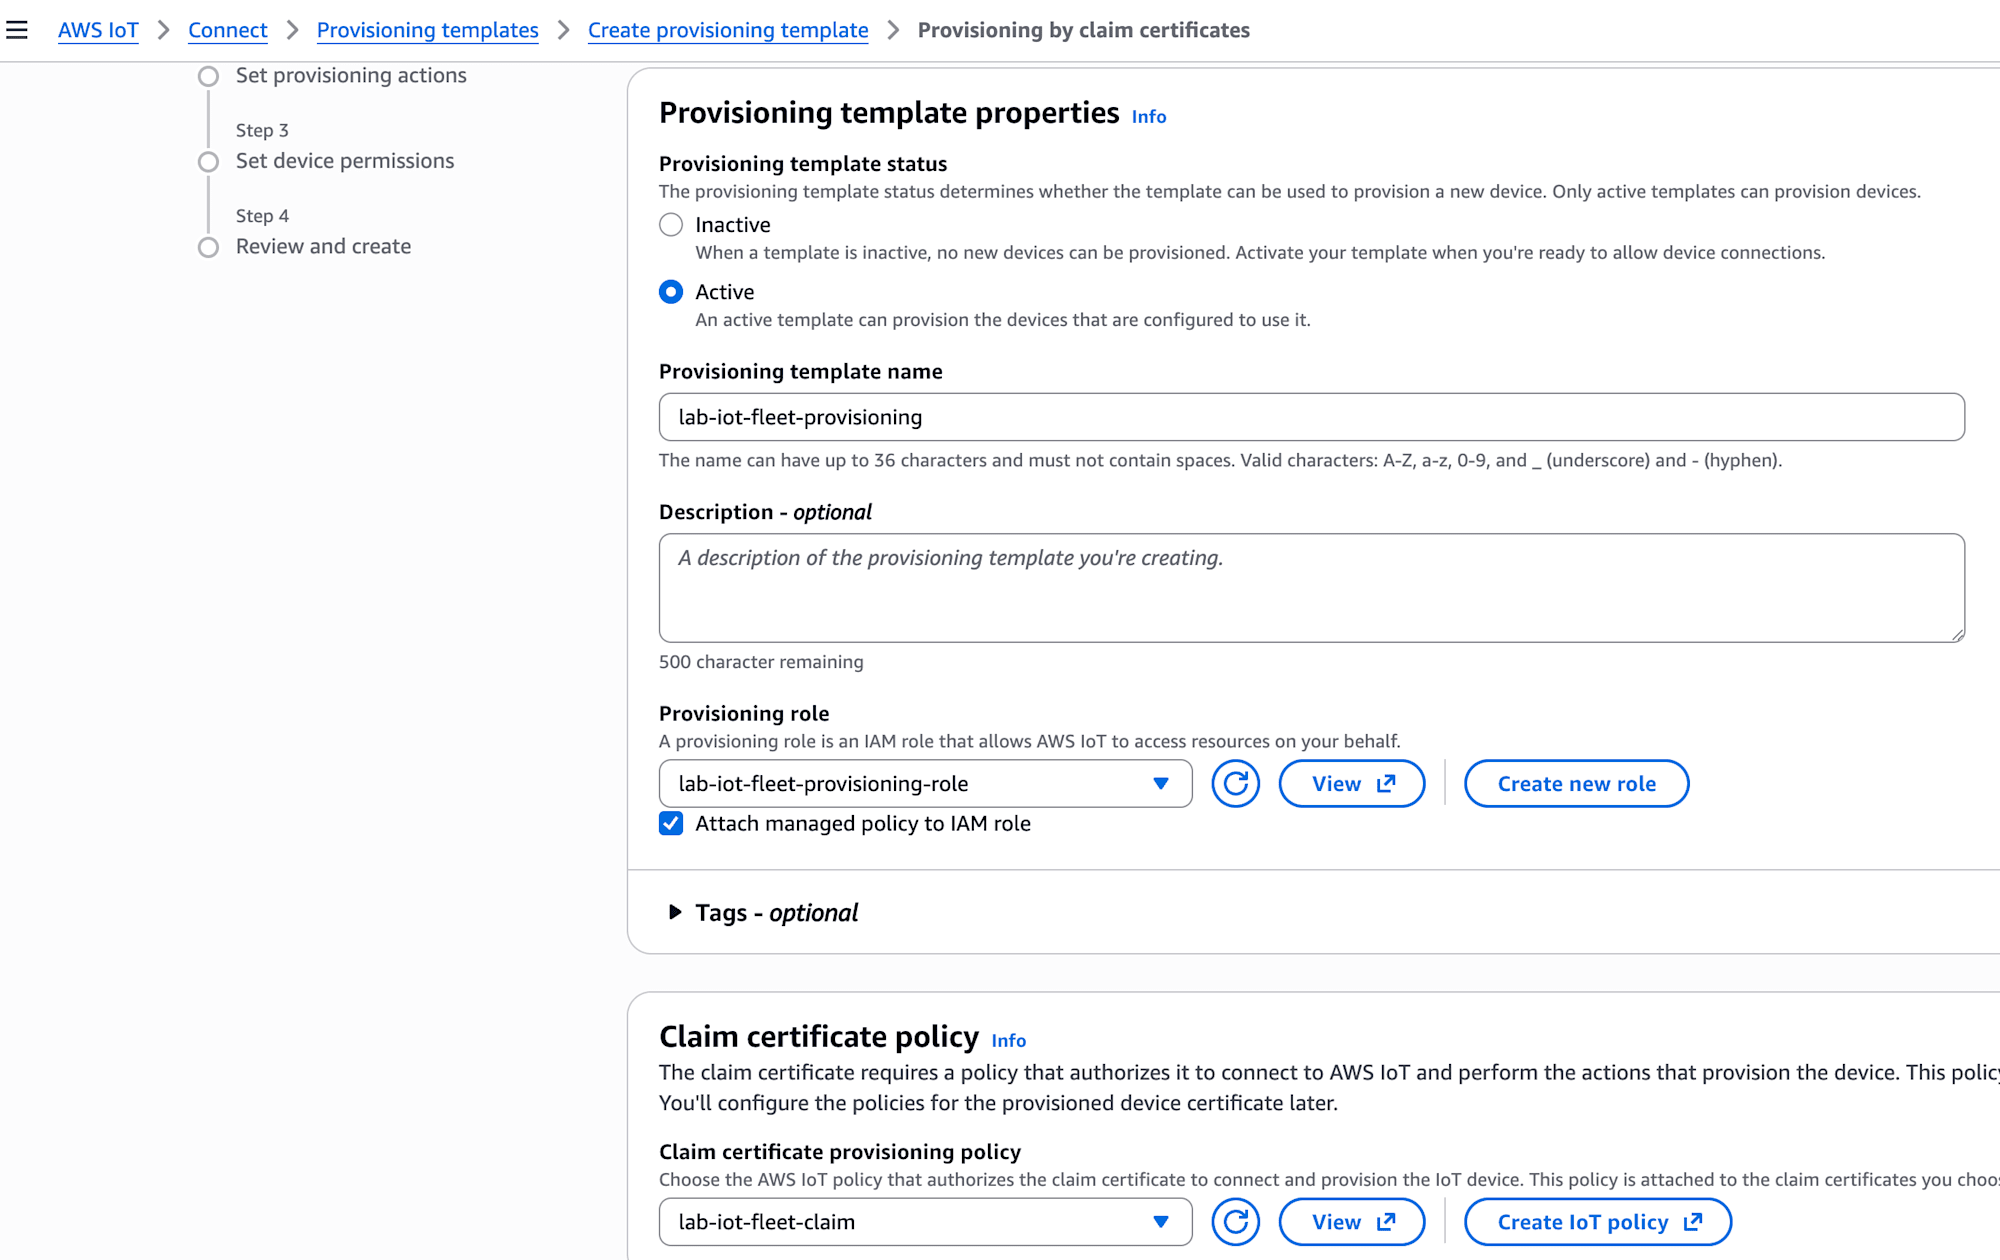
The template name is lab-iot-fleet-provisioning. The main settings are as follows.
- Template Status: Active
- Claim certificate policy:
lab-iot-fleet-claim - Claim certificate: The valid certificate created earlier
- Automatically create a thing resource: Enabled
- Thing name prefix:
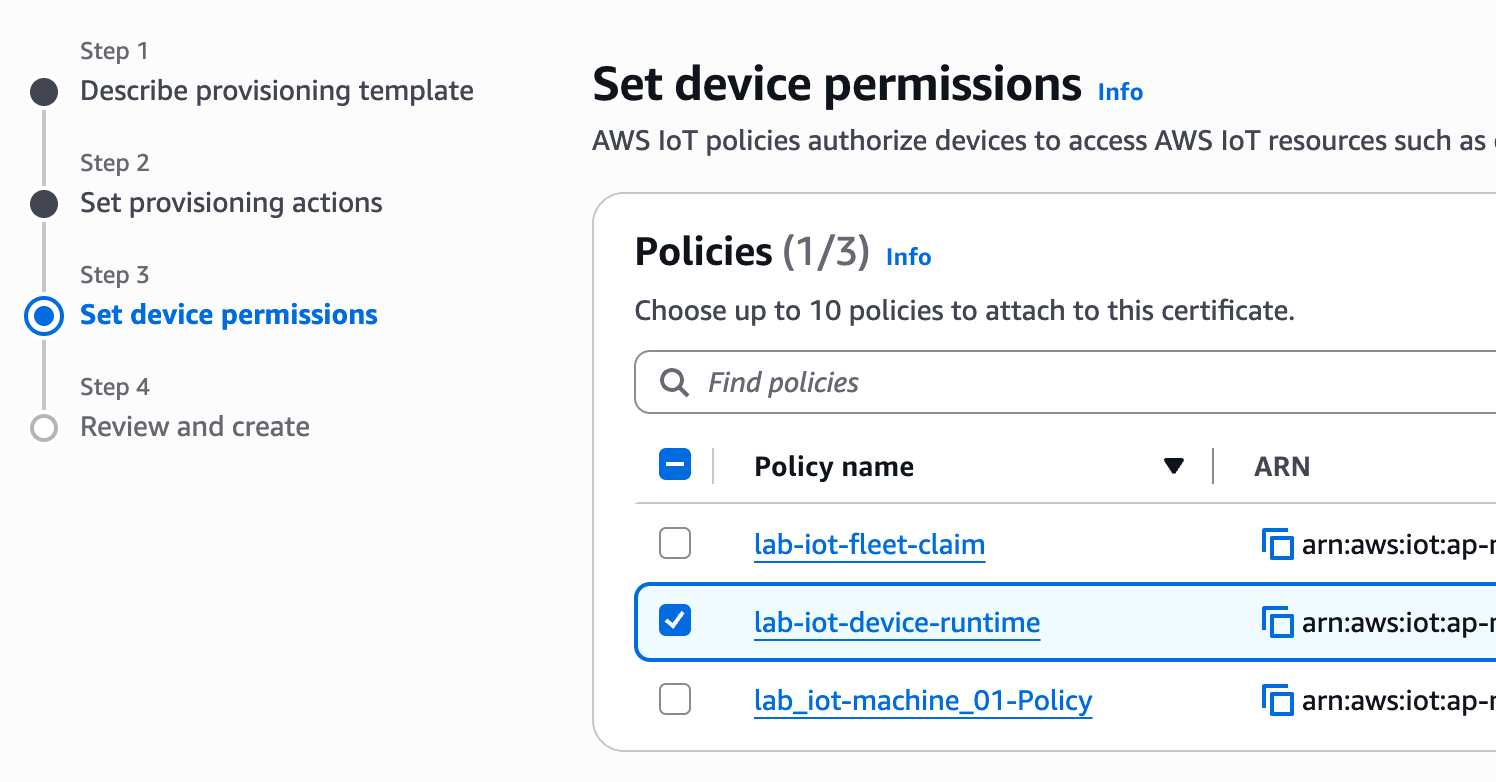
lab-iot-machine- - Device permissions: Select only
lab-iot-device-runtime - Pre-provisioning Lambda: Not used
- Optional settings such as Thing type: Not configured
For Claim certificate policy, select the claim lab-iot-fleet-claim, and for Set device permissions, select only the runtime lab-iot-device-runtime. Both Policies appear on the same screen, but their roles are different.
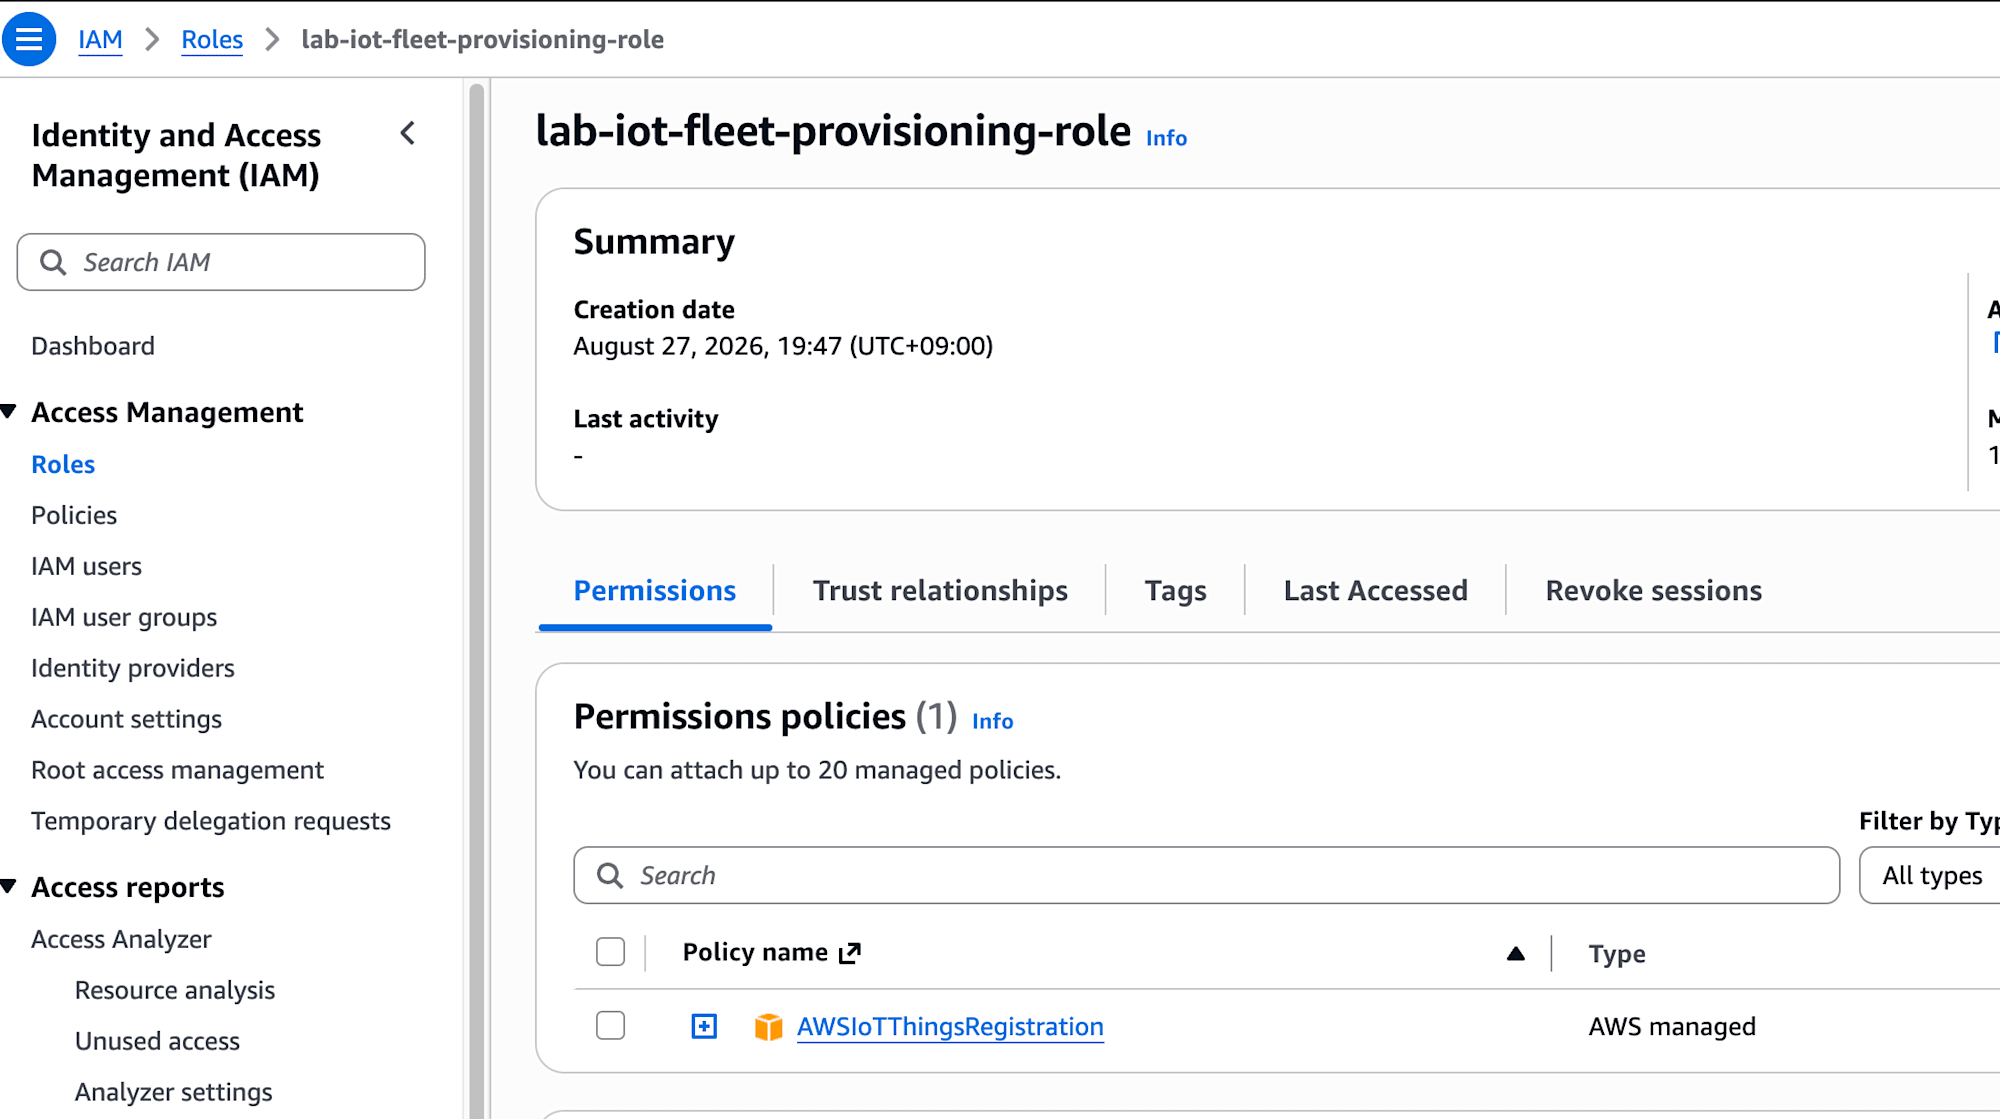
For the provisioning IAM role, I used lab-iot-fleet-provisioning-role created by the wizard. This role is trusted by iot.amazonaws.com and has AWSIoTThingsRegistration. Since it is not a role passed to the container, no access keys or similar are placed locally. Also, AWSIoTFullAccess is not granted.
Since the purpose this time was to verify the operation of one device, I did not use a Pre-provisioning Lambda. In production use, there is room to add a hook that validates serial numbers and registration target lists.
Confirming the AWS IoT Endpoint
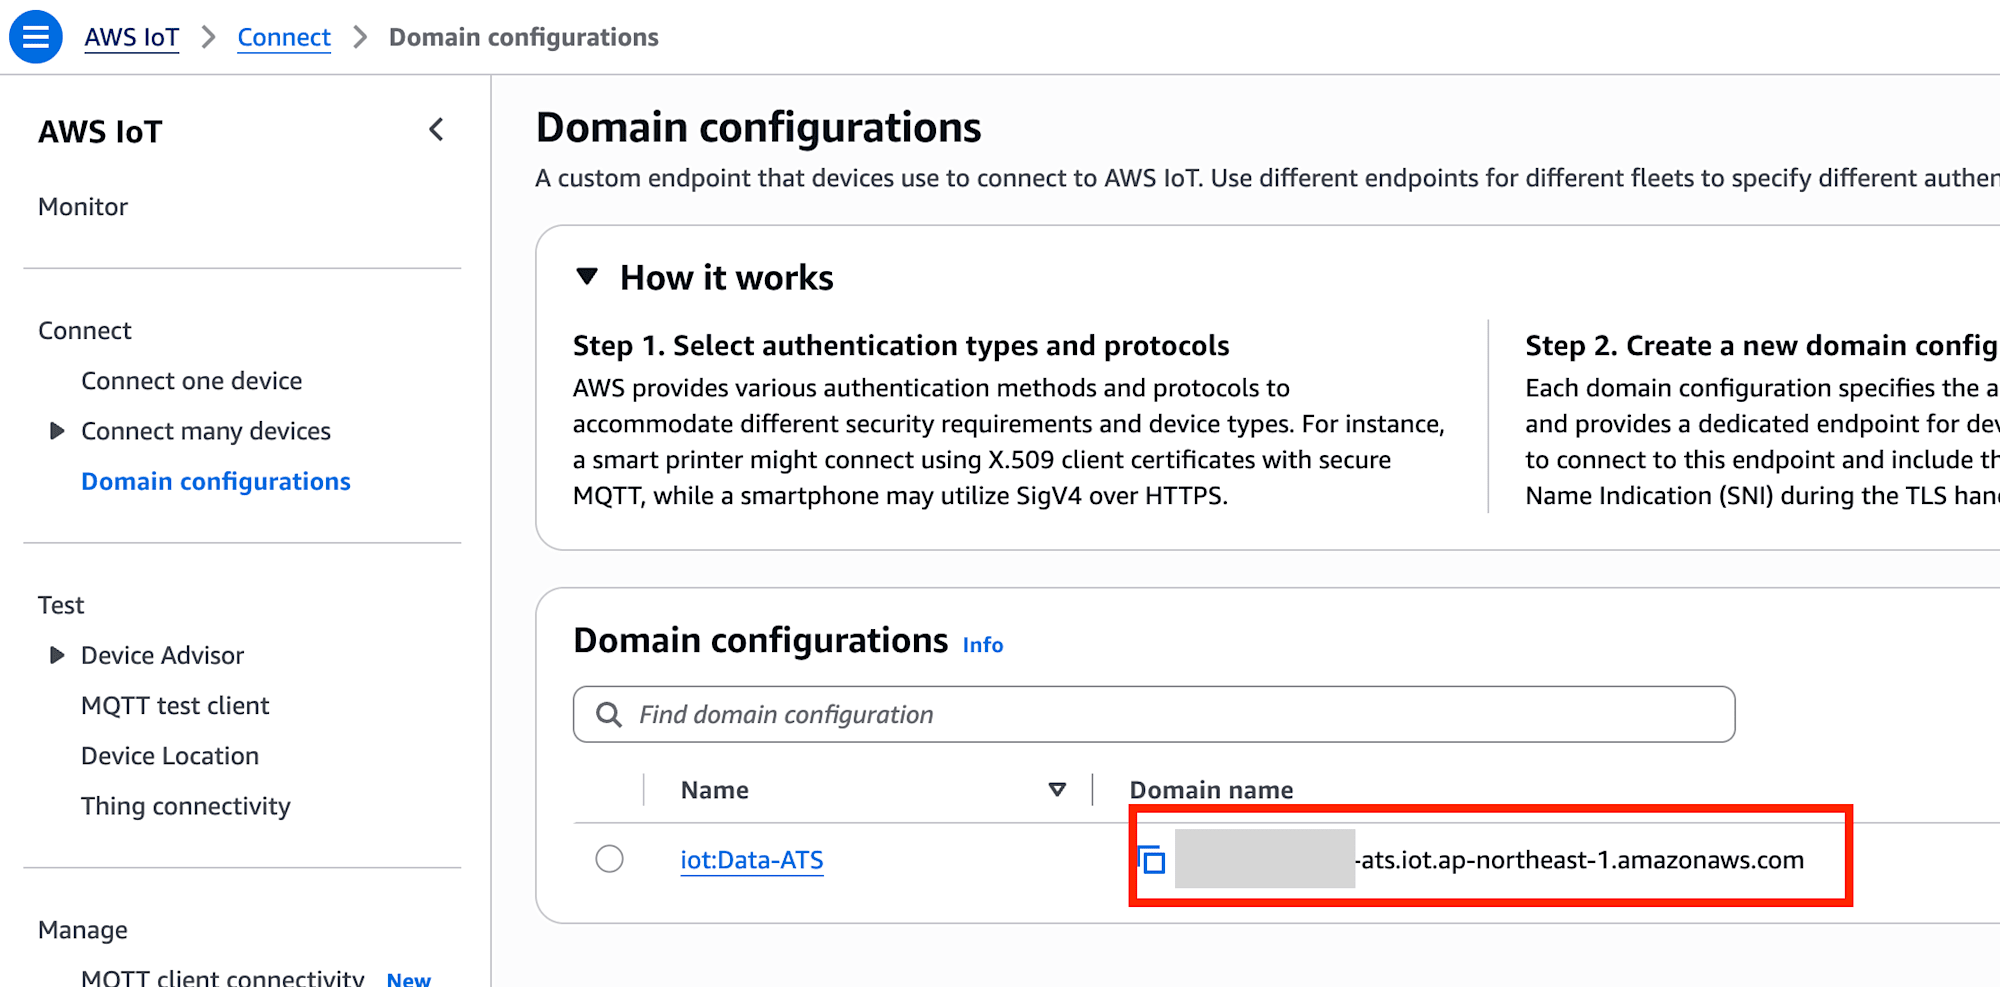
For the connection destination, I used the default iot:Data-ATS domain name displayed in AWS IoT Core > Connect > Domain configurations.
The value has the following format.
xxxxxxxxxxxxxx-ats.iot.ap-northeast-1.amazonaws.com
The account-specific endpoint is not included in articles or Git, but is passed to the container from a local .env. Do not prepend https://.
Preparing the Local Side
Obtaining the Source Code
The minimal configuration code used this time is placed in the following repository.
git clone https://github.com/cm-obuchi-hugo-examples/iot-fleet-provisioning-device.git
cd iot-fleet-provisioning-device
Looking at only the main files, the structure is as follows.
iot-fleet-provisioning-device/
├── src/
│   └── index.ts
├── .env.example
├── Containerfile
├── package.json
├── pnpm-lock.yaml
└── tsconfig.json
Certificates, private keys, and the generated device identity are not included in the repository.
Preparing Credentials and Persistent Volumes
The container will have access to the following 3 types of storage.
/bootstrap/                         # read-only
├── claim.pem.crt
└── claim.private.pem.key

/trust/                             # read-only
└── AmazonRootCA1.pem

/identity/                          # persistent and writable
└── initially empty
/bootstrap is used only during initial registration. /identity starts as an empty volume or bind mount, and stores the generated device.pem.crt and private.pem.key.
The location on the host side and volume names can be chosen to suit the execution environment. What matters is passing claim credentials as read-only and making /identity a writable storage that persists after the container is deleted.
Configuring .env
Based on .env.example, I created a .env file that is not tracked.
AWS_IOT_ENDPOINT=xxxxxxxxxxxxxx-ats.iot.ap-northeast-1.amazonaws.com
THING_NAME=lab-iot-machine-02
FLEET_TEMPLATE_NAME=lab-iot-fleet-provisioning
FLEET_TEMPLATE_PARAMETERS_JSON={"SerialNumber":"02"}

IDENTITY_DIR=/identity
CLAIM_CERT_PATH=/bootstrap/claim.pem.crt
CLAIM_KEY_PATH=/bootstrap/claim.private.pem.key
ROOT_CA_PATH=/trust/AmazonRootCA1.pem
What is set in FLEET_TEMPLATE_NAME is the template name, not the template ARN. FLEET_TEMPLATE_PARAMETERS_JSON should match the parameters required by the active template version. In this case, the setting creates lab-iot-machine-02 from SerialNumber 02.
Building the Container Image
The Containerfile separates a build stage that compiles TypeScript from a runtime stage that only runs the generated JavaScript. Excerpting only the main parts, it looks like this.
# Build stage
FROM node:24-bookworm-slim AS build
WORKDIR /app
RUN corepack enable
COPY package.json pnpm-lock.yaml pnpm-workspace.yaml ./
RUN pnpm install --frozen-lockfile
COPY tsconfig.json ./
COPY src ./src
RUN pnpm build && pnpm prune --prod

# Runtime stage
FROM node:24-bookworm-slim AS runtime
WORKDIR /app
COPY --from=build --chown=node:node /app/package.json ./
COPY --from=build --chown=node:node /app/node_modules ./node_modules
COPY --from=build --chown=node:node /app/dist ./dist
USER node
CMD ["node", "dist/index.js"]
You can also confirm that claim certificates and private keys are not COPYed. Credentials are read from mounts at runtime, not from the image.
Running podman build installs the necessary packages in the build stage and compiles TypeScript to dist/index.js. The created image contains the files necessary for execution.
Also, since CMD ["node", "dist/index.js"] is set, podman run automatically executes index.js without additional install operations inside the container.
This time, I confirmed type checking and compilation on the local side before building the image.
corepack enable
pnpm install
pnpm typecheck
pnpm build
podman build -t iot-fleet-provisioning-device .
Since the details of how to build a container are not the main topic this time, only the parts related to Fleet Provisioning are covered here.
Starting the Container for the First Time
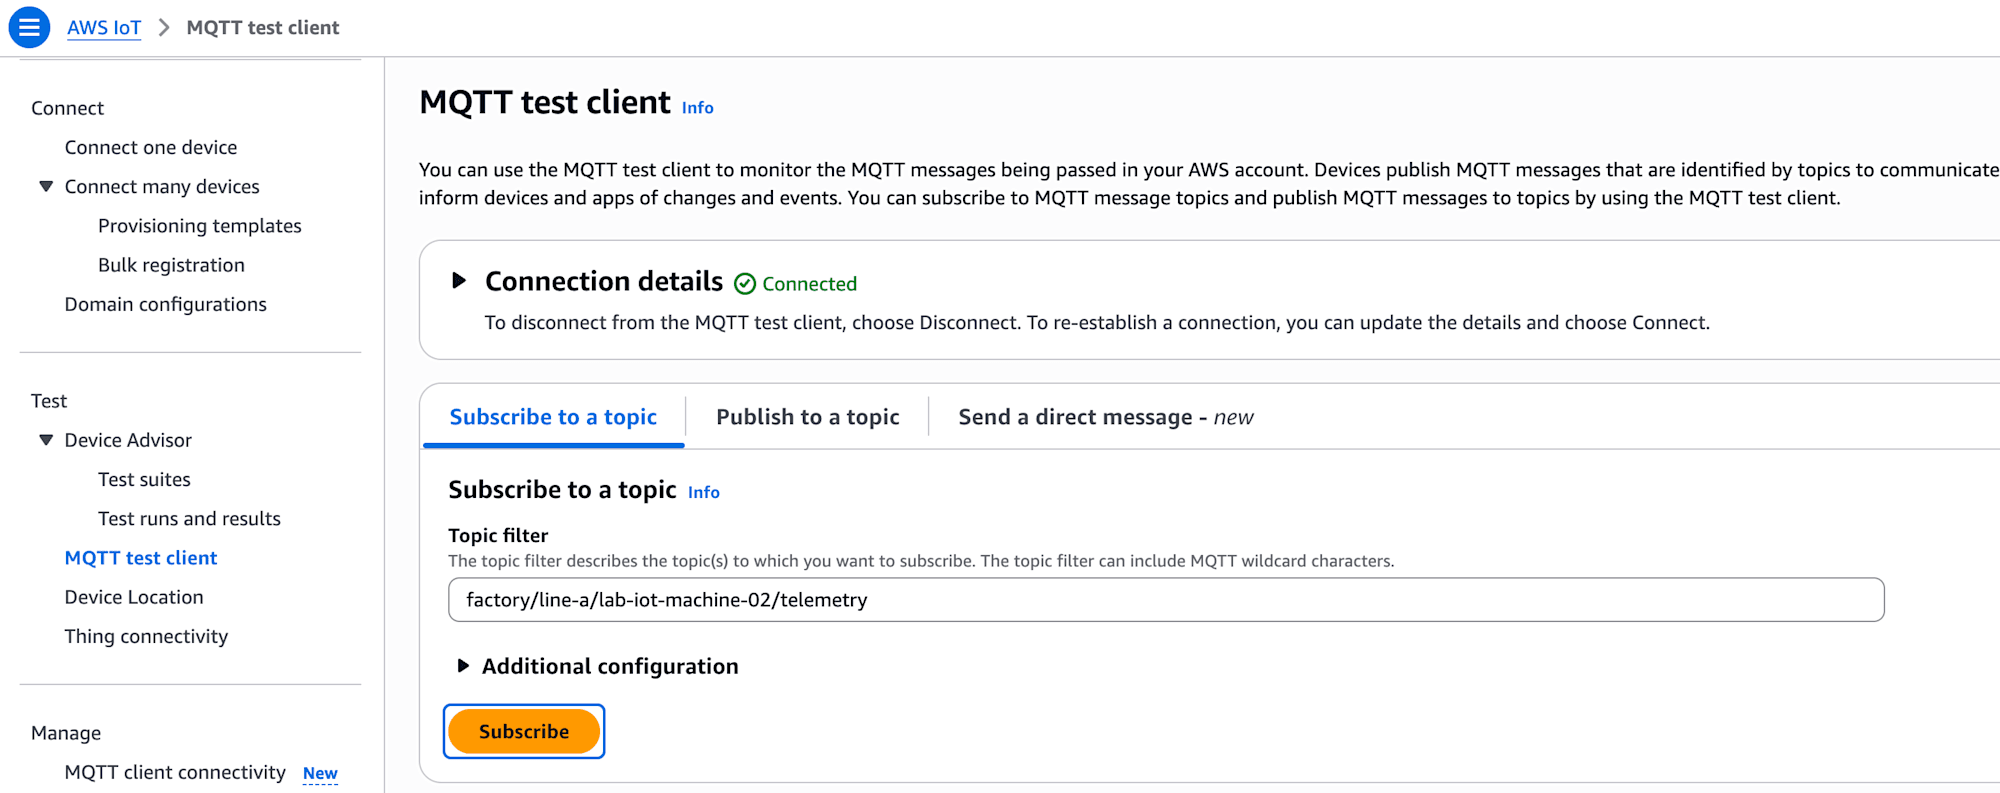
In the AWS IoT Core MQTT test client, I subscribed to the following Topic in advance.
factory/line-a/+/telemetry
At runtime, mount the claim credentials and Root CA as read-only, and the device identity save destination as read-write. Replace each <...> below with the path or volume prepared in your environment.
podman run --rm \
  --name lab-iot-machine-02 \
  --user "$(id -u):$(id -g)" \
  --env-file .env \
  -v "<bootstrap-directory>:/bootstrap:ro" \
  -v "<root-ca-file>:/trust/AmazonRootCA1.pem:ro" \
  -v "<persistent-identity-storage>:/identity:rw" \
  iot-fleet-provisioning-device
Results
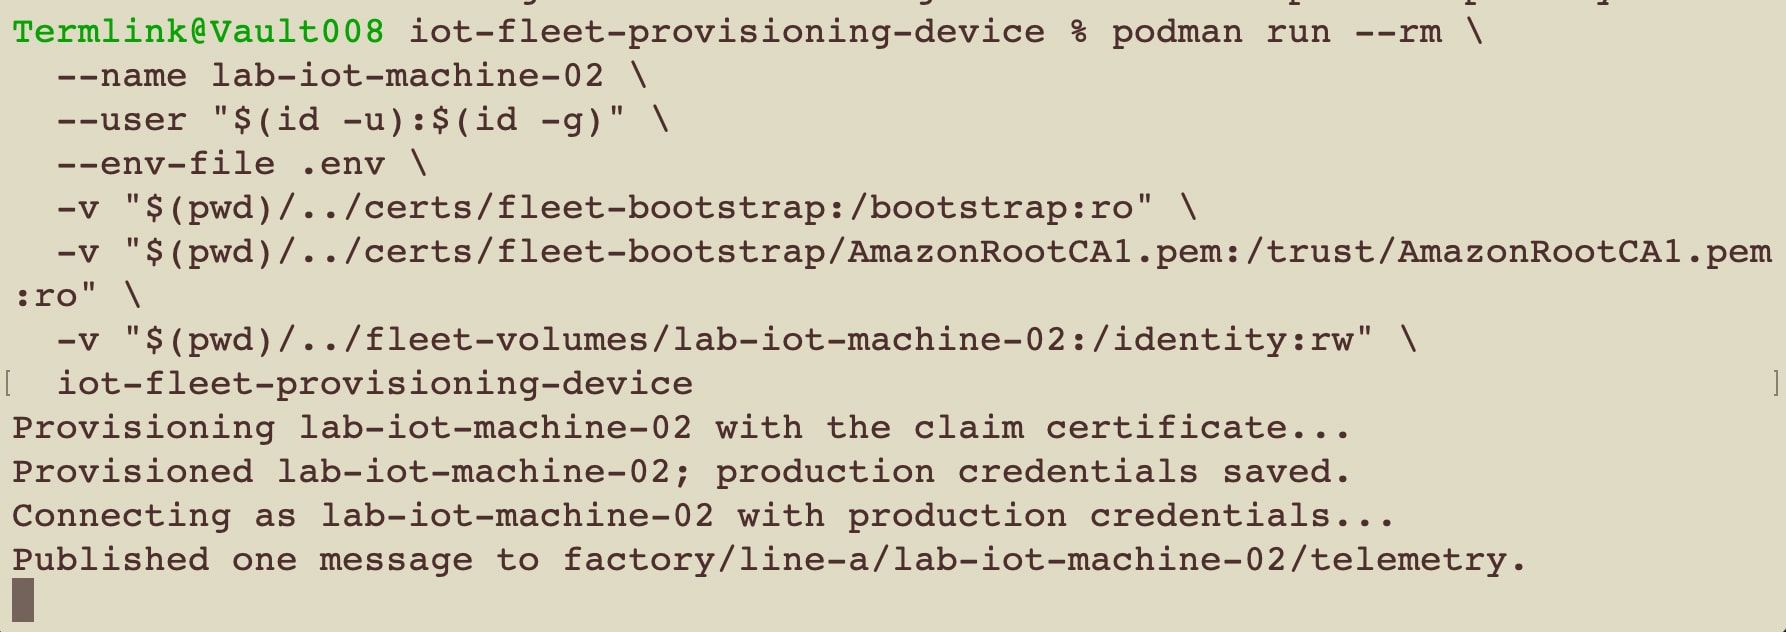
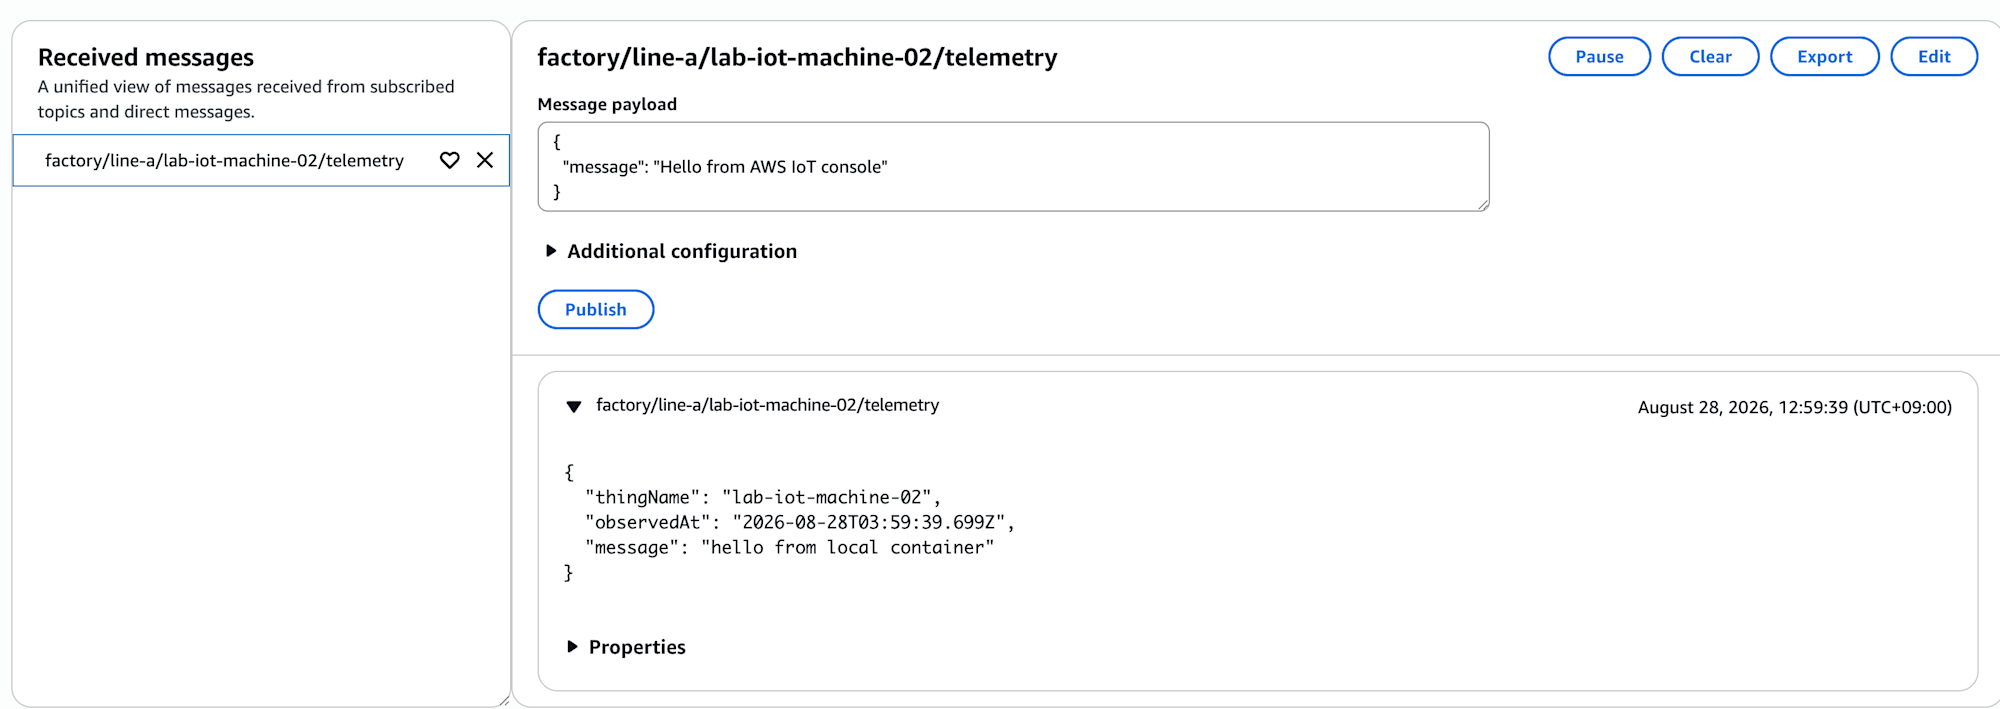
The actual container output was as follows.
Provisioning lab-iot-machine-02 with the claim certificate...
Provisioned lab-iot-machine-02; production credentials saved.
Connecting as lab-iot-machine-02 with production credentials...
Published one message to factory/line-a/lab-iot-machine-02/telemetry.
In AWS IoT Core's All devices > Things, I was able to confirm that lab-iot-machine-02, which did not exist beforehand, had been created.
From this log, I can see that the process progressed through: the provisioning connection using the claim certificate, completion of RegisterThing, saving the generated credentials, reconnection using the device-specific certificate, and one Publish of telemetry.
No IAM credentials were passed to the container. Also, the private key and certificate ownership token are not output to the logs.
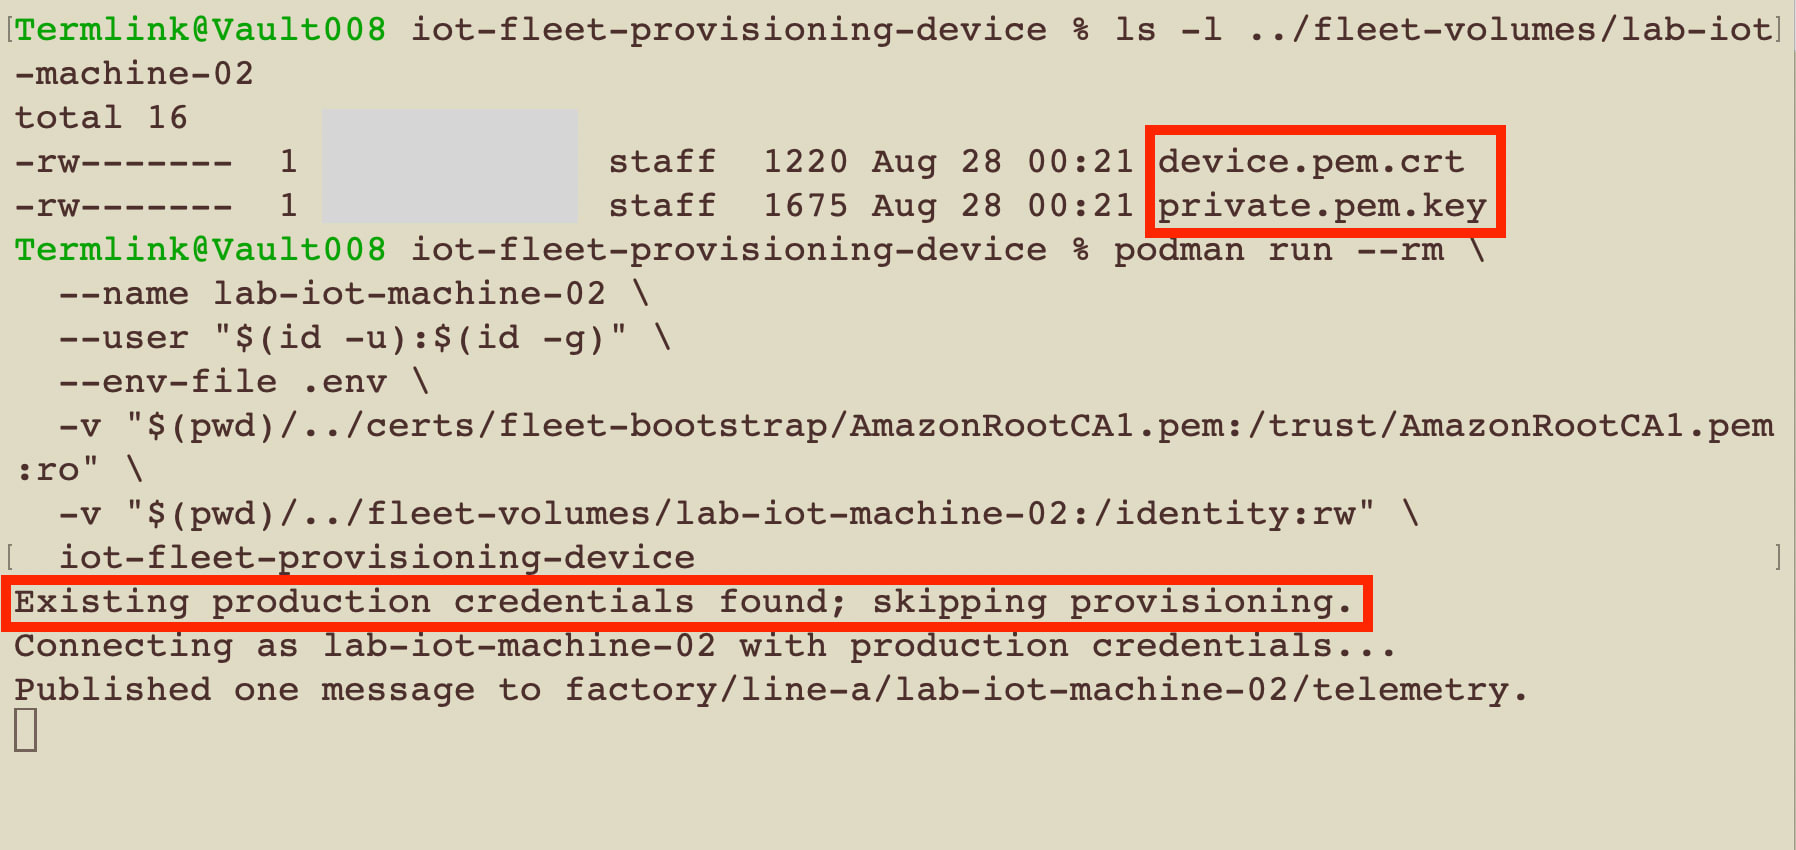
Using the same .env and /identity, and starting a new container without mounting the claim certificate and private key, the result was as follows.
Existing production credentials found; skipping provisioning.
Connecting as lab-iot-machine-02 with production credentials...
Published one message to factory/line-a/lab-iot-machine-02/telemetry.
Device finished.
Provisioning was not executed, and reconnection and Publish completed with the saved device certificate. No new certificate was created either.
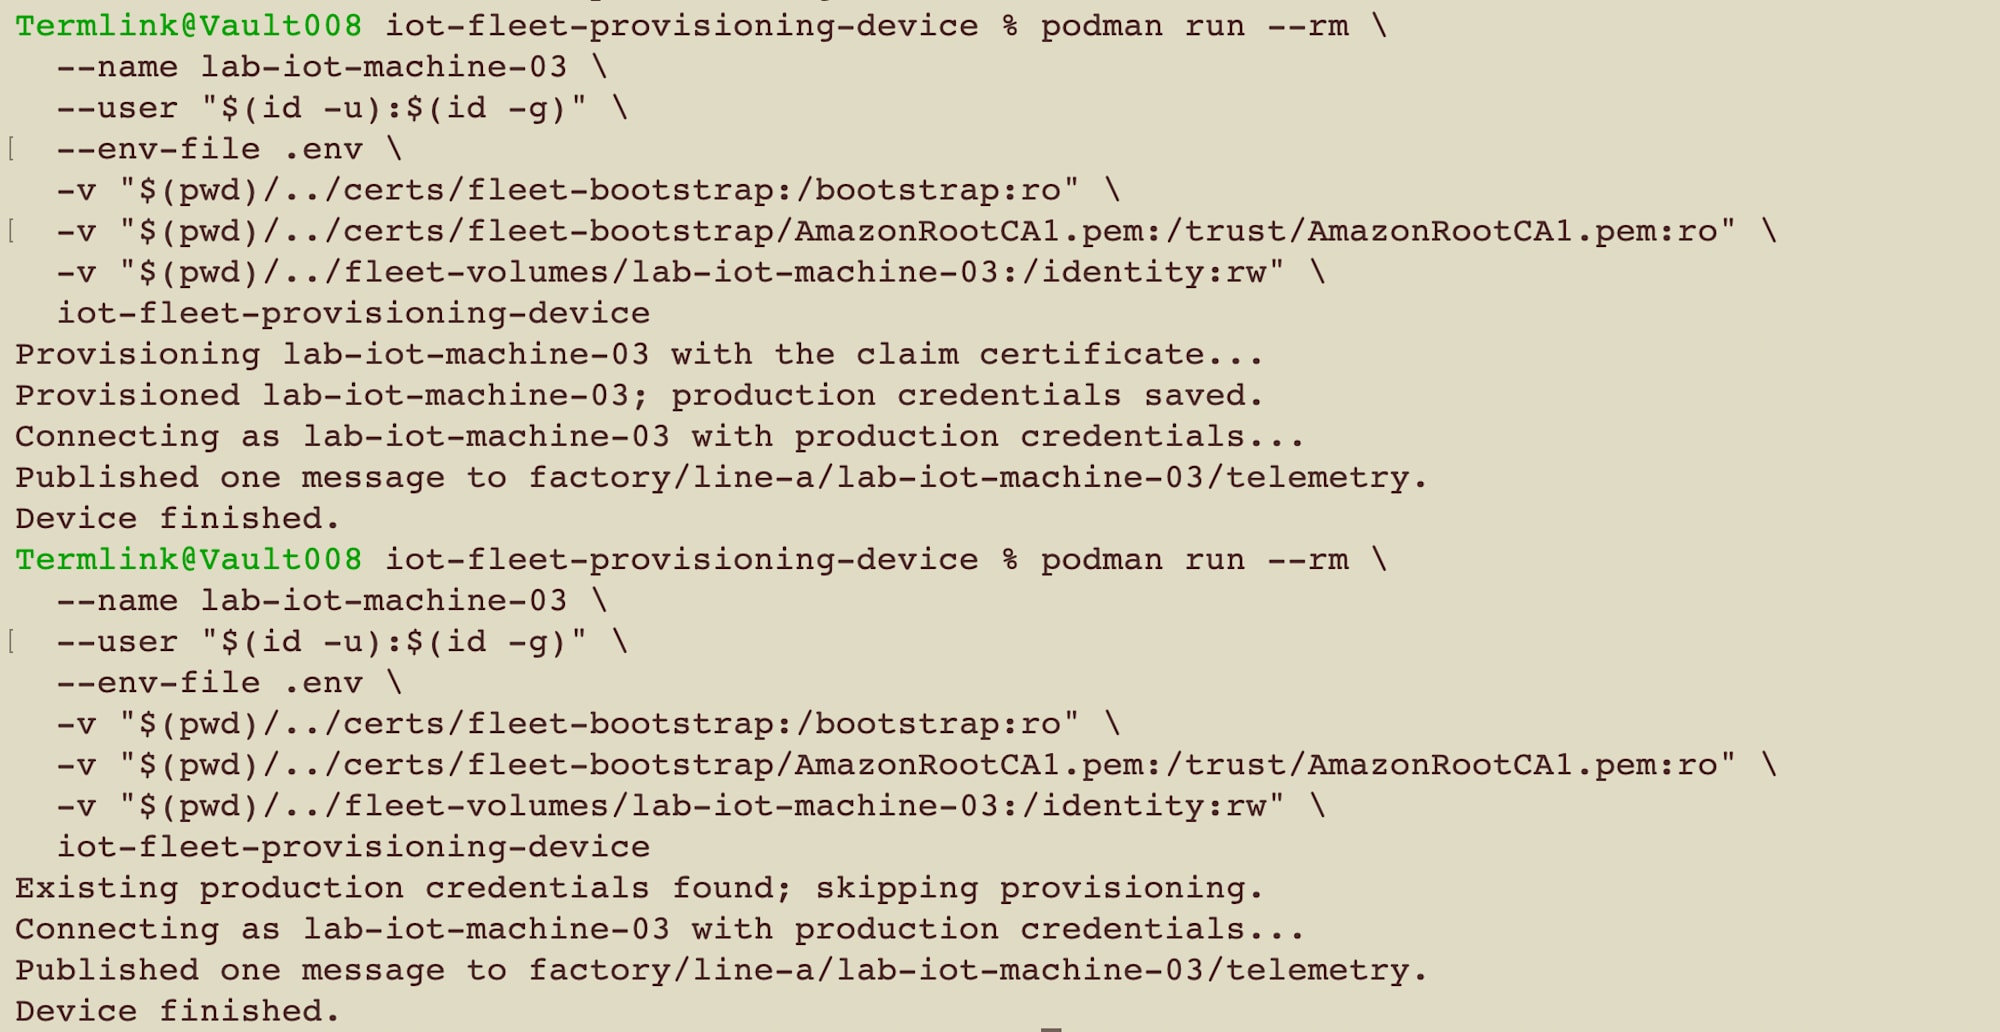
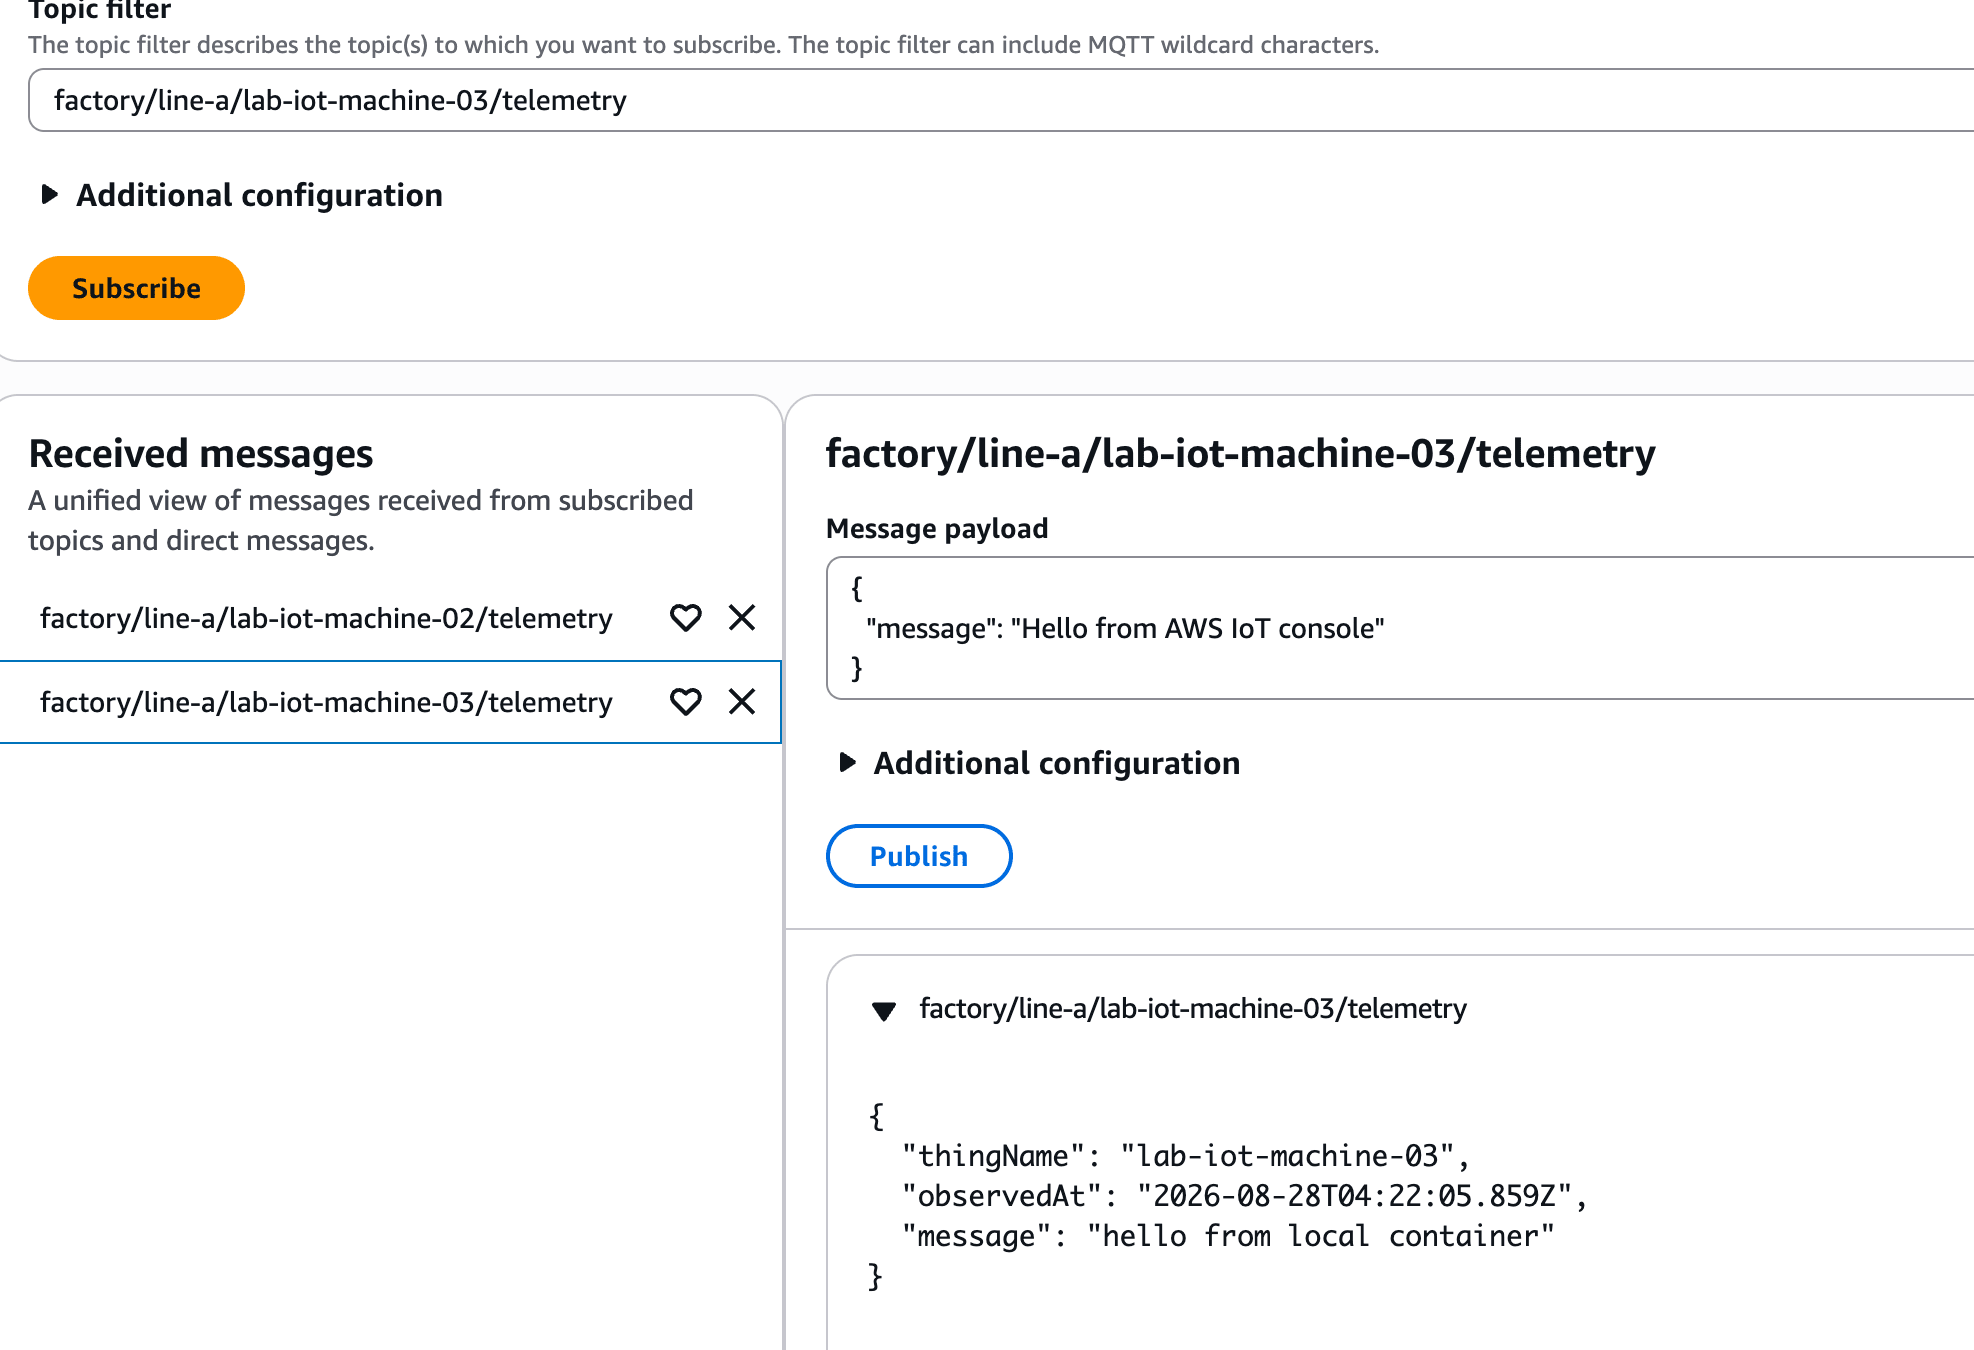
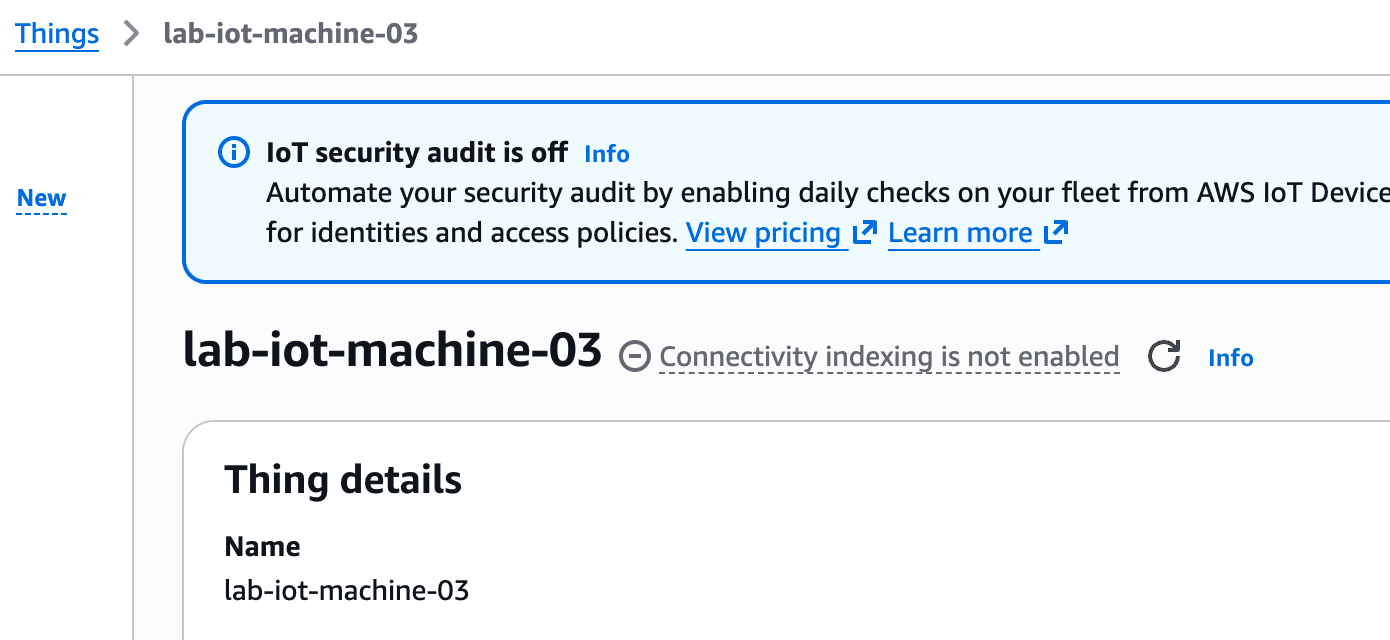
Registering Another Device with the Same Procedure
I was also able to confirm that a new Thing could be successfully registered using the same procedure.
What Was the Code Doing
After confirming the results, let's look at the main processing in src/index.ts.
Obtaining Unique Credentials with the Claim Certificate
On first startup, after making an MQTT5 connection with the claim certificate, CreateKeysAndCertificate is called. The certificate, private key, and short-lived ownership token returned from AWS are not output to the logs.
Then templateName, ownership token, and template parameters are passed to RegisterThing.
// Step 1: ask AWS to mint this device's unique certificate and private key.
// Never log the response because it contains private credential material.
const created = await identity.createKeysAndCertificate({});
if (
  !created.certificatePem ||
  !created.privateKey ||
  !created.certificateOwnershipToken
) {
  throw new Error("AWS returned an incomplete certificate response");
}

// Step 2: exchange the short-lived ownership token through the provisioning
// template. AWS creates the Thing and attaches the runtime policy.
const registered = await identity.registerThing({
  templateName,
  certificateOwnershipToken: created.certificateOwnershipToken,
  parameters: templateParameters,
});

// Step 3: persist the generated production identity outside the container.
await saveDeviceCredentials(created.certificatePem, created.privateKey);
If the Thing name included in the RegisterThing result differs from THING_NAME in .env, the process stops there.
Persisting Credentials
The generated certificate and private key are written to a temporary file and then renamed. The save destination is /identity, which is persisted outside the container.
const temporary = `${path}.${randomUUID()}.tmp`;
const handle = await open(temporary, "wx", 0o600);
try {
  await handle.writeFile(content, "utf8");
  await handle.sync();
} finally {
  await handle.close();
}
try {
  await rename(temporary, path);
  await chmod(path, 0o600);
} catch (error) {
  await rm(temporary, { force: true });
  throw error;
}
This minimal sample does not implement reconciliation for the case where the process stops between certificate creation and the completion of saving the two files. Therefore, it is treated as code that confirms a learning-purpose happy path.
Publishing with the Device-Specific Certificate
After closing the claim connection, reconnect using the saved device certificate and private key. Use the Thing name as the Client ID and Publish one telemetry item to that Thing's dedicated Topic.
const client = await connect(deviceCert, deviceKey, thingName);

await client.publish({
  topicName: `factory/line-a/${thingName}/telemetry`,
  qos: mqtt5.QoS.AtLeastOnce,
  payload: JSON.stringify({
    thingName,
    observedAt: new Date().toISOString(),
    message: "hello from local container",
  }),
});
Since QoS 1 (At Least Once) is specified, the connection is closed after waiting for the Publish to complete.
Not Using the Claim Certificate on Subsequent Startups
At startup, it checks whether both the certificate and private key exist in /identity. If both exist, provisioning is skipped and the process proceeds directly to the runtime connection.
const [hasCert, hasKey] = await Promise.all([
  exists(deviceCert),
  exists(deviceKey),
]);

if (hasCert !== hasKey) {
  throw new Error(
    "Only one production credential file exists; stop and investigate",
  );
}

if (!hasCert) {
  await provision();
} else {
  console.log("Existing production credentials found; skipping provisioning.");
}

await publish();
If only one of them exists, the process stops without issuing an additional certificate. In the restart test this time, both files were found, and it was confirmed that provisioning was skipped without the claim mount.
Conclusion
By starting a local Linux container, I was able to register lab-iot-machine-02 without manually preparing a Thing or device-specific certificates in advance. On restart, the saved identity was reused, and Publish was possible even without the claim certificate.
The most confusing part was understanding the difference between the IoT Policy for claim, the IoT Policy for runtime, and the provisioning IAM role. It became easier to organize the settings by thinking of each one separately as "initial registration," "normal communication," and "resource creation by AWS IoT Core."
It is also possible to run directly from Node.js without using a container by changing the credential paths in .env for local use. However, in this case, only execution from a Podman container was confirmed.
After verification, if no additional device provisioning is to be performed, deactivate the shared claim certificate. Be careful not to include private keys, generated device credentials, or account-specific endpoints in public repositories.