
I tried building a FastQC execution environment using AWS Batch with only the AWS Management Console

This page has been translated by machine translation. View original
Introduction
Hello, I'm Horiguchi.
What kind of environment do you usually use for RNA-seq analysis?
I think many of you may be doing it on a lab server or personal PC.
This time, I'll introduce step-by-step how to build a FastQC execution environment on AWS using the AWS Management Console. As a minimal configuration, I'd like to create an S3 bucket as a data storage destination and run just one FastQC job with AWS Batch.
I hope this will be helpful as a reference for what kind of configuration is needed when running analyses that are currently done on lab servers or personal PCs on the cloud.
Notes
- This article uses public data (GATK Test Data)
- This article does not provide scientific interpretation of the analysis results
Terminology
RNA-seq
This is a method for investigating which genes are being used and how much within a cell. When a gene is used, a molecule called RNA is created that copies that information. In RNA-seq, we estimate how active genes are by reading the sequences of RNA and measuring their quantities.
FASTQ
Sequences read by a device called a sequencer are generally stored in files in a format called FASTQ. FASTQ files record the read sequences and their read quality.
FastQC
This is software for checking whether there are quality issues in sequence data stored in FASTQ files, using graphs and tables.
In other words, to summarize the purpose of this article in one sentence:
"Let's check the quality of sequence data read by RNA-seq on AWS"
That's what this is about.
Thank you for reading.
Configuration to be Created This Time
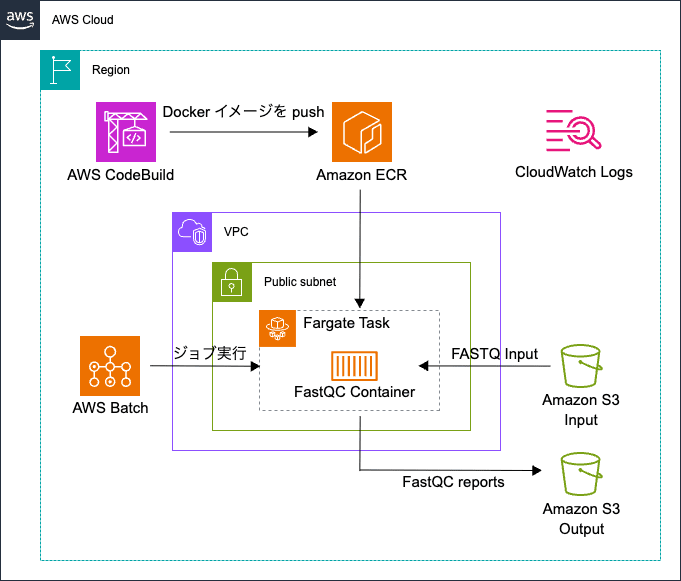
Overall architecture created in this article
Since we aim to complete everything in the Management Console this time, we will not build the FastQC container image on a local PC either, but instead create it with CodeBuild and save it to ECR.
The main AWS services used this time are as follows.
| Service | Purpose |
|---|---|
| Amazon S3 | Storing input FASTQ and FastQC results |
| AWS CodeBuild | Creating container images |
| Amazon ECR | Storing container images |
| AWS Batch | Job reception and scheduling |
| IAM | Access permissions to ECR and S3 |
| CloudWatch Logs | Checking job execution logs |
Note that Fargate will be used for the AWS Batch Compute environment.
There is no need to create or manage EC2 instances yourself.
1. Upload Input FASTQ to S3
Let's get started right away.
First, create an S3 bucket to store the input data and FastQC output.
Open the Amazon S3 console and select "Create bucket."
※ Traditionally, bucket names needed to be unique across all AWS accounts, but using account regional namespaces, you can use the same base name in different AWS accounts or regions. However, it must be unique within the same AWS account and same region.
Leave the settings basically at their defaults, and keep "Block all public access" enabled.
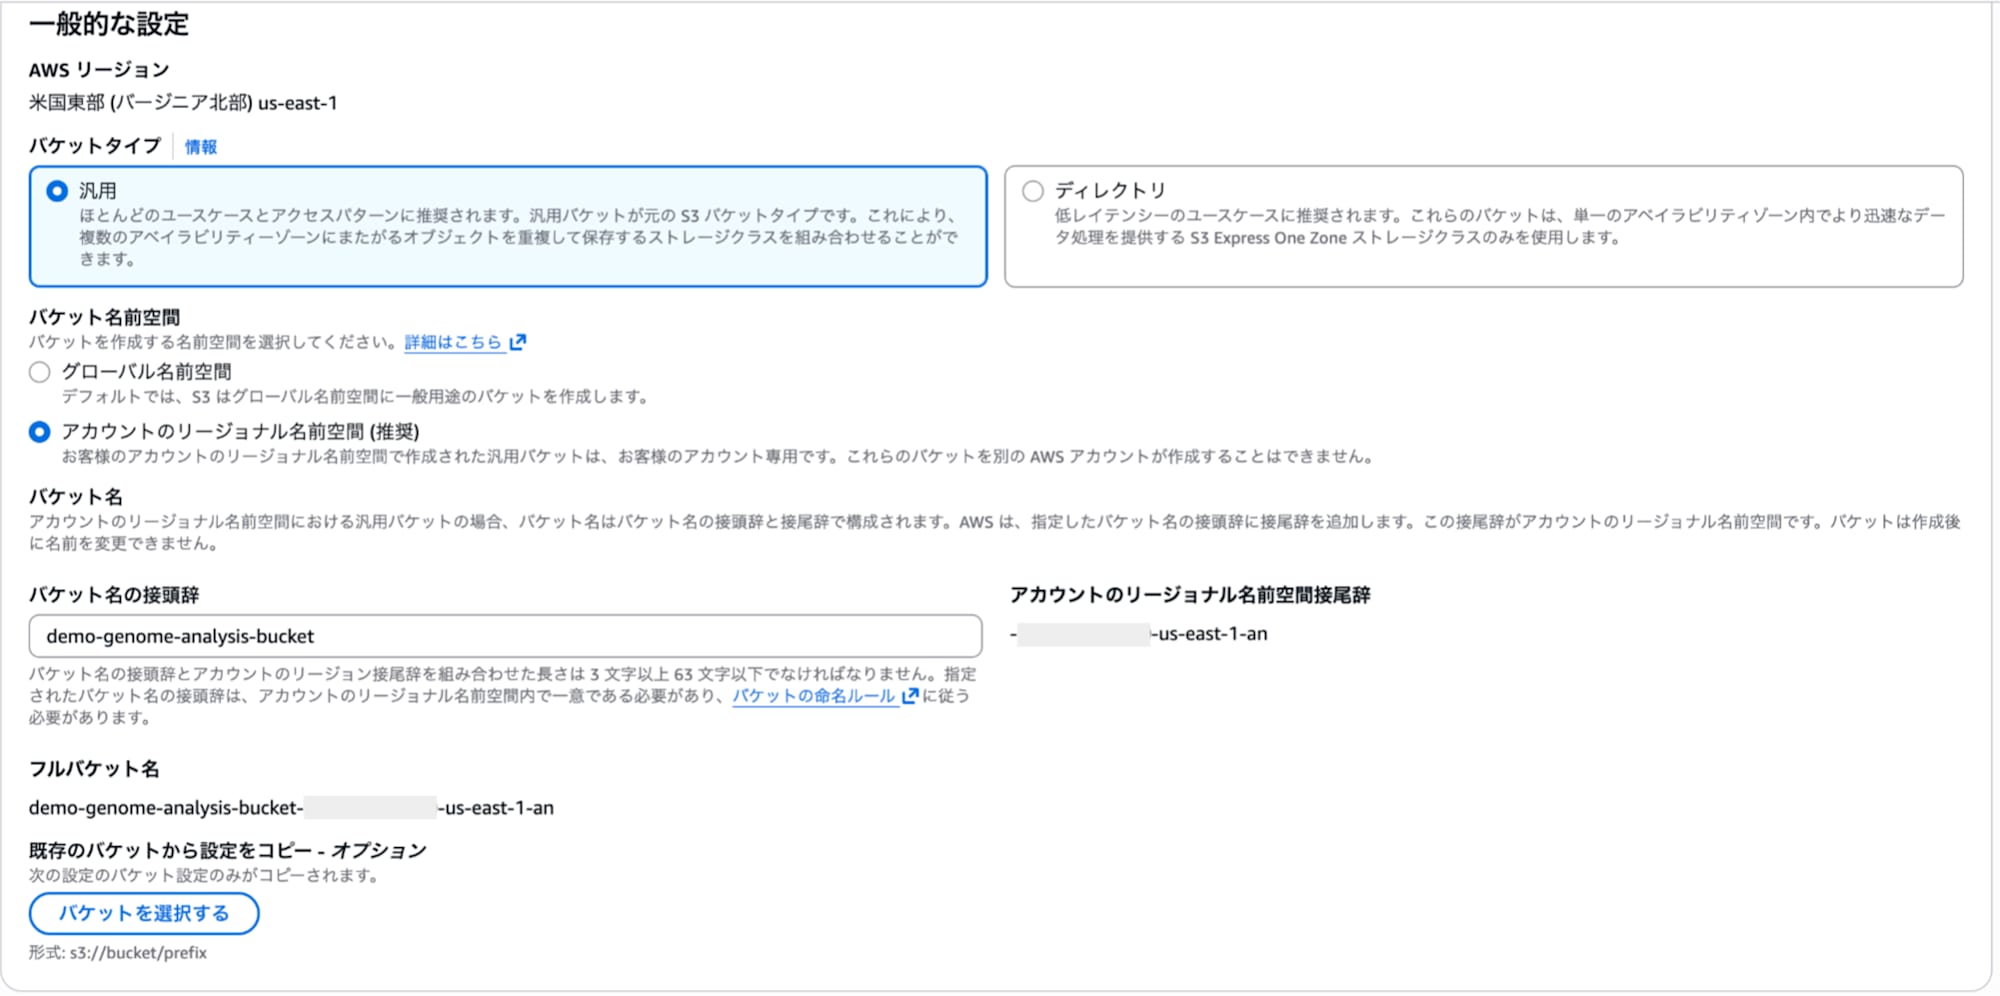
Creating an S3 bucket
Next, create the following 2 prefixes (folders in the console) within the bucket.
- input_data/: Store the target FASTQ files for analysis
- output_data/: Store the FastQC results
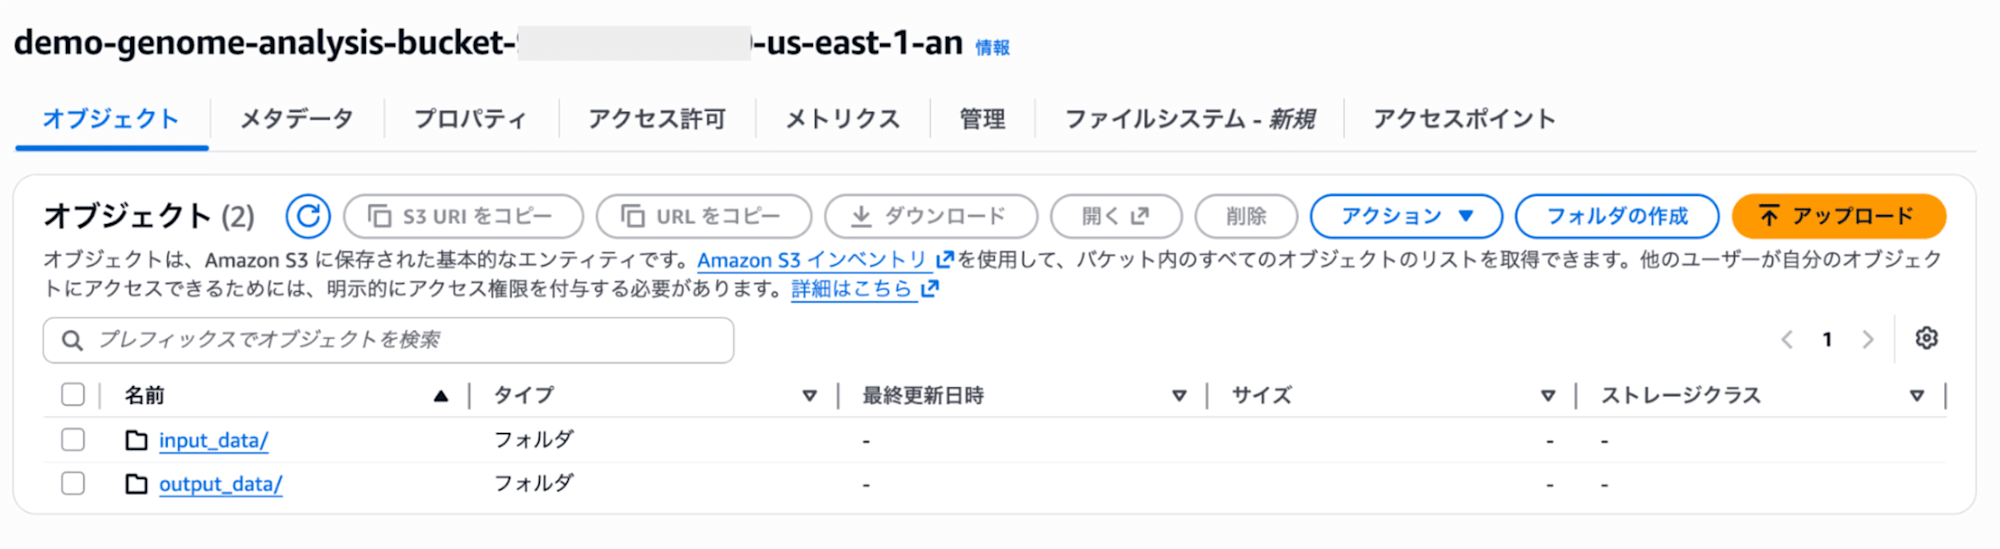
Create input_data and output_data folders within the S3 bucket
For paired-end data, place the input data in a structure like the following.
input_data/
├── sample1_R1.fastq.gz
└── sample1_R2.fastq.gz
On the other hand, for single-end data, there will be only one FASTQ file.
Note down the S3 URI of the uploaded object, as it will be used later when creating the AWS Batch job definition.
2. Create an ECR Repository for FastQC
2-1. Prerequisites
In AWS Batch, rather than installing analysis software directly on the host environment, jobs are executed using container images that bundle the necessary software and execution procedures. Therefore, it is first necessary to create a container image that incorporates FastQC, Java, AWS CLI, and other tools.
A container image is an execution environment that bundles all the software and settings needed for analysis. By fixing the FastQC version and required libraries within the image, there is no need to set up the environment each time it runs, and analysis can be executed under the same conditions.
This time, since we aim to complete everything in the AWS Management Console, we will create the container image for FastQC using AWS CodeBuild without operating Docker on a local PC. The created image will be saved to Amazon ECR, and when running jobs with AWS Batch, Fargate will retrieve it from ECR.
2-2. Creating an ECR Repository
Now let's actually create the ECR repository to store the FastQC container image.
From "Create repository" in Amazon ECR, I created a private repository.
The repository name for this time is as follows.
rna-seq/fastq-test
Since repository names can include /, you can express project names and purposes hierarchically.
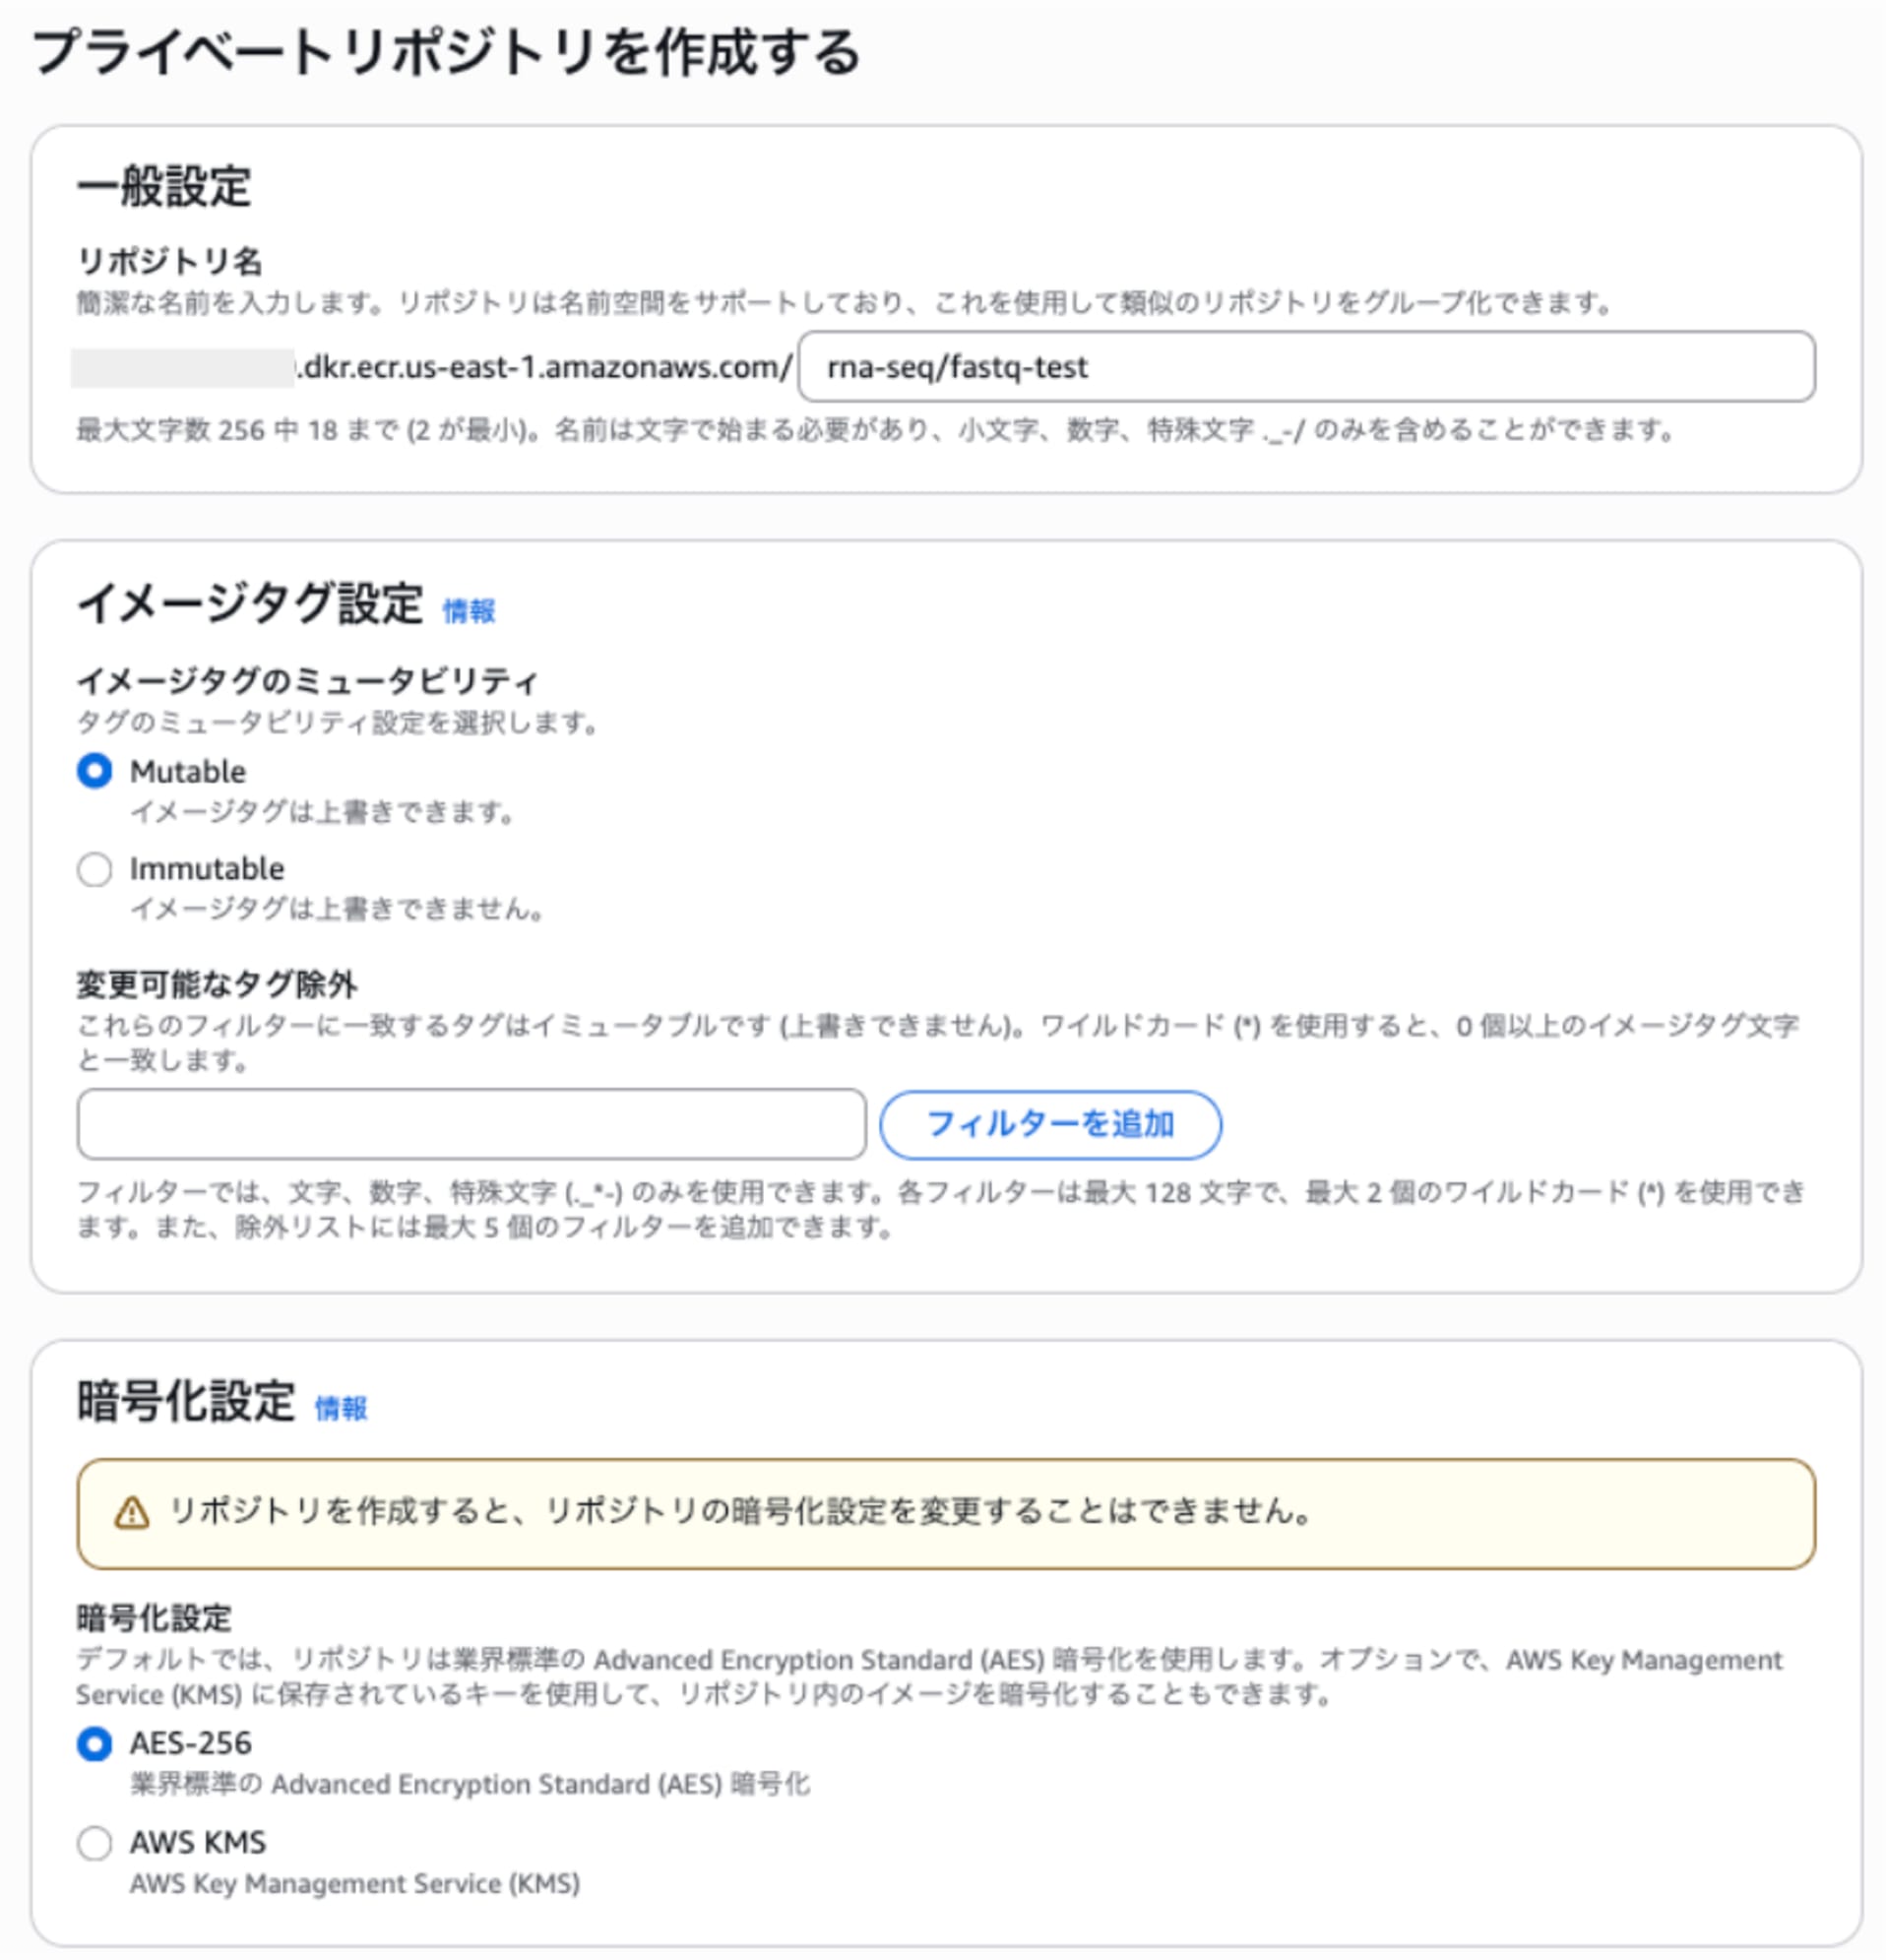
ECR repository creation screen
After creation, note down the ECR repository URI.
AWSアカウントID.dkr.ecr.us-east-1.amazonaws.com/rna-seq/fastq-test
This URI will be used later in the AWS Batch job definition.
3. Create a FastQC Container with CodeBuild
Create a CodeBuild project with the following settings.
| Item | Setting |
|---|---|
| Project type | Default project |
| Source provider | No source |
| Provisioning model | On-demand |
| Environment image | Managed image |
| Computing | EC2 |
| Execution mode | Container |
| OS | Amazon Linux |
| Runtime | Standard |
| Image | x86_64-standard:6.0 |
| Privileged mode | Enabled |
| Service role | Create new |
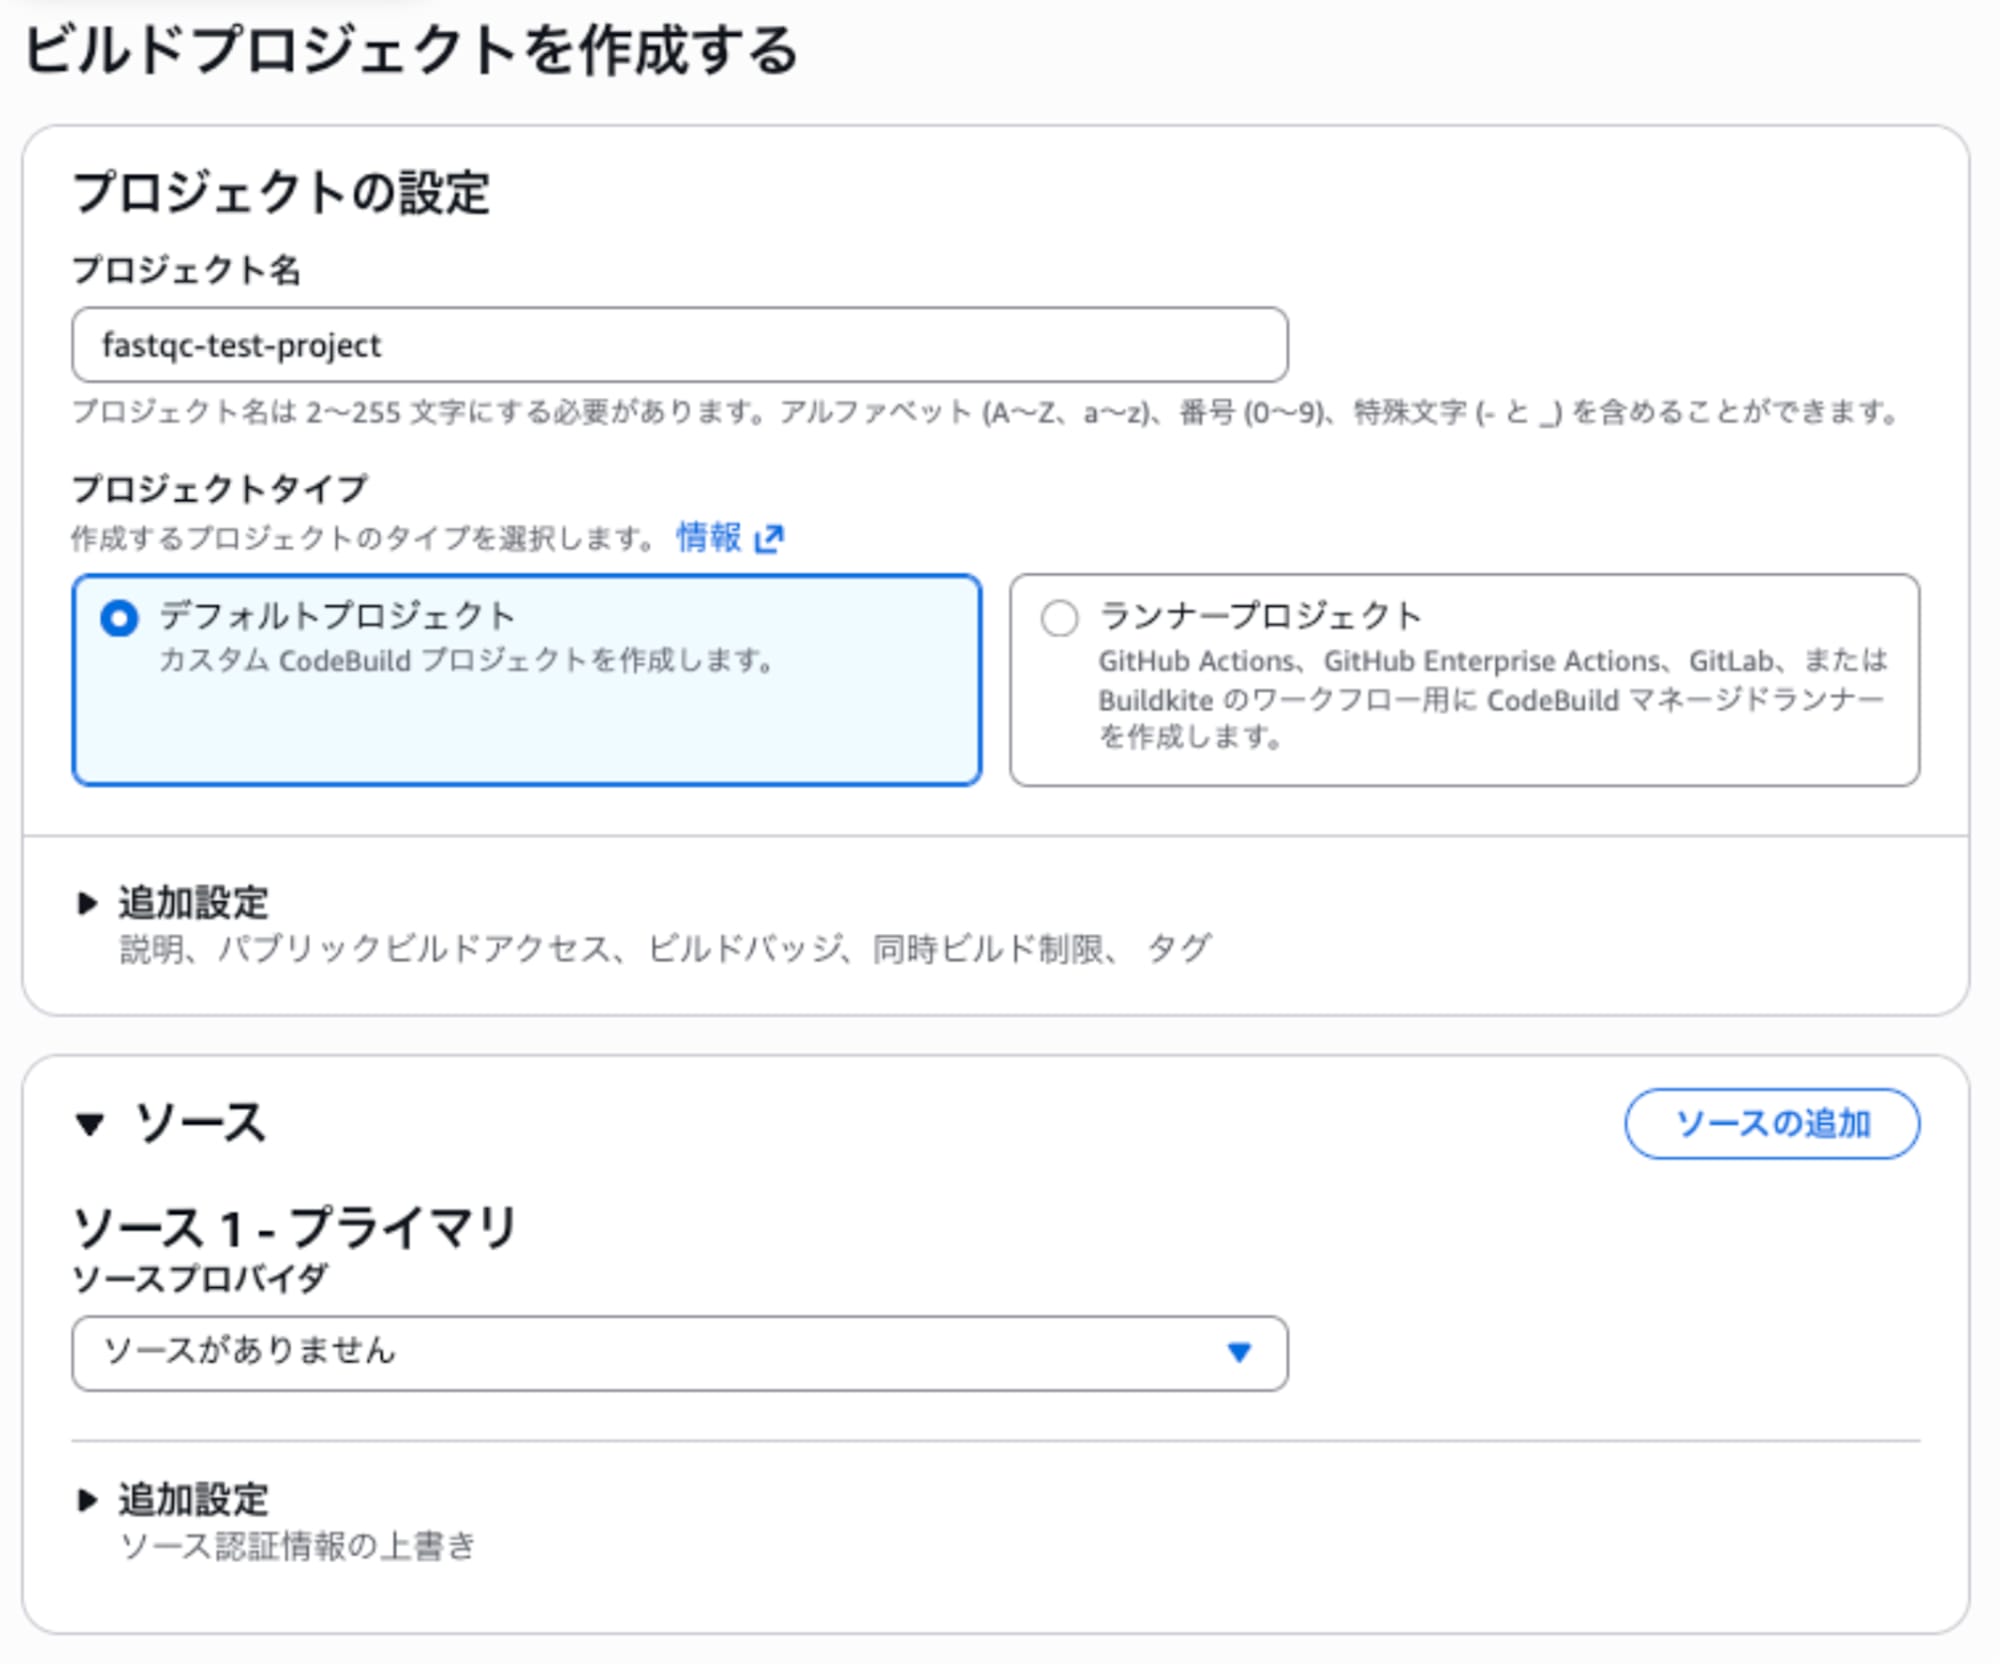
Basic settings of the CodeBuild project
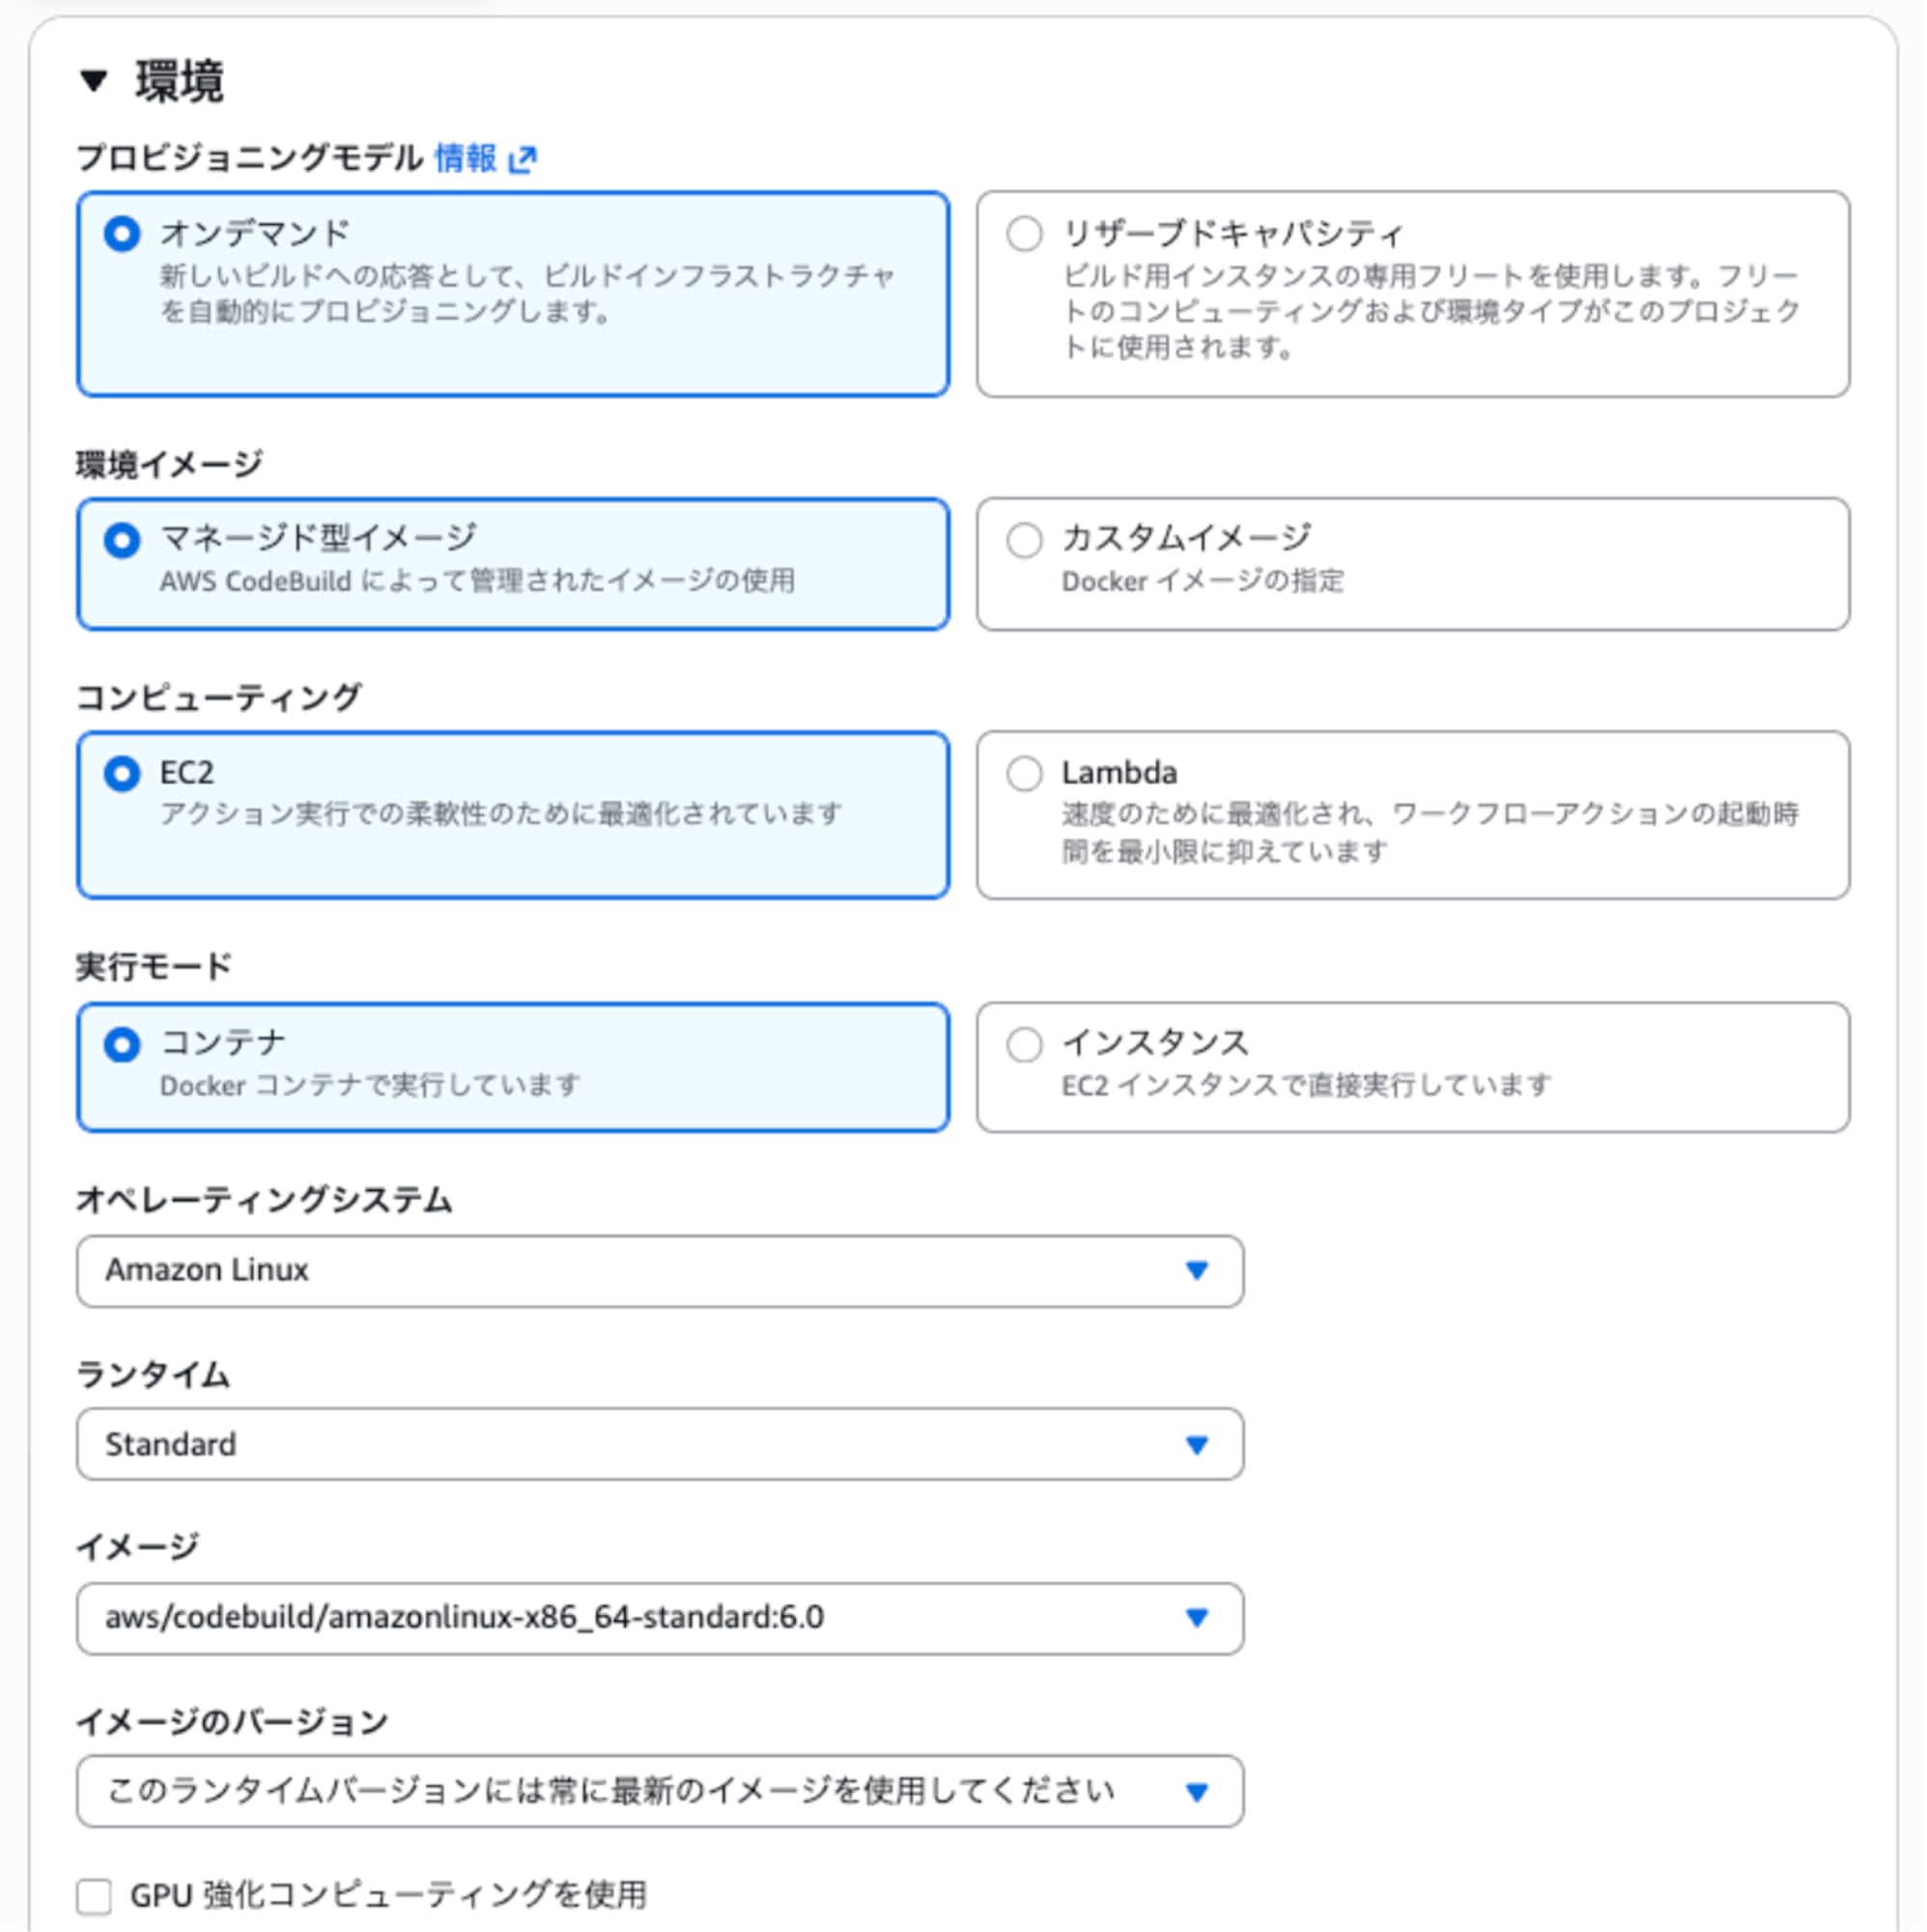
Environment settings of the CodeBuild project
Enable Privileged Mode
In the CodeBuild environment settings, enable privileged mode.
Expand "Additional configuration" at the bottom of the "Environment" section, and check the box in the privilege grant field.
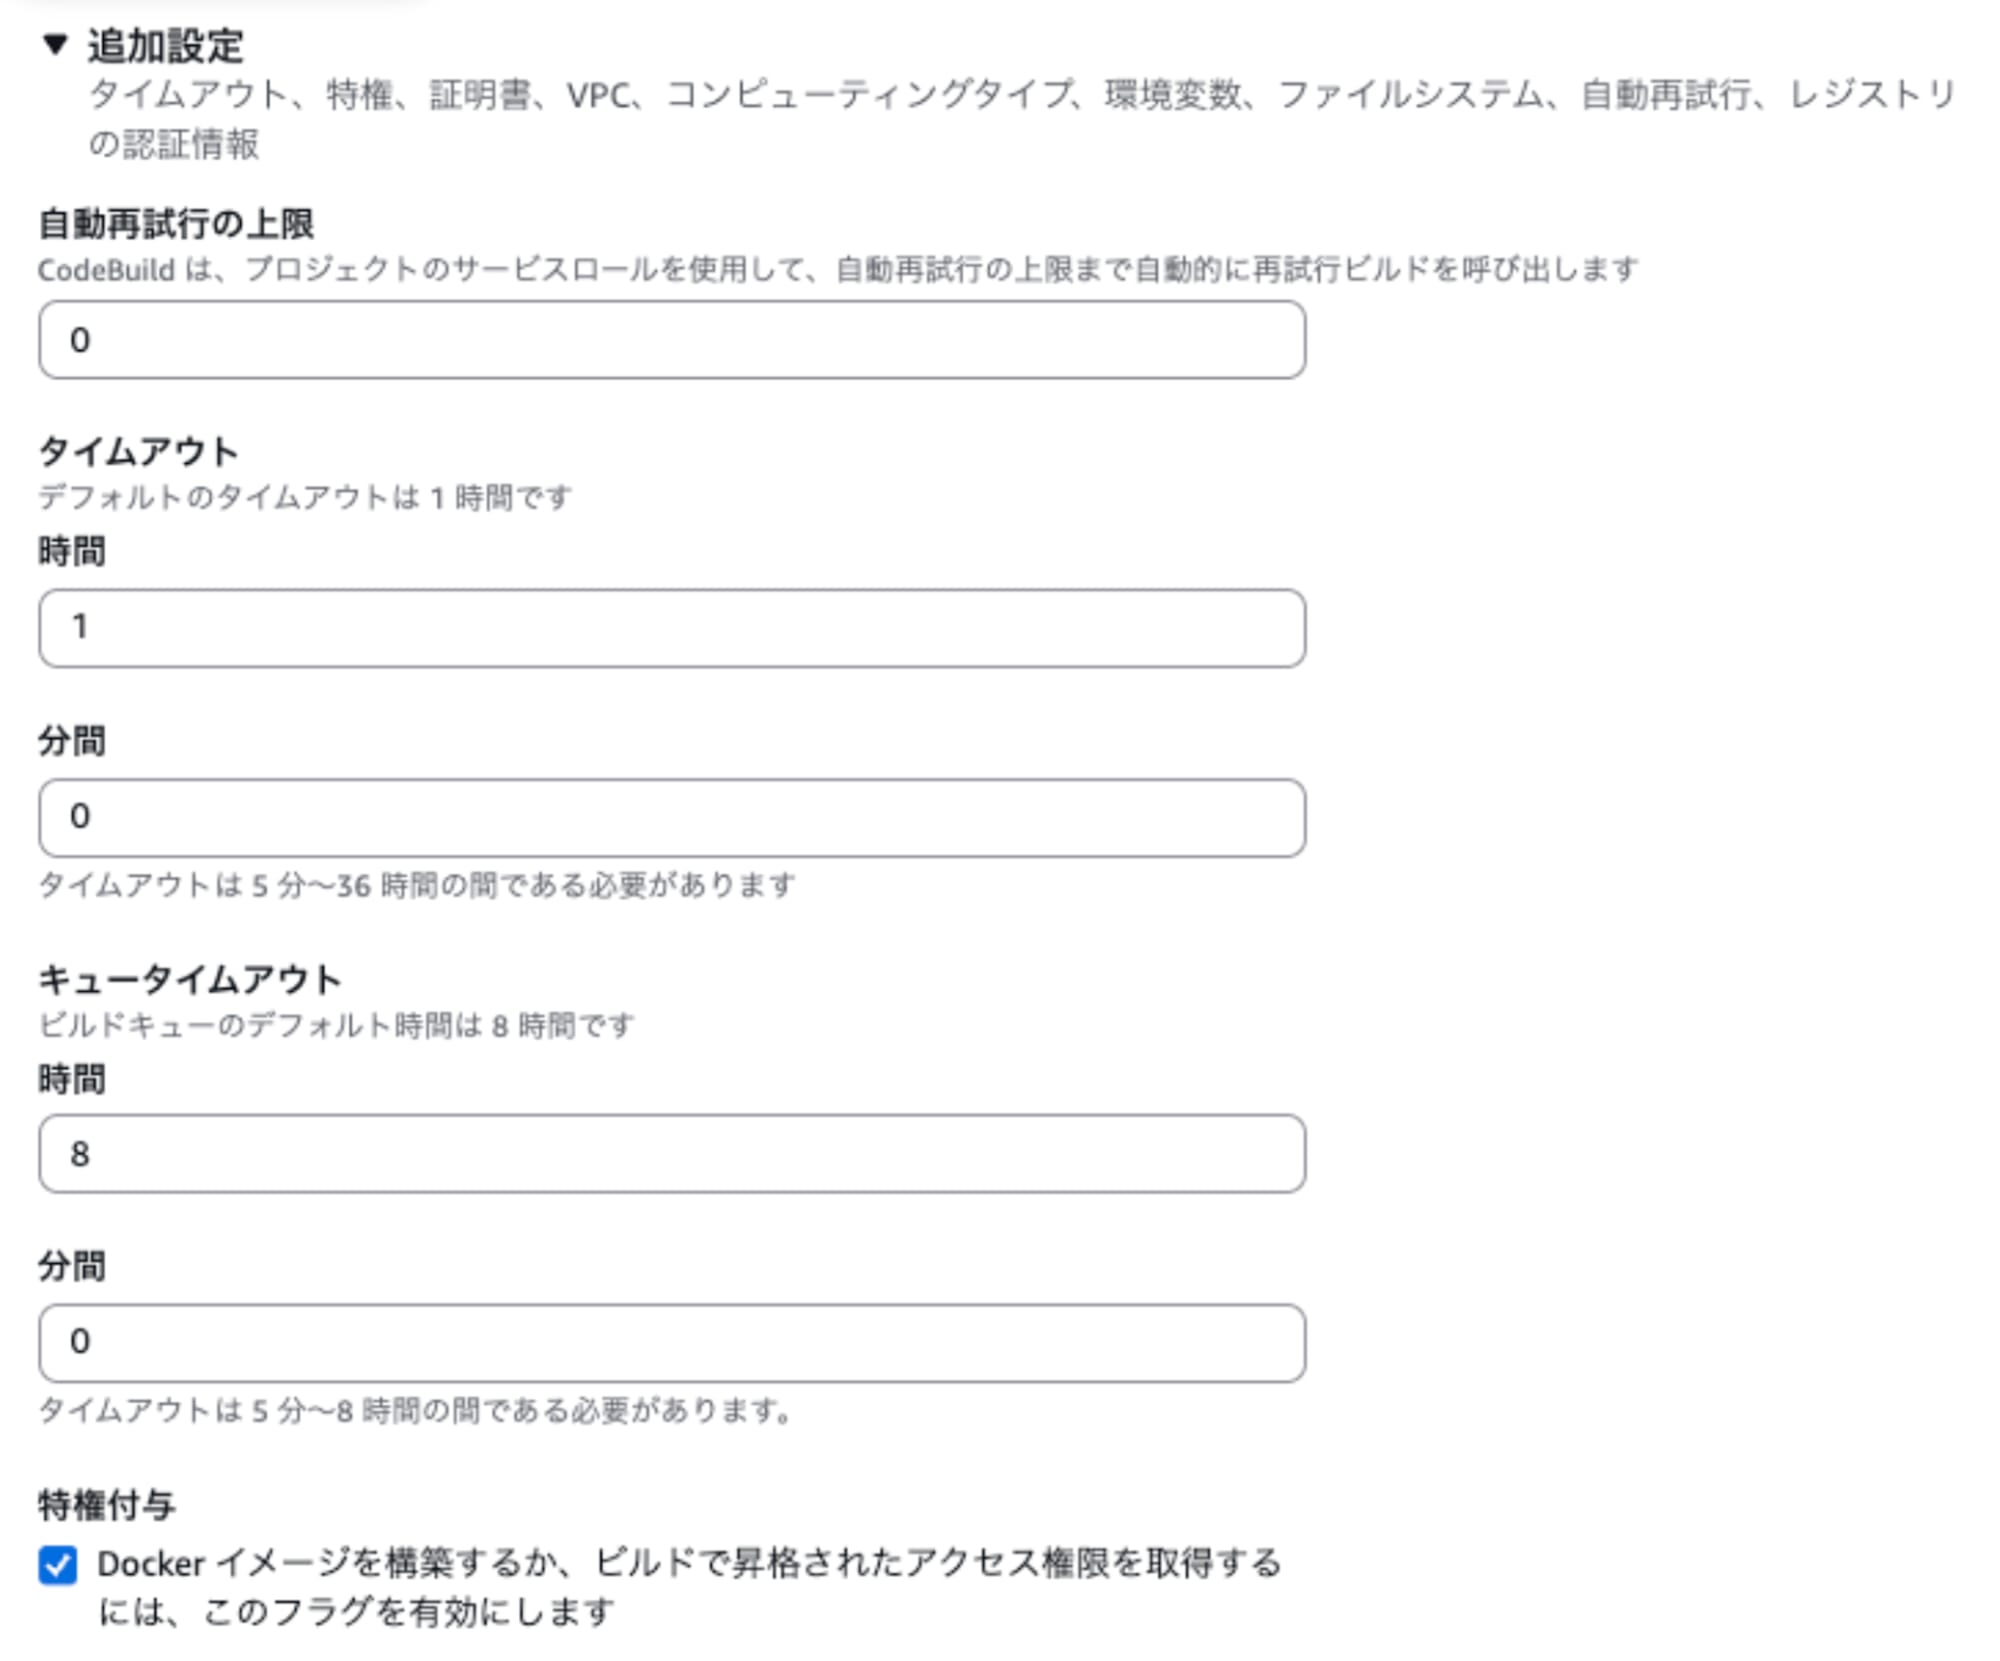
Privilege grant setting in CodeBuild
What is Privileged Mode?
The CodeBuild build environment itself also runs in a container. This time, we will further execute the following commands within it.
docker build
docker push
Privileged mode needs to be enabled in order to run Docker image manipulation commands such as docker build inside CodeBuild.
Note that privileged mode and IAM permissions are separate things.
Required to run Docker build, etc.
 → Privileged mode
Required to push to ECR
 → IAM policy of the CodeBuild service role
Both privileged mode and appropriate IAM policies are needed together before the created Docker image can be pushed to ECR.
Setting Environment Variables
The following environment variables were set for the CodeBuild project.
| Name | Value |
|---|---|
| ECR_REPOSITORY | rna-seq/fastq-test |
| IMAGE_TAG | 0.12.1 |
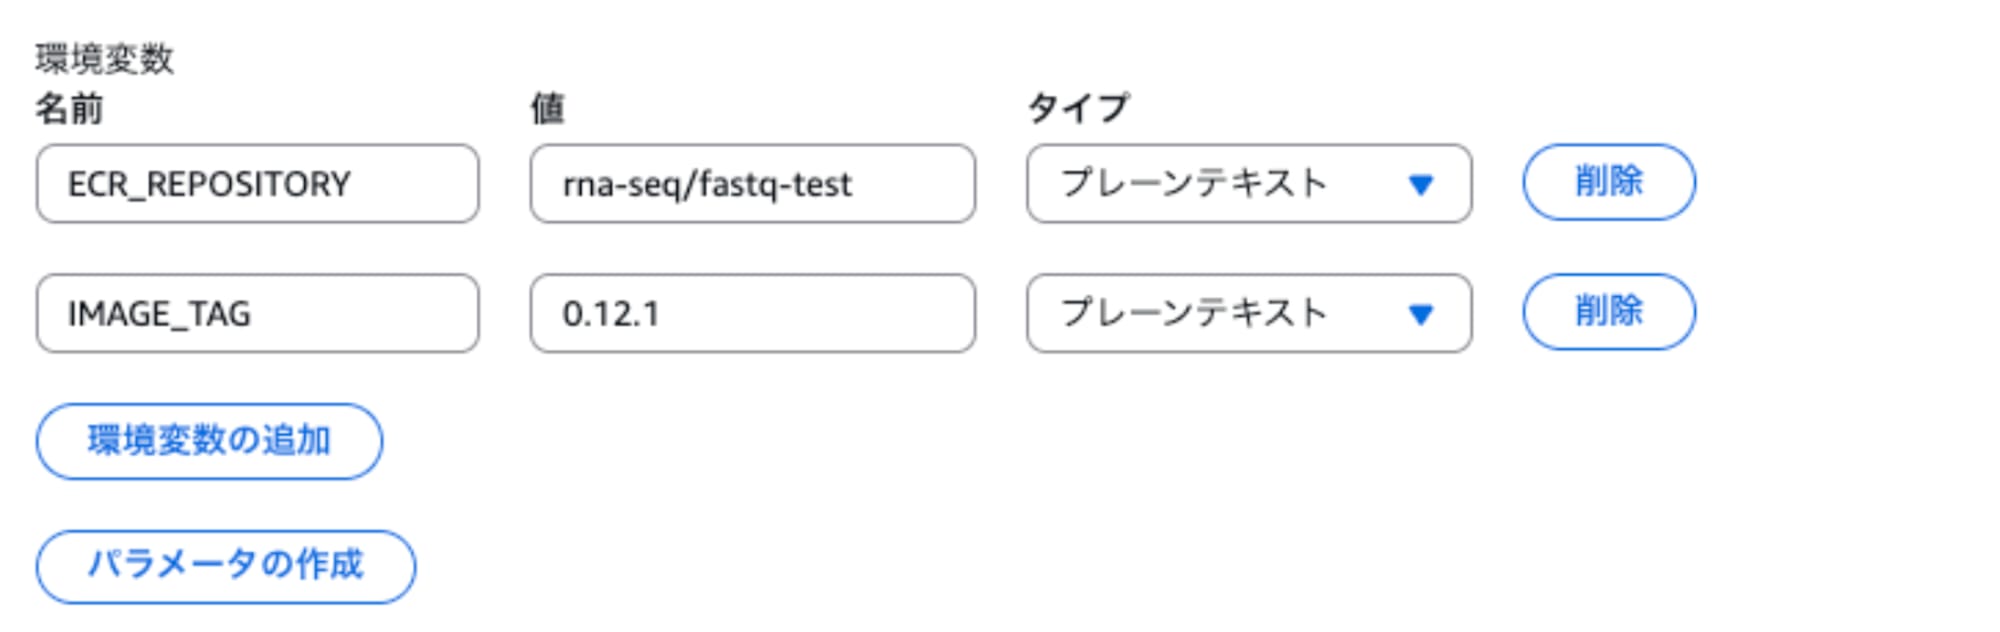
CodeBuild environment variables
For ECR_REPOSITORY, set only the repository name, not the entire ECR URI.
Since we are using FastQC 0.12.1 this time, the image tag is set to 0.12.1.
Processes Executed When the Container Starts
The container created this time will perform the following processes when it starts.
- Download FASTQ from S3
- Run FastQC
- Upload HTML and ZIP to S3
Since we are entering the contents of the Dockerfile and shell script as a single line in the Build commands field this time, each was encoded in Base64 format. They are decoded with base64 -d during the build and output as files.
The commands set in the Build commands field are as follows.
echo RlJPTSBwdWJsaWMuZWNyLmF3cy9hbWF6b25saW51eC9hbWF6b25saW51eDoyMDIzCkFSRyBGQVNUUUNfVkVSU0lPTj0wLjEyLjEKUlVOIGRuZiBpbnN0YWxsIC15IGphdmEtMTctYW1hem9uLWNvcnJldHRvLWhlYWRsZXNzIHBlcmwgdW56aXAgd2dldCBhd3NjbGkgZ3ppcCB0YXIgJiYgZG5mIGNsZWFuIGFsbApSVU4gd2dldCAtcSAiaHR0cHM6Ly93d3cuYmlvaW5mb3JtYXRpY3MuYmFicmFoYW0uYWMudWsvcHJvamVjdHMvZmFzdHFjL2Zhc3RxY192JHtGQVNUUUNfVkVSU0lPTn0uemlwIiAtTyAvdG1wL2Zhc3RxYy56aXAgJiYgdW56aXAgL3RtcC9mYXN0cWMuemlwIC1kIC9vcHQgJiYgY2htb2QgK3ggL29wdC9GYXN0UUMvZmFzdHFjICYmIGxuIC1zIC9vcHQvRmFzdFFDL2Zhc3RxYyAvdXNyL2xvY2FsL2Jpbi9mYXN0cWMgJiYgcm0gL3RtcC9mYXN0cWMuemlwCkNPUFkgcnVuX2Zhc3RxYy5zaCAvdXNyL2xvY2FsL2Jpbi9ydW5fZmFzdHFjLnNoClJVTiBjaG1vZCAreCAvdXNyL2xvY2FsL2Jpbi9ydW5fZmFzdHFjLnNoC0VOVFJZUEOJTlQgWyIvdXNyL2xvY2FsL2Jpbi9ydW5fZmFzdHFjLnNoIl0K | base64 -d > Dockerfile && echo IyEvdXNyL2Jpbi9lbnYgYmFzaApzZXQgLWV1byBwaXBlZmFpbAoKOiAiJHtJTlBVVF9SMTo/SU5QVVRfUjEgaXMgcmVxdWlyZWR9Igo6ICIke09VVFBVVF9TMzo/T1VUUFVUX1MzIGlzIHJlcXVpcmVkfSIKSU5QVVRfUjI9IiR7SU5QVVRfUjI6LU5PTkV9IgpUSFJFQURTPSIke1RIUkVBRFM6LTJ9IgoKbWtkaXIgLXAgL3dvcmsvaW5wdXQgL3dvcmsvb3V0cHV0CgpSMV9MT0NBTD0iL3dvcmsvaW5wdXQvJChiYXNlbmFtZSAiJElOUFVUX1IxIikiCmF3cyBzMyBjcCAiJElOUFVUX1IxIiAiJFIxX0xPQ0FMIgpJTlBVVFM9KCIkUjFfTE9DQUwiKQoKaWYgW1sgIiRJTlBVVF9SMiIgIT0gIk5PTkUiICYmIC1uICIkSU5QVVRfUjIiIF1dOyB0aGVuCiAgUjJfTE9DQUw9Ii93b3JrL2lucHV0LyQoYmFzZW5hbWUgIiRJTlBVVF9SMiIpIgogIGF3cyBzMyBjcCAiJElOUFVUX1IyIiAiJFIyX0xPQ0FMIgogIElOUFVUUys9KCIkUjJfTE9DQUwiKQpmaQoKZmFzdHFjIC0tdGhyZWFkcyAiJFRIUkVBRFMiIC0tb3V0ZGlyIC93b3JrL291dHB1dCAiJHtJTlBVVFNbQF19Igphd3MgczMgY3AgL3dvcmsvb3V0cHV0LyAiJHtPVVRQVVRfUzMlL30vIiAtLXJlY3Vyc2l2ZQo= | base64 -d > run_fastqc.sh && ACCOUNT_ID=$(aws sts get-caller-identity --query Account --output text) && REGION=$AWS_DEFAULT_REGION && ECR_URI=${ACCOUNT_ID}.dkr.ecr.${REGION}.amazonaws.com/${ECR_REPOSITORY} && aws ecr get-login-password --region ${REGION} | docker login --username AWS --password-stdin ${ACCOUNT_ID}.dkr.ecr.${REGION}.amazonaws.com && docker build -t ${ECR_URI}:${IMAGE_TAG} . && docker push ${ECR_URI}:${IMAGE_TAG}
The contents of the Dockerfile before encoding are as follows.
FROM public.ecr.aws/amazonlinux/amazonlinux:2023

ARG FASTQC_VERSION=0.12.1

RUN dnf install -y \
      java-17-amazon-corretto-headless \
      perl \
      unzip \
      wget \
      awscli \
      gzip \
      tar \
    && dnf clean all

RUN wget -q \
      "https://www.bioinformatics.babraham.ac.uk/projects/fastqc/fastqc_v${FASTQC_VERSION}.zip" \
      -O /tmp/fastqc.zip \
    && unzip /tmp/fastqc.zip -d /opt \
    && chmod +x /opt/FastQC/fastqc \
    && ln -s /opt/FastQC/fastqc /usr/local/bin/fastqc \
    && rm /tmp/fastqc.zip

COPY run_fastqc.sh /usr/local/bin/run_fastqc.sh

RUN chmod +x /usr/local/bin/run_fastqc.sh

ENTRYPOINT ["/usr/local/bin/run_fastqc.sh"]
The shell script for running FastQC before encoding is as follows.
#!/usr/bin/env bash
set -euo pipefail

: "${INPUT_R1:?INPUT_R1 is required}"
: "${OUTPUT_S3:?OUTPUT_S3 is required}"

INPUT_R2="${INPUT_R2:-NONE}"
THREADS="${THREADS:-2}"

mkdir -p /work/input /work/output

R1_LOCAL="/work/input/$(basename "$INPUT_R1")"
aws s3 cp "$INPUT_R1" "$R1_LOCAL"
INPUTS=("$R1_LOCAL")

if [[ "$INPUT_R2" != "NONE" && -n "$INPUT_R2" ]]; then
  R2_LOCAL="/work/input/$(basename "$INPUT_R2")"
  aws s3 cp "$INPUT_R2" "$R2_LOCAL"
  INPUTS+=("$R2_LOCAL")
fi

fastqc \
  --threads "$THREADS" \
  --outdir /work/output \
  "${INPUTS[@]}"

aws s3 cp \
  /work/output/ \
  "${OUTPUT_S3%/}/" \
  --recursive
Since we used a CodeBuild project with "no source" this time, we set the commands in the build commands field to generate the Dockerfile and shell script, then build and push the Docker image.
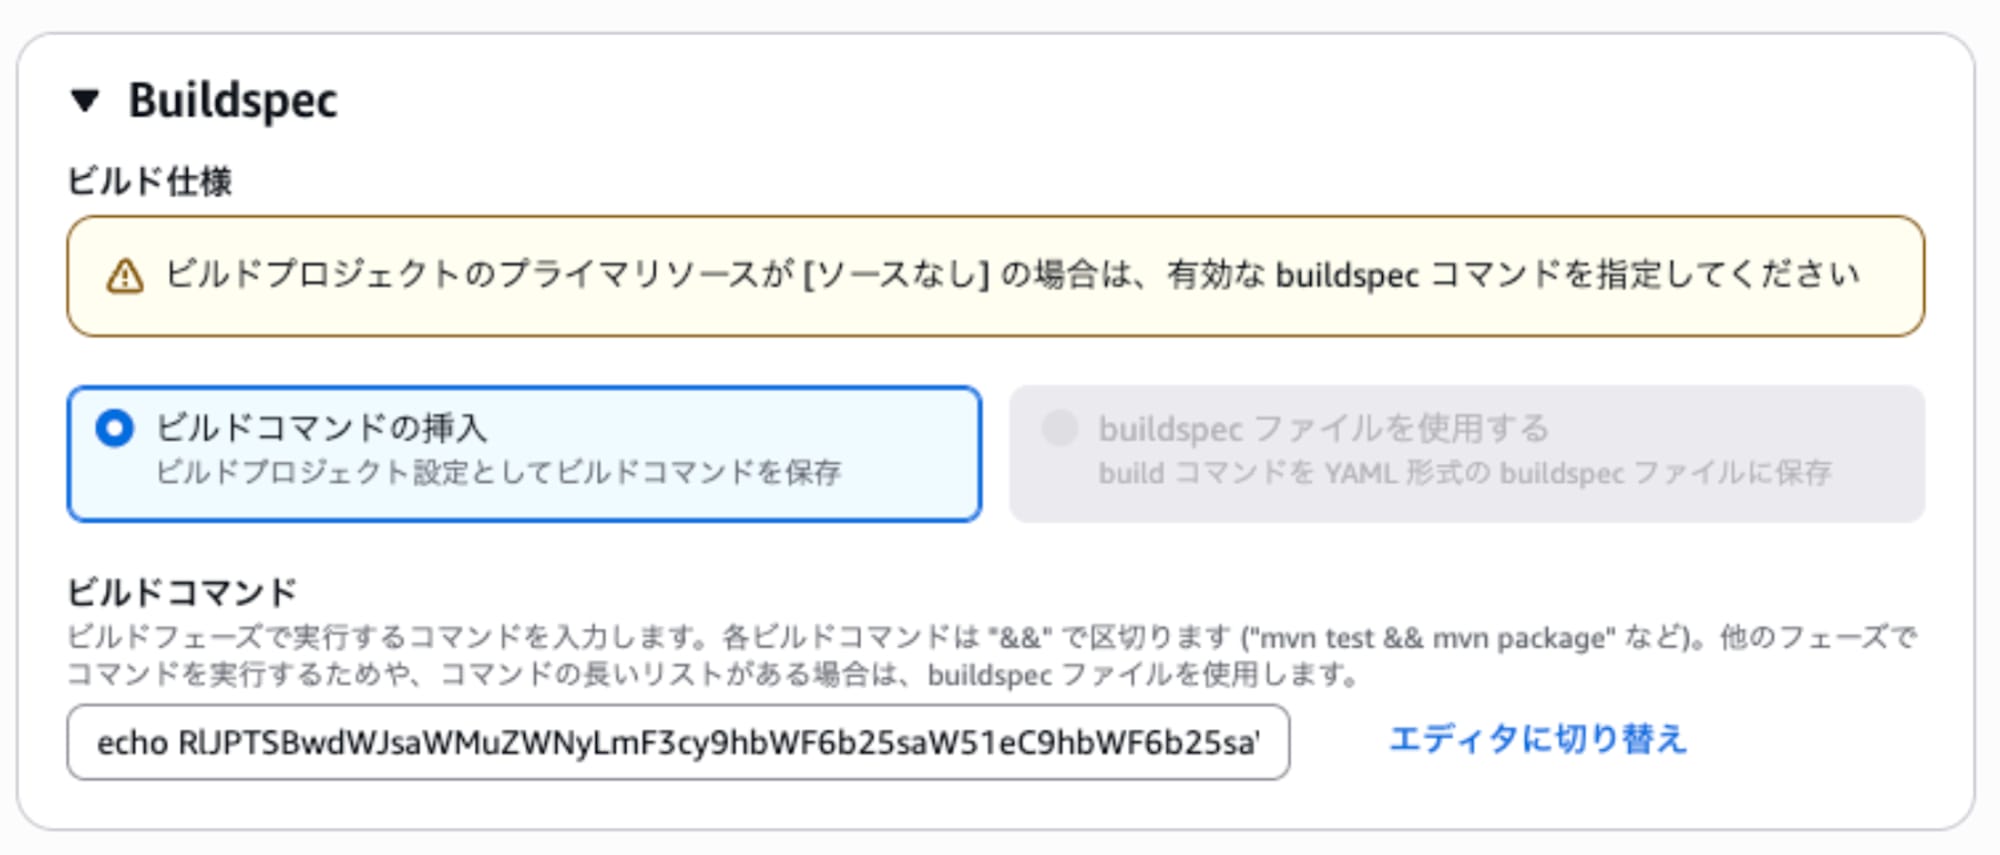
CodeBuild build commands settings
Supplement: Creating a Container Image in a Local Environment
This time, we used CodeBuild to create the container image for FastQC in order to complete all work using only the AWS Management Console.
On the other hand, if Docker is available on your local PC, you can also create the container image in the local environment and push it directly to ECR. With this method, there is no need to create a CodeBuild project or IAM role for CodeBuild.
Note that a container image created locally cannot be sent directly to AWS Batch. It needs to be saved to a container registry such as ECR so that AWS Batch can retrieve it.
Prerequisites
Prepare the following tools on your local PC.
- Docker
- AWS CLI
- AWS credentials to use with AWS CLI
Place the Dockerfile and execution script
Create a working directory and place the following 2 files inside it.
fastqc-batch/
├── Dockerfile
└── run_fastqc.sh
With CodeBuild, these files were encoded in Base64 to enter them as a single line in the Build commands field. In a local environment, files can be created directly, so there is no need to use Base64.
In the directory where the files are placed, build the container image using Docker.
Push the container image to ECR
Open the target repository in the ECR console and select "View push commands" in the upper right of the screen to see the commands corresponding to the account ID, region, and repository name in use.
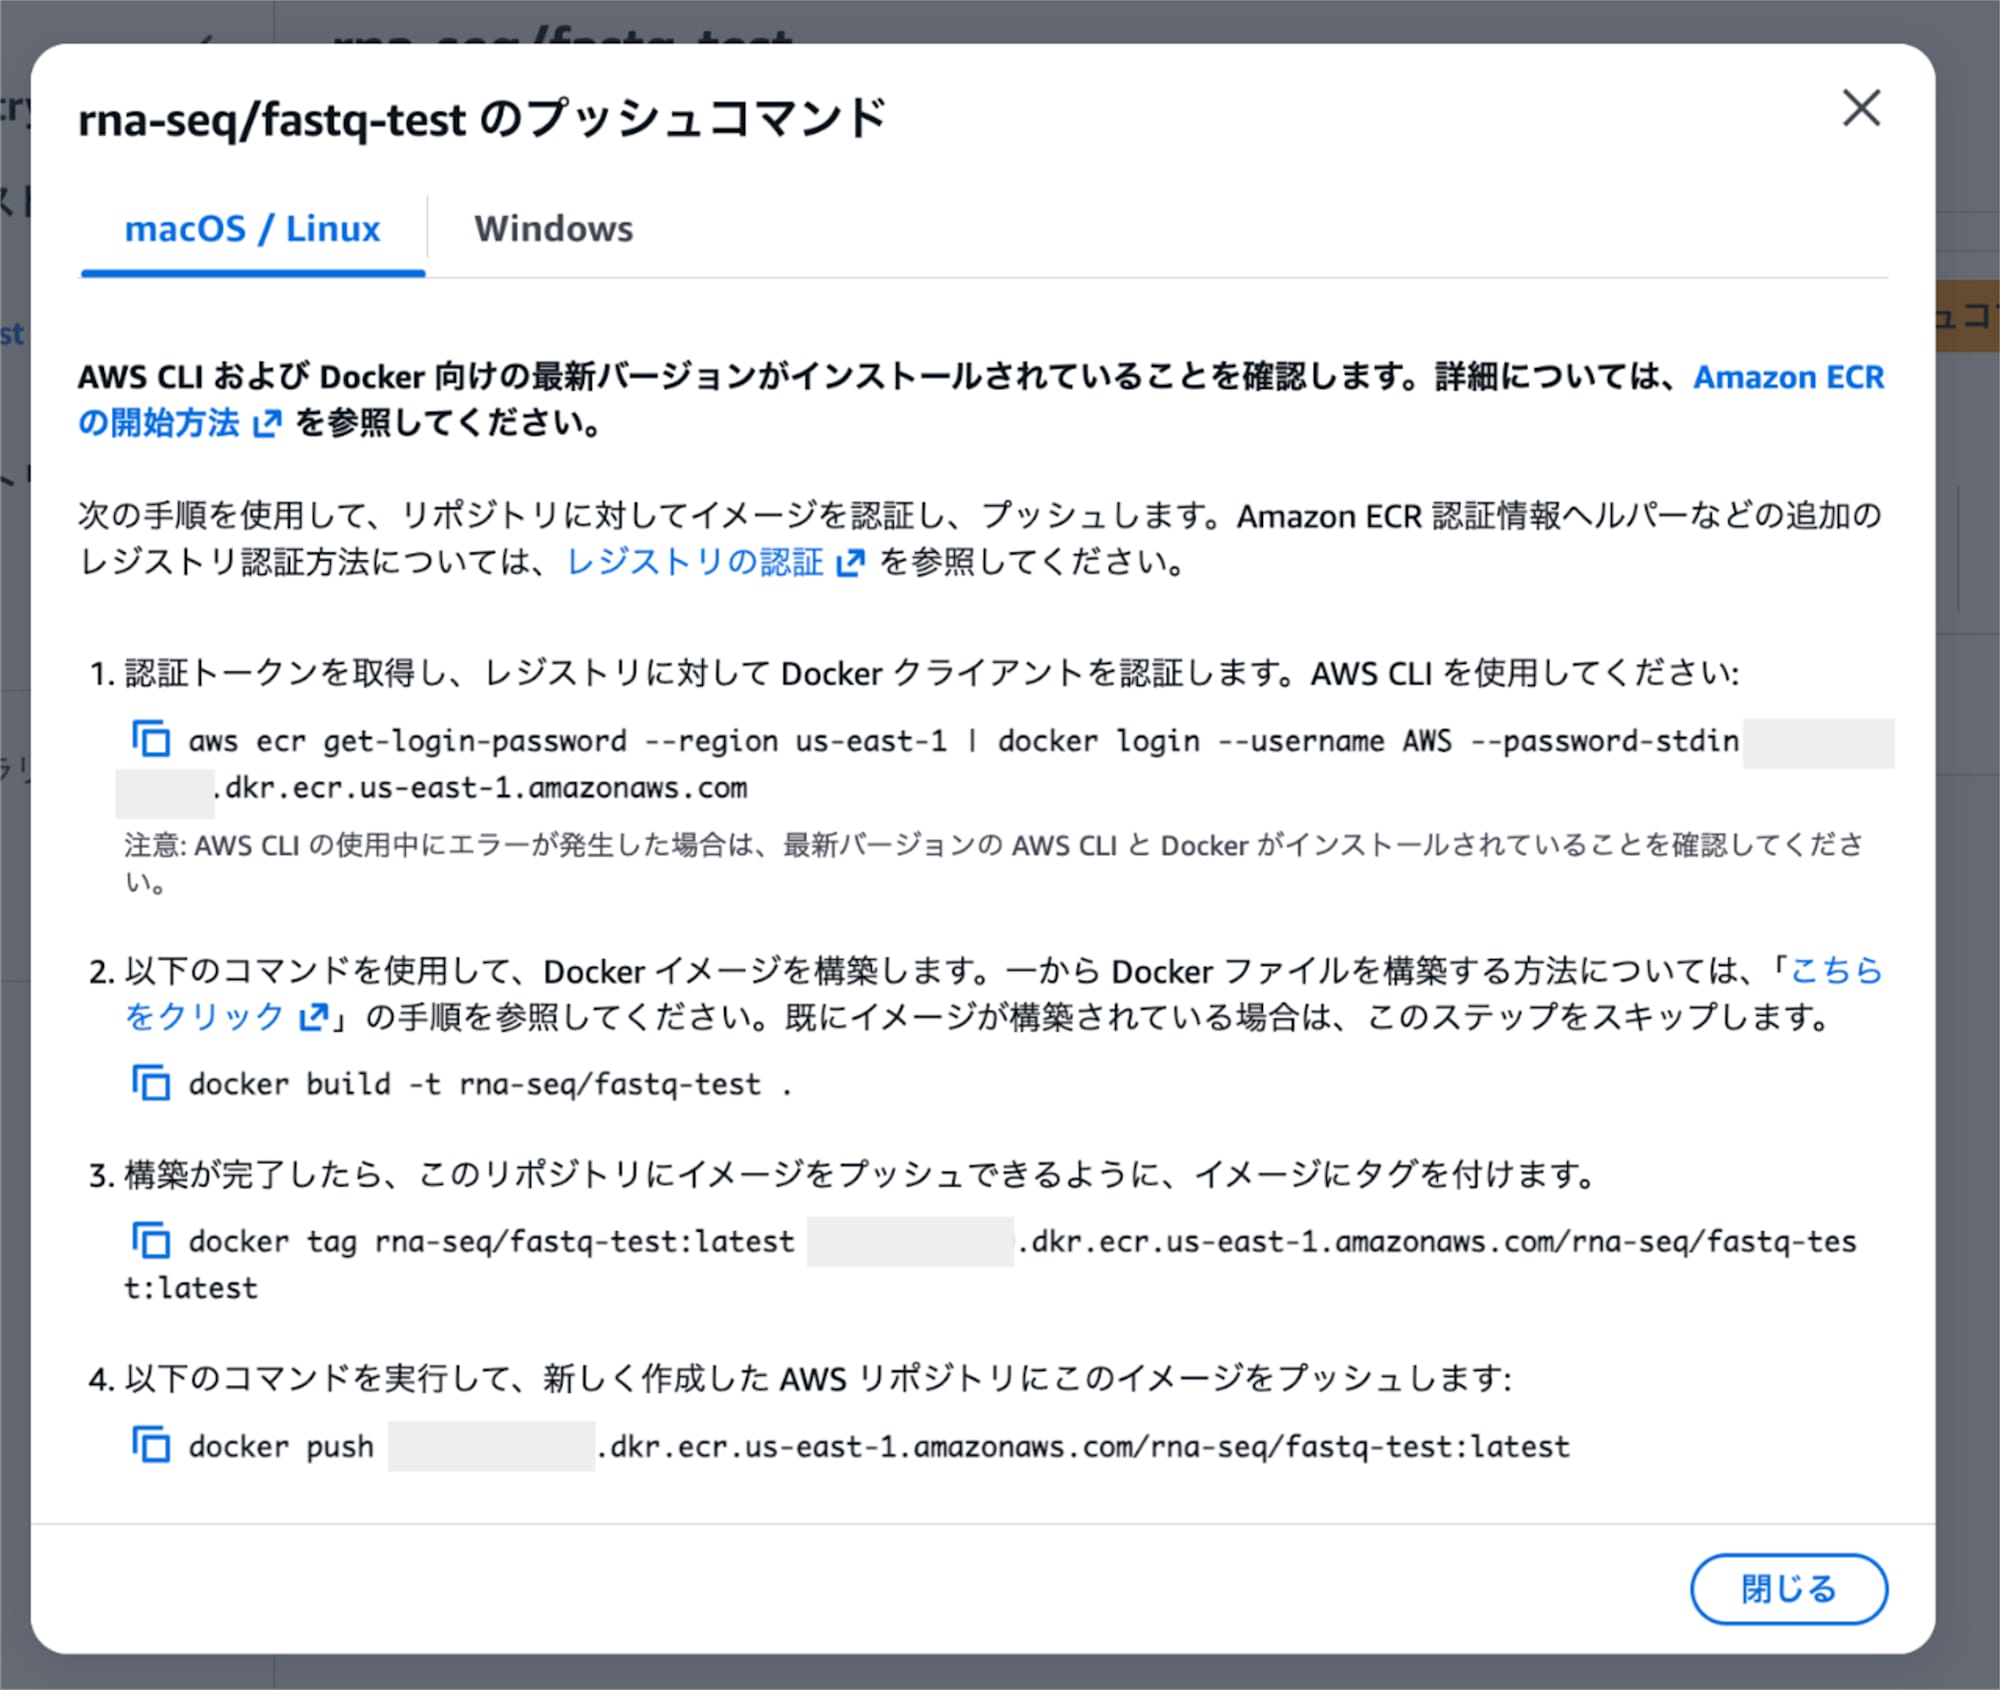
Push commands to ECR
The displayed commands include logging into ECR, building the container image, tagging, and pushing to ECR. Basically, executing them in the displayed order allows you to proceed with the push.
By default, latest is used as the image tag. To match the settings in this article, change latest to 0.12.1 in both the tagging command and the push command.
Once the push is complete, open the ECR repository in the AWS Management Console. If the image with the 0.12.1 tag is displayed, it was successful.
For the AWS Batch Job definition, specify the image URI in the following format, the same as when created with CodeBuild.
AWSアカウントID.dkr.ecr.us-east-1.amazonaws.com/rna-seq/fastq-test:0.12.1
Push permissions to ECR
The IAM user or IAM role executing the commands needs permissions to push images to ECR.
Mainly, the following operations' permissions are used. (Reference)
ecr:GetAuthorizationToken
ecr:BatchCheckLayerAvailability
ecr:InitiateLayerUpload
ecr:UploadLayerPart
ecr:CompleteLayerUpload
ecr:PutImage
ecr:BatchGetImage
If permissions are insufficient, errors such as AccessDenied will appear when executing docker push.
Differences from using CodeBuild
| Item | Build with CodeBuild | Build locally |
|---|---|---|
| Docker execution location | On AWS | Local PC |
| Docker installation on local | Not required | Required |
| AWS CLI local configuration | Not required | Required |
| CodeBuild project | Required | Not required |
| CodeBuild service role | Required | Not required |
| ECR repository | Required | Required |
| Execution method from AWS Batch | Same | Same |
With either method, the FastQC container image is ultimately saved to ECR. Therefore, the AWS Batch configuration and execution method after the ECR push is complete do not change.
If Docker is already installed on your local PC, building locally and pushing to ECR will have fewer steps. On the other hand, if you don't want to change the local environment or want to complete everything with browser operations only, using CodeBuild is more suitable.
4. Add ECR Push Permissions to the CodeBuild Role
Add an IAM policy to the CodeBuild service role so that CodeBuild can push images to ECR.
Enter "codebuild" in the search field on the IAM role dashboard, find the role created when you selected "Create a new service role" earlier, and click the role name.
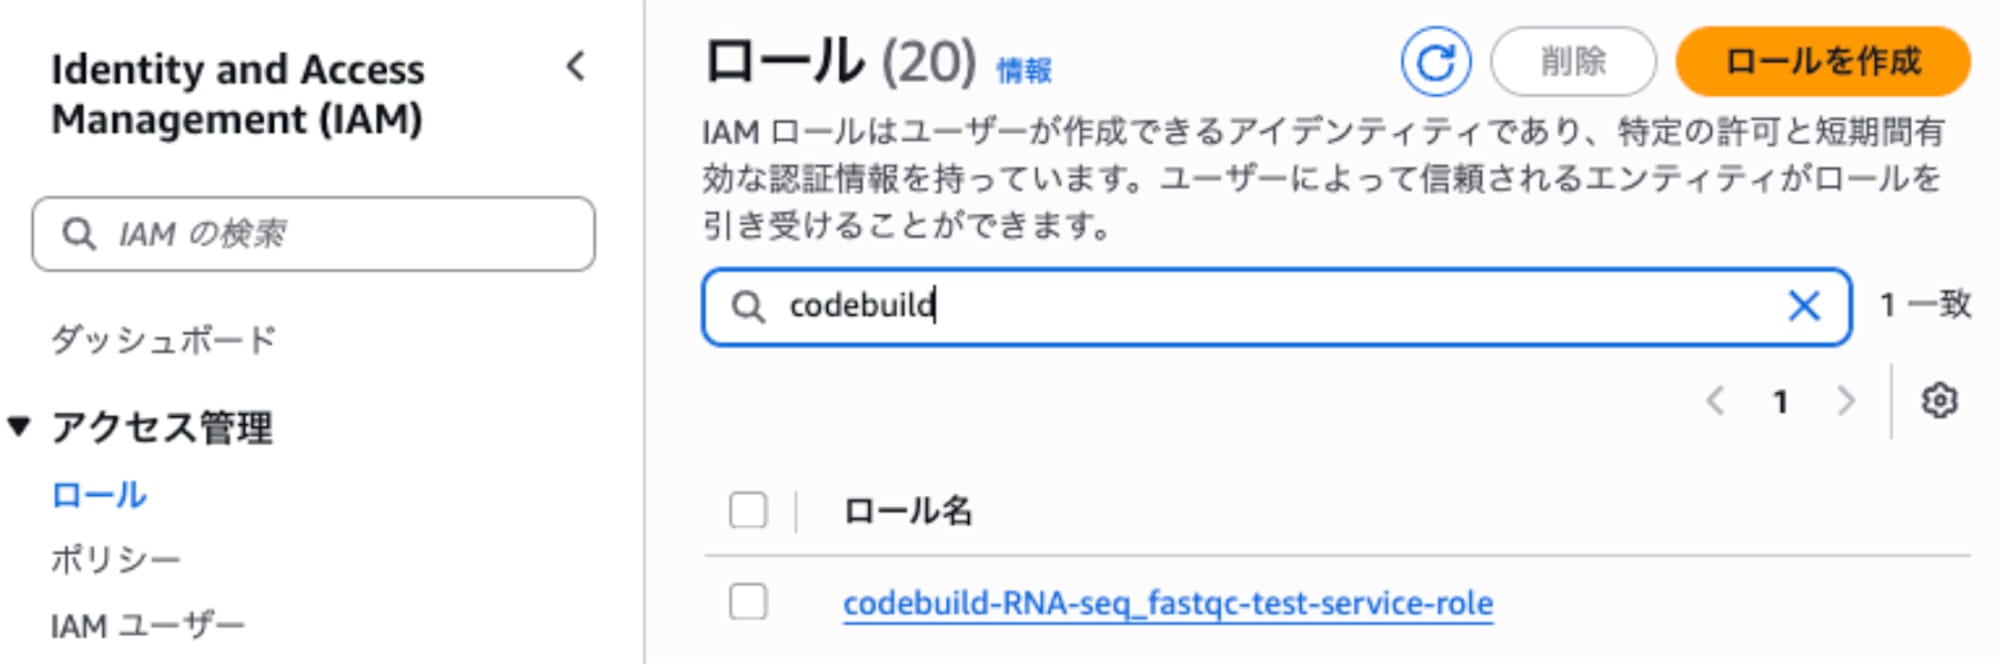
IAM policy settings screen
Click "Add permissions" → "Create inline policy" in the upper right of the permissions policies section to open the policy editor.
Select the "JSON" tab in the upper right of the policy editor and write the policy content.
The following policy was set this time.
{
 "Version": "2012-10-17",
 "Statement": [
   {
     "Sid": "GetEcrAuthorizationToken",
     "Effect": "Allow",
     "Action": [
       "ecr:GetAuthorizationToken"
     ],
     "Resource": "*"
   },
   {
     "Sid": "PushFastqcImage",
     "Effect": "Allow",
     "Action": [
       "ecr:BatchCheckLayerAvailability",
       "ecr:GetDownloadUrlForLayer",
       "ecr:BatchGetImage",
       "ecr:InitiateLayerUpload",
       "ecr:UploadLayerPart",
       "ecr:CompleteLayerUpload",
       "ecr:PutImage"
     ],
     "Resource": "arn:aws:ecr:us-east-1:AWSアカウントID:repository/rna-seq/fastq-test"
   }
 ]
}
This IAM policy directly specifies the ARN of the ECR repository in Resource. Therefore, the region name, AWS account ID, and repository name must match the repository created earlier.
5. Create IAM Roles for AWS Batch
AWS Batch Fargate jobs use 2 types of IAM roles.
| Role | Purpose |
|---|---|
| Execution role | Retrieving images from ECR, sending logs to CloudWatch Logs |
| Job role | Accessing S3 from the running FastQC container |
The names are similar, but their purposes differ.
The Execution role is used by Fargate to retrieve container images from ECR and send execution logs to CloudWatch Logs. On the other hand, the Job role is used when the running container accesses AWS services such as S3.
In this configuration, the Job role is used when the FastQC container retrieves FASTQ from S3 and saves the analysis results to S3.
Execution role
Attach the following AWS managed policy to the Execution role.
AmazonECSTaskExecutionRolePolicy
The role name could be something like the following.
FastqcBatchExecutionRole
Now let's actually create the role.
First, enter the role creation screen from the "Create role" button in the upper right of the IAM role dashboard.
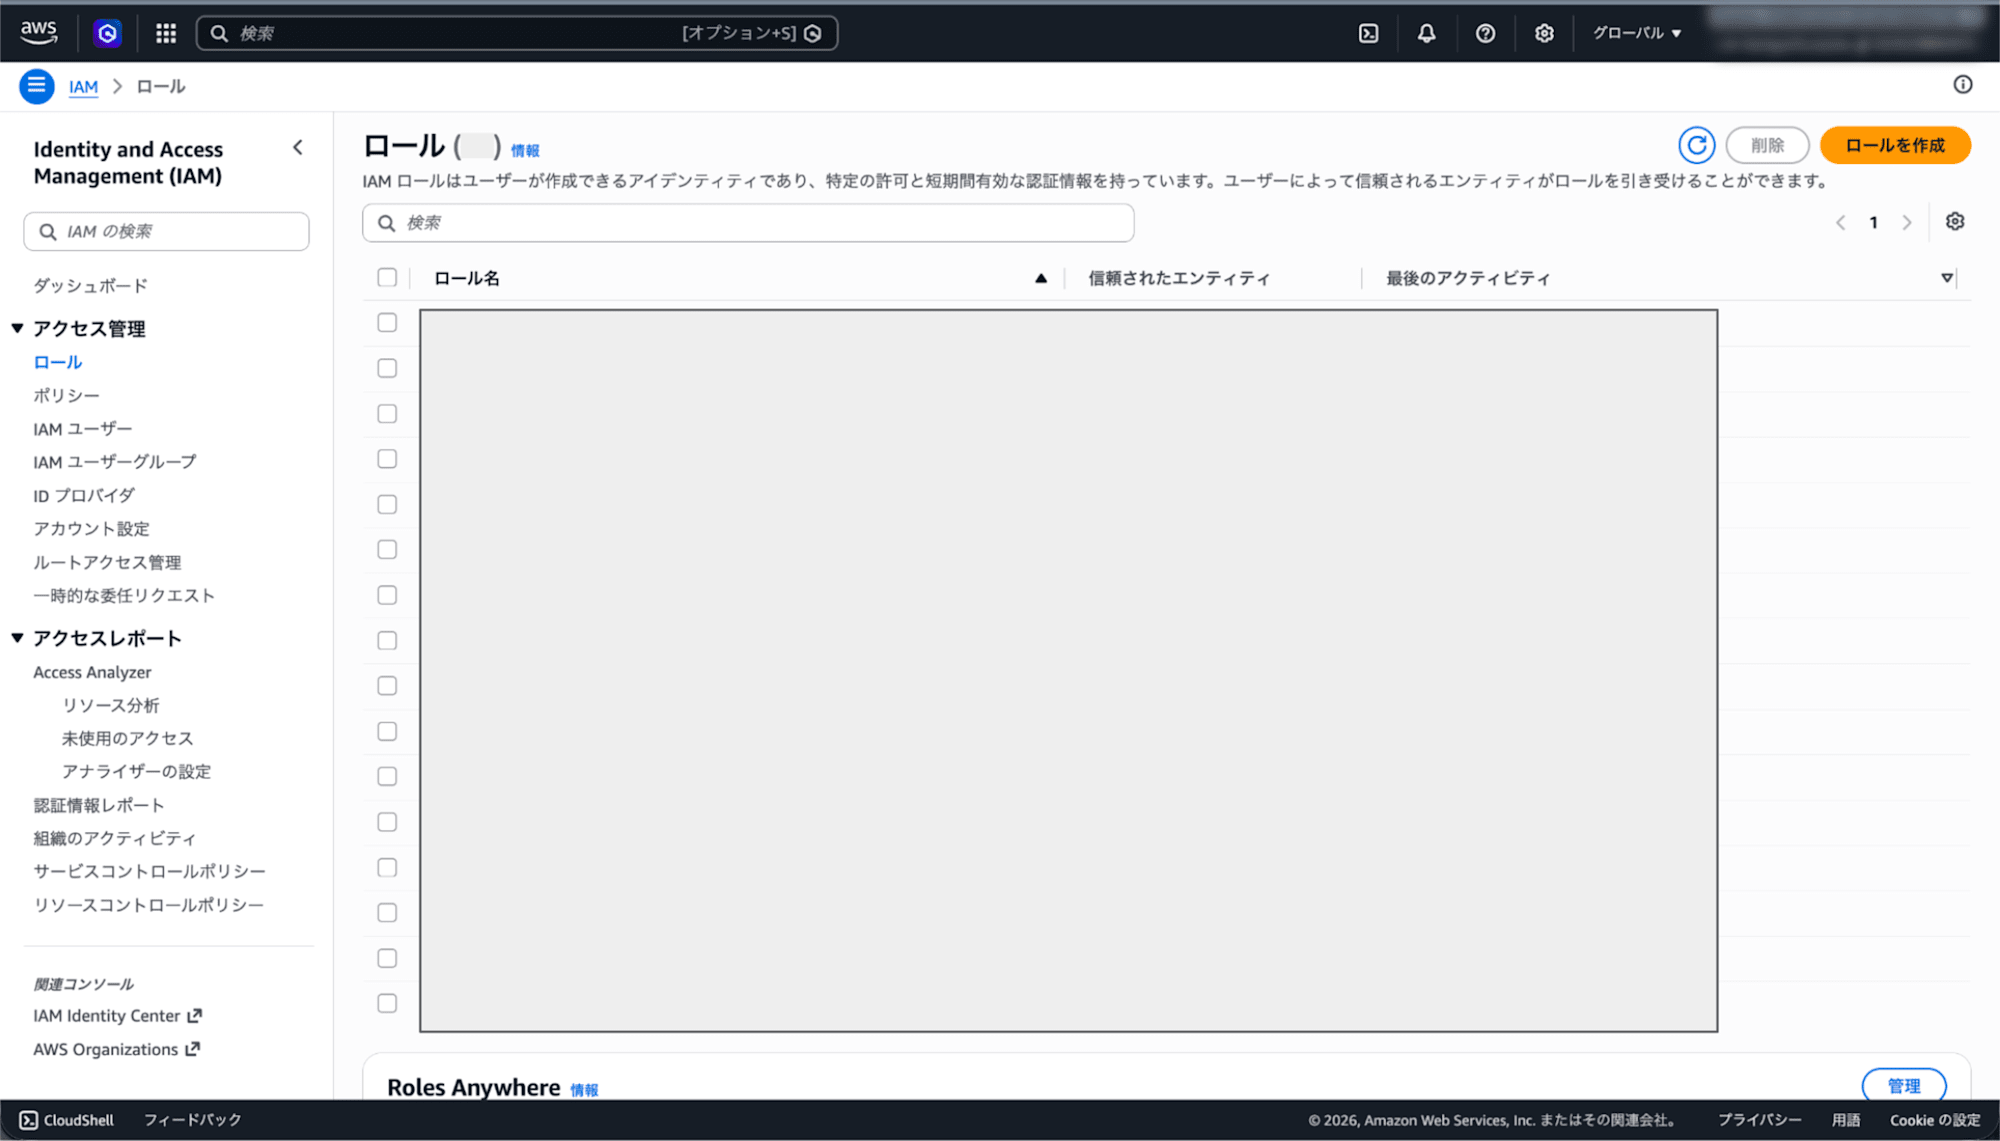
For the trusted entity type, specify "AWS service," and for the use case, specify "ECS Task."
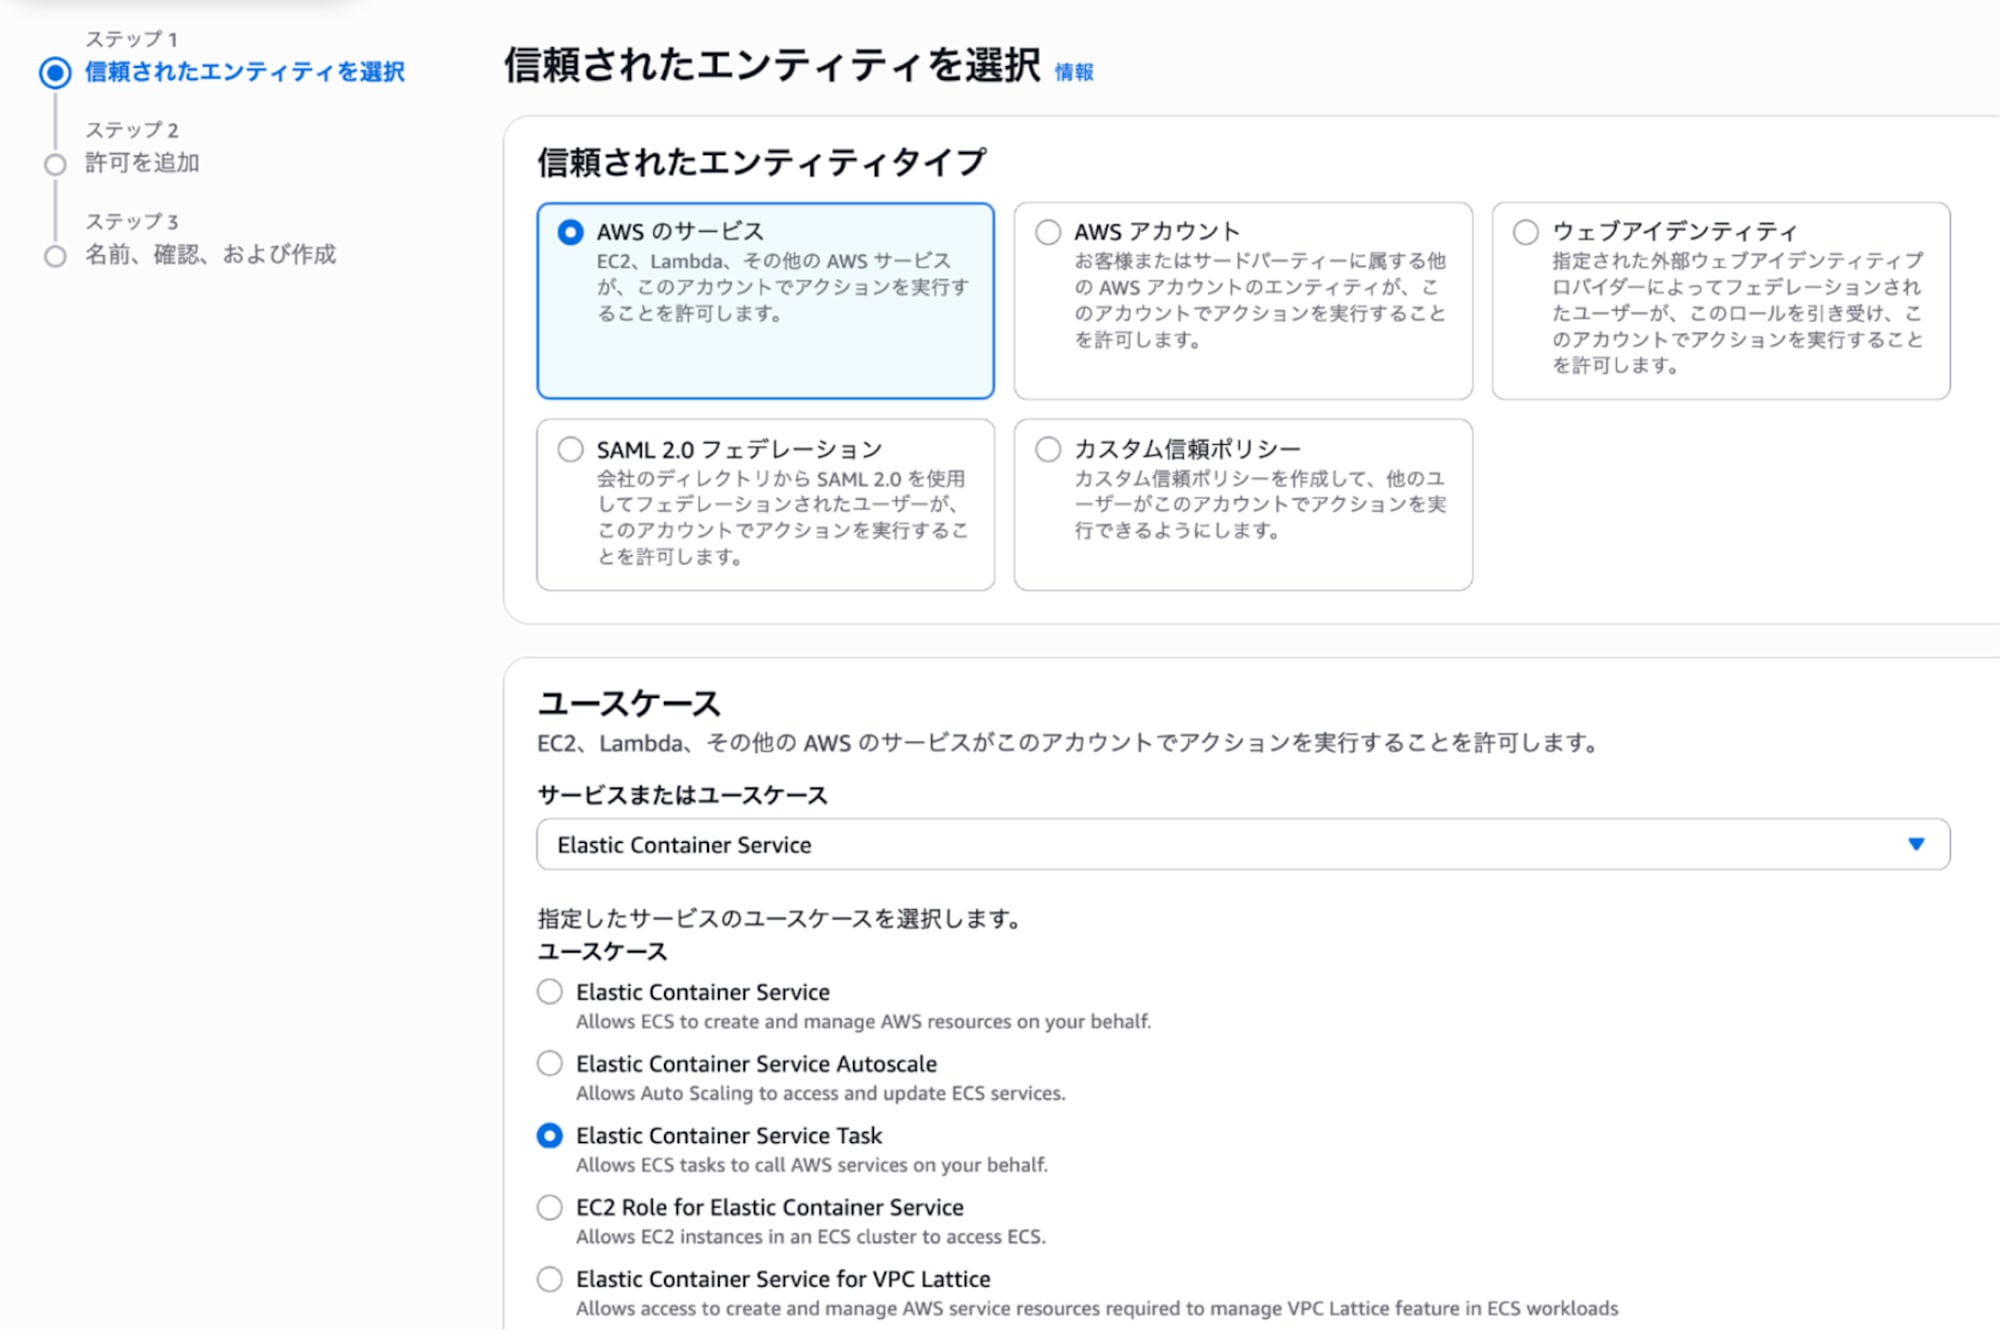
For the permissions policy, search for and specify the AWS managed policy "AmazonECSTaskExecutionRolePolicy."
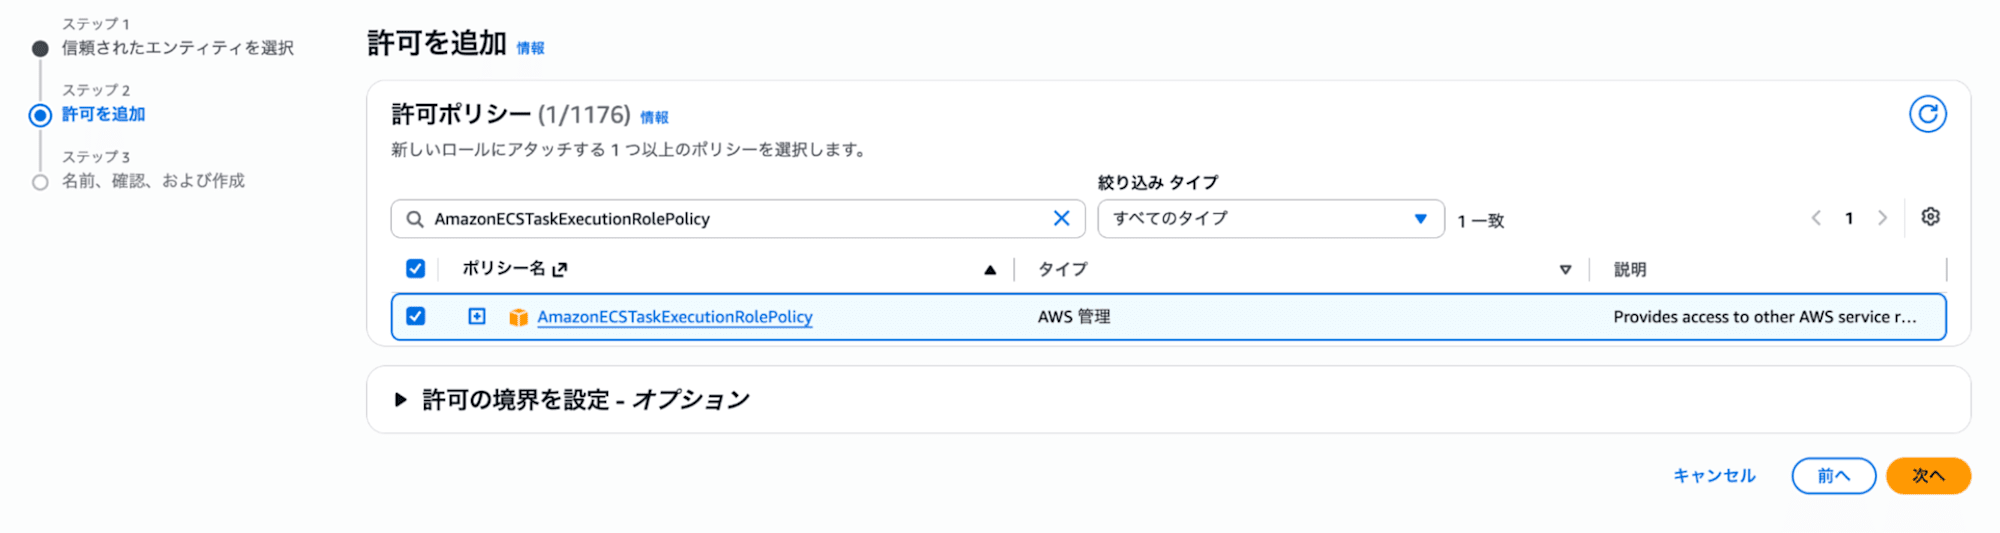
Creating the Execution role
Job role
The role name for the Job role is as follows.
FastqcBatchJobRole
For this role as well, specify "AWS service" as the trusted entity type and "ECS Task" as the use case.
Set the S3 access permissions not with an AWS managed policy but with an inline policy as follows.
{
  "Version": "2012-10-17",
  "Statement": [
    {
      "Sid": "ListBucket",
      "Effect": "Allow",
      "Action": [
        "s3:ListBucket",
        "s3:GetBucketLocation"
      ],
      "Resource": "arn:aws:s3:::バケット名-アカウントID-リージョン-an"
    },
    {
      "Sid": "ReadFastqInput",
      "Effect": "Allow",
      "Action": [
        "s3:GetObject"
      ],
      "Resource": "arn:aws:s3:::バケット名-アカウントID-リージョン-an/input_data/*"
    },
    {
      "Sid": "WriteFastqcOutput",
      "Effect": "Allow",
      "Action": [
        "s3:PutObject"
      ],
      "Resource": "arn:aws:s3:::バケット名-アカウントID-リージョン-an/output_data/*"
    }
  ]
}
Object read and write permissions are limited to the prefixes used this time. Only read access is allowed for input_data/, and only write access for output_data/.
6. Create an AWS Batch Compute Environment
Next, create the AWS Batch Compute environment.
The settings are as follows.
| Item | Setting |
|---|---|
| Computing environment configuration | Fargate |
| Fargate Spot | Do not use |
| Maximum vCPUs | 4 |
| Status | Enabled |
| VPC | Default VPC |
| Subnets | Default VPC subnets |
| Security group | Default security group |
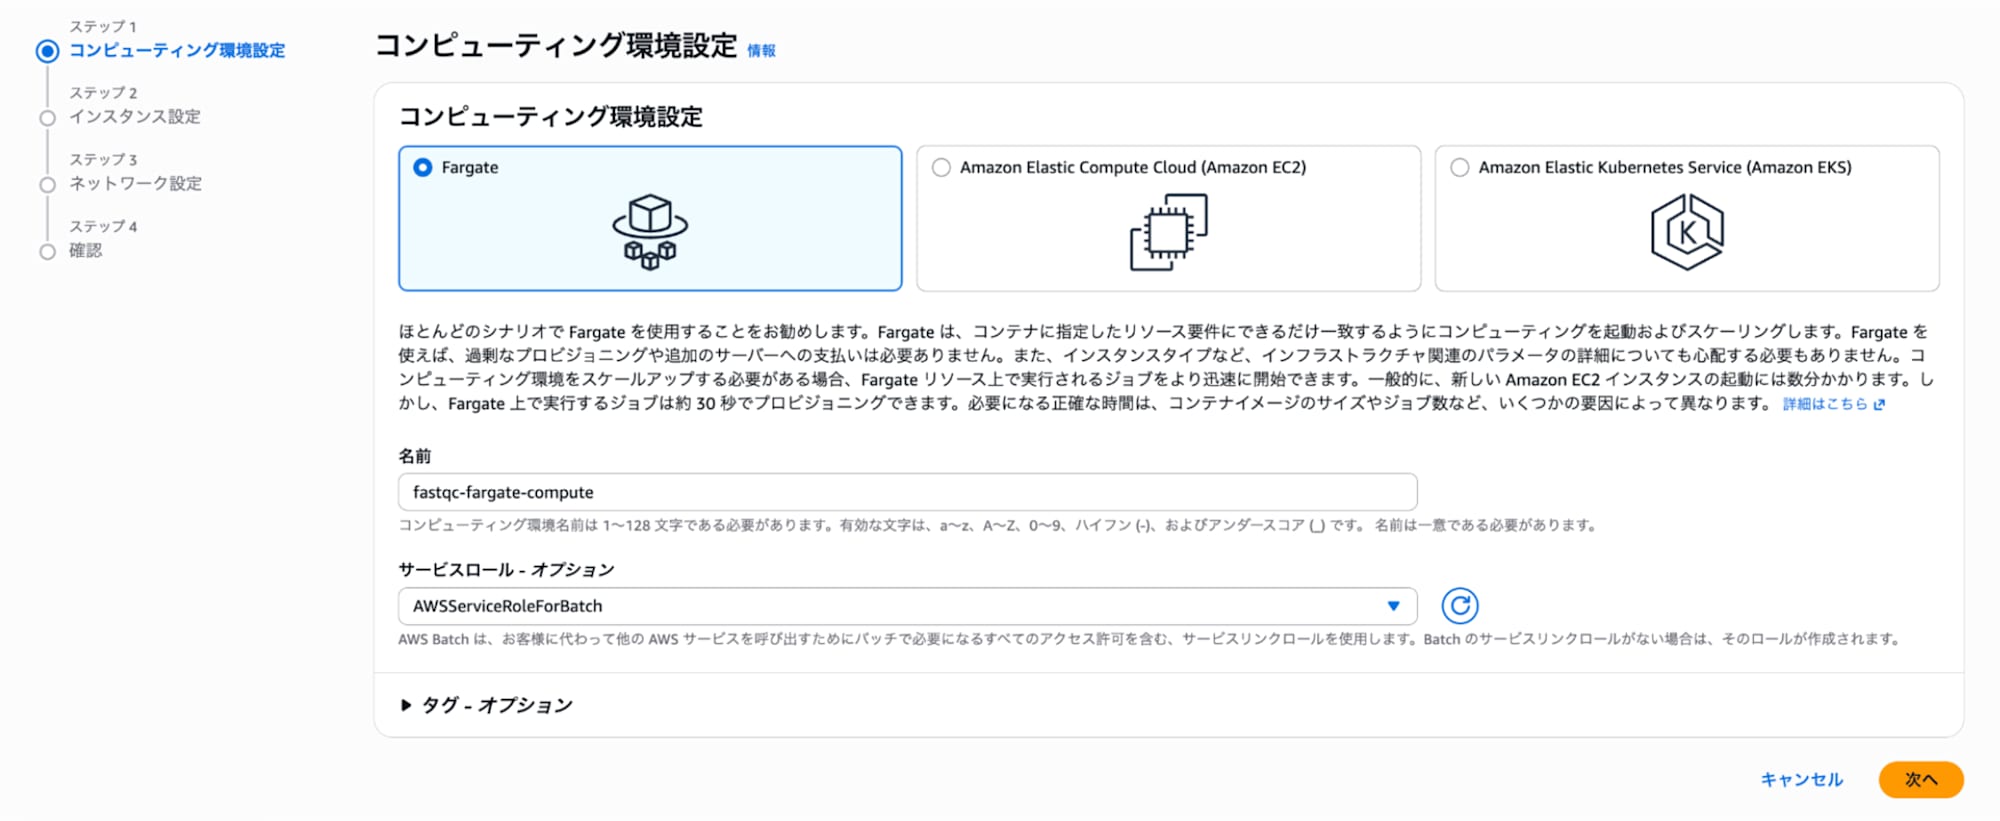
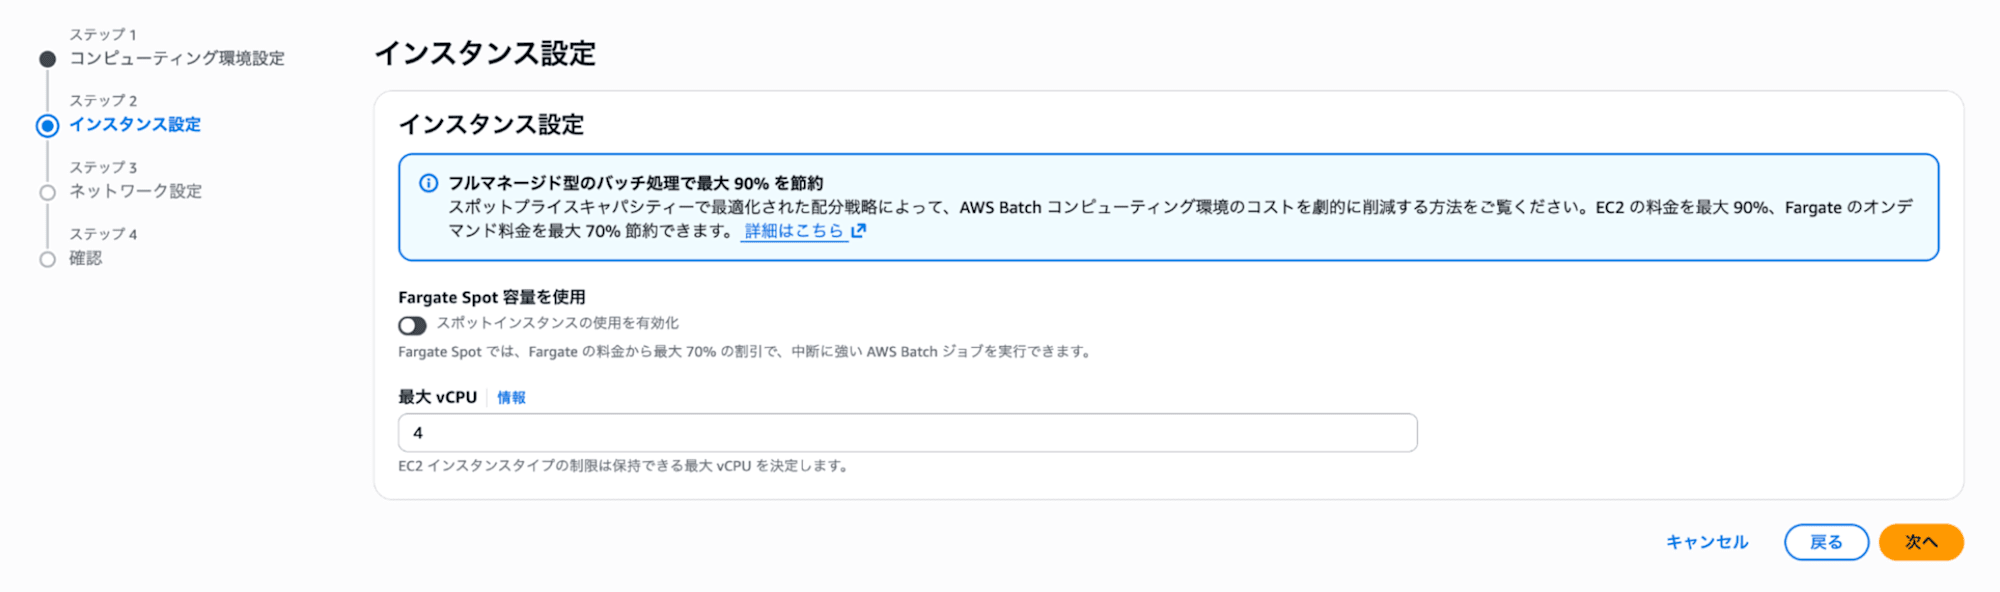
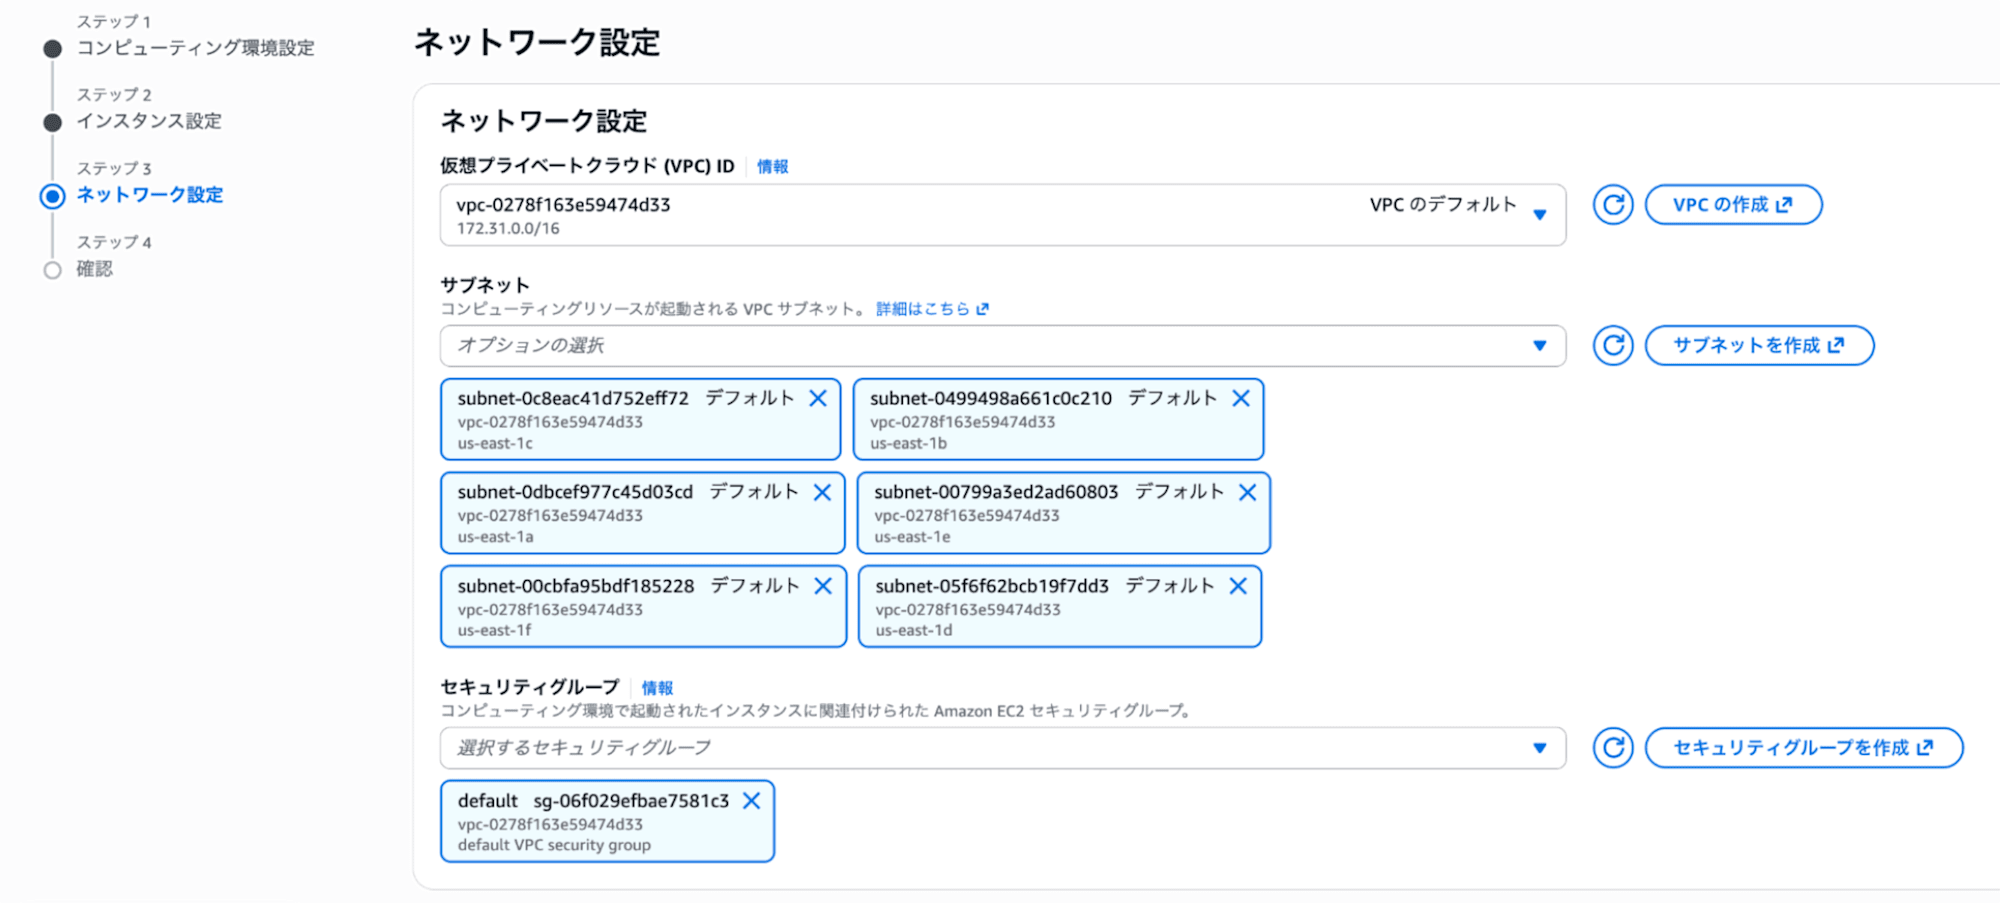
Compute environment creation screen
Maximum vCPUs
The "Maximum vCPUs" of the Compute environment is not the number of vCPUs allocated to a single job, but the upper limit of vCPUs that can be used simultaneously across the entire environment.
On the other hand, the number of vCPUs used by one job is specified in the Job definition. For example, in an environment with a maximum of 4 vCPUs, if 2 vCPUs are used per job, a maximum of 2 jobs can run simultaneously. The third and subsequent jobs will wait until a running job completes and vCPUs become available.
Since this is a functional check for 1 sample, 4 maximum vCPUs is sufficient.
Also, setting the maximum vCPUs to 256 does not mean 256 vCPUs are always running.
However, if a large number of jobs are unintentionally submitted, there is a possibility of scaling up to that limit.
From a cost perspective, it is safer to keep it small during the verification stage.
After creation, confirm that the Compute environment is in the following state.
Status: ENABLED
Health status: VALID
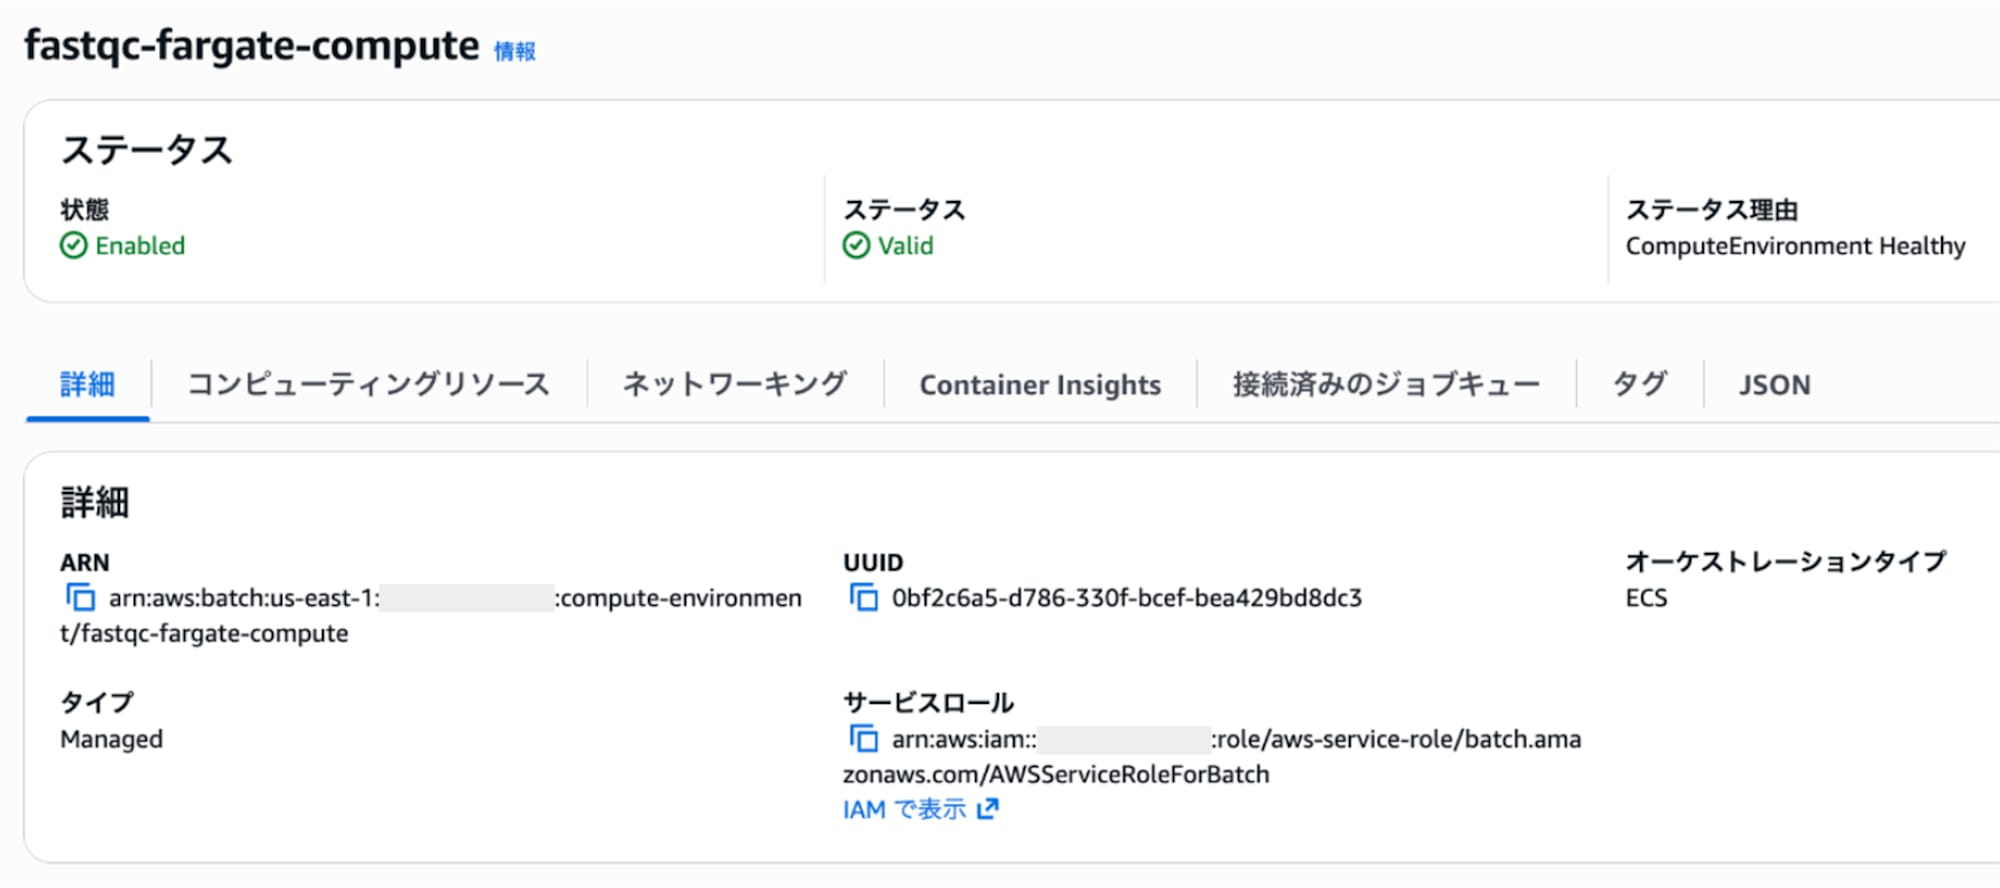
Details of the Compute environment after creation
Why Not Use EC2?
When thinking about running applications on AWS, the first service that comes to mind might be EC2 (Elastic Compute Cloud). In fact, if you just want to run FastQC once, it's simpler to run it directly on a local PC or EC2 without using AWS Batch.
The purpose of using AWS Batch in this article is not to make a one-off FastQC more efficient. The goal is to create a foundation where, as the number of samples increases, multiple analysis jobs can be submitted to a queue in advance and automatically executed according to available compute resources.
That's why we're building the environment with AWS Batch from the start.
7. Create a Job Queue
Next, create a Job queue to accept jobs.
Select "Job queues" from the left menu of AWS Batch and start creating from the "Create" button in the upper right.
The settings are as follows.
| Item | Setting |
|---|---|
| Orchestration type | Fargate |
| Job queue name | fastqc-queue |
| Status | Enabled |
| Priority | 1 |
| Compute environment | Created Fargate environment |
| Compute environment order | 1 |
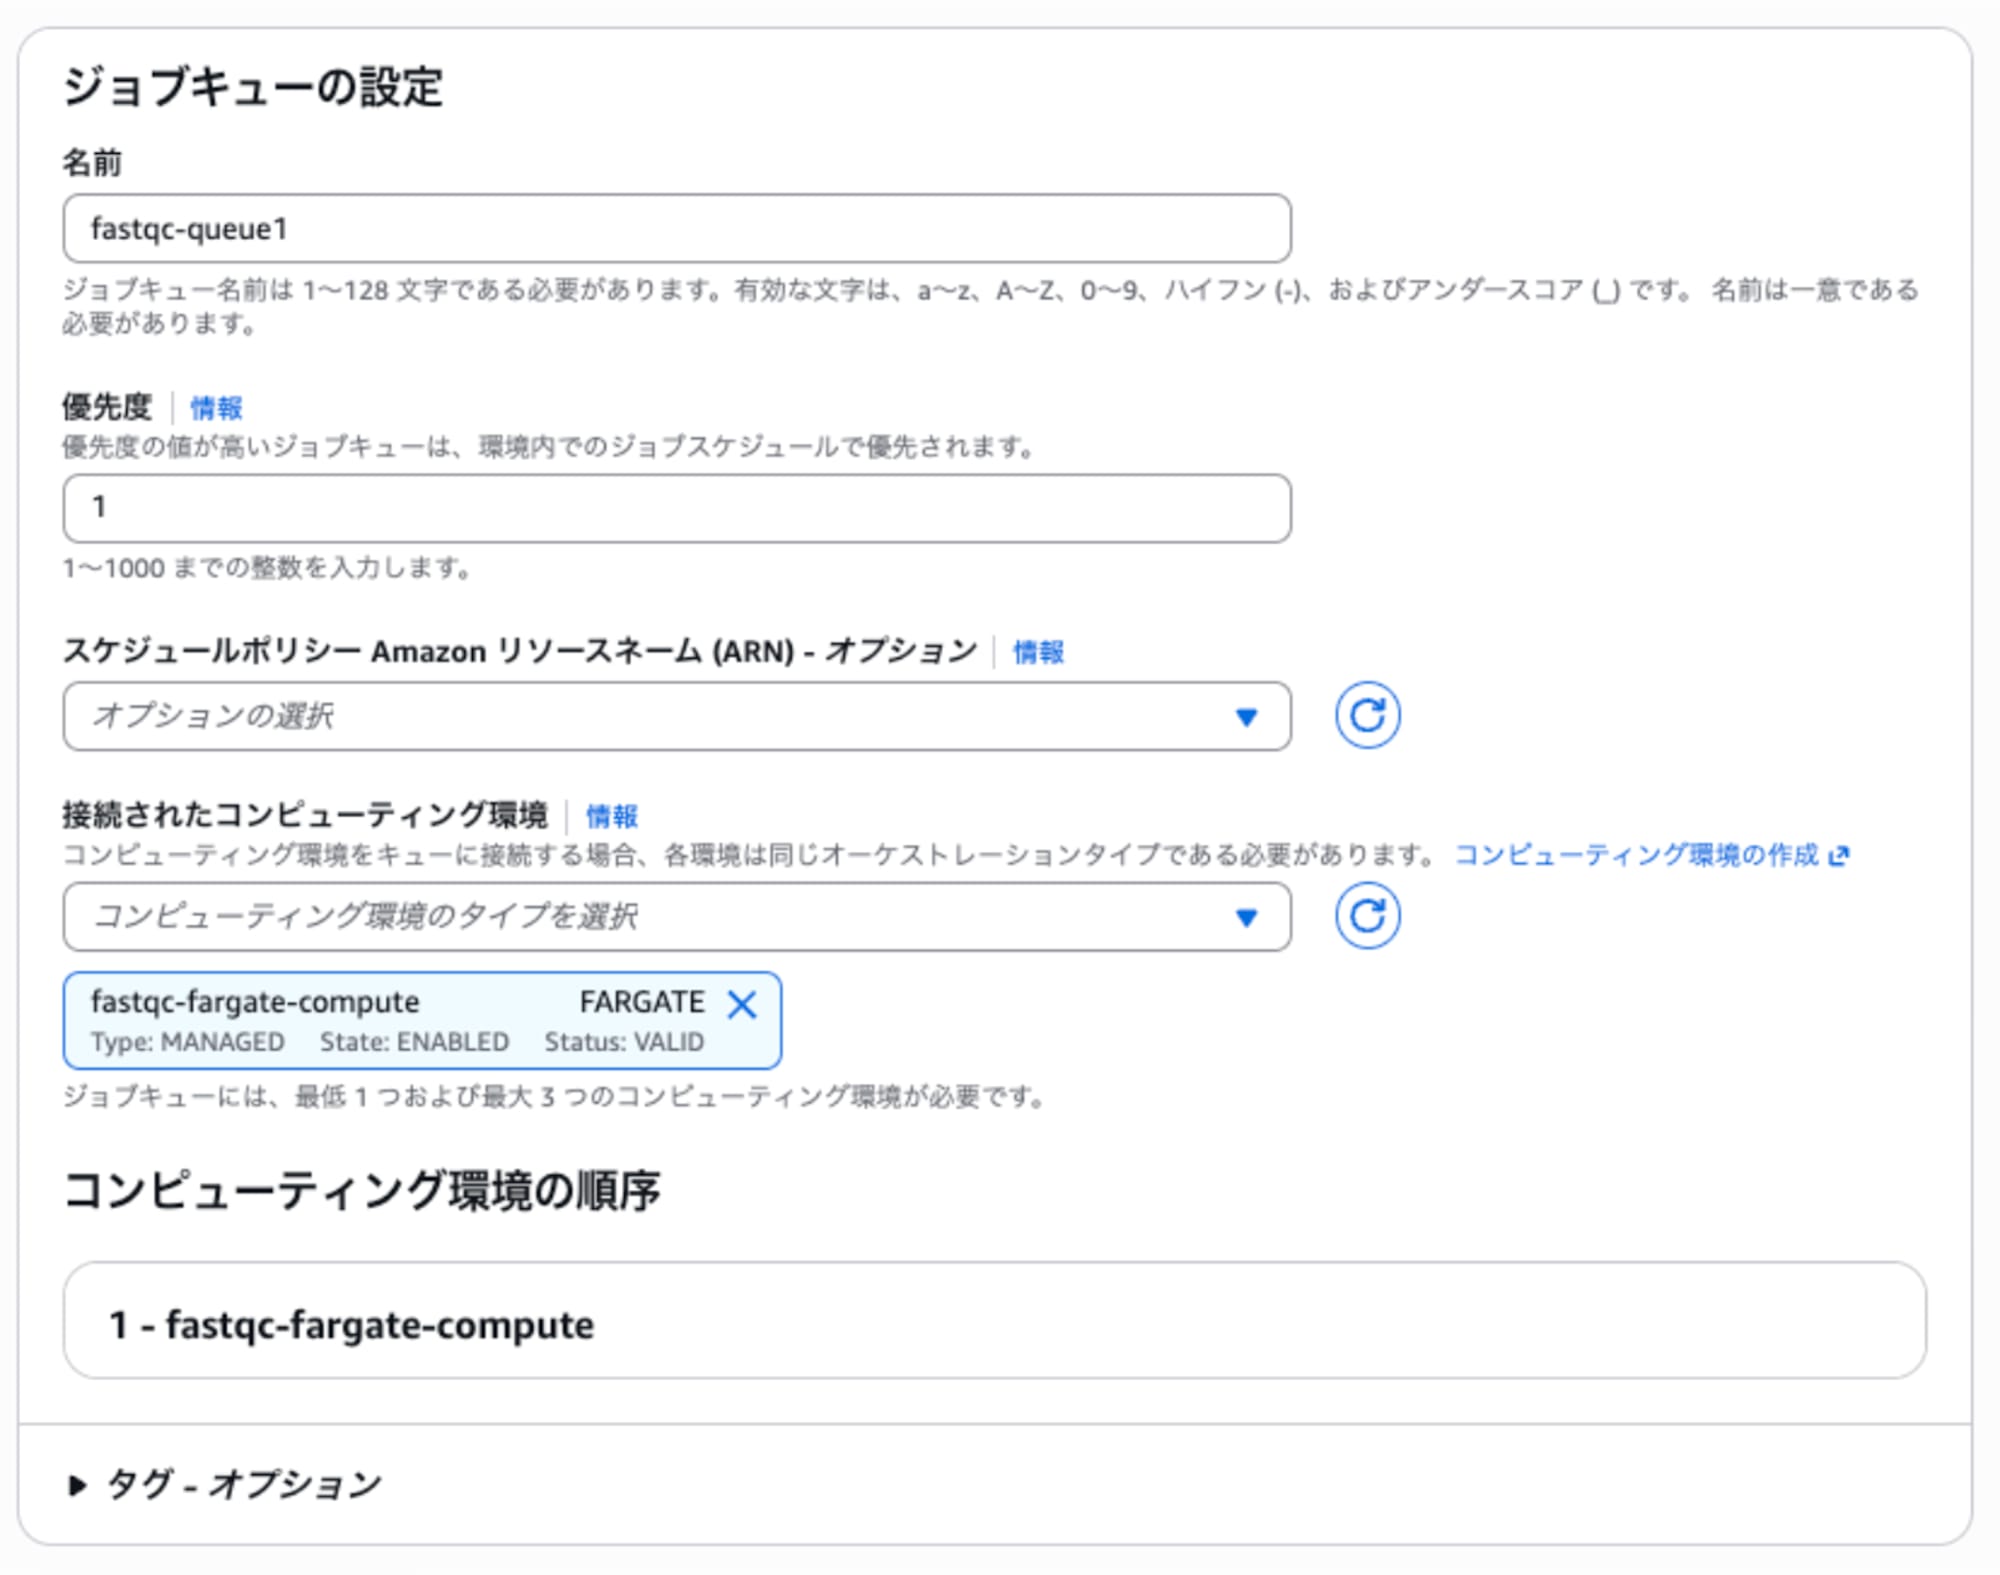
Job queue creation screen
After creation, confirm the following state.
Status: ENABLED
Health status: VALID
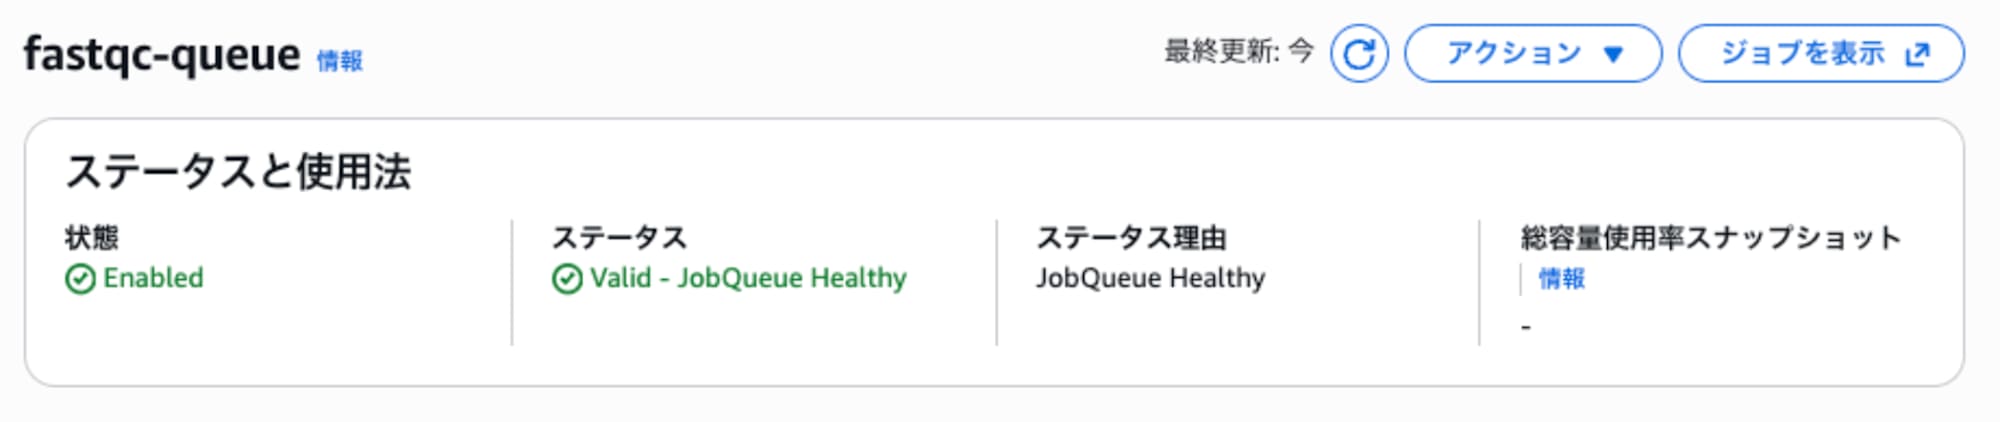
Details of the Job queue after creation
8. Create a FastQC Job Definition
The job definition configures the container image to run, CPU, memory, IAM roles, environment variables, and other settings.
This time, I created a job definition for Fargate.
| Item | Setting |
|---|---|
| Job definition name | fastqc-job-definition |
| Platform | Fargate |
| Image | FastQC image in ECR |
| vCPU | 2.0 |
| Memory | 4 GB |
| Execution role | FastqcBatchExecutionRole |
| Job role | FastqcBatchJobRole |
| Assign public IP | Enabled |
| Ephemeral storage | 50 GiB |
| Execution timeout | 7200 seconds |
※ Leave the scheduling priority blank.
For the image, specify the image URI pushed to ECR with CodeBuild.
AWSアカウントID.dkr.ecr.us-east-1.amazonaws.com/rna-seq/fastq-test:0.12.1
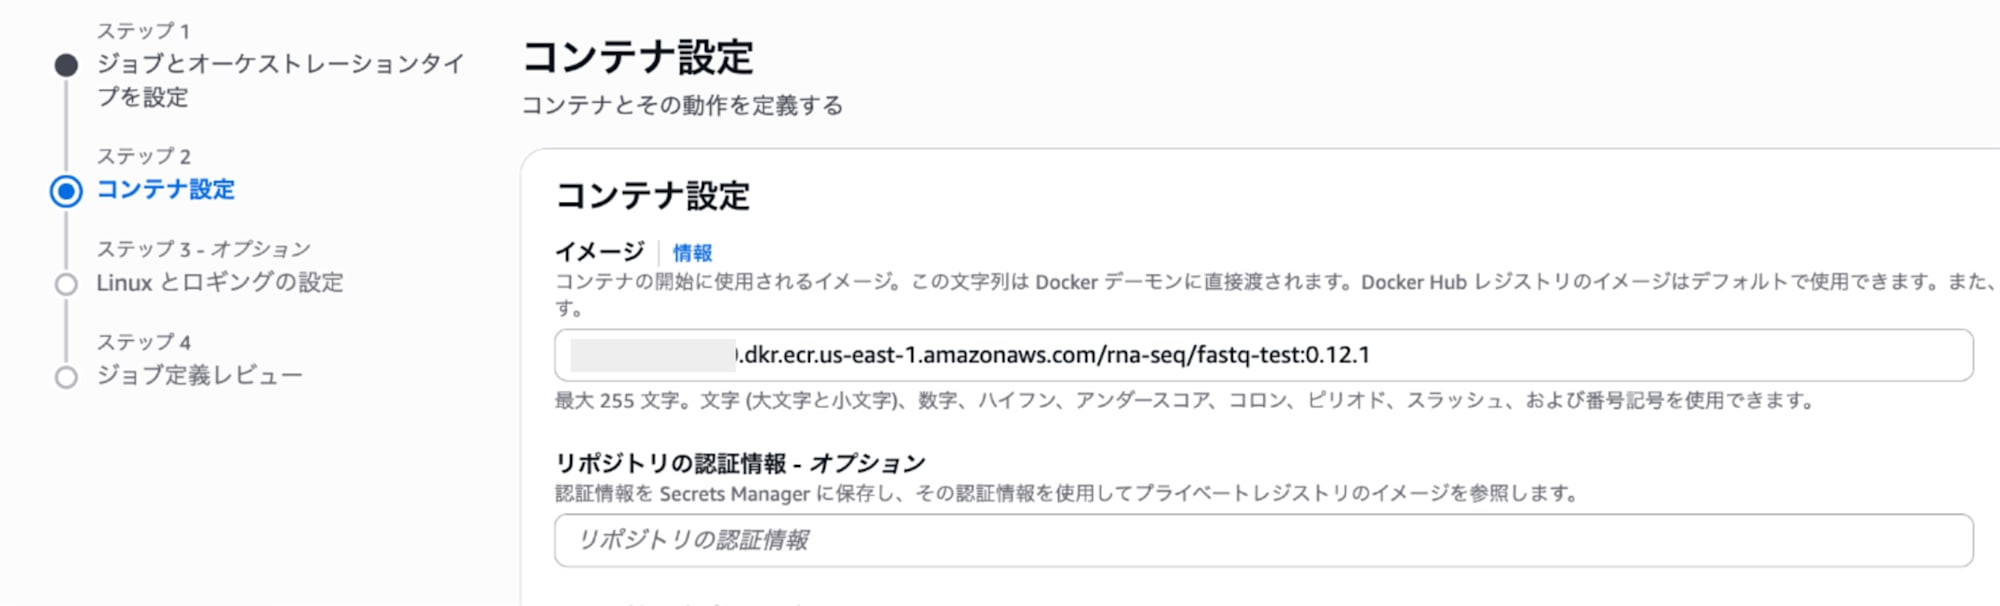
Container image settings of the job definition
Making the Root Filesystem Read-Only and Adding Volumes
In this configuration, as a response to Security Hub CSPM control ECS.5 (making the container's root filesystem read-only), "Enable read-only filesystem" is selected in the job definition to prohibit writes to the container's root filesystem.
However, if writing is prohibited as is, processes that involve writing such as downloading FASTQ files and temporary output from FastQC will fail. Therefore, a volume is added to the job definition and mounted at /work inside the container. All file downloads and temporary output within the script are done under this /work directory.
This prevents writes from occurring at the container root, allowing FastQC to run while clearing the Security Hub CSPM control.
Additionally, to ensure that temporary directories implicitly referenced by FastQC itself and related tools are directed to /work, the following environment variables are fixed on the job definition side.
| Environment variable | Value | Description |
|---|---|---|
| HOME | /work | Location referenced by shells and tools as the home directory |
| TMPDIR | /work | Environment variable referenced by many Unix tools as a temporary file location |
| JAVA_TOOL_OPTIONS | -Djava.io.tmpdir=/work | Option referenced by FastQC (Java-based) as the temporary file output destination |
| THREADS | 2 | Number of threads used by FastQC |
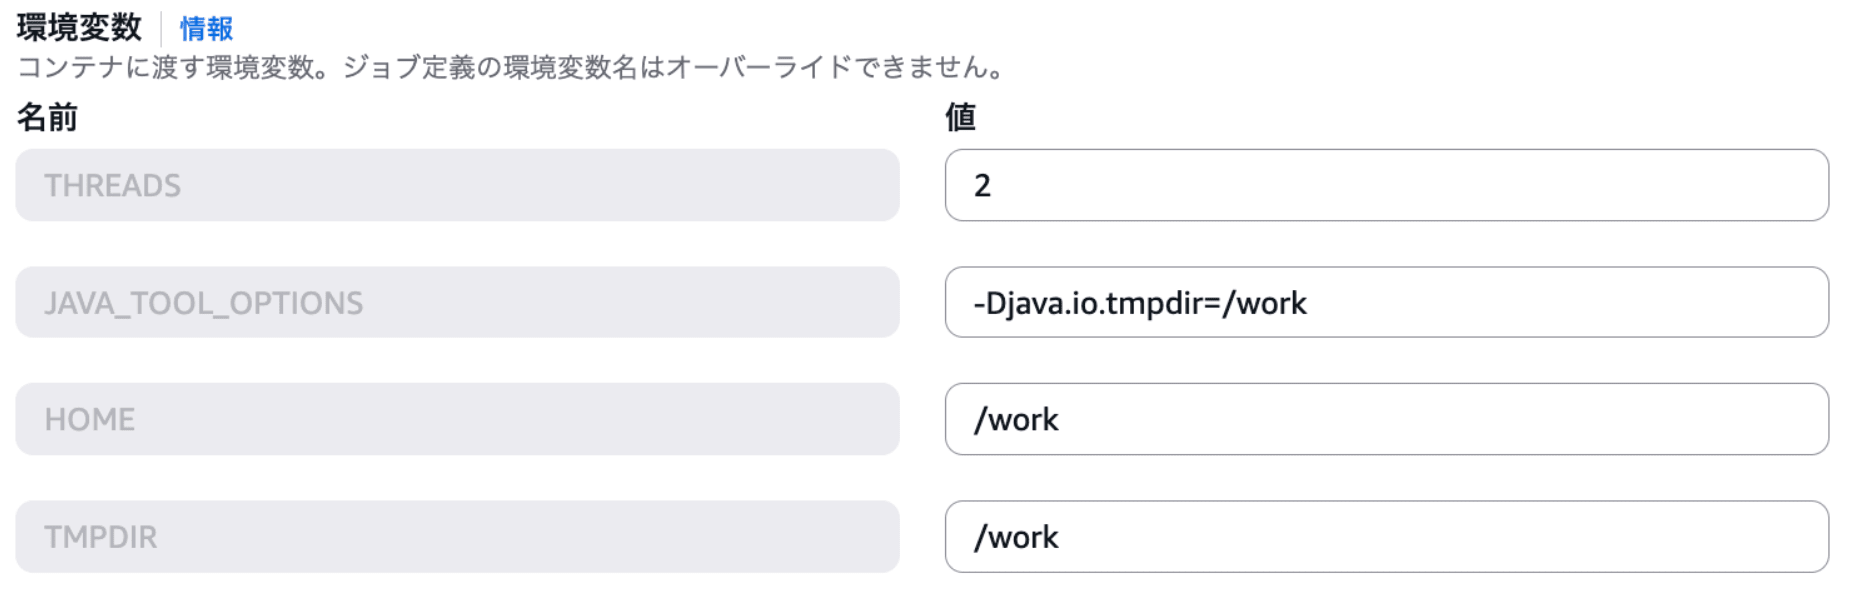
Environment variable settings
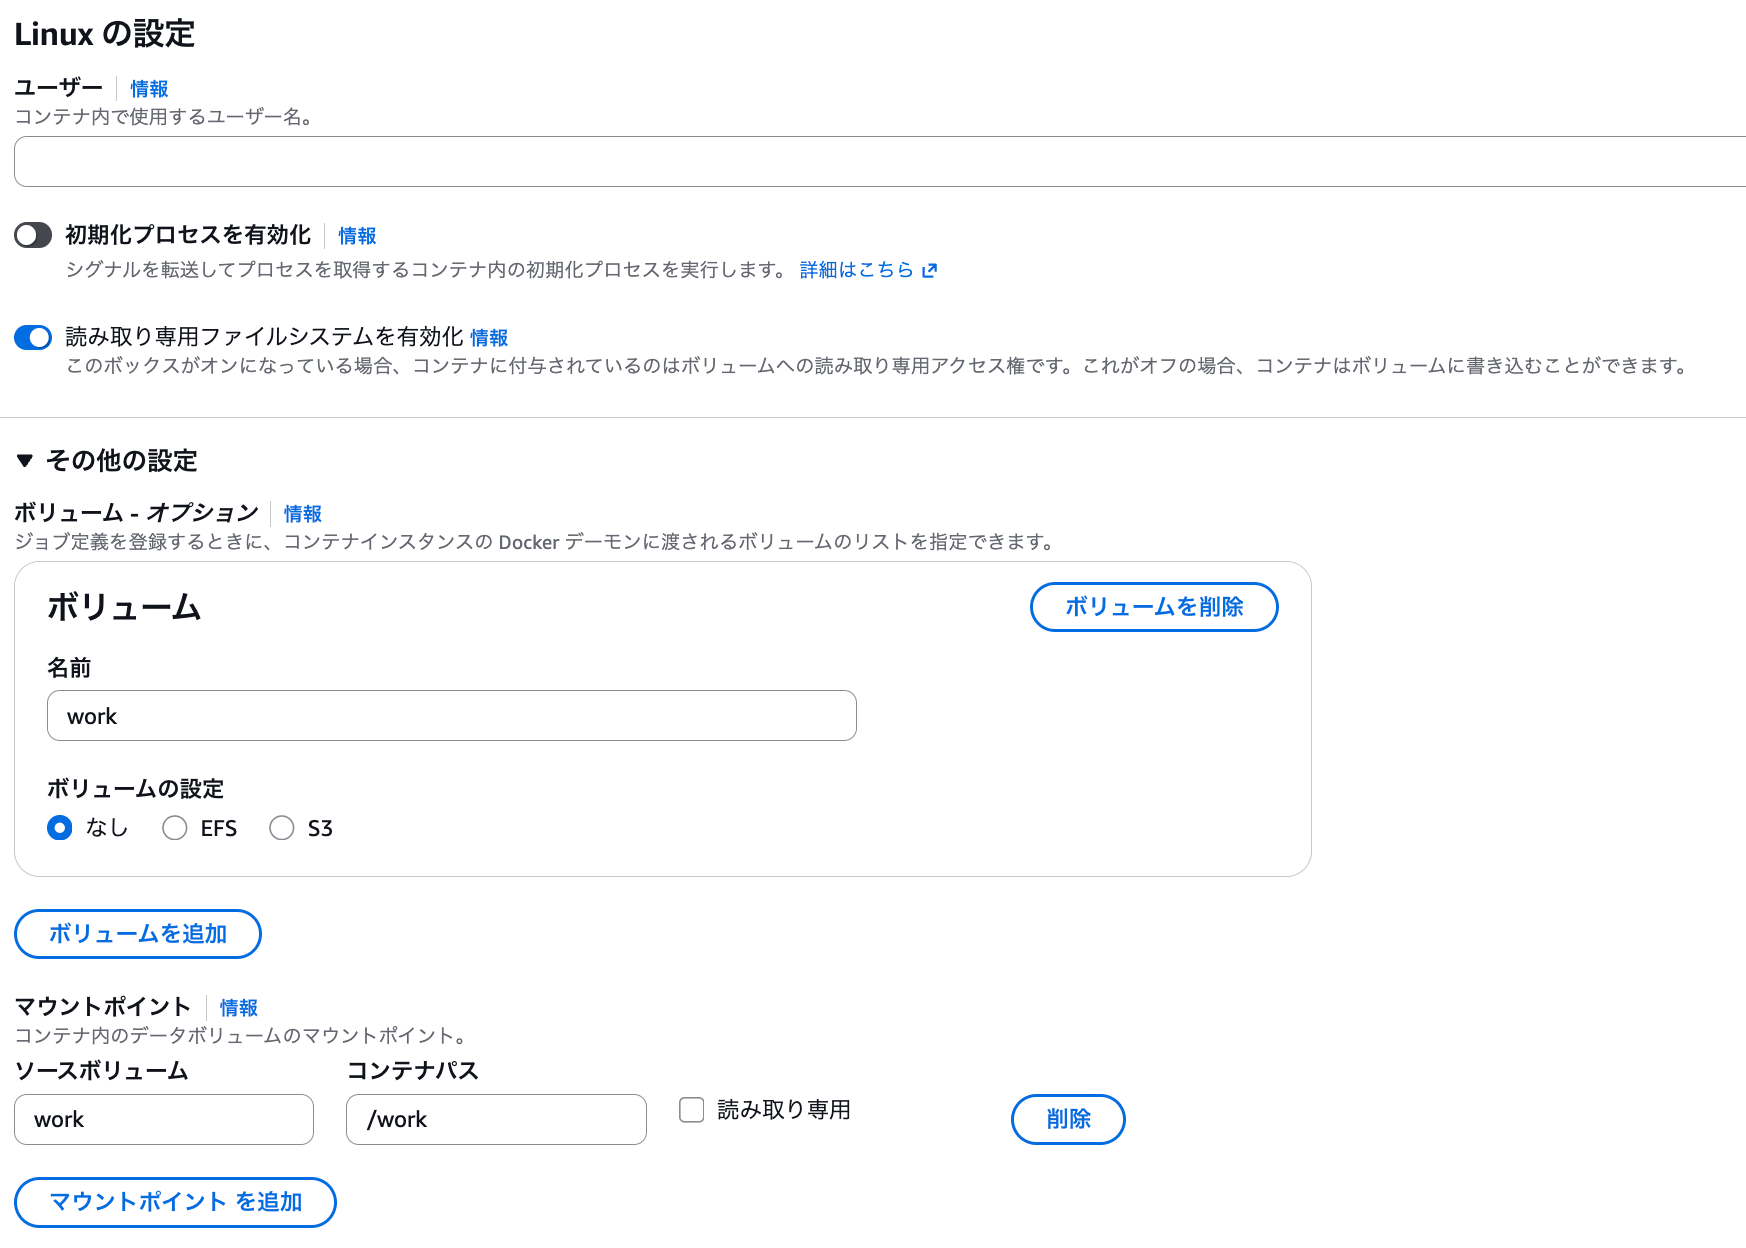
Enabling read-only filesystem and adding a volume
Environment Variables
The input/output information passed to the container was set as environment variables.
For paired-end, there are the following 3.
| Name | Value |
|---|---|
| INPUT_R1 | S3 URI of R1 FASTQ |
| INPUT_R2 | S3 URI of R2 FASTQ |
| OUTPUT_S3 | S3 URI for FastQC output destination |
For example, the values would be as follows.
INPUT_R1=s3://バケット名-アカウントID-リージョン名-an/input_data/sample1_R1.fastq.gz
INPUT_R2=s3://バケット名-アカウントID-リージョン名-an/input_data/sample1_R2.fastq.gz
OUTPUT_S3=s3://バケット名-アカウントID-リージョン名-an/output_data/
For single-end, set INPUT_R2 as follows.
INPUT_R2=NONE
In addition to the 4 environment variables set earlier, set these S3 URIs.
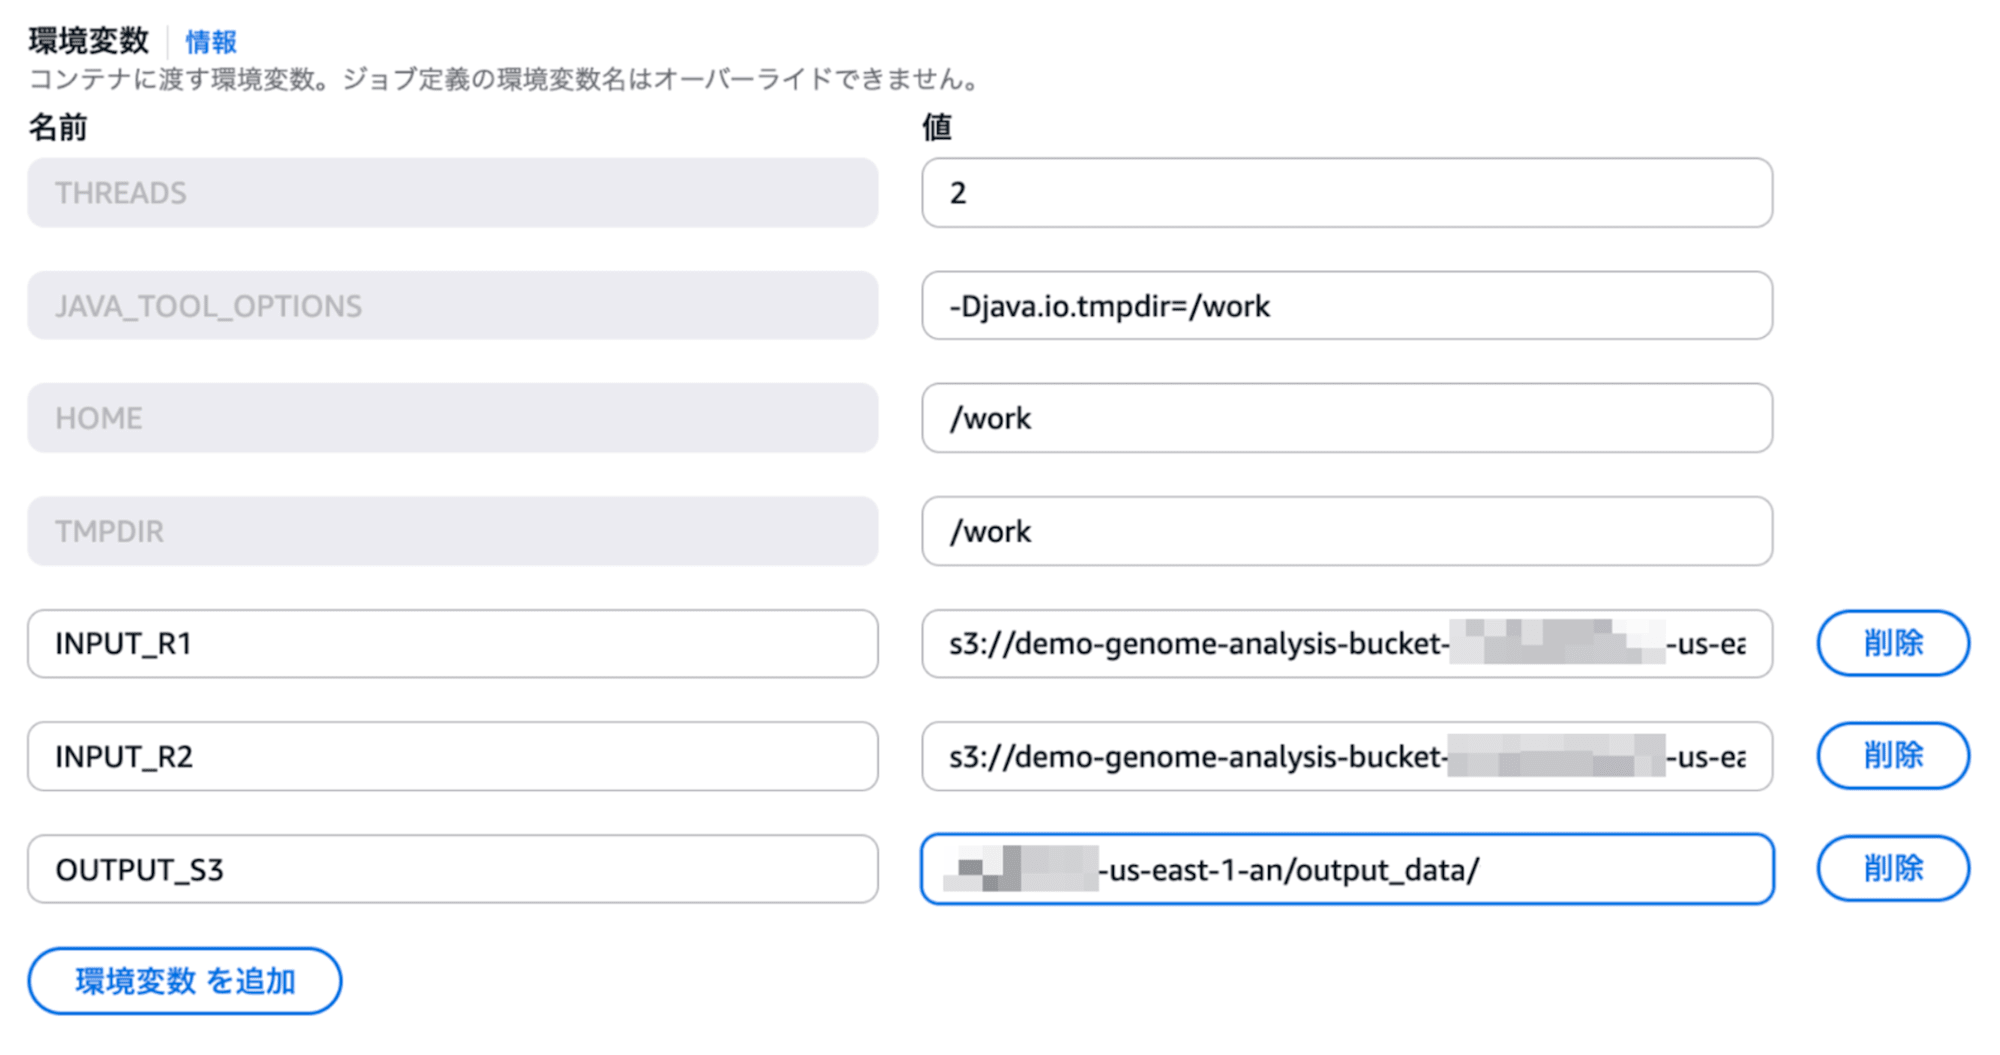
Adding sample input/output destinations to environment variables
Since this was a verification with just 1 sample, the S3 URIs are set directly in the job definition.
When processing multiple samples, it would be more convenient not to define the input and output environment variables here, but to allow their values to be overridden when submitting jobs, as introduced in the next section.
9. Submit a FastQC Job
Now that the job definition and Job queue are ready, select "Submit new job" from the "Jobs" screen of AWS Batch.
The settings are as follows.
| Item | Value |
|---|---|
| Job name | fastq-job |
| Job definition | Latest revision of fastqc-job-definition |
| Job queue | fastqc-queue |
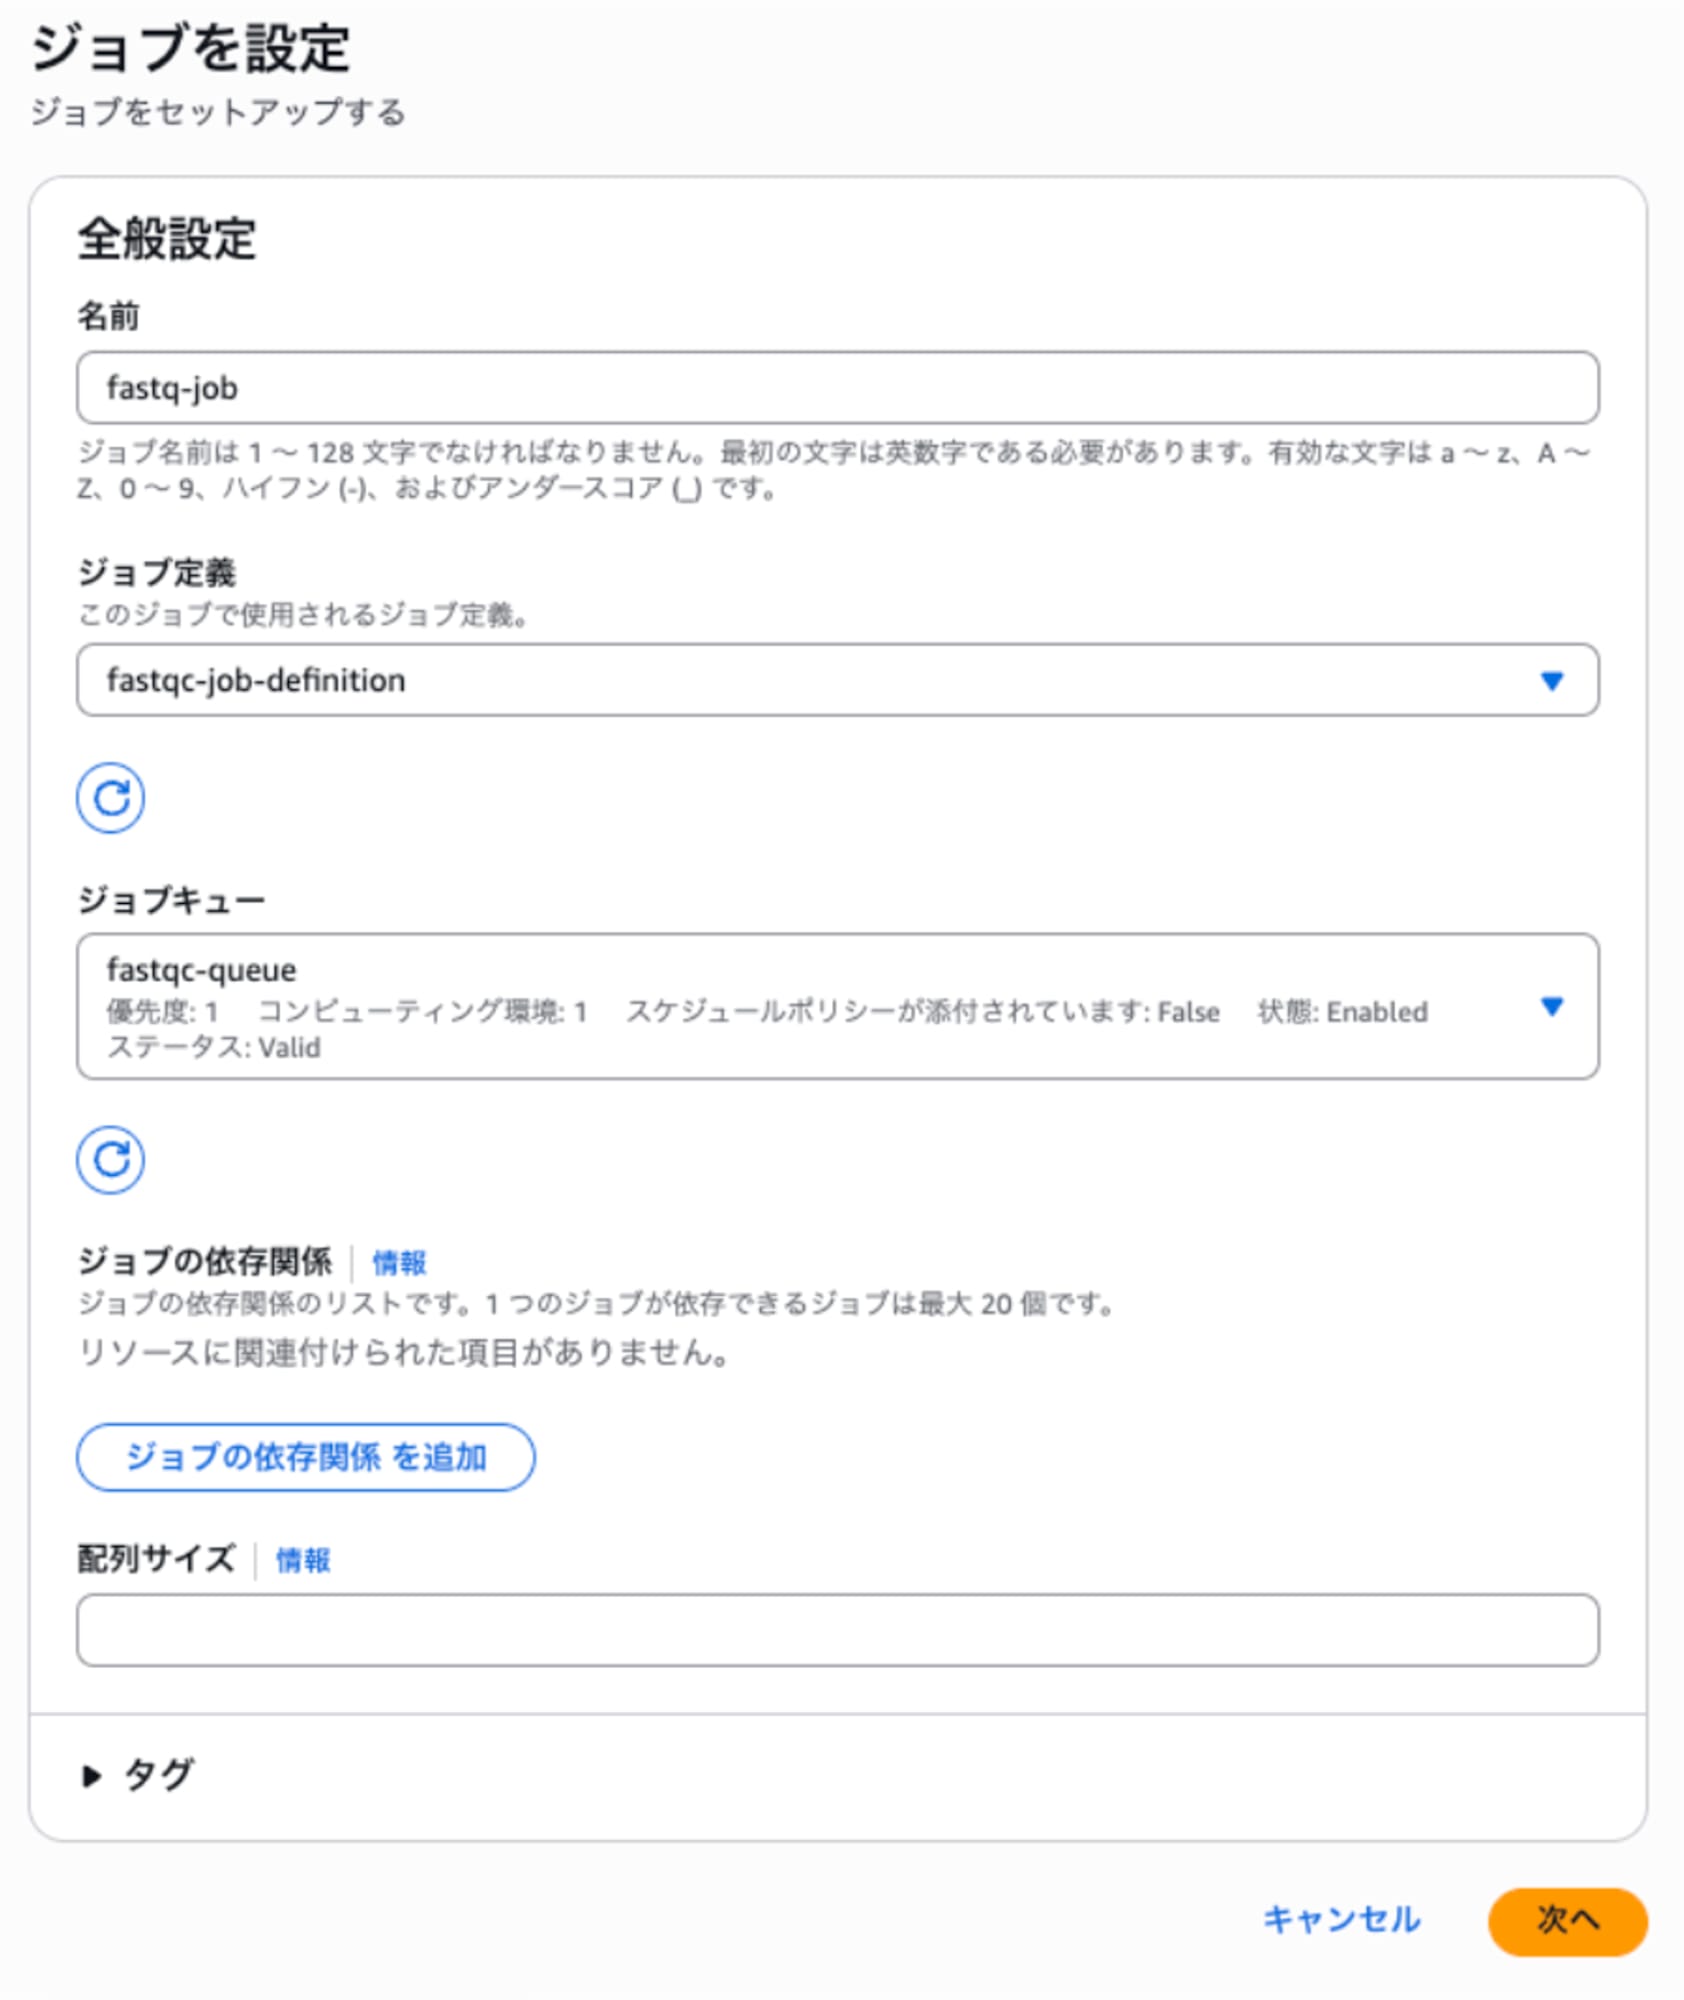
Job submission screen
10. Verify Processing in CloudWatch Logs
By opening the log stream from the job details screen, you can check the container execution logs in CloudWatch Logs.
In this log, you can mainly verify the following processes:
- Download R1 from S3
- Download R2 from S3
- Run FastQC
- Upload results to S3
Even if a job fails, you can first check CloudWatch Logs to identify which process caused the error.
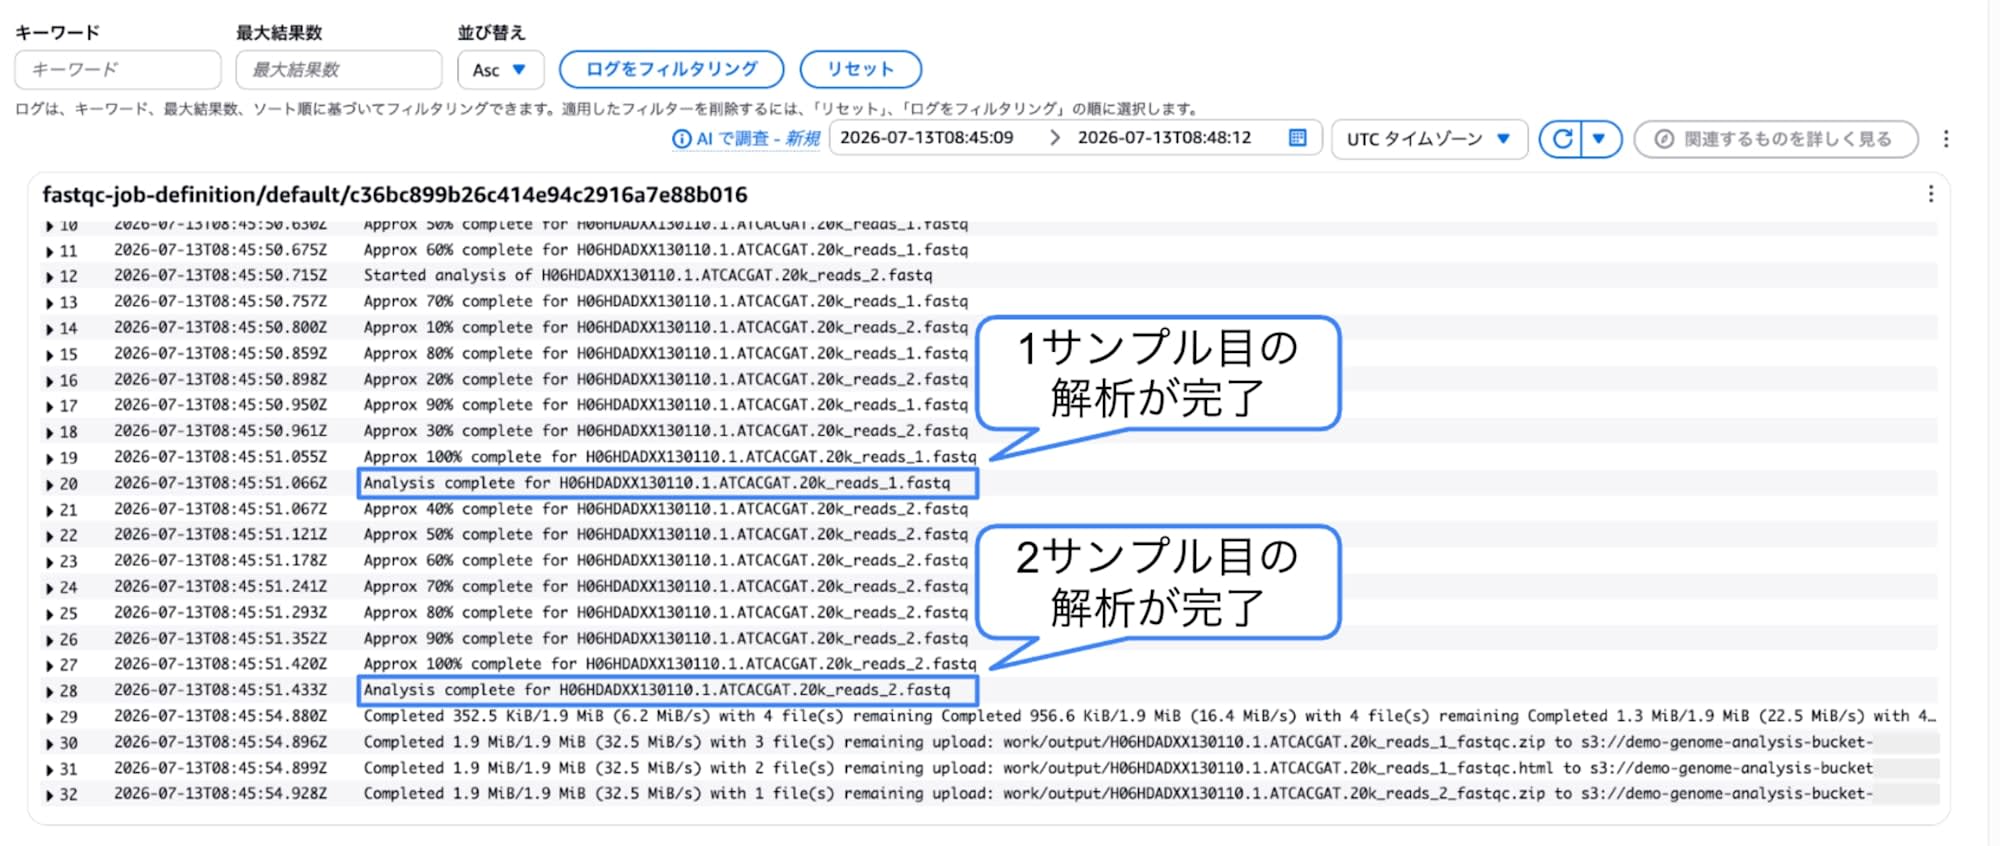
CloudWatch Logs during FastQC execution
Ultimately, the AWS Batch job status became SUCCEEDED.

Job SUCCEEDED screen
11. Check the FastQC Report Output to S3
Finally, check the output_data/ directory in the S3 bucket.
For paired-end data, an HTML and ZIP file are created for each FASTQ file.
output_data/
├── sample1_R1_fastqc.html
├── sample1_R1_fastqc.zip
├── sample1_R2_fastqc.html
└── sample1_R2_fastqc.zip
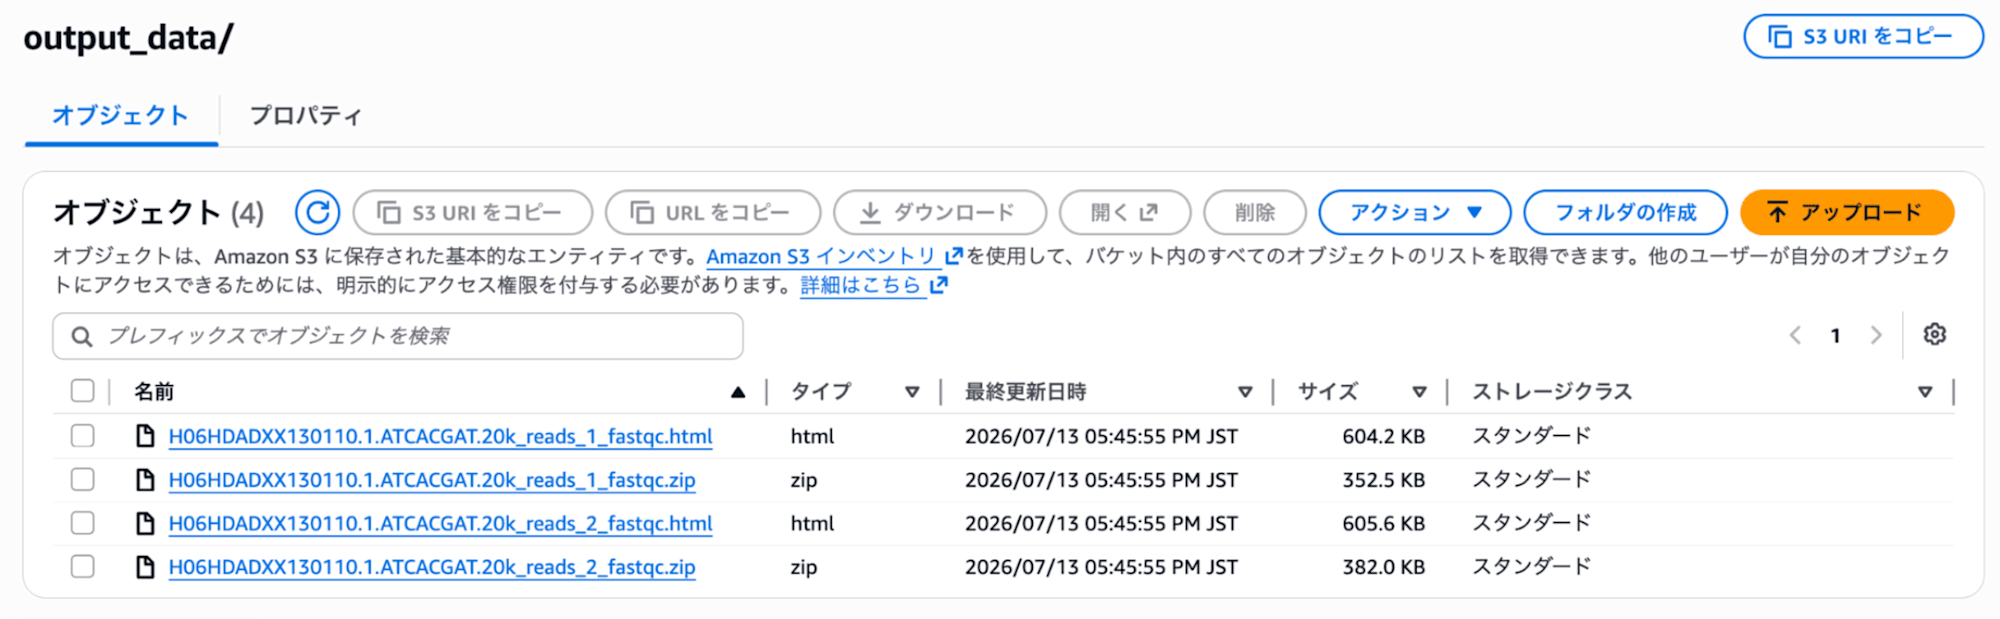
FastQC files output to S3
Download the HTML file and open it in a local browser to view the standard FastQC report.
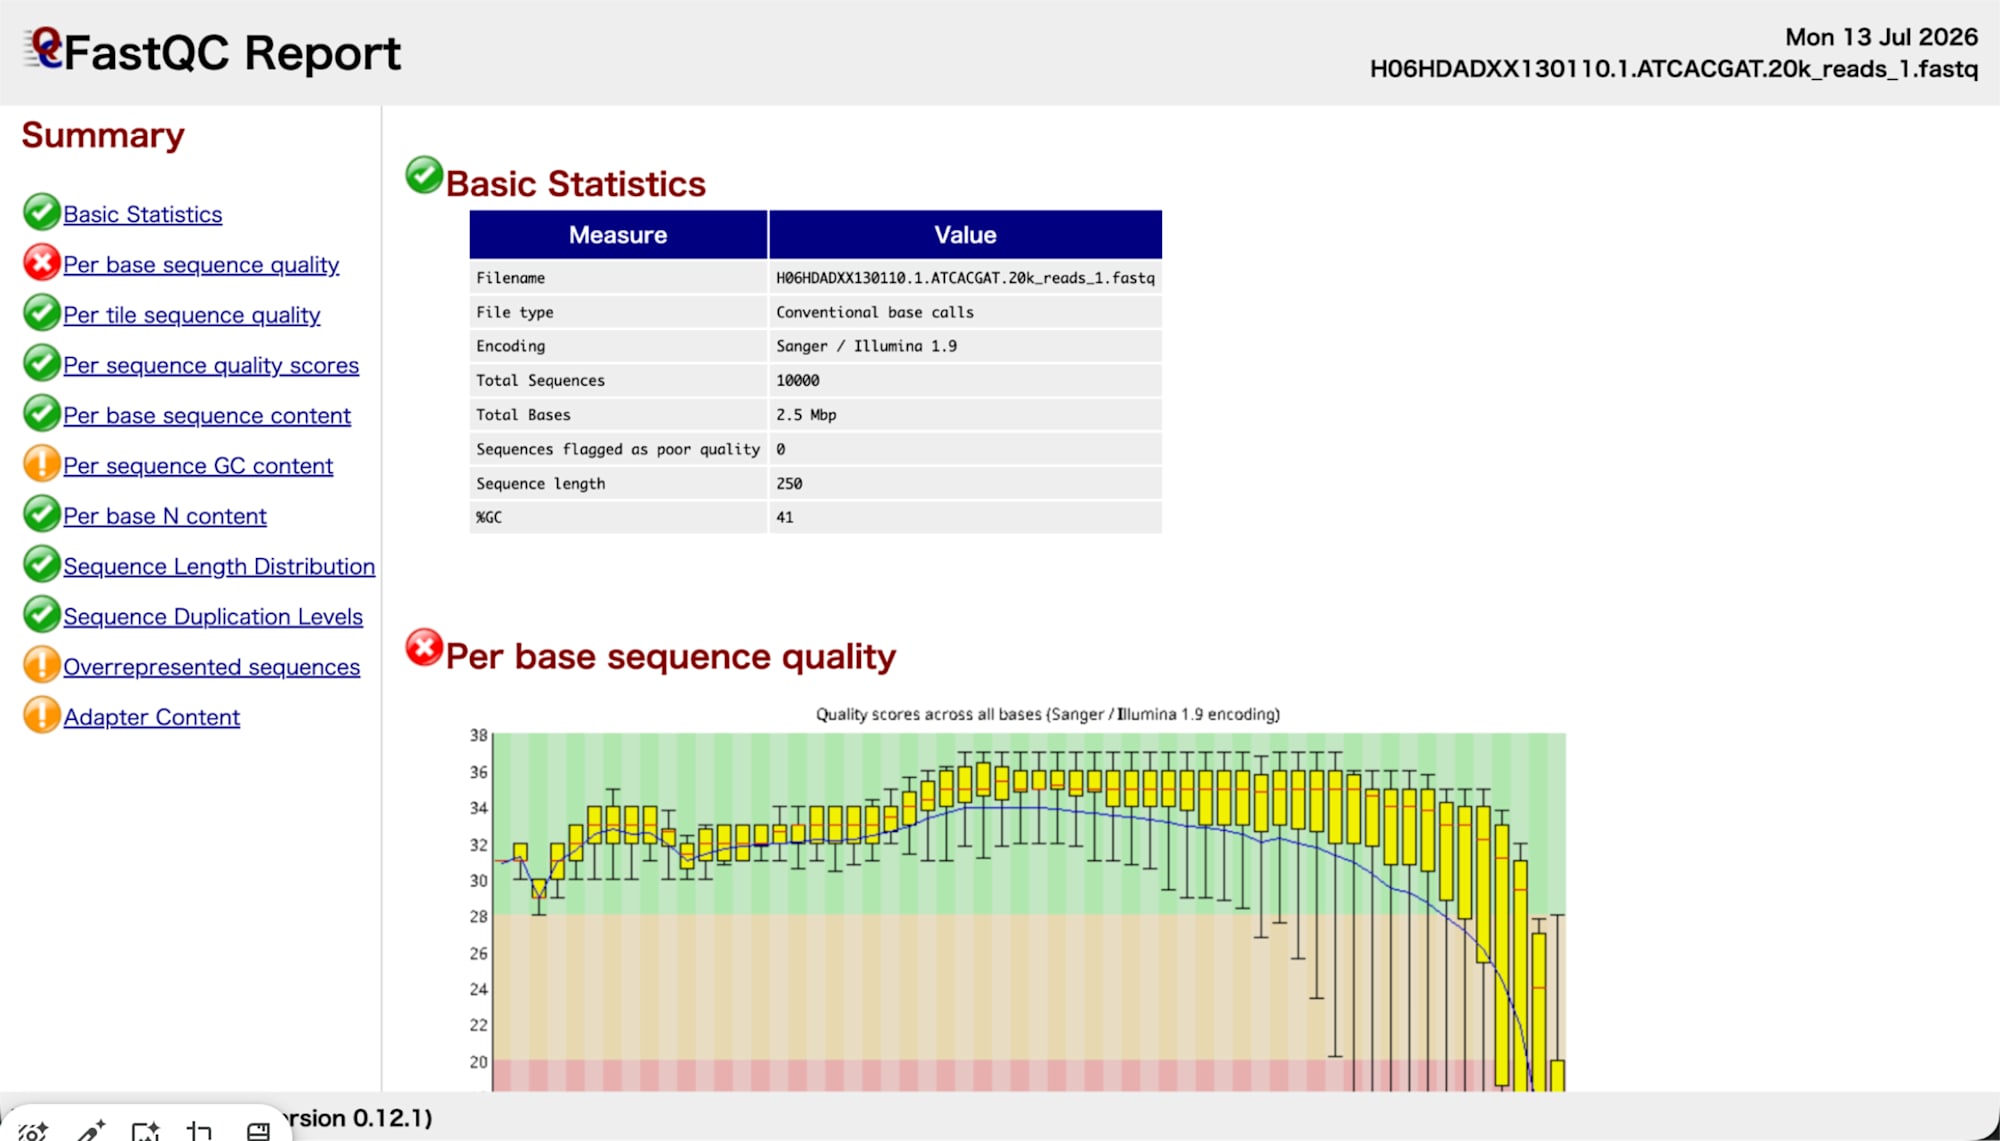
FastQC report opened in a browser
Great work!
This completes the quality check of FASTQ files using AWS Batch from the AWS Management Console.
We were able to go through the entire process of analyzing FASTQ files on S3 with AWS Batch and returning the results back to S3.
The initial setup may take some time, but once you get used to it, you will be able to do it more smoothly.
Also, as explained in the next section, among the resources created this time, there are many resources that do not incur charges simply by being retained. Some resources such as compute environments, job queues, and IAM roles can be reused, so the next time you can prepare the environment with fewer steps than this time.
12. Cleanup
After verification, delete any unnecessary resources.
- CloudWatch Logs log groups
- Input FASTQ files
- FastQC results
- CodeBuild project
- ECR repository
No Fargate Charges If No Jobs Are Running
Fargate charges are based on the vCPU, memory, and other resources used while a job is actually running.
Therefore, even if you keep the AWS Batch Compute environment, no Fargate computing charges will be incurred as long as no jobs are running.
In addition, the following resources basically do not incur charges simply by being retained.
- AWS Batch
- Compute environment
- Job queue
- Job definition
- IAM roles and policies
- Default VPC
- Subnets
- Security groups
On the other hand, the services that may incur charges when data is stored are mainly the following:
- S3
- ECR
- CloudWatch Logs
Be Careful with NAT Gateway
This time, we did not create a NAT Gateway and instead configured the Fargate jobs to be assigned public IP addresses.
If you have created a NAT Gateway, charges will be incurred based on the time the NAT Gateway exists, even without any traffic. If it is no longer needed after verification, it must be deleted.
Summary
This time, we used AWS Batch and Fargate to analyze FASTQ files on S3 with FastQC.
The steps carried out are summarized as follows:
- Upload FASTQ files to S3
- Create an ECR repository
- Build a FastQC container with CodeBuild
- Push the container image to ECR
- Create an IAM role for AWS Batch
- Create a Fargate Compute environment
- Create a Job queue and Job definition
- Submit the FastQC job
- Check the HTML report output to S3
By running a single sample first, we were able to get a complete overview of the following relationships in AWS Batch:
- Job definition: what to run and with what resources
- Job queue: where to have jobs wait
- Compute environment: on which infrastructure to actually run jobs
This time we used a container image with FastQC built in, but by changing the software and execution scripts incorporated into the container, the same mechanism can be applied to other bioinformatics analyses as well. For example, read trimming, mapping, and expression quantification can also be run on AWS Batch by preparing container images that include the corresponding software.