![I tried building "Headscale", an OSS alternative control server for Tailscale, on Lightsail [6 dollars per month]](https://images.ctfassets.net/ct0aopd36mqt/wp-thumbnail-7b6473b3644c2d4da3f14cc28df3db24/c6a2b4fe207993338fff03ecd50022c7/eyecatch_tailscale.png?w=3840&fm=webp)
I tried building "Headscale", an OSS alternative control server for Tailscale, on Lightsail [6 dollars per month]

This page has been translated by machine translation. View original
Introduction
I'm Fujii (Da) from the Manufacturing Business Technology Department.
There are situations where you want to access your home network's PC or NAS from outside, or access EC2 instances in a private subnet, right?
To achieve this, you would need to set up a VPN.
Among the options, Tailscale is popular because it's free to use just by installing and signing in.
However, I knew that the free plan of Tailscale couldn't meet my intended use case. (Especially the 6-user limit)
Also, the paid plan charges per user, which could get expensive for multiple people, and since I initially wanted it for temporary testing purposes, I was looking for alternatives without committing to a paid plan.
That's when I found Headscale, an OSS alternative to Tailscale's control server.
While it requires self-hosting, building it on the minimum configuration of Amazon Lightsail keeps costs around 6 dollars per month, and you can use it without worrying about restrictions like user count limits.
Compared to Tailscale's Standard plan at "8 dollars per user per month," it's cheaper, and the more users there are, the greater the cost benefit of adopting Headscale.
In this article, I'll cover building Headscale on Lightsail, user management with Headplane, and other operational aspects.
What is Tailscale
Tailscale is a mesh VPN service based on WireGuard.
Simply install the client on each device and log in, and a private network called a tailnet is created, enabling devices to communicate directly through encrypted tunnels.
Useful features include:
- NAT traversal: Devices on separate networks, such as at home or while out, can connect directly without port forwarding or a global IP
- MagicDNS: Name resolution by device name without remembering IP addresses
- ACL: Control which users and devices can connect where through policies
- Exit Node / Subnet Router: Use a specific device as an internet exit point or as a relay to networks outside the tailnet
- Multi-platform: Official clients available for Windows / macOS / Linux / iOS / Android
As an architectural characteristic, actual traffic between devices flows through WireGuard P2P, and the control server only handles key and configuration distribution.
For environments where NAT traversal is not possible, relay servers called DERP are provided.
Tailscale is offered as a SaaS with a free Personal plan and paid Standard/Premium/Enterprise plans.
The free plan has some restrictions as follows. (As of July 2026)
| Item | Personal (Free) |
|---|---|
| Users | Up to 6 |
| User devices | Unlimited |
| ACL groups | Up to 3 |
| Tagged resources | Up to 50 (excess at $1 per item per month) |
| Unavailable features | SSO, user approval workflow, network flow logs, JIT access |
Also, the FAQ at the bottom of the pricing page states that the Personal plan is for non-commercial use.
This is a free plan and is only suitable for non-commercial use of Tailscale.
What is Headscale
Headscale is an OSS implementation for self-hosting Tailscale's control server.
The official repository describes it as follows:
An open source, self-hosted implementation of the Tailscale control server
The Tailscale control server handles key and configuration distribution.
Since Headscale implements the same API as this control server, you can use the official Tailscale client as-is.
You can connect from clients on Linux, macOS, Windows, iOS, and Android simply by changing the login server destination to Headscale.
The point that actual traffic between devices flows directly via WireGuard P2P is the same as Tailscale.
The only difference is whether the control server is handled by Tailscale's SaaS or self-hosted.
The license is BSD 3-Clause, and since it's self-hosted, there are no commercial use restrictions or per-user billing.
This allows you to step away from both the constraint mentioned in the previous section that "the Personal plan is for non-commercial use," and from the pricing structure of paid plans where costs accumulate as the number of users grows.
The only cost is the resource fee for the server you prepare yourself.
The main features as a control server are all in place.
- Connection-related features such as MagicDNS, ACL, Exit Node, and Subnet Router
- Pre-authentication keys (pre-auth keys) for registering nodes non-interactively
- DERP for relaying when NAT traversal is not possible
On the other hand, there are some trade-offs compared to the SaaS version of Tailscale.
- No official Web management UI. Primarily CLI-oriented design; if a GUI is needed, you must introduce a third-party management console such as Headplane
- Backup and upgrades must be managed yourself
- A single instance can only handle a single tailnet, designed for personal use or small organizations
- Some features like Funnel and Tailnet Lock are unsupported or lag behind in following the original
For use cases like mine—personal or small-group use wanting to keep costs down—these trade-offs are rarely a problem.
The lack of a GUI is resolved by introducing Headplane.
What is Headplane
Headplane is a third-party Web management UI for Headscale.
It's a project aiming to recreate Tailscale's official management console, and you can perform the following operations from a browser:
- Managing users and nodes, issuing pre-authentication keys
- Renaming nodes, changing owners, key expiration, route approval
- Editing ACL and tags
- Editing DNS settings such as MagicDNS
The license is MIT and Docker images are distributed.
Authentication supports login via Headscale's API key as well as OIDC.
This time, I'll co-locate it with Headscale on the same instance using Docker.
This Configuration
I made a configuration where Headscale itself and Headplane are co-located on a single Lightsail instance, managed as a set with CloudFormation.
- Hosting: Lightsail nano dual-stack plan (5 dollars per month, Tokyo region)
- OS: Ubuntu 24.04 LTS
- Headscale: Installed via DEB package, state in SQLite, TLS via built-in Let's Encrypt (autocert)
- DERP: Using Tailscale's official DERP server (not self-hosting)
- Management UI: Headplane co-located via Docker, not publicly exposed, limited to localhost
- IaC: CloudFormation (covering instance, static IP, firewall, automatic snapshots, and Route 53 A record)
I'll explain the reasons for each selection.
The reason a minimum nano plan is sufficient for the server is that the control server's job is only key and configuration distribution, and actual traffic between devices doesn't pass through it.
Load and data transfer are small, and static IP and 1 TB transfer are included in the price, so costs are expected to be nearly fixed.
The reason the plan is dual-stack rather than IPv6-only is to ensure devices on IPv4-only networks can also reach the control server.
The Headscale state is saved to SQLite, and TLS certificates are handled by the built-in Let's Encrypt integration (autocert).
For personal or small-group scale, no external database or reverse proxy is needed.
By reducing components, the number of things to manage in operations decreases accordingly.
For relaying when NAT traversal is not possible, I use the DERP servers published by Tailscale as-is.
Headscale has a function to embed a DERP server, but enabling it would cause relay traffic to pass through this instance, taking on load and transfer volume, so I won't use it.
Headplane is co-located on the instance as a Docker container.
The management UI is not exposed to the internet; it's bound only to localhost and opened from the local machine via SSH port forwarding when needed.
Without needing to prepare a separate authentication mechanism, only people who can SSH in can access the management screen.
Let me also touch on availability.
This is a single-instance configuration, and Headscale itself only supports one instance per tailnet, so redundancy of the control server is not possible.
However, even if the control server stops, established communications between devices are not interrupted.
As mentioned earlier, actual traffic does not pass through the control server.
Since DERP is also handled by Tailscale's official servers, relaying is also unaffected.
What becomes unavailable during a shutdown is registering new devices, re-authentication of expired keys, and configuration changes such as ACL.
For personal or small-group use, the impact of a shutdown is limited to this scope, so I've accepted that recovery from snapshots is sufficient.
As a prerequisite, a custom domain is required.
This is not a prerequisite specific to this configuration, but a prerequisite for operating Headscale itself.
Since the Tailscale client connects to the control server via HTTPS and verifies certificates, a domain name from which a valid certificate can be issued is required regardless of the configuration.
In this case, this domain is used for name resolution and certificate acquisition with Let's Encrypt, and if DNS is Route 53, A record creation can be included in CloudFormation.
CloudFormation Template
The full template I created is as follows.
Explanation of the CloudFormation Template
The resources defined are only three: the Lightsail instance, static IP, and Route 53 A record (created only when HostedZoneId is provided).
The firewall (ports 22/80/443) and automatic snapshots are set as instance properties.
Software installation and configuration are all done in the instance's UserData (startup script).
- OS package updates (apt-get update / upgrade)
- Securing 1 GB of swap (since the nano plan has 512 MB of memory)
- Installing the Headscale DEB package
- Rewriting config.yaml (server_url, listen_addr, TLS, base_domain)
- Placing the initial ACL policy (only when PolicyMode is specified)
- Validation with
headscale configtest - Starting the Headplane Docker container (bound only to localhost:3000)
ACL allows you to choose the configuration method with the parameter PolicyMode.
By default (none), nothing is configured, leaving Headscale's default behavior (allowing all communication between all nodes).
Specifying file or database places and enables an initial all-permit policy (same behavior as none), which can then be used as a template to gradually restrict.
With database, you can also edit from the Headplane GUI described later.
Only the insertion of runtime data such as user creation and pre-authentication key issuance is done manually after deployment.
The necessary commands are output to the stack's Outputs, and I'll execute them in order in later sections.
Note that this template is an immutable design, intended to be deployed only once.
UserData, which handles software installation and configuration, is only executed at first boot and will not be reapplied to an existing instance even if the stack is updated.
Changes to basic properties such as OS image or plan also result in recreating the instance.
When you want to change the configuration, recreate the stack, and handle the running server with in-place operations such as the upgrades described later.
Tips: Why UserData is Written in POSIX sh
Lightsail concatenates UserData into its own #!/bin/sh wrapper and runs it with dash.
The shebang written at the beginning of the custom script is concatenated after the wrapper and does not become line 1, so even if you write #!/bin/bash, it will not be executed with bash.
Dash does not support bash-specific syntax such as set -o pipefail, and writing these causes it to exit with an error at that line.
The reason UserData in the template is written to be POSIX sh compatible, avoiding bash-specific syntax like set -o pipefail, [[ ]], and arrays, is for this reason.
Also, UserData failures do not appear in the stack status.
This is because CloudFormation only waits until instance creation is complete and does not care about the success or failure of the startup script.
The deployment will "complete" but nothing will be built on the server—a confusing situation.
Errors are recorded in /var/log/headscale-bootstrap.log.
(In this template, UserData redirects output to this file at the beginning)
When you modify UserData and it doesn't work, it's good to check this log first.
Deploy
Deploy by passing parameters.
Since the template does not include IAM resources, specifying --capabilities is not required.
aws cloudformation deploy \
  --template-file lightsail-headscale.cfn.yaml \
  --stack-name headscale \
  --region ap-northeast-1 \
  --parameter-overrides \
    DomainName=headscale.example.com \
    BaseDomain=tailnet.example.com \
    AvailabilityZone=ap-northeast-1a \
    HostedZoneId=Z0123456789ABCDEFGHIJ \
    SshAllowedCidr=xxx.xxx.xxx.xxx/32
- DomainName: The public FQDN of the control server. An A record and TLS certificate are created with this name
- BaseDomain: The MagicDNS suffix. Appended after device names within the tailnet
- AvailabilityZone: AZ in the deployment target region
- HostedZoneId: Route 53 hosted zone ID. If omitted, no A record is created, so manually point to the static IP output in Outputs
- SshAllowedCidr: Source to allow SSH (port 22). There is no default value, so always specify. Restricting to the management device's IP (/32) is recommended
Deployment takes about 3 minutes to complete.
Connectivity Check
Once deployment is complete, verify name resolution and HTTPS connectivity.
dig +short headscale.example.com          # Returns the static IP
curl -sS https://headscale.example.com/health
# => {"status":"pass"}
If {"status":"pass"} is returned, HTTPS is reachable from the public internet and Let's Encrypt certificate acquisition (autocert) is complete.
The certificate is issued on the first access after name resolution goes through.
SSH Configuration
In subsequent sections I'll work by SSHing into the server, so let's set up the key first.
If you omitted the KeyPairName parameter in the template, the instance has the region's default key pair set.
Open the instance page in the Lightsail console, go to the "Connect" tab, and download it from the "Download default key" link under "Use your own SSH client."
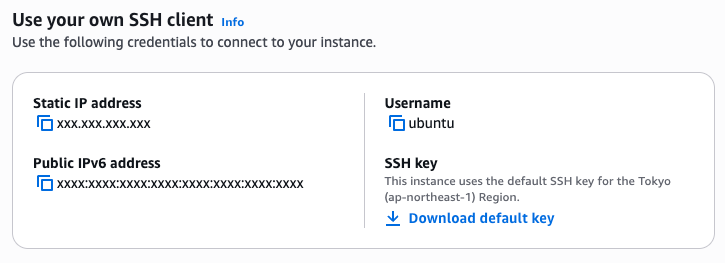
Move the downloaded key to ~/.ssh and restrict permissions.
mv ~/Downloads/LightsailDefaultKey-ap-northeast-1.pem ~/.ssh/
chmod 400 ~/.ssh/LightsailDefaultKey-ap-northeast-1.pem
Adding an entry to ~/.ssh/config makes subsequent connections easier.
The static IP of the connection destination can be confirmed in the stack's Outputs (StaticIp).
Host headscale
  HostName <static IP>
  User ubuntu
  IdentityFile ~/.ssh/LightsailDefaultKey-ap-northeast-1.pem
  IdentitiesOnly yes
The reason IdentitiesOnly yes is added is that if there are many keys registered in ssh-agent, the server's maximum number of attempts may be reached before the specified key is tried, causing disconnection with Too many authentication failures.
Once you can log in with ssh headscale, preparation is complete.
If login fails, check whether the IP address in the network rule allowing Lightsail's SSH port matches the PC's IP address.
Also, *** System restart required *** may be displayed on first login.
This is because the kernel and other components were updated by UserData's apt-get upgrade, and the new kernel won't be active until a reboot.
Both Headscale and Headplane will automatically recover after a reboot, so complete the reboot at this point before connecting clients.
sudo reboot
Connecting from a Tailscale Client
Headscale users are the units that own nodes.
Devices used by individuals are registered under the owner's user (e.g., alice).
Servers shared by multiple people are not tied to a specific individual, so instead of belonging to a user, they are registered with a tag (e.g., tag:server).
This way, when you later look at nodes list or ACL, individual devices are distinguishable by owner, and shared servers by tag.
Here I'll show three registration procedures: a personal PC, a personal Android, a shared server, and the flow when adding a device for a user who cannot operate the server.
Interactively Registering a Personally Owned PC
First, create the user of the device's owner on the server side.
The headscale CLI communicates with the running daemon via unix socket, so sudo is required.
# Execute after entering with ssh headscale
sudo headscale users create alice
Next, install the official client on the PC.
Windows and macOS clients can be obtained from Tailscale's official website or each OS's store.
Once the client is installed, point the login server to Headscale and log in.
From the GUI, click the icon next to the Add Account... button on the Account Settings screen and enter https://headscale.example.com.
If using the command-line client, you can specify it with tailscale login --login-server https://headscale.example.com.
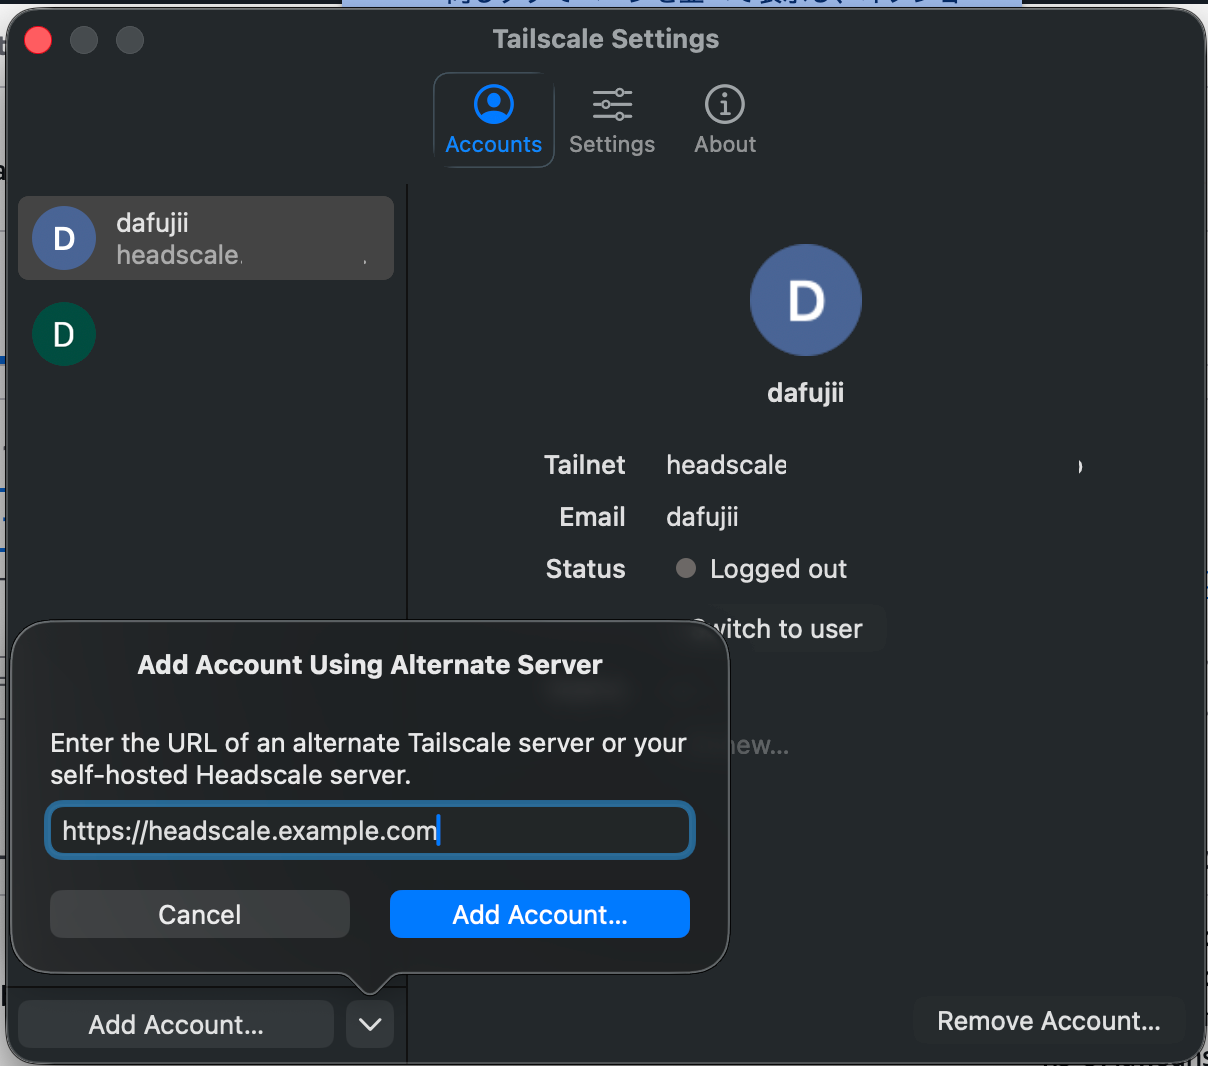
In either method, executing login opens a browser displaying the Auth ID used for registration.
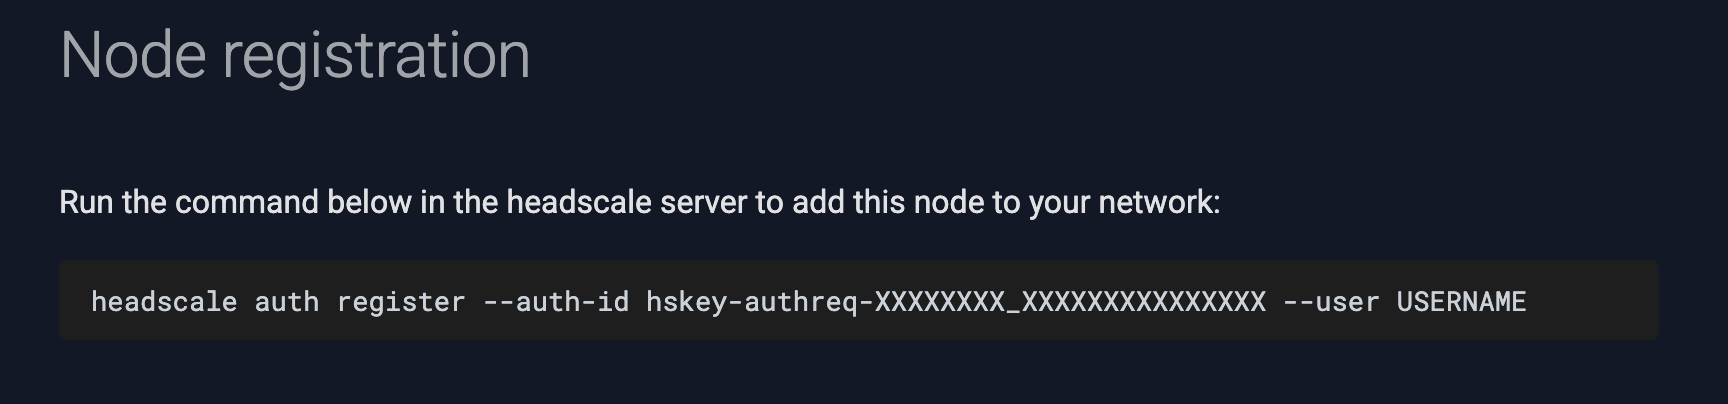
Following the on-screen instructions, register on the server side by providing that Auth ID, and the node joins the tailnet.
# Execute after entering with ssh headscale
sudo headscale auth register --auth-id <Auth ID displayed in browser> --user alice
sudo is required here as well; without it, you'll get permission denied connecting to the socket.
Registering a Personally Owned Android
For Android, use the official app distributed on Google Play.
The app has a setting to change the login server, so specify the Headscale URL there.
In the app as of writing, open the settings menu at the top right of the app, select Accounts, then from the three-dot menu at the top right select Use an alternate server, and enter https://headscale.example.com.
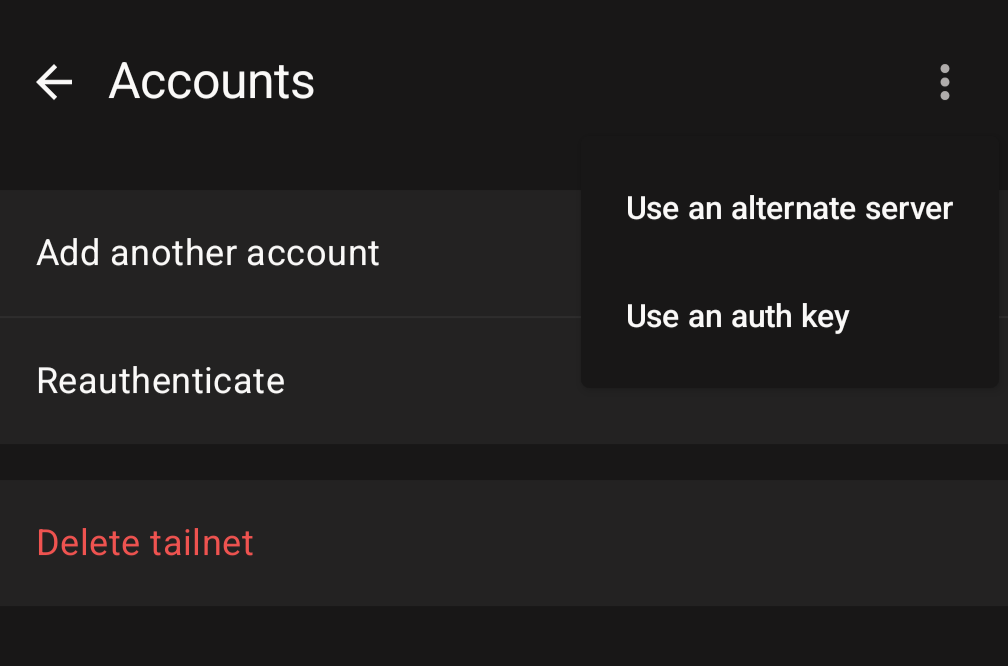
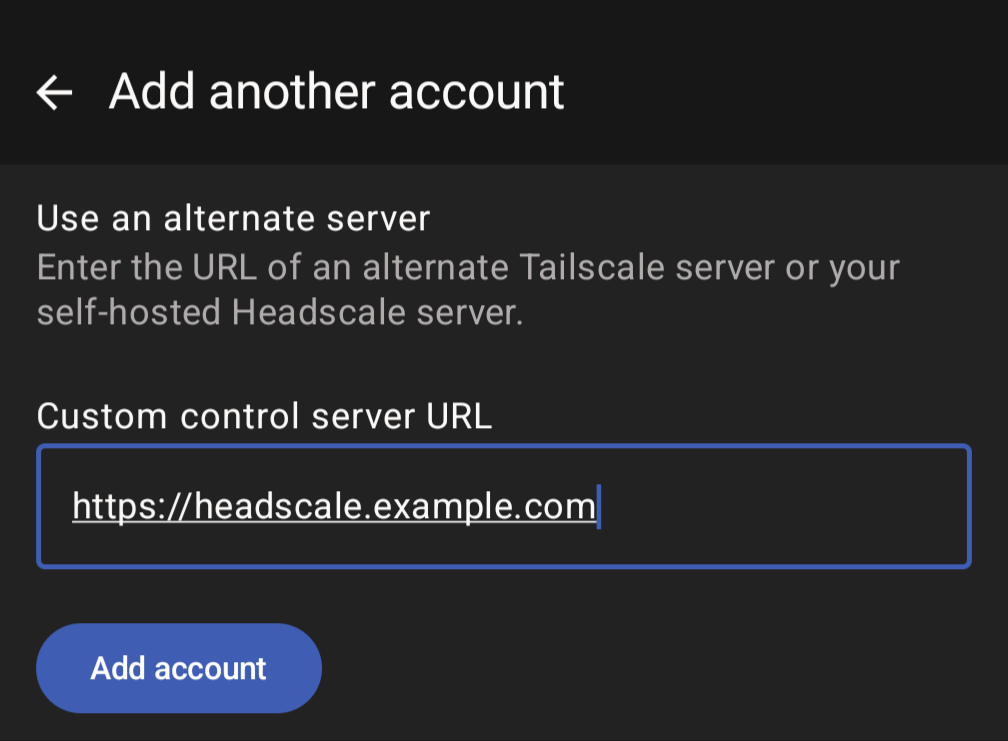
From here, registration on the server side is the same as for the PC.
Follow the on-screen instructions to proceed with registration, and when you run headscale auth register on the server side with the displayed Auth ID, the node is registered.
Since this Android is also a personal device, specify the owner's alice for --user.
Since I don't have iOS, I only describe Android, but the same steps should work on iOS as well.
Registering a Shared Server with a Pre-authentication Key
For shared servers, registration with a pre-authentication key, which doesn't involve interactive browser operations, is suitable.
Servers often don't have a browser for interaction, and registration completes just by passing the key.
Since this server is not tied to a specific individual, don't create a user; instead, issue a pre-authentication key with a tag attached.
# Execute after entering with ssh headscale
sudo headscale preauthkeys create --tags tag:server --reusable --expiration 24h
Tags just need to follow the format of lowercase starting with tag: (comma-separated for multiple), and no ACL policy or tagOwners declaration is needed.
Registration is possible even with this template's default (PolicyMode=none).
Nodes registered with this key don't belong to any user and are given the specified tags as-is.
Tagged nodes have their node key expiration disabled, so even servers that stay connected won't require re-authentication due to expiration (the --expiration here is separate and specifies how long the key can be used for registration).
Keys with --reusable can be reused across multiple devices within the validity period.
This is useful when registering several servers with the same role, or when writing a key in configuration management tools for reuse.
If registering one device once is sufficient, remove --reusable to make it a one-time use key.
After noting the issued key, install the official client on the server and register it by passing the key.
Since tailscale up requires administrator privileges on Linux to configure network interfaces, add sudo.
curl -fsSL https://tailscale.com/install.sh | sh
sudo tailscale up --login-server https://headscale.example.com --auth-key <issued key>
Registering Devices of Users Who Cannot Operate the Server with Pre-authentication Keys
The steps so far assumed that the administrator who can operate the server completes registration themselves.
To interactively add a device for a user who cannot operate the server, a round-trip is needed where the person conveys their Auth ID to the administrator for approval.
Using pre-authentication keys eliminates this round-trip.
If the administrator prepares and provides a key, registration can be completed with just the person's own operations.
On the administrator side, create the user and issue a key.
The reason for issuing under the person's own user is to correctly assign the owner of registered devices.
# Execute after entering with ssh headscale (also possible from Headplane GUI described later)
sudo headscale users create bob
sudo headscale users list        # Note the numeric ID displayed
sudo headscale preauthkeys create --user <ID> --expiration 1h
Unlike the shared server case, don't add --reusable and keep the expiration short.
Making the key single-use and short-lived limits the impact of a leak during transmission to one device and a short time.
Provide the issued key to the person through a secure channel.
The operation on the person's side is just installing the client and passing the key.
sudo tailscale up --login-server https://headscale.example.com --auth-key <received key>
Note that the official documentation doesn't have steps for registration via pre-authentication key in the Android app, and Android devices basically use interactive registration.
In that case, the person conveys the displayed Auth ID to the administrator, and the administrator approves with headscale auth register.
Confirming Registration
On the server side, confirm the list of registered nodes.
sudo headscale nodes list
Personal devices are listed under the owner's user (alice or bob).
Shared servers registered with tags don't belong to any user, so the User column shows tagged-devices and the Tags column shows the attached tags.
If these appear in the list, registration is complete.
Accessing a Home Server from a Device Outside
Once registration is complete, devices that have joined the tailnet can connect directly even when not on the same network.
Here I'll try accessing a shared server (nas) placed on the home LAN from a PC connected to a mobile network while out.
The point to confirm here is that it's reachable even though we're not on the same LAN and haven't done any router port forwarding.
Running tailscale status on the remote device shows all nodes in the tailnet including nas, each with their tailnet internal address (100.x.y.z in the 100.64.0.0/10 range).
Reachability and routing can be confirmed with tailscale ping.
# Execute on the remote device
tailscale ping nas
# => pong from nas (100.x.y.z) via <peer's global IP:port> in 23ms
If the peer's global IP appears in via, actual traffic is flowing directly via P2P.
When NAT traversal is not possible, it shows relay notation like via DERP(tok), but in either case the control server (Lightsail instance) is not traversed.
You can use the MagicDNS node name (<node name>.<BaseDomain>) directly as the destination.
Name resolution works without additional configuration on the client side, so for example SSH connects as follows:
ssh nas.tailnet.example.com
If the server OS firewall restricts incoming connections, allow incoming traffic from the tailscale0 interface or from 100.64.0.0/10.
Managing Users with Headplane
SSHing in and entering commands every time you add a user or issue a key is cumbersome.
That's where Headplane comes in.
Since it's already set up by the template's UserData (the default value of InstallHeadplane is true), no additional construction work is needed.
Since the management UI is only bound to localhost:3000, access it via SSH port forwarding from your local machine.
An equivalent command is also output to Outputs as HeadplaneTunnel.
ssh -L 3000:localhost:3000 headscale
While keeping the tunnel open, open the following in a browser.
http://localhost:3000/admin/
When opened, a login screen appears asking for the Headscale API key.
Issue the key right here. The login screen also shows instructions to generate it with headscale apikeys create.
# Execute after entering with ssh headscale
sudo headscale apikeys create
Since the key is only displayed once at creation, paste it in and log in.
The default expiration is 90 days and can be changed with --expiration.
The session after login is also valid until this key's remaining expiration; when it expires, issue a new key and log in again.
Issued keys remain on the Headscale side, so check unused ones with sudo headscale apikeys list and expire them with sudo headscale apikeys expire --prefix <prefix>.
Note that logging in with an API key is essentially administrator access to Headscale.
Handle keys with care.
Once the dashboard opens, you can complete user addition, pre-authentication key issuance, and node management in the browser from here on.
If PolicyMode is set to database, ACL editing can also be done from the GUI.
Creating Users and Pre-authentication Keys via GUI
The user creation and pre-authentication key issuance done earlier via CLI can also be executed from this screen.
Screen labels are those of Headplane (0.7.0) at the time of writing, and names may change depending on the version.
If the names differ, read them according to the purpose of the operation.
First, create a user.
Opening Users from navigation shows the list of registered users.
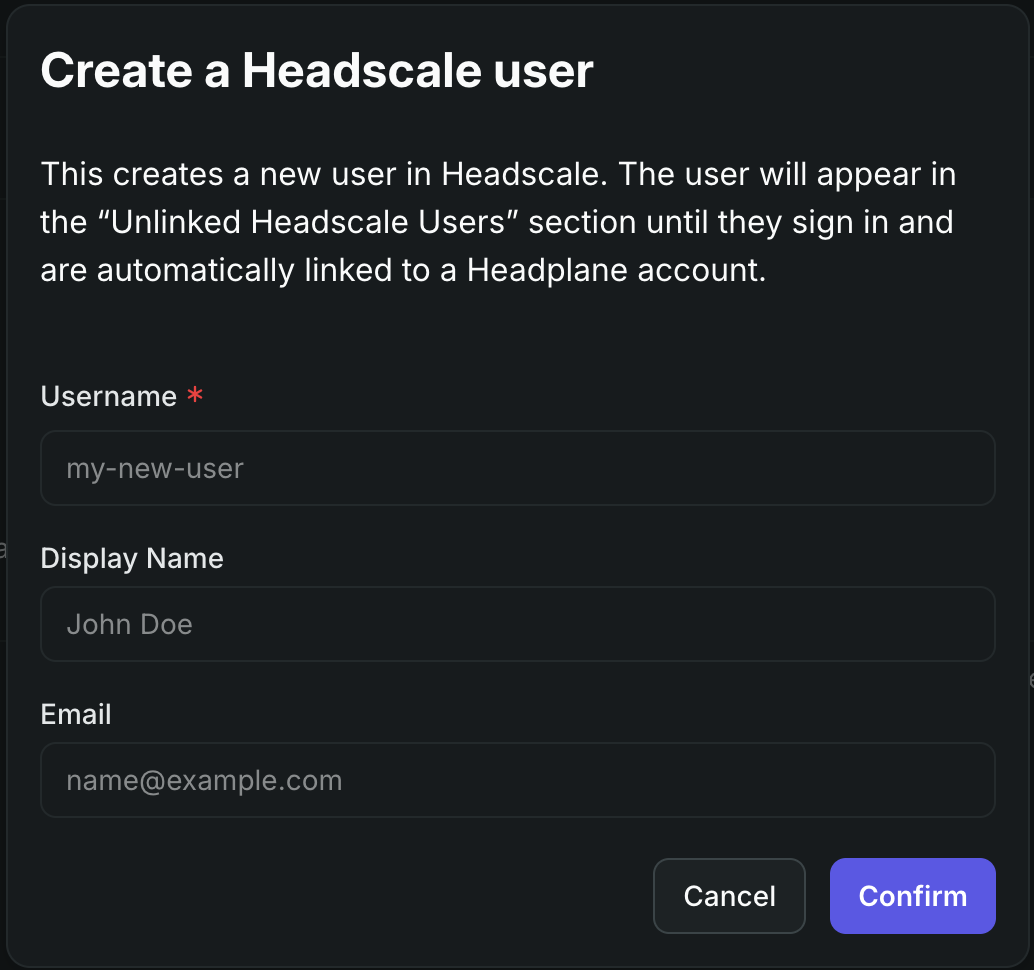
Pressing "Add user" on this screen opens a user creation dialog (Create a Headscale user).
"Username" is required in the input fields, while "Display Name" and "Email" are optional.
Just like with CLI's headscale users create alice, only deciding on the username is sufficient here.
After creation, the new user is added to the list.
Next, issue a pre-authentication key for the created user.
Open the Pre-Auth Keys screen either by opening the Manage Auth Keys link from Settings in the navigation, or by pressing the "Add Device" button in Machines and selecting "Generate Pre-auth Key."
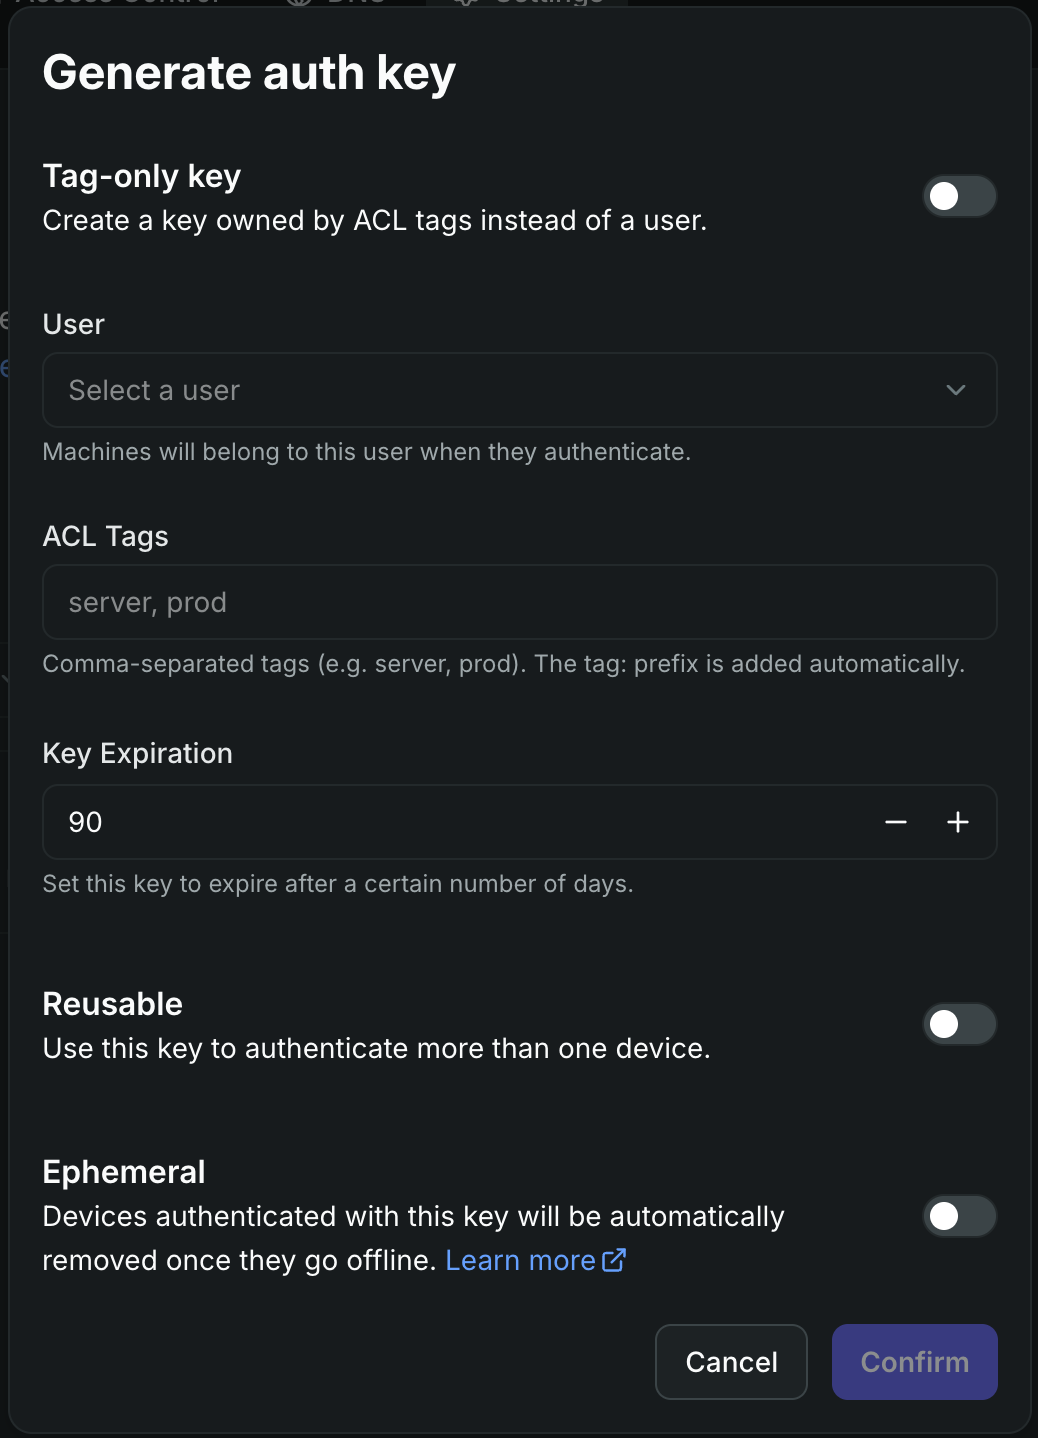
Pressing "Create pre-auth key" displays the issuance dialog (Generate auth key).
Select the key owner in "User."
With CLI, you had to look up the numeric ID to pass to --user using headscale users list, but with GUI you just select from the list, so no need to look up the ID.
Enabling "Reusable" allows one key to be reused across multiple devices, same as CLI's --reusable.
Set the expiration in "Key Expiration."
This form specifies in days, with a default value of 90 days.
With CLI you specified in hours like --expiration 24h, so the only difference here is reading it in days.
For devices that should be automatically deleted when disconnected, use "Ephemeral"; to attach tags, use "ACL Tags."
"ACL Tags" corresponds to --tags used in the shared server section, and "Ephemeral" corresponds to --ephemeral which hasn't been covered so far.
After confirming the contents and issuing, the generated key is displayed once.
As the screen also says "Copy this key now.", closing it means you can't display the full key again, so copy it right there.
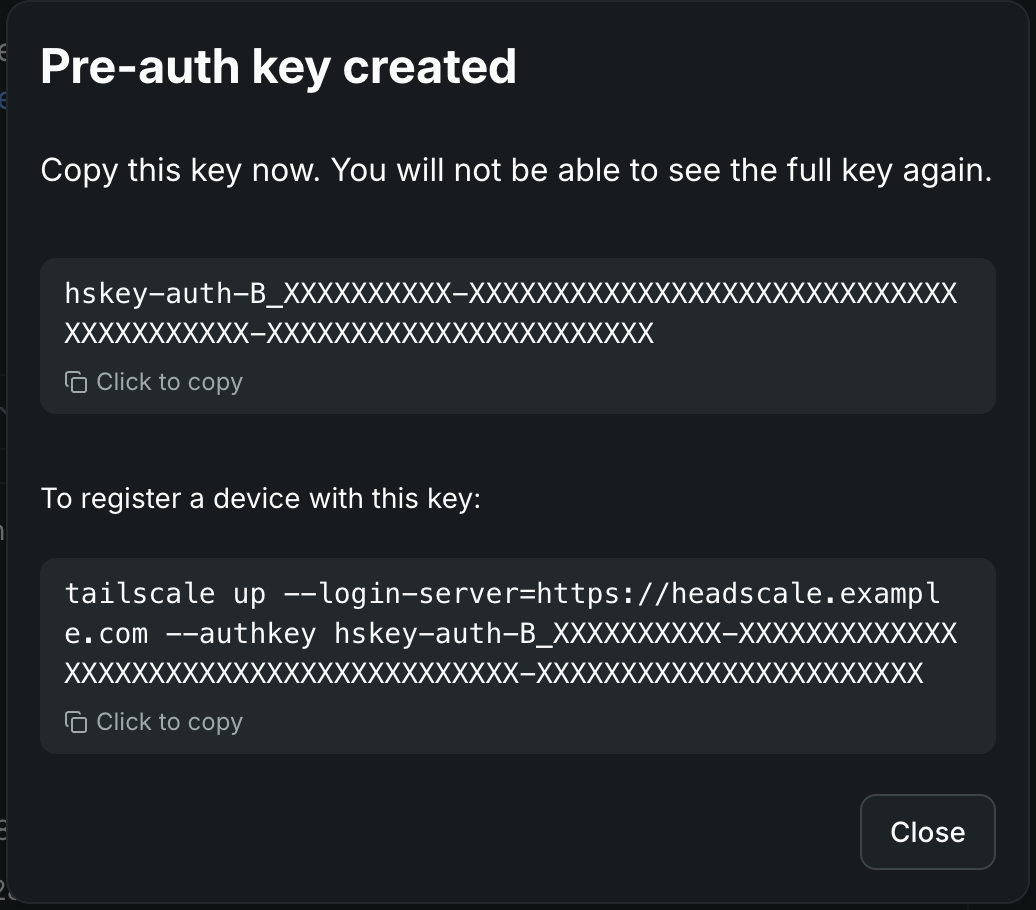
After that, just like the key issued via CLI, pass this key to tailscale up --auth-key on the device side to connect.
With this, you can complete everything from user creation to pre-authentication key issuance without SSHing.
Operations
Finally, I'll summarize costs, backup, and upgrades.
Costs
The monthly breakdown excluding the free tier is as follows. (Tokyo region, as of July 2026)
| Item | Billing basis | Monthly (dollars) |
|---|---|---|
| Lightsail nano dual-stack | Fixed (includes 1 TB transfer) | 5.00 |
| Static IP | Included in bundle, no additional charge | 0.00 |
| Route 53 hosted zone | 0.50/zone | 0.50 |
| Automatic snapshots | 0.05/GB month (incremental) | ~0.50 |
| Data transfer (outbound overage) | Only for excess over 1 TB at 0.14/GB | ~0.00 |
The total is approximately 6 dollars per month, mostly fixed costs.
The reason data transfer is barely incurred is that in a configuration using official DERP, actual traffic between devices does not pass through this server.
Note that switching to built-in DERP causes relay traffic to pass through the server, so outbound amounts exceeding 1 TB will be charged.
Incidentally, building an equivalent configuration on EC2 would cost approximately 3.9 dollars per month even for the minimum class t4g.nano excluding the free tier, with an additional approximately 3.65 dollars for a public IPv4 address and EBS charges separately, plus outbound data transfer on a pay-as-you-go basis.
Fixed costs alone excluding data transfer exceed 8 dollars per month.
Lightsail bundling IPv4 and 1 TB transfer makes total costs more predictable for small-scale operations like this one.
Backup
Backup is handled by the automatic snapshots enabled in the template.
A full disk snapshot is taken once daily, and Lightsail's default retains the last 7 generations.
The only thing specified in the template is the acquisition time (18:00 UTC); there is no configuration item for the number of retained generations.
Since Headscale's state is a single SQLite file, it can be fully restored from a disk snapshot.
When recovering, create a new instance from a snapshot and reassign the static IP.
Upgrade
You need to manage Headscale and Headplane upgrades yourself.
Since HeadscaleVersion and HeadplaneImage in the template are only used in UserData during the first launch, updates are done in-place via SSH rather than by updating the stack.
The upgrade principles described in the Headscale official documentation are as follows.
- Check the release notes
- Upgrade minor versions sequentially without skipping (e.g., 0.27 → 0.28 → 0.29)
- Stop the service and take a backup before updating
DB migrations run automatically at startup, and downgrading is not supported.
Since the only practical way to roll back is to restore from a snapshot, take a manual snapshot immediately before performing the upgrade.
# From your local machine: take a backup immediately before
aws lightsail create-instance-snapshot \
  --instance-name headscale \
  --instance-snapshot-name headscale-pre-upgrade \
  --region ap-northeast-1
Headscale itself is installed via DEB, so updates are also done via DEB.
# Run on the server side (ssh headscale)
sudo systemctl stop headscale
ARCH=$(dpkg --print-architecture)
wget -O /tmp/headscale.deb \
  "https://github.com/juanfont/headscale/releases/download/v<new version>/headscale_<new version>_linux_${ARCH}.deb"
sudo apt-get install -y /tmp/headscale.deb
sudo headscale configtest    # Any configuration key changes in the new version can be detected here
sudo systemctl start headscale
curl -sS https://headscale.example.com/health
Headplane is a Docker container, so pull the new image and recreate the container.
Since configuration and data are mounted on the host side, they will not be lost even if the container is removed.
However, startup options such as --log-opt (rotation settings to prevent log bloat) are not carried over by mounts, so you need to add the same options as the initial launch.
sudo docker pull ghcr.io/tale/headplane:latest
sudo docker rm -f headplane
sudo docker run -d --name headplane --restart unless-stopped \
  --log-opt max-size=10m --log-opt max-file=3 \
  -p 127.0.0.1:3000:3000 \
  -v /etc/headplane/config.yaml:/etc/headplane/config.yaml:ro \
  -v /var/lib/headplane:/var/lib/headplane \
  -v /etc/headscale/config.yaml:/etc/headscale/config.yaml:ro \
  ghcr.io/tale/headplane:latest
Closing
I set up a self-hosted Headscale on Lightsail and made it reproducible with CloudFormation, including GUI management via Headplane.
The cost is around $6 per month and does not change even as the number of users increases.
As long as Tailscale's free plan is sufficient, that remains the easiest option, but when you hit the user limit or commercial use restrictions, I believe this configuration becomes a realistic alternative.
I hope this serves as a reference for anyone considering the same setup.