
I tried automatically building an SSH tunnel and SOCKS5 proxy with Node.js using ssh2

This page has been translated by machine translation. View original
Introduction
I deployed a web app on a closed network that can only be accessed via a bastion server (see the previous article). While deployment worked, I had to manually set up an SSH tunnel every time I wanted to check the app in a browser during development, which was tedious.
What made it even more troublesome was verifying a CloudFront distribution that only allowed access from the deploy server's IP (IP-restricted). Simple port forwarding wouldn't work — I needed a SOCKS5 proxy that routes external traffic through the deploy server's IP.
This article introduces three SSH tunneling scripts implemented with Node.js's ssh2 library.
- proxy.mjs — TCP port forwarding (accessing the app screen)
- test-nginx.mjs — Tunnel for verifying routing via nginx
- socks5-proxy.mjs — SOCKS5 dynamic proxy (communication to arbitrary destinations)
Prerequisites & Environment
| Item | Value |
|---|---|
| Node.js | 24 LTS |
| ssh2 | 1.17.0 |
| Local OS | macOS |
Network Configuration
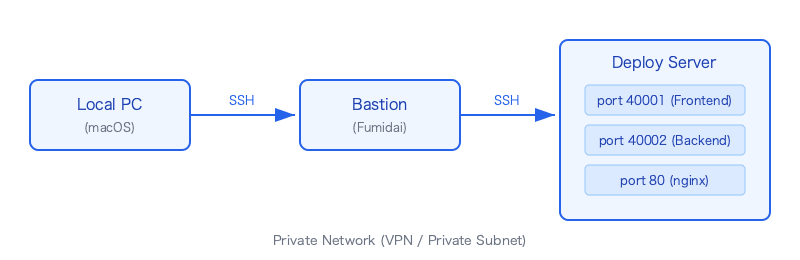
1. proxy.mjs — 2-Hop TCP Tunnel
This script allows a local browser to access the app's frontend (port 40001).
Tunnel Configuration
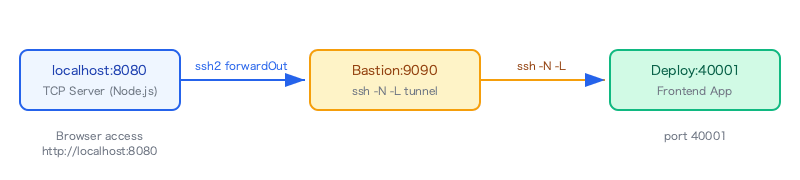
It establishes a two-stage tunnel.
- On the bastion:
ssh -N -L 9090:localhost:40001 user@deploy-serverforwards port 40001 on the deploy server to port 9090 on the bastion - Locally: ssh2's
forwardOutrelays local TCP server connections to port 9090 on the bastion
Cleaning Up Old Tunnels
Since tunnel processes can remain after the previous script exits, we clean up on startup. bastionExec is a helper function that wraps ssh2's conn.exec().
function cleanupBastion(done) {
  const killCmd = "fuser -k " + BASTION_TUNNEL_PORT + "/tcp 2>/dev/null; exit 0";
  bastionExec(killCmd, (err, stream) => {
    if (err) { done(); return; }
    stream.on("close", () => done());
    stream.resume();
  });
}
fuser -k kills the process holding the specified port. 2>/dev/null; exit 0 ensures no error occurs when no process is found.
Local TCP Server and Relay
function startLocalServer() {
  const server = net.createServer((socket) => {
    const id = socket.remoteAddress + ":" + socket.remotePort;
    outer.forwardOut("127.0.0.1", LOCAL_PORT, "localhost", BASTION_TUNNEL_PORT, (err, stream) => {
      if (err) {
        socket.destroy();
        return;
      }
      // Bidirectional pipe
      socket.pipe(stream).pipe(socket);

      // Cleanup
      stream.on("close", () => socket.destroy());
      socket.on("close", () => stream.destroy());
      socket.on("error", () => stream.destroy());
      stream.on("error", () => socket.destroy());
    });
  });

  server.listen(LOCAL_PORT, "127.0.0.1", () => {
    console.log("[3/3] Tunnel ready — " + LOCAL_URL);
    execFile("open", [LOCAL_URL]);  // Auto-open browser
  });
}
A local TCP server is started with net.createServer, and when a browser connection arrives, it is relayed to the bastion's tunnel port via forwardOut. Here, outer is the ssh2 Client instance connected to the bastion. socket.pipe(stream).pipe(socket) establishes bidirectional communication.
Host Key Verification
With production use in mind, host key verification against ~/.ssh/known_hosts is also implemented.
function makeHostVerifier(host) {
  return (key) => {
    const fp = "SHA256:" + crypto.createHash("sha256")
      .update(key).digest("base64").replace(/=+$/, "");
    let out;
    try {
      out = execFileSync("ssh-keygen", ["-F", host, "-l"],
        { encoding: "utf8", stdio: ["pipe", "pipe", "pipe"] });
    } catch {
      console.error("[!] " + host + " not in ~/.ssh/known_hosts. Run once:");
      console.error("    ssh-keyscan -H " + host + " >> ~/.ssh/known_hosts");
      return false;
    }
    if (out.includes(fp)) return true;
    console.error("[!] Host key MISMATCH for " + host + " — possible MITM attack!");
    return false;
  };
}
It computes the SHA256 fingerprint of the public key presented by the server and cross-references it against the entry in known_hosts using ssh-keygen -F. If there is a mismatch, it warns of a possible MITM attack and rejects the connection.
Usage
pnpm proxy
Running it completes the connection in 3 steps and automatically opens the browser.
[1/3] Connecting to bastion (10.xxx.x.xxx) as user...
[auth] agent: /private/tmp/com.apple.launchd.xxx/Listeners
[2/3] Bastion connected. Cleaning up stale tunnel on port 9090...
[2/3] Bastion->target tunnel up (bastion:9090 -> target:40001)

[3/3] Tunnel ready — http://localhost:8080/your-app
Ctrl+C to close.
2. test-nginx.mjs — Tunnel for nginx Verification
While proxy.mjs connects directly to the app's port (40001), in production, access goes through nginx's reverse proxy (port 80). To verify routing configuration, I created a variant that connects to nginx (port 80).
const MOCK_PORT = Number(process.env.MOCK_PORT ?? 80);            // nginx port
const BASTION_TUNNEL_PORT = Number(process.env.BASTION_TUNNEL_PORT ?? 9091);  // Different port to avoid conflict with proxy
const LOCAL_PORT = Number(process.env.LOCAL_PORT ?? 8081);
The TCP relay logic is identical to proxy.mjs. Only the destination port and local port differ, allowing proxy (direct connection) and nginx (via reverse proxy) to run simultaneously on separate ports.
pnpm proxy   # localhost:8080 → deploy target:40001 (direct)
pnpm nginx   # localhost:8081 → deploy target:80 (via nginx)
If you get a 404 via nginx but the page displays fine through proxy directly, you can immediately tell there's an issue with nginx's location configuration.
3. socks5-proxy.mjs — SOCKS5 Dynamic Proxy
This script is for browsing the outside world using the deploy server's IP. This is the most technically interesting part.
Background: Why SOCKS5 Is Needed
There was a CloudFront distribution that only allowed access from the deploy server's IP. Since TCP tunneling (-L) can only forward specific ports, a SOCKS5 dynamic proxy (ssh -D) is needed to communicate with arbitrary destinations using the deploy server's IP.
Tunnel Configuration
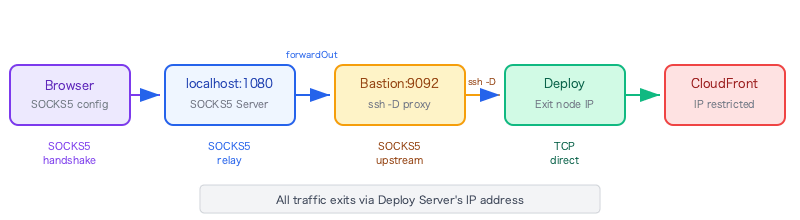
- Run
ssh -D 9092 -N user@deploy-serveron the bastion (SOCKS5 proxy, exit point is the deploy server's IP) - Start a SOCKS5 server locally and accept the browser's SOCKS5 handshake
- Connect to the bastion's SOCKS5 via ssh2's
forwardOutand relay the upstream handshake - After the handshake completes, switch to a bidirectional raw data pipe
Implementing the SOCKS5 Handshake
The SOCKS5 protocol (RFC 1928) handshake needs to be implemented from scratch.
Buffered Asynchronous Reader
During the handshake, each field of the protocol must be read with an exact byte count. Since Node.js streams can split chunks at arbitrary boundaries, I created a Reader that buffers until the specified number of bytes is available.
class Reader {
  constructor() { this.buf = Buffer.alloc(0); this.pending = null; }

  push(chunk) {
    this.buf = Buffer.concat([this.buf, chunk]);
    if (this.pending && this.buf.length >= this.pending.n) {
      const { n, resolve } = this.pending;
      this.pending = null;
      resolve(this._take(n));
    }
  }

  read(n) {
    return this.buf.length >= n
      ? Promise.resolve(this._take(n))
      : new Promise((resolve) => { this.pending = { n, resolve }; });
  }

  _take(n) {
    const out = this.buf.slice(0, n);
    this.buf = this.buf.slice(n);
    return out;
  }

  flush() {
    const out = this.buf;
    this.buf = Buffer.alloc(0);
    return out;
  }
}
awaiting read(n) resolves exactly when n bytes have arrived from the stream. flush() after the handshake completes retrieves any remaining bytes that weren't consumed, passing them to the raw data pipe.
Browser-Side Handshake
async function handleClient(socket) {
  const br = new Reader();
  socket.on("data", (chunk) => br.push(chunk));

  // 1. Greeting: version + list of authentication methods
  const greet = await br.read(2);       // [ver=5, nmethods]
  await br.read(greet[1]);              // Method list (just consume it)
  socket.write(Buffer.from([5, 0]));    // Reply "no authentication required"

  // 2. CONNECT request: parse destination address
  const hdr = await br.read(4);         // [ver, cmd, rsv, atyp]
  if (hdr[1] !== 1) { socket.destroy(); return; }  // Only CONNECT is supported

  let host, port;
  const atyp = hdr[3];
  if (atyp === 1) {          // IPv4
    const b = await br.read(6);
    host = `${b[0]}.${b[1]}.${b[2]}.${b[3]}`;
    port = (b[4] << 8) | b[5];
  } else if (atyp === 3) {   // Domain name
    const [len] = await br.read(1);
    const b = await br.read(len + 2);
    host = b.slice(0, len).toString();
    port = (b[len] << 8) | b[len + 1];
  } else if (atyp === 4) {   // IPv6
    const b = await br.read(18);
    const parts = [];
    for (let i = 0; i < 16; i += 2)
      parts.push(((b[i] << 8) | b[i + 1]).toString(16));
    host = parts.join(":");
    port = (b[16] << 8) | b[17];
  }
  // ...
}
Depending on the SOCKS5 address type (atyp), it handles three patterns: IPv4 (4 bytes), domain name (length-prefixed + string), and IPv6 (16 bytes). The port number is always 2 bytes in big-endian.
Relaying to Upstream SOCKS5
Once the destination from the browser is known, connect to the SOCKS5 proxy on the bastion via forwardOut and send a CONNECT request upstream using the same protocol.
outer.forwardOut("127.0.0.1", LOCAL_SOCKS_PORT, "127.0.0.1", BASTION_SOCKS_PORT, async (err, ch) => {
  const ur = new Reader();
  ch.on("data", (chunk) => ur.push(chunk));

  // Upstream SOCKS5 greeting
  ch.write(Buffer.from([5, 1, 0]));       // ver=5, 1 method, no-auth
  const gr = await ur.read(2);
  if (gr[0] !== 5 || gr[1] !== 0) throw new Error("upstream rejected auth");

  // Send CONNECT request to upstream
  const hb = Buffer.from(host);
  const req = Buffer.allocUnsafe(7 + hb.length);
  req[0] = 5; req[1] = 1; req[2] = 0; req[3] = 3;  // ver, CONNECT, rsv, domain
  req[4] = hb.length; hb.copy(req, 5);
  req[5 + hb.length] = (port >> 8) & 0xff;
  req[6 + hb.length] = port & 0xff;
  ch.write(req);

  // Read the upstream CONNECT response
  const resp = await ur.read(4);
  if (resp[1] !== 0) throw new Error("upstream CONNECT failed");
  // Skip BND.ADDR (size varies by atyp)
  // ...
Switching from Handshake to Raw Data Pipe
After the handshake completes, stop processing the SOCKS5 protocol and pipe raw TCP data bidirectionally as-is.
// Reply "connection succeeded" to browser
socket.write(Buffer.from([5, 0, 0, 1, 0, 0, 0, 0, 0, 0]));

// Transfer any extra data buffered during the handshake
socket.removeListener("data", onBrData);
ch.removeListener("data", onUpData);
const leftBr = br.flush();
const leftUp = ur.flush();
if (leftBr.length) ch.write(leftBr);
if (leftUp.length) socket.write(leftUp);

// Bidirectional pipe for raw data
socket.pipe(ch);
ch.pipe(socket);
ch.on("close", () => socket.destroy());
socket.on("close", () => ch.destroy());
The key is the flush() processing. Data that remained in the Reader's buffer during the handshake (such as the beginning of an actual HTTP request) must be transferred before switching to the pipe. Forgetting this causes data loss and breaks the connection.
Usage
pnpm socks5
Running it launches Chrome with a dedicated profile, and all traffic is routed through the deploy server's IP.
[1/3] Connecting to bastion...
[2/3] SOCKS5 proxy up on bastion:9092 (exits via target)

[3/3] SOCKS5 proxy ready — localhost:1080
Opening Chrome with isolated profile...
Ctrl+C to close.
execFile("open", ["-n", "-a", "Google Chrome", "--args",
  "--proxy-server=socks5://localhost:" + LOCAL_SOCKS_PORT,
  "--user-data-dir=/tmp/socks5-proxy-chrome",
  TARGET_URL,
]);
Using a dedicated profile with --user-data-dir avoids affecting your normal browser session. --proxy-server specifies the SOCKS5 proxy, routing all traffic through the tunnel.
How to Use the Three Scripts
| Script | Command | Purpose | Destination |
|---|---|---|---|
| proxy.mjs | pnpm proxy |
Checking the app screen | Deploy target:40001 (direct) |
| test-nginx.mjs | pnpm nginx |
nginx routing verification | Deploy target:80 (via nginx) |
| socks5-proxy.mjs | pnpm socks5 |
Accessing IP-restricted resources | Arbitrary destinations (via deploy server IP) |
Configuration via Environment Variables
The three scripts share common environment variables. Set the following in .env.
BASTION_HOST=10.xxx.x.xxx
BASTION_USER=your_user@bastion.local
DEPLOY_USER=your_user
DEPLOY_HOST=10.xxx.x.xx
Since --env-file=.env is specified in package.json, they are automatically loaded from process.env within the scripts.
{
  "scripts": {
    "proxy": "node --env-file=.env scripts/proxy.mjs",
    "nginx": "node --env-file=.env scripts/test-nginx.mjs",
    "socks5": "node --env-file=.env scripts/socks5-proxy.mjs"
  }
}
Summary
By using the ssh2 library, you can incorporate the functionality of OpenSSH's ssh -L (TCP tunnel) and ssh -D (SOCKS5 proxy) into Node.js scripts.
- proxy.mjs: TCP forwarding to a specific port. A simple pattern of
forwardOut+socket.pipe(stream) - test-nginx.mjs: The same pattern with a different destination. Specialized for debugging nginx configuration
- socks5-proxy.mjs: Implements the SOCKS5 protocol from scratch to function as a dynamic proxy
The key design points of socks5-proxy.mjs in particular are the buffered asynchronous reading via the Reader class and the design of switching to a raw data pipe after the handshake completes. These two patterns can be applied broadly to any communication processing that involves binary protocol handshakes, not just SOCKS5.
If you're working in a closed environment and find it tedious to type SSH commands every time just to check things in a browser, please give this a try.