
I tried running the Snowflake Openflow Connector for PostgreSQL on SPCS and connecting it to RDS for PostgreSQL

This page has been translated by machine translation. View original
This is Kasahara from the Data Business Division.
The other day, I tried using Snowflake's Openflow Connector for PostgreSQL to see if I could transfer data from RDS for PostgreSQL to Snowflake via CDC (Change Data Capture).
At that time, I adopted BYOC as the Openflow deployment model and tried running Openflow on EKS in my own AWS account.
This time, I tried adopting SPCS, the other deployment model, to run Openflow on Snowflake and see if I could connect to RDS for PostgreSQL.
Architecture for This Time
The architecture for this time is as follows.
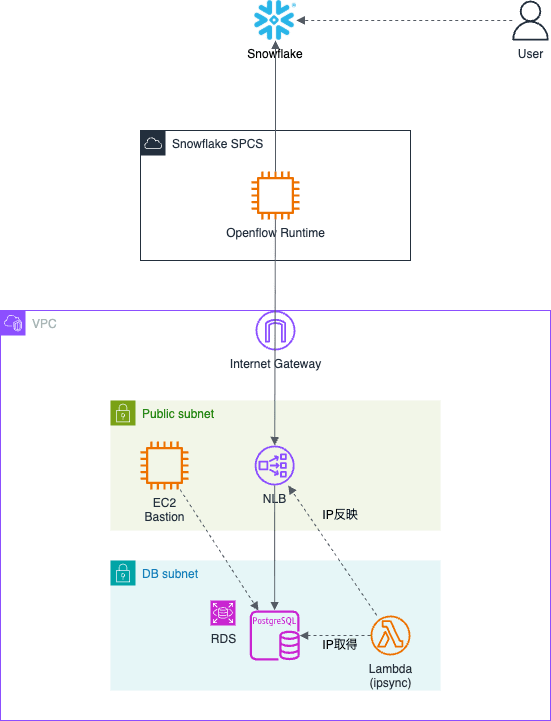
The Openflow runtime runs on SPCS (Snowpark Container Services). Since SPCS is a fully self-contained service within Snowflake, deployment and management become easier.
Regarding the connection to RDS for PostgreSQL, this time instead of a PrivateLink connection, I configured it assuming a connection via the internet so that it can be used even with Snowflake's Standard/Enterprise license.
While making RDS accessible from a public network is also an option, this time I tried enabling connectivity from SPCS by going through an NLB.
In the NLB's security group, I set Snowflake's egress CIDRs as inbound rules to restrict access by IP address. I also prepare a Lambda function that resolves the RDS endpoint to an IP address via DNS lookup and configures it in the NLB's target group.
Setup Steps
1. Network Environment
This time I'm using a simple configuration with two public subnets and two private subnets. Security groups to be used later are also prepared in advance.
The bastion EC2 for executing SQL against the RDS for PostgreSQL instance is created using this template.
Note that the NLB is not created with this template but with a separate template.
Network environment setup CFn template: 01-network.yaml
AWSTemplateFormatVersion: '2010-09-09'

Parameters:
  ProjectName:
    Type: String
    Default: openflow-pg-nlb

  VpcCidr:
    Type: String
    Default: 10.1.0.0/16

  PublicSubnet1Cidr:
    Type: String
    Default: 10.1.0.0/24

  PublicSubnet2Cidr:
    Type: String
    Default: 10.1.1.0/24

  PrivateSubnet1Cidr:
    Type: String
    Default: 10.1.10.0/24

  PrivateSubnet2Cidr:
    Type: String
    Default: 10.1.11.0/24

  BastionInstanceType:
    Type: String
    Default: t3.micro

  LatestAmiId:
    Type: AWS::SSM::Parameter::Value<AWS::EC2::Image::Id>
    Default: /aws/service/ami-amazon-linux-latest/al2023-ami-kernel-default-x86_64

Resources:
  Vpc:
    Type: AWS::EC2::VPC
    Properties:
      CidrBlock: !Ref VpcCidr
      EnableDnsSupport: true
      EnableDnsHostnames: true
      Tags:
        - Key: Name
          Value: !Sub '${ProjectName}-vpc'

  InternetGateway:
    Type: AWS::EC2::InternetGateway
    Properties:
      Tags:
        - Key: Name
          Value: !Sub '${ProjectName}-igw'

  IgwAttachment:
    Type: AWS::EC2::VPCGatewayAttachment
    Properties:
      VpcId: !Ref Vpc
      InternetGatewayId: !Ref InternetGateway

  PublicSubnet1:
    Type: AWS::EC2::Subnet
    Properties:
      VpcId: !Ref Vpc
      CidrBlock: !Ref PublicSubnet1Cidr
      AvailabilityZone: !Select [0, !GetAZs '']
      MapPublicIpOnLaunch: true
      Tags:
        - Key: Name
          Value: !Sub '${ProjectName}-public-1'

  PublicSubnet2:
    Type: AWS::EC2::Subnet
    Properties:
      VpcId: !Ref Vpc
      CidrBlock: !Ref PublicSubnet2Cidr
      AvailabilityZone: !Select [1, !GetAZs '']
      MapPublicIpOnLaunch: true
      Tags:
        - Key: Name
          Value: !Sub '${ProjectName}-public-2'

  PrivateSubnet1:
    Type: AWS::EC2::Subnet
    Properties:
      VpcId: !Ref Vpc
      CidrBlock: !Ref PrivateSubnet1Cidr
      AvailabilityZone: !Select [0, !GetAZs '']
      Tags:
        - Key: Name
          Value: !Sub '${ProjectName}-private-1'

  PrivateSubnet2:
    Type: AWS::EC2::Subnet
    Properties:
      VpcId: !Ref Vpc
      CidrBlock: !Ref PrivateSubnet2Cidr
      AvailabilityZone: !Select [1, !GetAZs '']
      Tags:
        - Key: Name
          Value: !Sub '${ProjectName}-private-2'

  PublicRouteTable:
    Type: AWS::EC2::RouteTable
    Properties:
      VpcId: !Ref Vpc
      Tags:
        - Key: Name
          Value: !Sub '${ProjectName}-rt-public'

  DefaultRoute:
    Type: AWS::EC2::Route
    DependsOn: IgwAttachment
    Properties:
      RouteTableId: !Ref PublicRouteTable
      DestinationCidrBlock: 0.0.0.0/0
      GatewayId: !Ref InternetGateway

  PublicSubnet1RtAssoc:
    Type: AWS::EC2::SubnetRouteTableAssociation
    Properties:
      SubnetId: !Ref PublicSubnet1
      RouteTableId: !Ref PublicRouteTable

  PublicSubnet2RtAssoc:
    Type: AWS::EC2::SubnetRouteTableAssociation
    Properties:
      SubnetId: !Ref PublicSubnet2
      RouteTableId: !Ref PublicRouteTable

  PrivateRouteTable:
    Type: AWS::EC2::RouteTable
    Properties:
      VpcId: !Ref Vpc
      Tags:
        - Key: Name
          Value: !Sub '${ProjectName}-rt-private'

  PrivateSubnet1RtAssoc:
    Type: AWS::EC2::SubnetRouteTableAssociation
    Properties:
      SubnetId: !Ref PrivateSubnet1
      RouteTableId: !Ref PrivateRouteTable

  PrivateSubnet2RtAssoc:
    Type: AWS::EC2::SubnetRouteTableAssociation
    Properties:
      SubnetId: !Ref PrivateSubnet2
      RouteTableId: !Ref PrivateRouteTable

  NlbSecurityGroup:
    Type: AWS::EC2::SecurityGroup
    Properties:
      GroupDescription: internet-facing NLB - inbound 5432 from Snowflake egress IPs (added later).
      VpcId: !Ref Vpc
      SecurityGroupEgress:
        - IpProtocol: -1
          CidrIp: 0.0.0.0/0
          Description: Allow all outbound (forward to RDS target + health checks).
      Tags:
        - Key: Name
          Value: !Sub '${ProjectName}-nlb-sg'

  RdsSecurityGroup:
    Type: AWS::EC2::SecurityGroup
    Properties:
      GroupDescription: RDS PostgreSQL (private) - inbound 5432 from NLB SG and bastion only.
      VpcId: !Ref Vpc
      SecurityGroupIngress:
        - IpProtocol: tcp
          FromPort: 5432
          ToPort: 5432
          SourceSecurityGroupId: !Ref NlbSecurityGroup
          Description: PostgreSQL from the internet-facing NLB nodes.
        - IpProtocol: tcp
          FromPort: 5432
          ToPort: 5432
          SourceSecurityGroupId: !Ref BastionSecurityGroup
          Description: PostgreSQL from bastion (psql admin / postgres setup SQL).
      Tags:
        - Key: Name
          Value: !Sub '${ProjectName}-rds-sg'

  BastionSecurityGroup:
    Type: AWS::EC2::SecurityGroup
    Properties:
      GroupDescription: Bastion host - outbound only (SSM Session Manager, dnf, psql to RDS).
      VpcId: !Ref Vpc
      SecurityGroupEgress:
        - IpProtocol: -1
          CidrIp: 0.0.0.0/0
          Description: Allow all outbound.
      Tags:
        - Key: Name
          Value: !Sub '${ProjectName}-bastion-sg'

  LambdaSecurityGroup:
    Type: AWS::EC2::SecurityGroup
    Properties:
      GroupDescription: IP-sync Lambda - outbound only (ELB + Logs via interface endpoints).
      VpcId: !Ref Vpc
      SecurityGroupEgress:
        - IpProtocol: -1
          CidrIp: 0.0.0.0/0
          Description: Allow all outbound (HTTPS to interface endpoints, DNS).
      Tags:
        - Key: Name
          Value: !Sub '${ProjectName}-lambda-sg'

  VpcEndpointSecurityGroup:
    Type: AWS::EC2::SecurityGroup
    Properties:
      GroupDescription: VPC interface endpoints - inbound 443 from the Lambda SG.
      VpcId: !Ref Vpc
      SecurityGroupIngress:
        - IpProtocol: tcp
          FromPort: 443
          ToPort: 443
          SourceSecurityGroupId: !Ref LambdaSecurityGroup
          Description: HTTPS from the IP-sync Lambda.
      Tags:
        - Key: Name
          Value: !Sub '${ProjectName}-vpce-sg'

  ElbInterfaceEndpoint:
    Type: AWS::EC2::VPCEndpoint
    Properties:
      VpcId: !Ref Vpc
      ServiceName: !Sub 'com.amazonaws.${AWS::Region}.elasticloadbalancing'
      VpcEndpointType: Interface
      PrivateDnsEnabled: true
      SubnetIds:
        - !Ref PrivateSubnet1
        - !Ref PrivateSubnet2
      SecurityGroupIds:
        - !Ref VpcEndpointSecurityGroup

  LogsInterfaceEndpoint:
    Type: AWS::EC2::VPCEndpoint
    Properties:
      VpcId: !Ref Vpc
      ServiceName: !Sub 'com.amazonaws.${AWS::Region}.logs'
      VpcEndpointType: Interface
      PrivateDnsEnabled: true
      SubnetIds:
        - !Ref PrivateSubnet1
        - !Ref PrivateSubnet2
      SecurityGroupIds:
        - !Ref VpcEndpointSecurityGroup

  BastionRole:
    Type: AWS::IAM::Role
    Properties:
      AssumeRolePolicyDocument:
        Version: '2012-10-17'
        Statement:
          - Effect: Allow
            Principal:
              Service: ec2.amazonaws.com
            Action: sts:AssumeRole
      ManagedPolicyArns:
        - arn:aws:iam::aws:policy/AmazonSSMManagedInstanceCore
      Tags:
        - Key: Name
          Value: !Sub '${ProjectName}-bastion-role'

  BastionInstanceProfile:
    Type: AWS::IAM::InstanceProfile
    Properties:
      Roles:
        - !Ref BastionRole

  BastionInstance:
    Type: AWS::EC2::Instance
    Properties:
      InstanceType: !Ref BastionInstanceType
      ImageId: !Ref LatestAmiId
      IamInstanceProfile: !Ref BastionInstanceProfile
      SubnetId: !Ref PublicSubnet1
      SecurityGroupIds:
        - !Ref BastionSecurityGroup
      UserData:
        Fn::Base64: !Sub |
          #!/bin/bash
          # PostgreSQL client (psql) for running postgres/*.sql against RDS.
          dnf install -y postgresql16 || dnf install -y postgresql15
      Tags:
        - Key: Name
          Value: !Sub '${ProjectName}-bastion'

Outputs:
  VpcId:
    Value: !Ref Vpc
    Export:
      Name: !Sub '${ProjectName}-VpcId'
  PublicSubnet1Id:
    Value: !Ref PublicSubnet1
    Export:
      Name: !Sub '${ProjectName}-PublicSubnet1Id'
  PublicSubnet2Id:
    Value: !Ref PublicSubnet2
    Export:
      Name: !Sub '${ProjectName}-PublicSubnet2Id'
  PrivateSubnet1Id:
    Value: !Ref PrivateSubnet1
    Export:
      Name: !Sub '${ProjectName}-PrivateSubnet1Id'
  PrivateSubnet2Id:
    Value: !Ref PrivateSubnet2
    Export:
      Name: !Sub '${ProjectName}-PrivateSubnet2Id'
  NlbSecurityGroupId:
    Description: Attach Snowflake egress IPs here (aws/scripts/update-snowflake-egress-sg.sh --sg-id <this>).
    Value: !Ref NlbSecurityGroup
    Export:
      Name: !Sub '${ProjectName}-NlbSecurityGroupId'
  RdsSecurityGroupId:
    Value: !Ref RdsSecurityGroup
    Export:
      Name: !Sub '${ProjectName}-RdsSecurityGroupId'
  BastionSecurityGroupId:
    Value: !Ref BastionSecurityGroup
    Export:
      Name: !Sub '${ProjectName}-BastionSecurityGroupId'
  LambdaSecurityGroupId:
    Value: !Ref LambdaSecurityGroup
    Export:
      Name: !Sub '${ProjectName}-LambdaSecurityGroupId'
  BastionInstanceId:
    Description: Connect with `aws ssm start-session --target <id>`.
    Value: !Ref BastionInstance
    Export:
      Name: !Sub '${ProjectName}-BastionInstanceId'
2. Database (RDS for PostgreSQL) Environment
We set up the DB that will serve as the data source. This is unchanged from last time.
- rds.logical_replication = 1
- This sets wal_level=logical.
It is applied from the time of creation for newly created instances, but let's verify with SHOW wal_level; just to be sure.
- This sets wal_level=logical.
- PubliclyAccessible = false
- Since we access via NLB, we configure it to not allow public access.
DB environment setup CFn template: 02-rds-postgres.yaml
AWSTemplateFormatVersion: '2010-09-09'

Parameters:
  ProjectName:
    Type: String
    Default: openflow-pg-nlb

  EngineVersion:
    Type: String
    Default: '16.14'

  ParameterGroupFamily:
    Type: String
    Default: postgres16

  DBInstanceClass:
    Type: String
    Default: db.t4g.micro

  AllocatedStorage:
    Type: Number
    Default: 20

  DBName:
    Type: String
    Default: appdb

  MasterUsername:
    Type: String
    Default: postgres

Resources:
  DBSubnetGroup:
    Type: AWS::RDS::DBSubnetGroup
    Properties:
      DBSubnetGroupDescription: !Sub '${ProjectName} RDS subnet group (private)'
      SubnetIds:
        - Fn::ImportValue: !Sub '${ProjectName}-PrivateSubnet1Id'
        - Fn::ImportValue: !Sub '${ProjectName}-PrivateSubnet2Id'
      Tags:
        - Key: Name
          Value: !Sub '${ProjectName}-db-subnet-group'

  DBParameterGroup:
    Type: AWS::RDS::DBParameterGroup
    Properties:
      Description: !Sub '${ProjectName} - logical replication enabled'
      Family: !Ref ParameterGroupFamily
      Parameters:
        rds.logical_replication: '1'
      Tags:
        - Key: Name
          Value: !Sub '${ProjectName}-pg-params'

  DBInstance:
    Type: AWS::RDS::DBInstance
    DeletionPolicy: Delete
    UpdateReplacePolicy: Delete
    Properties:
      DBInstanceIdentifier: !Sub '${ProjectName}-pg'
      Engine: postgres
      EngineVersion: !Ref EngineVersion
      DBInstanceClass: !Ref DBInstanceClass
      AllocatedStorage: !Ref AllocatedStorage
      StorageType: gp3
      DBName: !Ref DBName
      MasterUsername: !Ref MasterUsername
      ManageMasterUserPassword: true   # stores the master password in Secrets Manager
      DBSubnetGroupName: !Ref DBSubnetGroup
      DBParameterGroupName: !Ref DBParameterGroup
      VPCSecurityGroups:
        - Fn::ImportValue: !Sub '${ProjectName}-RdsSecurityGroupId'
      PubliclyAccessible: false   # private; reachable only via the NLB + bastion
      MultiAZ: false
      BackupRetentionPeriod: 1
      DeletionProtection: false
      Tags:
        - Key: Name
          Value: !Sub '${ProjectName}-pg'

Outputs:
  DBEndpointAddress:
    Description: >-
      RDS endpoint host. Use as the RDS_ENDPOINT env for the IP-sync Lambda (03 stack).
      NOTE: clients connect via the NLB DNS name, not this host. Its TLS cert CN is this
      endpoint, so connect with sslmode=require (verify-full against the NLB name fails).
    Value: !GetAtt DBInstance.Endpoint.Address
    Export:
      Name: !Sub '${ProjectName}-DBEndpointAddress'
  DBEndpointPort:
    Value: !GetAtt DBInstance.Endpoint.Port
    Export:
      Name: !Sub '${ProjectName}-DBEndpointPort'
  DBName:
    Value: !Ref DBName
  MasterUserSecretArn:
    Description: Secrets Manager ARN holding the master username/password.
    Value: !GetAtt DBInstance.MasterUserSecret.SecretArn
    Export:
      Name: !Sub '${ProjectName}-MasterUserSecretArn'
3. NLB Environment
We will build the NLB to be used this time, and a Lambda function that sets the RDS endpoint IP in the NLB's target group.
NLB Environment Setup CFn Template 03-nlb-ipsync.yaml
AWSTemplateFormatVersion: '2010-09-09'

Parameters:
  ProjectName:
    Type: String
    Default: openflow-pg-nlb

  SyncScheduleExpression:
    Type: String
    Default: rate(1 minute)

  LogRetentionDays:
    Type: Number
    Default: 14

Resources:
  Nlb:
    Type: AWS::ElasticLoadBalancingV2::LoadBalancer
    Properties:
      Name: !Sub '${ProjectName}-nlb'
      Type: network
      Scheme: internet-facing
      IpAddressType: ipv4
      SecurityGroups:
        - Fn::ImportValue: !Sub '${ProjectName}-NlbSecurityGroupId'
      Subnets:
        - Fn::ImportValue: !Sub '${ProjectName}-PublicSubnet1Id'
        - Fn::ImportValue: !Sub '${ProjectName}-PublicSubnet2Id'
      LoadBalancerAttributes:
        - Key: load_balancing.cross_zone.enabled
          Value: 'true'
        - Key: deletion_protection.enabled
          Value: 'false'
      Tags:
        - Key: Name
          Value: !Sub '${ProjectName}-nlb'

  TargetGroup:
    Type: AWS::ElasticLoadBalancingV2::TargetGroup
    Properties:
      Name: !Sub '${ProjectName}-tg'
      TargetType: ip          # The private IP of RDS is set by the IP-sync Lambda function.
      Protocol: TCP
      Port: 5432
      VpcId:
        Fn::ImportValue: !Sub '${ProjectName}-VpcId'
      HealthCheckProtocol: TCP
      HealthCheckPort: traffic-port
      HealthCheckIntervalSeconds: 30
      HealthyThresholdCount: 3
      UnhealthyThresholdCount: 3
      TargetGroupAttributes:
        - Key: preserve_client_ip.enabled
          Value: 'false'
        - Key: deregistration_delay.timeout_seconds
          Value: '30'
      Tags:
        - Key: Name
          Value: !Sub '${ProjectName}-tg'

  Listener:
    Type: AWS::ElasticLoadBalancingV2::Listener
    Properties:
      LoadBalancerArn: !Ref Nlb
      Protocol: TCP
      Port: 5432
      DefaultActions:
        - Type: forward
          TargetGroupArn: !Ref TargetGroup

  IpSyncLogGroup:
    Type: AWS::Logs::LogGroup
    Properties:
      LogGroupName: !Sub '/aws/lambda/${ProjectName}-nlb-ipsync'
      RetentionInDays: !Ref LogRetentionDays

  IpSyncRole:
    Type: AWS::IAM::Role
    Properties:
      AssumeRolePolicyDocument:
        Version: '2012-10-17'
        Statement:
          - Effect: Allow
            Principal:
              Service: lambda.amazonaws.com
            Action: sts:AssumeRole
      ManagedPolicyArns:
        - arn:aws:iam::aws:policy/service-role/AWSLambdaVPCAccessExecutionRole
      Policies:
        - PolicyName: nlb-target-sync
          PolicyDocument:
            Version: '2012-10-17'
            Statement:
              - Effect: Allow
                Action:
                  - elasticloadbalancing:RegisterTargets
                  - elasticloadbalancing:DeregisterTargets
                Resource: !Ref TargetGroup
              - Effect: Allow
                Action:
                  - elasticloadbalancing:DescribeTargetHealth
                  - elasticloadbalancing:DescribeTargetGroups
                Resource: '*'
      Tags:
        - Key: Name
          Value: !Sub '${ProjectName}-ipsync-role'

  IpSyncFunction:
    Type: AWS::Lambda::Function
    DependsOn: IpSyncLogGroup
    Properties:
      FunctionName: !Sub '${ProjectName}-nlb-ipsync'
      Runtime: python3.12
      Handler: index.handler
      Role: !GetAtt IpSyncRole.Arn
      Timeout: 60
      MemorySize: 128
      ReservedConcurrentExecutions: 1
      VpcConfig:
        SubnetIds:
          - Fn::ImportValue: !Sub '${ProjectName}-PrivateSubnet1Id'
          - Fn::ImportValue: !Sub '${ProjectName}-PrivateSubnet2Id'
        SecurityGroupIds:
          - Fn::ImportValue: !Sub '${ProjectName}-LambdaSecurityGroupId'
      Environment:
        Variables:
          RDS_ENDPOINT:
            Fn::ImportValue: !Sub '${ProjectName}-DBEndpointAddress'
          TARGET_GROUP_ARN: !Ref TargetGroup
          PORT: '5432'
      Code:
        ZipFile: |
          import os
          import socket
          import boto3

          TG_ARN = os.environ["TARGET_GROUP_ARN"]
          HOST = os.environ["RDS_ENDPOINT"]
          PORT = int(os.environ.get("PORT", "5432"))

          elbv2 = boto3.client("elbv2")

          def resolve_ipv4(host):
              infos = socket.getaddrinfo(host, PORT, family=socket.AF_INET,
                                         type=socket.SOCK_STREAM)
              return sorted({info[4][0] for info in infos})

          def current_targets():
              resp = elbv2.describe_target_health(TargetGroupArn=TG_ARN)
              return sorted({d["Target"]["Id"]
                             for d in resp.get("TargetHealthDescriptions", [])})

          def handler(event, context):
              desired = resolve_ipv4(HOST)
              existing = current_targets()
              to_add = [ip for ip in desired if ip not in existing]
              to_remove = [ip for ip in existing if ip not in desired]

              if to_add:
                  try:
                      elbv2.register_targets(
                          TargetGroupArn=TG_ARN,
                          Targets=[{"Id": ip, "Port": PORT} for ip in to_add],
                      )
                      print("registered: %s" % to_add)
                  except Exception as e:
                      print("register failed for %s: %s" % (to_add, e))

              if to_remove and desired:
                  try:
                      elbv2.deregister_targets(
                          TargetGroupArn=TG_ARN,
                          Targets=[{"Id": ip, "Port": PORT} for ip in to_remove],
                      )
                      print("deregistered: %s" % to_remove)
                  except Exception as e:
                      print("deregister failed for %s: %s" % (to_remove, e))

              result = {"host": HOST, "desired": desired,
                        "added": to_add, "removed": to_remove}
              print(result)
              return result
      Tags:
        - Key: Name
          Value: !Sub '${ProjectName}-nlb-ipsync'

  SyncScheduleRule:
    Type: AWS::Events::Rule
    Properties:
      Name: !Sub '${ProjectName}-nlb-ipsync-schedule'
      ScheduleExpression: !Ref SyncScheduleExpression
      State: ENABLED
      Targets:
        - Id: ipsync
          Arn: !GetAtt IpSyncFunction.Arn

  SyncSchedulePermission:
    Type: AWS::Lambda::Permission
    Properties:
      FunctionName: !Ref IpSyncFunction
      Action: lambda:InvokeFunction
      Principal: events.amazonaws.com
      SourceArn: !GetAtt SyncScheduleRule.Arn

Outputs:
  NlbDnsName:
    Value: !GetAtt Nlb.DNSName
    Export:
      Name: !Sub '${ProjectName}-NlbDnsName'
  TargetGroupArn:
    Value: !Ref TargetGroup
    Export:
      Name: !Sub '${ProjectName}-TargetGroupArn'
  IpSyncFunctionName:
    Value: !Ref IpSyncFunction
Incidentally, if the data volume is large and the initial snapshot acquisition is expected to take a long time, please extend the listener's idle timeout duration.
aws elbv2 modify-listener-attributes \
  --listener-arn "$LISTENER_ARN" \
  --attributes Key=tcp.idle_timeout.seconds,Value=6000
Note that we also considered using RDS Proxy as a candidate destination for the NLB target group. After investigation, we decided not to use RDS Proxy due to the following additional limitations of RDS Proxy with RDS for PostgreSQL.
RDS Proxy does not currently support streaming replication mode.
4. Execute the IP Sync Lambda and Register Target IPs
Although registration will also occur via scheduled execution, we will run it manually for immediate reflection and verification.
## Execute
aws lambda invoke \
  --function-name openflow-pg-nlb-nlb-ipsync /dev/stdout
## Verify
aws elbv2 describe-target-health \
  --target-group-arn "$TG_ARN" \
  --query "TargetHealthDescriptions[].{ip:Target.Id,state:TargetHealth.State}" \
  --output table
5. PostgreSQL Configuration
On the PostgreSQL side, we will create sample databases, schemas, and tables to serve as data sources.
The master user password for logging into RDS for PostgreSQL is stored in Secrets Manager, so please check there.
As before, you can either use SSM Session Manager port forwarding to run psql commands from your local PC, or run psql commands directly on the bastion EC2.
If using SSM Session Manager port forwarding, run the ssm start-session command as follows.
export BASTION_ID=<Bastion EC2 Instance ID>
export RDS_ENDPOINT=<DB Endpoint>

aws ssm start-session --region "ap-northeast-1" --target "$BASTION_ID" \
  --document-name AWS-StartPortForwardingSessionToRemoteHost \
  --parameters "{\"host\":[\"$RDS_ENDPOINT\"],\"portNumber\":[\"5432\"],\"localPortNumber\":[\"55432\"]}"
Without closing the terminal running the above command, open a new terminal and run the following command.
psql "host=localhost port=55432 dbname=appdb user=pgadmin sslmode=require" \
  -f postgres/01-test-data.sql
Use the -f option to specify and execute the SQL file.
The contents of the SQL file to be executed are as follows.
Running this SQL file will insert the test data.
Test Data Insertion SQL 01-test-data.sql
CREATE TABLE IF NOT EXISTS public.customers (
    id          BIGINT GENERATED ALWAYS AS IDENTITY PRIMARY KEY,
    name        TEXT        NOT NULL,
    email       TEXT        NOT NULL,
    created_at  TIMESTAMPTZ NOT NULL DEFAULT now(),
    updated_at  TIMESTAMPTZ NOT NULL DEFAULT now()
);

INSERT INTO public.customers (name, email) VALUES
    ('Alice Tanaka',  'alice@example.com'),
    ('Bob Suzuki',    'bob@example.com'),
    ('Carol Yamada',  'carol@example.com');

CREATE TABLE IF NOT EXISTS public.orders (
    id           BIGINT GENERATED ALWAYS AS IDENTITY PRIMARY KEY,
    customer_id  BIGINT      NOT NULL REFERENCES public.customers(id),
    amount       NUMERIC(12,2) NOT NULL,
    status       TEXT        NOT NULL DEFAULT 'NEW',
    created_at   TIMESTAMPTZ NOT NULL DEFAULT now()
);

INSERT INTO public.orders (customer_id, amount, status) VALUES
    (1, 1200.00, 'NEW'),
    (1,  450.50, 'PAID'),
    (2, 9800.00, 'NEW');

-- Row count check
SELECT 'customers' AS table, count(*) FROM public.customers
UNION ALL
SELECT 'orders' AS table, count(*) FROM public.orders;
Next, we will verify the logical replication settings for performing CDC.
At this point, please change and set the password for the PostgreSQL user that the Openflow Connector will use to connect.
The <CHANGE_ME_STRONG_PASSWORD> in the SQL query is the relevant section, so please change this value.
Logical Replication Settings Verification and Publication Configuration 02-logical-replication-setup.sql
-- Check logical replication
SHOW wal_level;
SHOW max_replication_slots;
SHOW max_wal_senders;

-- PUBLICATION
CREATE PUBLICATION snowflake_pub WITH (publish_via_partition_root = true);
ALTER PUBLICATION snowflake_pub ADD TABLE public.customers, public.orders;

-- user for openflow connector
CREATE ROLE openflow_repl WITH LOGIN PASSWORD '<CHANGE_ME_STRONG_PASSWORD>';
GRANT rds_replication TO openflow_repl;

-- Grant for Snapshot / CDC
GRANT CONNECT ON DATABASE public TO openflow_repl;
GRANT USAGE ON SCHEMA public TO openflow_repl;
GRANT SELECT ON ALL TABLES IN SCHEMA public TO openflow_repl;
ALTER DEFAULT PRIVILEGES IN SCHEMA public GRANT SELECT ON TABLES TO openflow_repl;

-- Check
SELECT pubname, schemaname, tablename
FROM pg_publication_tables
WHERE pubname = 'snowflake_pub'
ORDER BY tablename;
6. Snowflake Configuration
Next, we move on to the Snowflake configuration.
Execute the following SQL from a worksheet in Snowsight.
At this point, replace <your_user> in the query with the actual Snowflake username you are working with, and replace <NLB_DNS> with the DNS name of the NLB you created.
Openflow Activation 03-openflow-deployment-setup.sql
USE ROLE ACCOUNTADMIN;

-- Create Openflow Admin Role
CREATE ROLE IF NOT EXISTS OPENFLOW_ADMIN;

-- Grant for Openflow
GRANT CREATE OPENFLOW DATA PLANE INTEGRATION ON ACCOUNT TO ROLE OPENFLOW_ADMIN;
GRANT CREATE OPENFLOW RUNTIME INTEGRATION   ON ACCOUNT TO ROLE OPENFLOW_ADMIN;
GRANT CREATE COMPUTE POOL                   ON ACCOUNT TO ROLE OPENFLOW_ADMIN;

-- Create a warehouse to be used for Openflow execution
CREATE WAREHOUSE IF NOT EXISTS OPENFLOW_WH
  WAREHOUSE_SIZE      = 'XSMALL'
  AUTO_SUSPEND        = 60
  AUTO_RESUME         = TRUE
  INITIALLY_SUSPENDED = TRUE;

-- Grant to your working user
GRANT ROLE OPENFLOW_ADMIN TO USER <YOUR_USER>;

-- OAuth login to the runtime/connector uses the working user's DEFAULT_ROLE.
-- Even if the working user's role is changed to `OPENFLOW_ADMIN`,
-- if DEFAULT_ROLE is ACCOUNTADMIN / ORGADMIN / GLOBALORGADMIN / SECURITYADMIN,
-- access to Openflow will be denied
-- (the error `The role requested has been explicitly blocked ...` is returned)
-- Therefore, change DEFAULT_ROLE to the non-privileged OPENFLOW_ADMIN and set secondary roles to ALL
-- After the change, sign out once and sign back in before operating Openflow
ALTER USER <your_user> SET DEFAULT_ROLE = OPENFLOW_ADMIN;
ALTER USER <your_user> SET DEFAULT_SECONDARY_ROLES = ('ALL');

-- Role associated with the Openflow runtime
CREATE ROLE IF NOT EXISTS OPENFLOW_RUNTIME_ROLE_PGNLB;
-- Grant warehouse usage permissions
GRANT USAGE, OPERATE ON WAREHOUSE OPENFLOW_WH TO ROLE OPENFLOW_RUNTIME_ROLE_PGNLB;

-- Grant permission to Openflow admin role to assign this runtime role when creating the runtime
GRANT ROLE OPENFLOW_RUNTIME_ROLE_PGNLB TO ROLE OPENFLOW_ADMIN;

-- Network connection settings
CREATE DATABASE IF NOT EXISTS OPENFLOW_DB;
CREATE SCHEMA   IF NOT EXISTS OPENFLOW_DB.NETWORKING;

CREATE OR REPLACE NETWORK RULE OPENFLOW_DB.NETWORKING.NLB_PG_EGRESS
  MODE = EGRESS
  TYPE = HOST_PORT
  VALUE_LIST = ('<NLB_DNS>:5432');

CREATE OR REPLACE EXTERNAL ACCESS INTEGRATION OPENFLOW_PG_NLB_EAI
  ALLOWED_NETWORK_RULES = (OPENFLOW_DB.NETWORKING.NLB_PG_EGRESS)
  ENABLED = TRUE;

GRANT USAGE ON INTEGRATION OPENFLOW_PG_NLB_EAI TO ROLE OPENFLOW_RUNTIME_ROLE_PGNLB;
GRANT USAGE ON INTEGRATION OPENFLOW_PG_NLB_EAI TO ROLE OPENFLOW_ADMIN;

-- Create the destination database
CREATE DATABASE IF NOT EXISTS PG_OPENFLOW_NLB_DEST;

GRANT USAGE         ON DATABASE PG_OPENFLOW_NLB_DEST TO ROLE OPENFLOW_RUNTIME_ROLE_PGNLB;
GRANT CREATE SCHEMA ON DATABASE PG_OPENFLOW_NLB_DEST TO ROLE OPENFLOW_RUNTIME_ROLE_PGNLB;
GRANT USAGE ON DATABASE PG_OPENFLOW_NLB_DEST TO ROLE OPENFLOW_ADMIN;
It is necessary to permit connections to external networks using CREATE OR REPLACE EXTERNAL ACCESS INTEGRATION. This configuration will be reflected in the Openflow runtime later.
7. Openflow Deploy Configuration
Next, configure the Openflow deployment from Snowsight.
Switch the working user to the OPENFLOW_ADMIN role before proceeding.
From the left menu in Snowsight, click "Data" > "Openflow", then click "Launch Openflow".
Once the Openflow screen appears, click "Create a deployment".
On the "Prerequisites" screen, click "Next". On the "Deployment location" screen, select "Snowflake", enter an appropriate deployment name in the "Name" field, and click "Next".
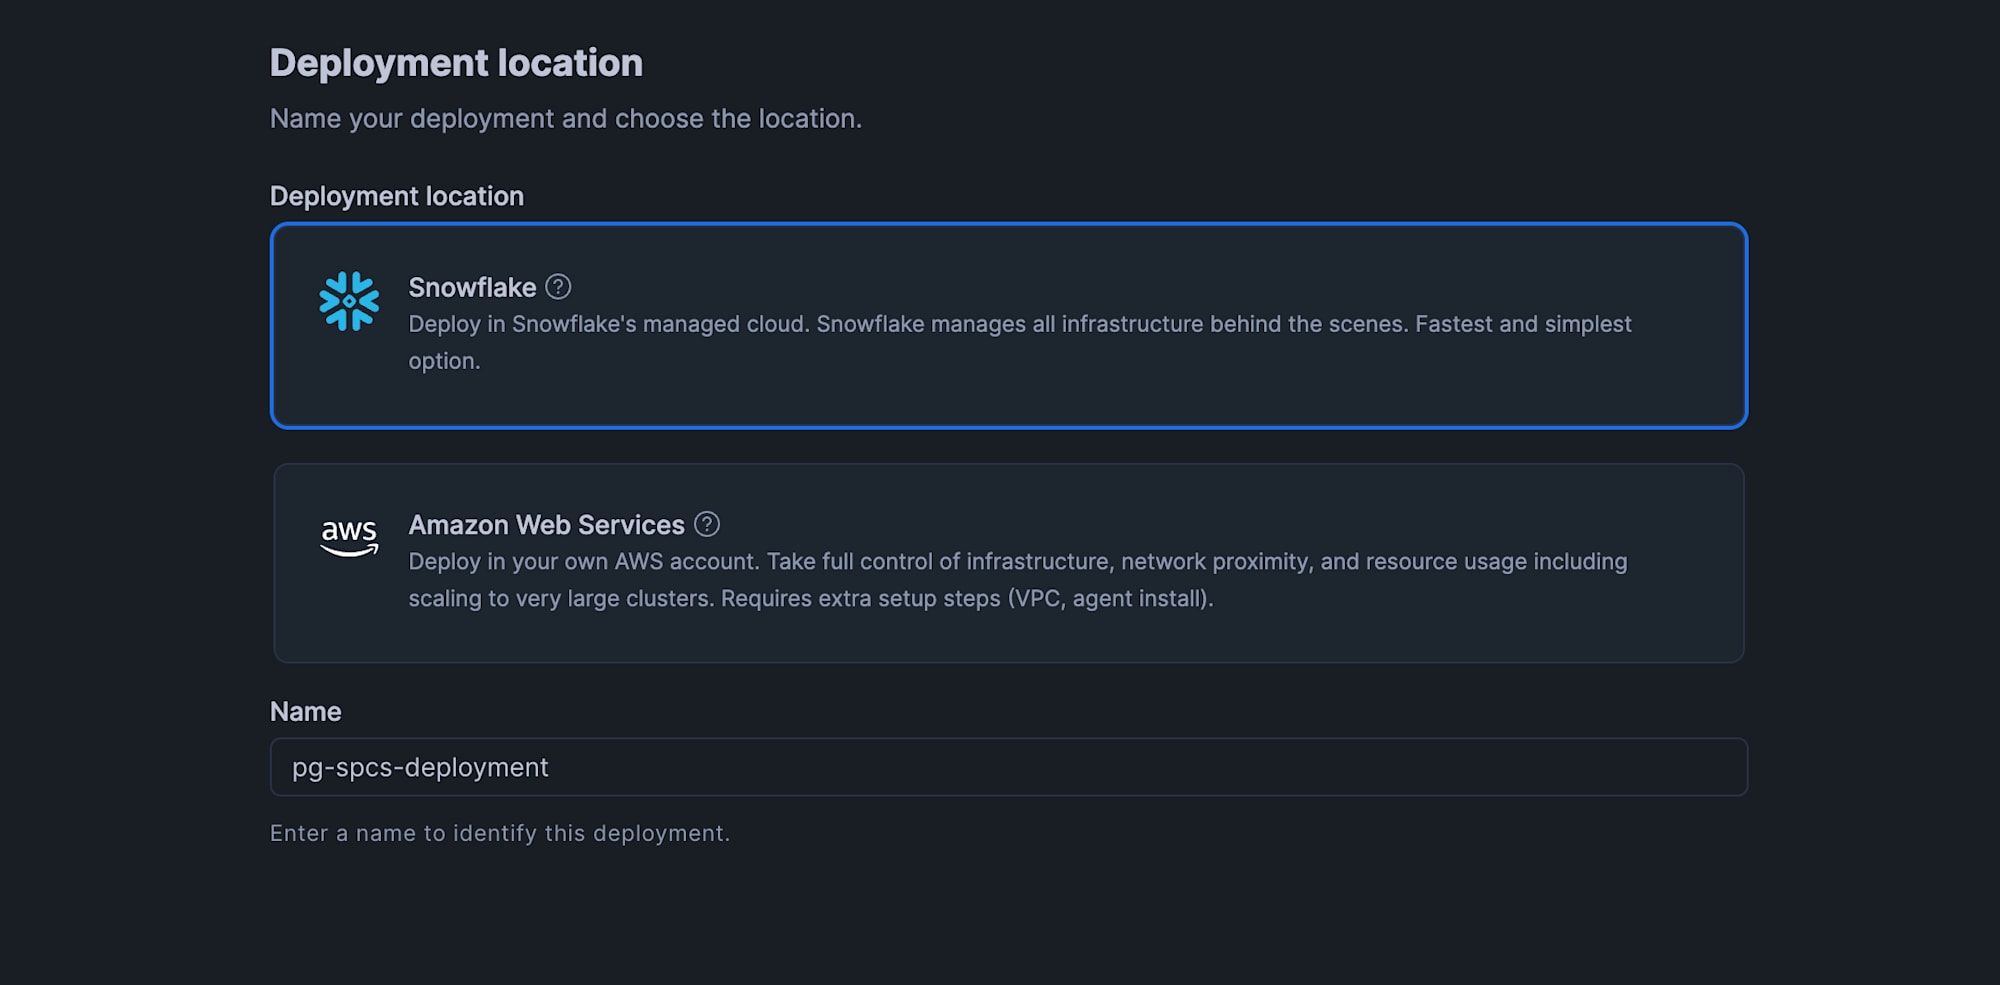
On "Deployment configuration", leave everything as-is for now and click "Create deployment".
Once the Openflow deployment status becomes Active, proceed to the next step.
8. Openflow Runtime Configuration
Next, configure the Openflow Runtime.
From the Openflow screen, click "Create a runtime".
On the "Create runtime" screen, configure the following settings and click "Create".
- Deployment
- Select the Openflow deployment name you created
- Runtime Name
- Enter as appropriate
- Here we use
PGNLB
- Node size
- Select Medium or higher
- Here we select
Medium
- Min nodes
- 1
- Max nodes
- 1
- Due to PostgreSQL connector requirements that do not support multi-node, specify
1for both Min nodes and Max nodes to ensure a single node configuration- Reference: Openflow Requirements
- Execute-as role
- Select
OPENFLOW_RUNTIME_ROLE_PGNLB
- Select
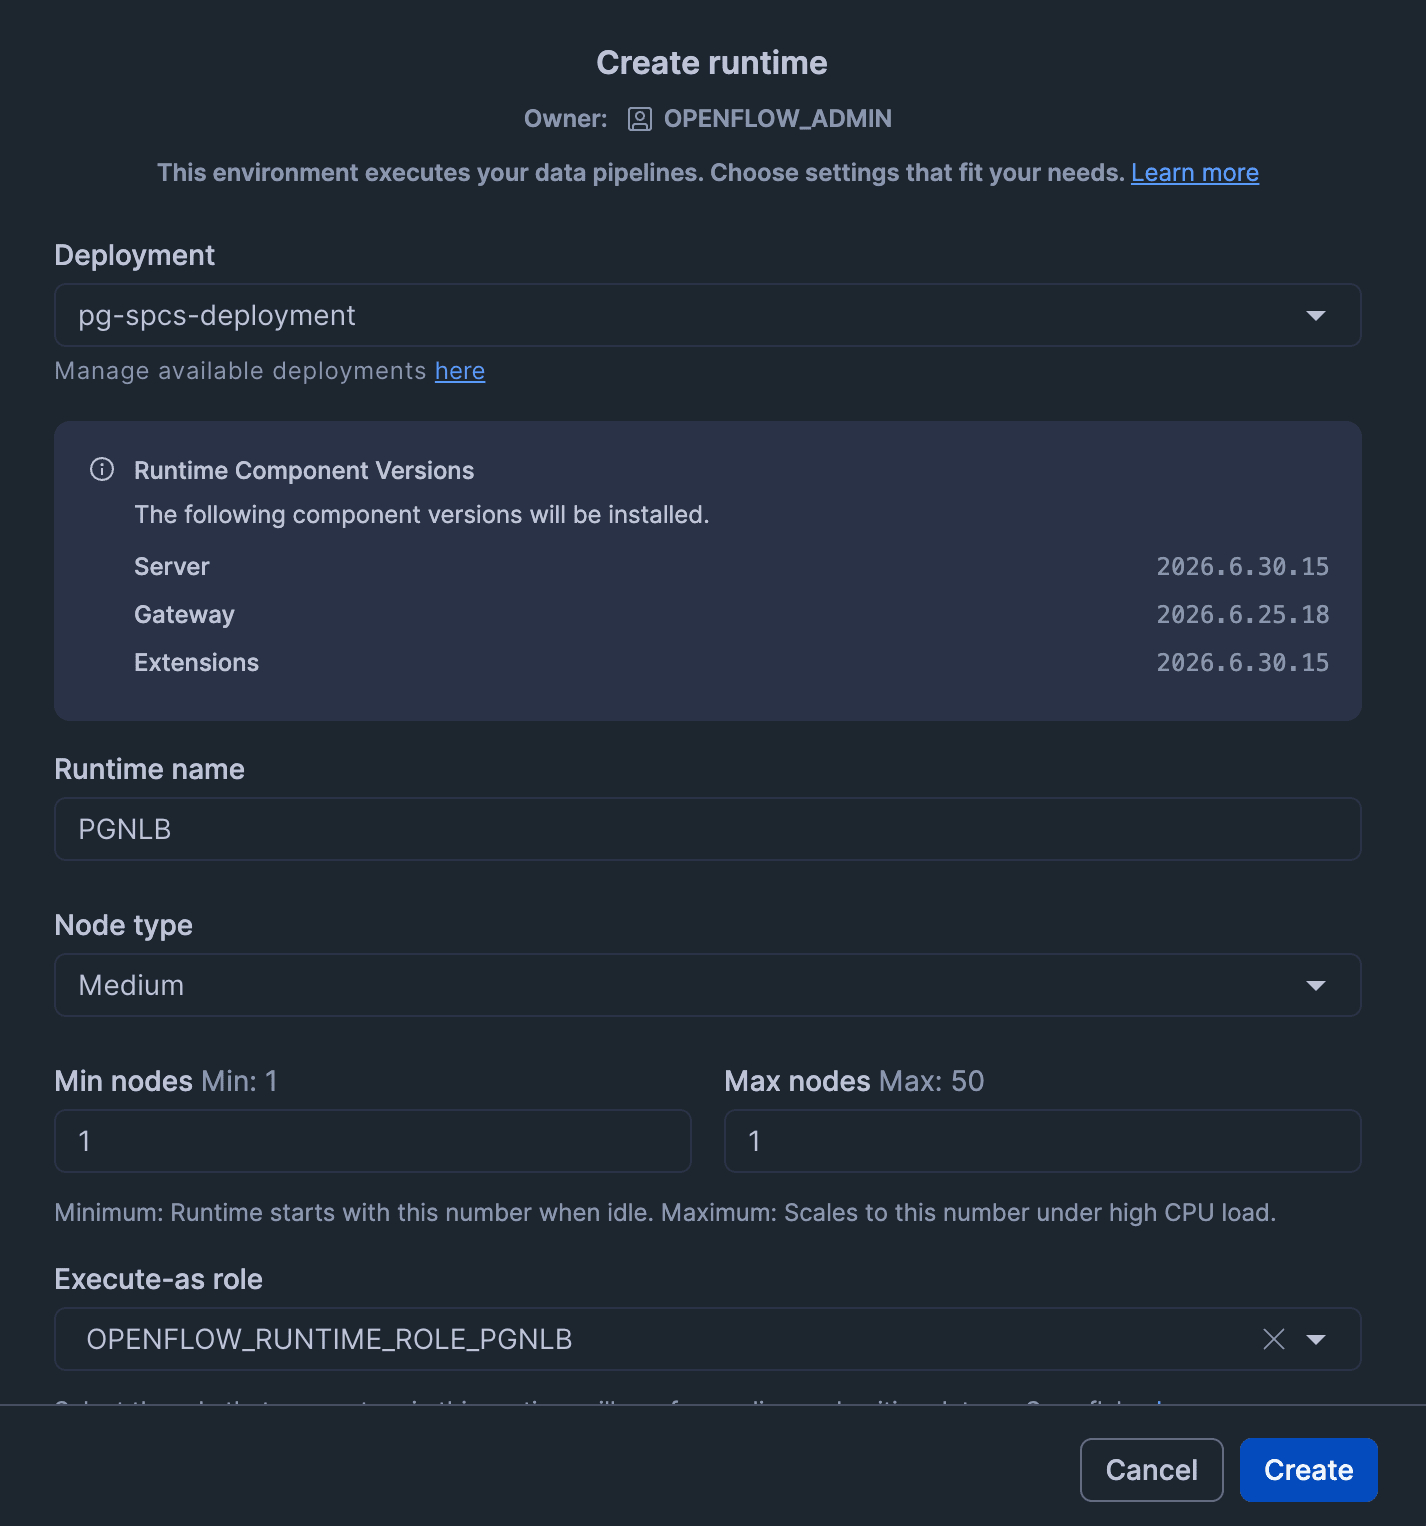
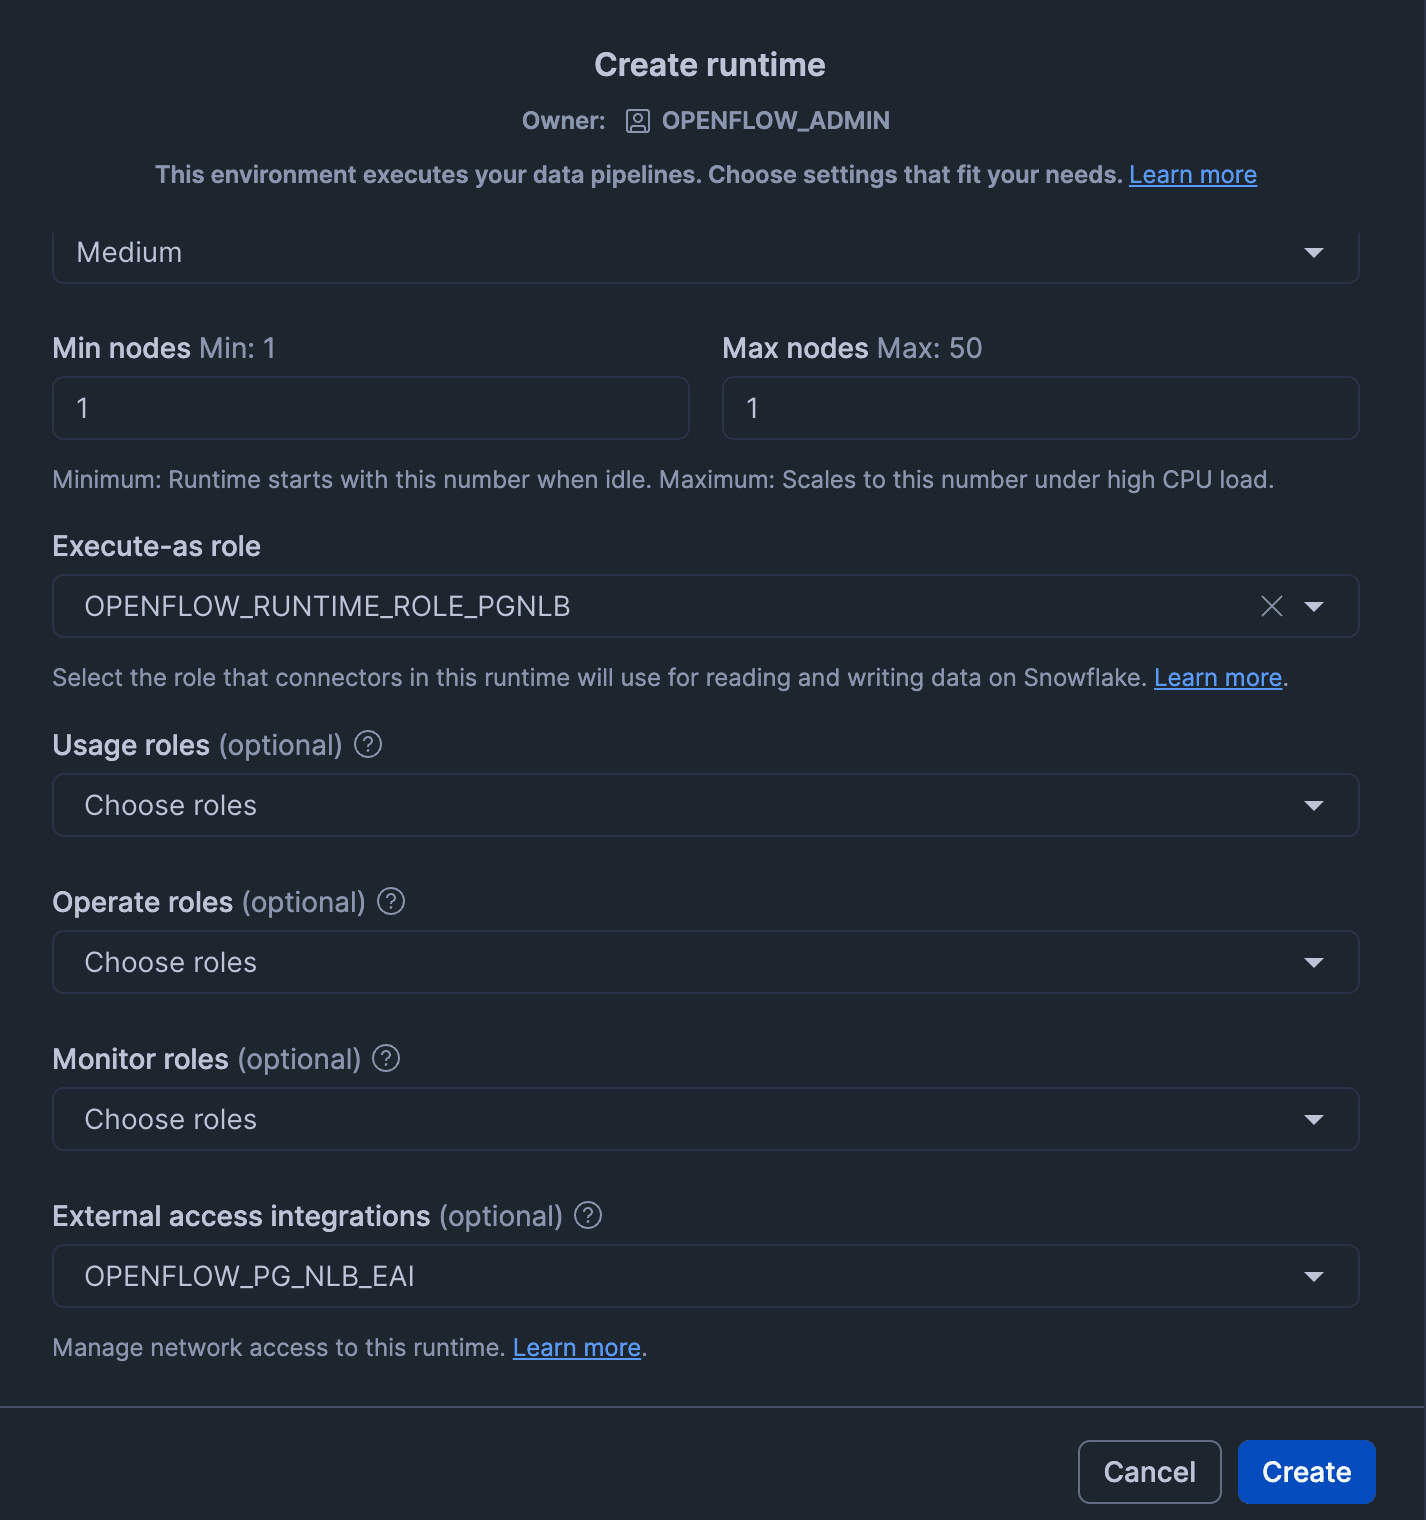
This will create the runtime.
Creation takes approximately 2 minutes. Wait until the runtime status becomes "Active".
9. Installing the Openflow Connector
Once the Openflow Runtime is created, install the connector for PostgreSQL.
If "PostgreSQL" is displayed under "Featured connectors" on the Openflow overview screen, click "Install" on the PostgreSQL panel.
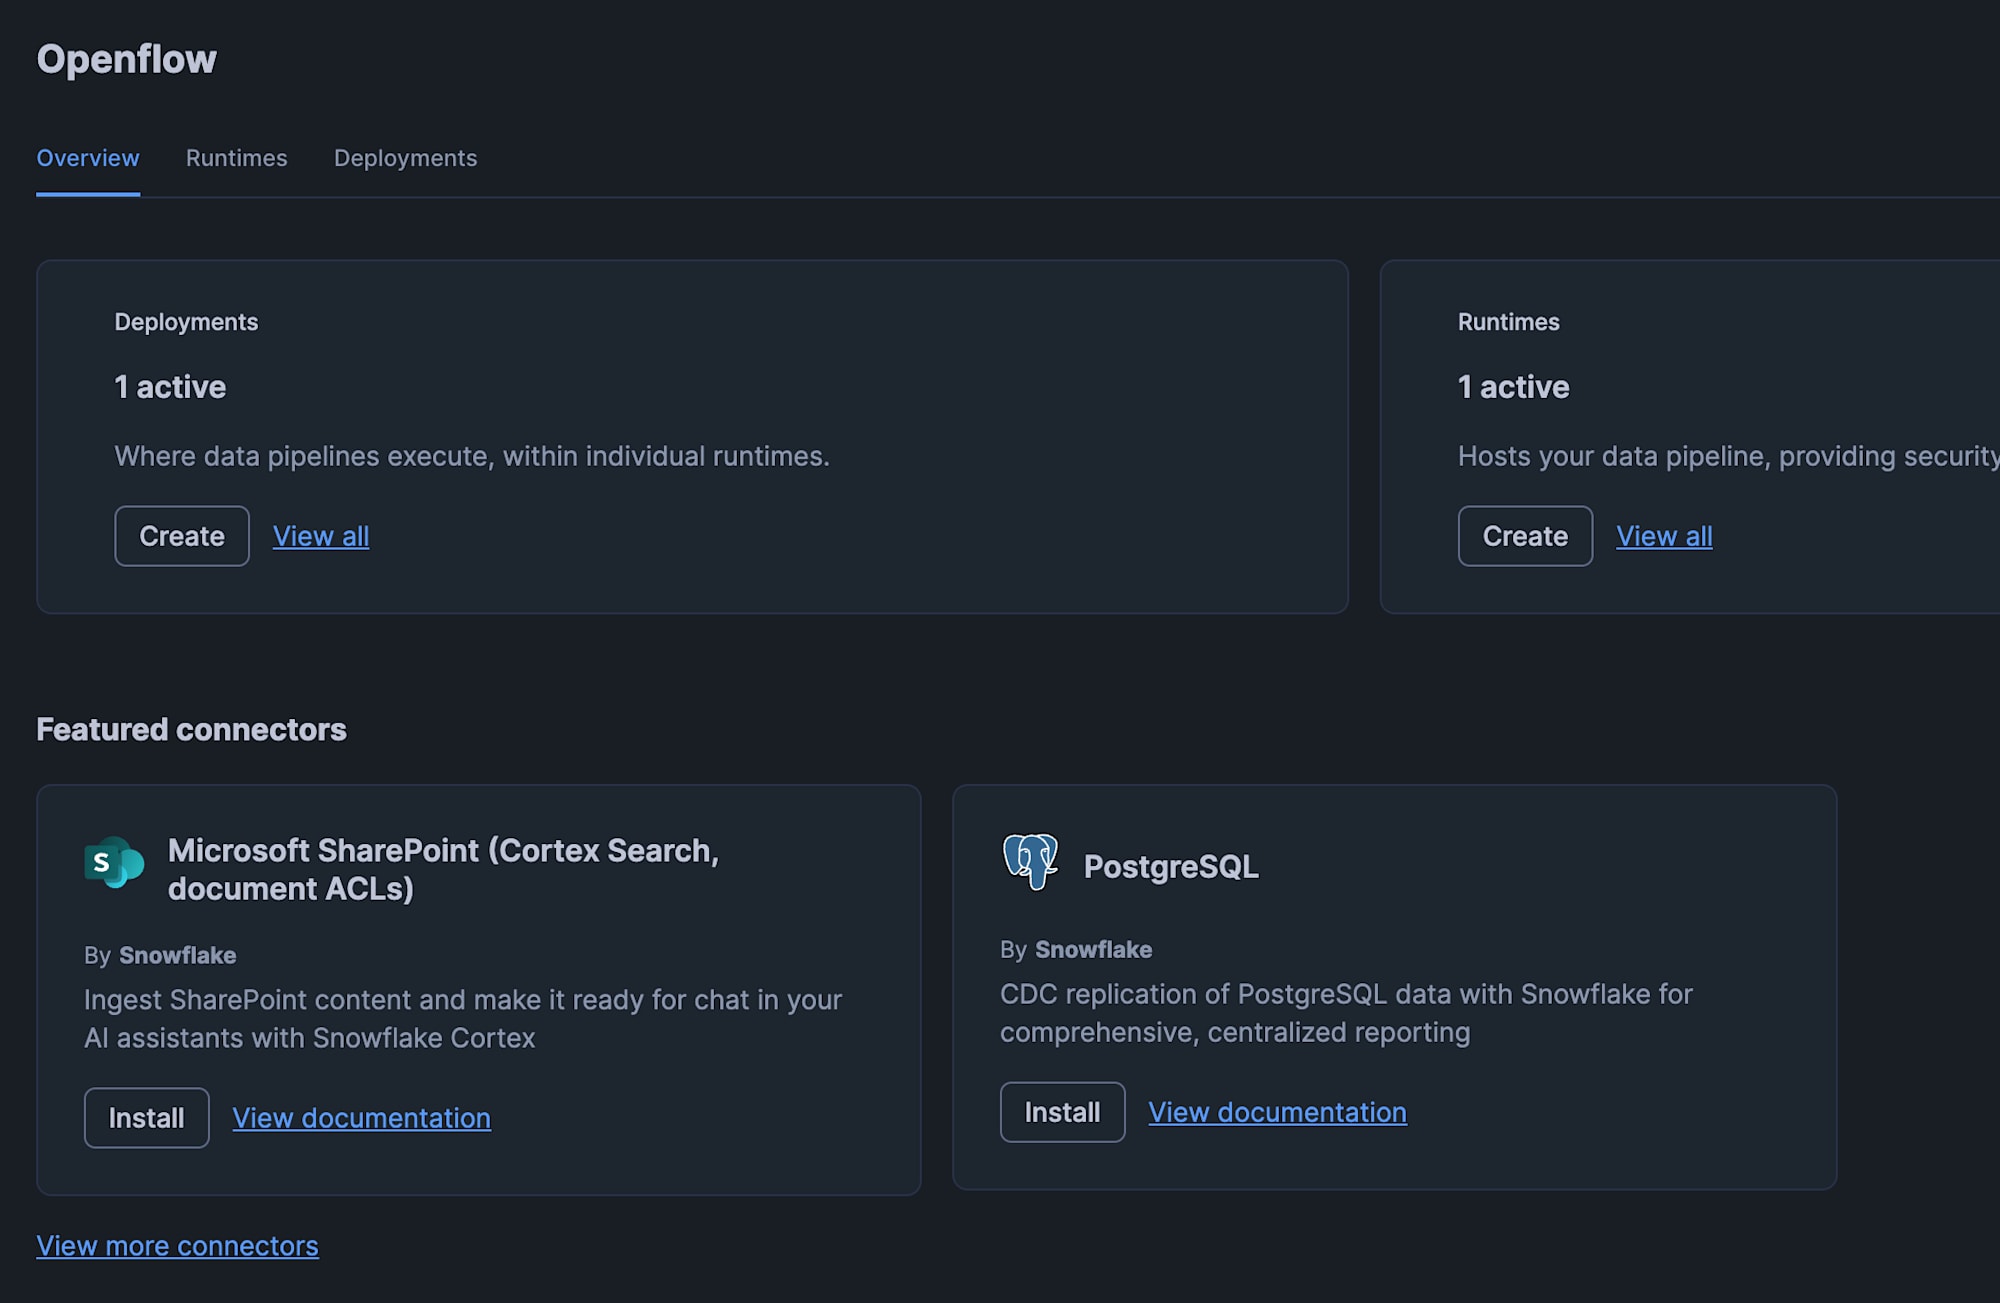
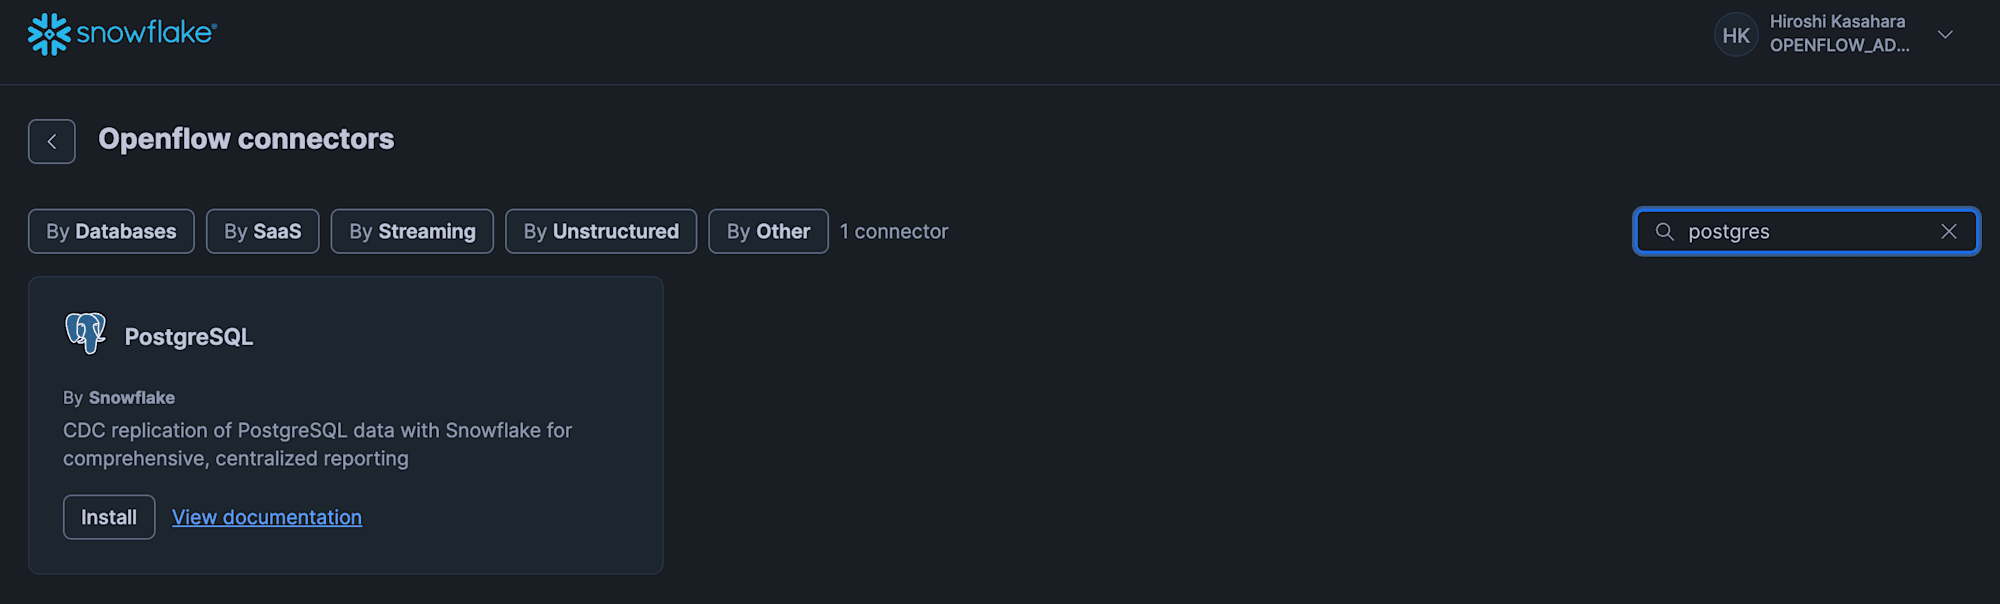
If it is not displayed, click the "View more connectors" link, search for "PostgreSQL" in the connector list, and similarly click "Install".
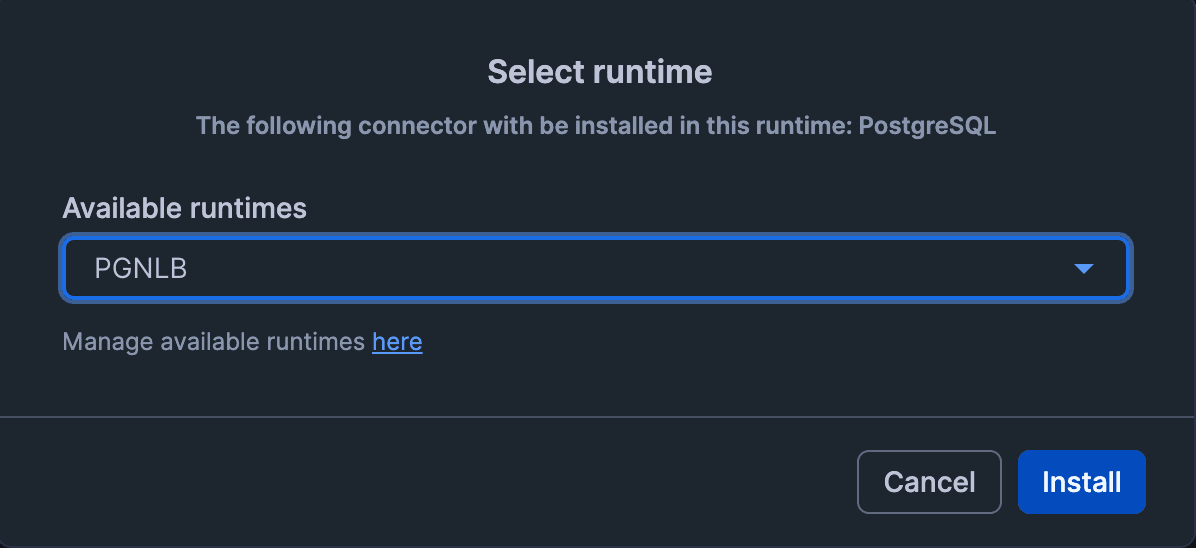
Select the Openflow Runtime where the PostgreSQL connector will be installed.
Here, select the Openflow Runtime you just created.
Clicking the "Add" button will install the PostgreSQL connector into the runtime.
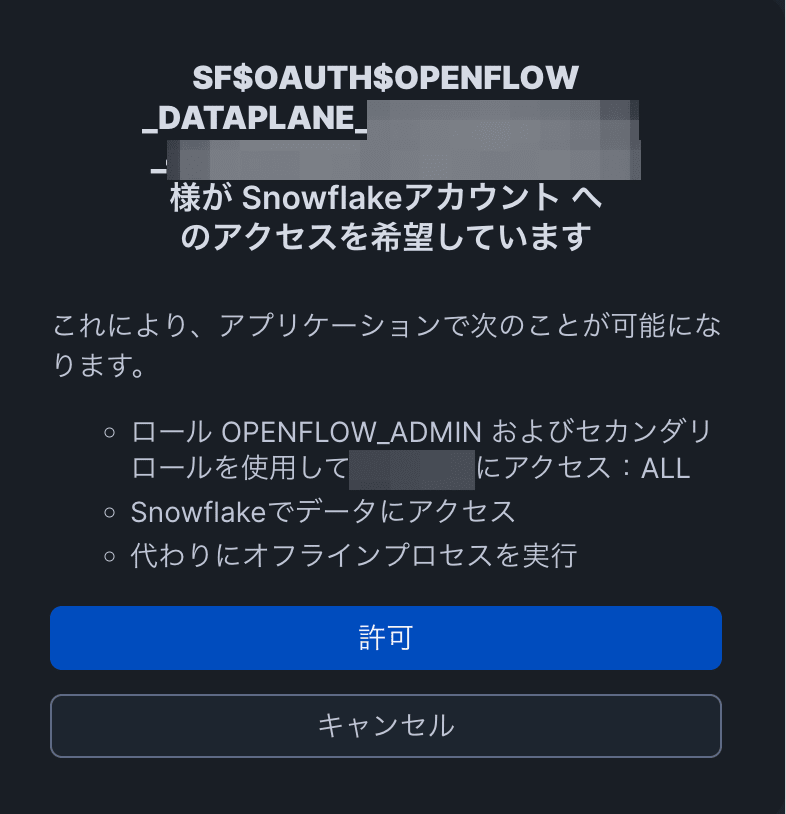
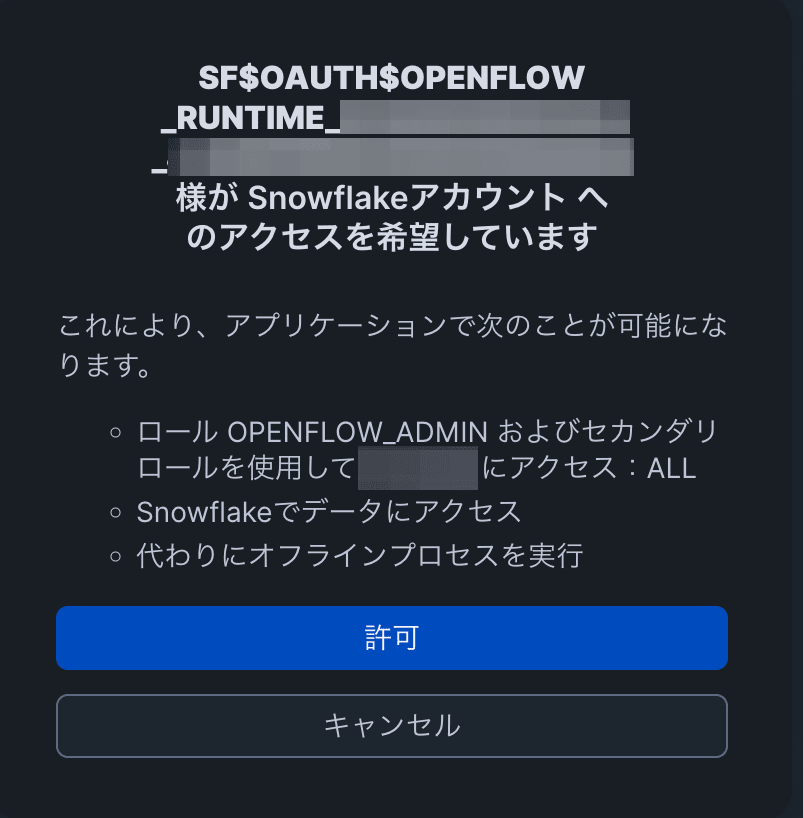
Authenticate with Snowflake credentials and grant access to the runtime.
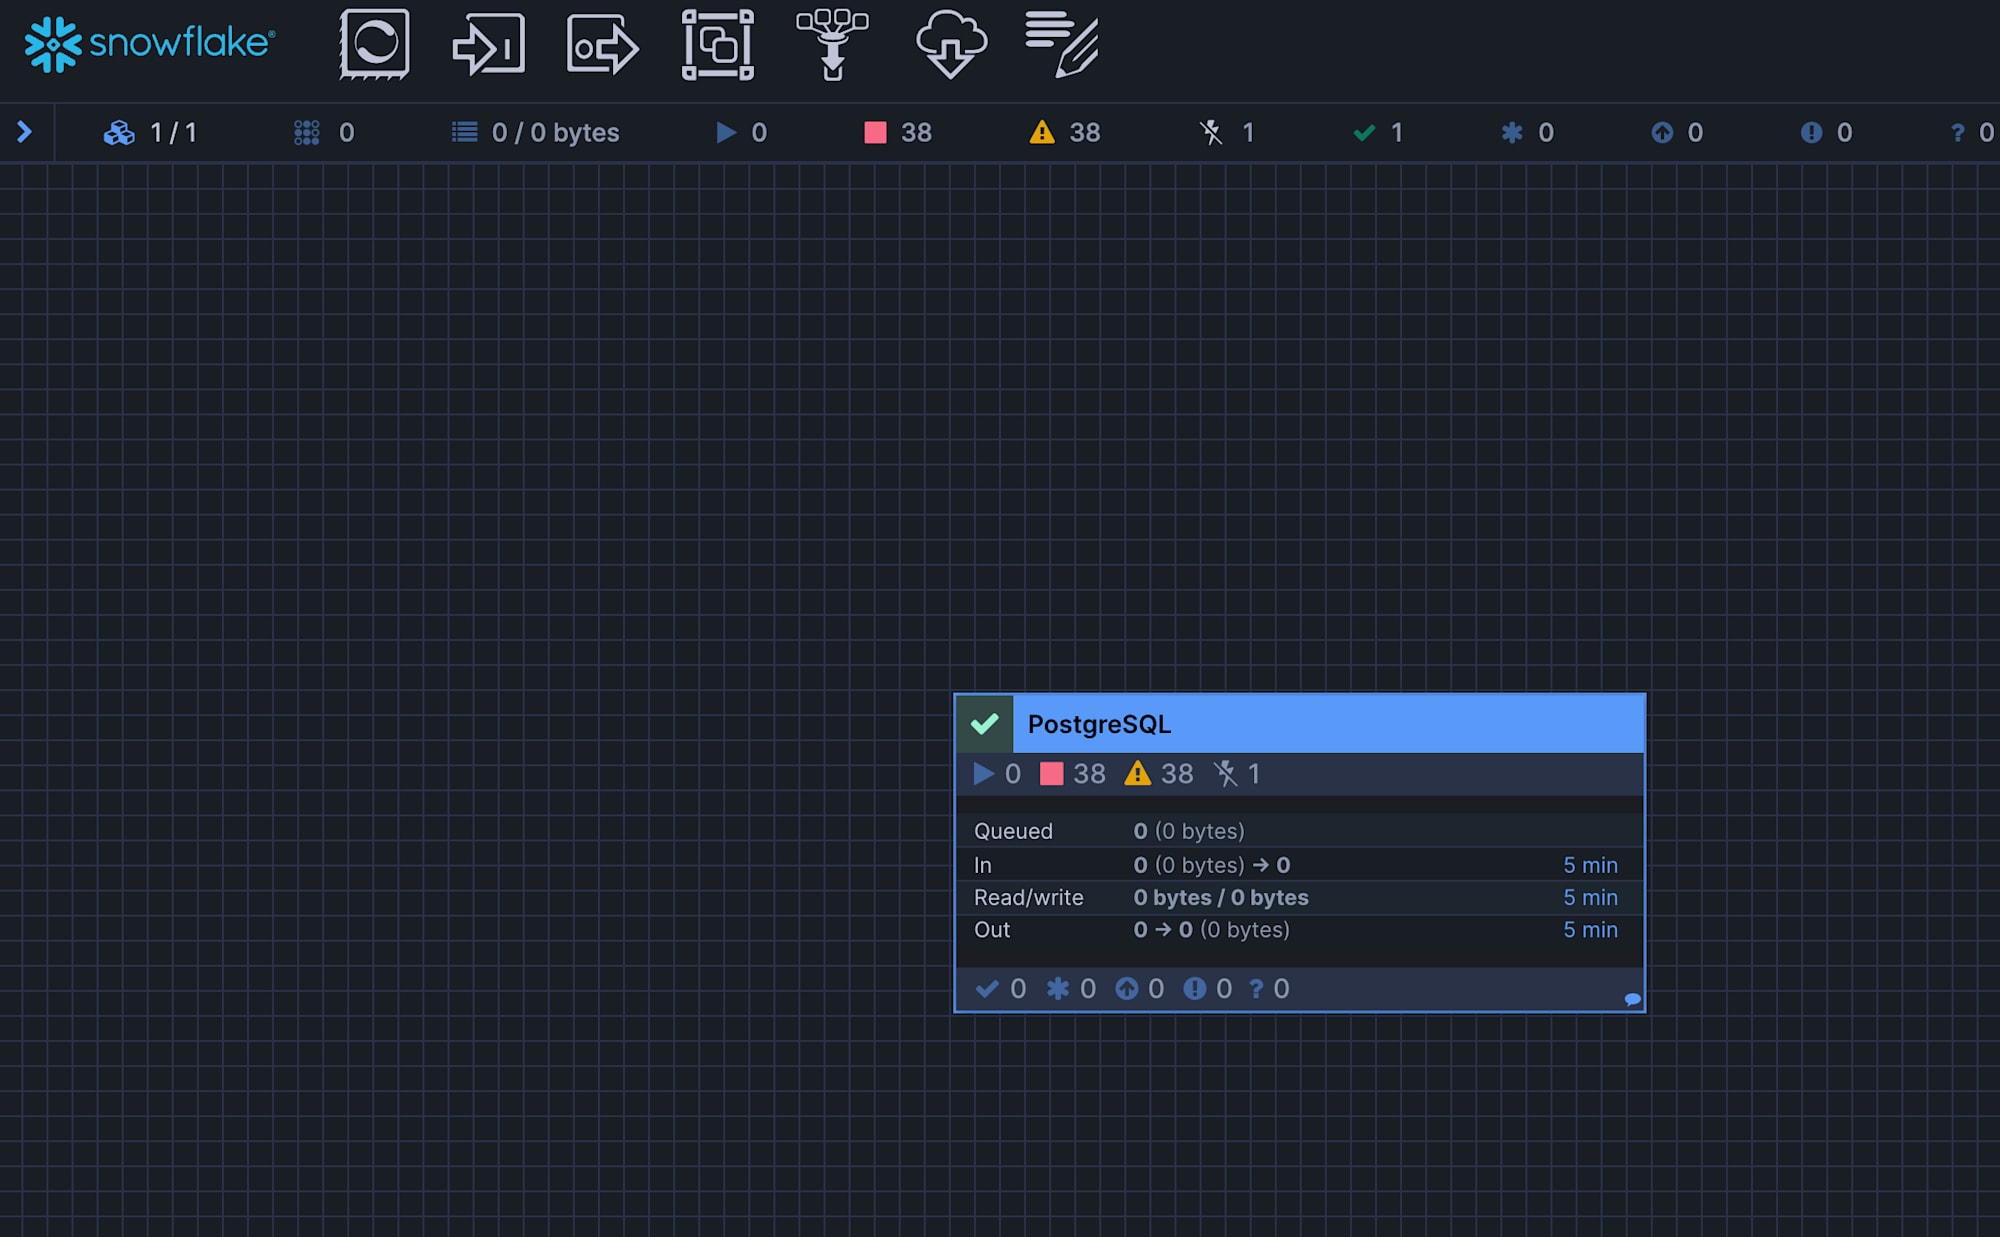
Upon success, the connector's process group will be displayed on the canvas.
Note that if "The role requested has been explicitly blocked for use with this application" is displayed when accessing the runtime and you are redirected to the login screen, you need to change the DEFAULT_ROLE setting of the working user for authentication.
This is configured in 03-openflow-deployment-setup.sql, but if this part has not yet been applied, please configure it again.
ALTER USER <your_user> SET DEFAULT_ROLE = OPENFLOW_ADMIN;
ALTER USER <your_user> SET DEFAULT_SECONDARY_ROLES = ('ALL');
10. Openflow Connector Configuration
On the canvas, perform the following configuration.
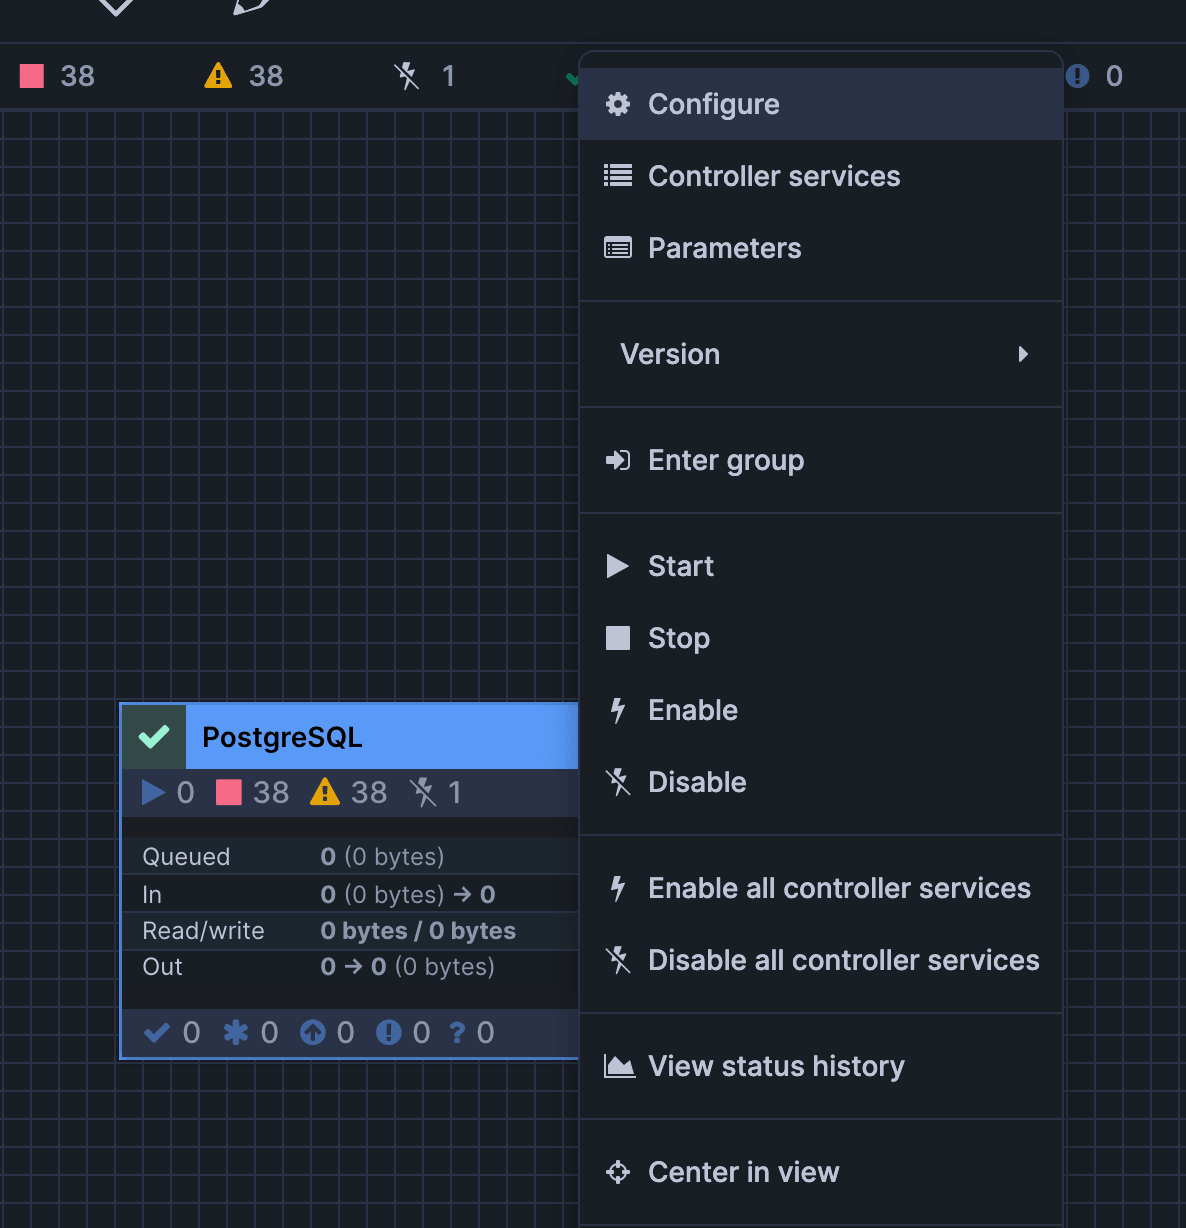
First, right-click the box labeled PostgreSQL and click "Parameters".
Set the values for Source / Destination / Ingestion as shown below, and click "Apply" for each of Source / Destination / Ingestion to apply the settings.
When clicking "Parameters", one of the Source / Destination / Ingestion parameter setting screens will pop up, so configure it as appropriate and then move on to the other parameter settings.
Source (Connection settings for RDS for PostgreSQL)
| Parameter | Value |
|---|---|
| PostgreSQL Connection URL | jdbc:postgresql://<NLB_DNS>:5432/appdb?sslmode=require |
| PostgreSQL Username | openflow_repl |
| PostgreSQL Password | Password set in 02-publication-user.sql |
| Publication Name | snowflake_pub |
| PostgreSQL JDBC Driver | Upload the JDBC jar from postgresql.org and specify it (also check "Reference asset") |
| Replication Slot Name | Can be left empty (a Replication Slot named snowflake_connector_<random> will be created automatically) |
For instructions on how to upload the JDBC jar file, please refer to this DevelopersIO article.
Destination (Connection settings for Snowflake)
| Parameter | Value |
|---|---|
| Destination Database | PG_OPENFLOW_NLB_DEST |
| Destination Schema Pattern | e.g. ${source.schema.name} (reproduces the public schema from the source PostgreSQL) |
| Snowflake Authentication Strategy | SNOWFLAKE_MANAGED |
| Snowflake Role | OPENFLOW_RUNTIME_ROLE_PGNLB |
| Snowflake Warehouse | OPENFLOW_WH |
Ingestion (Ingestion settings)
| Parameter | Value |
|---|---|
| Included Table Names | public.customers,public.orders |
| Merge Task Schedule (CRON) | e.g. 0 * * * * ? (every 1 minute. For trial purposes. Adjust for production) |
11. Allow Snowflake Egress IPs in the NLB Security Group
Before starting the flow, run the following SQL in Snowsight to obtain the Snowflake-side IP address ranges.
-- Run in Snowsight and note down the IPv4 CIDRs
SELECT SYSTEM$GET_SNOWFLAKE_EGRESS_IP_RANGES();
For each noted CIDR, add an ingress allow rule to the NLB's Security Group.
aws ec2 authorize-security-group-ingress \
    --region "ap-northeast-1" \
    --group-id "$NLB_SG" \
    --ip-permissions \
          "IpProtocol=tcp,FromPort=${PORT},ToPort=${PORT},IpRanges=[{CidrIp=${cidr},Description=snowflake-egress}]"
12. Starting the Flow
Right-click on a non-box area of the canvas and click "Enable all Controller Services".
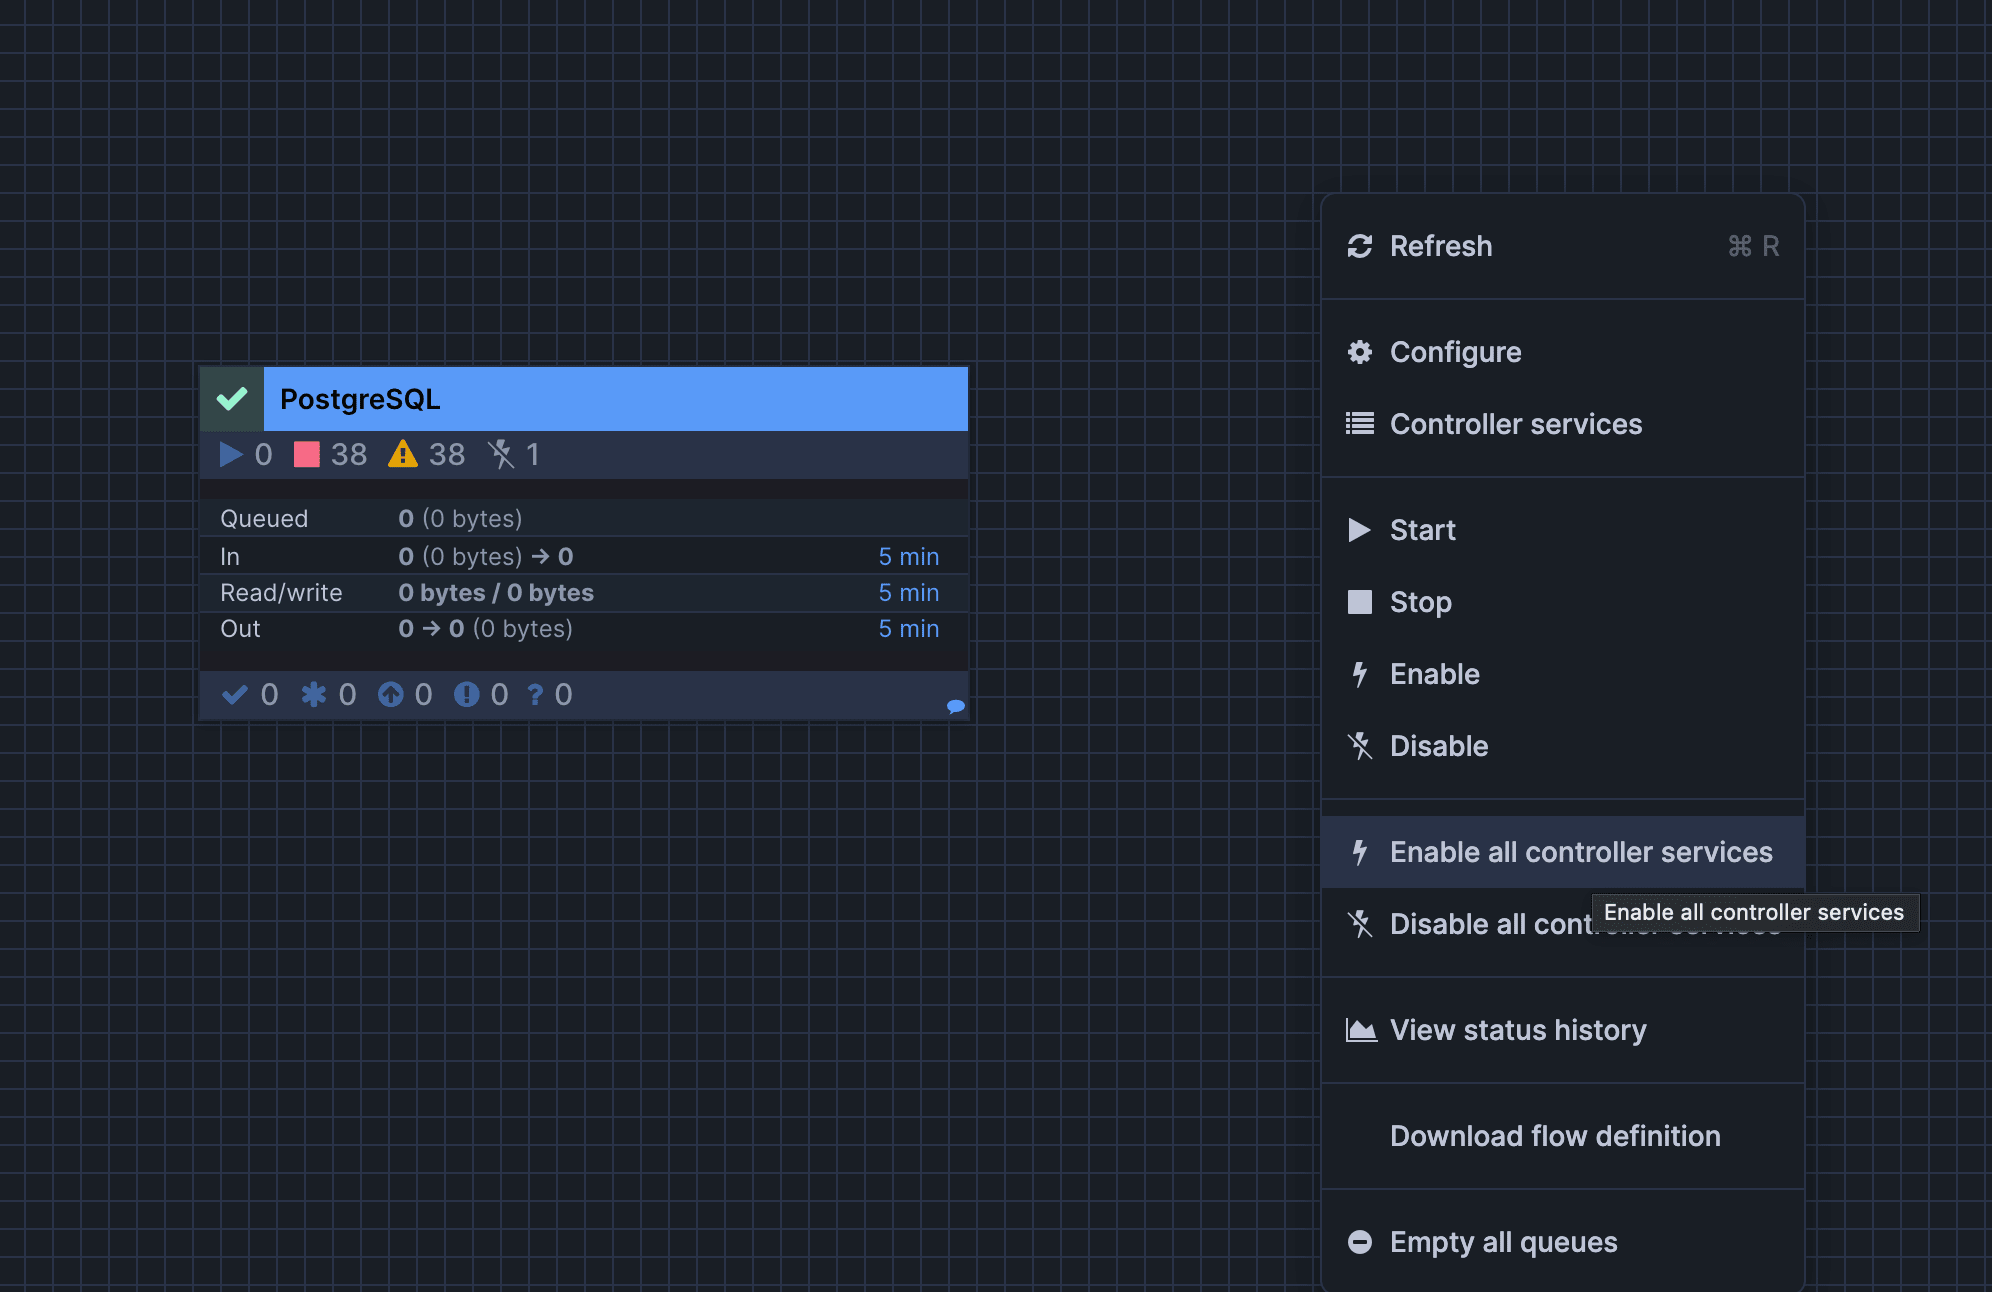
Next, right-click the box on the canvas and click "Start".
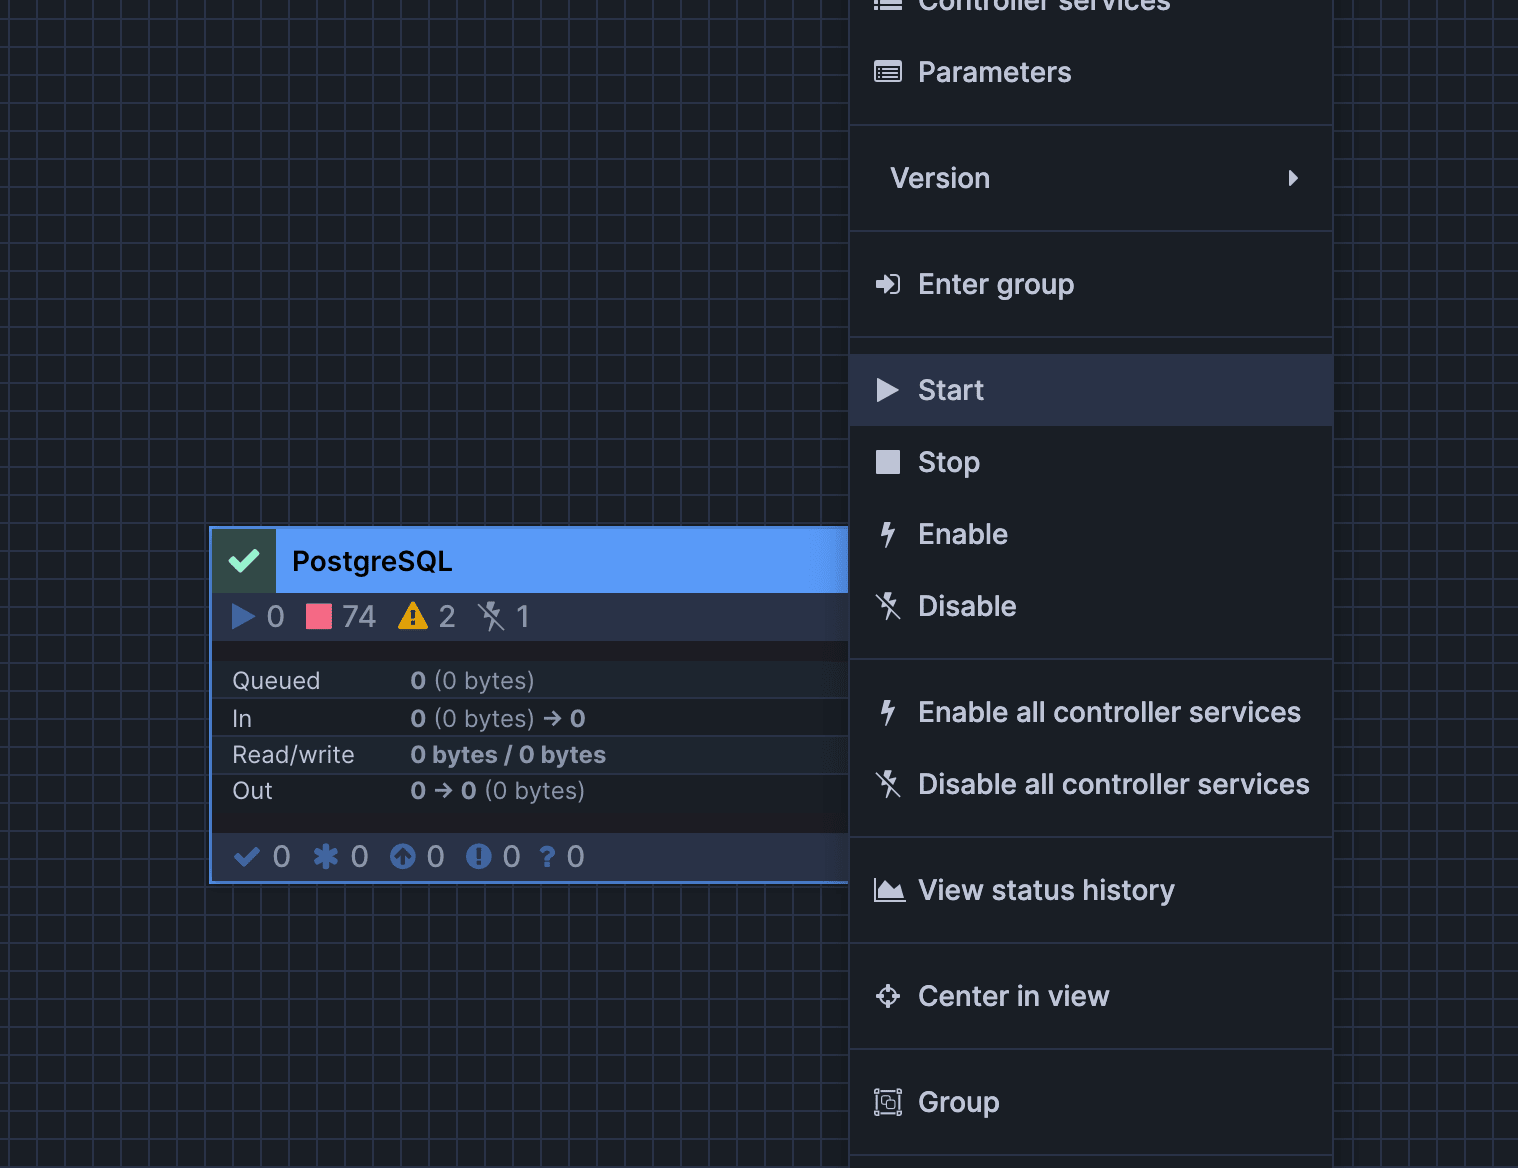
Executing the above steps in order will start the connector and begin ingestion in the order of initial snapshot → incremental (CDC).
Operation Verification
Once the connector has started, perform operation verification.
Initial Snapshot
First, let's confirm that the initial snapshot has completed successfully.
Once the initial snapshot is complete, you can see that the target schema public configured with PostgreSQL publication and each table are reflected in Snowflake.
From Snowsight, run the following SQL to check the number of records.
SELECT COUNT(*) FROM PG_OPENFLOW_NLB_DEST."public"."customers";
SELECT COUNT(*) FROM PG_OPENFLOW_NLB_DEST."public"."orders";
The counts should match the number of records stored in PostgreSQL.
CDC (Incremental Transfer)
Next, we will update data in the source PostgreSQL and verify that the changes are reflected in Snowflake.
The following SQL queries were executed against PostgreSQL to modify the data.
INSERT INTO public.orders (customer_id, amount, status) VALUES (3, 250.00, 'NEW');
UPDATE public.customers SET name = 'Alice T.', updated_at = now() WHERE id = 1;
DELETE FROM public.orders WHERE id = 2;
After the Merge schedule (every 1 minute), confirm the changes on the Snowflake side.
SELECT * FROM PG_OPENFLOW_NLB_DEST."public"."customers" ORDER BY "id";
SELECT * FROM PG_OPENFLOW_NLB_DEST."public"."orders"    ORDER BY "id";
Summary
What did you think?
This time, we deployed the Snowflake Openflow Connector for PostgreSQL on Snowflake's SPCS.
The initial setup was surprisingly challenging, similar to BYOC, but we were able to confirm that it works.
This time we connected over the internet, but when running the Openflow Connector on SPCS, connecting via PrivateLink is more secure.
Connecting via PrivateLink requires Snowflake's Business Critical edition, so organizations using Snowflake on the Standard or Enterprise edition will
likely need to take measures such as restricting access to only Snowflake's CIDR range for connection patterns like this one.
We hope this article has been helpful.