What is MCP Gateway? I tried the OSS ContextForge as an entry point for asking AI about business system data

This page has been translated by machine translation. View original
More and more people are asking about letting AI agents access internal business system data. For example, customer management systems like Salesforce, file sharing, accounting, expense reimbursement... the data they want to access is scattered across various business systems.
You might think "Why not just connect the AI agent directly to each system?" but as the number of targets increases, problems start to emerge. In this article, I'll organize those problems and then introduce the concept of MCP Gateway that has emerged as a solution, and actually try out the OSS implementation ContextForge.
MCP Gateway is a category where multiple vendors and OSS projects have already released products with similar definitions. It's a layer that sits between AI agents and groups of MCP servers, taking centralized control of cross-cutting concerns like authentication and access control. This article assumes readers who have used MCP (Model Context Protocol, the standard protocol for connecting AI agents to external tools) but haven't looked into Gateways for managing them.
For MCP itself, our company blog also has an explanation, so please refer to that.
What Goes Wrong with Direct Connections
First, let's think about a configuration where AI agents are connected directly to each business system.
It looks simple at first, but as the number of systems increases, the following problems accumulate.
- Configuration becomes cumbersome: For each client or agent, you must register and manage connection destinations one by one
- Authentication is fragmented: Each system has different authentication methods and token management, requiring individual handling
- Audit logs can't be captured: There's no central place to record who accessed which system's data and how much
- Costs are unpredictable: When API usage is pay-per-use, agents can call freely and costs can skyrocket without limit
- Access control is coarse: Fine-grained control like "this agent can only access this data" is difficult, and it tends to be all-or-nothing
What's even more troublesome is that connecting to AI agents via MCP usually requires a translation layer (MCP wrapper) that makes each existing Web API speak MCP. Building and operating these individually leads to a proliferation of wrappers, and the problems above become distributed across as many systems as there are.
Solving these one by one is quite a burden.
"MCP Gateway" That Solves These Problems
That's where the concept of MCP Gateway has recently emerged.
An MCP Gateway is a single, controlled entry point that sits between AI agents and business systems. By ensuring all tool calls pass through this "checkpoint," authentication, auditing, and control can be centralized in one place.
The problems mentioned earlier map neatly to the features that MCP Gateway provides.
| Direct Connection Problem | Solution with MCP Gateway |
|---|---|
| Cumbersome configuration | Consolidate and route multiple systems to a single endpoint |
| Fragmented authentication | Centralize authentication and authorization at the entry point |
| Can't capture audit logs | Record all calls in one place (audit logs / observability) |
| Unpredictable costs | Enforce call limits with rate limiting / quotas, reduce duplicate calls with cache |
| Coarse access control | Access control at the tool level |
Note that if you only need to expose existing Web APIs as MCP, you can achieve that by writing your own MCP servers. The value of inserting an MCP Gateway lies in gathering that translation in one place while also being able to apply authentication, auditing, and control all together.
How to Implement It: SaaS / OSS / Build Your Own
There are roughly three ways to implement an MCP Gateway.
- SaaS (managed): Entrust operations to a vendor. No need to build out authentication, governance, or scaling, and you can get started quickly. For example, Amazon Bedrock AgentCore Gateway is a fully managed service that can convert existing REST APIs (OpenAPI specs) and Lambda functions into MCP-compatible tools and publish them from a single endpoint, handling authentication for both the client side and tool side
- OSS (self-hosted): Host it yourself. Customization is free but operations are your own responsibility. ContextForge, which I'll cover today, falls into this category
- Build your own: Build everything yourself. Hard to choose unless requirements are very specific
When you break it down, this three-way choice is a tradeoff of "how much do you want to build yourself". SaaS minimizes build effort, OSS puts operations on you, and building from scratch means doing everything yourself.
Building the governance layer from scratch means you're taking on availability and keeping up with the MCP spec yourself, which is quite a heavy choice. Realistically, leaning toward SaaS or OSS is sensible.
For this article, I'll cover ContextForge as an OSS that you can self-host while also being able to do MCP conversion of existing Web APIs and extend through plugins.
What Is ContextForge
ContextForge (IBM/mcp-context-forge) is an open source AI Gateway / Registry / Proxy published by IBM. It can consolidate not only MCP servers but also A2A (Agent2Agent, a protocol for coordinating AI agents with each other) servers and REST/gRPC APIs, and publish them as a unified endpoint.
The features that are particularly relevant for the use case of "an entry point for internal systems" include:
- MCP-ification of existing Web APIs: REST APIs can be registered as MCP tools. You can configure per-tool mapping of tool parameters to HTTP headers, and timeouts (
timeout_ms, default 20000 milliseconds) (REST Passthrough) - Rate limiting: Upper limits on tool calls can be set with
TOOL_RATE_LIMIT(default 100 calls/minute), counted per tool and per client (Configuration) - Caching: The
Cached Tool Resultplugin can cache results of idempotent tools with a TTL (cached_tool_result) - Plugin mechanism: Extensible through a plugin framework called CPEX (ContextForge Plugin Extensions). PII masking, content moderation, circuit breakers, retries, and more are available out of the box (Plugins)
- Auditing and observability: Traces can be sent to external backends via OpenTelemetry (OTLP) (
OTEL_ENABLE_OBSERVABILITY, disabled by default. Configuration). Authentication and authorization events can be recorded in thesecurity_eventstable withSECURITY_LOGGING_ENABLED(Security Features)
Trying It Out: Converting an Existing Web API to MCP with ContextForge
From here, I'll actually set up ContextForge, register an existing Web API as an MCP tool, and try calling it through the MCP Gateway.
Instead of "an existing REST API inside the company," I'll use SampleAPIs, a dummy API service usable without authentication. I'll treat GET https://api.sampleapis.com/coffee/hot as a stand-in for an internal business API.
Here's the configuration we'll build:
Note that this time, rather than "how to set this up for production," we're at the stage of "checking whether this OSS meets our requirements by getting a feel for it," so I'll use a minimal single-container (SQLite) configuration. The official docker-compose.yml is a configuration with production operation in mind, with large resource requirements and lots of configuration, which is overkill for confirming functionality. I've summarized what I cut to get a minimal configuration in a supplement at the end of the article.
Starting ContextForge
You can start with a single container, but there are two things to keep in mind first.
Note 1: Make secrets strong
v1.0.8 validates JWT_SECRET_KEY and AUTH_ENCRYPTION_SECRET at startup, and the process won't start if the conditions aren't met (regardless of development or production). The conditions are "at least 32 characters," "sufficient entropy," and "not a known weak value." For that reason, the command below generates strong values with openssl rand -base64 48.
Note 2: Explicitly enable the Admin UI
MCPGATEWAY_UI_ENABLED and MCPGATEWAY_ADMIN_API_ENABLED are false by default. When trying with docker run, set both to true to open /admin.
With that in mind, the startup command looks like this:
$ docker run -d --name mcpgateway-minimal \
    -p 4444:4444 -v "$(pwd)/data-minimal:/data" \
    -e HOST=0.0.0.0 \
    -e DATABASE_URL="sqlite:////data/mcp.db" \
    -e JWT_SECRET_KEY="$(openssl rand -base64 48)" \
    -e AUTH_ENCRYPTION_SECRET="$(openssl rand -base64 48)" \
    -e PLATFORM_ADMIN_EMAIL=admin@example.com \
    -e PLATFORM_ADMIN_PASSWORD=changeme \
    -e MCPGATEWAY_UI_ENABLED=true \
    -e MCPGATEWAY_ADMIN_API_ENABLED=true \
    -e GUNICORN_WORKERS=2 \
    -e EXPOSE_ERROR_DETAILS=true \
    ghcr.io/ibm/mcp-context-forge:v1.0.8
Once started, verify with a health check (/health requires no authentication). The base URL for the minimal configuration is http://localhost:4444.
$ export BASE_URL="http://localhost:4444"
$ curl -s ${BASE_URL}/health
Execution result
{
  "status": "healthy",
  "mcp_runtime": {
    "mode": "python",
    "mounted": "python",
    "boot_mode": "off",
    "boot_mounted": "python",
    "effective_mode": "off",
    "override_active": false,
    "override_version": 0,
    "cluster_propagation": "disabled",
    "boot_reconcile_status": "ok",
    "pod_id": "86a9db64527a",
    "rust_build_included": false,
    "rust_runtime_enabled": false,
    "session_core_mode": "python",
    "event_store_mode": "python",
    "resume_core_mode": "python",
    "live_stream_core_mode": "python",
    "affinity_core_mode": "python",
    "session_auth_reuse_mode": "python",
    "rust_session_core_enabled": false,
    "rust_event_store_enabled": false,
    "rust_resume_core_enabled": false,
    "rust_live_stream_core_enabled": false,
    "rust_affinity_core_enabled": false,
    "rust_session_auth_reuse_enabled": false
  }
}
Logging into the Admin UI
Now that the environment is up, let's open the Admin UI first. Access http://localhost:4444/admin in your browser, and a login screen will appear.
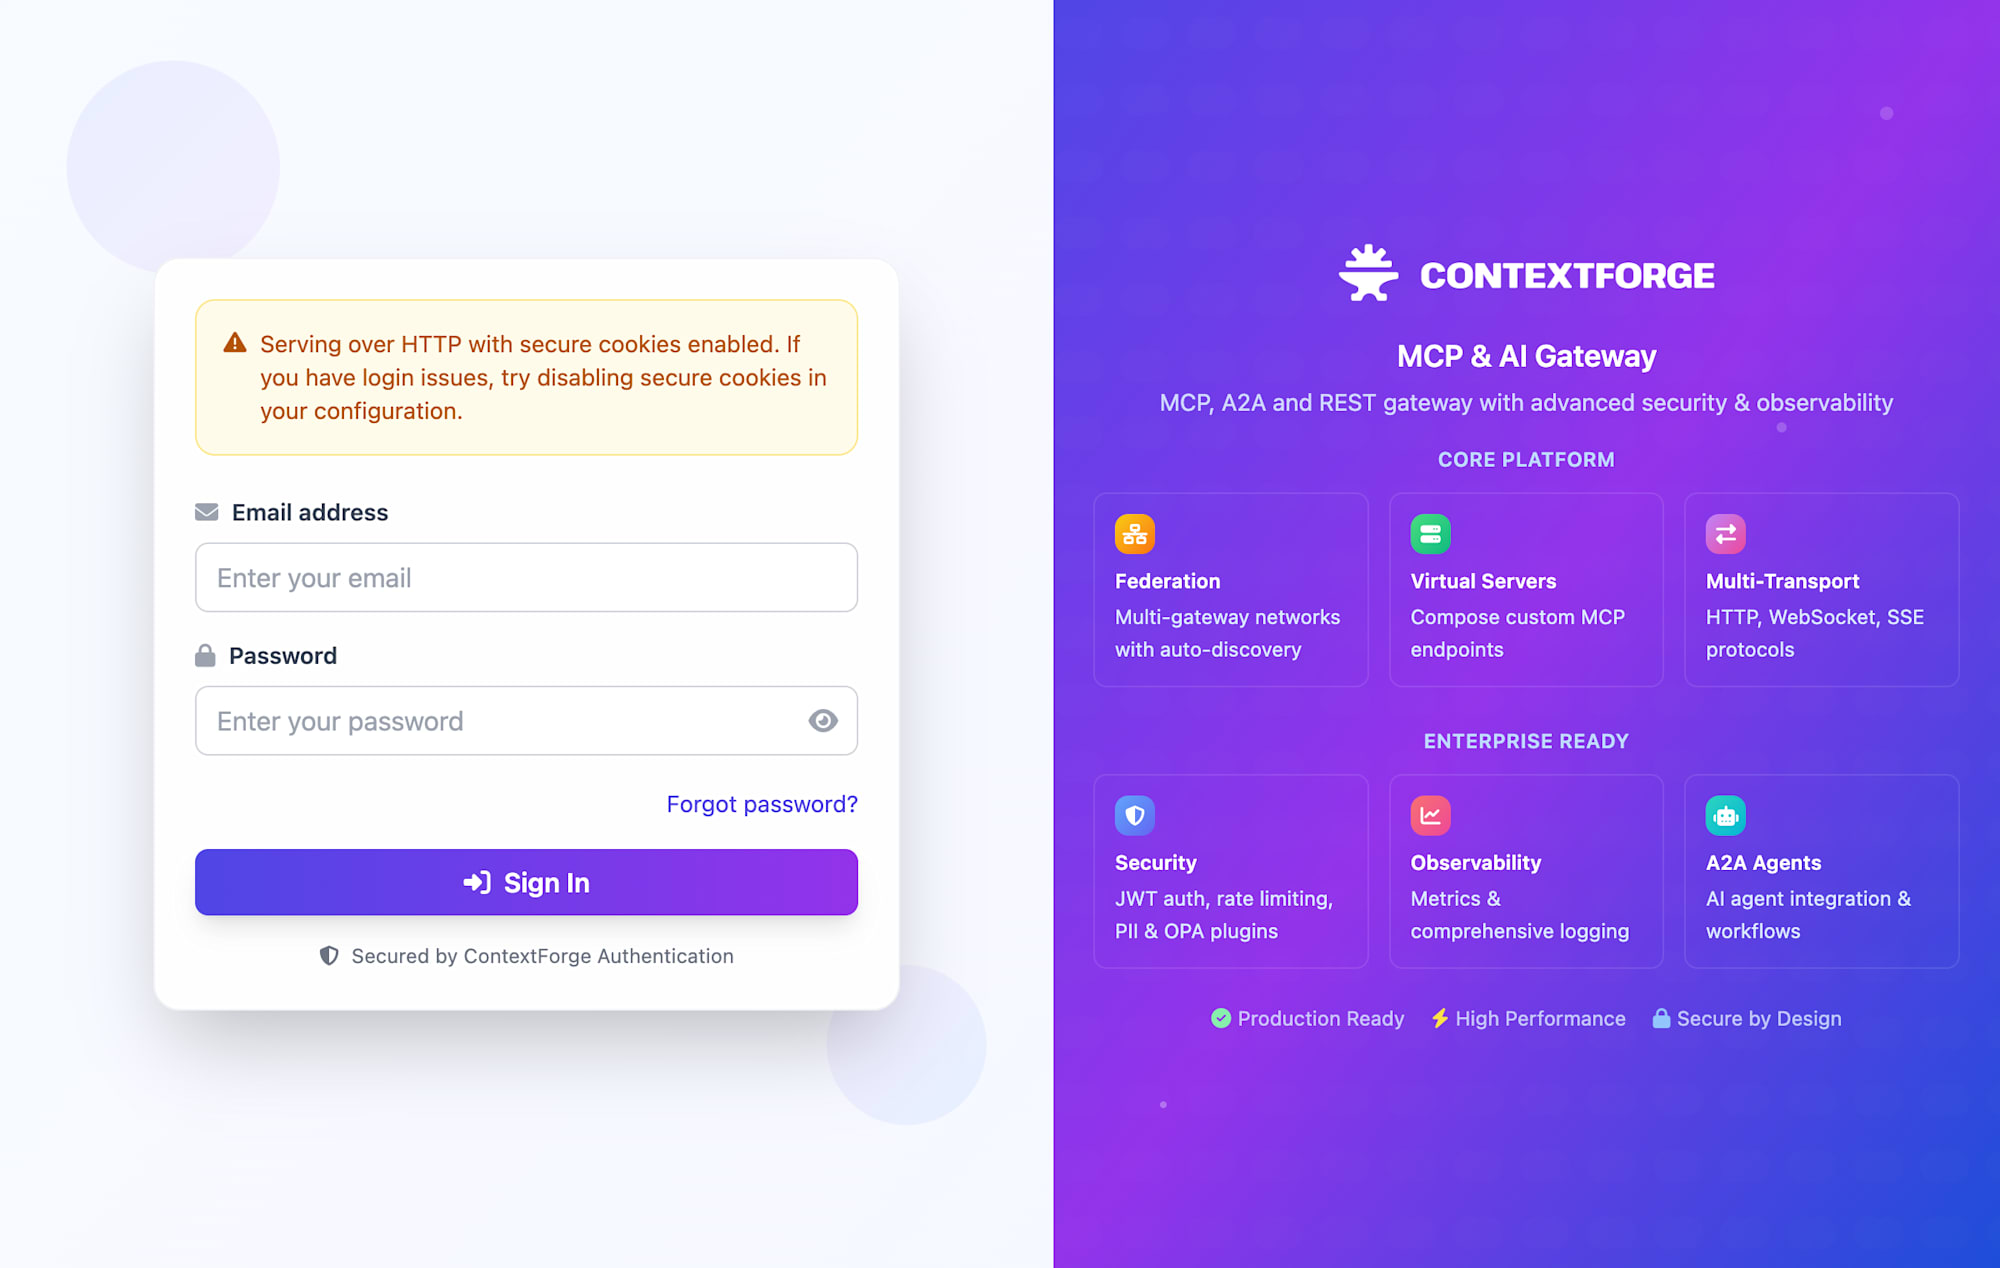
Enter the PLATFORM_ADMIN_EMAIL and PLATFORM_ADMIN_PASSWORD values specified at startup (admin@example.com / changeme). On first login, you won't go directly to the admin panel — instead, a screen asking you to change your password appears. It's designed so you can't keep using the initial password, so set a new password here.
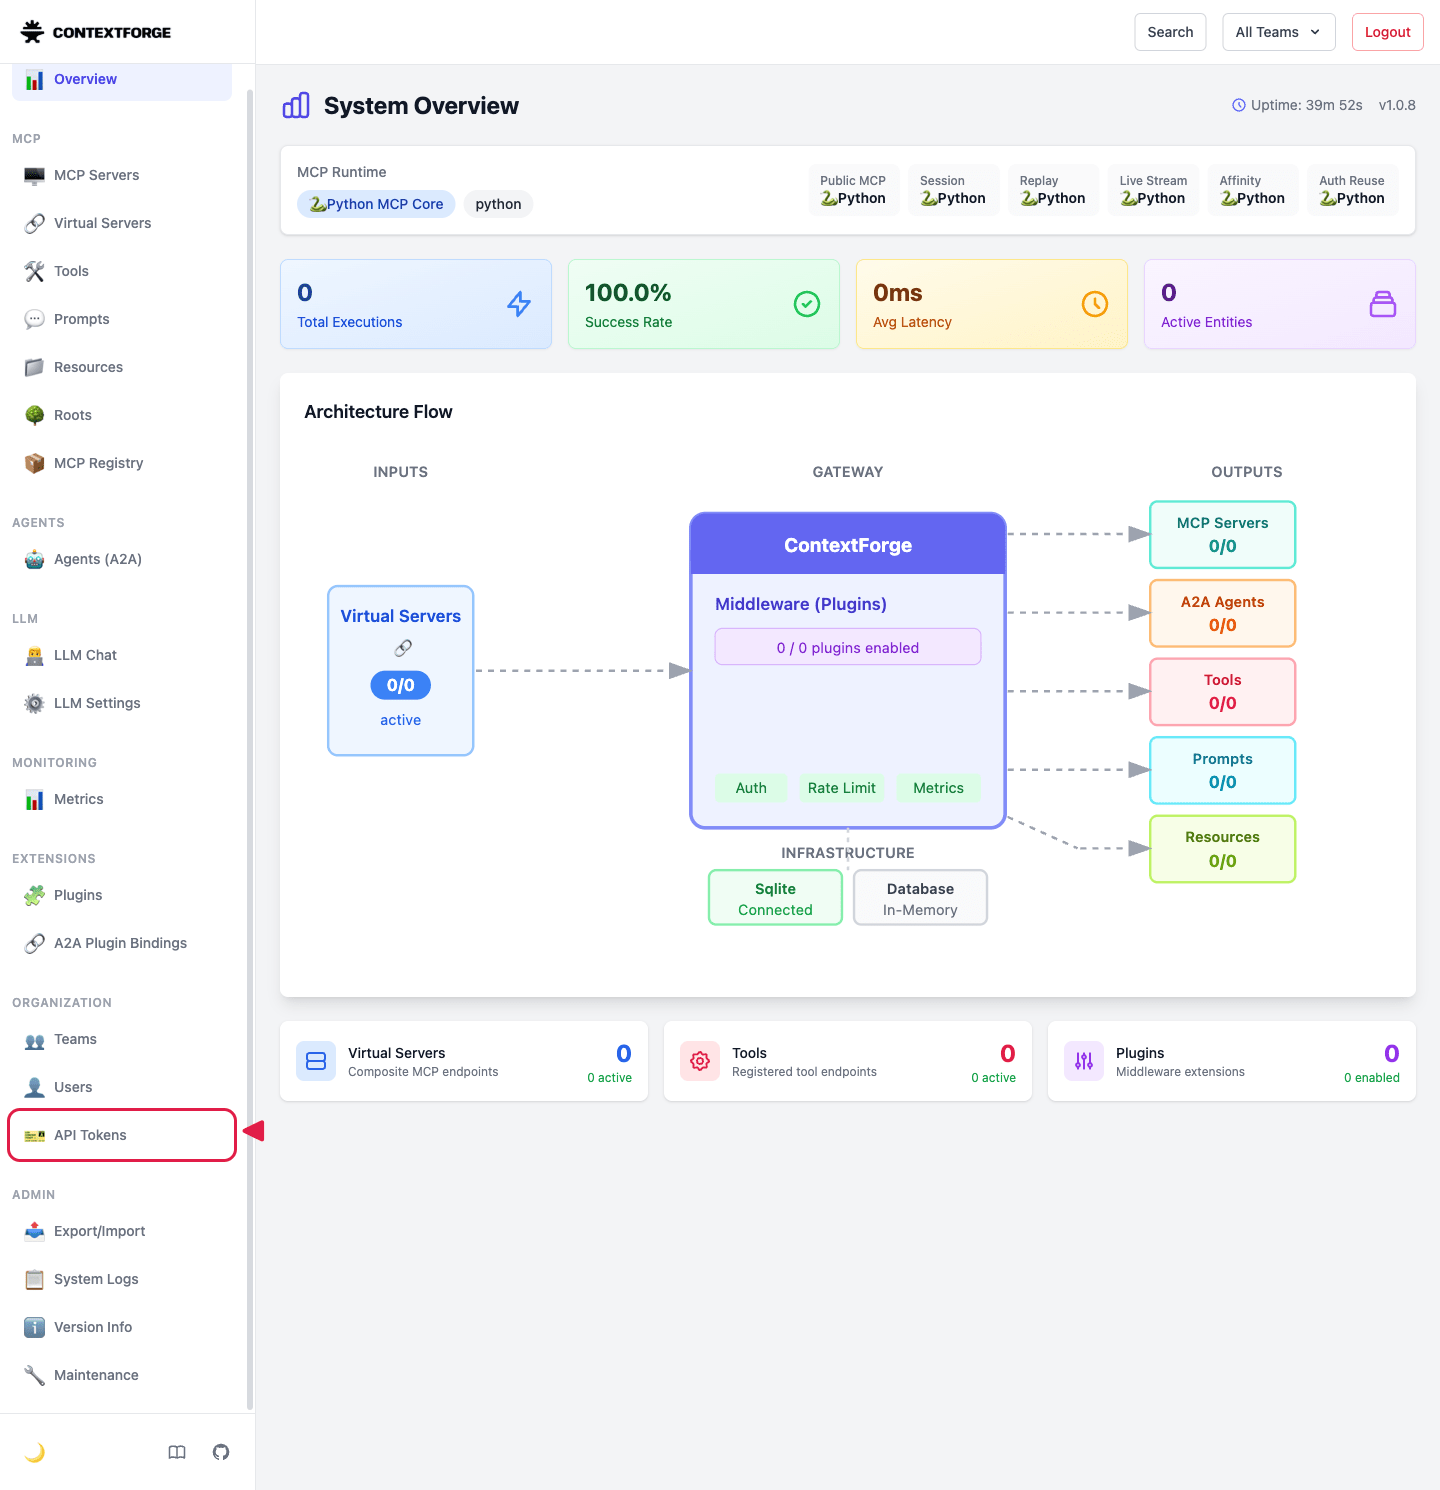
After the change, the System Overview screen opens.
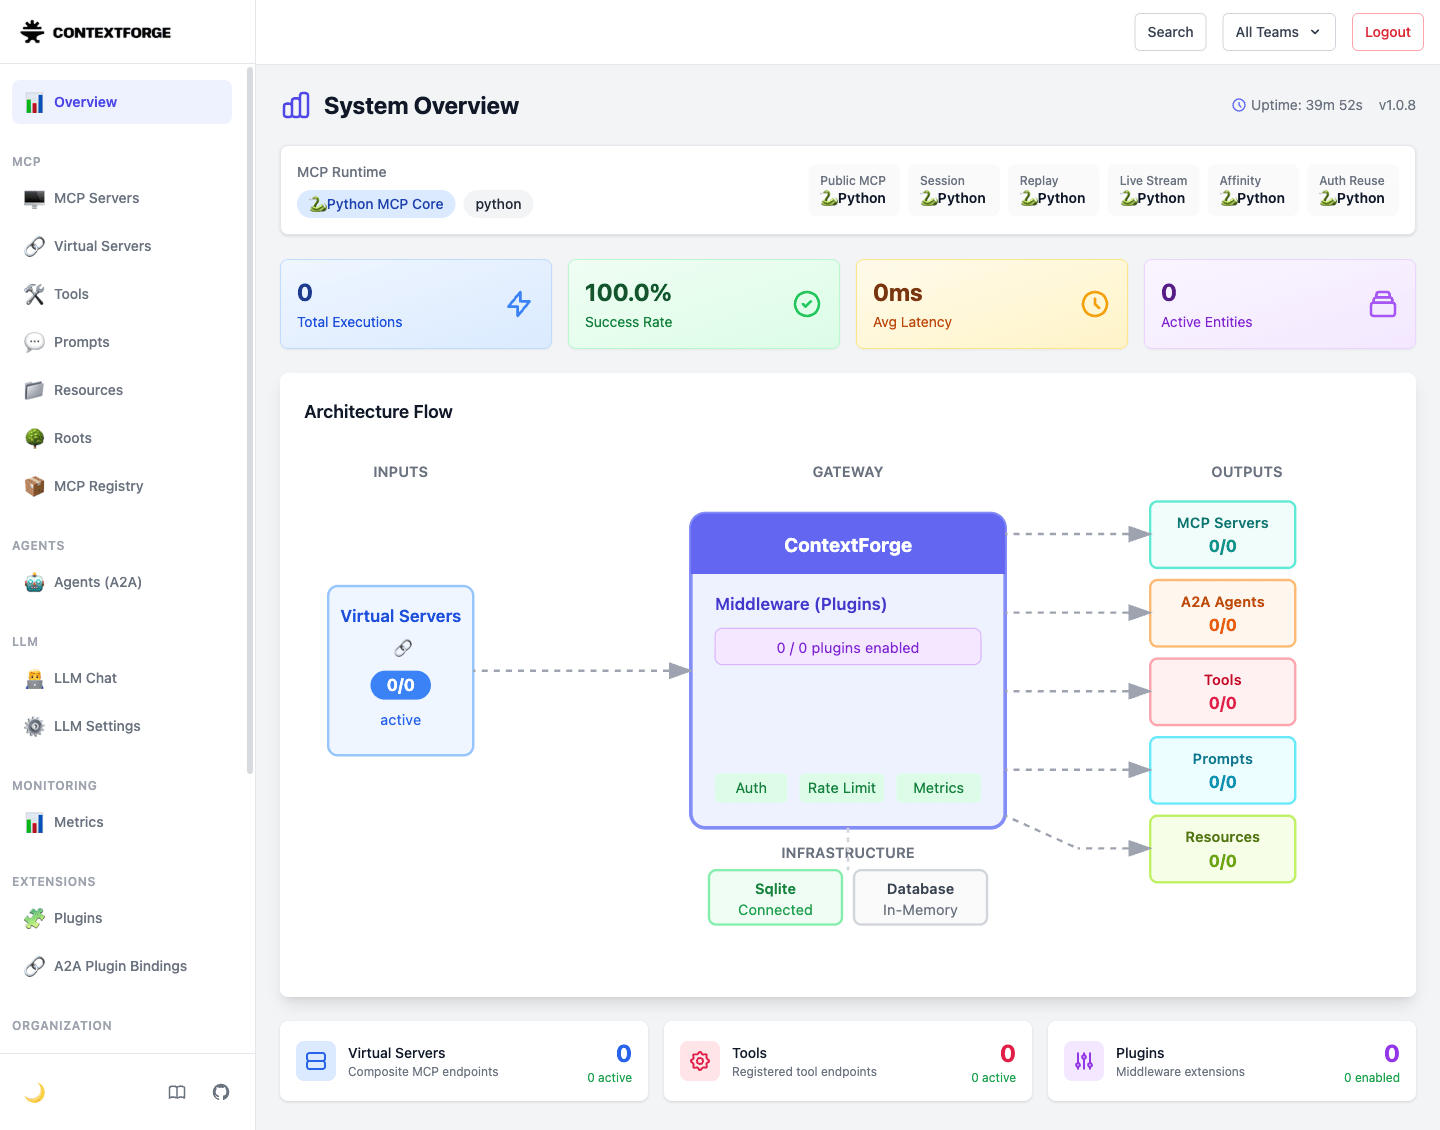
The running version, MCP runtime status, execution counts, success rates, and other metrics are displayed. The left sidebar is the list of registration targets (MCP Servers, Virtual Servers, Tools, Prompts...) we'll be working with. At this point, there are no registered tools or virtual servers — all show 0 items — and we'll be adding business APIs here one by one.
Understanding the Authentication Model
Before registering tools and connecting clients, let's clarify where ContextForge's authentication applies. Authentication is split into two layers.
- ① Client → MCP Gateway: A JWT (Bearer token) is required to connect to the MCP Gateway. Since
AUTH_REQUIRED, which requires authentication on all API routes, defaults totrue(Configuration), even in our configuration where nothing was specified in the startup command, tools cannot be called without authentication. - ② MCP Gateway → Business API: This is authentication per business API. The SampleAPIs we're using as our example happen to require no authentication, but in actual operations, API keys or OAuth would be held on the MCP Gateway side and applied.
The benefit of MCP Gateway "centralizing authentication in one place" comes from this structure: ① centrally receives client authentication, and ② the MCP Gateway manages each API's authentication credentials on its behalf.
Below, we'll first issue a JWT token from the Admin UI for ①.
Issuing a JWT Token
JWT tokens can be issued from the token management screen in the Admin UI. Tokens issued from the screen are registered in the DB and can be listed or revoked later.
In the Admin UI you just logged into, open "API Tokens" under "ORGANIZATION" in the sidebar.
Specify a name and expiration date and press "Create Token" to issue one.
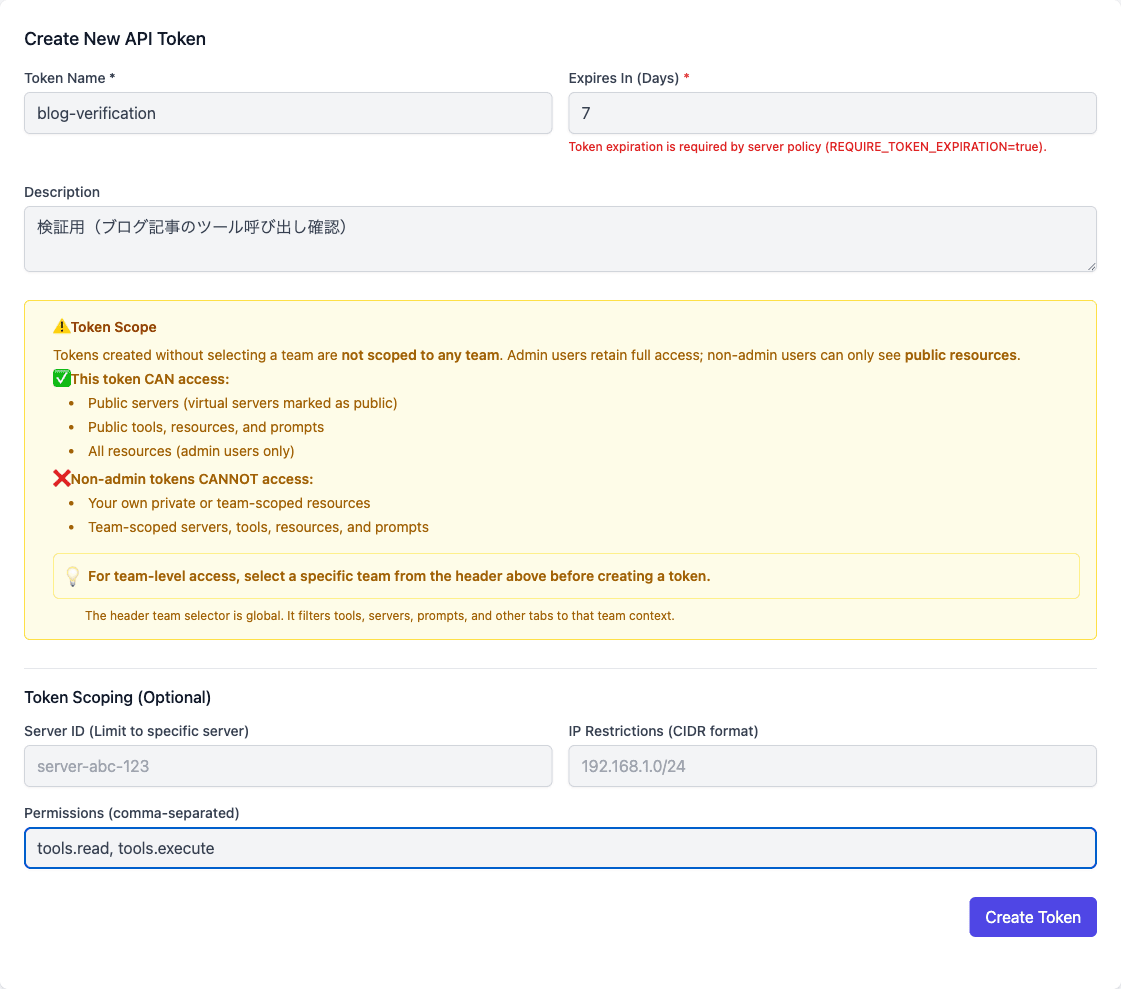
The expiration date is not optional but required, and the form also states "Expiration required by server policy (REQUIRE_TOKEN_EXPIRATION=true)." It's designed so you can't create tokens without an expiration.
In "Token Scoping," you can narrow down the scope allowed by this token. This time I specified tools.read, tools.execute in Permissions to create a token that only allows reading and executing tools. You can also specify restrictions to specific virtual servers (Server ID) or restrictions on source IPs (IP Restrictions).
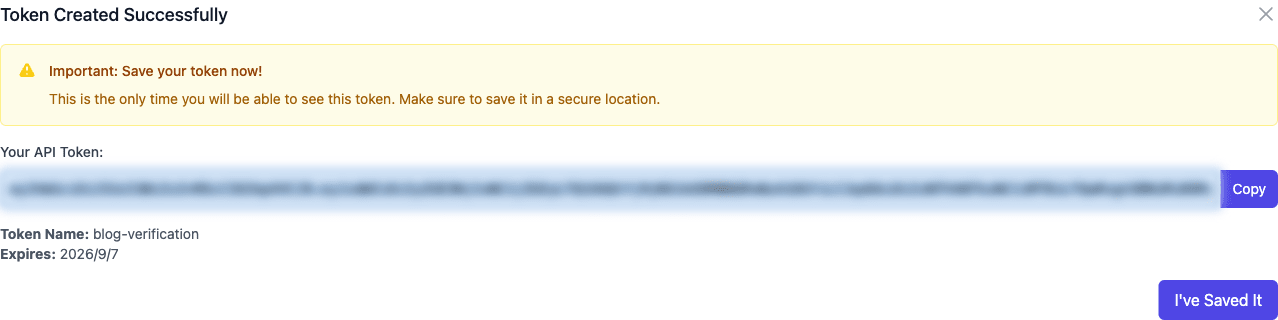
When issued, the token string is displayed. This screen is only shown once, so copy it here.
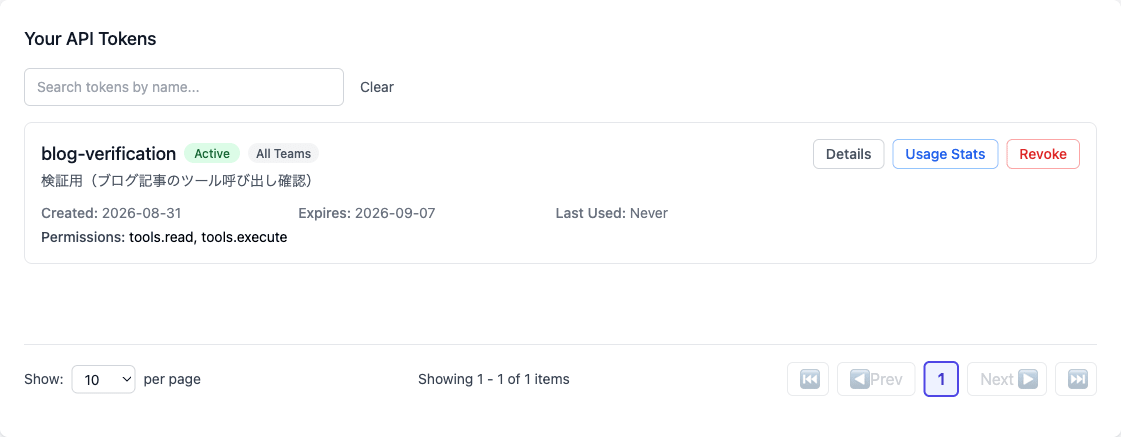
Issued tokens appear in the list. You can check creation date, expiration, last used date/time, and scope, and you can also revoke tokens with "Revoke" and view usage statistics with "Usage Stats."
Store the copied token in an environment variable. Later, when connecting from the client, it will be used as the authentication header (Authorization: Bearer <TOKEN>).
$ export TOKEN="<<YOUR_TOKEN>>"
Registering an Existing Web API as an MCP Tool
Now to the main topic. I'll register a SampleAPIs endpoint as a REST tool in ContextForge. Open "Tools" under "MCP" in the sidebar, and at the bottom of the list you'll find a form called "Add New Tool from REST API." This is the entry point for MCP-ifying existing Web APIs.
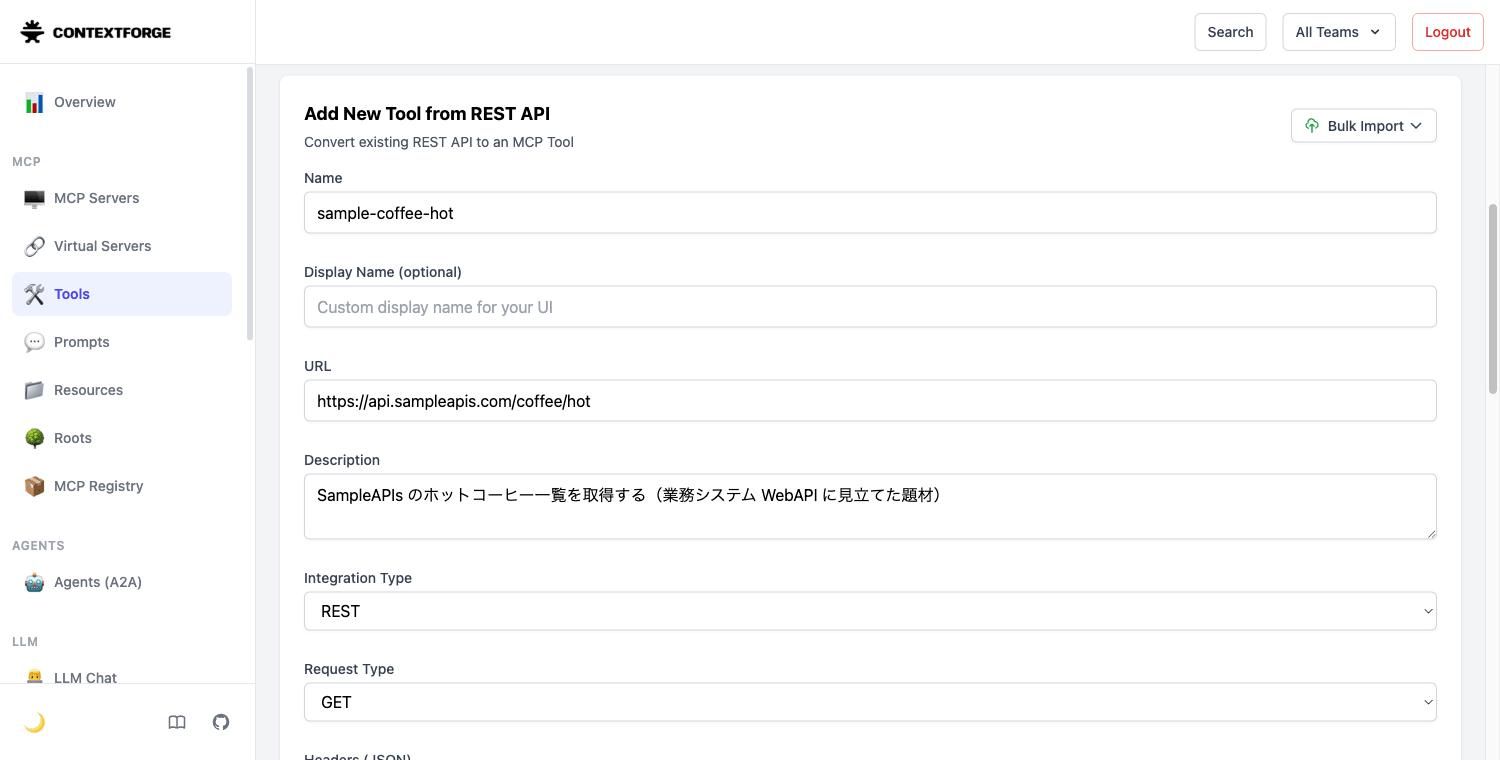
I only entered these three things:
- Name:
sample-coffee-hot - URL:
https://api.sampleapis.com/coffee/hot - Description: A description of the tool. Since the LLM reads this when choosing a tool, write what the tool can do
Integration Type defaults to REST and Request Type defaults to GET, so I left them as-is. Entering the url automatically extracts the internally used base_url and path_template. Headers, Input Schema, Output Schema, and Json Path Filter can be left empty and the tool can still be registered. For APIs that require authentication, select Basic / Bearer Token / Custom Headers under "Authentication Type" and hold the credentials there (today's SampleAPIs requires no authentication so I left it as None).
At the bottom of the form, specify tags and visibility, then press "Add Tool." Visibility is a choice of Public / Team / Private, defaulting to Public.
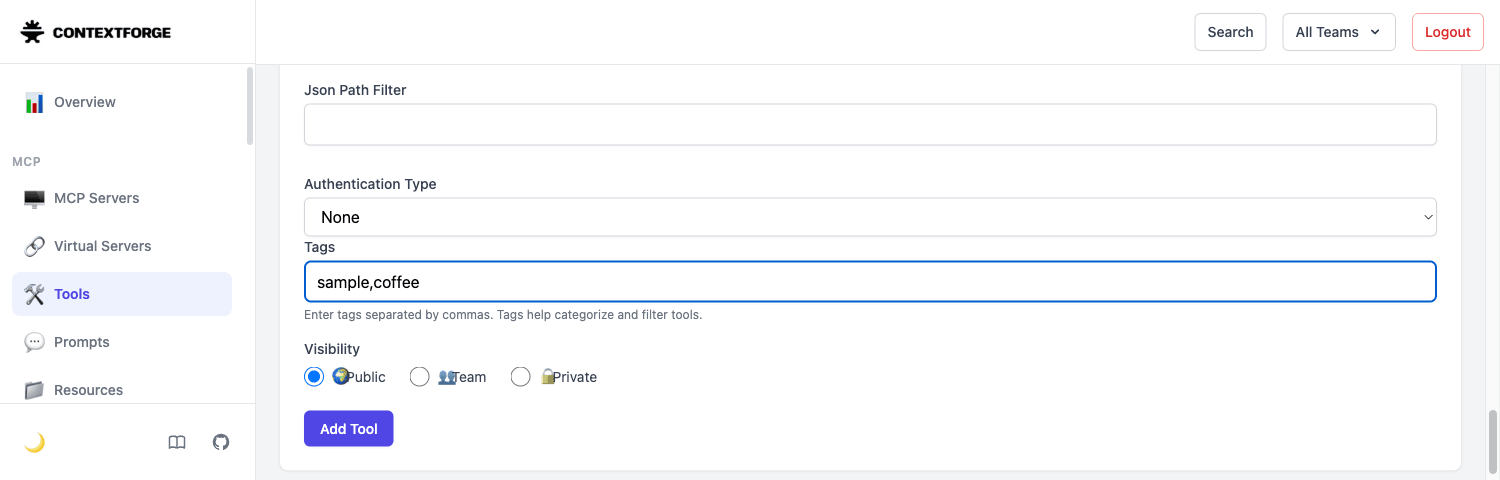
Once registered, it appears in the tool list.

A Tool ID is assigned, the Source shows the registered URL, and Status shows REST Public Online. The Name shown here (sample-coffee-hot) becomes the name used when calling the tool from an MCP client.
You can also verify operation from the screen. Choose "Test" from "Actions" in the list and press "Run Tool" to get the result of calling the API through the MCP Gateway back as a JSON-RPC response.
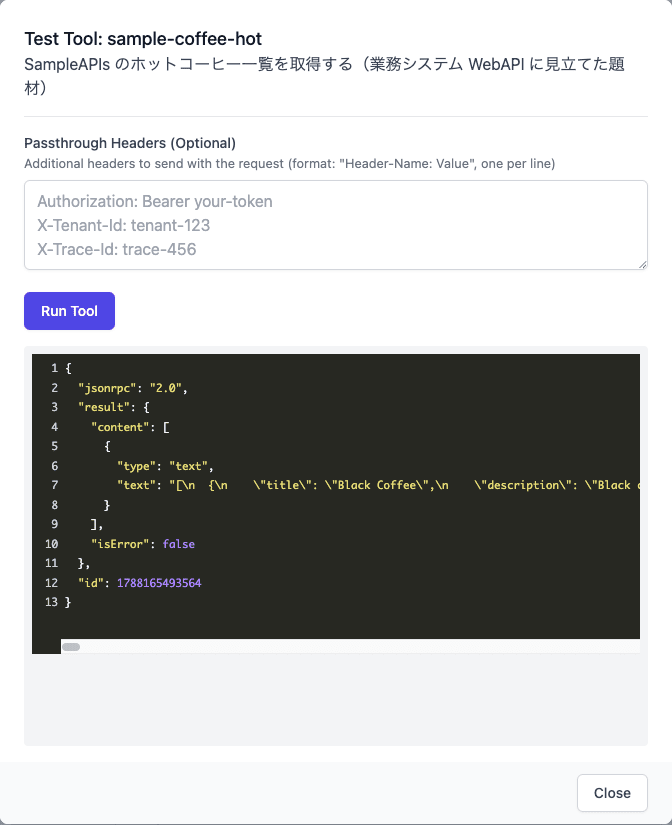
isError: false, and SampleAPIs' coffee list (Black Coffee, etc.) is in result.content as text. What was just a REST API at api.sampleapis.com/coffee/hot can now be treated as an MCP tool through ContextForge.
Grouping into a Virtual Server
Registered tools can be grouped as a virtual server and published to clients as a single MCP endpoint. Open "Virtual Servers" in the sidebar and use the "Add New Server" form at the bottom of the list.
Enter a name and description, then check the tools you want to publish under "Associated Tools." The sample-coffee-hot we just registered appears here. Resources and Prompts can be bundled the same way, but this time it's just tools.
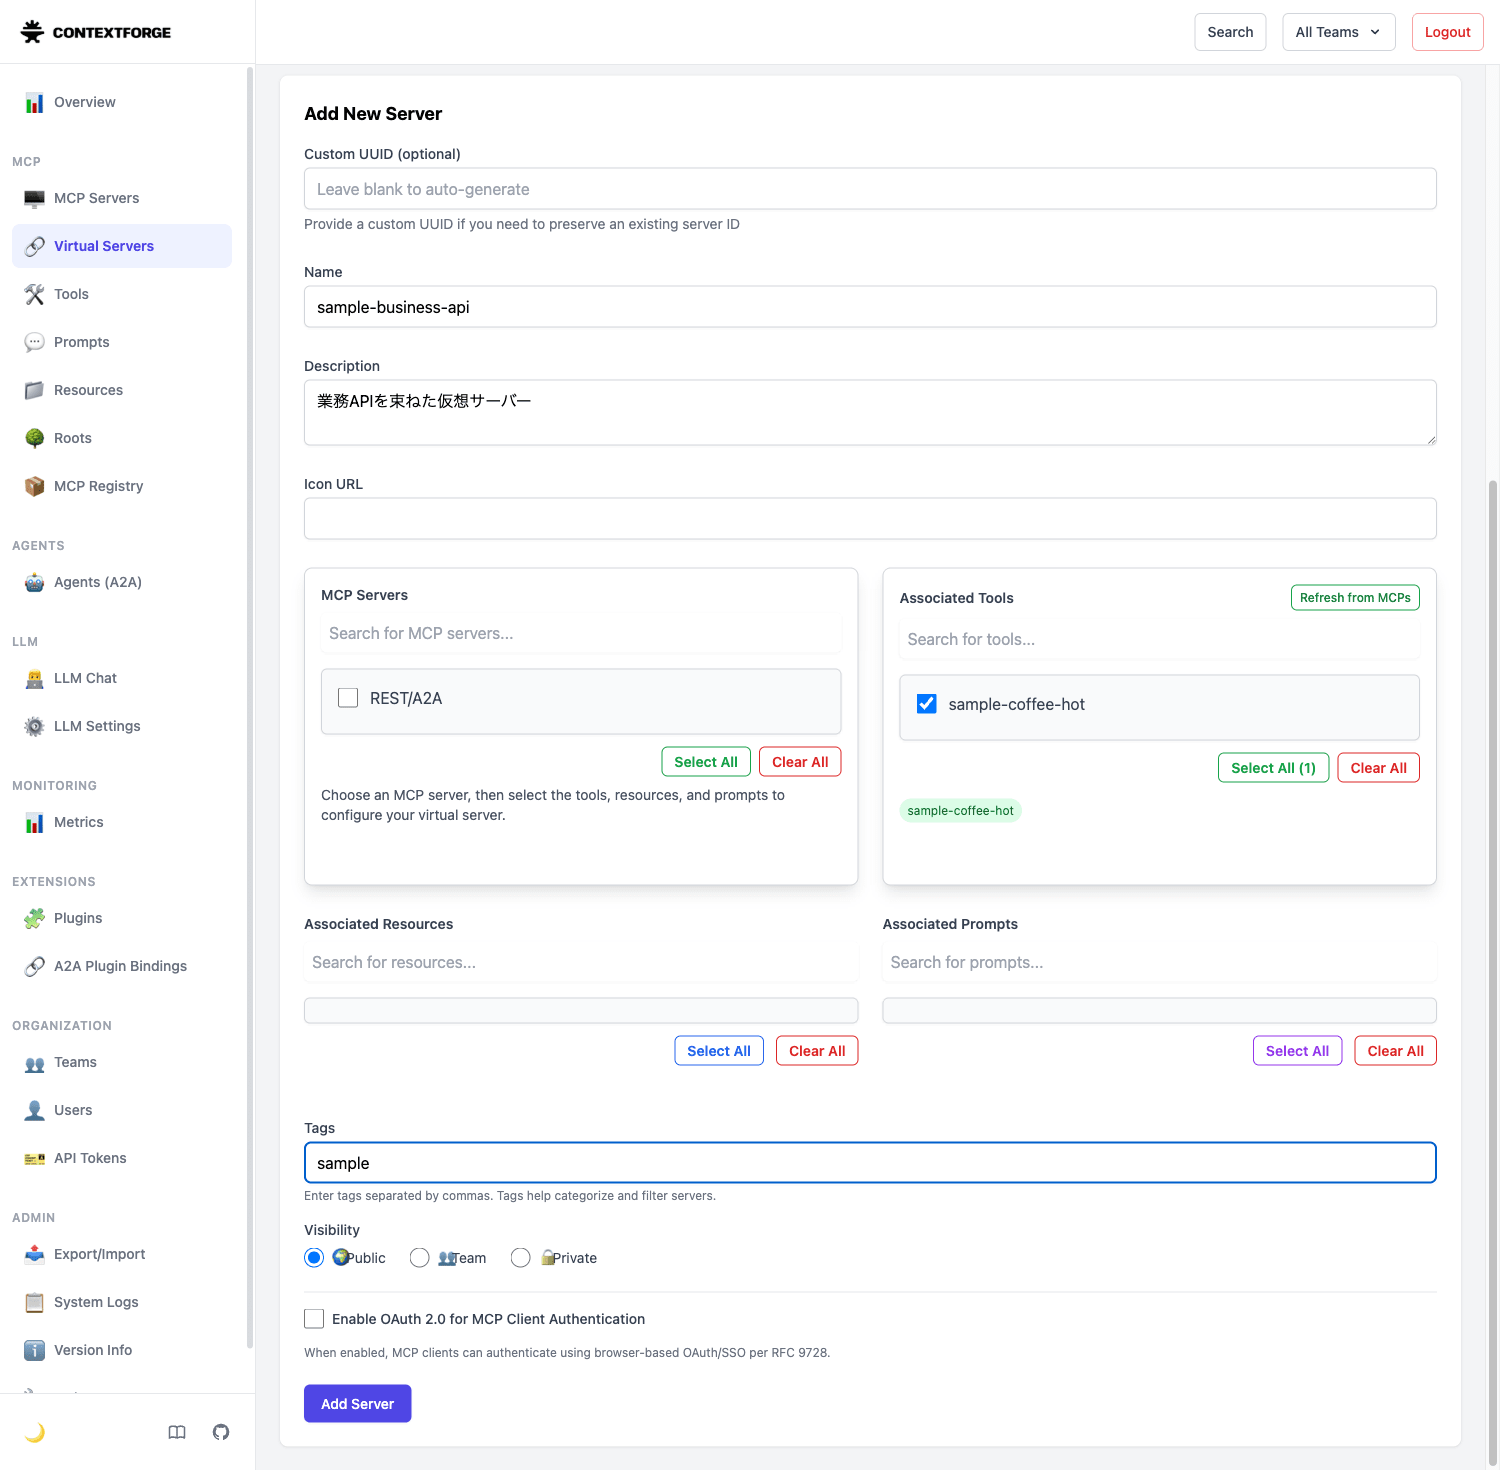
Leave Server ID empty to auto-generate one (only specify a "Custom UUID" if you want to inherit an existing ID). Enabling "Enable OAuth 2.0 for MCP Client Authentication" allows MCP clients to authenticate via browser-based OAuth/SSO. Since I'll be connecting with a JWT token this time, I'll leave it off.
Press "Add Server" and the virtual server is added to the list.

It shows "1 tool," indicating this virtual server has one tool. Open "View" from "Actions" to see the information needed for connection.
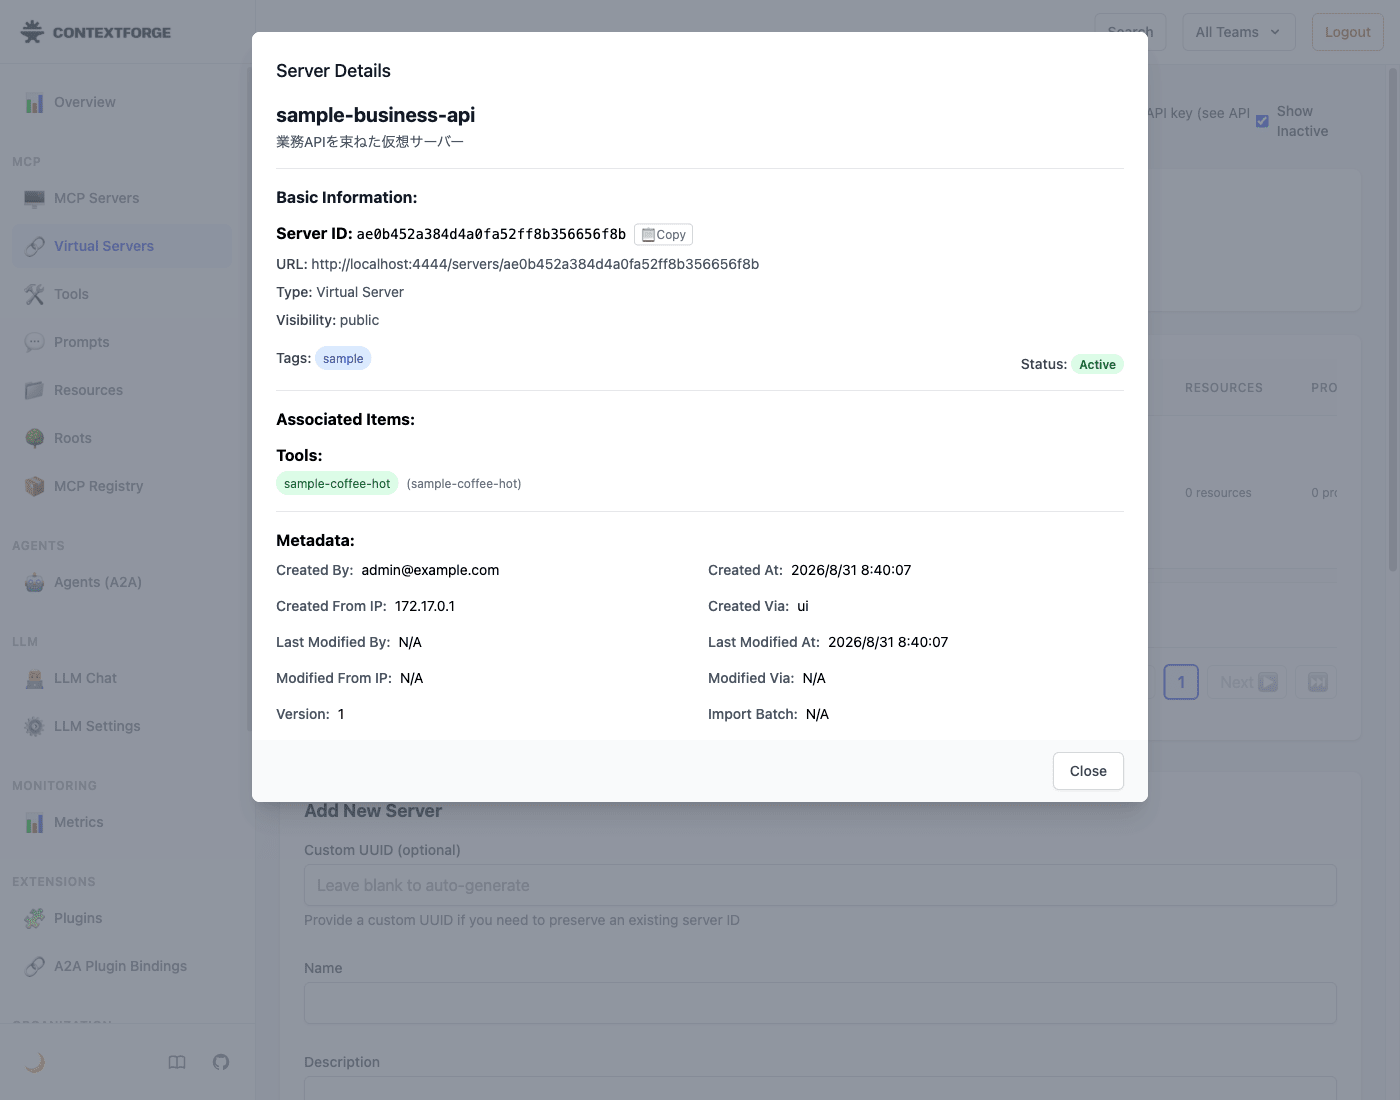
The Server ID and a URL containing it are displayed. The MCP endpoint for clients to connect to is the form of this URL with /mcp appended to the end.
http://localhost:4444/servers/<<YOUR_SERVER_UUID>>/mcp
This <<YOUR_SERVER_UUID>> and the JWT token from earlier are the connection information when connecting from the client.
Connecting from Claude Desktop
Let's connect to the created virtual server from Claude Desktop as an actual AI client.
One thing to pause and consider here is "where are we connecting from?" Claude Desktop has a connector feature to register remote MCP servers by URL, but this connection is sent from Anthropic's cloud side, so it won't reach our MCP Gateway running on localhost. The same applies to a configuration where the MCP Gateway is placed inside an internal corporate network — if you place it somewhere unreachable from the internet, this route won't work.
So this time, I'll use the method of writing to a configuration file. Since only the stdio format can be written in Claude Desktop's configuration file, I'll use mcp-remote as a bridge that receives stdio and forwards to HTTP.
First, write the token stored earlier in the TOKEN environment variable to a header file.
$ echo "Authorization: Bearer ${TOKEN}" > ~/.contextforge-headers.txt
$ chmod 600 ~/.contextforge-headers.txt
Next, add the following to the configuration file claude_desktop_config.json (on macOS: ~/Library/Application Support/Claude/claude_desktop_config.json). Replace <<YOUR_SERVER_UUID>> with the virtual server's ID and <<YOUR_USERNAME>> with your own username.
{
  "mcpServers": {
    "contextforge": {
      "command": "npx",
      "args": [
        "-y", "mcp-remote",
        "http://localhost:4444/servers/<<YOUR_SERVER_UUID>>/mcp",
        "--allow-http",
        "--transport", "http-only",
        "--header-file", "/Users/<<YOUR_USERNAME>>/.contextforge-headers.txt"
      ]
    }
  }
}
For details on mcp-remote flags and how to pass authentication headers, refer to the official README.
Restart Claude Desktop, and the business API tools you registered become usable from Claude.
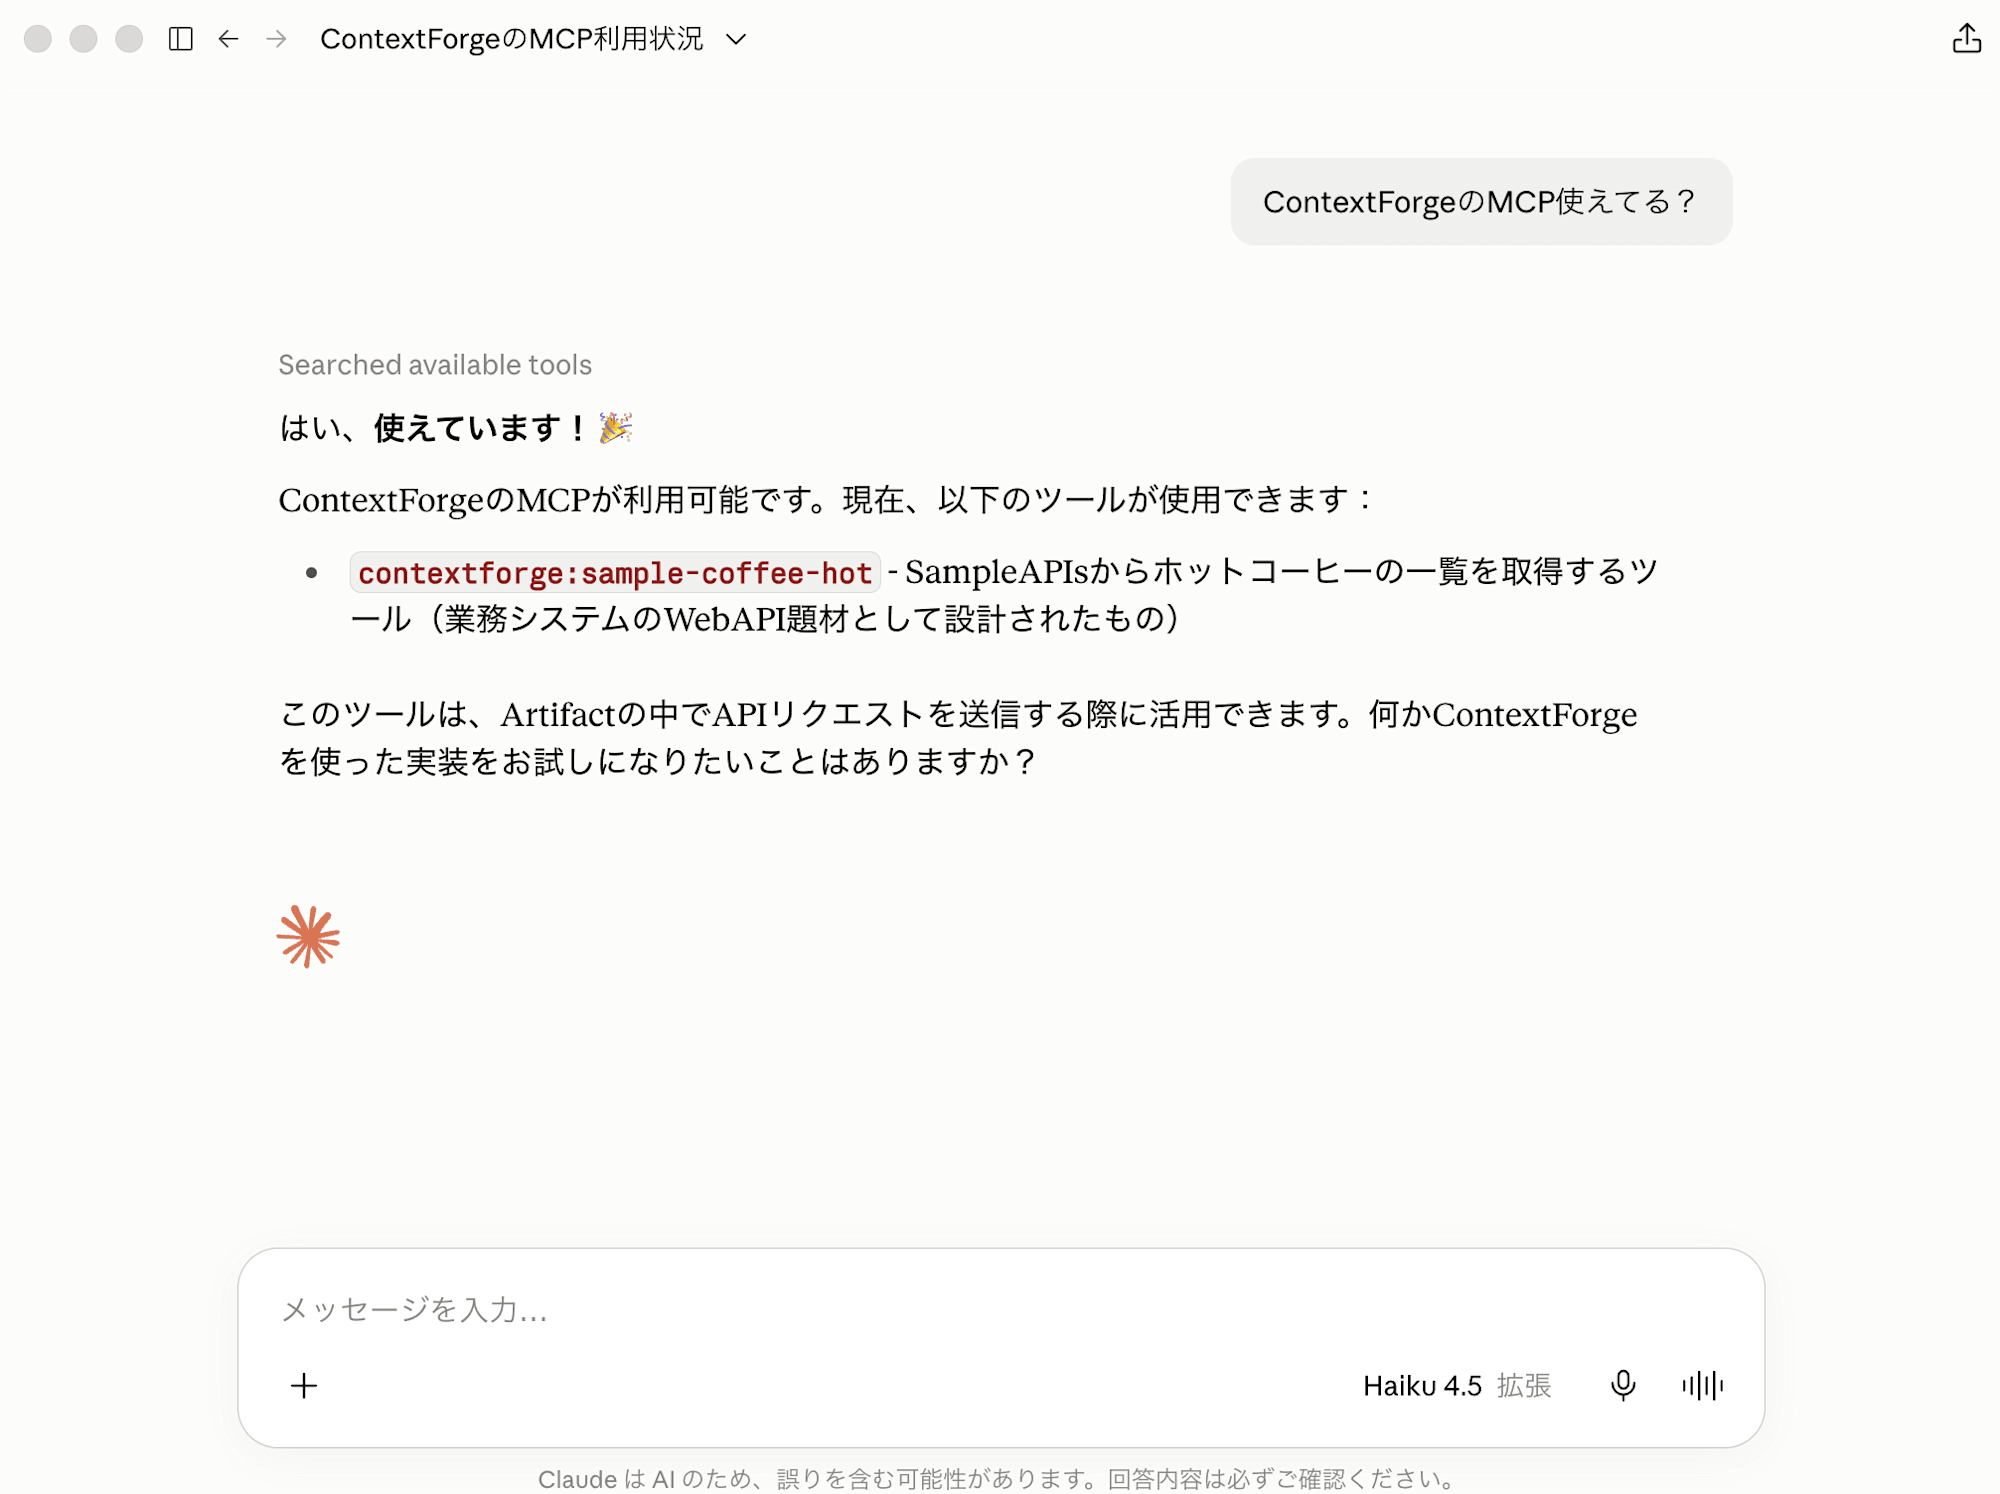
From the AI client's perspective, the connection destination is just a single ContextForge endpoint. Behind the scenes, multiple business systems are bundled, and the connection to the MCP Gateway is authenticated with JWT. This is the concrete form of a "single controlled entry point."
Seeing "What Was Called and How Much" in the Metrics Screen
Another benefit of routing through the MCP Gateway is that call records are gathered in one place. With direct connections, you'd have to look at each API's logs individually, but ContextForge lets you view calls that passed through the MCP Gateway all together in the "Metrics" section under "MONITORING" in the sidebar.
Let me open it after executing the earlier tool a few times.
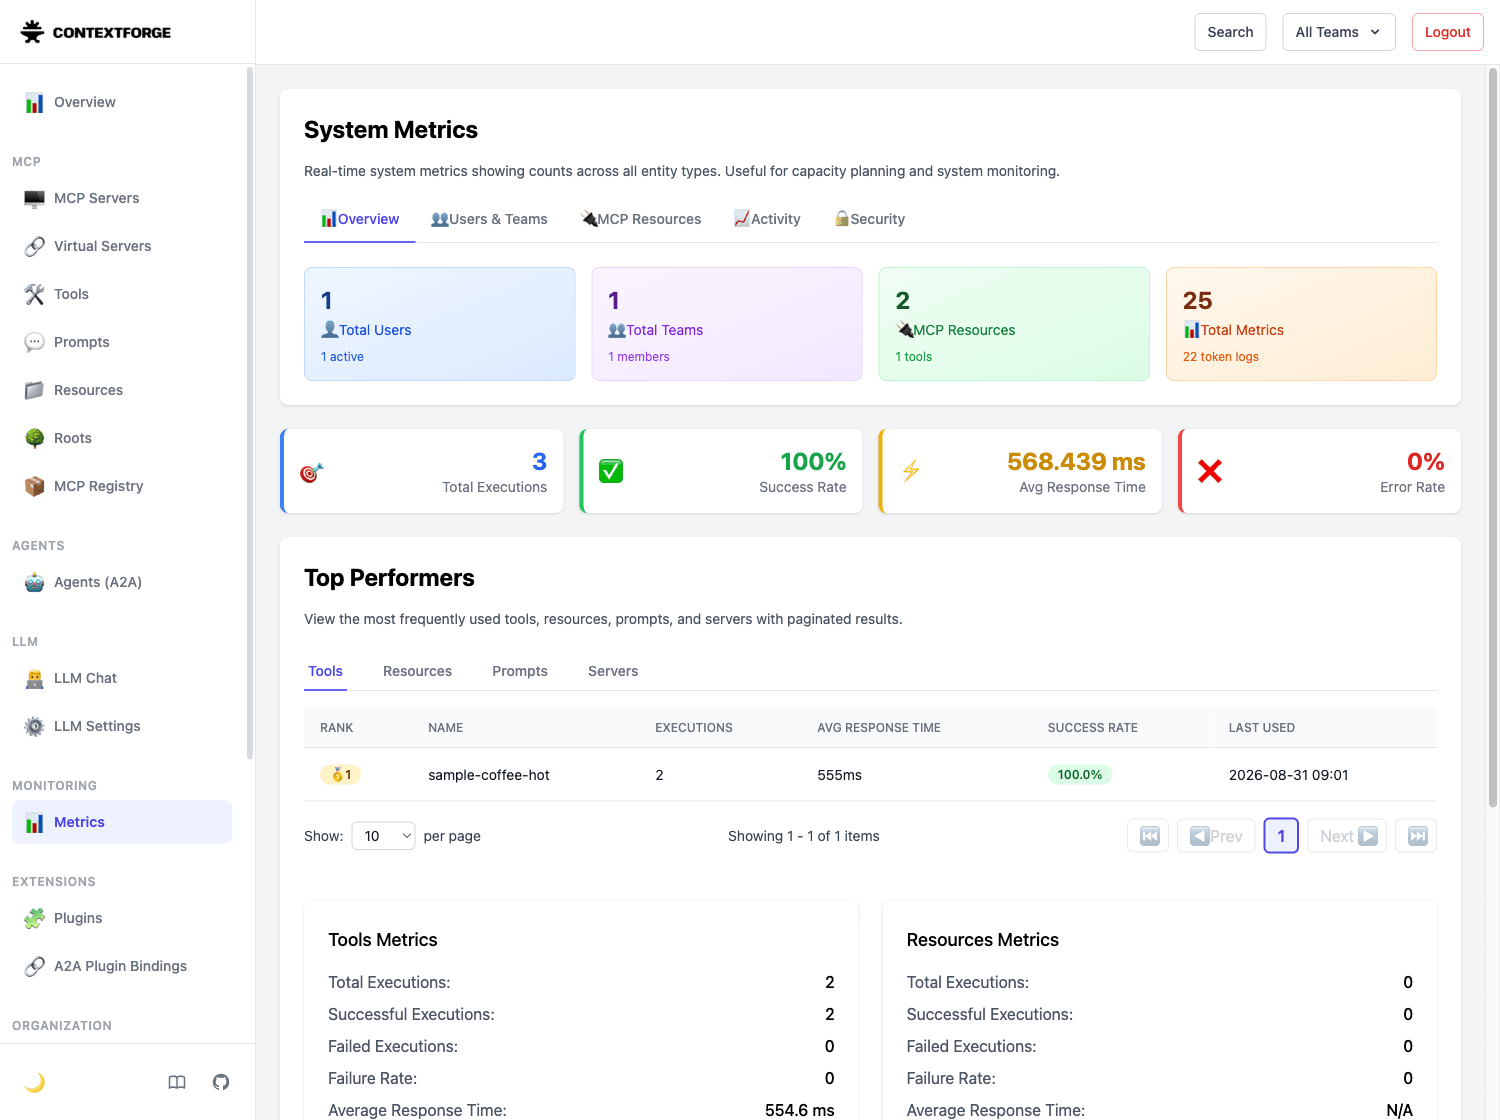
The top row of cards shows entity counts (users, teams, MCP resources, collected metrics), and below that are execution-related metrics: total execution count, success rate, average response time, and error rate.
"Top Performers" then ranks the most frequently used tools, resources, prompts, and virtual servers. Execution count, average response time, success rate, and last used date/time are shown per tool, so "which APIs are being used and which ones are slow" is visible here alone. Below that, breakdown for each of Tools / Resources / Prompts / Servers (success/failure count, failure rate, average response time, last execution time) is shown.
Switching tabs at the top of the screen reveals other perspectives. The "Activity" tab shows the status of API tokens, session count, and the number of collected metrics records.
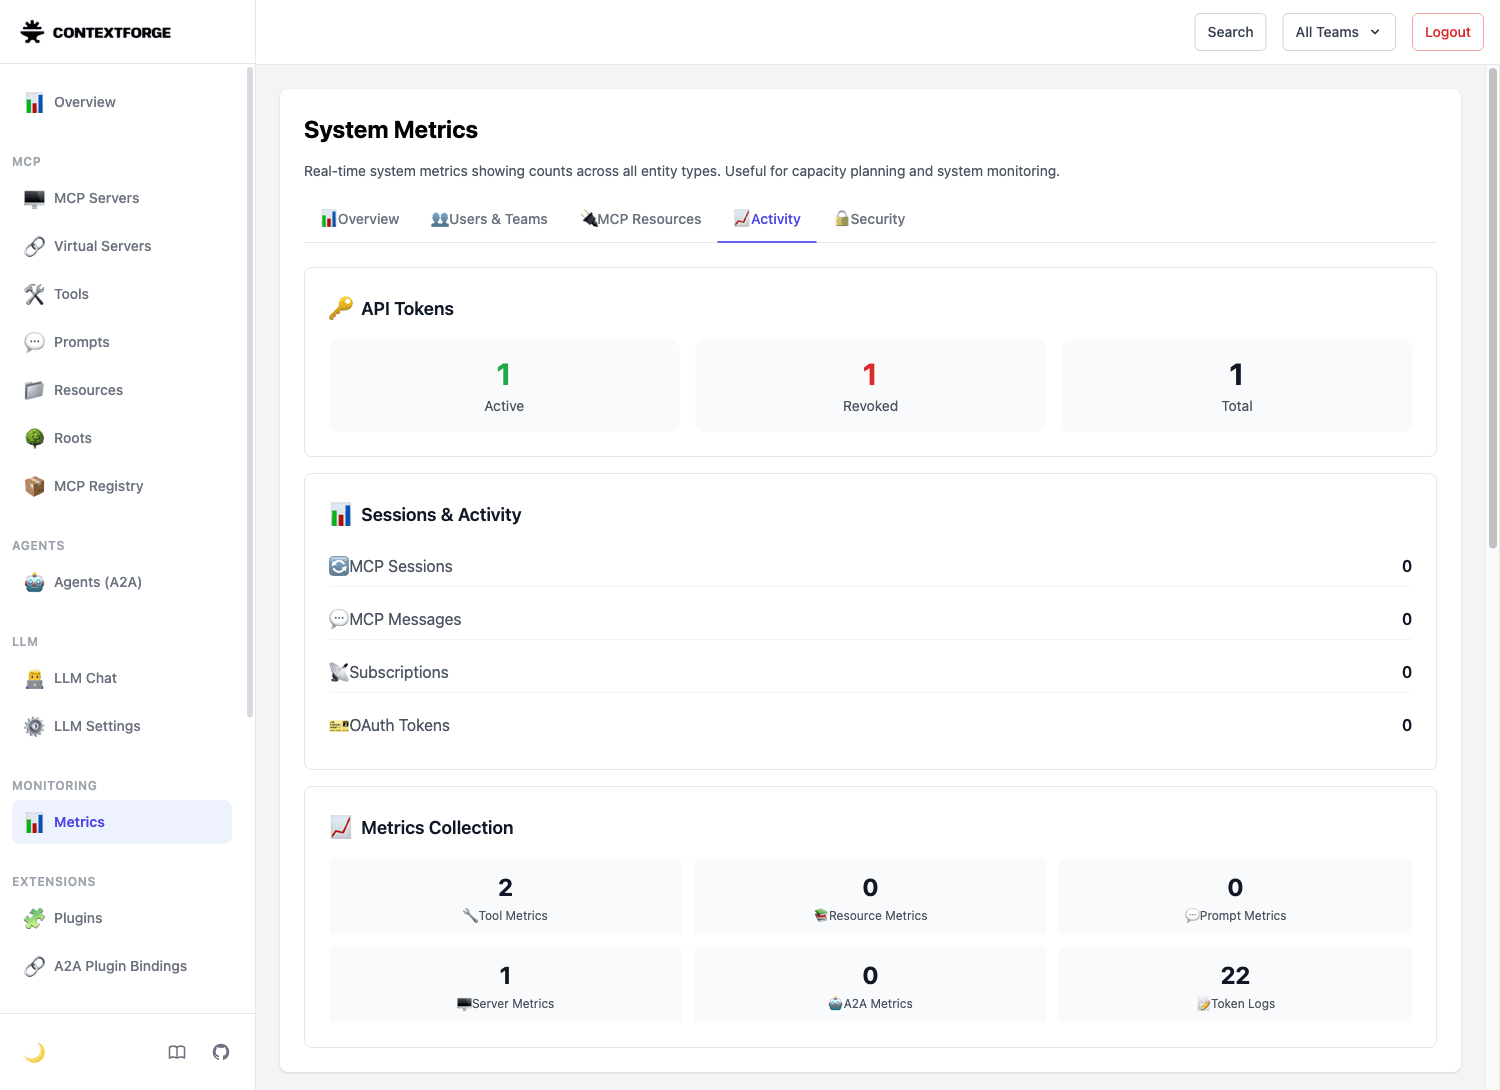
Active / Revoked / Total for issued tokens, MCP session count, and "Token Logs" shows the number of token usage log entries. You can track how much each person's token is being used.
The "Security" tab shows counts of authentication events and audit logs.
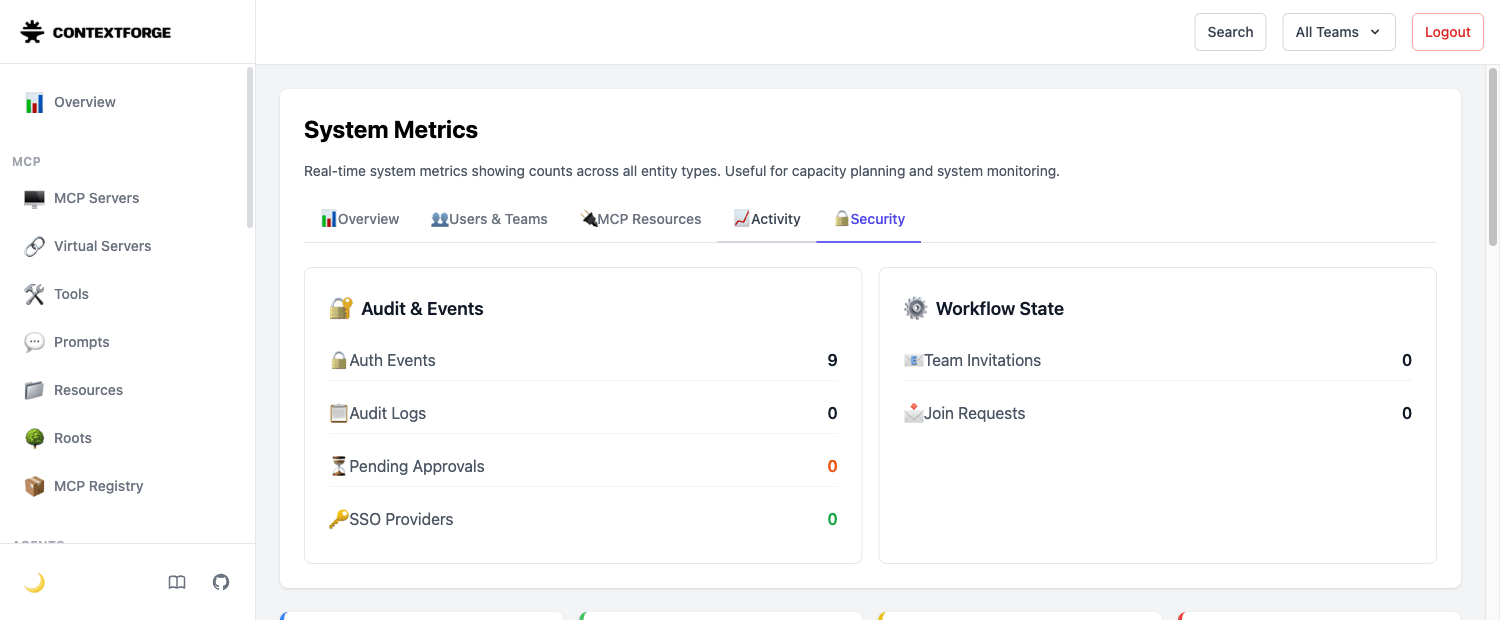
Auth Events are authentication events like logins, and this environment has counts from re-logins. Audit Logs accumulate when AUDIT_TRAIL_ENABLED is enabled; since it's disabled this time, the count is 0.
The numbers themselves are small since it's a test environment, but the fact that just by routing through a single MCP Gateway, per-tool usage records and response times are automatically captured is valuable in itself. With direct connections, tracking "which API was called, how much, and how fast" would require cross-referencing each API's logs separately.
Supplement: Operations Available from Both the UI and API
All operations so far were done from the Admin UI, but the same things can be done via REST API as well. Since the Admin UI itself calls this API, anything you can do on screen can also be done via API. This is more suited for cases where you want to manage tool and virtual server registration in code, or want to push changes from CI/CD.
The list of endpoints can be seen directly at /docs (Swagger UI) and /redoc on the running MCP Gateway. If you're already logged into the Admin UI in your browser, you can open these directly.
http://localhost:4444/docs
For specific usage, the API Usage Guide in the official documentation has examples per endpoint.
Supplement: What Was Cut to Create the Minimal Configuration
The official docker-compose.yml is a configuration with production operations in mind. Even without specifying profiles, it starts up a Gateway (3 replicas), nginx, PostgreSQL, pgbouncer, Redis, a DB migration job, and sample MCP servers with their registration jobs. Adding the monitoring profile adds Prometheus, Grafana, Loki, Tempo, pgAdmin, etc., and the sso profile adds Keycloak.
For this time, I replaced this with the following to get a single container.
| Full Configuration | This Minimal Configuration |
|---|---|
| PostgreSQL + pgbouncer (connection pool) | SQLite (DATABASE_URL="sqlite:////data/mcp.db") |
Redis (CACHE_TYPE=redis) |
Leave as default CACHE_TYPE=database. No Redis needed |
| nginx (TLS termination / cache, published on 8080) | Publish Gateway's 4444 directly |
| One-shot job for migrations | Not needed since SQLite file is created at startup |
| Sample MCP servers and auto-registration jobs | Not needed since we register the target Web API ourselves |
Gateway 3 replicas / GUNICORN_WORKERS=24 |
1 container / GUNICORN_WORKERS=2 |
Monitoring stack (monitoring profile) |
Check via Admin UI Metrics screen |
Conversely, there are parts that aren't enough with defaults in docker run, so I explicitly added those.
MCPGATEWAY_UI_ENABLED/MCPGATEWAY_ADMIN_API_ENABLED: Both default tofalse, so set totrueto use the Admin UIJWT_SECRET_KEY/AUTH_ENCRYPTION_SECRET: Strength is validated at startup, so pass generated valuesEXPOSE_ERROR_DETAILS=true: Validation errors are masked by default, returning only{"detail": "An error occurred, please try again."}, so this makes details visible during verification (a setting that should be hidden in production)
There are also constraints from what was cut. Since we're publishing directly over HTTP without nginx, a secure cookie warning appears on the login screen. With SQLite and a single container, sharing across multiple instances or scaling cannot be verified. Without the monitoring stack, metrics are only visible within what the Admin UI shows. It was sufficient for the purpose of "checking whether features meet requirements," but for verifying a production configuration, you'd need to set up the full configuration separately.
Closing
Starting from the theme of AI agents accessing internal business systems, I explored the concept of MCP Gateway and tried out ContextForge, its OSS implementation.
To summarize: the process of converting Web APIs to MCP is unavoidable no matter what, but the essence of MCP Gateway lies in being able to bundle that conversion in one place and centralize governance like authentication, auditing, rate limiting, and caching. Particularly for business systems where API usage is pay-per-use, cost governance through rate limiting and caching becomes effective. In actual operations, rather than governing everything uniformly, approaches like only routing systems with high cost risk through the Gateway are also worth considering.
For those who have started struggling with managing growing numbers of MCP servers, I think first trying to MCP-ify a single existing API locally and bundle it will give you a hands-on feel for where MCP Gateway shines. Please give it a try.
I hope this blog post is of some help to someone.
References
- ContextForge (IBM/mcp-context-forge)
- ContextForge Official Documentation
- SampleAPIs used as the example
- mcp-remote (stdio ⇄ remote MCP bridge)