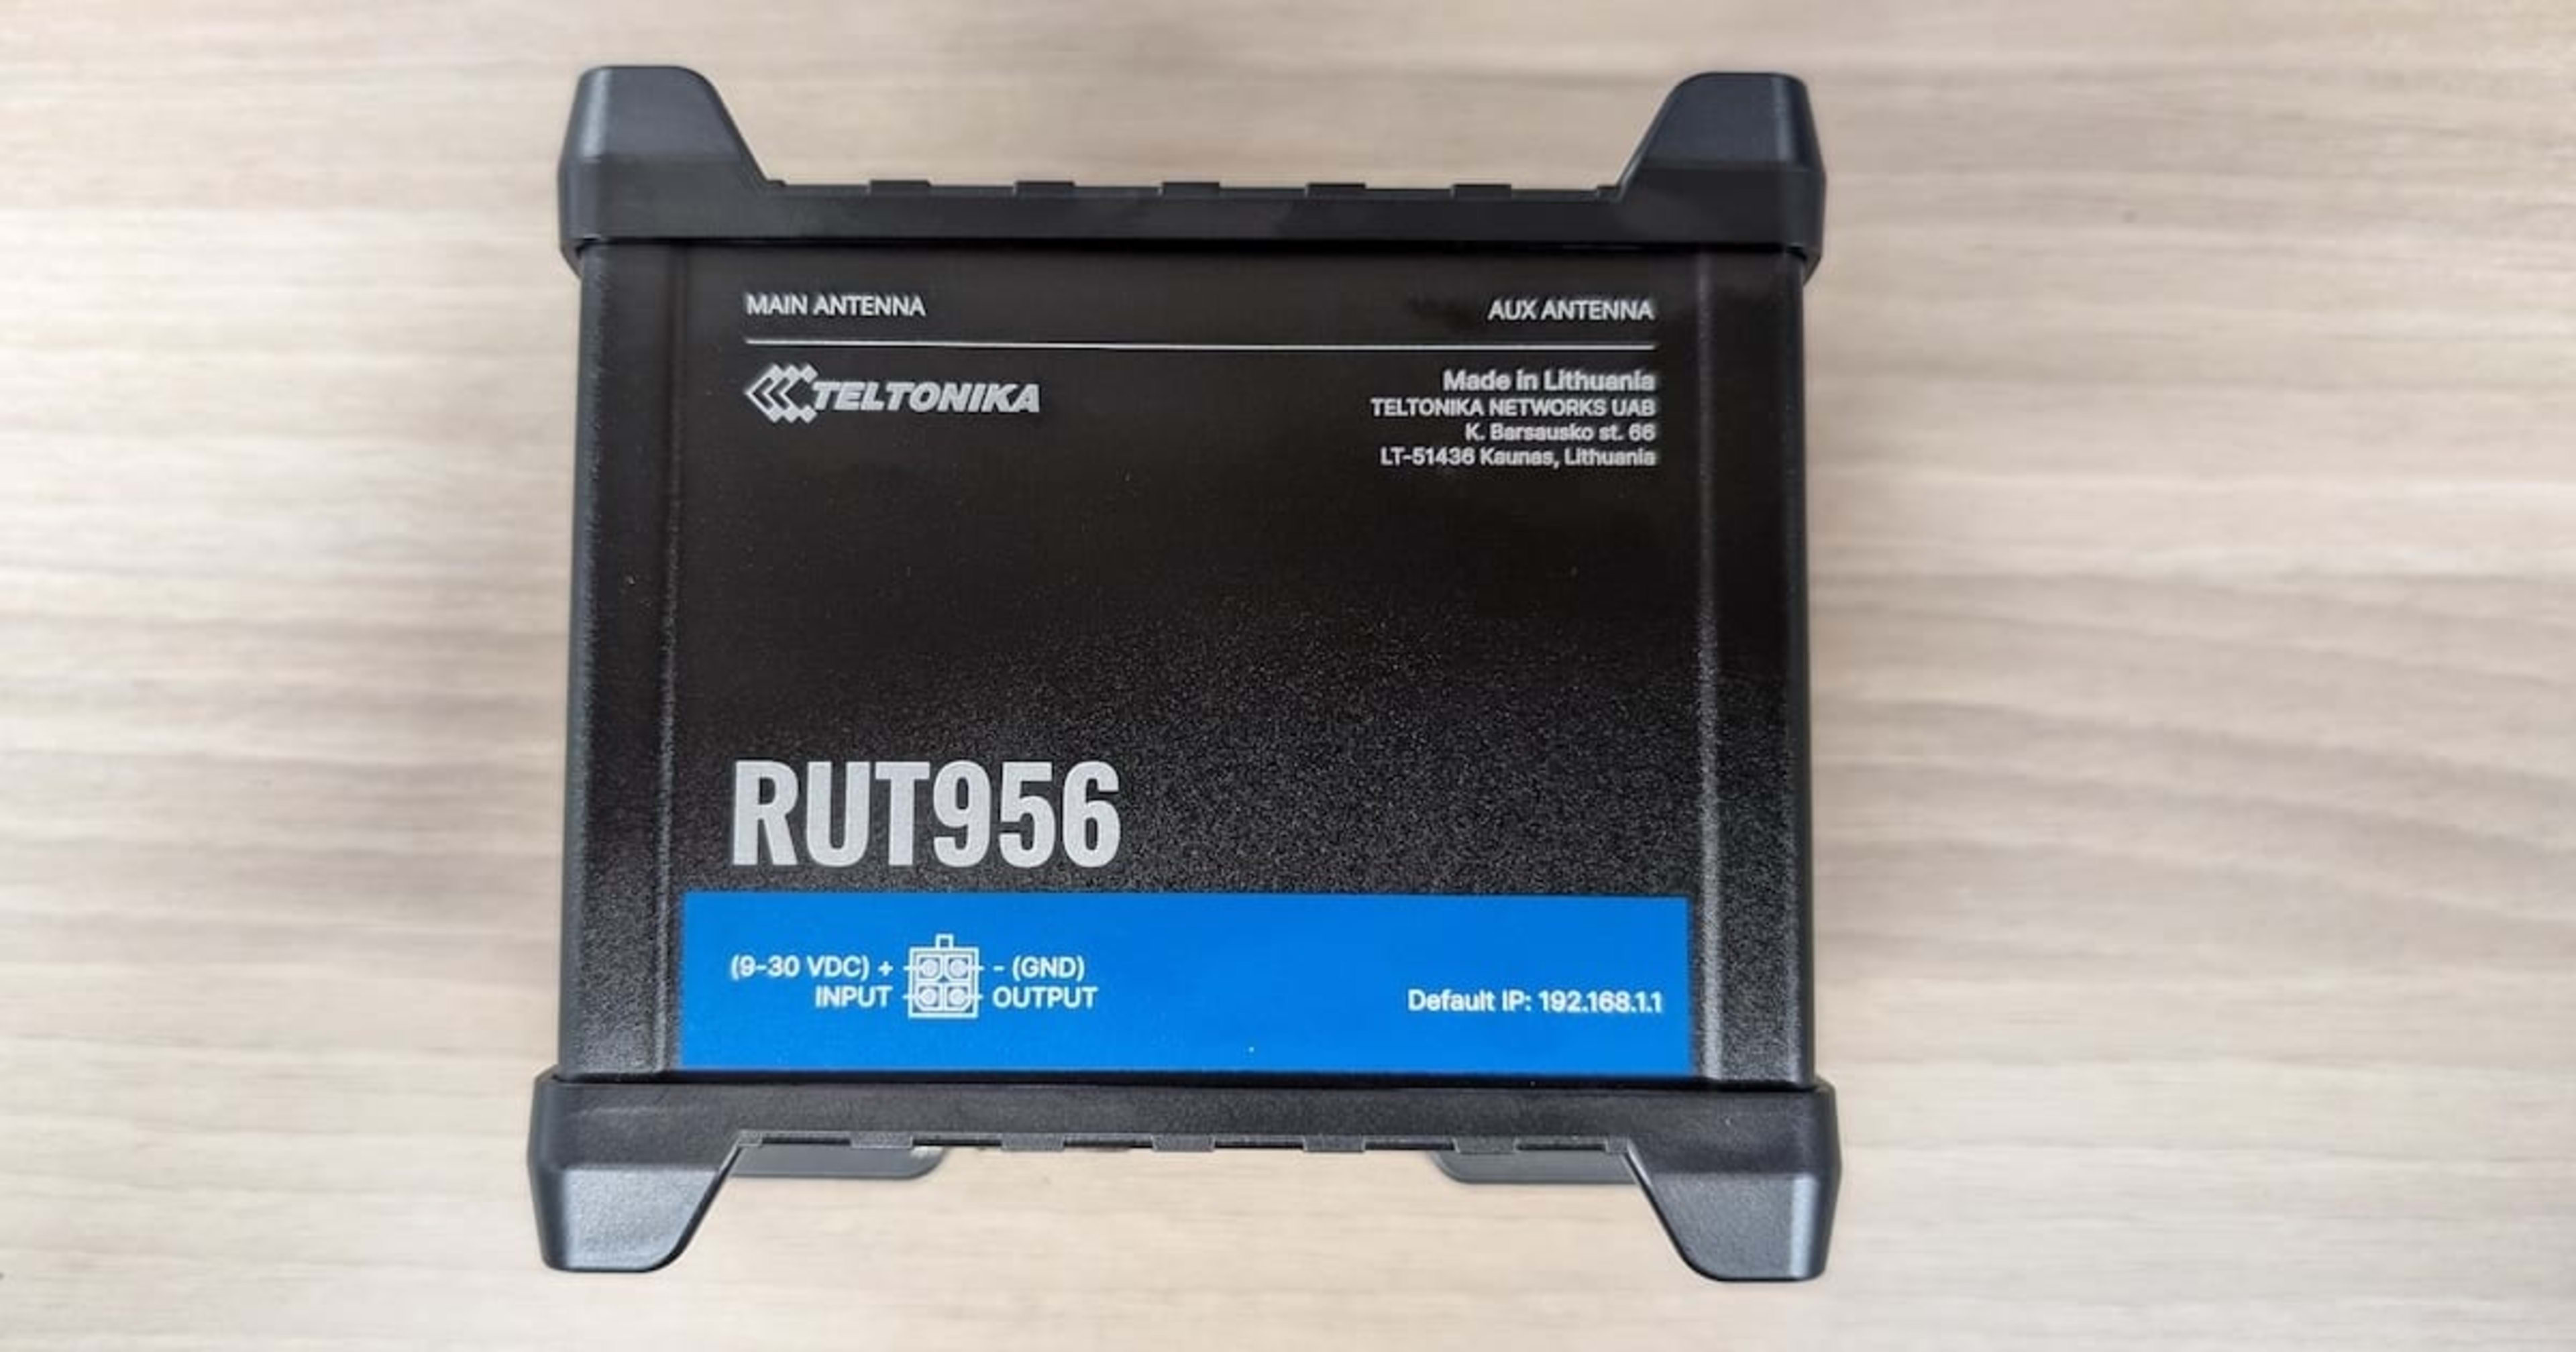
Tried Remote Access via WireGuard to Machines Behind the LTE Router Teltonika RUT956

This page has been translated by machine translation. View original
I'm Oguri, a big fan of whiskey, cigars, and pipes. I recently joined the Manufacturing Business Technology Department.
When conducting PoC at manufacturing sites, it can be difficult to add verification equipment to existing network lines. In such cases, a separate communication environment dedicated to PoC may be prepared, and LTE/5G routers are sometimes used for this purpose.
LTE/5G routers can connect to the internet immediately as long as there's a SIM and power. On the other hand, mobile lines typically don't have a global IP address, so you can't directly connect to devices behind the router from outside. However, after installing PoC equipment, you'll want to access the devices underneath remotely without going to the site.
So this time, I tried using a Teltonika Networks RUT956 on hand to see if I could access machines behind the router via WireGuard from a remote location.
What is the Teltonika RUT956?
The RUT956 is an industrial LTE router provided by Lithuania-based Teltonika Networks, equipped with 4G LTE connectivity, Wi-Fi, and wired LAN functions.
| Item | Details |
|---|---|
| Mobile line | 4G LTE Cat 4. Maximum download 150 Mbps |
| SIM | Dual SIM |
| Wi-Fi | 802.11b/g/n (Wi-Fi 4) |
| Wired LAN | 10/100 Mbps × 4 (WAN 1 + LAN 3) |
| Power | 9–30 V DC |
| Operating temperature | −40–75 ℃ |
| OS | RutOS (OpenWrt-based) |
The RUT956 has obtained technical conformity certification (giteki) and holds numerous certifications for radio wave regulations in ASEAN countries, making it available for use across a wide range of regions.
Why I Chose WireGuard
The RUT956 supports many VPNs such as OpenVPN, IPsec, and ZeroTier, but this time I chose a configuration that sets up a WireGuard server on AWS to connect. The reasons are the following three.
- Cost: ZeroTier, which is supported, has a free plan but it's for non-commercial use, making a paid plan mandatory for business use. Building a WireGuard server with the minimum Lightsail configuration can be kept at a lower cost.
- Native support on RUT956: Configuration can be done through the management screen alone.
- Simpler setup than OpenVPN or IPsec: Only a key pair and a few lines of configuration file are needed, and official apps for PC, Mac, and smartphones are available.
| Configuration | Monthly cost | Notes |
|---|---|---|
| Amazon Lightsail + WireGuard | 5 USD | Minimum configuration (512 MB memory). Includes 1 TB of data transfer, and no additional cost for a static IP address. |
| Tailscale Standard | 8 USD / user | Free Personal plan is for non-commercial use only |
| ZeroTier Essential | 18 USD (includes 10 devices) | Free Personal plan is for personal use and evaluation |
Unlike managed services like ZeroTier or Tailscale, you need to build/operate the hub server and exchange keys yourself, but the required work is minimal.
Configuration
The configuration for this time is as follows.
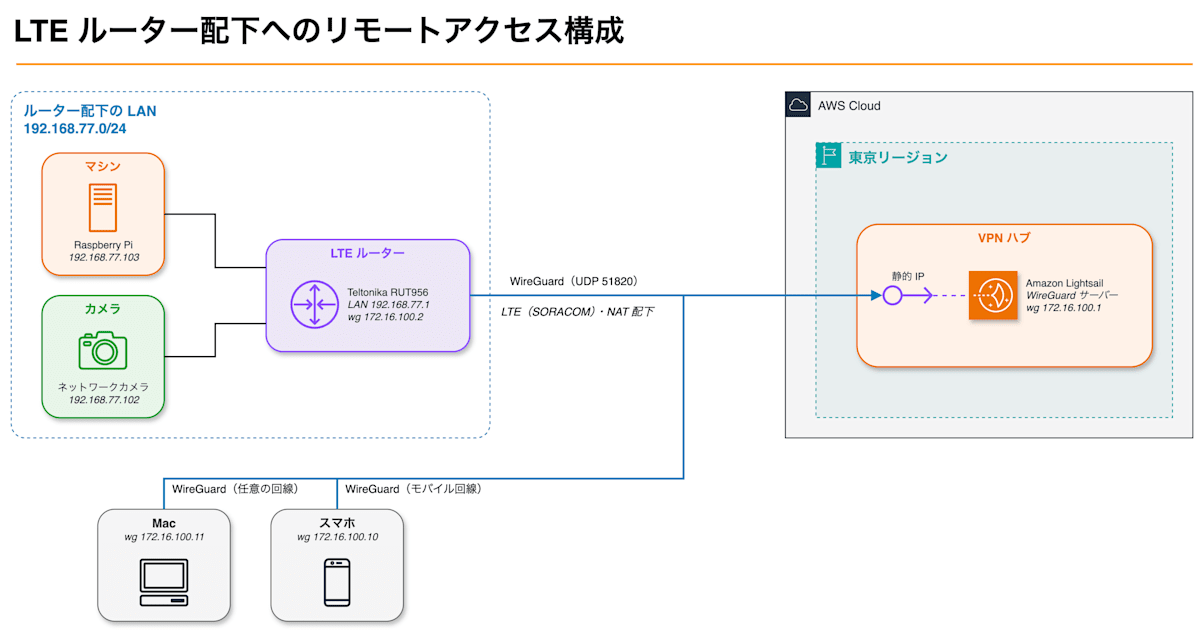
Since the LTE line is behind CGNAT, it cannot be accessed from the internet. Therefore, a WireGuard server is built on AWS to serve as the hub. The RUT956, PCs, smartphones, etc. all access the WireGuard server outbound, with no inbound communication.
Configuration Details
The basic configuration details are as follows.
- This time, the LAN CIDR for RUT956 is set to
192.168.77.0/24. - The WireGuard network itself is set to
172.16.100.0/24. - Persistent Keepalive is set to the recommended value of 25 seconds.
- The LAN CIDR of RUT956 is included in the server's AllowedIPs.
- Route Allowed IPs on RUT956 is enabled.
Trying It Out
Test Environment
The equipment used is as follows.
| Item | Details | Notes |
|---|---|---|
| LTE Router | RUT956 | Firmware version is RUT9M_R_00.07.24.3 |
| SIM | SORACOM IoT SIM {plan01s} | SMS is available |
| WireGuard server | Amazon Lightsail, Tokyo region, Ubuntu 24.04 LTS, Linux/Unix 0.5GB | |
| Clients | Mac (WireGuard app), Android (WireGuard app) | |
| Devices behind router | Raspberry Pi 4 Model B, network camera (TP-Link Tapo C210) |
IP addresses are assigned as follows.
| Device | IP Address | Notes |
|---|---|---|
| Router network | 192.168.77.0/24 (RUT956 is 192.168.77.1) | |
| RUT956 (LAN) | 192.168.77.1 | |
| Network camera (Tapo C210) | 192.168.77.102 | |
| Raspberry Pi | 192.168.77.103 | |
| WireGuard network | 172.16.100.0/24 | |
| WireGuard server | 172.16.100.1 | |
| RUT956 (WireGuard) | 172.16.100.2 | |
| Mac | 172.16.100.11 | |
| Smartphone | 172.16.100.12 |
AWS Configuration
First, create a Lightsail instance. The instance configuration is as follows.
| Item | Value | Notes |
|---|---|---|
| Region | Tokyo region | |
| Platform | Linux operating system | |
| Blueprint | Ubuntu 24.04 LTS | |
| Network type | Dual-stack | Use IPv4 |
| Instance plan | General purpose | $5/month 512 MB |
| Automatic snapshots | Enabled |
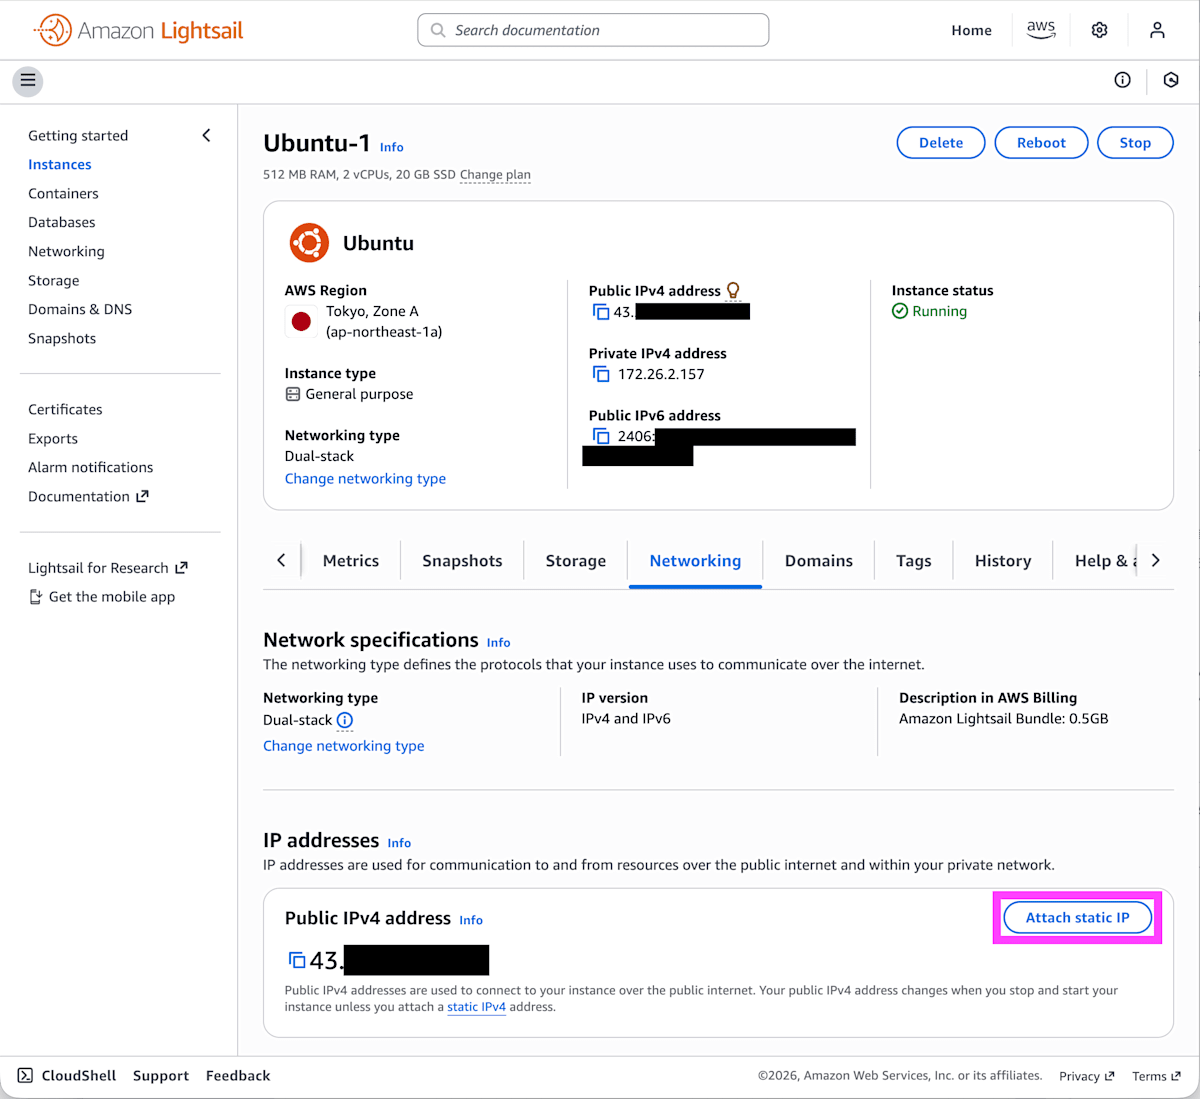
Select the Networking tab in the created instance details and click Attach static IP.
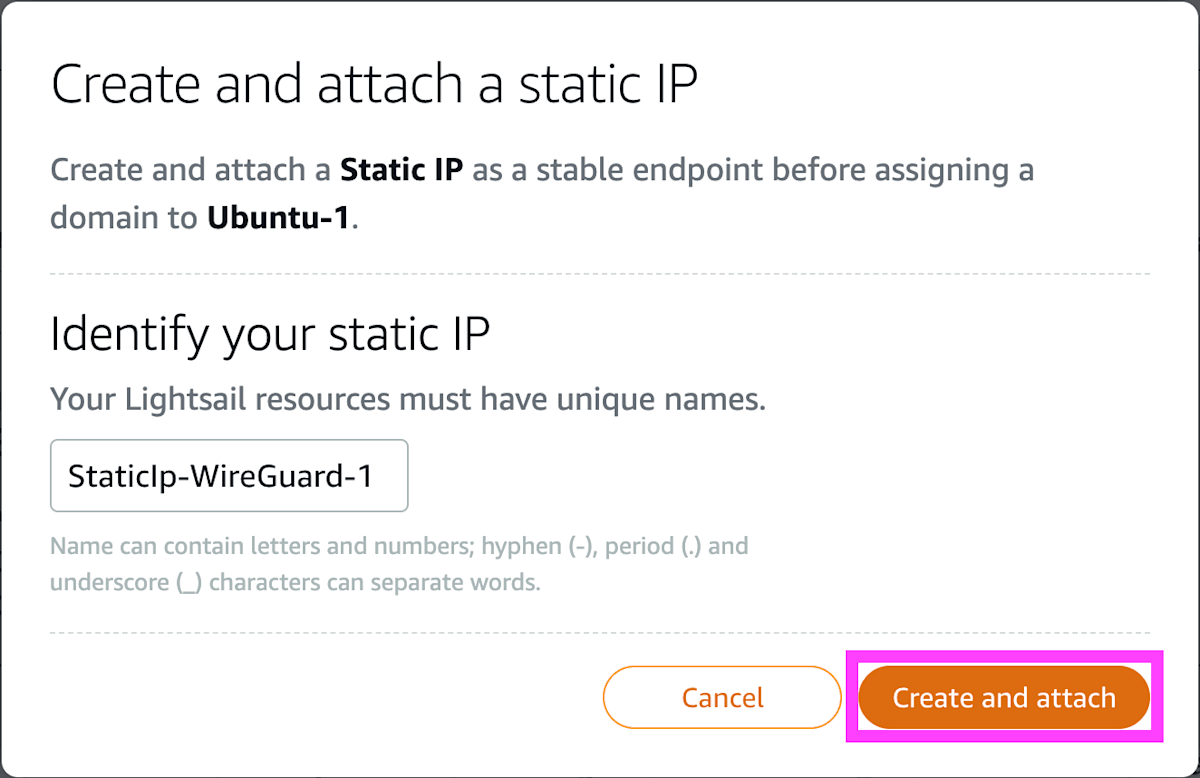
Enter the resource name for the IP address and click Create and attach. This sets the static IP address.
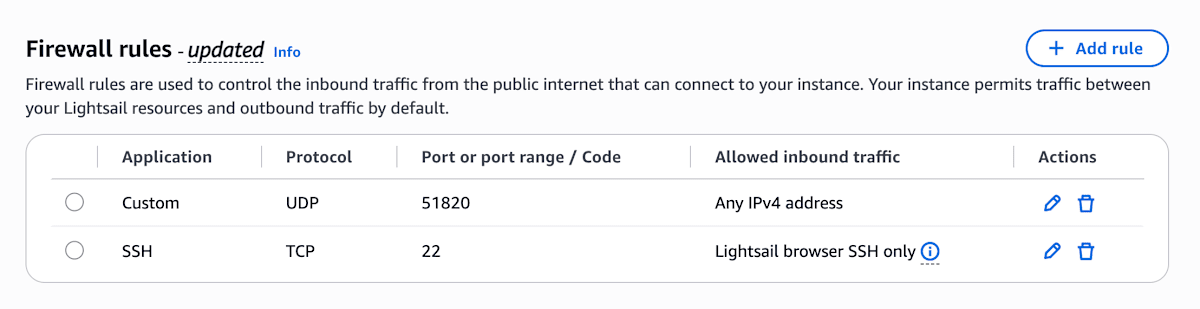
Configure the firewall rules. Delete the HTTP rule that's included by default and set the following rules.
| Application | Protocol | Port or port range/code | Allowed inbound traffic |
|---|---|---|---|
| Custom | UDP | 51820 | Any IPv4 address |
| SSH | TCP | 22 | Lightsail browser SSH only |
Log into Lightsail and install WireGuard. Also install a QR code encoder to have smartphones read the configuration.
$ sudo apt update && sudo apt install -y wireguard qrencode
Create the server key pair. The contents of server.key and server.pub will be used later.
$ wg genkey | sudo tee /etc/wireguard/server.key | wg pubkey | sudo tee /etc/wireguard/server.pub
$ sudo chmod 600 /etc/wireguard/server.key
$ sudo chmod 600 /etc/wireguard/server.pub
Create the WireGuard server configuration.
Create /etc/wireguard/wg0.conf.
[Interface]
Address    = 172.16.100.1/24
ListenPort = 51820
PrivateKey = <contents of server.key>
Enable IP forwarding and start WireGuard.
$ echo "net.ipv4.ip_forward = 1" | sudo tee /etc/sysctl.d/99-wireguard.conf
$ sudo sysctl --system
$ sudo systemctl enable --now wg-quick@wg0
Verify the configuration. Confirm that listening port: 51820 appears.
$ sudo wg show
interface: wg0
  public key: ABCDEFGHIJKLMNOPQRSTUVWXYZ1234567890abcdefg=
  private key: (hidden)
  listening port: 51820
RUT956 Configuration
Here, the RUT956 is operated via WebUI.
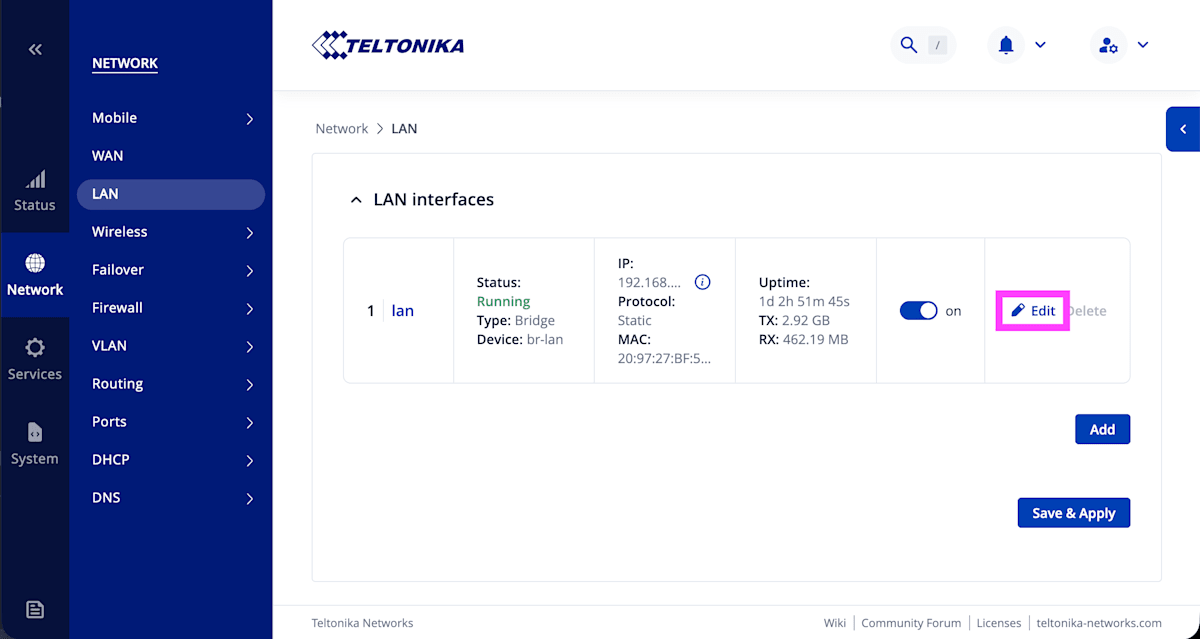
Edit the LAN configured under [Network] - [LAN].
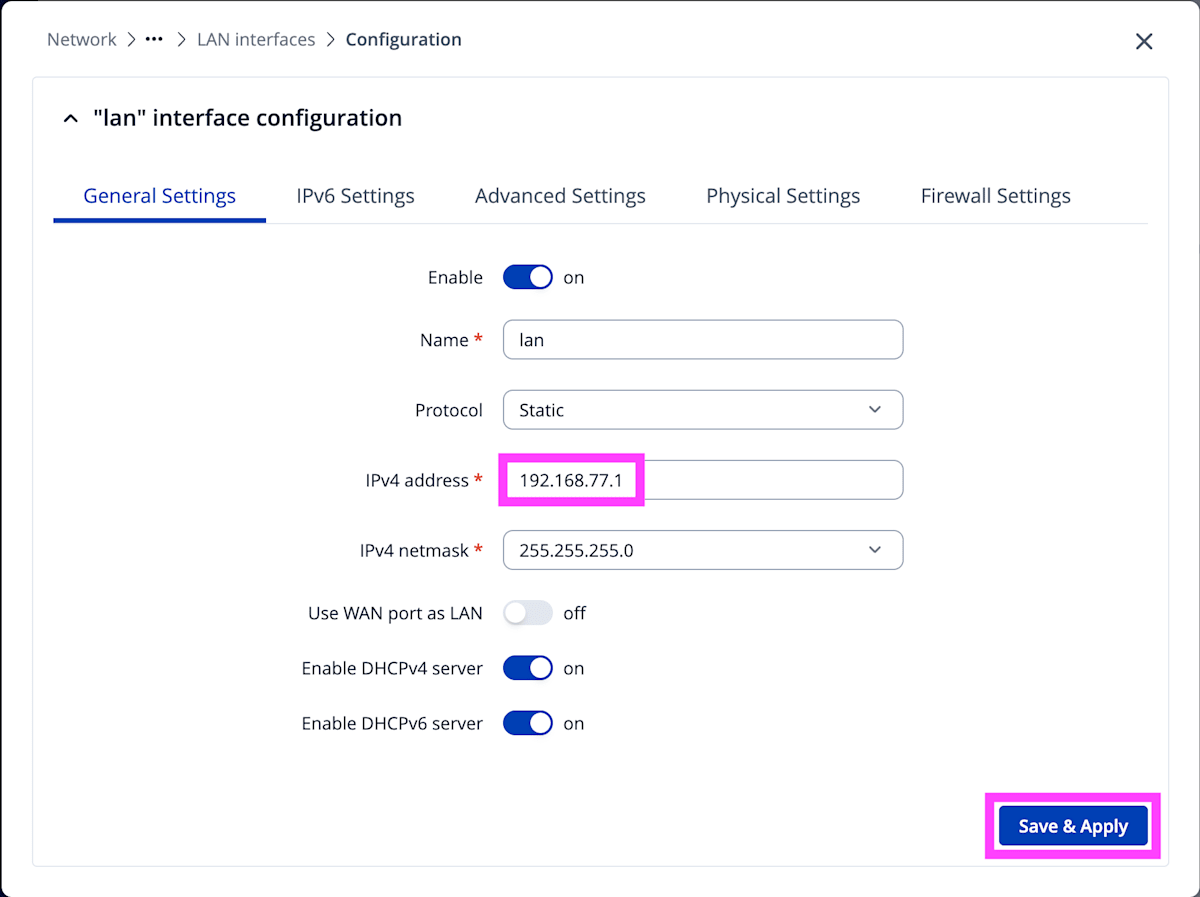
Here, set 192.168.77.1 for IPv4 address and click Save & Apply.
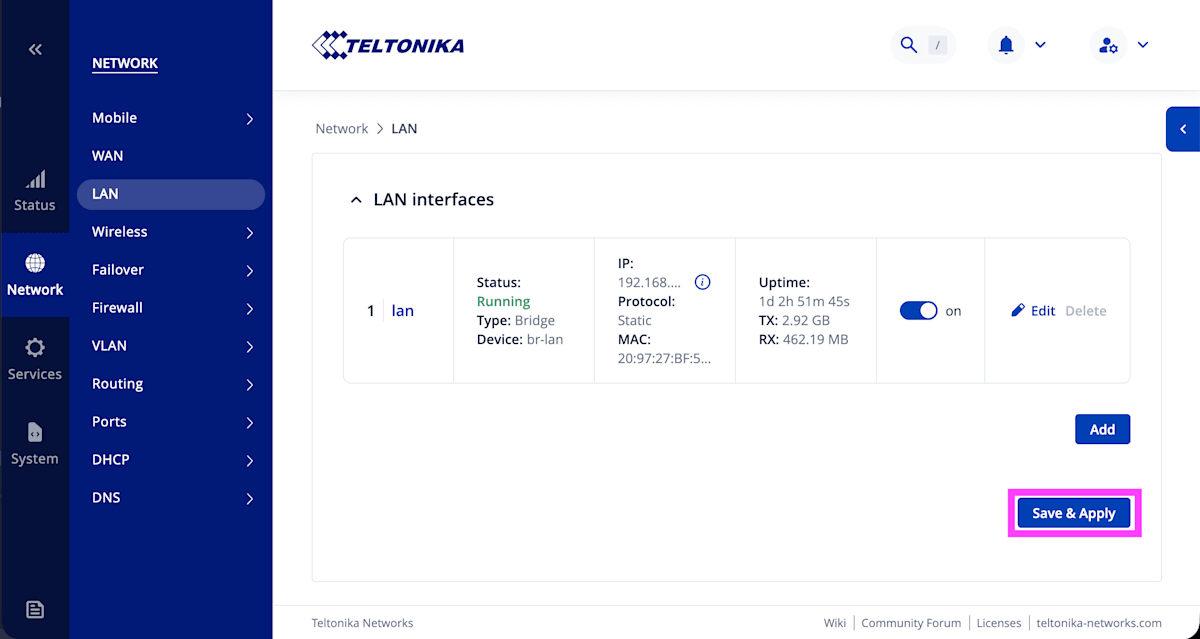
Click Save & Apply again on the LAN interfaces screen.
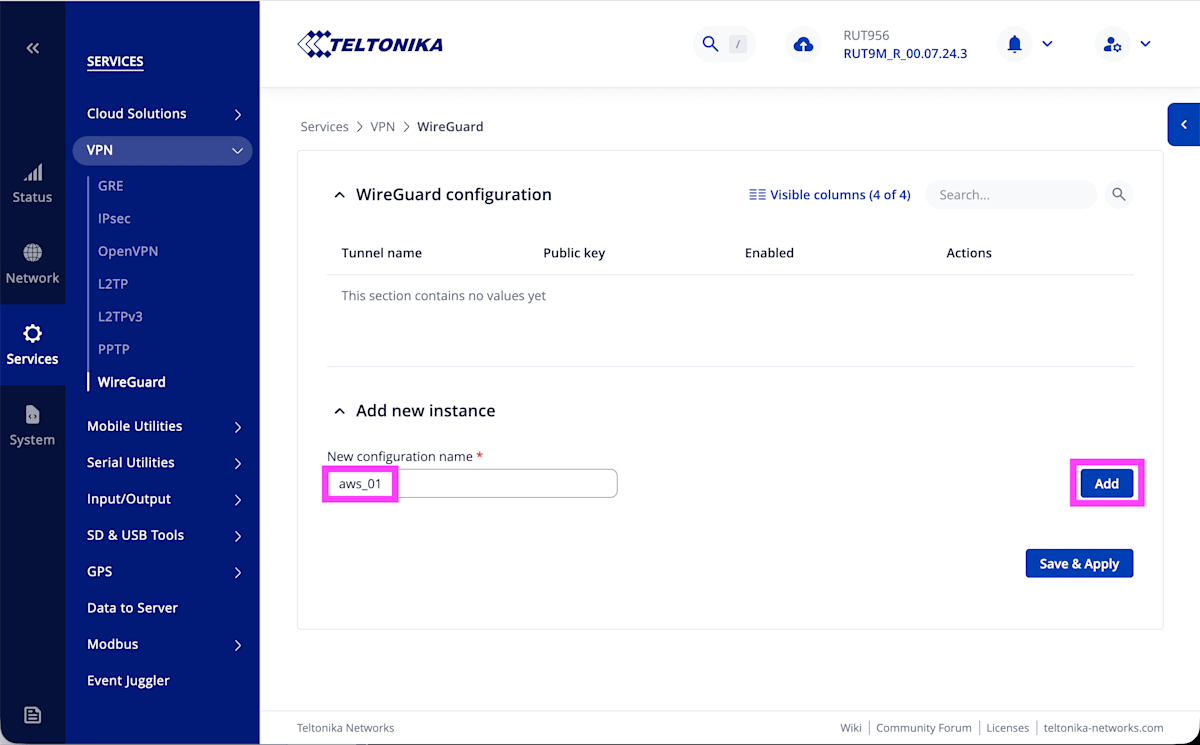
Create a WireGuard instance. Under [Service] - [VPN] - [WireGuard], enter the configuration name and click Add. Here, aws_01 was entered.
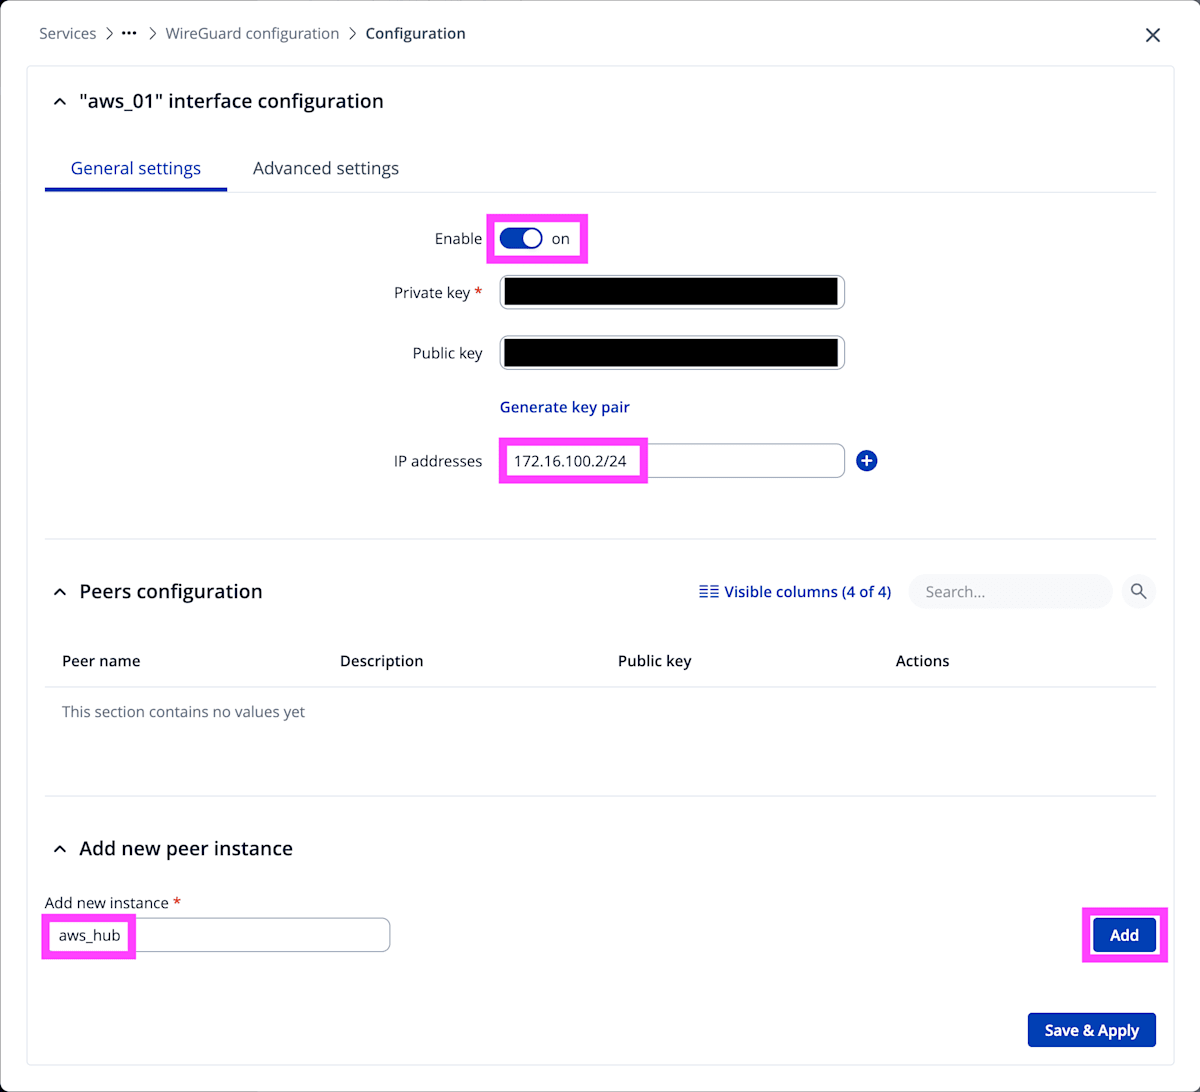
In the General settings tab, set Enable to ON, enter 172.16.100.2/24 for IP address, and take note of the Public Key. Enter aws_hub in peer instance and click Add.
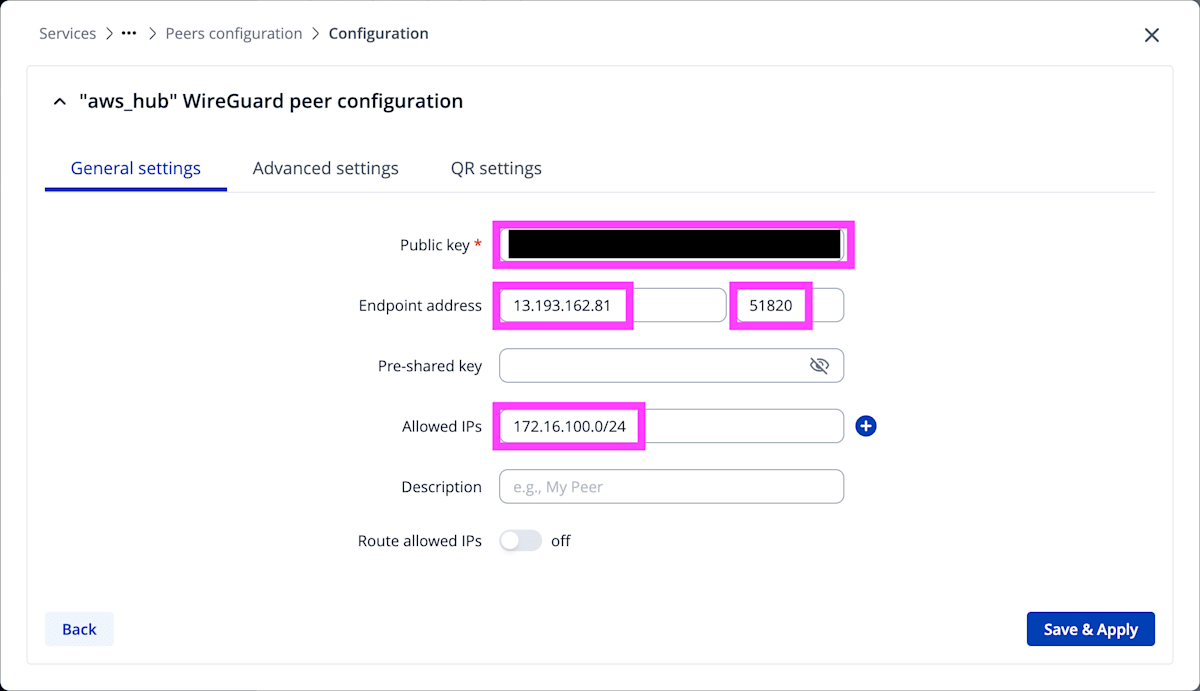
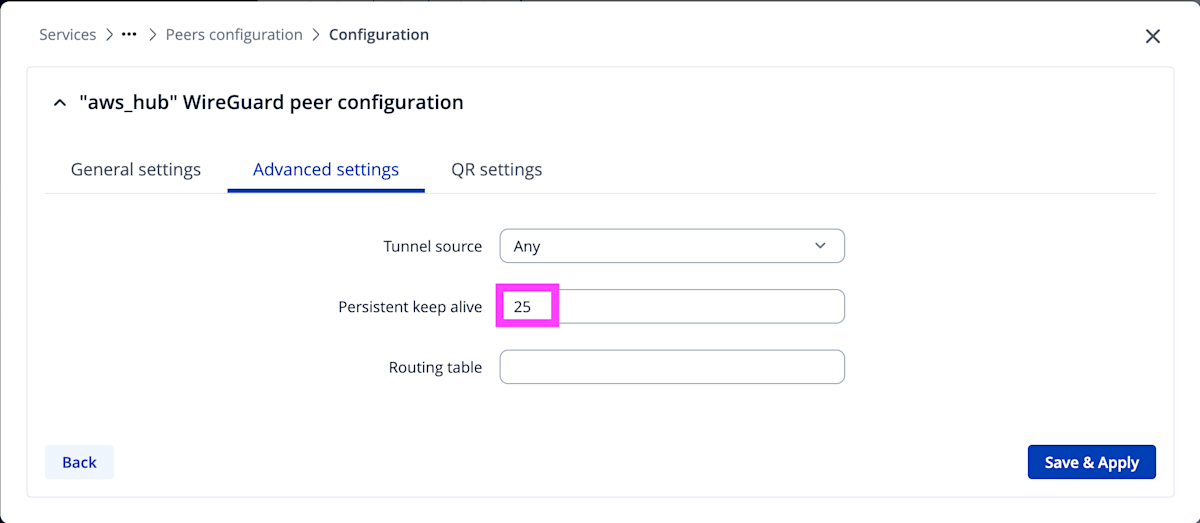
Enter the following content in the General settings and Advanced settings tabs and click Save & Apply.
| Tab | Item | Value |
|---|---|---|
| General settings | Public Key | Contents of server.pub created on Lightsail |
| General settings | Endpoint address (host) | <Lightsail static IP address> |
| General settings | Endpoint address (port) | 51820 |
| General settings | Allowed IPs | 172.16.100.0/24 |
| General settings | Route Allowed IPs | ON |
| Advanced settings | Persistent keep alive | 25 |
Verify the configuration and click Save & Apply.
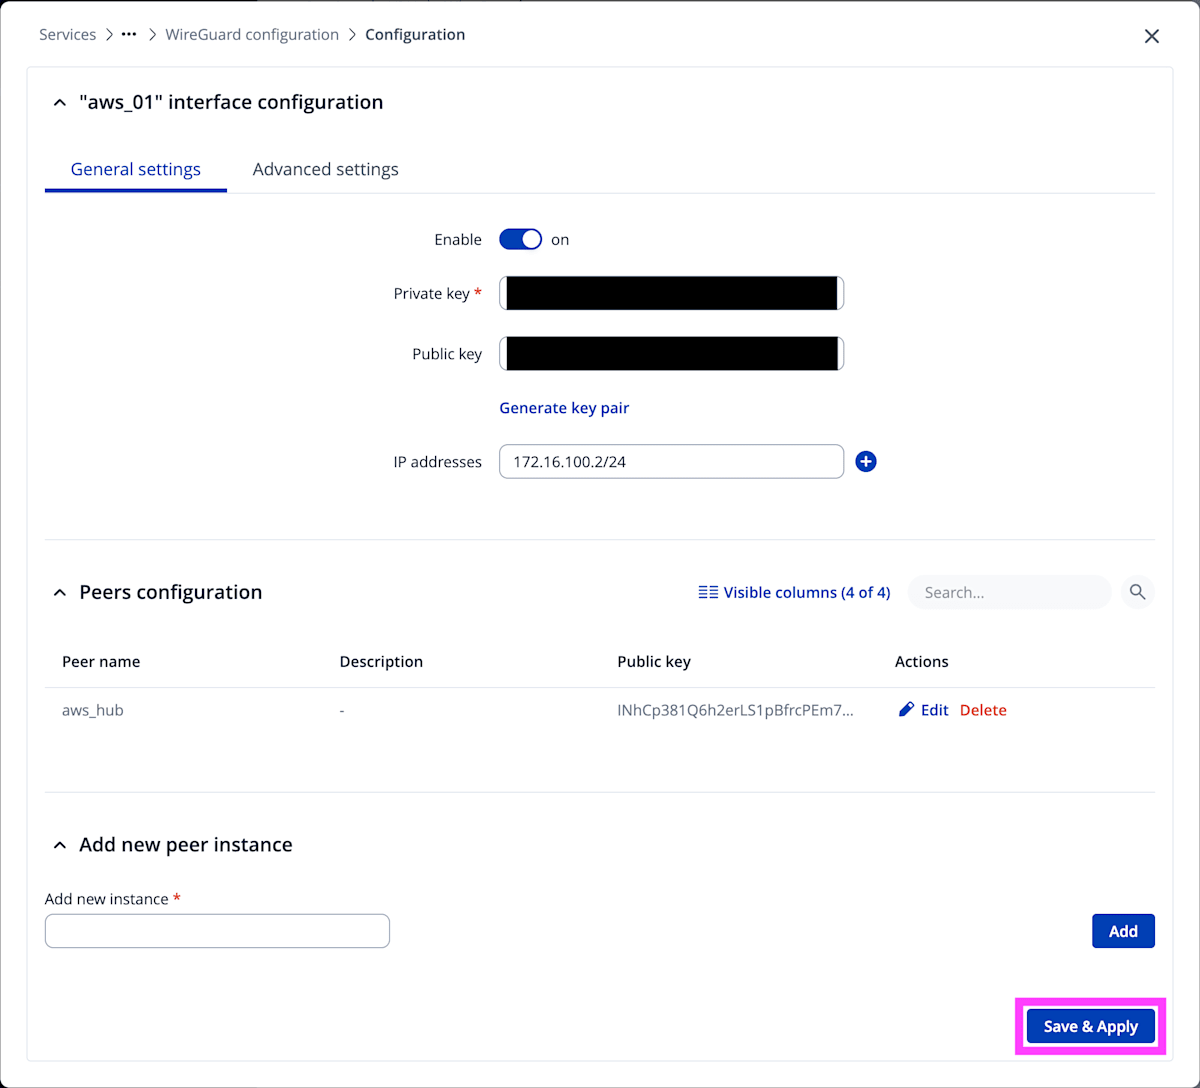
Adding RUT956 as a Peer to the WireGuard Server
On Lightsail, register the RUT956 public key in /etc/wireguard/wg0.conf and add it as a Peer. Append the following content. By registering both the RUT956's IP address in the WireGuard network and the CIDR of the RUT956's router network in AllowedIPs, connections to devices behind the router become possible.
# RUT956
[Peer]
PublicKey  = <RUT956 Public Key>
AllowedIPs = 172.16.100.2/32, 192.168.77.0/24
Restart the service and check the WireGuard status. You can confirm that RUT956 is registered as a Peer.
$ sudo systemctl restart wg-quick@wg0
$ sudo wg show
interface: wg0
  public key: ABCDEFGHIJKLMNOPQRSTUVWXYZ1234567890abcdefg=
  private key: (hidden)
  listening port: 51820

peer: ABCDEFGHIJKLMNOPQRSTUVWXYZ1234567890abcdefg=
  endpoint: 116.67.153.62:44682
  allowed ips: 172.16.100.2/32, 192.168.77.0/24
  latest handshake: 6 seconds ago
  transfer: 180 B received, 92 B sent
Verify the same on RUT956 as well.
root@RUT956:~# wg show
interface: aws_01
  public key: ABCDEFGHIJKLMNOPQRSTUVWXYZ1234567890abcdefg=
  private key: (hidden)
  listening port: 51820

peer: ABCDEFGHIJKLMNOPQRSTUVWXYZ1234567890abcdefg=
  endpoint: 192.0.2.1:51820
  allowed ips: 172.16.100.0/24
  latest handshake: 1 minute, 59 seconds ago
  transfer: 92 B received, 39.32 KiB sent
  persistent keepalive: every 25 seconds
Run ping from RUT956 to the WireGuard server to verify connectivity.
root@RUT956:~# ping -c 3 172.16.100.1
PING 172.16.100.1 (172.16.100.1): 56 data bytes
64 bytes from 172.16.100.1: seq=0 ttl=64 time=9.778 ms
64 bytes from 172.16.100.1: seq=1 ttl=64 time=5.001 ms
64 bytes from 172.16.100.1: seq=2 ttl=64 time=5.018 ms

--- 172.16.100.1 ping statistics ---
3 packets transmitted, 3 packets received, 0% packet loss
round-trip min/avg/max = 5.001/6.599/9.778 ms
Adding a Client
Check the installation method appropriate for the client and install it. Since I'm registering a MacBook Air M4 (macOS 26.6.2) as the client here, I installed it from the App Store.
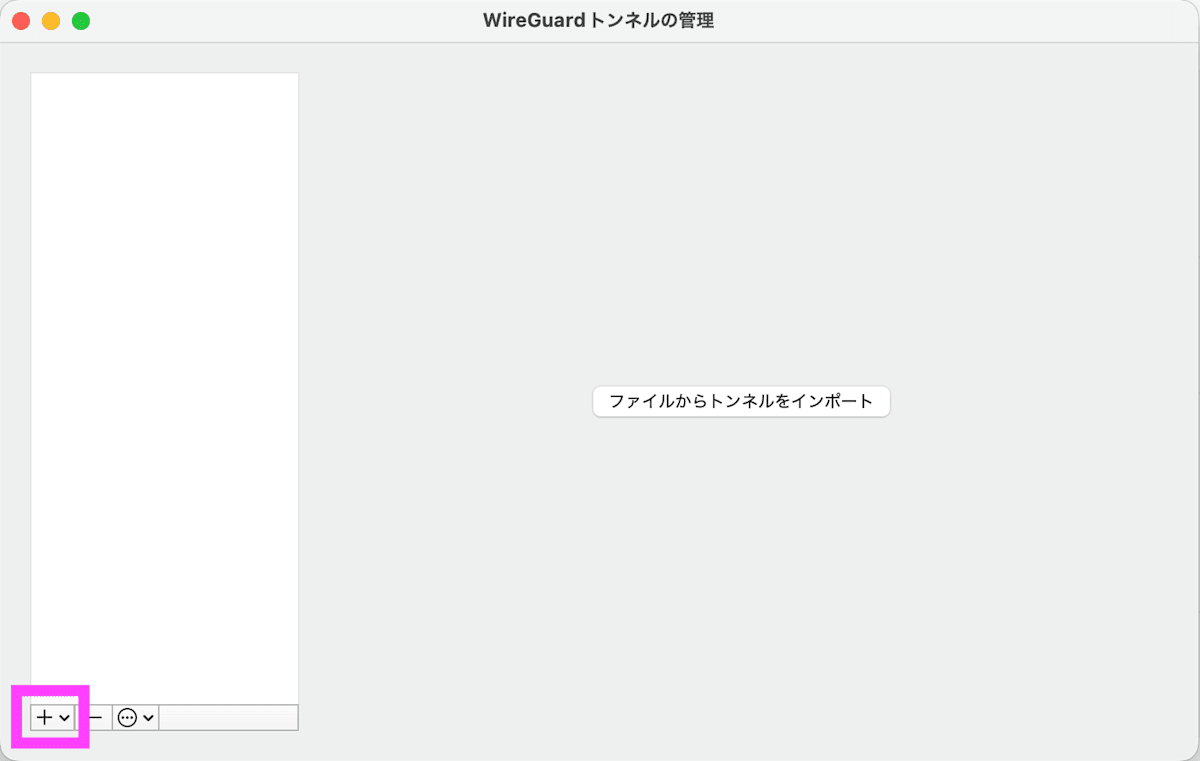
Launch WireGuard. Click + in the lower-left menu and select Add empty tunnel.
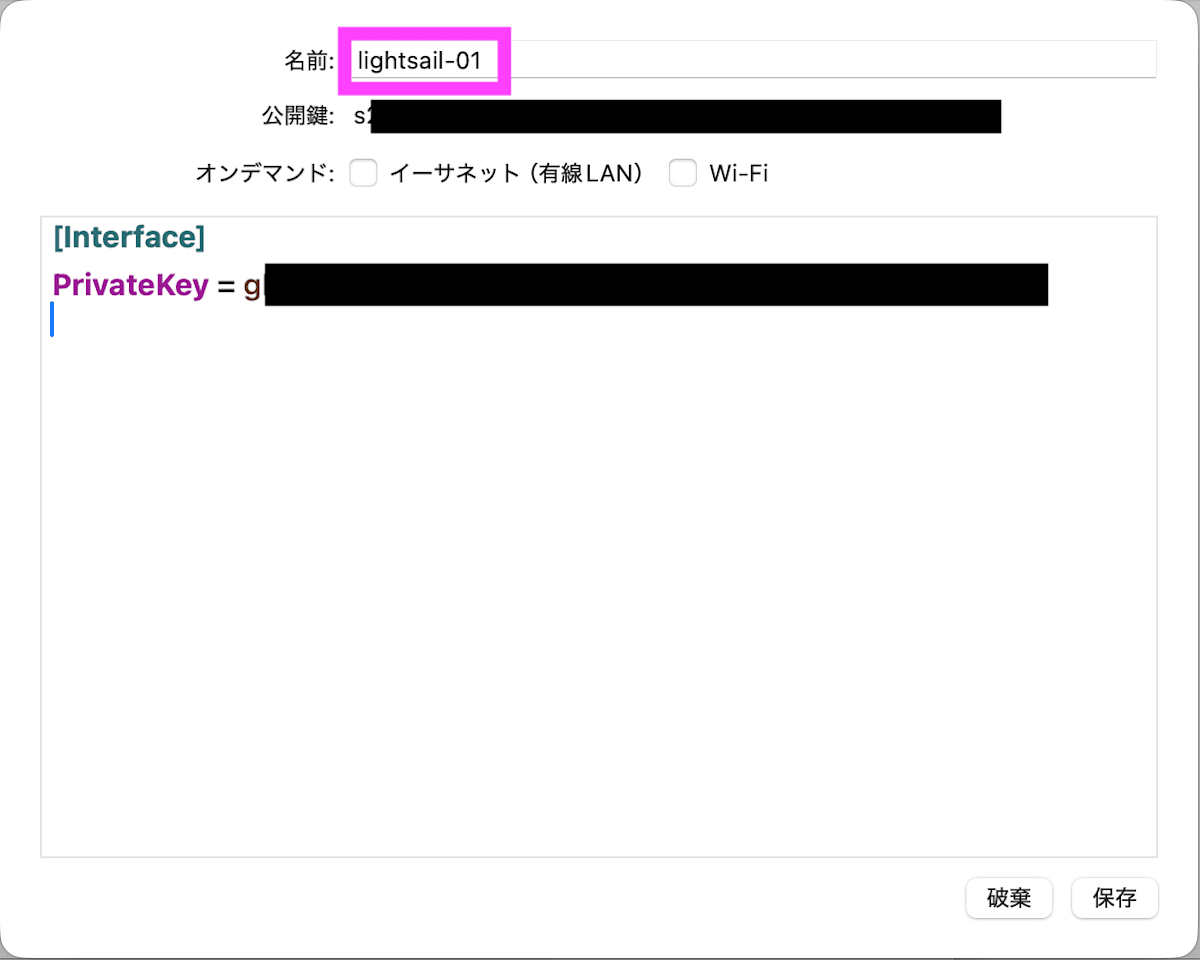
A public key and private key will be created, so enter any name. Never share the private key externally.
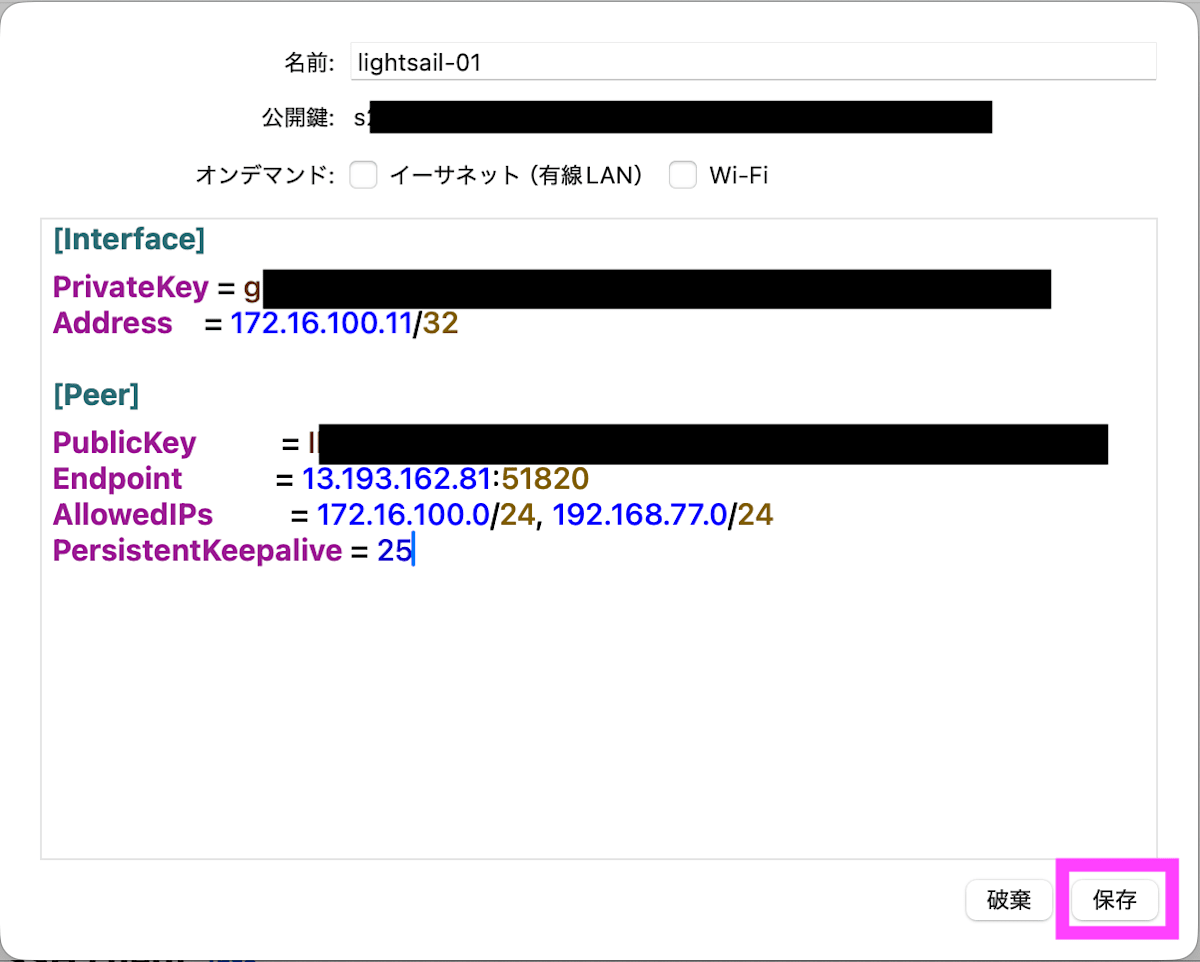
Enter the following content and click Save.
| Section | Key | Value | Notes |
|---|---|---|---|
| Interface | PrivateKey | <default value> | Do not change |
| Interface | Address | 172.16.100.11/32 | |
| Peer | PublicKey | <contents of Lightsail's server.pub> | |
| Peer | Endpoint | <Lightsail static IP address>:51820 |
|
| Peer | AllowedIPs | 172.16.100.0/24, 192.168.77.0/24 |
WireGuard network and router network |
| Peer | PersistentKeepalive | 25 |
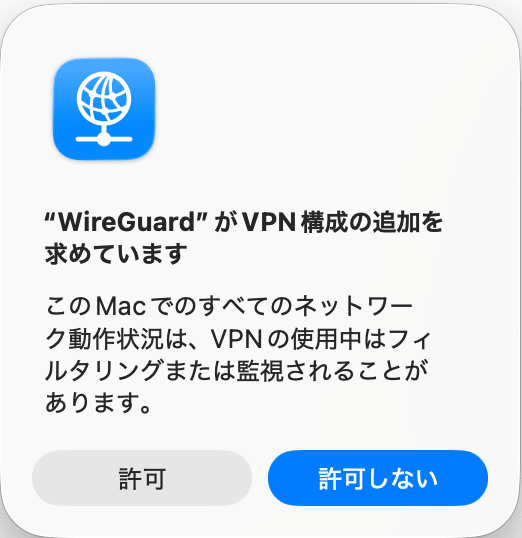
On macOS, you'll be asked to confirm adding the VPN configuration, so click Allow.
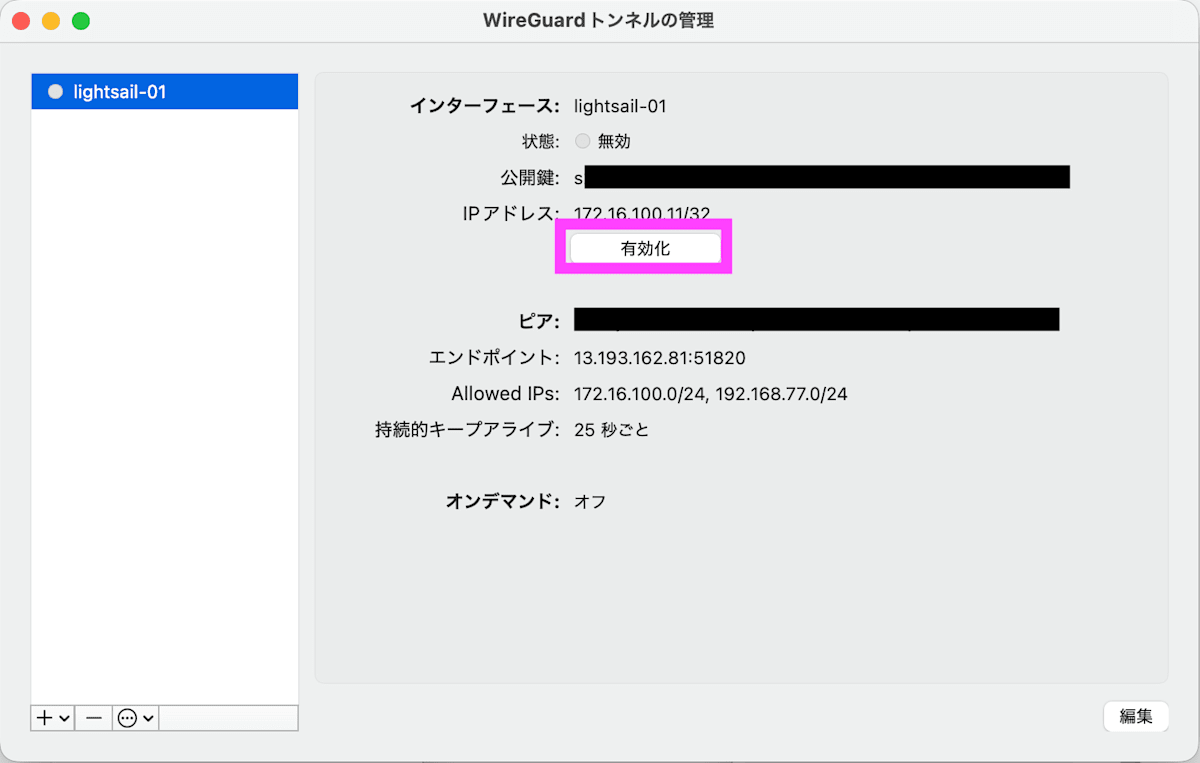
Click Activate and confirm that the status becomes active.
On Lightsail, register the macOS public key in /etc/wireguard/wg0.conf and add it as a Peer.
# Oguri's Macbook Air
[Peer]
PublicKey  = <macOS WireGuard app public key>
AllowedIPs = 172.16.100.11/32
Restart WireGuard.
$ sudo systemctl restart wg-quick@wg0
Operation Verification
Run ping to check if the client can connect to RUT956.
$ ping -c 3 192.168.77.1
PING 192.168.77.1 (192.168.77.1): 56 data bytes
64 bytes from 192.168.77.1: icmp_seq=0 ttl=63 time=14.092 ms
64 bytes from 192.168.77.1: icmp_seq=1 ttl=63 time=13.571 ms
64 bytes from 192.168.77.1: icmp_seq=2 ttl=63 time=13.338 ms

--- 192.168.77.1 ping statistics ---
3 packets transmitted, 3 packets received, 0.0% packet loss
round-trip min/avg/max/stddev = 13.338/13.667/14.092/0.315 ms
$ ping -c 3 192.168.77.103
PING 192.168.77.103 (192.168.77.103): 56 data bytes
64 bytes from 192.168.77.103: icmp_seq=0 ttl=62 time=15.316 ms
64 bytes from 192.168.77.103: icmp_seq=1 ttl=62 time=14.231 ms
64 bytes from 192.168.77.103: icmp_seq=2 ttl=62 time=16.520 ms

--- 192.168.77.103 ping statistics ---
3 packets transmitted, 3 packets received, 0.0% packet loss
round-trip min/avg/max/stddev = 14.231/15.356/16.520/0.935 ms
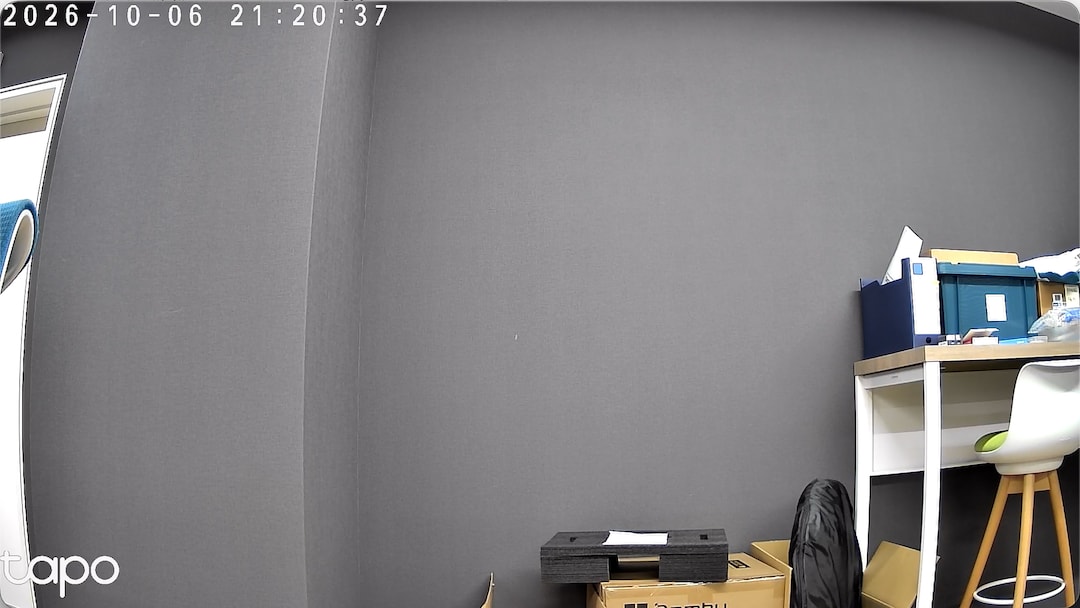
Also verify connectivity to the network camera. The TP-Link Tapo C210 also supports RTSP connections, so create an account for the camera in advance.
IINA is used as the RTSP client. Opening it in the format rtsp://<username>:<password>@192.168.77.102:554/stream1 will display the image.
Adding a Smartphone
Create the configuration on the Lightsail side and have it read via QR code.
$ sudo wg genkey | sudo tee /etc/wireguard/phone.key | sudo wg pubkey | sudo tee /etc/wireguard/phone.pub
[Interface]
PrivateKey = <contents of phone.key>
Address    = 172.16.100.12/32

[Peer]
PublicKey           = <Lightsail's server.pub>
Endpoint            = <Lightsail static IP address>:51820
AllowedIPs          = 172.16.100.0/24, 192.168.77.0/24
PersistentKeepalive = 25
Convert the contents of phone.conf to a QR code.
$ sudo cat /etc/wireguard/phone.conf | qrencode -t ansiutf8
In the WireGuard app on the smartphone, select Scan from QR code from the + in the lower right and scan the QR code. Give the tunnel a name and activate it.
Add the smartphone Peer to Lightsail's wg0.conf.
# Smart Phone
[Peer]
PublicKey  = <contents of phone.pub>
AllowedIPs = 172.16.100.12/32
Restart WireGuard.
$ sudo systemctl restart wg-quick@wg0
Checking the WireGuard status shows that the smartphone peer has been added.
$ sudo wg show
interface: wg0
  public key: ABCDEFGHIJKLMNOPQRSTUVWXYZ1234567890abcdefg=
  private key: (hidden)
  listening port: 51820

peer: ABCDEFGHIJKLMNOPQRSTUVWXYZ1234567890abcdefg=
  endpoint: 116.67.153.62:63205
  allowed ips: 172.16.100.12/32
  latest handshake: 1 second ago
  transfer: 180 B received, 92 B sent

peer: ABCDEFGHIJKLMNOPQRSTUVWXYZ1234567890abcdefg=
  allowed ips: 172.16.100.2/32, 192.168.77.0/24

peer: ABCDEFGHIJKLMNOPQRSTUVWXYZ1234567890abcdefg=
  allowed ips: 172.16.100.11/32
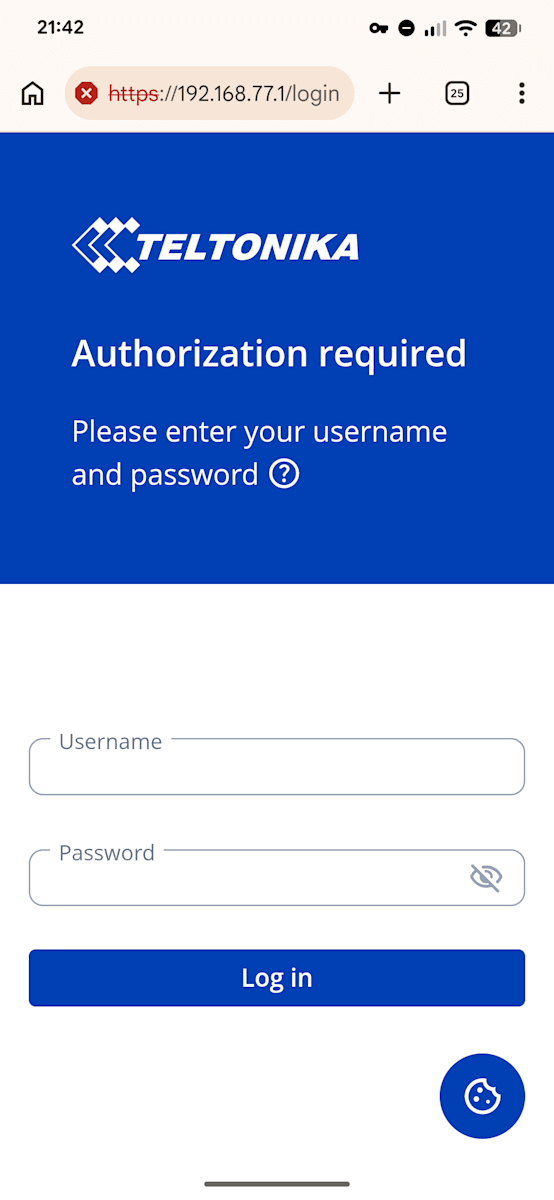
The RUT956 management screen can also be accessed from the smartphone.
Pitfalls
When the client Mac was connected to the LAN behind the LTE router, an issue occurred where even after disabling the WireGuard tunnel, it was impossible to connect to the Raspberry Pi or the network camera. When attempting to connect to the Raspberry Pi via SSH, the situation was as follows, with no route to the host.
$ ssh pi@192.168.77.103
ssh: connect to host 192.168.77.103 port 22: No route to host
This is due to a privacy feature that restricts communication with devices on the same network. On macOS, you can enable access by going to [System Settings] - [Privacy & Security] - [Local Network] and enabling the target application.
Enable the local network setting in the terminal app used to run SSH, and then SSH access works normally.
% ssh pi@192.168.77.103
pi@192.168.77.103's password:
Linux raspi4b-01 6.18.50+rpt-rpi-v8 #1 SMP PREEMPT Debian 1:6.18.50-1+rpt1 (2026-09-11) aarch64

The programs included with the Debian GNU/Linux system are free software;
the exact distribution terms for each program are described in the
individual files in /usr/share/doc/*/copyright.

Debian GNU/Linux comes with ABSOLUTELY NO WARRANTY, to the extent
permitted by applicable law.
Last login: Wed Oct  7 11:57:41 2026 from 192.168.77.181
pi@raspi4b-01:~$
Conclusion
Even with an LTE router without a global IP, by setting up a WireGuard hub server, it was possible to directly access machines behind the router via the internet. Since the RUT956 natively supports WireGuard, the router side only requires WebUI configuration, and for maintenance purposes, the hub can run on Lightsail's minimum plan.
In situations where an LTE router is placed as a PoC line, it's better to set up a remote access path in advance, as having one ready from the start reduces the number of trips to the site.