
Get rid of local private key files by using 1Password SSH agent from WSL2

This page has been translated by machine translation. View original
I am emi, a coffee lover.
In order to avoid storing credentials in plaintext on the terminal, I moved the Git authentication I use in WSL2 on Windows 11 to the 1Password SSH agent.
My company has adopted 1Password. 1Password has an SSH agent feature that lets you use keys stored in the vault directly with ssh. You no longer need to keep private key files on disk, and you can access GitHub without a PAT (Personal Access Token).
This is a task I tried once before but couldn't get working, and gave up partway through. This time I tackled it again and got it working all the way through, so I'm leaving a record of that here.
What I'm dealing with this time are SSH keys. AWS access keys for the JUMP account are already handled with AWS Vault, so I won't cover those in this article.
Please refer to the following for the steps to put AWS access keys into 1Password. It explains how to use the 1Password CLI and op plugin to obtain temporary AWS credentials via 1Password on WSL2.
Note that what to do in environments where 1Password cannot be used is something to think about separately, and is not covered in this article.
Operating Environment
| Item | Version |
|---|---|
| Windows | Windows 11 Enterprise 10.0.26200 |
| Distribution | Ubuntu 22.04.5 LTS (Jammy Jellyfish) |
| OpenSSH | 8.9p1 Ubuntu-3ubuntu0.13 |
| socat | 1.7.4.1 |
| npiperelay | v0.1.0 |
| 1Password | 8.12.32.33 |
This guide assumes that SSH keys have already been registered in 1Password.
What is the 1Password SSH Agent?
An SSH agent is a program that holds private keys in custody and returns a signature on behalf of the key only when a signature is needed for authentication. The point is that the key itself is not passed to the ssh command — ssh asks "please sign this data," and the agent returns only the signature. The key never leaves the inside of the agent.
The 1Password SSH agent fulfills this role using keys stored in the 1Password vault. You no longer need to place private key files on disk, and 1Password's approval is inserted each time a key is used.
In the Windows version of 1Password, you enable the SSH agent from "Developer" in the settings screen.
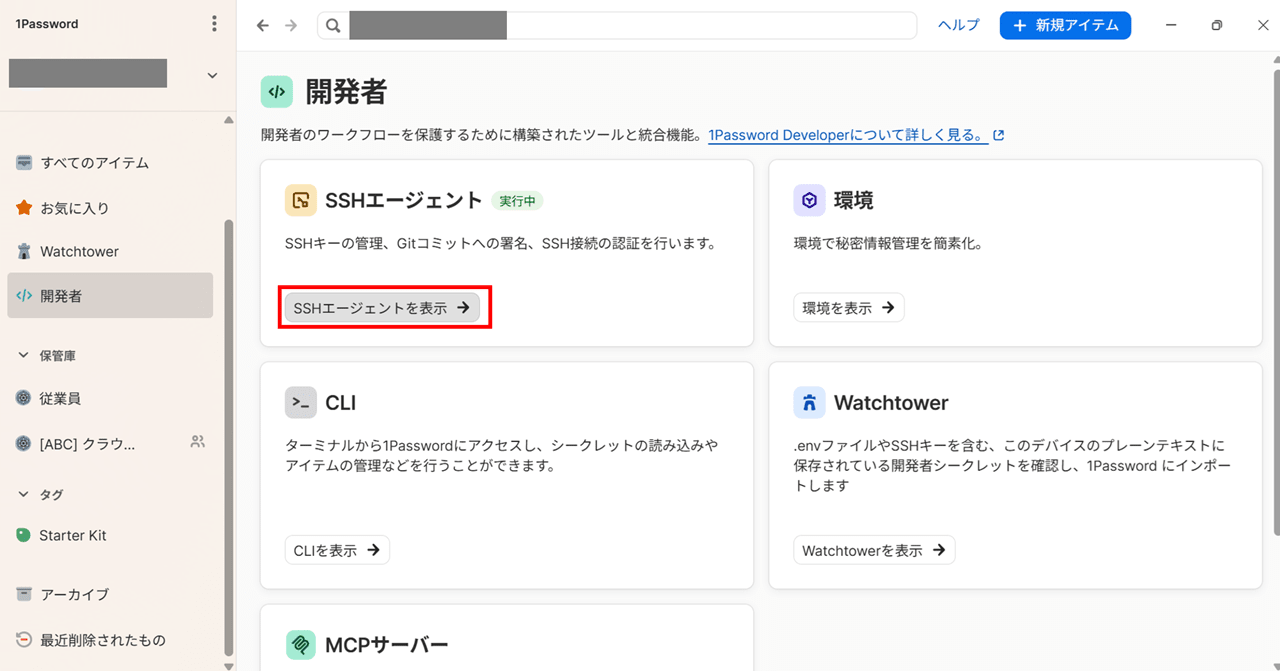
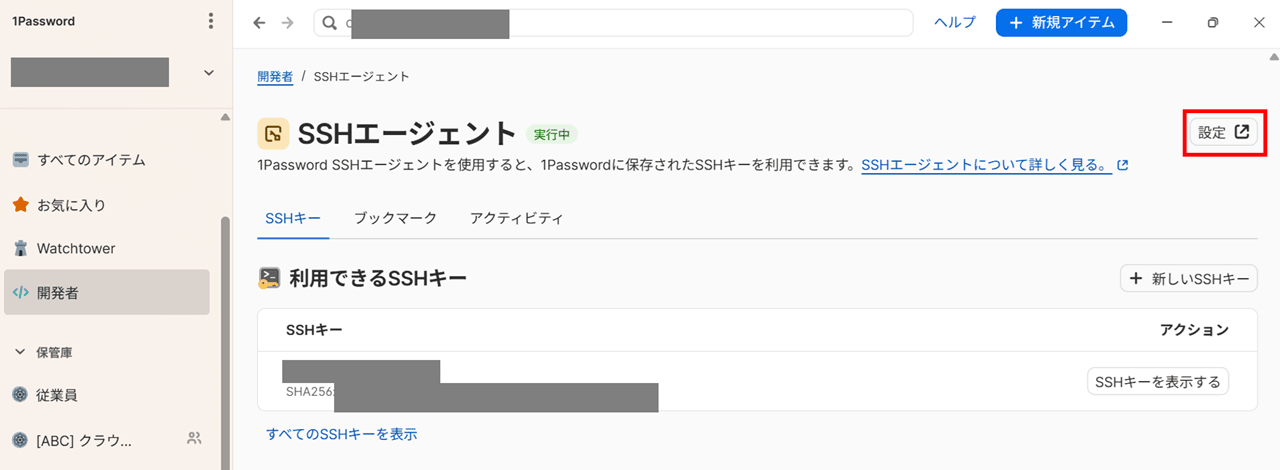
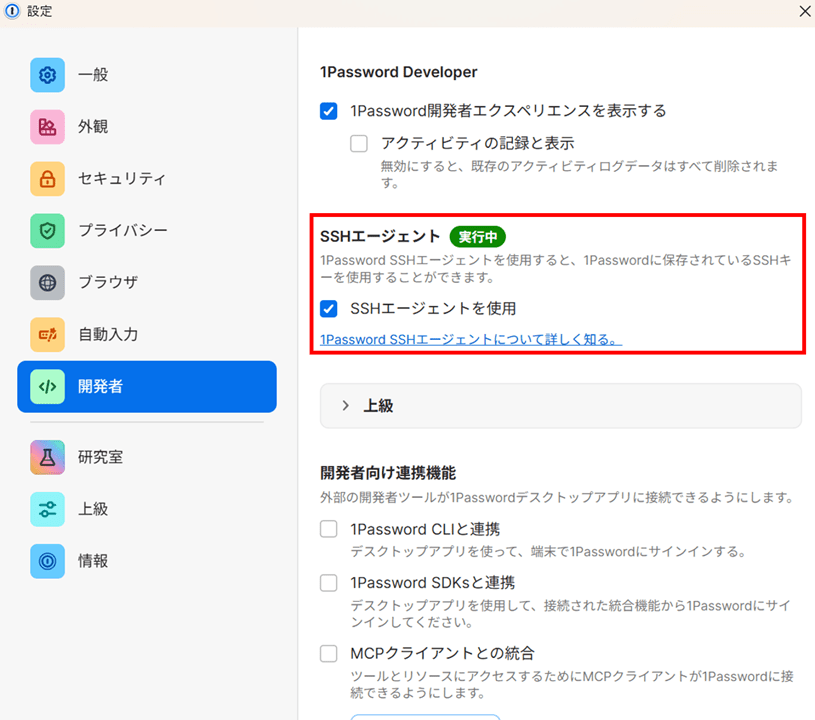
There is one prerequisite here. Windows originally comes with a service called "OpenSSH Authentication Agent." Since this is also an SSH agent, if it is running, 1Password cannot take over the SSH agent role. This is because two programs cannot simultaneously fulfill the same role.
This service is disabled by default. In my environment it was still disabled, so no special action was needed. Instructions for stopping it if it is running are in the official 1Password documentation.
Why Can't WSL2 Use It Directly?
1Password runs on the Windows side. Meanwhile, the ssh command that wants to use the key lives inside WSL2, a Linux environment. Even though they're on the same computer, they live in different worlds.
For programs to communicate, they need a port to talk through. The shape of that port differs between Windows and Linux.
The port that Windows 1Password opens is something called a named pipe, with the name \\.\pipe\openssh-ssh-agent. In contrast, the port that WSL2's ssh can talk to is a Unix domain socket. This uses a file path as the meeting point, and ssh is told "talk to the entity at this location" via an environment variable called SSH_AUTH_SOCK.
What is a Unix domain socket?
It is a mechanism for programs on the same machine to exchange data. In network communication, you specify the other party with an IP address and port number, but with Unix domain sockets you specify them with a file path. It doesn't go outside the machine.
Since it's specified by a path, you can see it with ls. The ~/.ssh/agent.sock we create in this article looks like this:
emiki@<hostname>:~$ ls -l ~/.ssh/agent.sock
srwxr-xr-x 1 emiki emiki 0 Aug 17 09:18 /home/emiki/.ssh/agent.sock
The s at the beginning of the line is the mark that this is a socket. Where a regular file would show - and a directory would show d. The size is 0 because this is not a file that stores content, but rather a name that exists only as a meeting point. One program waits at this location, and the other comes here to talk.
What both want to do is "move data back and forth," yet because the shape of the connectors is different, they don't plug in directly.
So we place two interpreters in between. One isn't enough because each interpreter only understands one side's language.
- npiperelay.exe
- Interprets between named pipes and standard I/O (runs on the Windows side)
- socat
- Interprets between standard I/O and Unix domain sockets (runs on the Linux side)
Standard I/O is like a common language that exists in both worlds. The two interpreters hold hands through this common language, creating a connection from end to end.
This mechanism where data is continuously passed through intermediaries is called a relay. The "relay" in the name npiperelay has this meaning. I'll use this terminology from here on in this article.
npiperelay.exe
This is an executable that runs on the Windows side. It takes data coming into its standard input, sends it to the named pipe, and outputs data returned from the pipe to its standard output. In other words, it is a tool that lets you treat a named pipe as "just standard I/O."
The author, jstarks, is an engineer at Microsoft who works on WSL and Hyper-V.
socat
Pronounced "sock-cat" or "so-cat." It is a Linux-side command. When you specify two I/O ports, it continuously passes data from one side to the other. The name is short for SOcket CAT — think of it as an extension of cat with the other end expanded to include sockets and the like.
This time we connect two things: "a port that creates a Unix domain socket and waits" and "a port that launches npiperelay.exe and talks to its standard I/O." Since WSL2 can directly launch Windows executables via /mnt/c/..., socat can call npiperelay.exe.
On Ubuntu it can be installed with apt.
sudo apt install socat
From ssh's perspective, it is talking to an ordinary SSH agent at ~/.ssh/agent.sock. It is not aware that socat and npiperelay.exe are relaying behind the scenes.
Placing npiperelay.exe
Obtain it from the GitHub releases. Rather than hardcoding the version, check for the latest using the releases API.
curl -sSL https://api.github.com/repos/jstarks/npiperelay/releases/latest \
  | grep -E '"(tag_name|browser_download_url)"'
Example output
emiki@<hostname>:~$ curl -sSL https://api.github.com/repos/jstarks/npiperelay/releases/latest \
>   | grep -E '"(tag_name|browser_download_url)"'
  "tag_name": "v0.1.0",
      "browser_download_url": "https://github.com/jstarks/npiperelay/releases/download/v0.1.0/npiperelay_0.1.0_checksums.txt"
      "browser_download_url": "https://github.com/jstarks/npiperelay/releases/download/v0.1.0/npiperelay_windows_386.zip"
      "browser_download_url": "https://github.com/jstarks/npiperelay/releases/download/v0.1.0/npiperelay_windows_amd64.zip"
The latest is v0.1.0, published in July 2020. There have been no releases since then.
Download the zip and checksum file and verify them.
What is a checksum?
It is a short string calculated from the contents of a file. If even 1 byte of the contents differs, the result is a completely different string. Think of it as a fingerprint for the file. The calculation method used this time is SHA-256, and the command name is also sha256sum.
The author of npiperelay has published the checksum of the released zip alongside it as npiperelay_0.1.0_checksums.txt. If you run the same calculation on your local zip and it matches, you know the file wasn't corrupted or tampered with in transit. However, since the checksum is also hosted on the same release page, this doesn't protect against the entire release being replaced.
The SHA256:VnGnegUS... that appears in the output later is the same concept. That one is calculated from a public key, and in SSH it's called a fingerprint. It's the same SHA-256, but checksums are hexadecimal and fingerprints are Base64, so they look different.
curl -sSLO https://github.com/jstarks/npiperelay/releases/download/v0.1.0/npiperelay_windows_amd64.zip
curl -sSLO https://github.com/jstarks/npiperelay/releases/download/v0.1.0/npiperelay_0.1.0_checksums.txt
cat npiperelay_0.1.0_checksums.txt
sha256sum --check --ignore-missing npiperelay_0.1.0_checksums.txt
Example output
emiki@<hostname>:~$ curl -sSLO https://github.com/jstarks/npiperelay/releases/download/v0.1.0/npiperelay_windows_amd64.zip
emiki@<hostname>:~$ curl -sSLO https://github.com/jstarks/npiperelay/releases/download/v0.1.0/npiperelay_0.1.0_checksums.txt
emiki@<hostname>:~$ cat npiperelay_0.1.0_checksums.txt
6b9ef61ffd17c03507a9a3d54d815dceb3dae669ac67fc3bf4225d1e764ce5f6  npiperelay_windows_amd64.zip
600e3f94f0d9f48e68b5a9276849d00d658ae9c18c81541463ed11b1dfe6c998  npiperelay_windows_386.zip

emiki@<hostname>:~$ sha256sum --check --ignore-missing npiperelay_0.1.0_checksums.txt
npiperelay_windows_amd64.zip: OK
The checksum file has 2 lines. npiperelay_windows_amd64.zip is the 64-bit version, and npiperelay_windows_386.zip is the 32-bit version. 386 is a name derived from the Intel 80386, an old CPU, and refers to the 32-bit Windows version.
This time I only downloaded the 64-bit version. Without --ignore-missing, sha256sum would go looking for the 32-bit version I don't have locally and fail.
Running without --ignore-missing
emiki@<hostname>:~$ sha256sum --check npiperelay_0.1.0_checksums.txt; echo "exit=$?"
npiperelay_windows_amd64.zip: OK
sha256sum: npiperelay_windows_386.zip: No such file or directory
npiperelay_windows_386.zip: FAILED open or read
sha256sum: WARNING: 1 listed file could not be read
exit=1
Once the checksum is verified, extract the file and place it on the Windows side. Since it's a Windows executable, place it under the Windows user folder rather than the WSL side.
unzip -o npiperelay_windows_amd64.zip
mkdir -p /mnt/c/Users/emiki/bin
cp npiperelay.exe /mnt/c/Users/emiki/bin/npiperelay.exe
ls -l /mnt/c/Users/emiki/bin/
Example output
emiki@<hostname>:~$ unzip -o npiperelay_windows_amd64.zip
Archive:  npiperelay_windows_amd64.zip
  inflating: LICENSE
  inflating: README.md
  inflating: npiperelay.exe

emiki@<hostname>:~$ mkdir -p /mnt/c/Users/emiki/bin
emiki@<hostname>:~$ cp npiperelay.exe /mnt/c/Users/emiki/bin/npiperelay.exe
emiki@<hostname>:~$ ls -l /mnt/c/Users/emiki/bin/
total 1832
-rwxrwxrwx 1 emiki emiki 1872384 Aug 17 09:18 npiperelay.exe
Aside: The story of where to place it
When I tried this before, I got stuck on where to put npiperelay.exe. The article I was referencing said to copy it to "a location in the PATH," and that author chose /usr/local/bin on the WSL side.
It works in /usr/local/bin too. However, that's a place for Linux binaries, and mixing in a Windows executable didn't feel right to me. Since WSL can directly launch Windows executables via /mnt/c/..., this time I placed it in a Windows-side directory and referenced it from socat.
Setting Up the Relay with socat
We use socat to create a Unix domain socket, connect the other end to npiperelay.exe, and create a single path from WSL2 all the way to 1Password.
This relay disappears when WSL restarts, so ultimately we'll write the startup process into .bashrc so the relay is re-established automatically every time a shell is opened.
However, if you write it into .bashrc right away, it will just run silently in the background every time you open a shell. Nothing will appear on screen even if it isn't working, so if you hit a snag in a later step, you won't know whether the cause is the relay or the configuration.
So first, run it manually once and confirm that you can see the 1Password key with ssh-add -l.
export SSH_AUTH_SOCK="$HOME/.ssh/agent.sock"
rm -f "$SSH_AUTH_SOCK"
( setsid socat UNIX-LISTEN:"$SSH_AUTH_SOCK",fork \
    EXEC:"/mnt/c/Users/emiki/bin/npiperelay.exe -ei -s //./pipe/openssh-ssh-agent",nofork & ) \
    >/dev/null 2>&1
Command explanation
The first line, export SSH_AUTH_SOCK="$HOME/.ssh/agent.sock", tells ssh where the agent is. The socket that socat creates later will also be created at the location defined here.
The second line, rm -f "$SSH_AUTH_SOCK", cleans up the previously created socket file. If a file remains at the same path, socat cannot create a new one. If you try to start it without removing the old one, you get this:
emiki@<hostname>:~$ socat UNIX-LISTEN:leftover.sock,fork EXEC:"/bin/cat",nofork
2026/08/17 15:01:26 socat[71167] E "leftover.sock" exists
From the third line onward is the main body. The surrounding setsid, &, and parentheses are shell syntax, not socat options.
- The trailing
&- Runs the command in the background and returns the prompt immediately. Without this alone, socat remains attached to the terminal, and when the terminal is closed socat ends and the relay is severed.
setsid- Detaches the process from the terminal and makes it independent. Even after the terminal is closed, socat keeps running, so
sshremains usable even after opening a different terminal.
- Detaches the process from the terminal and makes it independent. Even after the terminal is closed, socat keeps running, so
- The surrounding
( ... )- To prevent it from being treated as a job of this shell. Without it, job numbers and completion notifications like
[1] 12345would appear.
- To prevent it from being treated as a job of this shell. Without it, job numbers and completion notifications like
What is passed to socat itself is the specification of the two ports to connect.
UNIX-LISTEN:...,fork- The listening side that creates a Unix domain socket. Adding
forkcreates a child process for each connection, allowing simultaneous use from multiple terminals.
- The listening side that creates a Unix domain socket. Adding
EXEC:"...",nofork- The other side. Launches the specified command and connects to its standard I/O.
- In the
npiperelay.exelaunched byEXEC,-eispecifies to close when input reaches EOF, and-sspecifies to close the write side first.
The final >/dev/null 2>&1 discards the output. While testing manually, removing this allows socat error messages to appear on screen, making it easier to trace the cause.
Aside: socat didn't start because of a wrong socket path
When I tried this before, I was specifying ~/.1password/agent.sock for SSH_AUTH_SOCK. I had copied it from the guide I was referencing, but the ~/.1password directory didn't exist on my machine, and socat couldn't create the listening socket.
emiki@<hostname>:~/work$ export SSH_AUTH_SOCK=$HOME/.1password/agent.sock
emiki@<hostname>:~/work$ socat UNIX-LISTEN:$SSH_AUTH_SOCK,fork EXEC:"...",nofork &
[1] 10758
2025/11/28 12:04:04 socat[10758] E bind(5, {AF=1 "/home/emiki/.1password/agent.sock"}, 35): No such file or directory
socat won't create the parent directory for you. Once I changed it to create the socket under the already-existing ~/.ssh, it worked.
Confirm that it's working.
ls -l "$SSH_AUTH_SOCK"
ssh-add -l
Example output
emiki@<hostname>:~$ ls -l "$SSH_AUTH_SOCK"
srwxr-xr-x 1 emiki emiki 0 Aug 17 09:18 /home/emiki/.ssh/agent.sock

emiki@<hostname>:~$ ssh-add -l
3072 SHA256:VnGnegUSxxxxxxxxxxxxxxxxxxxxxxxxxxxxxxxxxxx my-ssh-key (RSA)
I can see the 1Password key from the WSL2 side!!!!!!!!!!!
Now that it's confirmed, write it into .bashrc. Since WSL destroys processes on restart, the relay needs to be re-established every time a shell is opened.
# Use 1Password SSH agent (Windows) from WSL
export SSH_AUTH_SOCK="$HOME/.ssh/agent.sock"
if ! ss -a 2>/dev/null | grep -q "$SSH_AUTH_SOCK"; then
  rm -f "$SSH_AUTH_SOCK"
  ( setsid socat UNIX-LISTEN:"$SSH_AUTH_SOCK",fork \
      EXEC:"/mnt/c/Users/emiki/bin/npiperelay.exe -ei -s //./pipe/openssh-ssh-agent",nofork & ) \
      >/dev/null 2>&1
fi
We use ss -a to check whether the socket is already listening, and skip startup if it is. Without this, a new socat process would accumulate every time a terminal is opened.
Let's verify there are no duplicate instances running.
ss -a | grep agent.sock
pgrep -a -x socat
Example output
emiki@<hostname>:~$ ss -a | grep agent.sock
u_str LISTEN  0      5                 /home/emiki/.ssh/agent.sock 73087                    * 0

emiki@<hostname>:~$ pgrep -a -x socat
55857 socat UNIX-LISTEN:/home/emiki/.ssh/agent.sock,fork EXEC:/mnt/c/Users/emiki/bin/npiperelay.exe -ei -s //./pipe/openssh-ssh-agent,nofork
Just one.
Note that if you search using -f like pgrep -c -f "socat UNIX-LISTEN", you'll get 2. This is because the command line of the shell that called pgrep matches the search pattern — it doesn't mean there are two socat processes. Using -x to look at the process name itself is more reliable.
Fixing ~/.ssh/config
My ~/.ssh/config had two blocks directly specifying key files for GitHub and Backlog. I'll switch both to go through the agent.
- Add
IdentityAgent ~/.ssh/agent.sockto tell it where the agent is - Remove
IdentityFile ~/.ssh/my-ssh-key - Remove
IdentitiesOnly yes
The third one was the biggest stumbling block this time. IdentitiesOnly yes means "use only the keys explicitly specified in the config file." If this remains, ssh will ignore the keys offered by the agent. If you only remove IdentityFile and think you're done, you'll end up puzzled when authentication doesn't work.
This was also why I gave up in the past. Even though ssh-add -l showed the 1Password key, ssh -T git@github.com kept returning Permission denied (publickey), and I ran out of time before finding the cause.
After the changes, ~/.ssh/config looks like this:
### my-ssh-key configuration

#### GitHub configuration
# - - - - - - - - - - - -
Host github.com
  User git
  Port 22
  Hostname github.com
  PreferredAuthentications publickey
  IdentityAgent ~/.ssh/agent.sock # Use 1Password SSH agent for private key
  TCPKeepAlive yes # personal preference

#### Backlog configuration
# - - - - - - - - - - - -
Host example.git.backlog.jp
  User example
  Port 22
  Hostname example.git.backlog.jp
  PreferredAuthentications publickey
  IdentityAgent ~/.ssh/agent.sock # Use 1Password SSH agent for private key
  TCPKeepAlive yes # personal preference
Connectivity Check
Connect to GitHub and Backlog. -T means don't allocate a terminal, which is useful when you want to test authentication only without opening a shell. Let's also check the exit codes.
ssh -T git@github.com; echo "exit=$?"
ssh -T example@example.git.backlog.jp; echo "exit=$?"
Example output
emiki@<hostname>:~$ ssh -T git@github.com; echo "exit=$?"
Hi emi-ki! You've successfully authenticated, but GitHub does not provide shell access.
exit=1

emiki@<hostname>:~$ ssh -T example@example.git.backlog.jp; echo "exit=$?"
You've successfully authenticated, but Backlog does not provide shell access.
exit=1
Authentication succeeded for both.
The exit code shows exit=1, but this is not a failure. Whether authentication succeeded is judged by the message like Hi emi-ki!.
Exit codes and why 1 is returned here
When a command finishes, it returns a number to the shell indicating whether it succeeded. This is called the exit code. 0 means success, and anything else indicates some problem occurred.
It normally doesn't appear on screen, so you don't think about it, but the exit code of the previous command is stored in a variable called $?. The reason for appending echo "exit=$?" is to see this.
emiki@<hostname>:~$ ls /etc/hostname; echo "exit=$?"
/etc/hostname
exit=0

emiki@<hostname>:~$ ls /etc/nothing; echo "exit=$?"
ls: cannot access '/etc/nothing': No such file or directory
exit=2
When specifying a file that exists, 0 is returned; when specifying a file that doesn't exist, 2 is returned. Shell scripts and CI use this number to decide whether to proceed.
By that convention, 1 represents "something went wrong." But the 1 here doesn't mean ssh failed authentication. The basis for saying so is in the ssh manual.
ssh exits with the exit status of the remote command or with 255 if an error occurred.
The number returned by ssh is the exit code of the program that ran on the remote end, carried back as-is. It returns 255 only when ssh itself fails. If you try to connect to a non-existent host, 255 is returned.
emiki@<hostname>:~$ ssh -o ConnectTimeout=3 nonexistent.invalid true; echo "exit=$?"
ssh: Could not resolve hostname nonexistent.invalid: Name or service not known
exit=255
What came back this time was 1, not 255. That tells us ssh completed its work up to this point, and the 1 is a number decided by the remote end. Both GitHub and Backlog open SSH only for Git operations. They don't give the connected user shell access — they return a greeting message and then close the connection with 1.
Aside: The public key had been removed from GitHub
When I tried this before, the public key I thought was registered on GitHub had actually been deleted. GitHub automatically deletes SSH keys that haven't been used for 1 year.
When Permission denied (publickey) appears, the cause isn't necessarily your local configuration. Open Settings on GitHub, go to SSH and GPG keys, and check whether your key is still registered. I re-registered it there.
Let's verify that the key used came from the agent.
ssh -v -T git@github.com 2>&1 | grep -iE "Offering|Server accepts|Authenticated to"
Example output
emiki@<hostname>:~$ ssh -v -T git@github.com 2>&1 | grep -iE "Offering|Server accepts|Authenticated to"
debug1: Offering public key: my-ssh-key RSA SHA256:VnGnegUSxxxxxxxxxxxxxxxxxxxxxxxxxxxxxxxxxxx agent
debug1: Server accepts key: my-ssh-key RSA SHA256:VnGnegUSxxxxxxxxxxxxxxxxxxxxxxxxxxxxxxxxxxx agent
Authenticated to github.com ([20.27.177.113]:22) using "publickey".
The word agent appears at the end of the line. If the key had been read from a file, the file path would appear there instead, confirming that authentication was done with a key passed from the agent.
When using a key through the agent for the first time, a 1Password approval dialog appears on the Windows side.
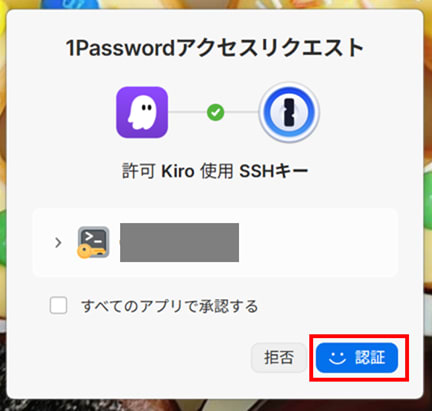
Approving here allows ssh to proceed, and Hi emi-ki! is returned.
Once approved, you won't be asked again until 1Password locks or quits.
Any subsequent SSH commands run in that process can use your key without further approval until 1Password locks or quits, or for the amount of time set in the options you've configured
When locked, the private key is removed from the agent's memory, so after a gap like the next morning, you'll be prompted to unlock 1Password.
If you're running Git from CI or scripts with time limits on waiting, it's worth accounting for the wait time for this approval or lock unlock.
Moving remotes to SSH
Now that the key pathway is in place, the next step is to change Git's connection from HTTPS to SSH. This is because if you leave it as HTTPS, a PAT will be used.
Add one line to ~/.gitconfig.
git config --global url."git@github.com:".insteadOf "https://github.com/"
This causes Git to automatically rewrite URLs starting with https://github.com/ to git@github.com:. This applies not only to repositories already on your machine, but also when a HTTPS URL is specified directly. We'll verify that in the latter part of this article.
All we added here is a rewrite rule. We haven't touched the .git/config settings file for each repository, so HTTPS URLs remain in those files.
Example output
emiki@<hostname>:~/work/slide-tool$ grep -m1 "url = " .git/config
	url = https://github.com/example-org/slide-tool.git

emiki@<hostname>:~/work/slide-tool$ git remote -v
origin	git@github.com:example-org/slide-tool.git (fetch)
origin	git@github.com:example-org/slide-tool.git (push)

emiki@<hostname>:~/work/slide-tool$ git ls-remote --get-url origin
git@github.com:example-org/slide-tool.git
Even though they're looking at the same repository, .git/config shows HTTPS while git remote -v shows SSH — the display is inconsistent. This is because git remote -v shows the URL after the rewrite has been applied. Since communication happens over SSH, this serves the purpose in terms of actual behavior.
However, this state depends on the single line we added to ~/.gitconfig. If that line is removed, or if the repository is taken to another machine, it will revert to HTTPS. So let's also rewrite the URL on the repository side.
git -C ~/work/workshop-repo remote set-url origin git@github.com:example-org/workshop-repo.git
git -C ~/work/handson-repo remote set-url origin git@github.com:example-org/handson-repo.git
git -C ~/work/slide-tool remote set-url origin git@github.com:example-org/slide-tool.git
Confirm that git fetch works for each.
Example output
emiki@<hostname>:~$ for d in workshop-repo handson-repo slide-tool; do
>   printf '%-16s ' "$d"; git -C ~/work/$d fetch >/dev/null 2>&1; echo "exit=$?"
> done
workshop-repo    exit=0
handson-repo     exit=0
slide-tool       exit=0
All good.
Deleting the Local Key File
Delete it after all the connectivity checks above have passed.
rm -v ~/.ssh/my-ssh-key ~/.ssh/my-ssh-key:Zone.Identifier
ls -la ~/.ssh/
Example execution result
emiki@<hostname>:~$ rm -v ~/.ssh/my-ssh-key ~/.ssh/my-ssh-key:Zone.Identifier
removed '/home/emiki/.ssh/my-ssh-key'
removed '/home/emiki/.ssh/my-ssh-key:Zone.Identifier'

emiki@<hostname>:~$ ls -la ~/.ssh/
total 28
drwx------  2 emiki emiki 4096 Aug 17 09:32 .
drwxr-x--- 24 emiki emiki 4096 Aug 17 09:29 ..
srwxr-xr-x  1 emiki emiki    0 Aug 17 09:18 agent.sock
-rw-r--r--  1 emiki emiki  575 Mar 26  2023 my-ssh-key.pub
-rw-r--r--  1 emiki emiki  617 Aug 17 09:24 config
-rw-------  1 emiki emiki 1342 Oct 28  2025 known_hosts
-rw-------  1 emiki emiki 1120 Oct 28  2025 known_hosts.old
my-ssh-key:Zone.Identifier is a byproduct that comes with files copied from Windows. The public key my-ssh-key.pub is not secret information, so I left it.
What is `:Zone.Identifier`?
Looking at its contents, it is 25 bytes of text.
emiki@<hostname>:~$ cat "WSL2.png:Zone.Identifier"
[ZoneTransfer]
ZoneId=3
ZoneId=3 is a mark meaning "obtained from the internet." Windows reads this to display warnings such as "This file was obtained from another computer" or SmartScreen blocks.
Originally, it is stored in an NTFS alternate data stream, which is like a hidden pocket attached to a file. On Windows, it does not appear as a separate file. However, since ext4 on the WSL side has no such mechanism, copying via Explorer to \\wsl.localhost causes the contents to be written out as a regular file. This is the true nature of the visible :Zone.Identifier.
The Linux side does not read this file, so within WSL alone, deleting it causes no problems. The my-ssh-key:Zone.Identifier this time is also something that can be deleted along with the key file without issue.
However, this is not just a junk file. When viewing the same file from Windows via \\wsl.localhost, the mark can still be read.
Get-Content -Path '\\wsl.localhost\Ubuntu\home\emiki\work\blog\WSL2.png' -Stream Zone.Identifier
[ZoneTransfer]
ZoneId=3
Deleting this file on the WSL side also removes the mark when viewed from Windows. For executable files of unknown origin, it is safer to leave them. If the mark is present, Windows will warn you or SmartScreen will block execution when you try to run it from Windows, preventing accidental execution.
After deleting, verify connectivity one more time.
Example execution result
emiki@<hostname>:~$ ssh -T git@github.com
Hi emi-ki! You've successfully authenticated, but GitHub does not provide shell access.

emiki@<hostname>:~$ for d in workshop-repo handson-repo slide-tool company-match-quiz legacy-repo; do
>   printf '%-20s ' "$d"; git -C ~/work/$d fetch >/dev/null 2>&1; echo "exit=$?"
> done
workshop-repo        exit=0
handson-repo         exit=0
slide-tool           exit=0
company-match-quiz   exit=0
legacy-repo          exit=128
Only legacy-repo failed, but this is a repository from past work that I no longer have access to, so this is expected.
Bonus: Cleaning Up PAT and pass
From here is a bonus section. Since switching to SSH means there are no more occasions to use GitHub PATs, I'll clean those up as well.
Navigate to GitHub Settings > Developer Settings > Personal access tokens, and Delete the fine-grained token.
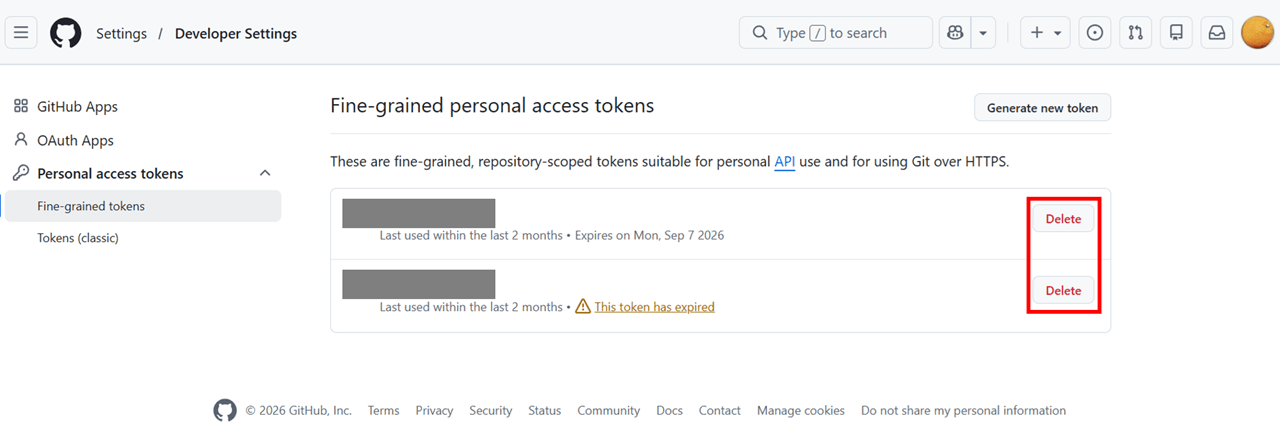
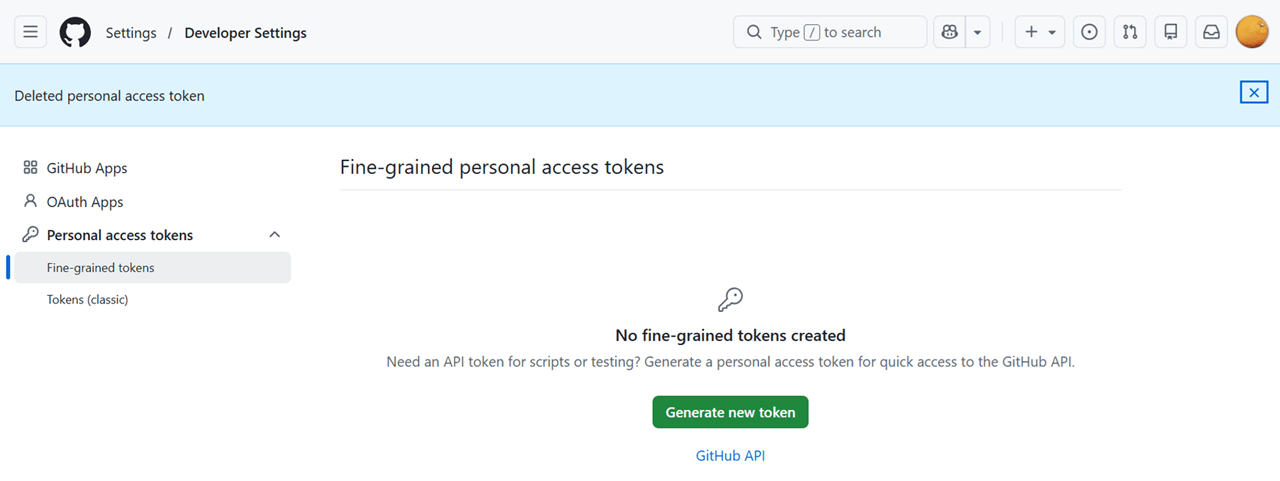
It's gone.
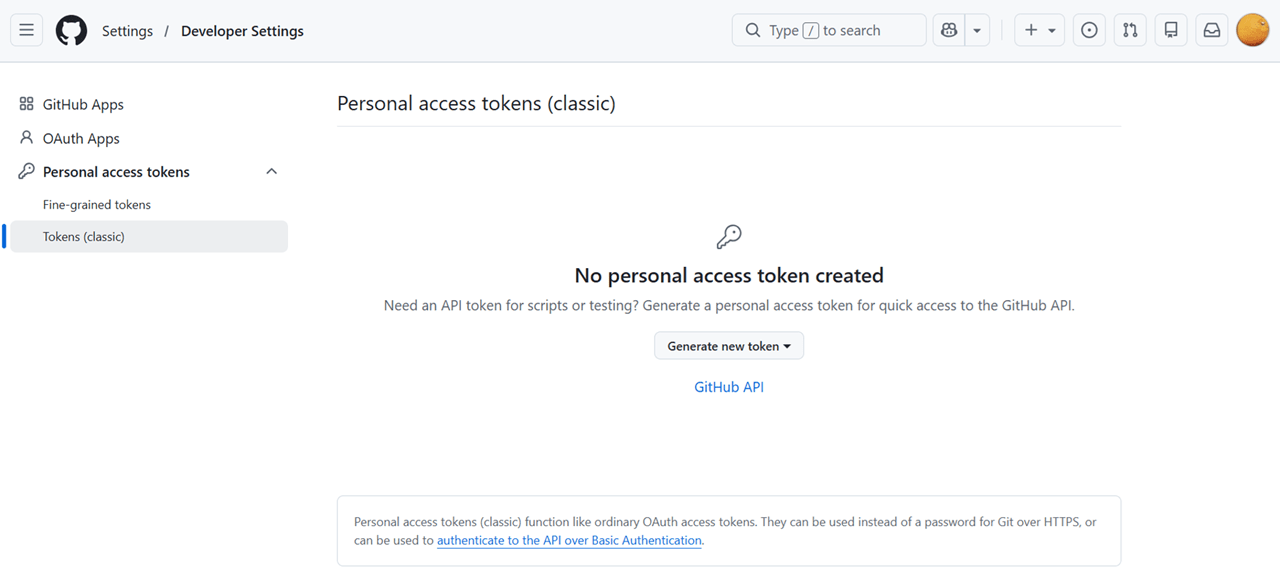
I confirmed that nothing remains in the Tokens (classic) tab either.
Next, delete the pass entry that stored the PAT. Reversing the order would cause Git Credential Manager to ask for the PAT again, which is confusing, so delete the GitHub side first.
pass rm -r -f git/https/github.com
pass ls
Example execution result
emiki@<hostname>:~$ pass rm -r -f git/https/github.com
removed '/home/emiki/.password-store/git/https/github.com/example-org/slide-tool.git/emi-ki.gpg'
removed directory '/home/emiki/.password-store/git/https/github.com/example-org/slide-tool.git'
removed '/home/emiki/.password-store/git/https/github.com/example-org/cc-plugin.git/emi-ki.gpg'
removed directory '/home/emiki/.password-store/git/https/github.com/example-org/cc-plugin.git'
removed '/home/emiki/.password-store/git/https/github.com/example-org/handson-repo/emi-ki.gpg'
removed directory '/home/emiki/.password-store/git/https/github.com/example-org/handson-repo'
removed directory '/home/emiki/.password-store/git/https/github.com/example-org'
removed '/home/emiki/.password-store/git/https/github.com/emi-ki/company-match-quiz.git/86865300.gpg'
removed directory '/home/emiki/.password-store/git/https/github.com/emi-ki/company-match-quiz.git'
removed directory '/home/emiki/.password-store/git/https/github.com/emi-ki'
removed directory '/home/emiki/.password-store/git/https/github.com/'

emiki@<hostname>:~$ pass ls
Password Store
├── claude-code
│   └── grafana-otlp-token
├── default
├── git
│   └── https
└── sts.GetSessionToken,...
Only the entries under github.com were deleted, and unrelated entries remain.
Finally, remove the credential settings for GitHub from ~/.gitconfig.
git config --global --remove-section 'credential.https://github.com'
Git Credential Manager itself and settings for non-GitHub hosts remain as-is.
With all of the above done, let's try hitting the HTTPS URL directly.
GIT_SSH_COMMAND="ssh -v" git ls-remote https://github.com/example-org/slide-tool.git 2>&1 \
  | grep -iE "Offering|Authenticated to"
Example execution result
emiki@<hostname>:~$ GIT_SSH_COMMAND="ssh -v" git ls-remote https://github.com/example-org/slide-tool.git 2>&1 | grep -iE "Offering|Authenticated to"
debug1: Offering public key: my-ssh-key RSA SHA256:VnGnegUSxxxxxxxxxxxxxxxxxxxxxxxxxxxxxxxxxxx agent
Authenticated to github.com ([20.27.177.113]:22) using "publickey".
With no PAT anywhere, the HTTPS URL was rewritten to SSH and authentication succeeded with the 1Password key.
Bonus: Does the Relay Re-establish After Restarting WSL?
Since it was written in .bashrc, it should re-establish, but let's verify. Drop socat and open a new shell.
pkill -x socat
pgrep -a -x socat || echo "no socat"
ls -l ~/.ssh/agent.sock
Example execution result
emiki@<hostname>:~$ pkill -x socat
emiki@<hostname>:~$ pgrep -a -x socat || echo "no socat"
no socat
emiki@<hostname>:~$ ls -l ~/.ssh/agent.sock
ls: cannot access '/home/emiki/.ssh/agent.sock': No such file or directory
When socat exits, it also cleans up the socket file. The rm -f written in .bashrc serves as a safeguard for cases where socat terminates abnormally and only the file remains.
Now open a new shell in this state.
Example execution result
emiki@<hostname>:~$ bash -ic 'echo "SSH_AUTH_SOCK=$SSH_AUTH_SOCK"; ssh-add -l'
SSH_AUTH_SOCK=/home/emiki/.ssh/agent.sock
3072 SHA256:VnGnegUSxxxxxxxxxxxxxxxxxxxxxxxxxxxxxxxxxxx my-ssh-key (RSA)

emiki@<hostname>:~$ pgrep -a -x socat
57203 socat UNIX-LISTEN:/home/emiki/.ssh/agent.sock,fork EXEC:/mnt/c/Users/emiki/bin/npiperelay.exe -ei -s //./pipe/openssh-ssh-agent,nofork
It re-established successfully.
What Was Migrated to 1Password and What I Still Want to Address
Since I started using Claude Code on WSL2, I've stumbled a few times around authentication. With this configuration, some of those stumbling blocks have been eliminated along with their underlying assumptions.
Every time I updated a GitHub PAT, I had to go through GCM, GPG, and pinentry in sequence. Since I deleted the PAT itself, this task will no longer occur.
When I stumbled while getting Claude Code skills to work, most of the issues were caused by the layered authentication configuration of GCM, GPG, and pass, and by managing Fine-grained PAT scopes. Now that I've shifted to SSH, there are no more situations where I need to worry about PAT scopes.
I also encountered issues with the Claude Code screen becoming garbled. That was resolved by switching pinentry to the GUI version.
However, situations where I enter a GPG passphrase still remain. That's because I store the OTLP authentication token in pass, and retrieving it goes through GPG each time. Even though I moved SSH to 1Password this time, I haven't gotten there yet.
If I can move this token to 1Password as well, passphrase entry would be eliminated entirely. I'll try that next.
Closing
The private key file is gone from ~/.ssh in WSL2, and the GitHub PAT is also gone. Git operations now work with just 1Password approval.
The flow was: place npiperelay.exe, set up a relay with socat, and rewrite ~/.ssh/config. This was a task I had given up on before, so it was satisfying to get it working.
This approach cannot be used in environments where 1Password is unavailable. In that case, a configuration using pass with GPG encryption would be the way to go, so the past articles I mentioned earlier should be more helpful as reference.
For questions or requests about this article, please contact us via "Feedback for DevelopersIO" at the bottom of the page.
References