I tried operating a lakehouse with natural language from Amazon QuickSight against an aws-dataprocessing-mcp-server hosted on Amazon Bedrock AgentCore Runtime
This page has been translated by machine translation. View original
This is Ishikawa from the Cloud Business Division. I tried hosting the aws-dataprocessing-mcp-server published by AWS Labs on Amazon Bedrock AgentCore Runtime, and enabling natural language operations on data lakes and lakehouses from Amazon Quick.
The AWS Labs MCP server collection includes servers specialized for specific use cases. This time, I'll focus on the aws-dataprocessing-mcp-server tailored for data analysis operations, and run it with an integration pattern of Quick + AgentCore Runtime + Cognito JWT authentication.
aws-dataprocessing-mcp-server is distributed via PyPI / uvx and is stdio-only. To run it on AgentCore Runtime, you need to build a custom container that listens on streamable-http, and work around several "pitfalls." This article covers the implementation as well.
What is aws-dataprocessing-mcp-server
aws-dataprocessing-mcp-server is a server for operating AWS data processing services such as AWS Glue and Amazon Athena via the Model Context Protocol (MCP). Operations commonly used in data engineering work—such as querying the Glue Data Catalog, executing Athena queries, and managing tables and databases—are provided as 36 tools.
The main tool categories are as follows.
- Glue Data Catalog:
manage_aws_glue_databases,manage_aws_glue_tables,manage_aws_glue_connections,manage_aws_glue_partitions - Glue ETL:
manage_aws_glue_jobs,manage_aws_glue_workflows,manage_aws_glue_triggers,manage_aws_glue_crawlers - Glue Interactive Sessions:
manage_aws_glue_sessions,manage_aws_glue_statements - EMR:
manage_aws_emr_clusters,manage_aws_emr_ec2_steps,manage_aws_emr_serverless_applications - Athena:
manage_aws_athena_query_executions,manage_aws_athena_workgroups,manage_aws_athena_data_catalogs - Common:
create_data_processing_role,list_s3_buckets,add_inline_policy
By default it starts in read-only mode, and adding the --allow-write flag also enables write operations. In this article, I verified with read-only mode to prioritize safety.
What is Amazon Bedrock AgentCore Runtime
Amazon Bedrock AgentCore Runtime is a serverless execution environment for hosting AI agents and MCP servers. It supports communication via the Model Context Protocol (MCP) and Agent to Agent (A2A) protocols, and isolates sessions per microVM. It handles JWT authentication, sending observability data to CloudWatch / X-Ray, and launching from ECR container images all in one place.
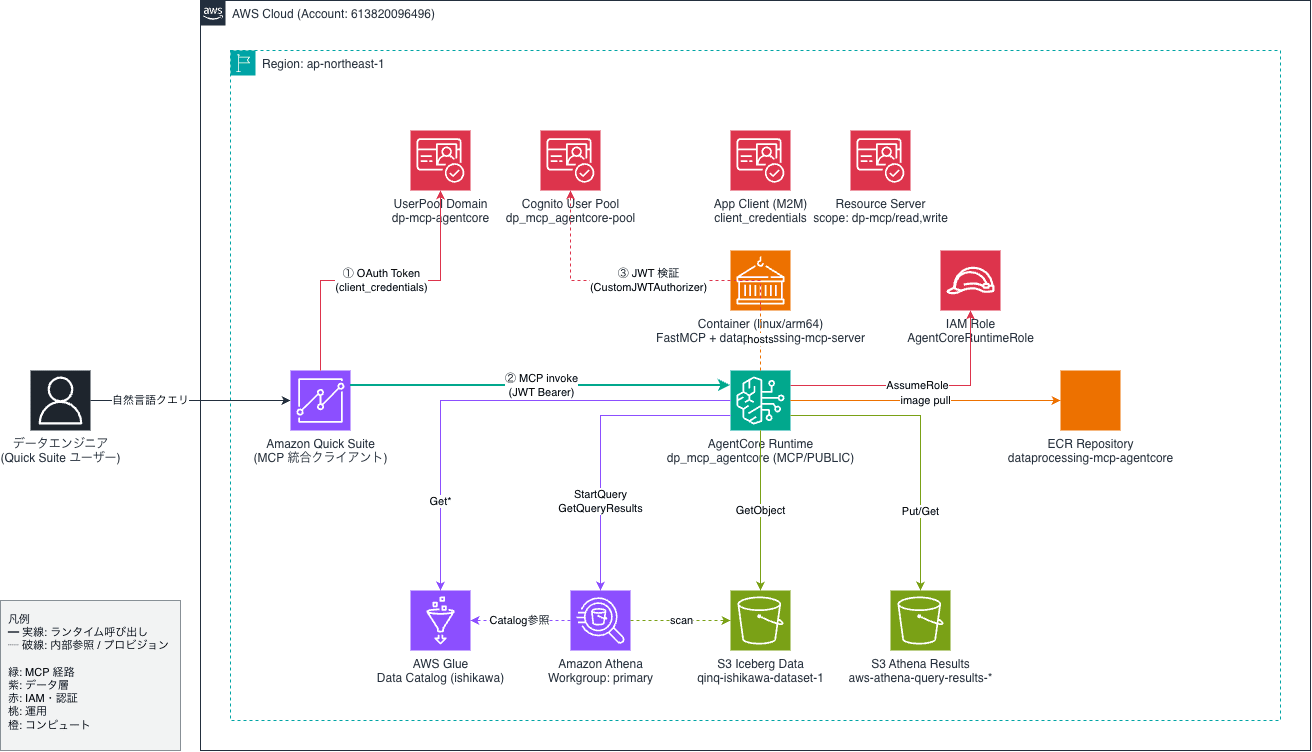
Overall Architecture
The request flow is as follows.
What I Did
Prerequisites
- AWS account (this verification was performed in a sandbox in ap-northeast-1)
- Amazon Quick Enterprise edition
- A container runtime capable of building linux/arm64 images (this verification used Mac + Podman)
- MCP version at verification time: awslabs.aws-dataprocessing-mcp-server: 0.1.31
Step1: Designing a Custom Container for AgentCore Runtime
The server.py of aws-dataprocessing-mcp-server starts FastMCP() with default settings, so it listens on stdio transport. Since AgentCore Runtime requires streamable-http, port 8000, and the /mcp path, I wrote a thin wrapper to do the following.
- Override
FastMCP.__init__and passTransportSecuritySettings(enable_dns_rebinding_protection=False) - Override
FastMCP.run, setmcp.settings.host = "0.0.0.0",port = 8000,stateless_http = True, and launch withstreamable-http - Make the same handler respond not only to
/mcpbut also to/mcp/, and suppress 307 redirects withredirect_slashes=False
The core of the wrapper server_http.py is as follows.
import uvicorn
from mcp.server.fastmcp import FastMCP
from mcp.server.transport_security import TransportSecuritySettings
from starlette.routing import Route

_original_init = FastMCP.__init__

def _patched_init(self, *args, **kwargs):
    kwargs.setdefault(
        "transport_security",
        TransportSecuritySettings(enable_dns_rebinding_protection=False),
    )
    _original_init(self, *args, **kwargs)

FastMCP.__init__ = _patched_init

_original_run = FastMCP.run

def _patched_run(self, transport=None, **kwargs):
    self.settings.host = "0.0.0.0"
    self.settings.port = 8000
    self.settings.stateless_http = True

    if transport == "streamable-http" or transport is None:
        app = self.streamable_http_app()
        app.router.redirect_slashes = False
        existing = next(
            r for r in app.router.routes if isinstance(r, Route) and r.path == "/mcp"
        )
        app.router.routes.append(
            Route("/mcp/", endpoint=existing.endpoint, methods=existing.methods)
        )
        uvicorn.run(app, host="0.0.0.0", port=8000, log_level="info")
        return
    return _original_run(self, transport=transport)

FastMCP.run = _patched_run

from awslabs.aws_dataprocessing_mcp_server.server import main  # noqa: E402

if __name__ == "__main__":
    main()
The important point here is the first override of transport_security. Since MCP Python SDK 1.21, FastMCP has DNS rebinding protection enabled by default. Since AgentCore Runtime's proxy sets the upstream AWS domain in the Host header and forwards it to the internal microVM, without disabling this you will get 421 Misdirected Request. Since JWT authentication is handled on the AgentCore Runtime side, disabling this here still maintains defense in depth.
Step2: Building the Docker Image
The Dockerfile is structured as follows.
FROM --platform=linux/arm64 python:3.12-slim

ENV PYTHONUNBUFFERED=1 \
    PIP_NO_CACHE_DIR=1

WORKDIR /app

COPY requirements.txt /app/requirements.txt
RUN pip install --no-cache-dir -r /app/requirements.txt

COPY server_http.py /app/server_http.py

RUN groupadd -r app && useradd -r -g app -d /home/app -m app
USER app

EXPOSE 8000

ENTRYPOINT ["python", "/app/server_http.py"]
Pin versions in requirements.txt.
awslabs.aws-dataprocessing-mcp-server==0.1.31
mcp[cli]==1.23.0
uvicorn==0.32.0
Build specifying linux/arm64. On Apple Silicon Mac, this becomes a native build.
podman build --platform linux/arm64 -t dataprocessing-mcp-agentcore:v0.4 .
Do a quick operation check locally using curl.
$ curl -s -X POST "http://localhost:8000/mcp" \
  -H "Content-Type: application/json" \
  -H "Accept: application/json, text/event-stream" \
  -d '{"jsonrpc":"2.0","id":1,"method":"initialize","params":{"protocolVersion":"2025-06-18","capabilities":{},"clientInfo":{"name":"curl","version":"0.1"}}}' | head -3

event: message
data: {"jsonrpc":"2.0","id":1,"result":{"protocolVersion":"2025-06-18","capabilities":{...},"serverInfo":{"name":"awslabs.aws-dataprocessing-mcp-server","version":"1.23.0"}, ...}}
I created a private repository in ap-northeast-1 and pushed the built image.
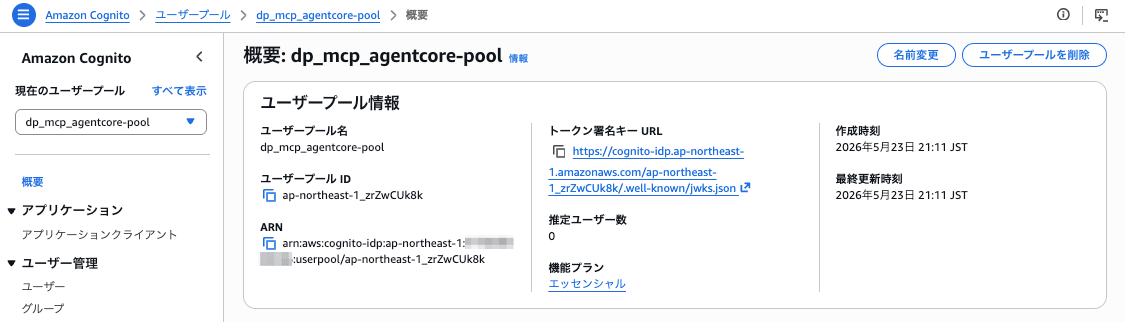
Step3: Creating an Amazon Cognito User Pool
Create a User Pool and App Client for Machine-to-Machine authentication.
aws cognito-idp create-user-pool \
  --pool-name dp-mcp-agentcore-pool \
  --policies '{"PasswordPolicy":{"MinimumLength":12,"RequireUppercase":true,"RequireLowercase":true,"RequireNumbers":true,"RequireSymbols":true}}' \
  --region ap-northeast-1
The Pool ID ap-northeast-1_ogeMbwGMK is obtained. Next, create a Resource Server and scopes.
aws cognito-idp create-resource-server \
  --user-pool-id ap-northeast-1_ogeMbwGMK \
  --identifier dp-mcp \
  --name "Dataprocessing MCP Resource Server" \
  --scopes \
    ScopeName=read,ScopeDescription="Read data processing resources" \
    ScopeName=write,ScopeDescription="Write data processing resources" \
  --region ap-northeast-1
Create a domain prefix and App Client (for client_credentials).
aws cognito-idp create-user-pool-domain \
  --user-pool-id ap-northeast-1_ogeMbwGMK \
  --domain dp-mcp-1f6b687c \
  --region ap-northeast-1

aws cognito-idp create-user-pool-client \
  --user-pool-id ap-northeast-1_ogeMbwGMK \
  --client-name dp-mcp-m2m-client \
  --generate-secret \
  --allowed-o-auth-flows client_credentials \
  --allowed-o-auth-scopes "dp-mcp/read" "dp-mcp/write" \
  --allowed-o-auth-flows-user-pool-client \
  --supported-identity-providers COGNITO \
  --region ap-northeast-1
This gives you the Token URL https://dp-mcp-1f6b687c.auth.ap-northeast-1.amazoncognito.com/oauth2/token and Client ID / Client Secret.
Step4: Creating an IAM Execution Role
The execution role passed to AgentCore Runtime must have at minimum the following permissions.
- ECR pull (narrowed down to the target repository ARN)
- CloudWatch Logs (only
/aws/bedrock-agentcore/runtimes/*) - X-Ray PutTrace related
bedrock-agentcore:GetWorkloadAccessToken*(workload-identity-directory/default)- Read-only APIs for Glue / Athena / S3
The trust policy sets bedrock-agentcore.amazonaws.com as the Principal, restricted to your own account with aws:SourceAccount.
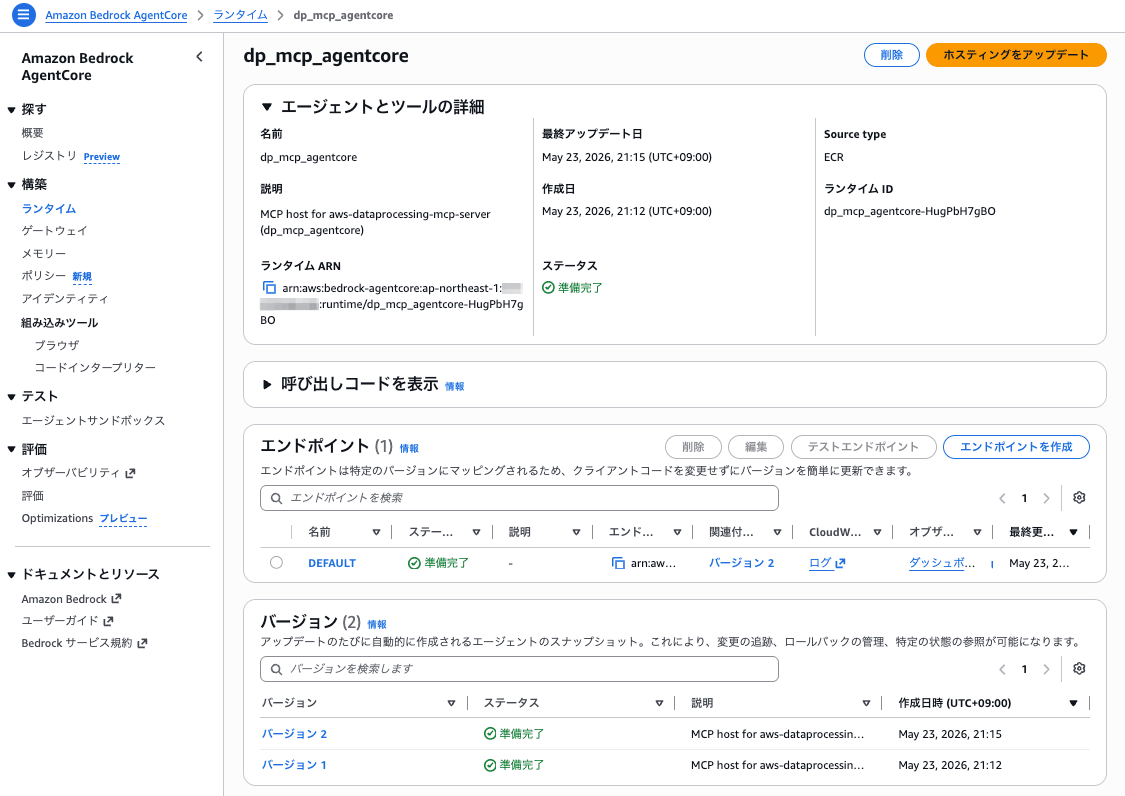
Step5: Creating the AgentCore Runtime
Create the AgentCore Runtime specifying the ECR image, IAM role, Cognito Discovery URL, and App Client ID.
$ aws bedrock-agentcore-control create-agent-runtime \
  --agent-runtime-name dp_mcp_agentcore \
  --agent-runtime-artifact 'containerConfiguration={containerUri=<AWS_ACCOUNT_ID>.dkr.ecr.ap-northeast-1.amazonaws.com/dataprocessing-mcp-agentcore:v0.4}' \
  --network-configuration 'networkMode=PUBLIC' \
  --protocol-configuration 'serverProtocol=MCP' \
  --role-arn arn:aws:iam::<AWS_ACCOUNT_ID>:role/AgentCoreRuntimeRole-DpMcp \
  --authorizer-configuration 'customJWTAuthorizer={discoveryUrl=https://cognito-idp.ap-northeast-1.amazonaws.com/ap-northeast-1_ogeMbwGMK/.well-known/openid-configuration,allowedClients=[38gvcra4aiq2kof9tim48ujoqb]}' \
  --environment-variables 'AWS_REGION=ap-northeast-1,FASTMCP_LOG_LEVEL=INFO' \
  --region ap-northeast-1

{
  "agentRuntimeArn": "arn:aws:bedrock-agentcore:ap-northeast-1:<AWS_ACCOUNT_ID>:runtime/dp_mcp_agentcore-O8HEgzH8Fj",
  "agentRuntimeId": "dp_mcp_agentcore-O8HEgzH8Fj",
  "agentRuntimeVersion": "1",
  "status": "CREATING"
}
It became READY within tens of seconds.
Step6: Connecting from a Remote MCP Client
Obtain a JWT from Cognito via client_credentials grant, and connect to the AgentCore Runtime endpoint (/invocations?qualifier=DEFAULT) from a Python MCP client.
import asyncio, base64, json, urllib.parse, urllib.request
from mcp import ClientSession
from mcp.client.streamable_http import streamablehttp_client

REGION = "ap-northeast-1"
ARN = "arn:aws:bedrock-agentcore:ap-northeast-1:<AWS_ACCOUNT_ID>:runtime/dp_mcp_agentcore-O8HEgzH8Fj"
DOMAIN = "dp-mcp-1f6b687c"
CLIENT_ID = "..."
CLIENT_SECRET = "..."

def get_jwt():
    body = urllib.parse.urlencode({"grant_type": "client_credentials",
                                   "scope": "dp-mcp/read dp-mcp/write"}).encode()
    creds = base64.b64encode(f"{CLIENT_ID}:{CLIENT_SECRET}".encode()).decode()
    req = urllib.request.Request(
        f"https://{DOMAIN}.auth.{REGION}.amazoncognito.com/oauth2/token",
        data=body,
        headers={"Authorization": f"Basic {creds}",
                 "Content-Type": "application/x-www-form-urlencoded"},
    )
    return json.loads(urllib.request.urlopen(req).read())["access_token"]

async def main():
    token = get_jwt()
    url = (f"https://bedrock-agentcore.{REGION}.amazonaws.com/runtimes/"
           f"{urllib.parse.quote(ARN, safe='')}/invocations?qualifier=DEFAULT")
    headers = {"Authorization": f"Bearer {token}", "Content-Type": "application/json"}
    async with streamablehttp_client(url, headers, timeout=120) as (r, w, _):
        async with ClientSession(r, w) as session:
            await session.initialize()
            tools = await session.list_tools()
            print(f"tool count: {len(tools.tools)}")
            result = await session.call_tool(
                "manage_aws_glue_databases",
                {"operation": "list-databases", "region_name": REGION},
            )
            for c in result.content:
                if c.type == "text":
                    print(c.text[:600])

asyncio.run(main())
The execution result is as follows.
tool count: 36
Successfully listed 7 databases
{"databases":[{"name":"default", ...},{"name":"qsdemo_dev", ...},{"name":"qsdemo_iot", ...},{"name":"qsdemo_sandbox", ...},{"name":"quick_workshop", ...}], "count":7, ...}
36 tools were registered, and the list of Glue databases was also retrieved. Next, I call Athena workgroups and databases within the Athena catalog.
=== manage_aws_athena_databases_and_tables (list-databases) ===
{"database_list":[{"Name":"default"},{"Name":"ishikawa"},{"Name":"iwasa"},{"Name":"qsdemo_dev"},{"Name":"qsdemo_iot"},{"Name":"qsdemo_sandbox"},{"Name":"quick_workshop"}],"count":7}
I was able to verify "viewing the catalog"—the entry point for data analysis—through a natural language tool call.
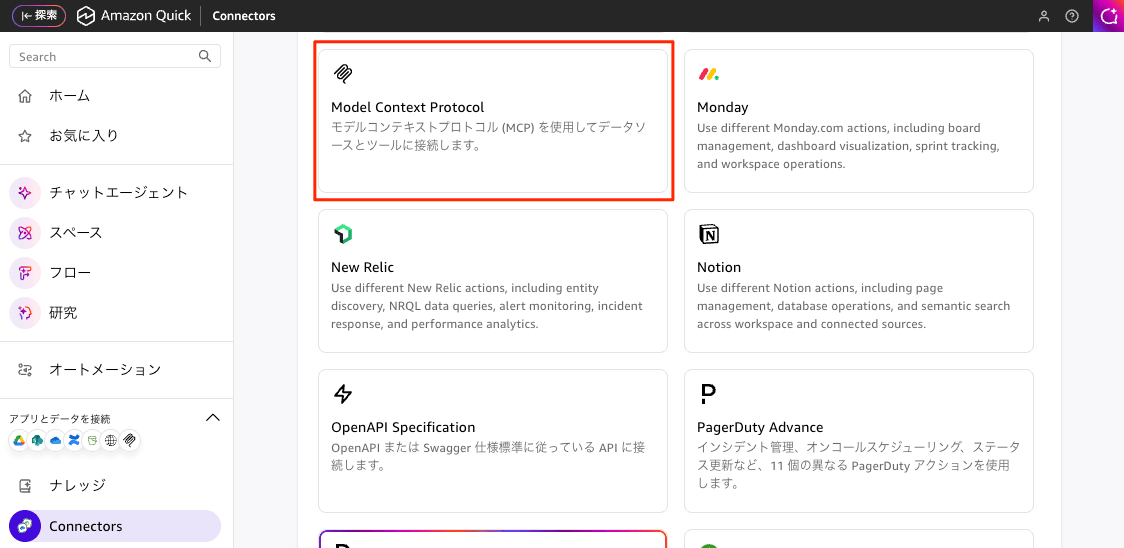
Step7: Registering the MCP Connector in Amazon Quick
Select Connectors, then select Model Context Protocol from the Create for your team tab.
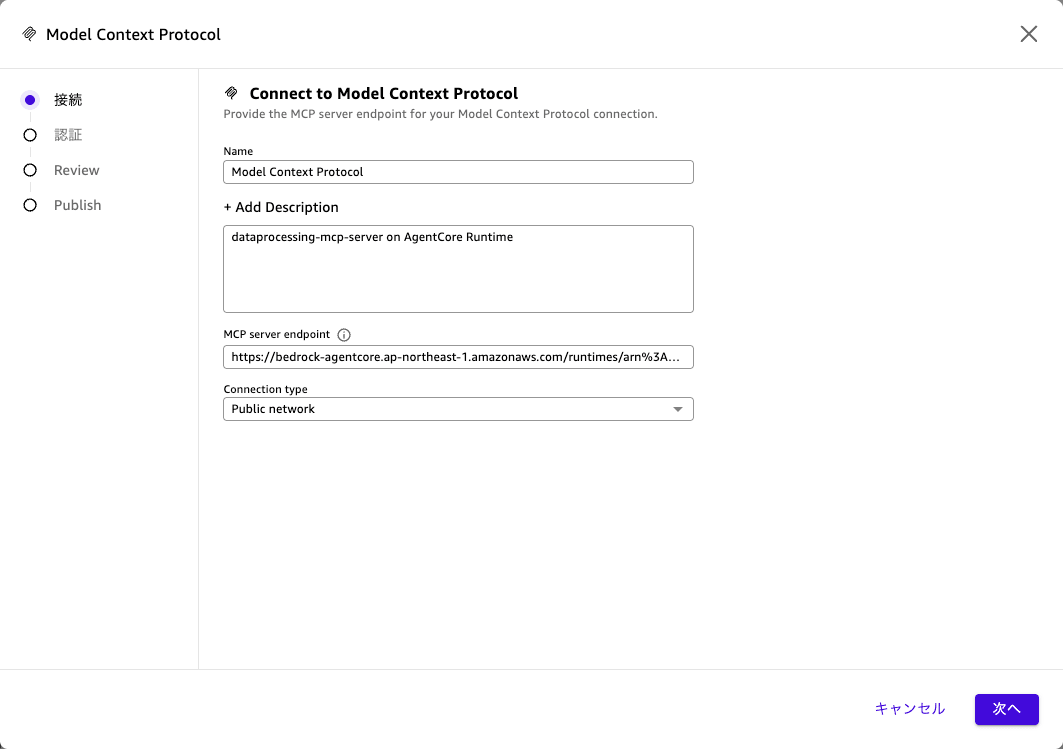
Under "Connection," configure the following.
- Name
- Description
- MCP server endpoint
- Connection Type (leave the default
Public Network)
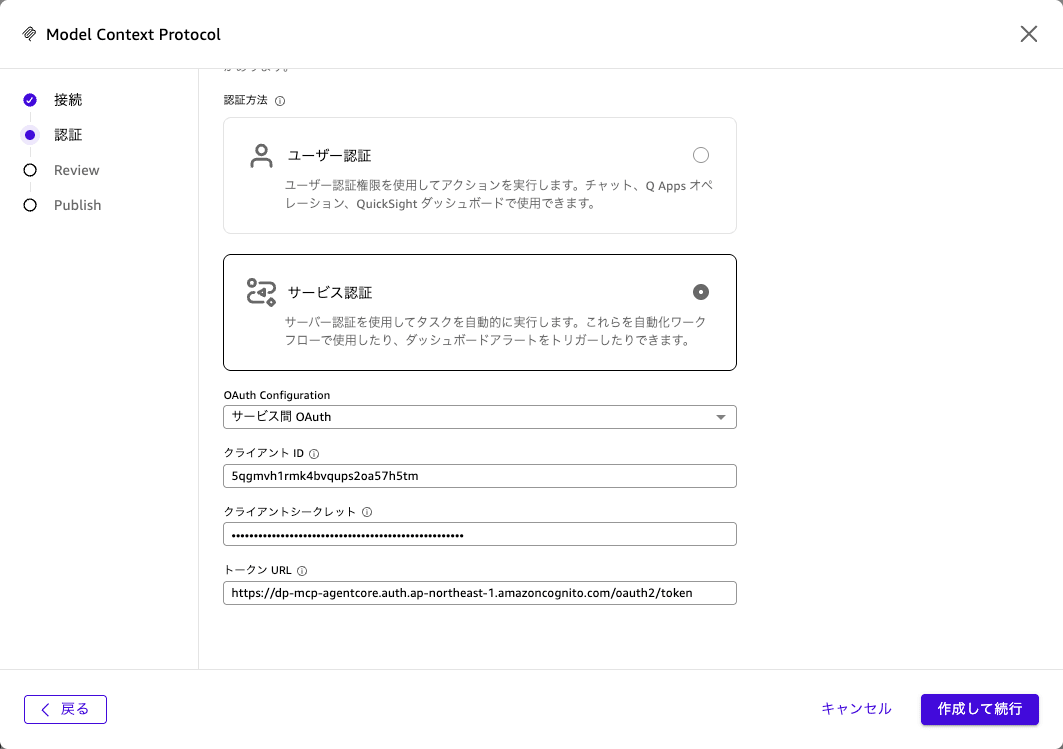
Under "Authentication," configure the following.
- Authentication method: Select
Service authentication - OAuth Configuration
- Client ID
- Client Secret
- Token URL
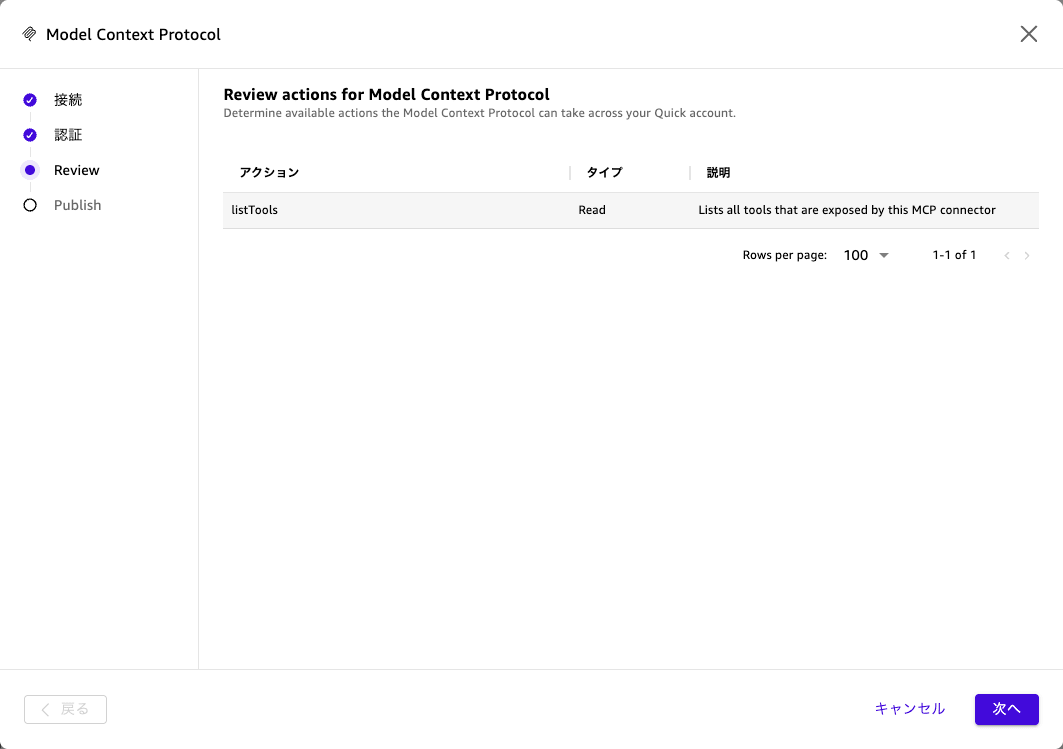
Under "Review," verify the content.
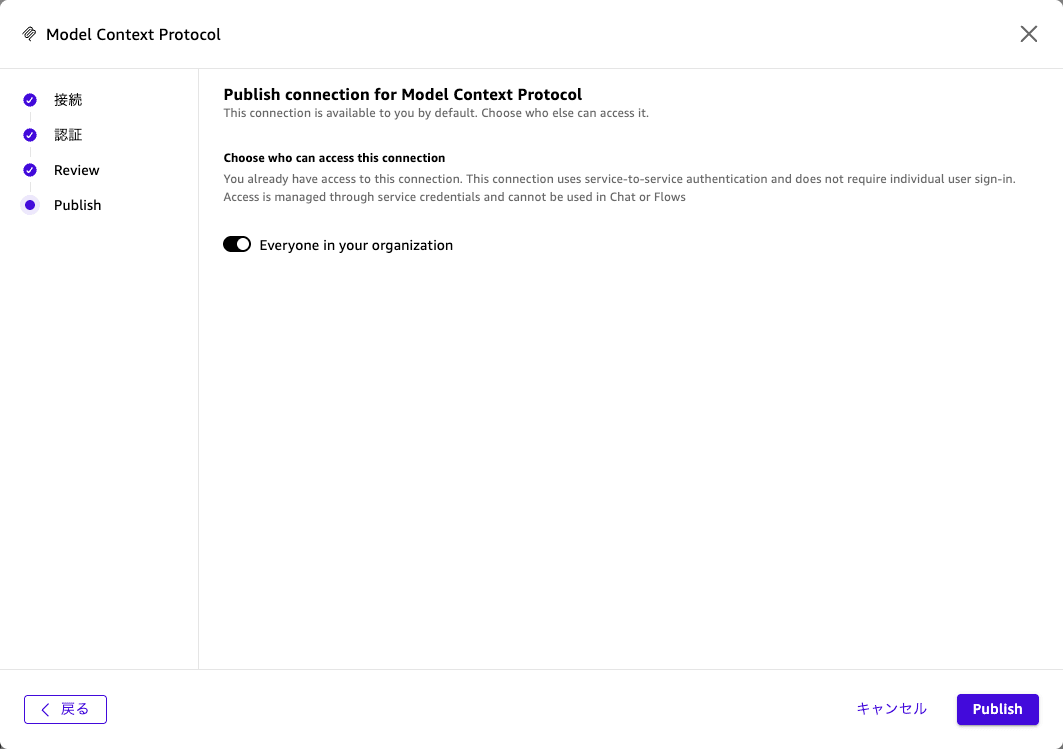
Under "Publish," register the MCP. Since turning off Everyone in your organization does not allow individual configuration, you will register it as is.
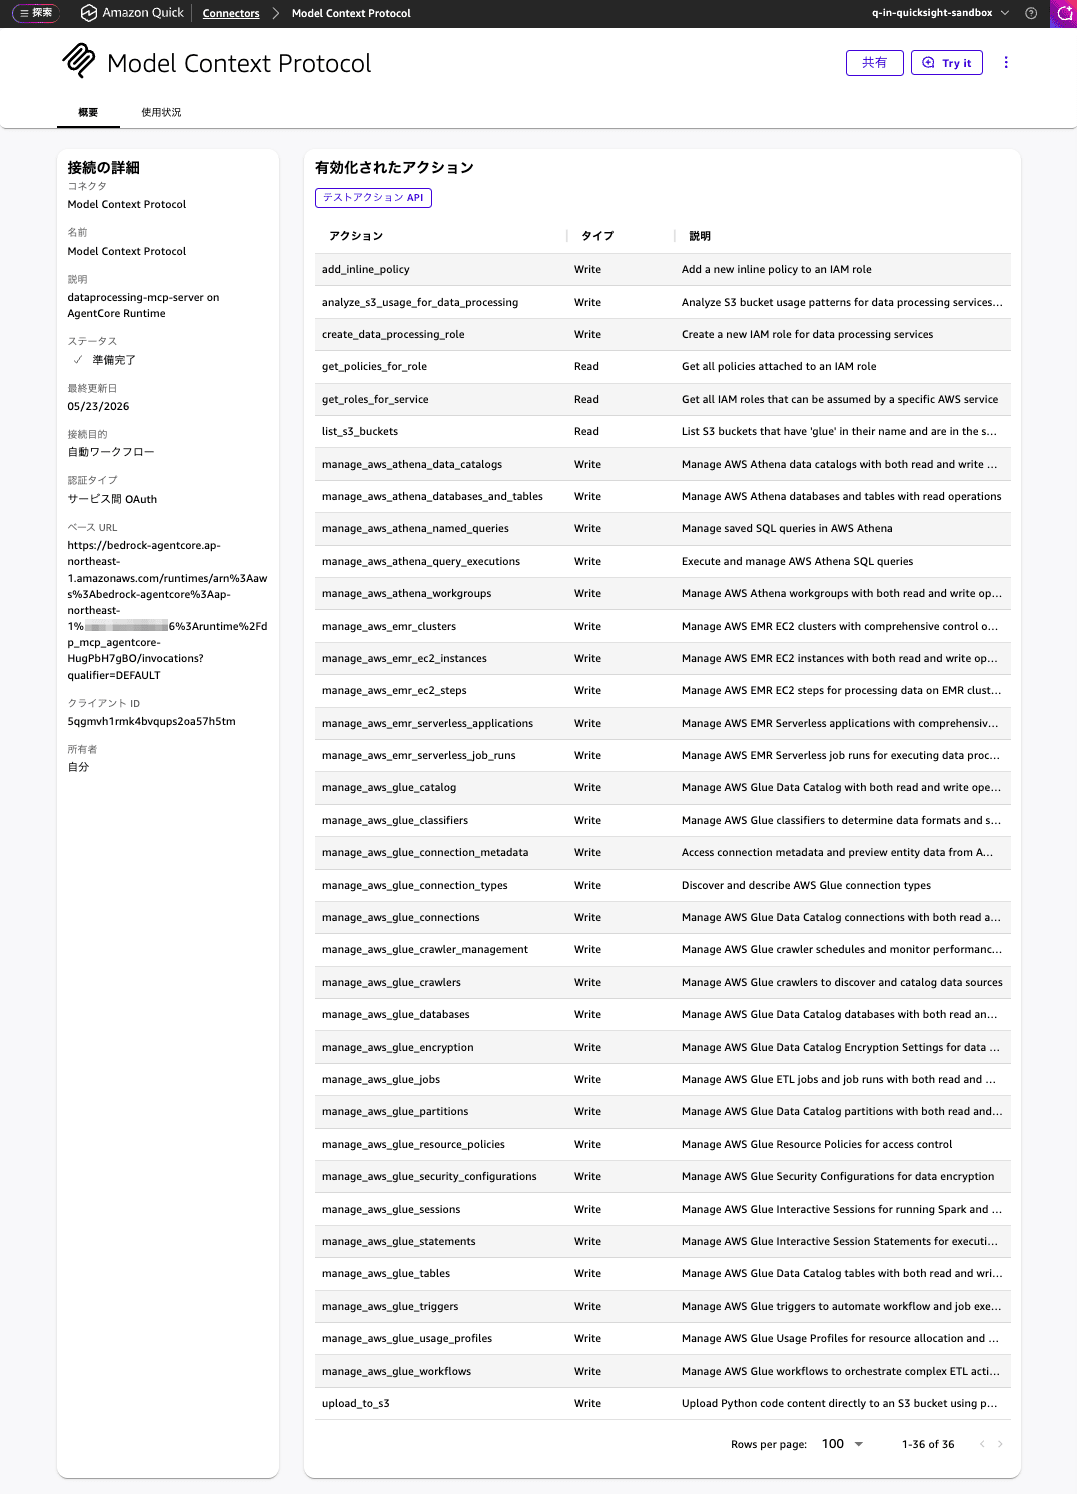
You can confirm the 36 registered actions.
Step8: Verifying the Amazon Quick MCP Connector
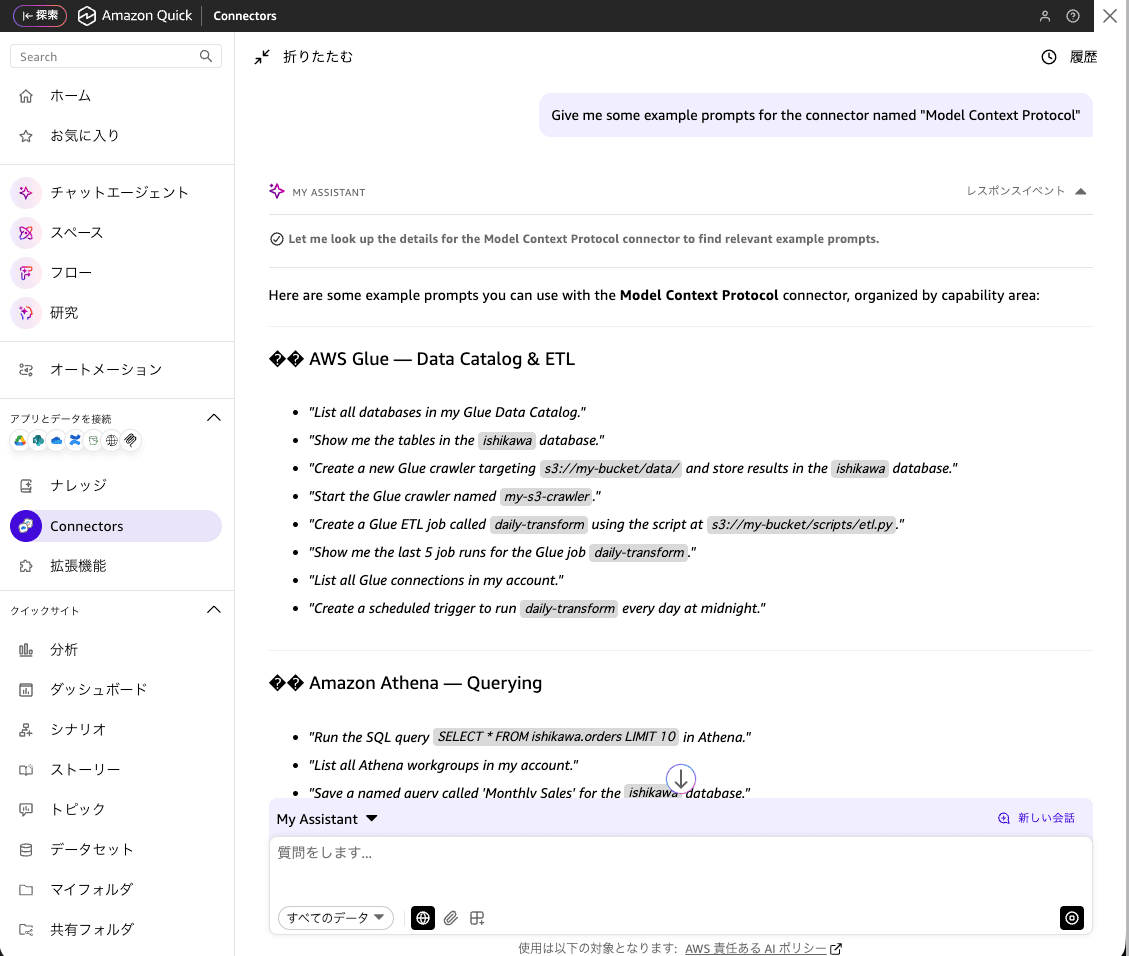
Pressing the [Try it] button displays the chat screen.
On the chat screen, this MCP is already selected as the Connector, and execution of the following prompt begins.
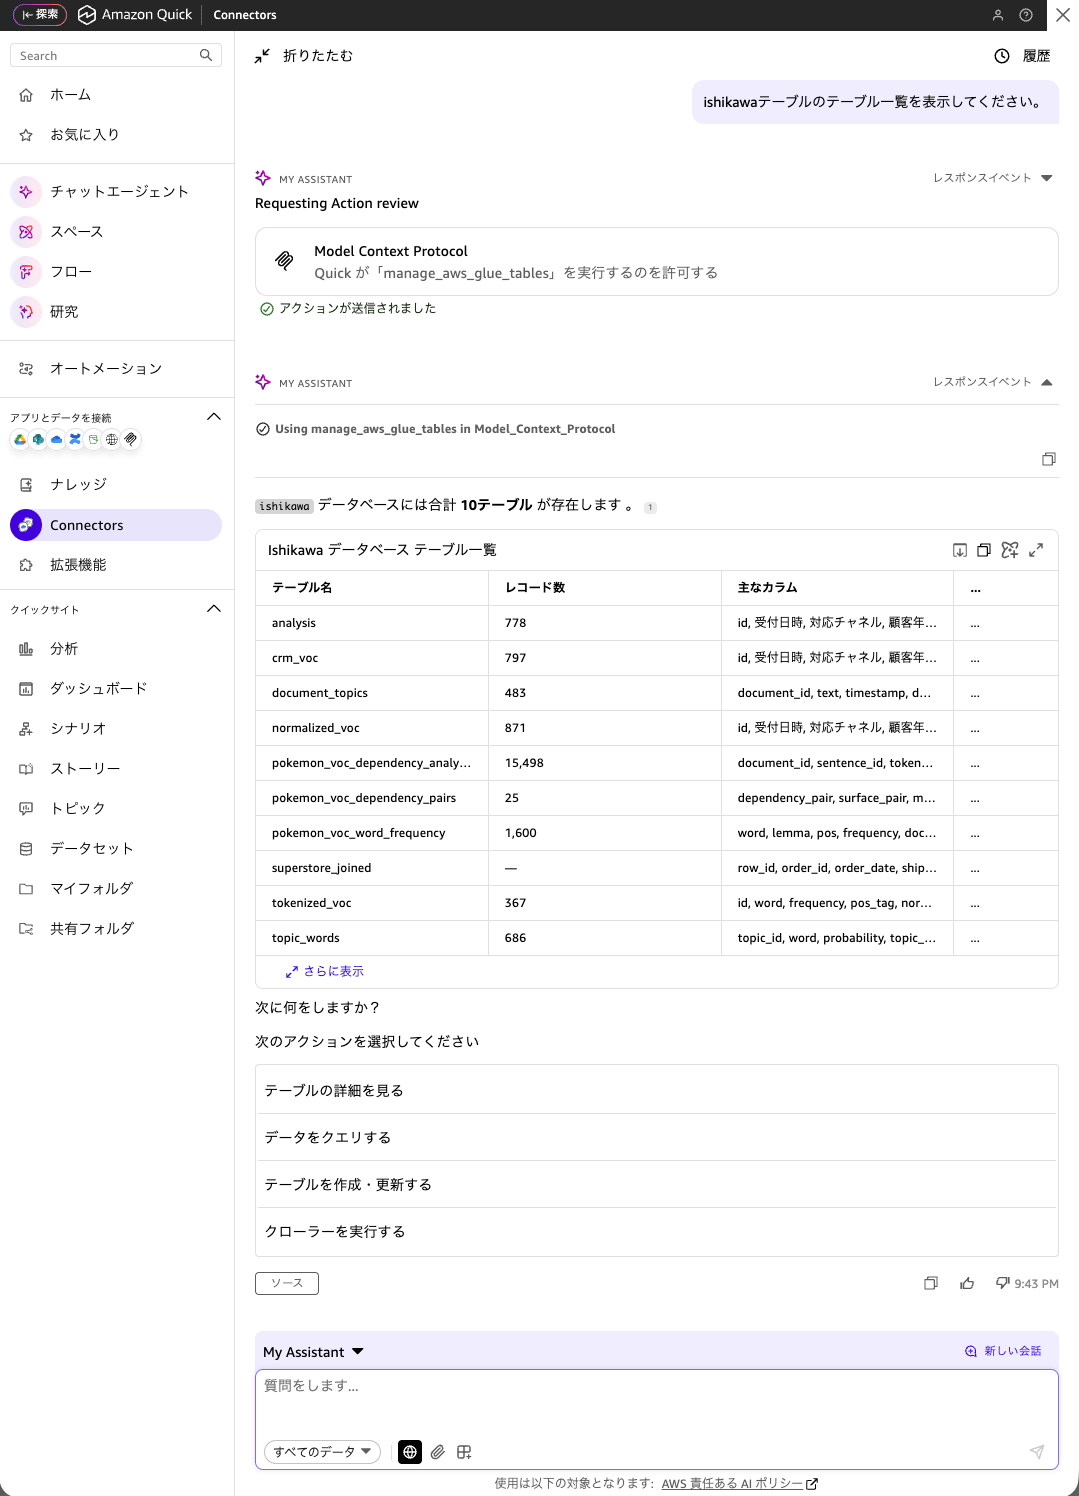
Let's go ahead and enter a prompt. I type "Please display the list of tables in the ishikawa table." Before executing the MCP, "Allow" confirmation is always required. This is a consideration to prevent unexpected MCP calls.
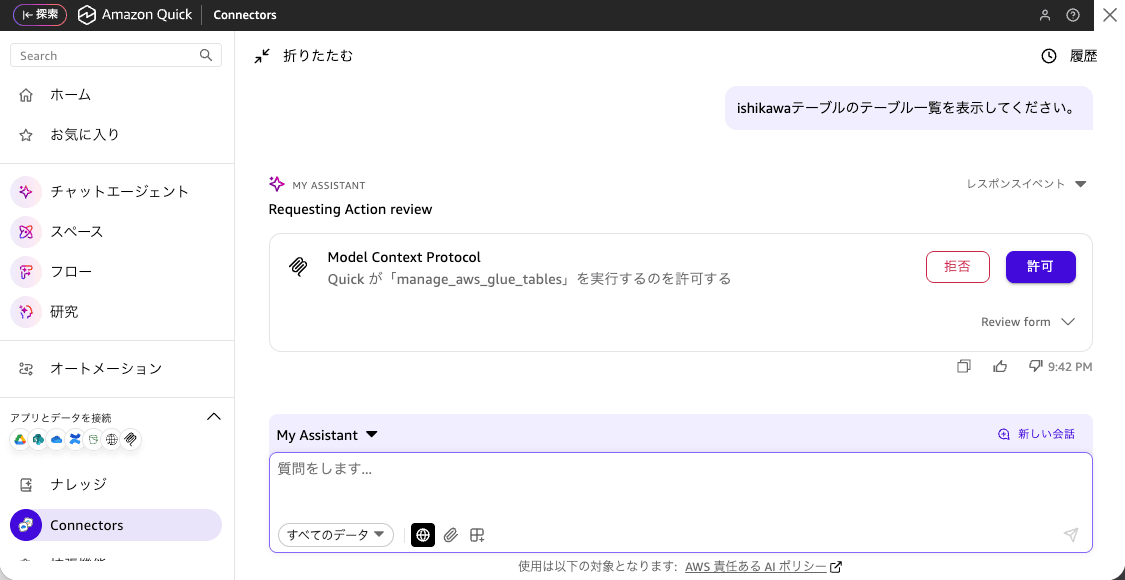
I typed "ishikawa table" where I meant "ishikawa database," but the list from the "ishikawa database" was displayed.
Step9: Updating Amazon Quick Data with the MCP Connector
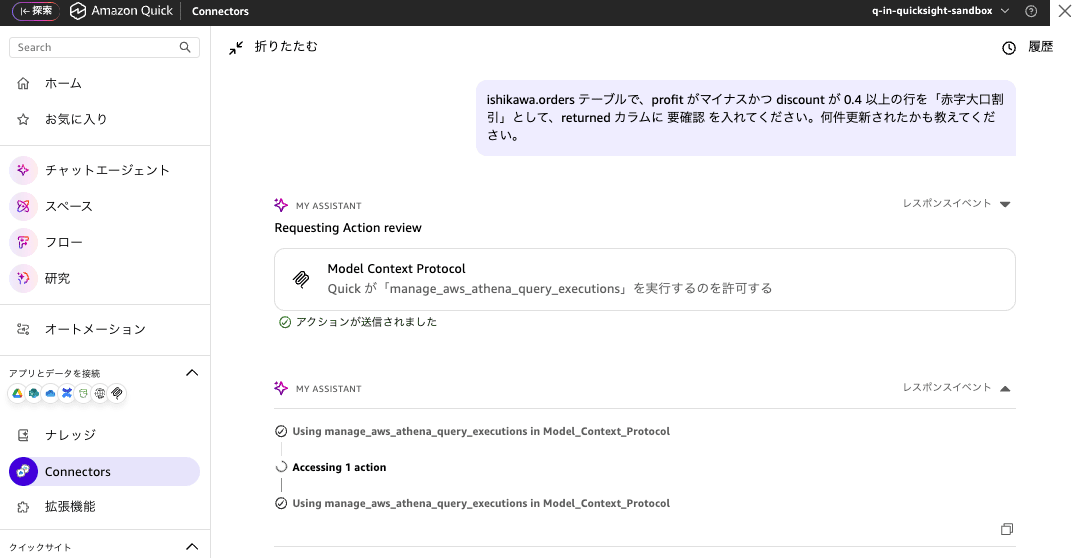
There is sometimes a need to update data on "QuickSight." Moreover, being able to instruct changes in natural language makes it very convenient. I enter the following prompt to perform the update.
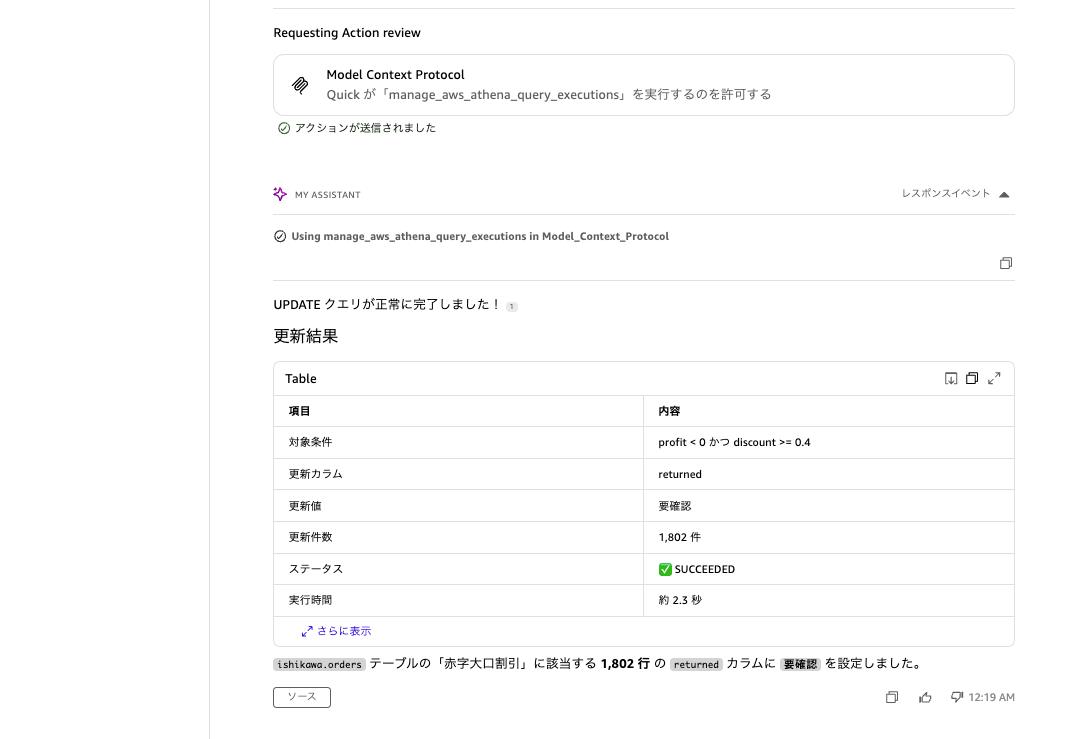
In the ishikawa.orders table, for rows where profit is negative and discount is 0.4 or more, please put "要確認" (needs review) in the returned column as "high-discount deficit." Please also tell me how many rows were updated.
The results of the changes are also displayed in a human-readable format.
:
:
:
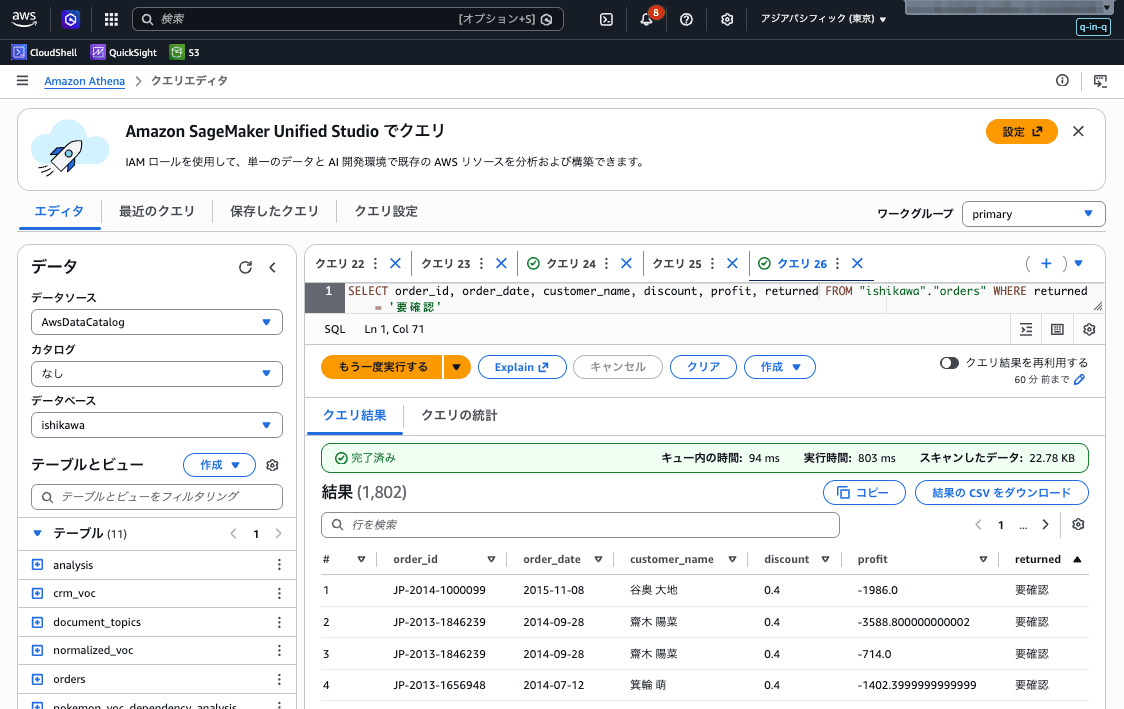
When I also checked from Amazon Athena, I was able to confirm the changes according to the specified conditions.
Discussion
- The verification in this article was conducted in read-only mode. When enabling write operations in production, you need to add the
--allow-writeflag and--allow-sensitive-data-accessflag to the ENTRYPOINT, and also extend the IAM execution role permissions to include write operations. - It is recommended to manage the Cognito Client Secret using AWS Secrets Manager or similar, rather than embedding it in version control or on the client side.
- The reason
enable_dns_rebinding_protection=Falseis set for DNS rebinding protection is to conform to AgentCore Runtime's proxy behavior of rewriting the Host header. Unauthorized external access is blocked by AgentCore Runtime's JWT authentication, but please be careful if you reuse the container in a different environment as-is. - aws-dataprocessing-mcp-server is at version 0.1.31 (pre-1.0) at the time of writing this article. The tool structure and arguments may change in the future. In this article, the configuration pins the version within the container image.
Closing
By connecting Amazon Quick and aws-dataprocessing-mcp-server via Amazon Bedrock AgentCore Runtime, you can integrate Glue / Athena operations into a natural language interface. To run an OSS MCP server on AgentCore Runtime as-is, you will encounter the following "pitfalls":
- A wrapper to switch to streamable-http
- Building the container for linux/arm64 and pushing to ECR
- Handling FastMCP's DNS rebinding protection
- Redirect behavior for
/mcp//mcp/paths
I hope the wrapper implementation and verification logs in this article serve as a reference for those who want to host other AWS Labs MCP servers (aws-iam-mcp-server, aws-s3-mcp-server, etc.) on AgentCore Runtime using the same pattern.