Amazon Bedrock AgentCore Runtime にホストした aws-dataprocessing-mcp-server を Amazon Quick から自然言語でレイクハウスを操作してみた
クラウド事業本部の石川です。AWS Labs が公開している aws-dataprocessing-mcp-server を Amazon Bedrock AgentCore Runtime にホストし、Amazon Quick から自然言語で データレイクやレイクハウス を操作できるようにしてみました。
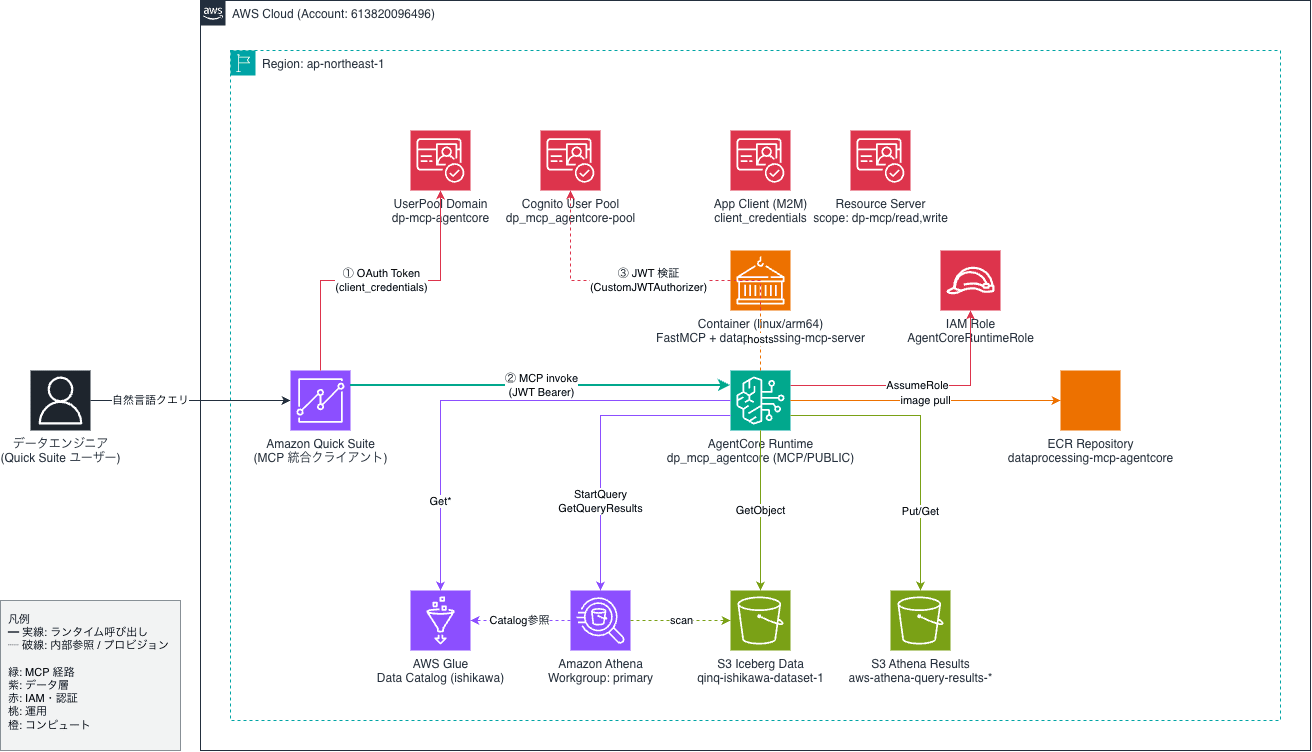
AWS Labs の MCP サーバー群には、特定用途に特化したサーバーも揃っています。今回はデータ分析運用にフォーカスした aws-dataprocessing-mcp-server を取り上げ、Quick + AgentCore Runtime + Cognito JWT 認証の統合パターンで動かしてみます。
aws-dataprocessing-mcp-server は PyPI / uvx 配布で stdio 専用です。AgentCore Runtime で動かすには、streamable-http で待ち受けるカスタムコンテナをビルドし、いくつかの「ハマりどころ」を回避する必要があります。本記事ではその実装も含めて紹介します。
aws-dataprocessing-mcp-server とは
aws-dataprocessing-mcp-server は、AWS GlueやAmazon Athena のデータ処理サービスを Model Context Protocol(MCP)経由で操作するためのサーバーです。Glue Data Catalog の照会、Athena クエリの実行、テーブルやデータベースの管理など、データエンジニアリング業務でよく使う操作が 36 個のツールとして提供されています。
主なツールカテゴリは以下の通りです。
- Glue Data Catalog 系:
manage_aws_glue_databases,manage_aws_glue_tables,manage_aws_glue_connections,manage_aws_glue_partitions - Glue ETL 系:
manage_aws_glue_jobs,manage_aws_glue_workflows,manage_aws_glue_triggers,manage_aws_glue_crawlers - Glue Interactive Sessions 系:
manage_aws_glue_sessions,manage_aws_glue_statements - EMR 系:
manage_aws_emr_clusters,manage_aws_emr_ec2_steps,manage_aws_emr_serverless_applications - Athena 系:
manage_aws_athena_query_executions,manage_aws_athena_workgroups,manage_aws_athena_data_catalogs - 共通:
create_data_processing_role,list_s3_buckets,add_inline_policy
デフォルトは読み取り専用で起動し、--allow-write フラグを付けると更新系の操作も解禁されます。本記事では安全性を優先して読み取り専用で検証しました。
Amazon Bedrock AgentCore Runtime とは
Amazon Bedrock AgentCore Runtime は、AI エージェントや MCP サーバーをホスティングするためのサーバーレス実行環境です。Model Context Protocol(MCP)や Agent to Agent(A2A)プロトコルでの通信をサポートし、microVM 単位でセッションを分離します。JWT 認証、CloudWatch / X-Ray への観測データ送信、ECR コンテナイメージからの起動を一手に担います。
アーキテクチャ全体像
リクエストの流れは以下の通りです。
やってみた
前提条件
- AWS アカウント(本検証は ap-northeast-1 のサンドボックスで実施)
- Amazon Quick Enterprise エディション
- linux/arm64 イメージをビルドできるコンテナランタイム(本検証は Mac + Podman を使用)
- 検証時のMCP は awslabs.aws-dataprocessing-mcp-server: 0.1.31
Step1: AgentCore Runtime 向けカスタムコンテナの設計
aws-dataprocessing-mcp-server の server.py は FastMCP() をデフォルト設定で起動するため、stdio トランスポートで待ち受けます。AgentCore Runtime は streamable-http、port 8000、/mcp パスを要求するので、薄いラッパーを書いて以下を行います。
FastMCP.__init__を上書きし、TransportSecuritySettings(enable_dns_rebinding_protection=False)を渡すFastMCP.runを上書きし、mcp.settings.host = "0.0.0.0"、port = 8000、stateless_http = Trueを設定したうえでstreamable-httpで起動する/mcpだけでなく/mcp/でも同じハンドラを応答させ、redirect_slashes=Falseで 307 リダイレクトを抑止する
ラッパー server_http.py の中核は以下の通りです。
import uvicorn
from mcp.server.fastmcp import FastMCP
from mcp.server.transport_security import TransportSecuritySettings
from starlette.routing import Route

_original_init = FastMCP.__init__

def _patched_init(self, *args, **kwargs):
    kwargs.setdefault(
        "transport_security",
        TransportSecuritySettings(enable_dns_rebinding_protection=False),
    )
    _original_init(self, *args, **kwargs)

FastMCP.__init__ = _patched_init

_original_run = FastMCP.run

def _patched_run(self, transport=None, **kwargs):
    self.settings.host = "0.0.0.0"
    self.settings.port = 8000
    self.settings.stateless_http = True

    if transport == "streamable-http" or transport is None:
        app = self.streamable_http_app()
        app.router.redirect_slashes = False
        existing = next(
            r for r in app.router.routes if isinstance(r, Route) and r.path == "/mcp"
        )
        app.router.routes.append(
            Route("/mcp/", endpoint=existing.endpoint, methods=existing.methods)
        )
        uvicorn.run(app, host="0.0.0.0", port=8000, log_level="info")
        return
    return _original_run(self, transport=transport)

FastMCP.run = _patched_run

from awslabs.aws_dataprocessing_mcp_server.server import main  # noqa: E402

if __name__ == "__main__":
    main()
ここで重要なのは 1 つ目の transport_security の上書きです。FastMCP は MCP Python SDK 1.21 以降、DNS rebinding 保護をデフォルトで有効化しています。AgentCore Runtime のプロキシは Host ヘッダに上流の AWS ドメインを設定して内部 microVM に転送するため、無効化しないと 421 Misdirected Request が返ります。AgentCore Runtime 側で JWT 認証されているため、ここで無効化しても多層防御は維持されます。
Step2: Docker イメージのビルド
Dockerfile は次のように構成します。
FROM --platform=linux/arm64 python:3.12-slim

ENV PYTHONUNBUFFERED=1 \
    PIP_NO_CACHE_DIR=1

WORKDIR /app

COPY requirements.txt /app/requirements.txt
RUN pip install --no-cache-dir -r /app/requirements.txt

COPY server_http.py /app/server_http.py

RUN groupadd -r app && useradd -r -g app -d /home/app -m app
USER app

EXPOSE 8000

ENTRYPOINT ["python", "/app/server_http.py"]
requirements.txt は version を pin します。
awslabs.aws-dataprocessing-mcp-server==0.1.31
mcp[cli]==1.23.0
uvicorn==0.32.0
linux/arm64 を指定してビルドします。Apple Silicon Mac ではネイティブビルドとなります。
podman build --platform linux/arm64 -t dataprocessing-mcp-agentcore:v0.4 .
ローカルでcurlコマンドを用いて簡単に動作確認します。
$ curl -s -X POST "http://localhost:8000/mcp" \
  -H "Content-Type: application/json" \
  -H "Accept: application/json, text/event-stream" \
  -d '{"jsonrpc":"2.0","id":1,"method":"initialize","params":{"protocolVersion":"2025-06-18","capabilities":{},"clientInfo":{"name":"curl","version":"0.1"}}}' | head -3

event: message
data: {"jsonrpc":"2.0","id":1,"result":{"protocolVersion":"2025-06-18","capabilities":{...},"serverInfo":{"name":"awslabs.aws-dataprocessing-mcp-server","version":"1.23.0"}, ...}}
ap-northeast-1 にプライベートリポジトリを作成し、ビルドしたイメージを push しました。
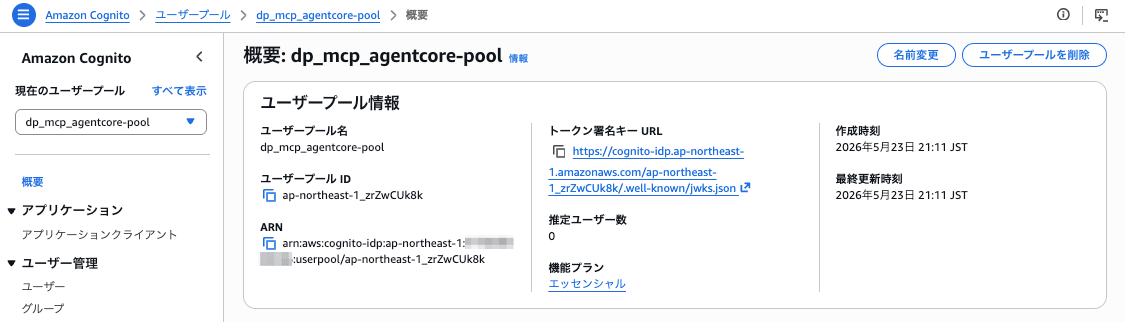
Step3: Amazon Cognito User Pool の作成
Machine-to-Machine 認証用の User Pool と App Client を作成します。
aws cognito-idp create-user-pool \
  --pool-name dp-mcp-agentcore-pool \
  --policies '{"PasswordPolicy":{"MinimumLength":12,"RequireUppercase":true,"RequireLowercase":true,"RequireNumbers":true,"RequireSymbols":true}}' \
  --region ap-northeast-1
Pool ID として ap-northeast-1_ogeMbwGMK を得ます。次に Resource Server とスコープを作成します。
aws cognito-idp create-resource-server \
  --user-pool-id ap-northeast-1_ogeMbwGMK \
  --identifier dp-mcp \
  --name "Dataprocessing MCP Resource Server" \
  --scopes \
    ScopeName=read,ScopeDescription="Read data processing resources" \
    ScopeName=write,ScopeDescription="Write data processing resources" \
  --region ap-northeast-1
ドメインプレフィックスと App Client(client_credentials 用)を作成します。
aws cognito-idp create-user-pool-domain \
  --user-pool-id ap-northeast-1_ogeMbwGMK \
  --domain dp-mcp-1f6b687c \
  --region ap-northeast-1

aws cognito-idp create-user-pool-client \
  --user-pool-id ap-northeast-1_ogeMbwGMK \
  --client-name dp-mcp-m2m-client \
  --generate-secret \
  --allowed-o-auth-flows client_credentials \
  --allowed-o-auth-scopes "dp-mcp/read" "dp-mcp/write" \
  --allowed-o-auth-flows-user-pool-client \
  --supported-identity-providers COGNITO \
  --region ap-northeast-1
これにより Token URL https://dp-mcp-1f6b687c.auth.ap-northeast-1.amazoncognito.com/oauth2/token と Client ID / Client Secret が得られます。
Step4: IAM 実行ロールの作成
AgentCore Runtime に渡す実行ロールには、最低限以下の権限を付与します。
- ECR pull(対象リポジトリ ARN を絞り込み)
- CloudWatch Logs(
/aws/bedrock-agentcore/runtimes/*のみ) - X-Ray PutTrace 系
bedrock-agentcore:GetWorkloadAccessToken*(workload-identity-directory/default)- Glue / Athena / S3 の参照系 API
信頼ポリシーは bedrock-agentcore.amazonaws.com を Principal に、aws:SourceAccount で自アカウントに限定します。
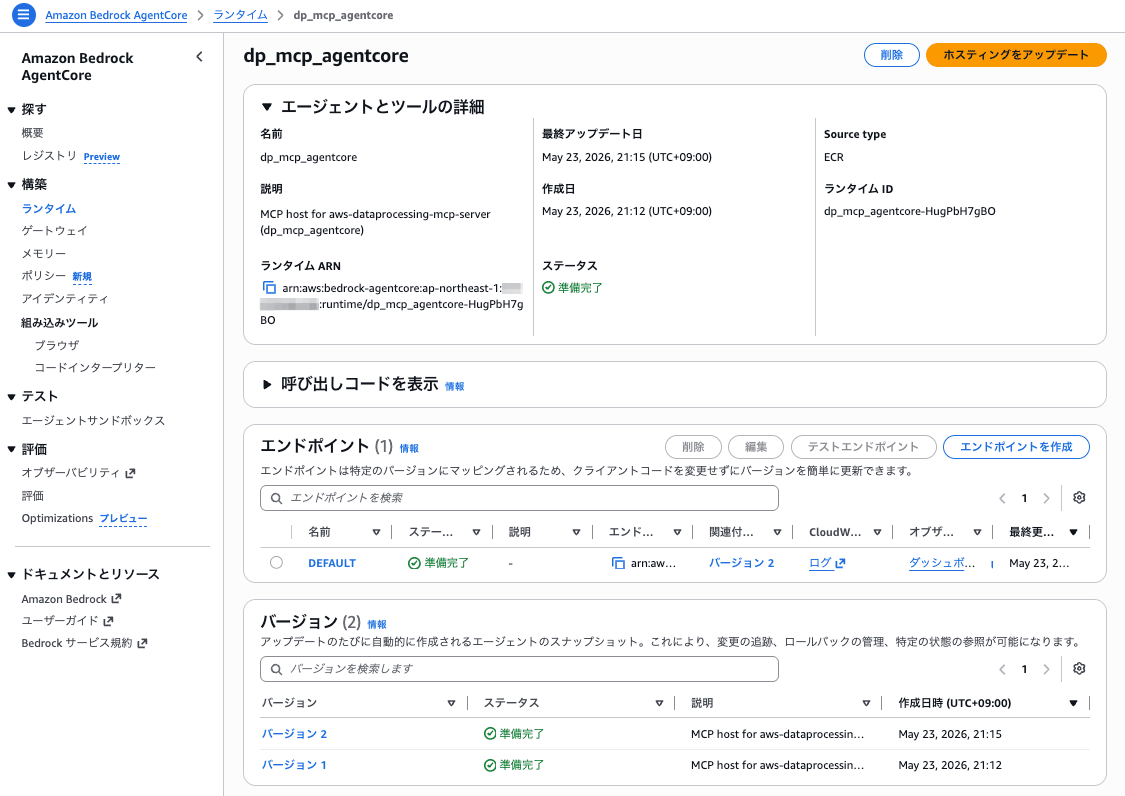
Step5: AgentCore Runtime の作成
ECR イメージ、IAM ロール、Cognito の Discovery URL と App Client ID を指定して AgentCore Runtime を作成します。
$ aws bedrock-agentcore-control create-agent-runtime \
  --agent-runtime-name dp_mcp_agentcore \
  --agent-runtime-artifact 'containerConfiguration={containerUri=<AWS_ACCOUNT_ID>.dkr.ecr.ap-northeast-1.amazonaws.com/dataprocessing-mcp-agentcore:v0.4}' \
  --network-configuration 'networkMode=PUBLIC' \
  --protocol-configuration 'serverProtocol=MCP' \
  --role-arn arn:aws:iam::<AWS_ACCOUNT_ID>:role/AgentCoreRuntimeRole-DpMcp \
  --authorizer-configuration 'customJWTAuthorizer={discoveryUrl=https://cognito-idp.ap-northeast-1.amazonaws.com/ap-northeast-1_ogeMbwGMK/.well-known/openid-configuration,allowedClients=[38gvcra4aiq2kof9tim48ujoqb]}' \
  --environment-variables 'AWS_REGION=ap-northeast-1,FASTMCP_LOG_LEVEL=INFO' \
  --region ap-northeast-1

{
  "agentRuntimeArn": "arn:aws:bedrock-agentcore:ap-northeast-1:<AWS_ACCOUNT_ID>:runtime/dp_mcp_agentcore-O8HEgzH8Fj",
  "agentRuntimeId": "dp_mcp_agentcore-O8HEgzH8Fj",
  "agentRuntimeVersion": "1",
  "status": "CREATING"
}
数十秒で READY になりました。
Step6: リモート MCP クライアントから接続
Cognito から client_credentials grant で JWT を取得し、AgentCore Runtime のエンドポイント(/invocations?qualifier=DEFAULT)に Python の MCP クライアントから接続します。
import asyncio, base64, json, urllib.parse, urllib.request
from mcp import ClientSession
from mcp.client.streamable_http import streamablehttp_client

REGION = "ap-northeast-1"
ARN = "arn:aws:bedrock-agentcore:ap-northeast-1:<AWS_ACCOUNT_ID>:runtime/dp_mcp_agentcore-O8HEgzH8Fj"
DOMAIN = "dp-mcp-1f6b687c"
CLIENT_ID = "..."
CLIENT_SECRET = "..."

def get_jwt():
    body = urllib.parse.urlencode({"grant_type": "client_credentials",
                                   "scope": "dp-mcp/read dp-mcp/write"}).encode()
    creds = base64.b64encode(f"{CLIENT_ID}:{CLIENT_SECRET}".encode()).decode()
    req = urllib.request.Request(
        f"https://{DOMAIN}.auth.{REGION}.amazoncognito.com/oauth2/token",
        data=body,
        headers={"Authorization": f"Basic {creds}",
                 "Content-Type": "application/x-www-form-urlencoded"},
    )
    return json.loads(urllib.request.urlopen(req).read())["access_token"]

async def main():
    token = get_jwt()
    url = (f"https://bedrock-agentcore.{REGION}.amazonaws.com/runtimes/"
           f"{urllib.parse.quote(ARN, safe='')}/invocations?qualifier=DEFAULT")
    headers = {"Authorization": f"Bearer {token}", "Content-Type": "application/json"}
    async with streamablehttp_client(url, headers, timeout=120) as (r, w, _):
        async with ClientSession(r, w) as session:
            await session.initialize()
            tools = await session.list_tools()
            print(f"tool count: {len(tools.tools)}")
            result = await session.call_tool(
                "manage_aws_glue_databases",
                {"operation": "list-databases", "region_name": REGION},
            )
            for c in result.content:
                if c.type == "text":
                    print(c.text[:600])

asyncio.run(main())
実行結果は以下の通りです。
tool count: 36
Successfully listed 7 databases
{"databases":[{"name":"default", ...},{"name":"qsdemo_dev", ...},{"name":"qsdemo_iot", ...},{"name":"qsdemo_sandbox", ...},{"name":"quick_workshop", ...}], "count":7, ...}
36 ツールが登録され、Glue データベースの一覧も取得できました。続けて Athena ワークグループ、Athena カタログ内データベースを呼び出します。
=== manage_aws_athena_databases_and_tables (list-databases) ===
{"database_list":[{"Name":"default"},{"Name":"ishikawa"},{"Name":"iwasa"},{"Name":"qsdemo_dev"},{"Name":"qsdemo_iot"},{"Name":"qsdemo_sandbox"},{"Name":"quick_workshop"}],"count":7}
データ分析の入口となる「カタログを見る」を自然言語経由のツール呼び出しで検証できました。
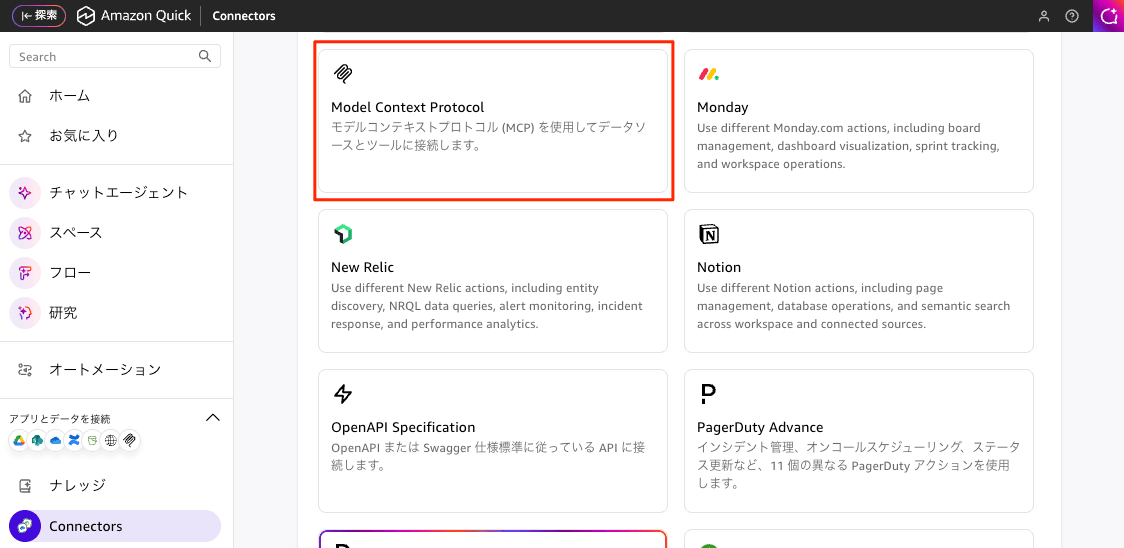
Step7: Amazon Quick のMCP コネクタを登録する
Connectors を選択、Create for your team タブの中のModel Context Protocol を選択します。
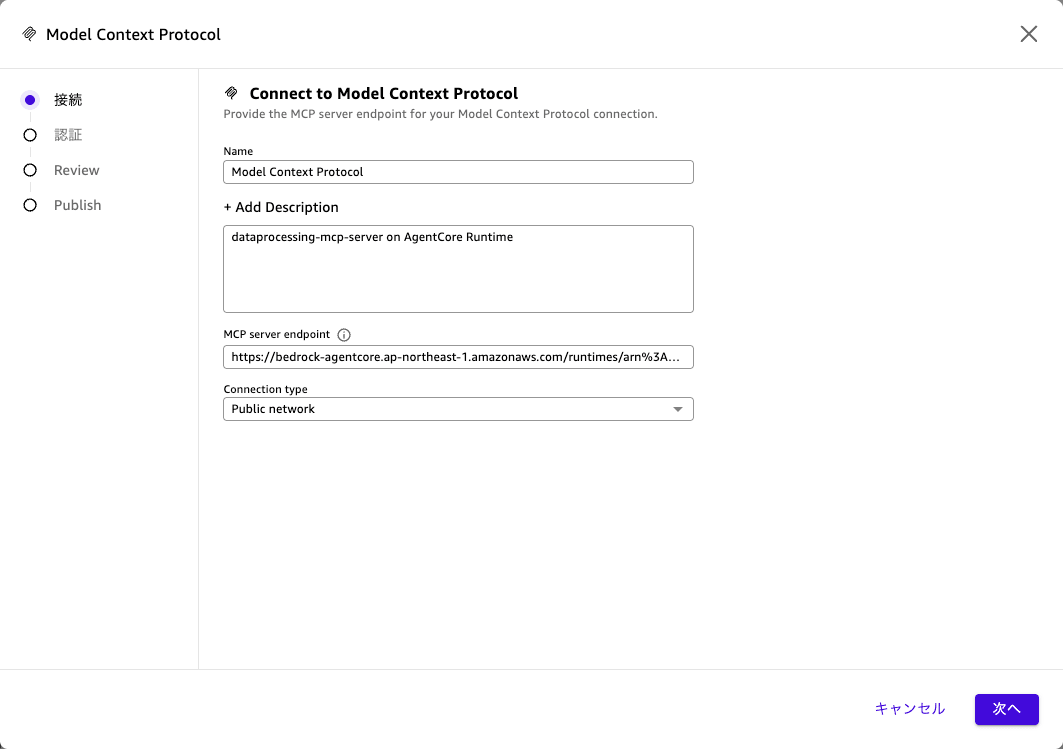
「接続」では以下を設定します。
- Name
- Description
- MCP server endpoint
- Connection Type (デフォルトの
Public Networkのまま)
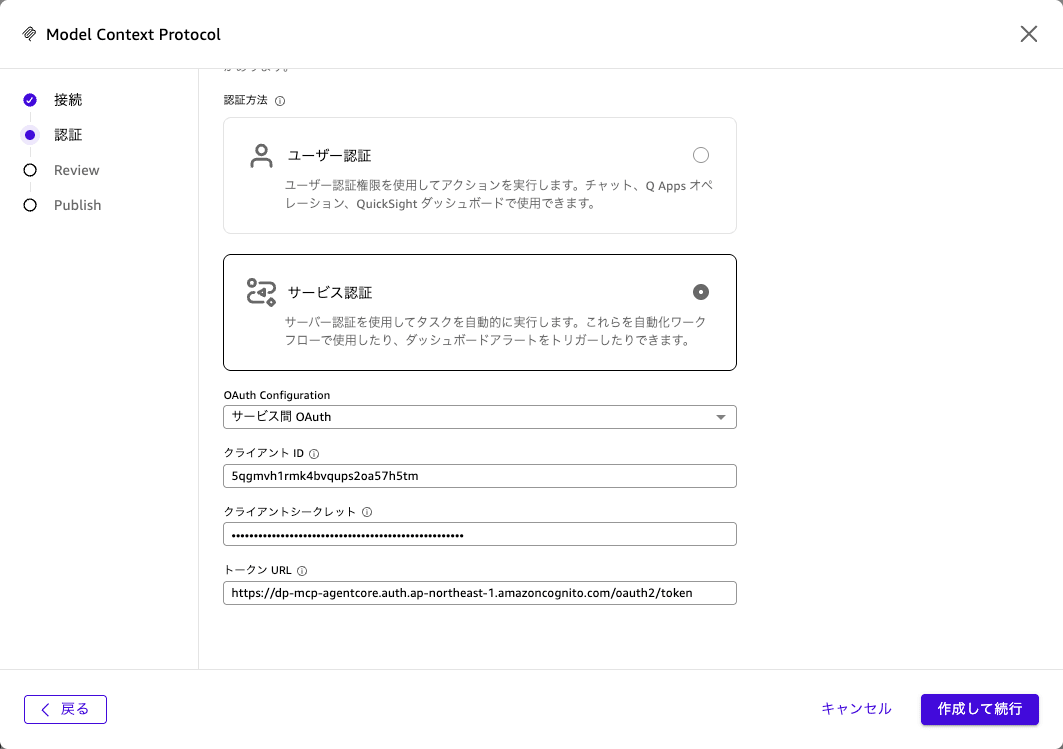
「認証」では以下を設定します。
- 認証方法:
サービス認証を選択 - OAuth Configuration
- クライアントID
- クライアントシークレット
- トークンURL
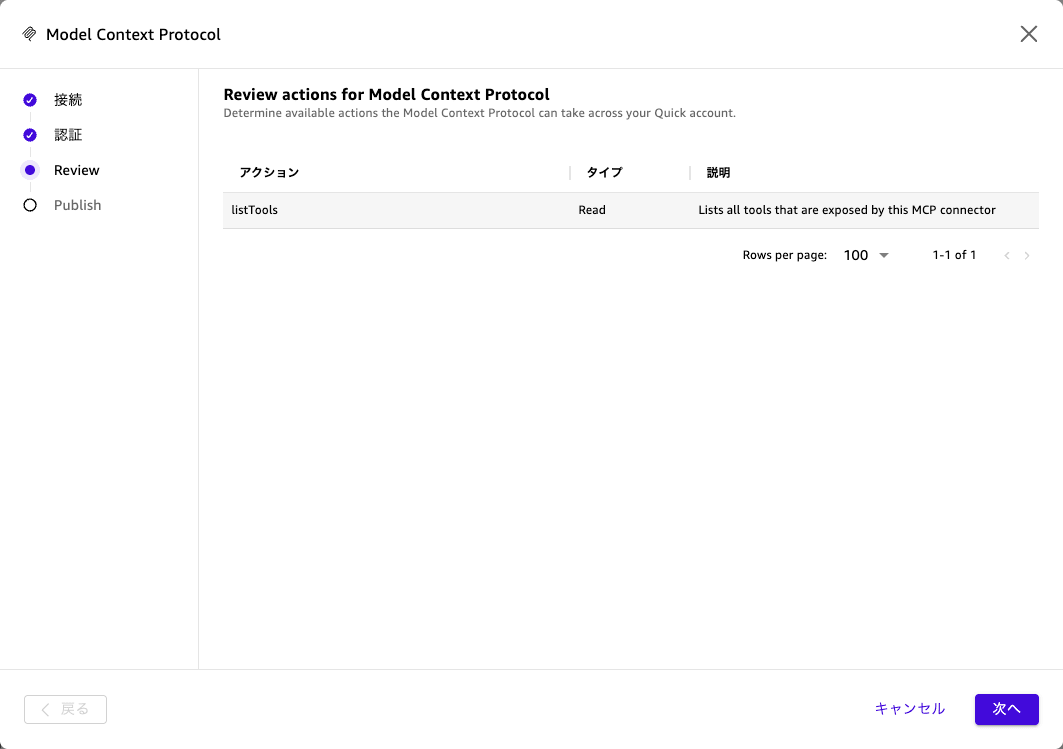
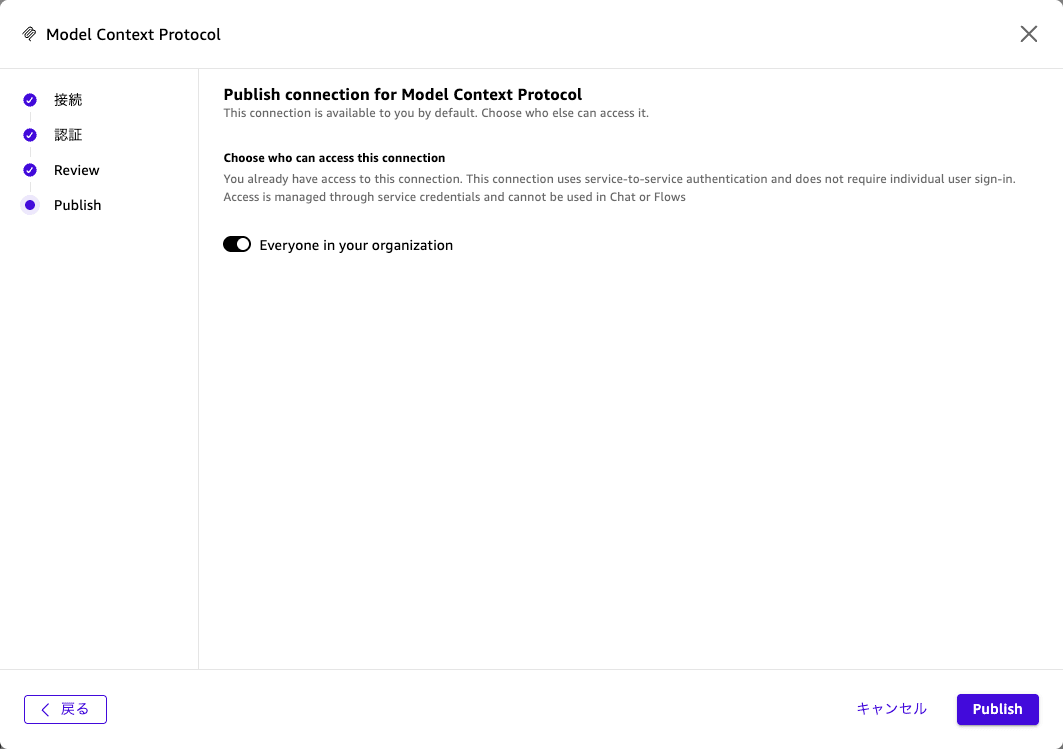
「Review」で内容を確認します。
「Publish」では、MCPを登録します。Everyone in your organizationをoffにしても個別に設定できるわけではないので、このまま登録することになります。
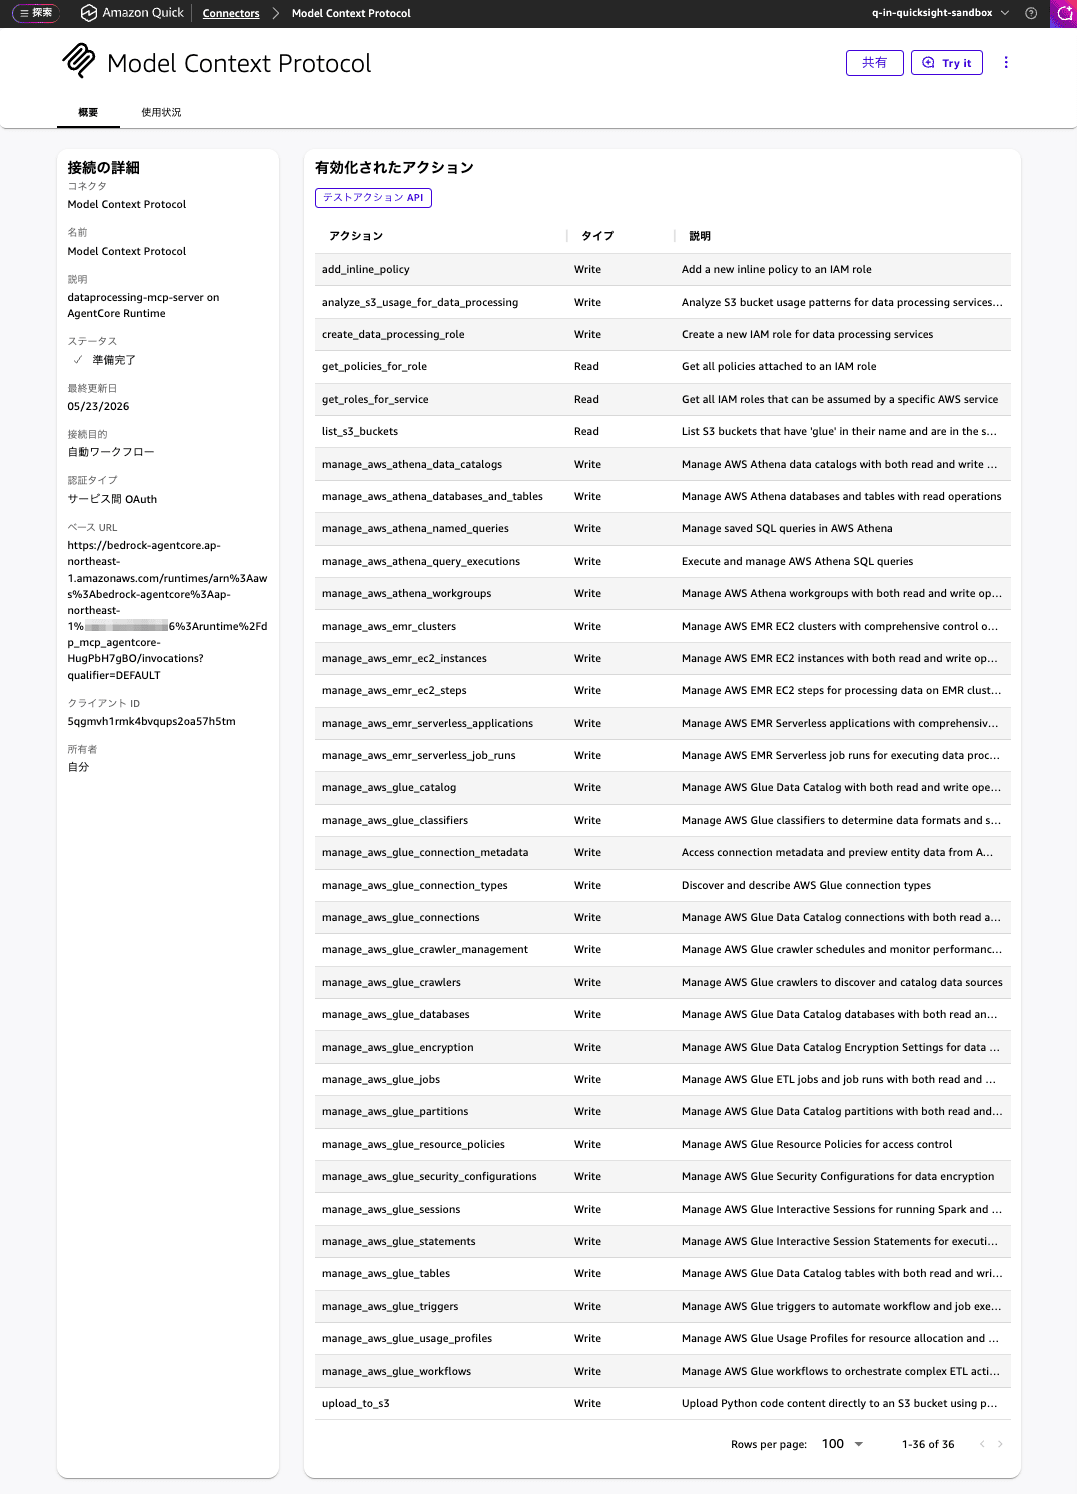
登録された36のアクションが確認できます。
Step8: Amazon Quick の MCP コネクタの動作確認
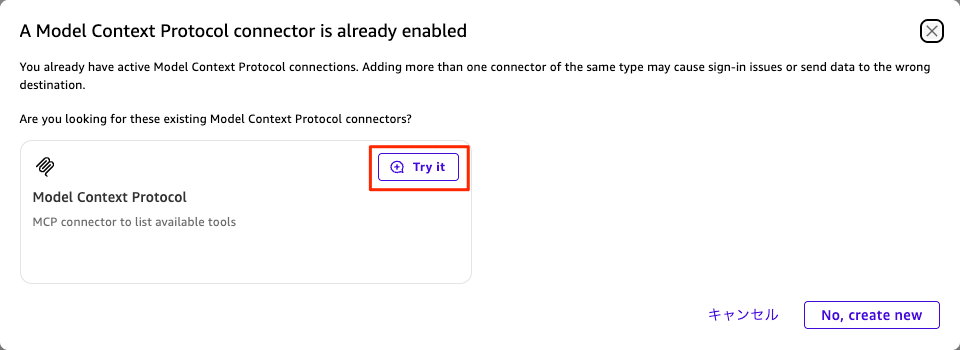
[Try it] ボタンを押すと、チャット画面が表示されます。
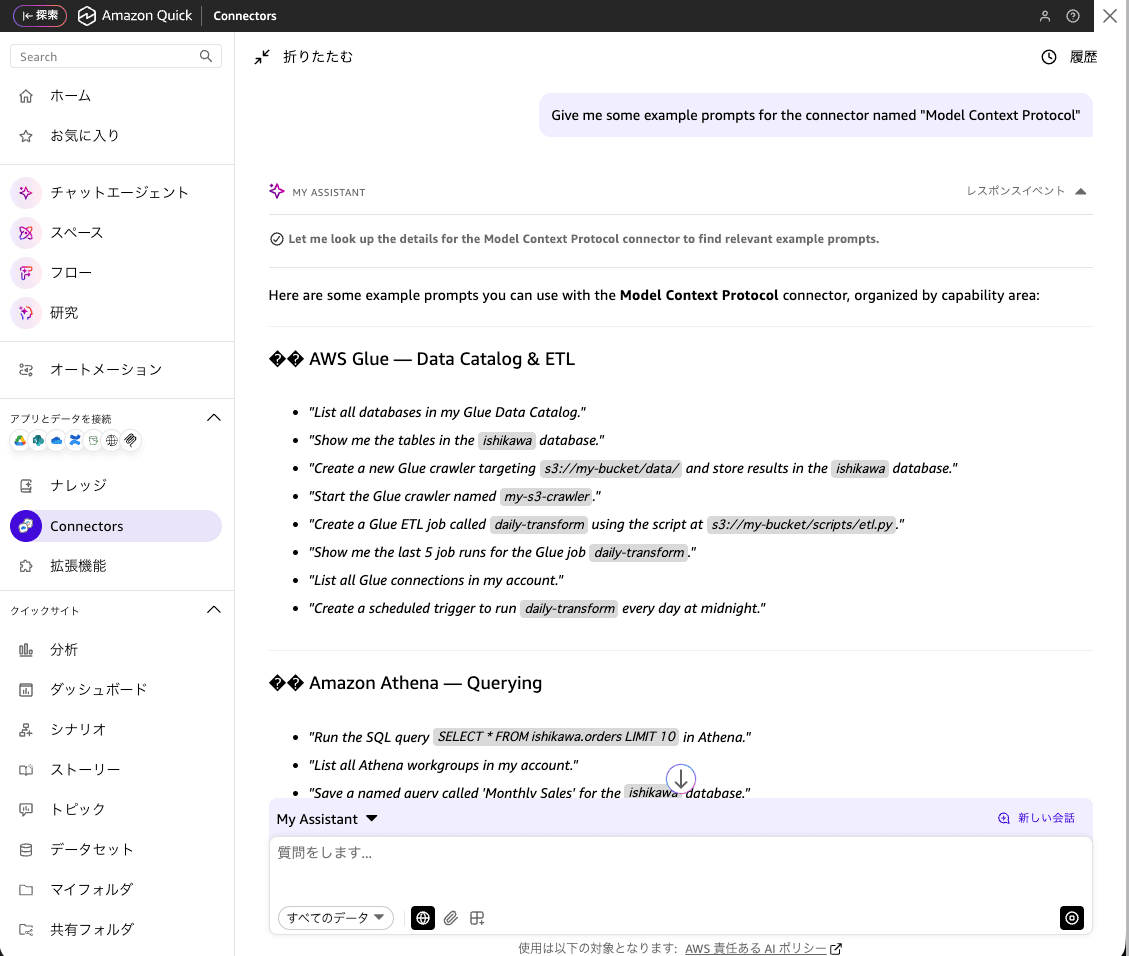
チャット画面では、すでにConnectorにこのMCPを選択された状態で、下記のプロンプトの実行が始まります。
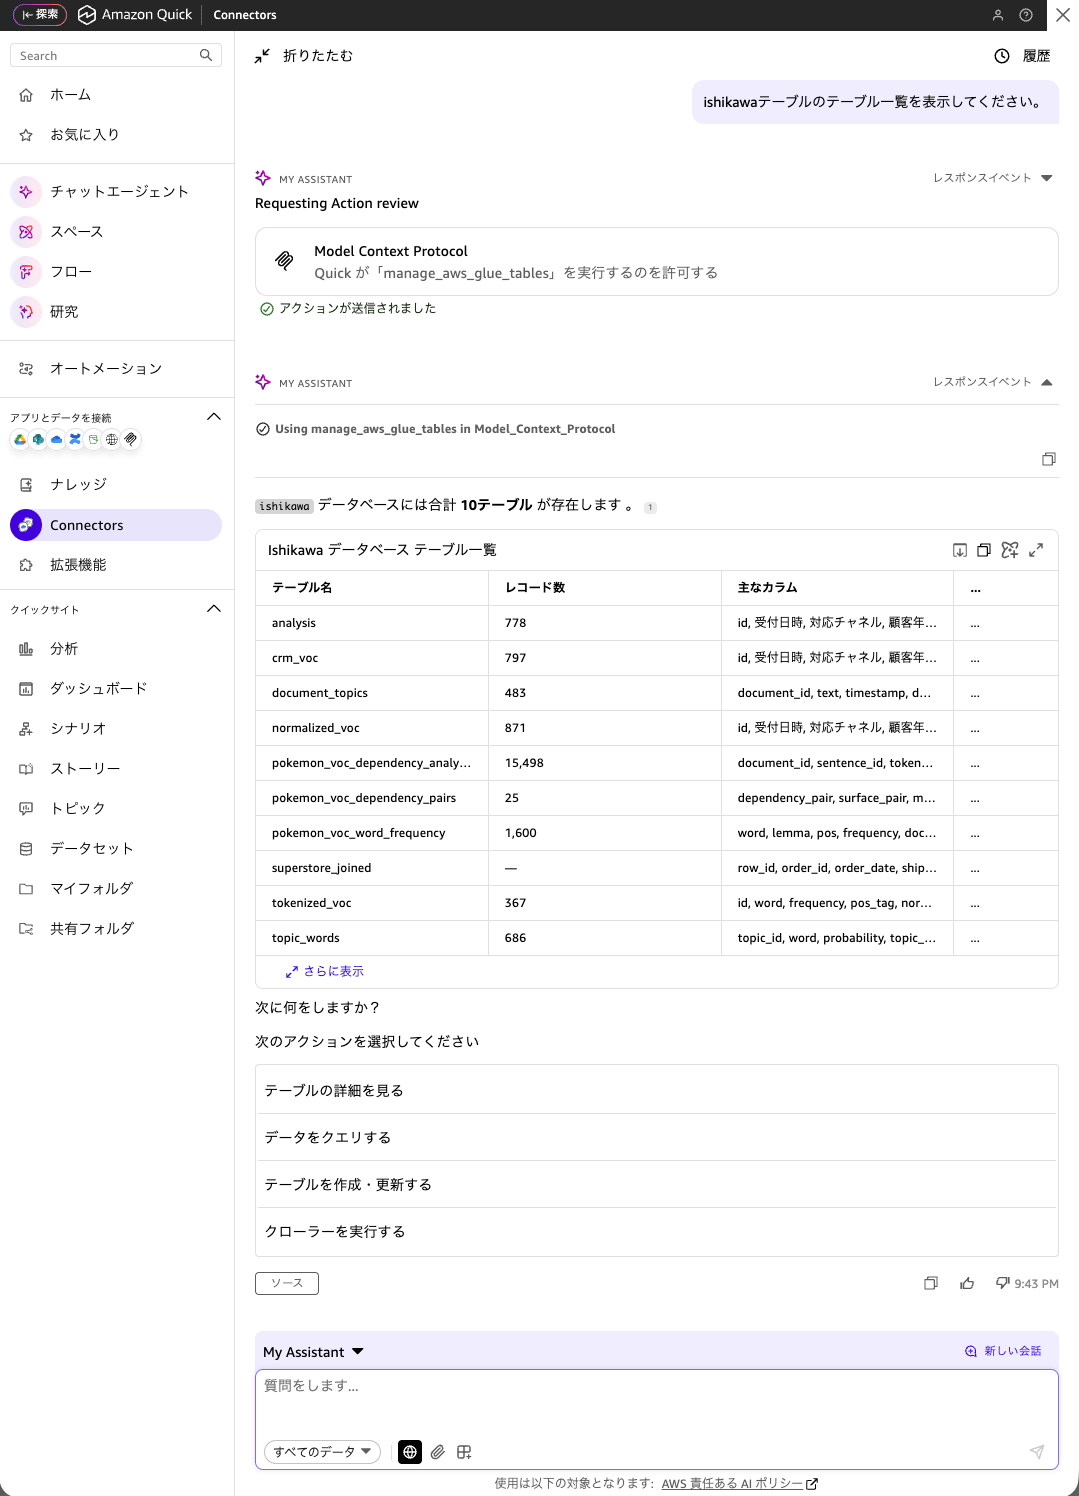
では早速、プロンプトを入力します。「ishikawaテーブルのテーブル一覧を表示してください。」と入力します。MCPの実行前には、必ず「許可」が求められます。思いがけないMCP呼び出しがないように配慮されています。
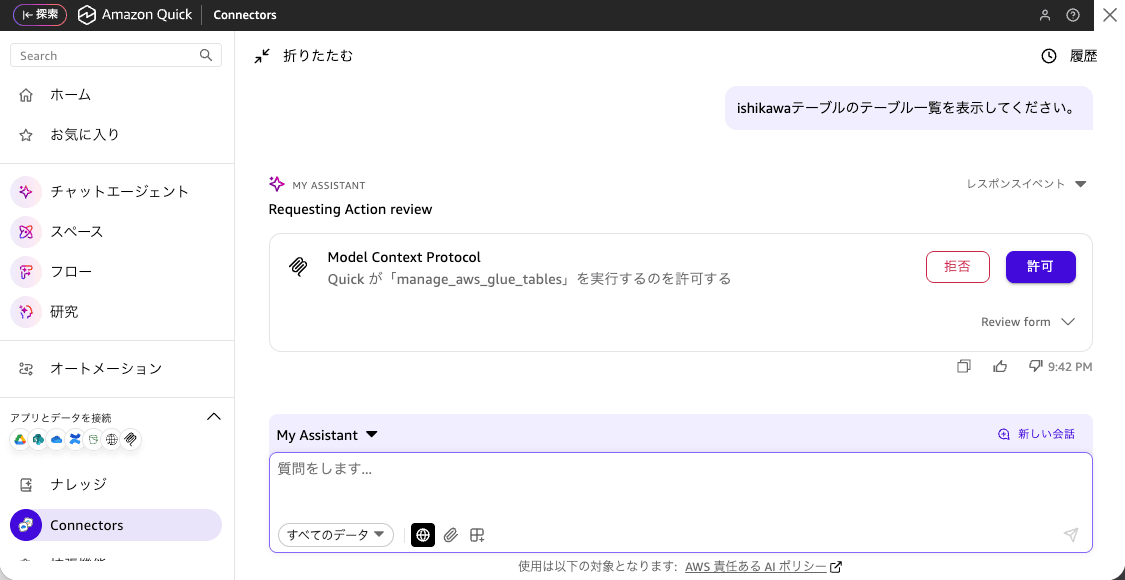
「ishikawaデータベース」と指示するところ、「ishikawaテーブル」とタイポしましたが、「ishikawaデータベース」の一覧が表示されました。
Step9: Amazon Quick の データを MCP コネクタで更新
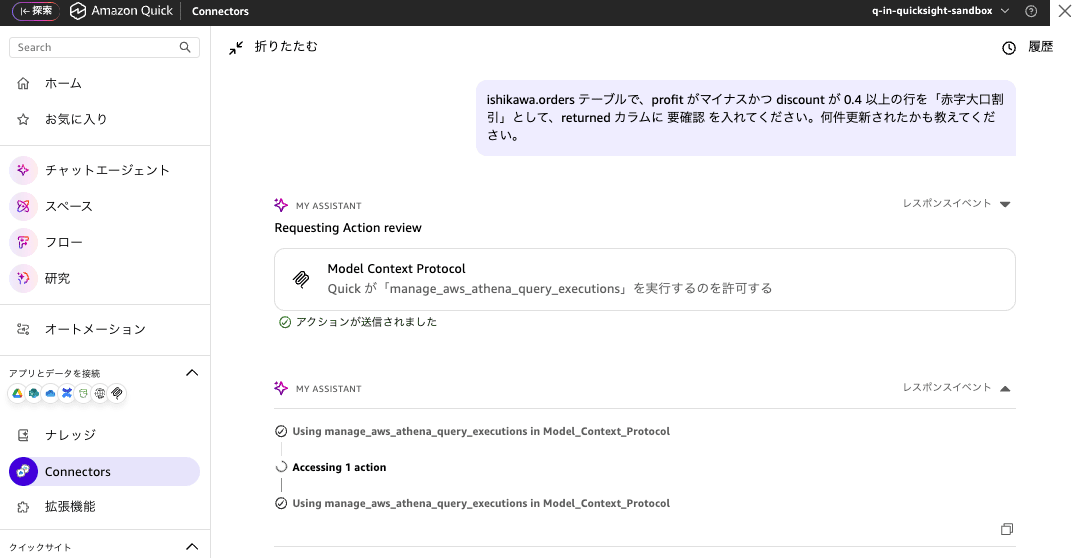
「Quick Sight」上でデータを更新したいというニーズは時々あります。しかも、自然言語で変更内容を指示できるととても使い勝手の良いものになります。下記のプロンプトを入力して更新します。
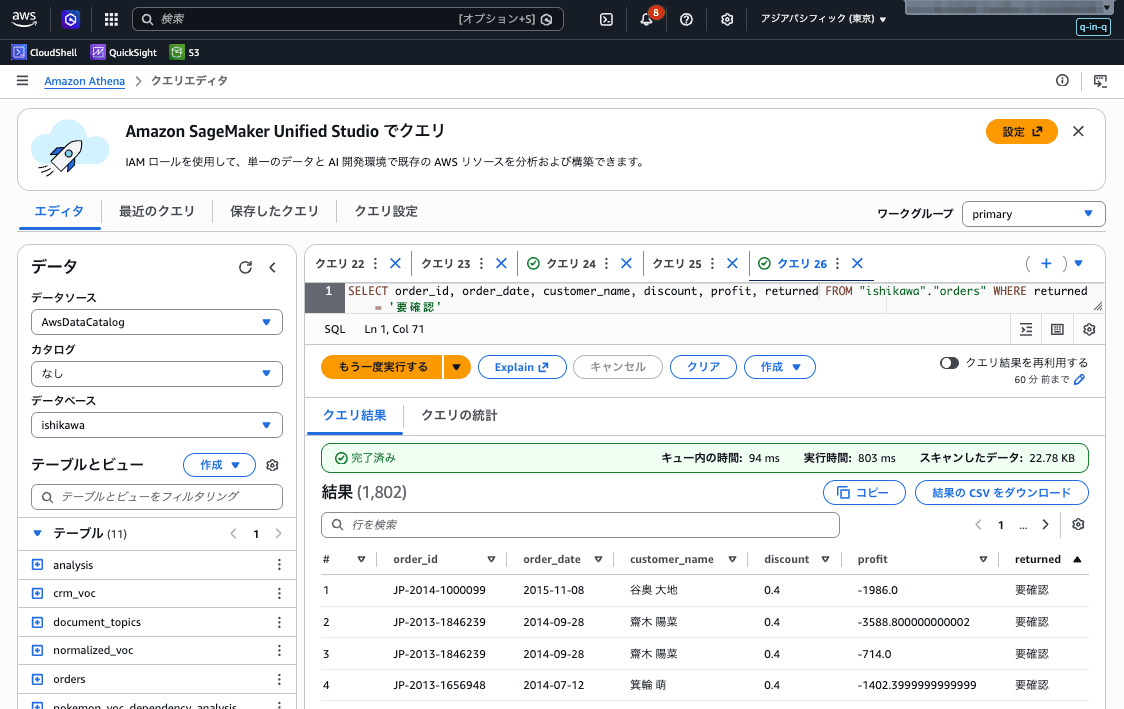
ishikawa.orders テーブルで、profit がマイナスかつ discount が 0.4 以上の行を「赤字大口割引」として、returned カラムに 要確認 を入れてください。何件更新されたかも教えてください。
変更に結果も、人にとってわかりやすく表示されます。
:
:
:
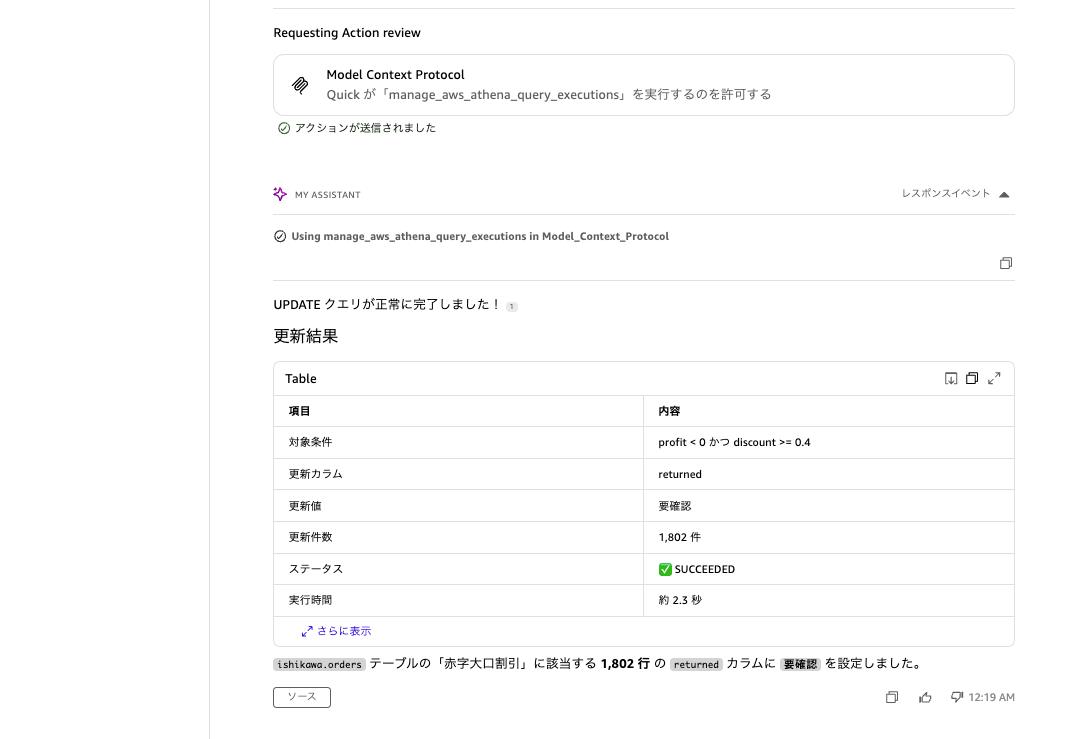
Amazon Athena からも確認したところ、指定した条件のとおり変更が確認できました。
考察
- 本記事の検証は read-only で実施しました。本番運用で書き込み操作も解禁する場合は
--allow-writeフラグや--allow-sensitive-data-accessフラグを ENTRYPOINT に追加し、IAM 実行ロールの権限も書き込み系まで広げる必要があります。 - Cognito の Client Secret はバージョン管理やクライアント側に埋め込まず、AWS Secrets Manager 等で管理することを推奨します。
- DNS rebinding 保護を
enable_dns_rebinding_protection=Falseにしている点は、AgentCore Runtime のプロキシが Host ヘッダを書き換える仕様に合わせるためです。AgentCore Runtime の JWT 認証で外部からの不正アクセスは弾かれていますが、コンテナを別環境にそのまま流用する場合は注意してください。 - aws-dataprocessing-mcp-server は本記事執筆時点で version 0.1.31(pre-1.0)です。今後ツール構成や引数が変わる可能性があります。本記事ではコンテナイメージ内で version を pin する構成にしています。
最後に
Amazon Quick と aws-dataprocessing-mcp-server を Amazon Bedrock AgentCore Runtime で繋ぐことで、Glue / Athena の運用業務を自然言語インターフェースに統合できます。OSS の MCP サーバーをそのまま AgentCore Runtime に載せるには、
- streamable-http に切り替えるラッパー
- linux/arm64 でのコンテナビルドと ECR push
- FastMCP の DNS rebinding 保護の取り扱い
/mcp//mcp/のパスのリダイレクト挙動
といった「ハマりどころ」を踏みます。本記事のラッパー実装と検証ログが、同じパターンで他の AWS Labs MCP サーバー(aws-iam-mcp-server、aws-s3-mcp-server など)を AgentCore Runtime に載せたい方の参考になれば幸いです。