I tried creating a chat app template that can distribute AI agents built with Amazon Bedrock AgentCore Managed Harness to users who don't use an AWS account

This page has been translated by machine translation. View original
Introduction
Hello, I'm Jinno from the Consulting Department, currently practicing my driving.
It feels great when you can park perfectly on the first try.
Changing the subject — has everyone been using Amazon Bedrock AgentCore Harness?
It's really convenient that you can create an agent just by configuring the model / system prompt / tools in the console. I've written several blog posts about it, including hands-on guides, introducing its appeal.
However, when you actually want your team to use the agent you've created, the problem is that users also need to sign in to the AWS Management Console. I'd like to avoid issuing IAM users or console access to everyone just so they can try out the agent...
So, I created a template that places a web chat with Cognito authentication in front of Harness, allowing members without an AWS account to use it with just a browser! It's based on Amplify Gen 2 and includes non-functional requirements needed for internal distribution, such as SSO.
Here is the repository.
Prerequisites
- Node.js 24 or higher
- AWS CLI (with credentials configured)
- A region where AgentCore Harness is available (e.g., us-east-1)
The Harness itself is manually created in the console, and its ARN is passed to the template via environment variables.
Architecture
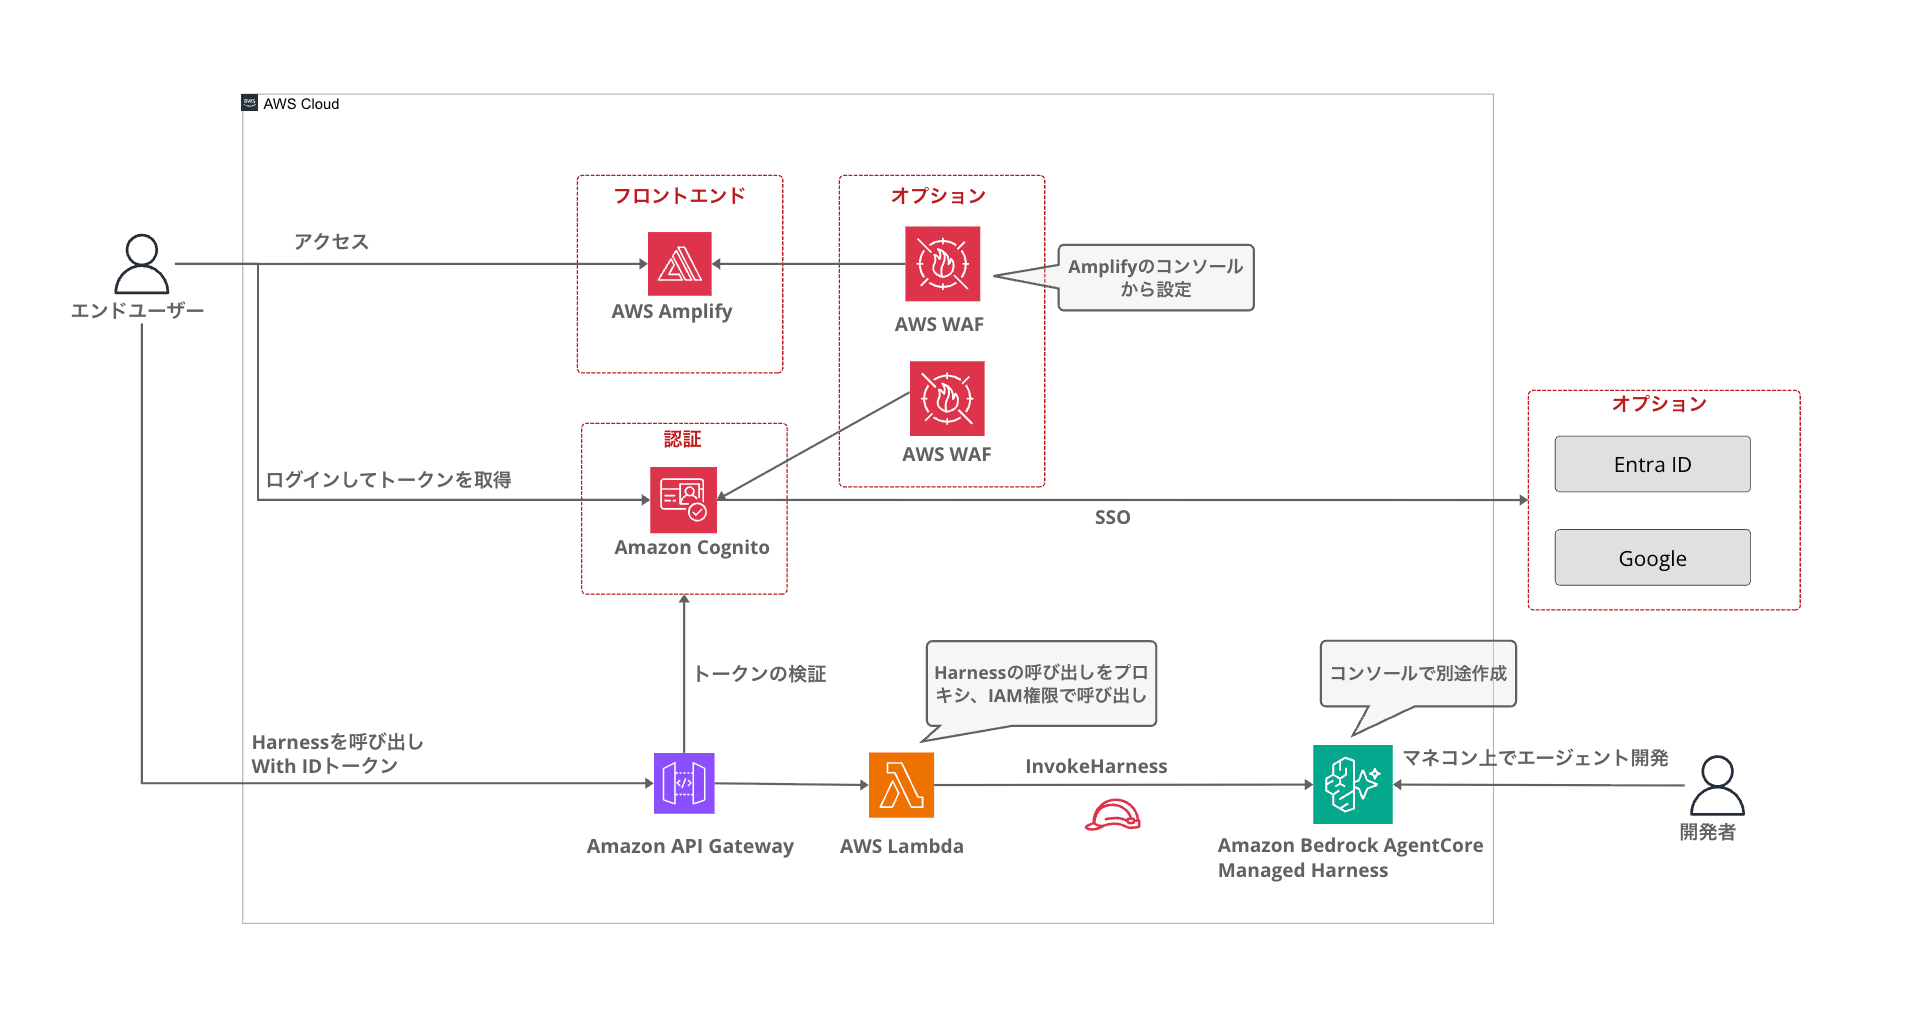
The architecture is simple — Amplify Gen 2 deploys the SPA, Cognito, API Gateway, and Lambda all together.
| Resource | Role |
|---|---|
| Cognito User Pool | User authentication (including SSO federation and sign-up control) |
| API Gateway REST | POST /invoke. JWT verification with Cognito Authorizer |
| Lambda harness-proxy | A proxy that calls Harness with IAM authentication and transparently passes through SSE |
| WAF Web ACL (optional) | Source IP restriction for Cognito connections |
A key design choice is that Harness is invoked via the Lambda IAM role.
Users log in to Cognito to obtain a JWT, then send a request to API Gateway with that token. JWT verification is handled by API Gateway's Cognito Authorizer, and Harness is invoked using the Lambda IAM role.
As alternatives, you could issue temporary credentials via Cognito Identity Pool to invoke InvokeHarness directly from the frontend, or configure a JWT Authorizer on the Harness side. However, the former involves passing AWS credentials to the browser, and the latter makes it impossible to operate Harness from the console, degrading the testing experience — so neither was adopted here.
Since the agent itself (model / system prompt / tools) remains managed in the Harness settings screen in the console, no app redeployment is needed when you want to change the agent's behavior. It's great that you can change settings in the console and have them immediately reflected for users!
Deploying with sandbox
First, let's run it in the Amplify sandbox. The backend (Cognito, API Gateway, Lambda) is deployed as actual AWS resources, while only the frontend runs on a local development server. The production environment for distributing to the team will be created separately with Amplify Hosting, described later.
Once you've created a Harness in the console and noted its ARN, just clone the repository and deploy with environment variables set.
git clone https://github.com/yuu551/agentcore-harness-chat.git
cd agentcore-harness-chat

npm install

HARNESS_ARN=arn:aws:bedrock-agentcore:us-east-1:123456789012:harness/xxxxxxxx \
ADMIN_USER_EMAIL=you@example.com \
  npx ampx sandbox --once
If you set ADMIN_USER_EMAIL, the first user will be created at deploy time and a temporary password will be sent by email. Since self-signup is disabled by default, this is the way to log in for the first time.
Once deployment is complete, start the development server.
npm run dev
Open http://localhost:5173 and log in with the temporary password you received (you'll be prompted to change it on first login) to try the chat. Streaming responses, tool usage visualization, and model switching are supported.
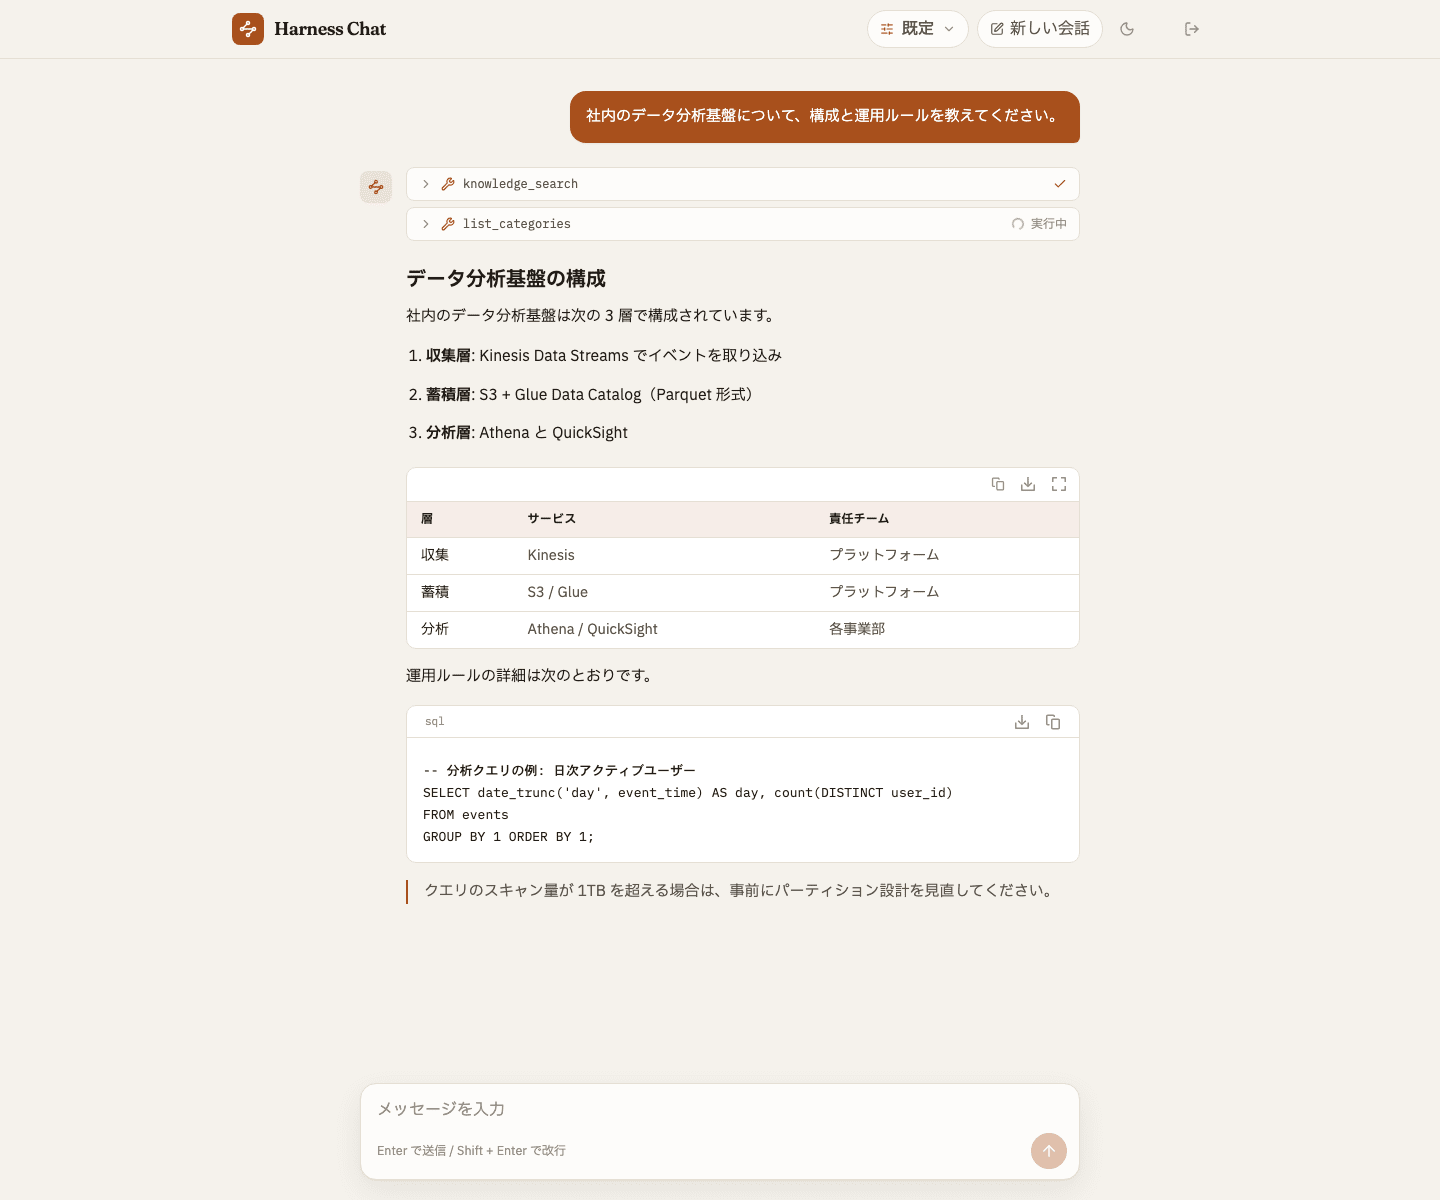
Great — you can now chat with the agent created in Harness!
Production Deployment (Amplify Hosting)
Now that we've confirmed it works, let's create the production environment for distributing to the team using Amplify Hosting's Git integration. The process is simple here too.
- Fork the repository or push it to your own GitHub repository
- In the Amplify console, select "Create new app" → "GitHub", connect your repository and branch (it will be auto-detected as an Amplify Gen 2 project)
- Set the HARNESS_ARN and ADMIN_USER_EMAIL environment variables in the app settings and run the initial deployment
Make sure to set the environment variables before starting the initial deployment. If you start the build without setting HARNESS_ARN, it will fail with a synth error.
There is one thing to note: since the app URL is issued after the initial deployment, the CORS configuration is a two-step process.
- After the initial deployment completes, check the issued URL (e.g., https://main.xxxxxxxx.amplifyapp.com)を確認する)
- Set that URL in the APP_ORIGINS environment variable and redeploy
If you skip this step, the page will load but only the chat submission will fail with a CORS error, so don't forget to configure it. Note that APP_ORIGINS is reflected not only in the API's CORS allowlist but also in Cognito's callback / logout URLs, so this setting is also a prerequisite when using SSO.
On the downside, each Amplify Hosting deployment takes about 10–13 minutes. This is because a full build including the backend runs even for minor frontend changes. The following article also describes a similar frustration and a migration to a SAM configuration.
Since some steps like the CORS configuration above require redeployment, repeatedly changing environment variables and waiting 10 minutes each time can be stressful. It's recommended to finalize parameter adjustments for SSO, WAF, and other settings on the sandbox side as much as possible before proceeding with the production deployment. (I'm thinking of switching myself...)
After that, simply pushing to the main branch will trigger an automatic redeployment. Share the issued URL with your team and distribution is complete!
Key Points
Streaming Proxy Lambda
The Harness invocation is implemented using Lambda response streaming. Here is an excerpt of the core part.
const command = new InvokeHarnessCommand({
  harnessArn: HARNESS_ARN,
  runtimeSessionId: sessionId,
  messages,
  actorId: claims.sub,
});
const response = await client.send(command);

for await (const event of response.stream) {
  responseStream.write(`data: ${JSON.stringify(event)}\n\n`);
}
It simply passes the SSE stream from InvokeHarness through to the frontend, and the entire proxy is about 100 lines. Since Harness handles conversation session management, the app side doesn't need to manage sessions. However, note that this template itself does not persist conversation history.
Optional Features for Internal Distribution
When distributing internally, various authentication requirements arise, but these can be enabled via environment variables.
| Feature | Environment Variable |
|---|---|
| Self-signup | SELF_SIGNUP=true |
| Email domain restriction | ALLOWED_EMAIL_DOMAINS=example.com |
| Google SSO | GOOGLE_AUTH=true |
| Entra ID SSO | ENTRA_AUTH=true ENTRA_TENANT_ID=xxx |
| SSO-only mode | SSO_ONLY=true |
| WAF IP restriction | ALLOWED_IPV4_CIDRS=203.0.113.0/24 (IPv6: ALLOWED_IPV6_CIDRS) |
With SSO-only mode, password login can be disabled, enabling operation integrated with internal Google Workspace or Entra ID.
One additional note: SSO client IDs and client secrets are passed as secrets rather than environment variables. For sandbox, use a command like npx ampx sandbox secret set GOOGLE_CLIENT_ID, and for production (Amplify Hosting), set them with the same key name under "Hosting" → "Secrets" in the Amplify console. Note that values set in sandbox are not carried over to production, so you need to configure them separately in both environments.
Since SSO and WAF involve settings that don't only exist on the AWS side (such as work on the Google Cloud or Entra ID side), setup guides are provided under the docs directory in the repository.
- Harness Setup (Console creation steps)
- Google SSO Configuration (Starting from OAuth client creation on the Google Cloud side)
- Entra ID SSO Configuration (Through app registration and email claim configuration)
- WAF IP Restriction (With a usage guide for template WAF vs Amplify Firewall)
Reading these alongside the README should allow you to complete the setup including console operations!
Note that if you're deploying exclusively for your own environment, you can directly modify the values in amplify/parameters.ts instead of using environment variables.
export const parameters = {
  harnessArn: process.env.HARNESS_ARN ?? "",
  // You can directly change values instead of using environment variables (e.g., selfSignUp: true)
  selfSignUp: flag(process.env.SELF_SIGNUP),
  ...
};
All parameters are consolidated in this file with explanatory comments, so you can see at a glance what can be changed. Editing directly prevents missing environment variable settings, and having the configuration remain as code is also an advantage. However, be careful not to commit account-specific information such as ARNs or tenant IDs to a public repository.
Choosing How to Apply IP Restrictions
For IP restrictions, the options differ depending on which access you want to restrict or protect.
| Template WAF | Amplify Console Firewall | |
|---|---|---|
| What it protects | Cognito (login) | Amplify Hosting (frontend delivery) |
| How to configure | Environment variable ALLOWED_IPV4_CIDRS (IaC managed) | Configure in the console |
| Cost | WAF fixed cost (approx. $6–7/month) | Amplify Firewall usage fees apply separately |
The template's WAF is attached to Cognito via CDK, so logins from outside allowed IPs will be blocked. However, the login screen itself is still visible. If you have a requirement to hide even the existence of the screen from non-allowed IPs, apply IP restrictions to the frontend delivery side as well using the Firewall in the Amplify console. Since the Hosting app is outside IaC management, this must be configured in the console.
If there are no clear requirements, I think it's fine to start with just the template's WAF.
Cost Estimate
The infrastructure created by the template is almost entirely pay-as-you-go, and for small-scale use it should be a few dollars per month. The dominant cost is Bedrock inference, and AgentCore charges pay-as-you-go only for the base resources. Prices are as of July 2026.
| Resource | Estimate |
|---|---|
| Bedrock model inference | Proportional to usage (dominant cost) |
| AgentCore Harness | Pay-as-you-go for base resources only |
| Cognito | Free tier: 10,000 MAU (OIDC/SAML federation such as Entra ID: free up to 50 MAU, then $0.015/MAU) |
| API Gateway REST | $3.50/1 million requests |
| Lambda | Streaming 1 min × ARM 128MB ≈ $0.0001/call |
| Amplify Hosting | Build $0.01/min, delivery $0.15/GB |
| WAF (when enabled) | Fixed cost of approx. $6–7/month + $0.60/1 million requests |
Only WAF has a fixed cost, so if IP restriction is not needed, leaving it unconfigured means the WAF resource itself will not be created. If you plan to actively use Entra ID SSO, please budget for the Cognito OIDC federation charges ($0.015/MAU).
Conclusion
I've made it possible to distribute an agent quickly created in the console to your team just as easily! Personally, I like that agent improvements can be completed entirely in the console without needing to redeploy the app — though the long build times are a downside...
If you want to distribute an agent you built with Harness but find it troublesome to grant permissions to all users, please give this a try. If you have any feedback, feel free to submit it via GitHub Issues!
I hope this article was helpful to you. Thank you for reading to the end!