I tried connecting GitHub, Slack, and Google Calendar to an AI agent using user-delegated authorization (3LO) with Amazon Bedrock AgentCore Gateway

This page has been translated by machine translation. View original
Introduction
Hello, I'm Jinno from the Consulting Division, and I love supermarkets.
It's the height of summer and really hot, isn't it? I've been hooked on buying cheap ice cream at the supermarket to beat the heat.
Completely changing the subject, this article is the 6th entry in the "Summer Vacation Free Research Relay" by Classmethod volunteers! Since this project is not just a simple "let's try it out" but rather about building systems, verifying undocumented behaviors, and digging into why certain designs were chosen, I put in serious effort to write this one!
A Word on Motivation
Previously, I wrote an article about implementing user-delegated authorization (hereafter 3LO) with Amazon Bedrock AgentCore Identity, and accessing Google Drive from an agent.
Last time, while the agent itself ran on AgentCore Runtime, the server receiving the OAuth callback was a FastAPI running on my local PC, and the token used for Session Binding was passed via environment variables. Since I prioritized understanding the mechanism and mixed in some local components, it wasn't very practical...
At the end of the previous article, I wrote that I wanted to implement the entire authentication flow seamlessly in the cloud, so this time is the homework collection (fitting for summer vacation)!!
To make it so that just passing one URL completes everything from login to authorization, I quickly hosted the frontend with Amplify, and this time, being ambitious, I connected 3 services—GitHub, Slack, and Google Calendar—to a single Gateway, configured as outbound authentication with AgentCore Gateway's user-delegated type!
Since cases involving both 3LO and Gateway can often be hard to get into, I hope this can serve as a sample for everyone.
To show a preview of the finished product, starting from a question about GitHub, the authorization is completed, and then the agent resumes processing and returns a list of repositories.
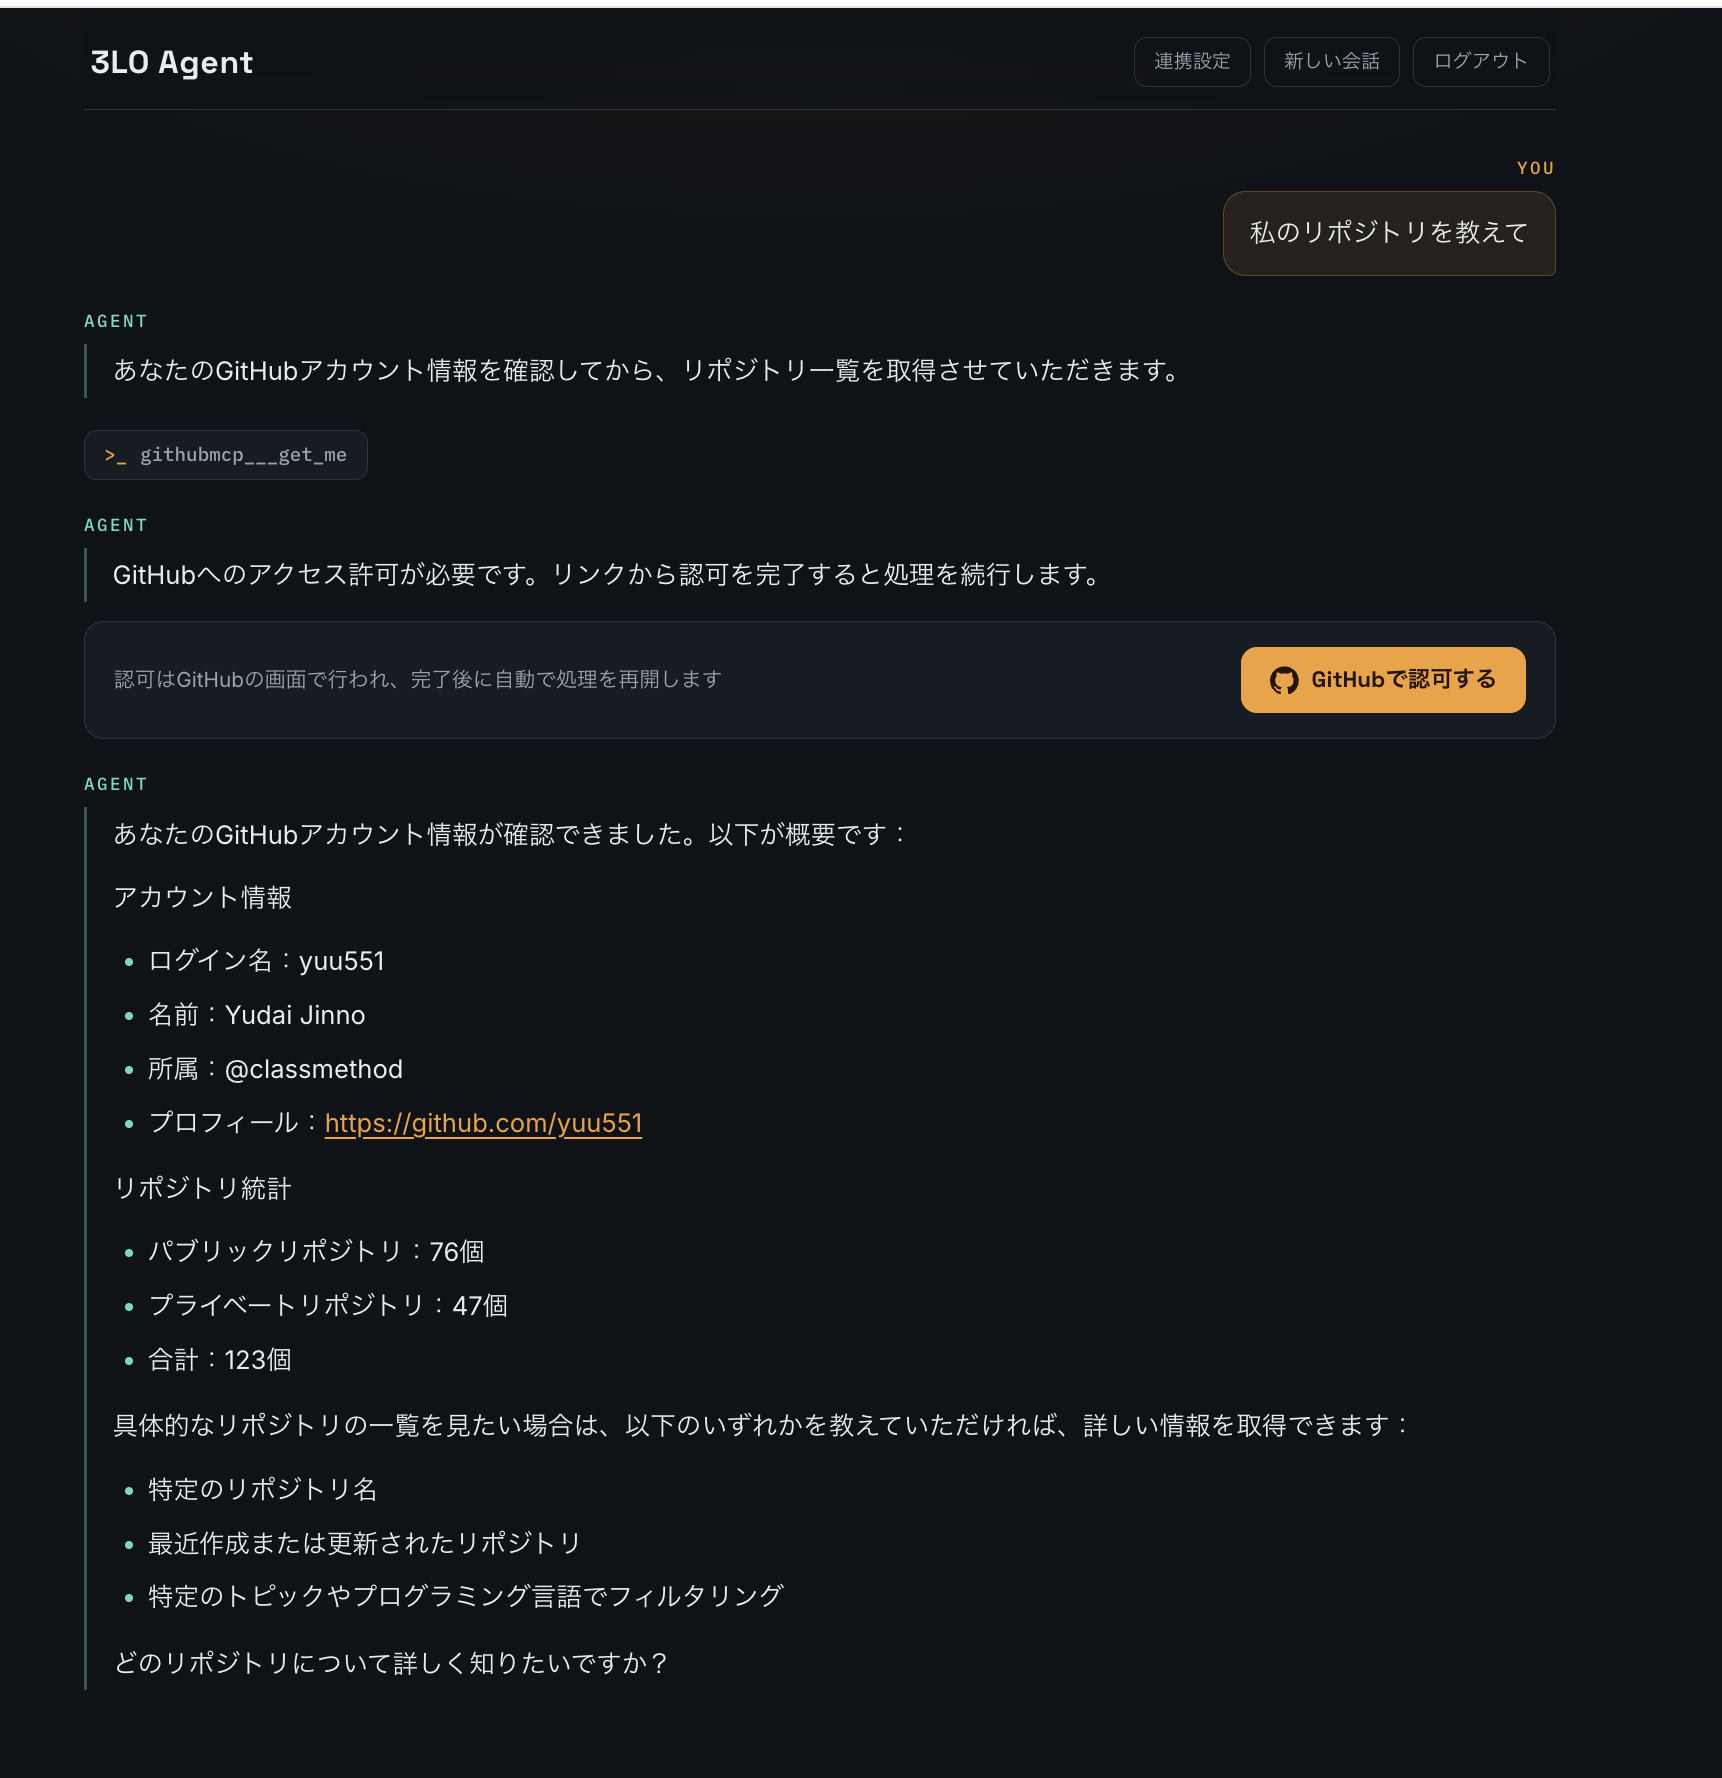
This is the GitHub example, but the same applies to Slack and Google Calendar—once authorization is completed, the agent resumes processing and returns the results.
The full code is published on GitHub. Some details have been trimmed in this article for explanation purposes, so please refer to it as needed!
Review from Last Time (The Players in 3LO)
I'll defer to the previous article for details, but let me briefly review the players when implementing 3LO with AgentCore Identity. This time, Gateway is added to the mix.
| Term | Role |
|---|---|
| Credential Provider | Connection settings for external services. Registers client IDs and secrets |
| Token Vault | A safe that securely stores users' access tokens. Distinguishes tokens by the combination of user × workload × Provider |
| Session Binding | The process of linking the authorization after OAuth completion to the correct user in the Token Vault |
| Gateway | An entry point that converts existing APIs and MCP servers into MCP tools for agents. Can configure 3LO as outbound authentication |
The key point in the 3LO flow is Session Binding. When a user completes authorization on the external service side, they are redirected from AgentCore Identity to the application's callback screen with a session_id. Unless this session_id is linked to which user performed the authorization, the token won't be saved in the Token Vault, and the agent will never be able to retrieve the token.
Last time, this linking was done by a local FastAPI server, but this time we'll make it serverless with API Gateway + Lambda + DynamoDB.
This Time's Architecture
Putting the overall picture into a diagram, the configuration looks like this.

| Component | Service Used | Role |
|---|---|---|
| Frontend | AWS Amplify Hosting (React SPA) | Chat UI, OAuth callback screen, pre-linking settings panel |
| User Authentication | Amazon Cognito (Amplify Auth) | App login. Access tokens are also used for Runtime and Gateway calls |
| Agent | AgentCore Runtime + Strands Agents | Agent that calls MCP tools on the Gateway |
| Tool Infrastructure | AgentCore Gateway | Relays 3 targets and grants tokens via outbound authentication (3LO) |
| Conversation Memory | AgentCore Memory | Maintains conversation history per conversation UUID |
| Authorization | AgentCore Identity | Credential Provider and Token Vault per service |
| Session Binding API | API Gateway + Lambda + DynamoDB | Records the authorization flow and completes Session Binding |
The Gateway targets are the following 3.
| Target | Connection Method | Destination |
|---|---|---|
| GitHub | MCP server target (static tool schema) | GitHub official remote MCP server |
| Slack | MCP server target (static tool schema) | Slack official remote MCP server |
| Google Calendar | OpenAPI target | Google Calendar API (REST) |
Wait, doesn't AgentCore Gateway have a built-in template for Slack Web? some of you might be thinking.
Indeed, you can easily add targets from the console using built-in templates.
However, as of the time of writing, there are no templates for GitHub and Google Calendar, and the documentation states that the outbound authentication for the Slack template uses API key method.
In the spirit of free research, I wanted to align all 3 services with 3LO per user, and also wanted to verify connectivity with official MCP servers for GitHub and Slack, so I chose the MCP server target for Slack as well, rather than using the template!
Putting the processing flow into a sequence diagram, it looks like the following. The flow is the same for any service—the first tool call becomes a return of an authorization URL (URL elicitation), and after the user's authorization and Session Binding, processing resumes on retry.
Ugh... what a long sequence...
Let me break it down!
Authorization is independent per service. If you ask about GitHub, a GitHub authorization link appears; if you ask about your calendar, a Google authorization link appears. Once each is authorized, the token is stored in the Token Vault, and from then on, answers are returned immediately without re-authorization.
Also, the end user's JWT is passed directly from the agent to the Gateway. Since user identification in the Token Vault is based on the inbound JWT to the Gateway, using the agent's own M2M token here would bind all users' tokens to a single ID, making user delegation difficult.
Token retrieval, storage, and provisioning are completed entirely between the Gateway and the Token Vault, so there are no external service tokens appearing in either the agent's code or the frontend. I'll dig a little deeper into this in the considerations section later.
Prerequisites
The environment for this time is as follows.
| Item | Value |
|---|---|
| Region | us-east-1 (N. Virginia) |
| Python | 3.12 |
| Node.js | 24.x |
| Package Management | uv (Python) / pnpm (Node.js) |
| Agent Framework | Strands Agents 1.45.0 + MCP Python SDK 1.28.1 |
| AgentCore SDK | bedrock-agentcore 1.15.1 or later |
| Model | Claude Haiku 4.5 |
| Frontend | React (Vite) + AWS Amplify Gen 2 |
| IaC | aws-cdk-lib 2.261.0 or later (using aws_bedrockagentcore module) |
This time, since verification is the goal and connecting agents to tools is the main focus, I chose Haiku.
As prerequisites, you will need a GitHub account, a Slack workspace where you have permission to install Apps, and a GCP project where you can create OAuth clients.
Building
The overall flow is the following 5 steps. I'll leave the agent and frontend code to the repository, and focus on the 3LO and target-related parts!
- Create OAuth apps on each service side
- Register client secrets in Secrets Manager
- Implement the agent (3LO authorization hook + Memory integration)
- Define Gateway, targets, and Memory in backend.ts
- Deploy and register callback URLs
Create OAuth Apps on Each Service Side
GitHub OAuth App
Create from GitHub's Settings → Developer settings → OAuth Apps.
A placeholder URL is fine for the Authorization callback URL (you'll replace it in step 5). After creation, note down the Client ID and Client Secret.
Slack App
Create from scratch at https://api.slack.com/apps.
Note that Slack's MCP server functionality is only available for Marketplace-published apps or internal apps. This time, I'm creating it as an internal app for my own workspace.
- Add channels:history / channels:read / search:read.public / users:read to User Token Scopes (not Bot Token Scopes) under OAuth & Permissions
- Add just users:read to Bot Token Scopes to create a bot user
- Enable MCP server access on the App Assistant page in app settings
- Note the Client ID and Client Secret from Basic Information
The bot user in step 2 isn't actually used. It's not documented as required, but in my verification environment (as of July 2026), without a bot user, the authorization screen showed a "doesn't have a bot user to install" error. If you get the same error, suspect step 2.
Google OAuth Client
Enable the Google Calendar API in the GCP console and configure the OAuth consent screen.
Create an OAuth client of the Web application type from Credentials, and note the Client ID and Client Secret.
Register Client Secrets in Secrets Manager
Since the Credential Provider is created with CDK, register secrets in Secrets Manager first to avoid hardcoding secrets in the code.
Register all 3 services in the same format.
aws secretsmanager create-secret \
  --name github-agent/oauth-client-secret \
  --secret-string '{"client_secret": "<GitHub Client Secret>"}' \
  --region us-east-1
# Do the same for slack-agent/oauth-client-secret and google-agent/oauth-client-secret
The Credential Provider configuration references this secret as an EXTERNAL source.
Implementing the Agent (3LO Authorization Hook)
From the agent's perspective, the Gateway behaves as an MCP server with Bearer authentication. It's just standard Strands MCP integration—simply attach the user's JWT forwarded to the Runtime and connect to the Gateway!
gateway = MCPClient(
    lambda: streamablehttp_client(
        GATEWAY_URL, headers={"Authorization": f"Bearer {bearer_token}"}
    )
)

with gateway:
    tools = gateway.list_tools_sync()

    agent = Agent(
        model=MODEL_ID,
        tools=tools,
        system_prompt=SYSTEM_PROMPT,
        hooks=[GatewayAuthHook(event_queue)],
        session_manager=session_manager,
        agent_id="default",
    )
However, 3LO requires one extra step around waiting for authorization.
When a tool is called for the first time while no user token exists in the Token Vault, the Gateway returns a JSON-RPC error (code -32042) with the authorization URL in its data. The application must notify the frontend of this authorization URL and retry until authorization is complete.
I use Strands Hooks for this post-processing that spans all tools. AfterToolCallEvent is called each time a tool execution finishes, and setting event.retry = True instructs it to re-execute the same tool.
class GatewayAuthHook(HookProvider):

    def __init__(self, event_queue: asyncio.Queue):
        self._event_queue = event_queue
        self._notified_providers: set[str] = set()
        self._deadlines: dict[str, float] = {}

    def register_hooks(self, registry: HookRegistry) -> None:
        registry.add_callback(AfterToolCallEvent, self._on_after_tool_call)

    async def _on_after_tool_call(self, event: AfterToolCallEvent) -> None:
        tool_name = event.tool_use.get("name", "") if event.tool_use else ""
        provider = provider_from_tool_name(tool_name)
        auth_url = extract_auth_url(event.result)

        if auth_url is None:
            # If a tool for a provider that was pending authorization succeeds, notify completion
            if (
                provider
                and provider in self._notified_providers
                and _result_status(event.result) == "success"
            ):
                await self._event_queue.put({
                    "type": "connection_status",
                    "provider": provider,
                    "status": "connected",
                })
                self._deadlines.pop(provider, None)
            return

        # Even if the provider can't be identified, the authorization itself proceeds
        key = provider or f"unknown:{tool_name}"

        if key not in self._deadlines:
            self._deadlines[key] = time.monotonic() + AUTH_DEADLINE_SECONDS
        if time.monotonic() > self._deadlines[key]:
            # Timeout: notify error and stop retrying
            error_event = {
                "type": "error",
                "scope": "chat",
                "code": "authorization_timeout",
                "data": "The authorization wait time has been exceeded. Please try again.",
            }
            if provider:
                error_event["provider"] = provider
            await self._event_queue.put(error_event)
            self._deadlines.pop(key, None)
            return

        if key not in self._notified_providers:
            payload = {
                "type": "auth_required",
                "auth_url": auth_url,
            }
            if provider:
                payload["provider"] = provider
            await self._event_queue.put(payload)
            self._notified_providers.add(key)

        await asyncio.sleep(AUTH_POLL_INTERVAL)
        event.retry = True  # Discard the result and re-execute the same tool
The provider is identified from the tool name prefix (githubmcp___ / slackmcp___ / googlecal___), and authorization URL notification, connection completion (connection_status: connected) notification, and 5-minute deadline timeout are handled commonly across providers. There's no need to implement per-service OAuth processing in the agent.
When adding a service, the only things to configure individually are the prefix mapping table for the connection panel display, the read tool used for connection verification, and the system prompt.
This 5-second interval polling is not ideal—if there were a push-type API that notifies when a token is stored in the Token Vault, retries could happen immediately. But since that doesn't exist at this point, even after authorization is complete, you'll wait up to 5 seconds until the next polling... so the experience feels a bit sluggish.
Session Binding API (Lambda + DynamoDB)
The concept is the same as the previous FastAPI version, but this time it's made serverless with Lambda + DynamoDB!
The API consists of 2 endpoints.
// The session URI is equivalent to a Bearer token, so only the SHA-256 hash is stored in the table
const flowKeyOf = (value: string) =>
  createHash('sha256').update(value).digest('hex');

// POST /auth/pending: Register a PENDING record using the authorization URL's request_uri as the flow identifier
if (event.rawPath === '/auth/pending') {
  const { flow_id: flowId, provider } = JSON.parse(event.body ?? '{}');
  if (typeof flowId !== 'string' || flowId.length === 0 || flowId.length > 2048) {
    return json(400, { error: 'flow_id is required' });
  }

  const hashedFlowId = flowKeyOf(flowId);
  try {
    await ddb.send(
      new PutCommand({
        TableName: TABLE_NAME,
        Item: {
          userId,
          flowId: hashedFlowId,
          ...(typeof provider === 'string' ? { provider } : {}),
          status: 'PENDING',
          createdAt: new Date().toISOString(),
          ttl: Math.floor(Date.now() / 1000) + 900, // Expires in 15 minutes
        },
        // Don't allow overwriting a COMPLETED record back to PENDING to prevent double Binding
        ConditionExpression:
          'attribute_not_exists(userId) AND attribute_not_exists(flowId)',
      })
    );
  } catch (e) {
    if (!isConditionalFailure(e)) throw e;

    // Check the existing record; return 200 if it's a PENDING within the deadline,
    // return 409 if it's already completed or expired (see implementation for details)
  }
  return json(200, { status: 'ok' });
}

// POST /auth/complete: Link session_id and user after callback
if (event.rawPath === '/auth/complete') {
  const { session_id: sessionId } = JSON.parse(event.body ?? '{}');

  // Since the callback's session_id is the same URN as the authorization URL's request_uri,
  // only records where the hash matches can be completed as an already-started flow
  const flowId = flowKeyOf(sessionId);

  // Reject if not PENDING (one-time transition)
  await ddb.send(
    new UpdateCommand({
      TableName: TABLE_NAME,
      Key: { userId, flowId },
      UpdateExpression: 'SET #st = :completed, boundAt = :now',
      ConditionExpression: '#st = :pending AND #ttl > :nowEpoch',
      ExpressionAttributeNames: { '#st': 'status', '#ttl': 'ttl' },
      ExpressionAttributeValues: {
        ':completed': 'COMPLETED',
        ':pending': 'PENDING',
        ':now': new Date().toISOString(),
        ':nowEpoch': Math.floor(Date.now() / 1000),
      },
    })
  );

  // Link the token to the Token Vault. On failure, roll back to PENDING with conditional update
  await agentcore.send(
    new CompleteResourceTokenAuthCommand({
      sessionUri: sessionId,
      userIdentifier: { userToken: rawToken },
    })
  );
  return json(200, { status: 'bound' });
}
The frontend registers a PENDING record before displaying the authorization link, and completion requests without a pre-registration are rejected. State transitions are enforced as one-time PENDING → COMPLETED via ConditionExpression, and attribute_not_exists is added on the registration side to prevent overwriting completed flows. The rollback on failure is also conditional, reverting only the record that you yourself set to COMPLETED back to PENDING. Abandoned flows automatically expire via TTL after 15 minutes.
The key is a composite key of userId + flowId, where flowId is the SHA-256 hash of the authorization URL's request_uri. Since the callback's session_id is the same URN as request_uri, only records where the same hash matches can be completed. Records simply don't exist for other flows or third parties' session_ids, so they're rejected. The values are hashed to avoid leaving Bearer-equivalent values in plain text in the table.
The user's JWT is passed to CompleteResourceTokenAuthCommand's userIdentifier. The Token Vault links the token it temporarily stored by session_id to the user of that JWT.
Defining Gateway and Targets in backend.ts
The Gateway itself is the entry point for the MCP protocol with Cognito as the JWT authorizer.
In this sample, SupportedVersions is set to 2025-11-25. As of the time of writing, the MCP protocol versions supported by the Gateway are 2026-07-28 / 2025-11-25 / 2025-06-18 / 2025-03-26 (a new version came out recently!!), and the elicitation mechanism for returning authorization URLs to the client was introduced in the 2025-11-25 spec!
GitHub (MCP Server Target + Static Tool Schema)
We'll target the GitHub official remote MCP server.
By default, an MCP server target calls tools/list on the MCP server at creation time, and the Gateway caches the tool list as a catalog (Implicit Synchronization).
For 3LO targets, this call itself requires the user's access token, which isn't available at deployment time since no one has authorized yet. As a result, the response to CreateGatewayTarget contains an authorization URL for the administrator, and the target stays at CREATE_PENDING_AUTH (waiting for authorization). During this time, updates, deletions, and re-synchronizations are also not accepted, and even after CloudFormation deployment completes, the target won't become READY. An operation where the administrator approves from the console on every deployment is difficult when you want to deploy in one shot.
So this time I'm using the method of statically passing tool definitions with mcpToolSchema. Since it doesn't call tools/list upstream and directly caches the passed schema, authorization at creation time becomes unnecessary, and it becomes READY at deployment completion.
The official blog also recommends this method for cases where human intervention at creation/update time is not possible (with step-by-step instructions using the GitHub MCP server as an example).
This isn't necessarily the right answer, but I'll go with this approach this time.
new CfnResource(stack, 'GitHubMcpTarget', {
  type: 'AWS::BedrockAgentCore::GatewayTarget',
  properties: {
    Name: 'githubmcp',
    GatewayIdentifier: gateway.ref,
    TargetConfiguration: {
      Mcp: {
        McpServer: {
          Endpoint: 'https://api.githubcopilot.com/mcp/',
          McpToolSchema: {
            InlinePayload: mcpToolsSchema, // Contents of github-mcp-tools.json
          },
        },
      },
    },
    CredentialProviderConfigurations: [{
      CredentialProviderType: 'OAUTH',
      CredentialProvider: {
        OauthCredentialProvider: {
          ProviderArn: credentialProvider.getAtt('CredentialProviderArn').toString(),
          Scopes: ['repo', 'read:user'],
          GrantType: 'AUTHORIZATION_CODE',
          DefaultReturnUrl: callbackUrl,
        },
      },
    }],
  },
});
Specifying AUTHORIZATION_CODE for GrantType makes it 3LO (user delegation). The built-in GithubOauth2 vendor can be used as-is on the Credential Provider side.
For the tool definitions, I narrowed down from the tools published by the GitHub MCP server (44 tools as of July 2026) to 6 read-only ones.
The static configuration has drawbacks too—it doesn't automatically follow upstream tool definition changes. Since SynchronizeGatewayTargets also cannot be called while a static schema is configured, the operation is to re-run the script and replace the schema when tools are updated. I accepted this maintenance cost for one-shot deployment, but if there are many tools, the approach of manually resolving CREATE_PENDING_AUTH might be easier (in that case, the same authorization wait occurs during re-synchronization on changes too).
One more point: the tools/list response may contain text dependent on the retrieval context in the description, such as the authenticated user's ID or availability of semantic search. If statically captured as-is, it could lead to misidentification by other users or exposure of personal information, so I decided to sanitize the descriptions before using them this time.
Slack (MCP Server Target + CustomOauth2)
The Slack official remote MCP server (mcp.slack.com/mcp) is also connected using the same static tool schema method. Since the target definition is almost the same as GitHub, I'll skip it and introduce what's unique to Slack.
The Slack MCP server can only be called with a user token (xoxp-). However, AgentCore Identity's built-in SlackOauth2 vendor uses the standard oauth.v2.access endpoint, so a bot token (xoxb-) ends up being stored in the Token Vault. This results in a confusing failure where the authorization flow completes normally, but only the tool call is rejected with an Authorization error (vended logs, which were useful for isolation, are introduced in the supplement).
After isolating the cause, I arrived at a method using the CustomOauth2 vendor to explicitly specify Slack's user-flow-dedicated endpoint.
const slackCredentialProvider = new CfnResource(stack, 'SlackCredentialProvider', {
  type: 'AWS::BedrockAgentCore::OAuth2CredentialProvider',
  properties: {
    Name: `slack-user-provider-${suffix}`,
    CredentialProviderVendor: 'CustomOauth2',
    Oauth2ProviderConfigInput: {
      CustomOauth2ProviderConfig: {
        ClientId: SLACK_CLIENT_ID,
        ClientSecretSource: 'EXTERNAL',
        ClientSecretConfig: {
          SecretId: SLACK_SECRET_NAME,
          JsonKey: 'client_secret',
        },
        OauthDiscovery: {
          AuthorizationServerMetadata: {
            Issuer: 'https://slack.com',
            AuthorizationEndpoint: 'https://slack.com/oauth/v2_user/authorize',
            TokenEndpoint: 'https://slack.com/api/oauth.v2.user.access',
            ResponseTypes: ['code'],
          },
        },
      },
    },
  },
});
oauth.v2.user.access is Slack's MCP-oriented endpoint that returns a user token in standard OAuth format. With this, the correct user token is stored in the Token Vault, enabling tool calls!
Google Calendar (OpenAPI Target)
Since Google Calendar does not have an officially available remote MCP server, we use Gateway's OpenAPI target. This is essentially the primary intended use case of Gateway — converting REST APIs directly into MCP tools using OpenAPI definitions. Even SaaS services that don't provide an MCP server can be connected using the same 3LO pattern as long as they have a REST API, and from the agent's perspective they can be called as tools like googlecal___listEvents.
For the OpenAPI definition, I manually wrote only 3 read operations from the Calendar API (calendar list, event list, event details).
There are tools that auto-generate from Discovery documents, but Gateway doesn't support schema references via $ref, and the response nesting was too deep to pass validation. While hand-writing is fine when there are few operations, maintaining the definitions would become tedious as endpoints increase to include write operations.
{
  "openapi": "3.0.3",
  "servers": [{ "url": "https://www.googleapis.com/calendar/v3" }],
  "paths": {
    "/calendars/{calendarId}/events": {
      "get": {
        "operationId": "listEvents",
        "description": "Retrieve a list of events for the specified calendar. Filter by period using timeMin/timeMax (RFC3339 format). Use calendarId='primary' for the user's own events.",
        ...
      }
    }
  }
}
The key points in the target definition are that TargetConfiguration becomes OpenApiSchema, and CustomParameters are passed to the OAuth configuration.
new CfnResource(stack, 'GoogleCalendarTarget', {
  type: 'AWS::BedrockAgentCore::GatewayTarget',
  properties: {
    Name: 'googlecal',
    GatewayIdentifier: gateway.ref,
    TargetConfiguration: {
      Mcp: {
        OpenApiSchema: {
          InlinePayload: googleCalendarSchema, // OpenAPI definition content
        },
      },
    },
    CredentialProviderConfigurations: [{
      CredentialProviderType: 'OAUTH',
      CredentialProvider: {
        OauthCredentialProvider: {
          ProviderArn: googleCredentialProvider.getAtt('CredentialProviderArn').toString(),
          Scopes: ['https://www.googleapis.com/auth/calendar.readonly'],
          GrantType: 'AUTHORIZATION_CODE',
          DefaultReturnUrl: callbackUrl,
          // Required for obtaining Google refresh tokens
          CustomParameters: {
            access_type: 'offline',
            prompt: 'consent',
          },
        },
      },
    }],
  },
});
Google access tokens expire in 1 hour. Token Vault automatically renews them using the refresh token, and the above CustomParameters request its issuance.
On the Credential Provider side, the built-in GoogleOauth2 vendor worked as-is!
Deployment and Callback URL Registration
Since the Client ID is designed to be passed via environment variables without being committed, you can deploy with the following command in sandbox.
GITHUB_CLIENT_ID=xxx SLACK_CLIENT_ID=xxx GOOGLE_CLIENT_ID=xxx pnpm ampx sandbox
No code changes are needed for deployment to Amplify Hosting. backend.ts determines the Hosting environment from build environment variables (AWS_BRANCH/AWS_APP_ID) and automatically switches the callback URL to https://<branch>.<appId>.amplifyapp.com/callback. Connect the repository to Hosting, set the same 3 Client IDs in the console environment variables, and the build will run (build settings are in the repository's amplify.yml). The operation verification in this article was performed in this Hosting environment.
Once deployment is complete, the callback URLs are output in amplify_outputs.json. For Hosting, you can download it from "Deployed backend resources" in the console.
{
  "custom": {
    "githubCallbackUrl": "https://...",
    "slackCallbackUrl": "https://...",
    "googleCallbackUrl": "https://..."
  }
}
Set each URL in GitHub's OAuth App Authorization callback URL, Slack's OAuth & Permissions Redirect URLs, and GCP's OAuth client Authorized redirect URIs respectively.
Operation Verification
Let's actually try it! Access the Amplify URL, sign up and log in, then start chatting from the chat screen.
First, GitHub. When I send "Tell me about my repositories," an authorization link is displayed at the point of tool invocation. Opening the link takes you to GitHub's authorization screen, and after approving, the callback tab automatically closes, and the retry succeeds in the original chat. As shown in the completed form at the beginning, the agent resumes processing and returns the repository list.
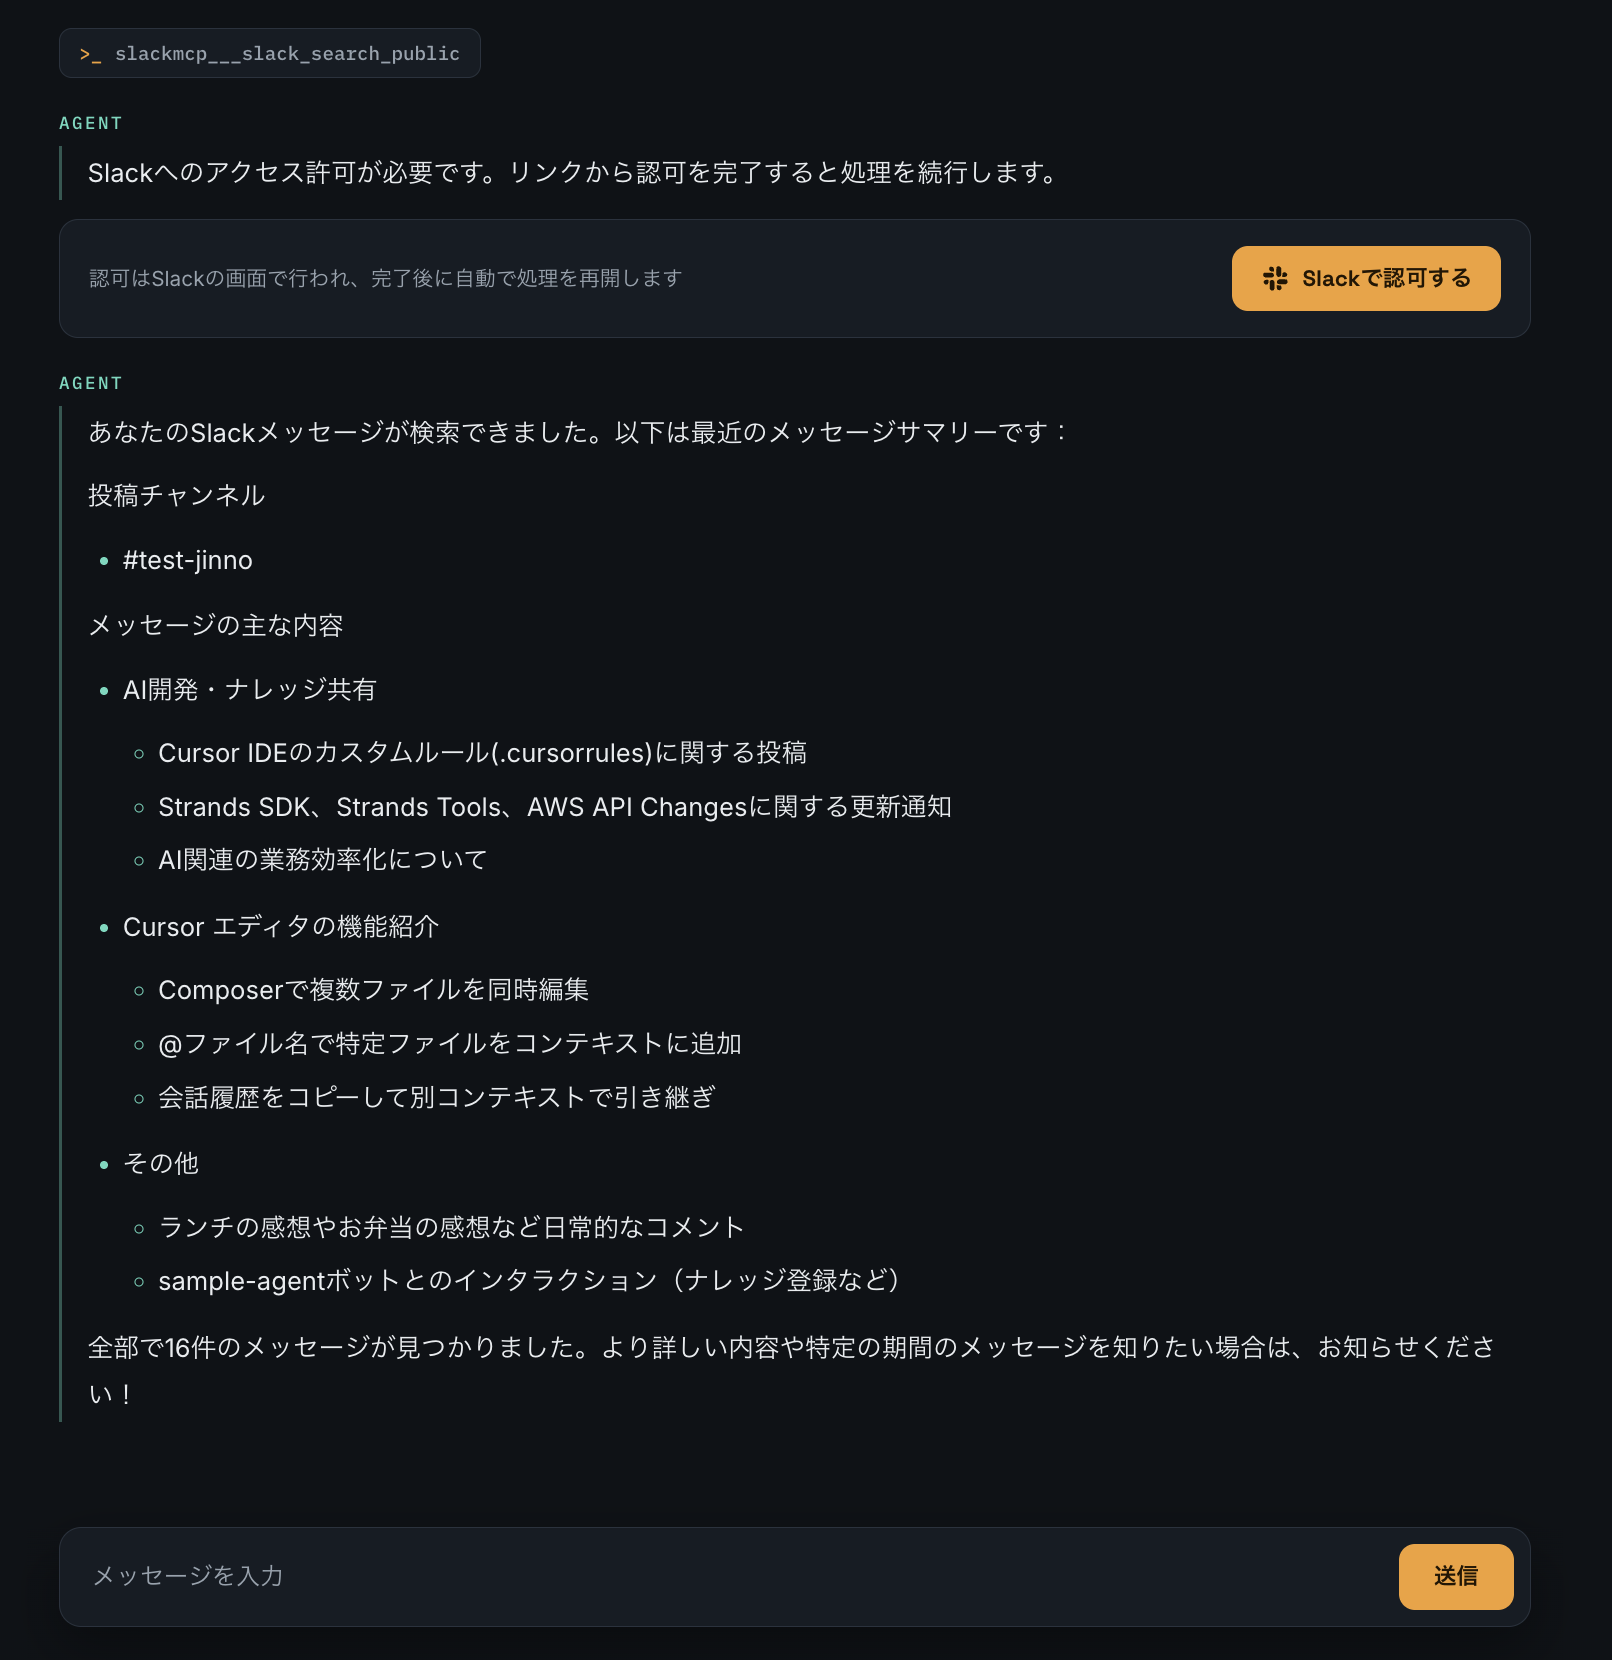
Slack follows the same flow. After selecting a workspace from the authorization link and approving, the message search results are returned.
Google Calendar is the same. Since it's in test mode, an unverified app warning appears, but you can proceed by continuing.
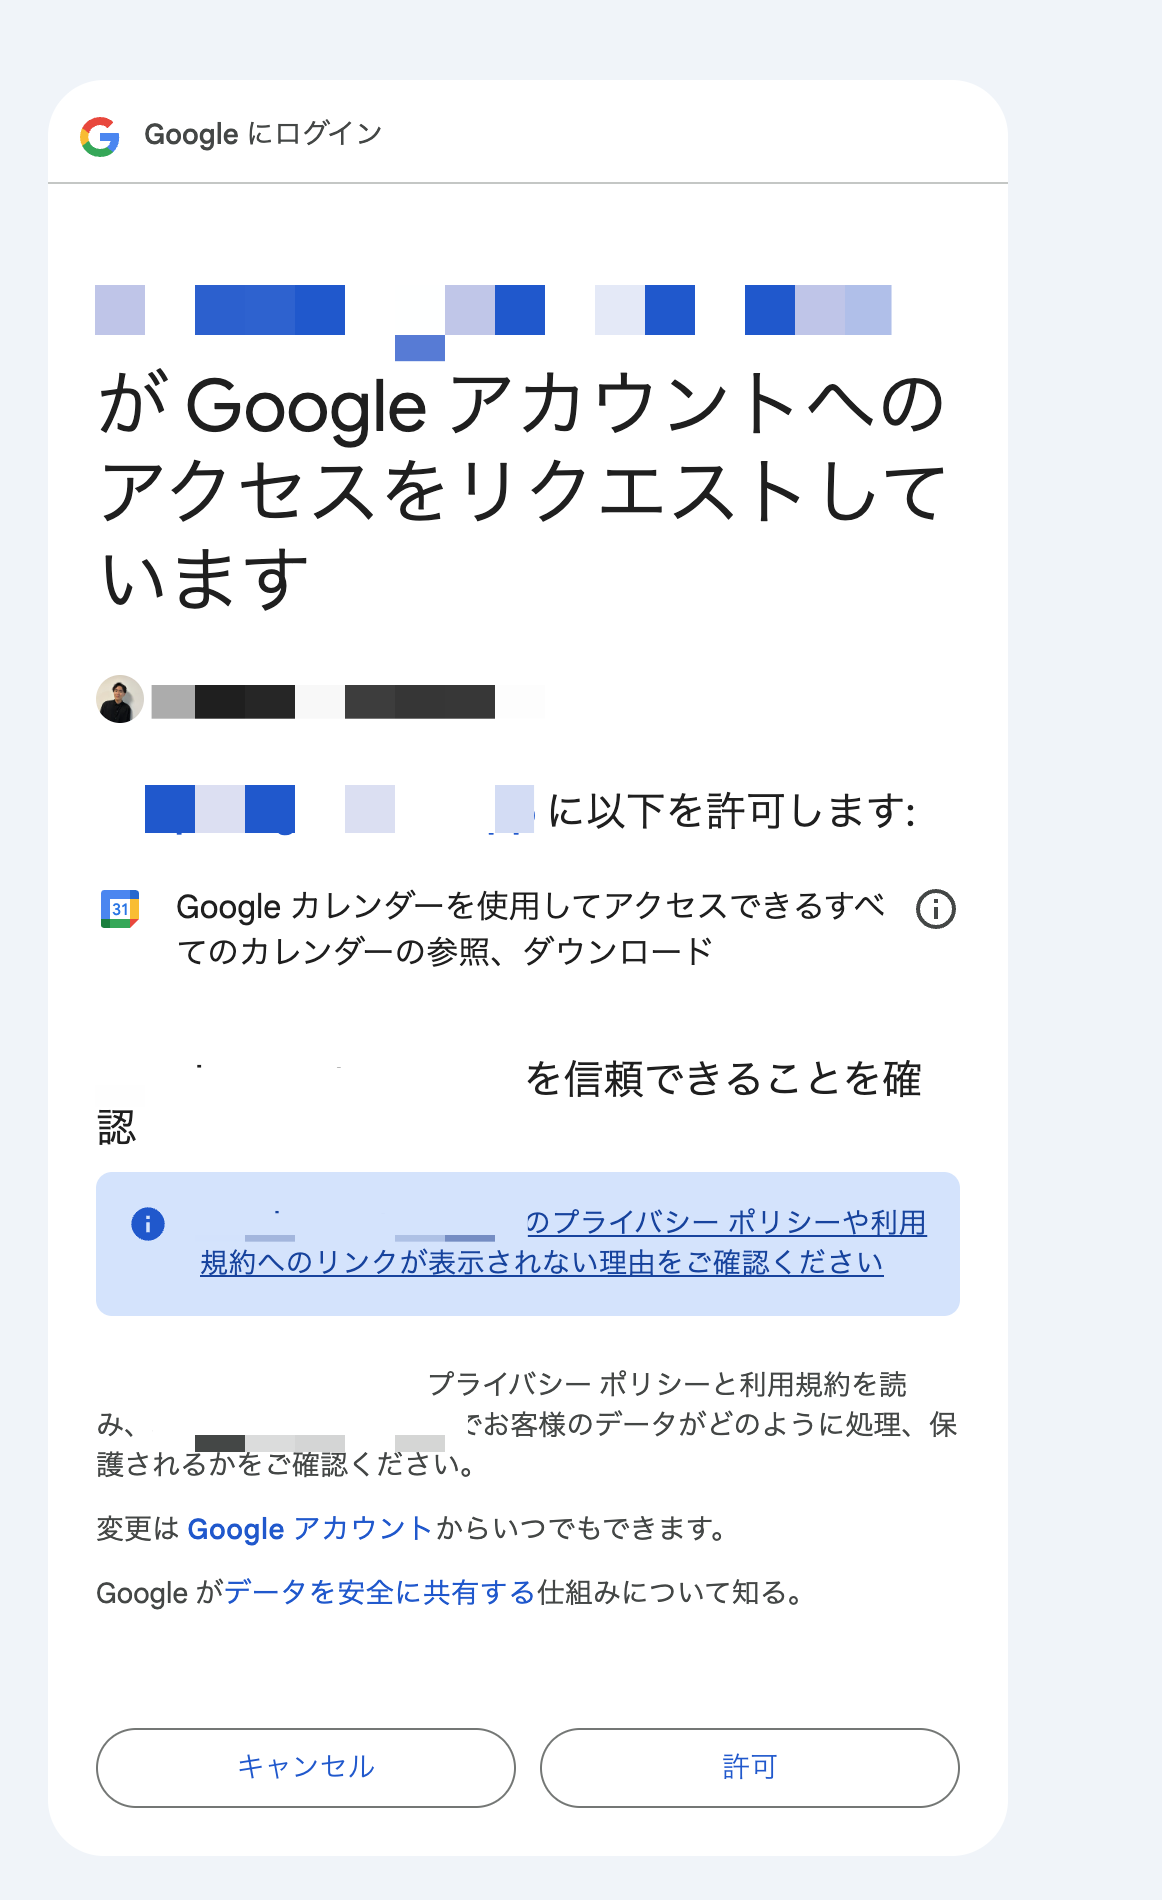
After approval, the Calendar API is called via the OpenAPI target and events are returned. In the integration settings panel on the right, all 3 services show "Connected."
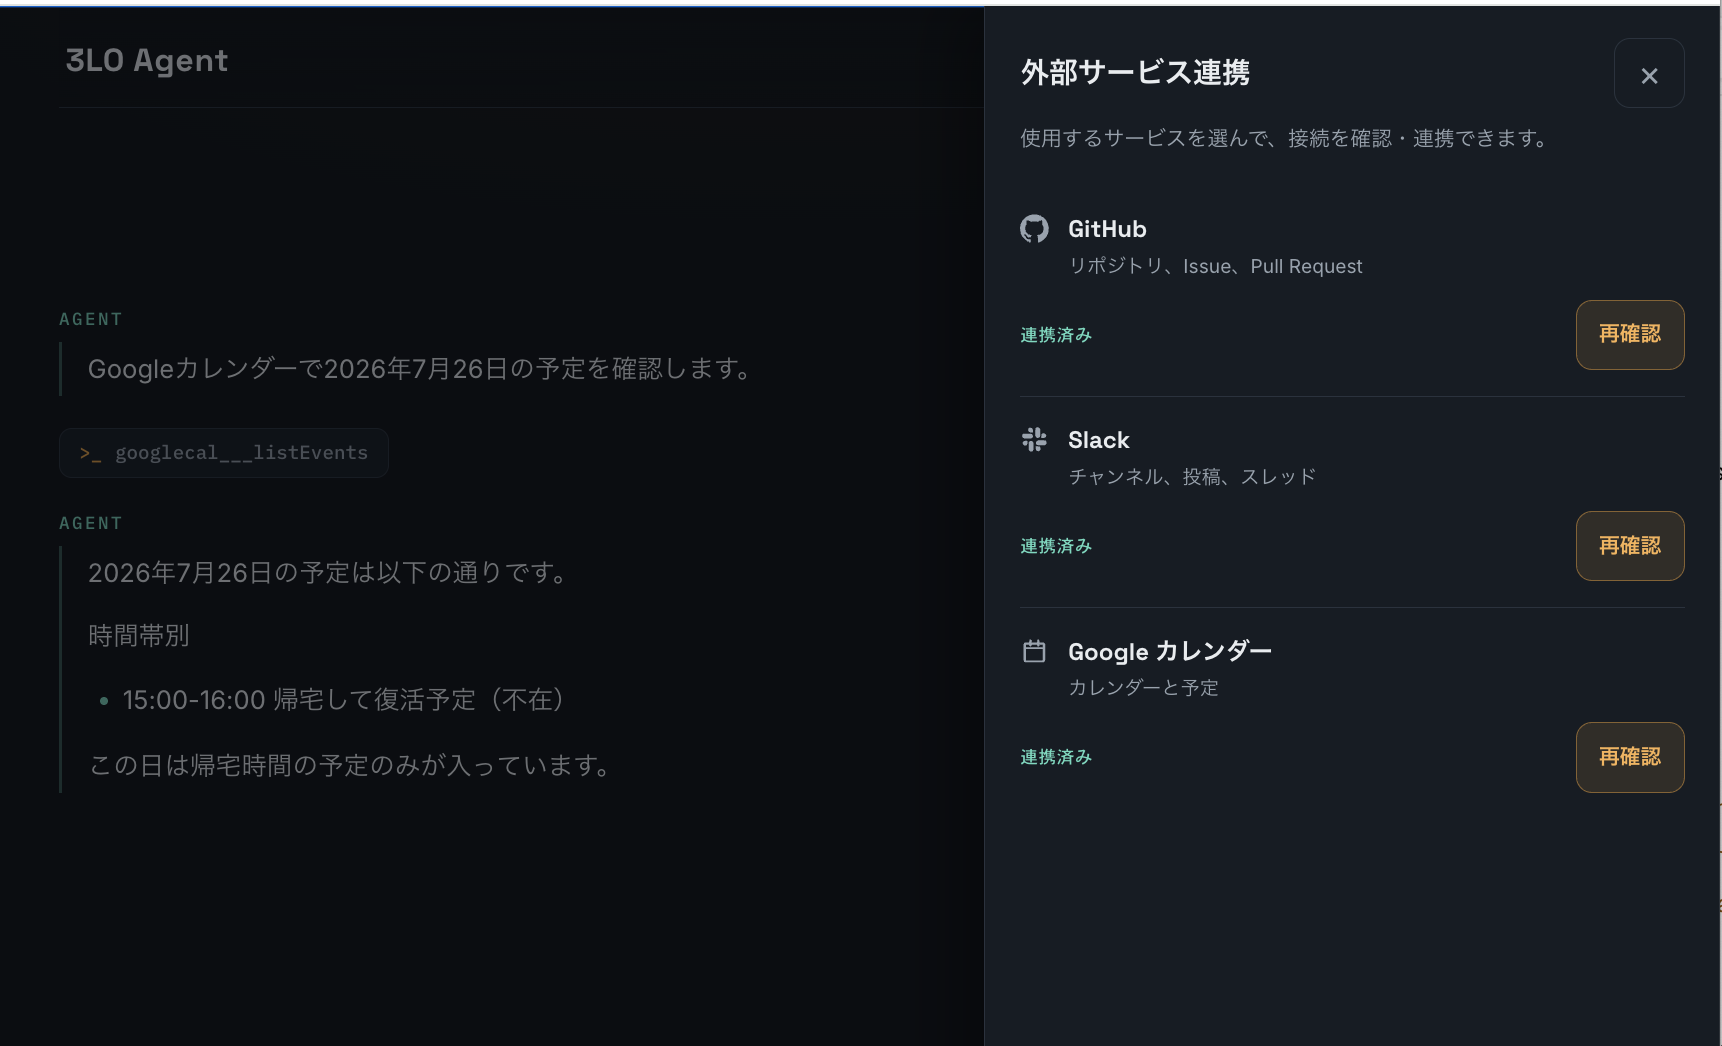
Once authorized, the token is stored in Token Vault, so from that point on, responses are provided through integration with the MCP Server without needing an authorization link!
Security Considerations for Production Use
By delegating 3LO to Gateway, external service tokens appear less frequently. It's a nice point that the acquisition, storage, and provision are completed between Gateway and Token Vault, and tokens no longer appear in agent code or the frontend!
Also, since everything goes through Gateway, there are benefits to centralization such as controlling authorization with Policies to select available tools and applying guardrails.
For Session Binding, the verification of legitimate users — which was a challenge last time — was extracted into Cognito JWT authentication and DynamoDB state management! Since the flowId created by hashing the request_uri uniquely matches the flow, completion is not possible with a session_id that the user themselves did not initiate. Note that the callback screen is implemented to complete automatically on access, so in production it might be good to add a confirmation button before completion.
All tools used this time were made read-only. Since system prompt instructions alone are insufficient as a safety boundary for write operations, write tools (such as slack_send_message) are excluded along with their OAuth scopes (chat:write). I'm considering trying write tools such as Slack posting and calendar registration in the future, and at that time I'd like to verify them with user confirmation before execution and guardrails together.
There are also some loose settings due to the demo purpose. (Bear with me...)
Session Binding API's CORS is *, Gateway's Identity-related IAM has Resource: *, and ExceptionLevel remains DEBUG (a setting that returns detailed errors to the client). The correspondence between conversation UUIDs and users is also unverified on the server side, so these would be points to revisit if productionizing.
Conclusion
Including the Session Binding that I had compromised on locally last time, I was able to run the entire 3LO flow serverlessly and consolidate 3 external services into a single Gateway!
Being able to choose between MCP server targets when an official MCP server is available, and OpenAPI targets when there isn't one, made this fun to build even as a sample! I'm also glad to have finally cleared my personal summer homework!
There are some rough edges, but I hope it's at least somewhat helpful!
Please feel free to open an Issue if you have any feedback or feature additions!
That concludes the 6th entry in the "Summer Vacation Independent Research Relay": "Connecting GitHub, Slack, and Google Calendar to an AI Agent Using User-Delegated Authorization (3LO) with Amazon Bedrock AgentCore Gateway."
Next time, Nayuta will be posting an entry about "Chronos-2 × Snowflake." Stay tuned!!
Supplementary Notes
Comparison with the @requires_access_token Approach
A comparison between the previous approach of handling tokens directly within the agent and the current approach of delegating to Gateway's outbound authentication.
| Aspect | @requires_access_token approach | Gateway outbound authentication approach |
|---|---|---|
| Token visibility | Passed to agent code | Completed between Gateway and Token Vault |
| External API calls | Agent implements directly | Gateway converts existing MCP servers or OpenAPI schemas into tools |
| Waiting for authorization completion | SDK has built-in polling | Retry with hook |
| Conversation memory | Custom implementation | AgentCore Memory + Session Manager |
| Expansion to multiple services | Tool implementation per service | Authorization processing is common. Tool selection, connection verification, and UI metadata are added |
For small-scale configurations that are self-contained with a single agent, the previous approach is simpler, but when you want to reuse tools across multiple agents or isolate tokens from application code, the Gateway approach is better suited!
About Google's Official Workspace MCP Server
Actually, Google has also started publishing an official remote MCP server (Developer Preview). Dedicated endpoints are available for Calendar, Gmail, Drive, Chat, Docs, Sheets, Slides, and People (for example, Calendar uses calendarmcp.googleapis.com/mcp/v1). OAuth 2.0 web application type clients are used for authentication.
It appears to be a configuration that can be connected as an MCP server target for AgentCore Gateway, but this was not verified this time. Depending on the organization's API controls and OAuth policies, administrator-side configuration may be required. If you cannot connect, check administrator policies and OAuth logs.
Adding Another Service (Gmail Example)
Here are the steps for when you want to integrate a new service as well. The approach splits into two depending on whether an official MCP server exists.
If an official MCP server exists, use the same MCP server target approach as GitHub and Slack. For Gmail, Google's official Workspace MCP server (Developer Preview) has a dedicated endpoint. To try connecting, add the target server entry to SERVERS in scripts/fetch_mcp_tools.py to generate a static schema, then add the target.
The OAuth client and Credential Provider configuration is the same as Google Calendar.
If no official MCP server exists, use the same OpenAPI target approach as Google Calendar. Hand-write only the operations you want to use in the OpenAPI definition and add the target. If it's a REST API like the Gmail API, it can be connected using this approach.
Regardless of which approach, the changes are to the following 5 items:
- Create an OAuth app on the service side and register the Client Secret in Secrets Manager in JSON format
- Add a Credential Provider and target to backend.ts, and register the issued callback URL on the service side
- Add the prefix mapping to
TOOL_PREFIX_TO_PROVIDERin gateway_auth.py and add a read-only tool for connection verification toPROVIDER_PROBESin connections.py - Add instructions on how to use the new service's tools to the system prompt in main.py (extracting to skills is also an option)
- Add the new service to
ProviderIdin the frontend'stypes/runtime.tsand display information inconnectionState.ts
The authorization hook itself is a provider-common mechanism, so no changes are needed there — additions are only configuration and metadata.
When adding more services for the same account, like Google Calendar and Gmail, pay attention to scope differences. If you add required scopes, existing tokens won't have sufficient permissions and re-authorization will be required.
Also, while it's tempting to keep adding tools, descriptions directly affect the model's tool selection accuracy, so consider them according to your use case.
Why I Chose Amplify
I chose Amplify Gen 2 this time because it allows managing Cognito authentication, hosting, and CDK backend in a single project. In particular, the fact that Cognito User Pool and User Pool Client definitions can be done in just a few lines with Amplify Auth is convenient.
On the other hand, AgentCore resource definitions are not inherently related to Amplify and are piggy-backing onto backend.ts. It was necessary to devise the placement stack for AgentCore resources to avoid circular references stemming from Amplify's stack splitting rules (auth stack, function stack, etc. are separated).
In terms of development experience, the sandbox environment creates all resources including Gateway, Runtime, and CodeBuild, so the initial deployment takes over 5 minutes, and subsequent deployments also take a fair amount of time, which is a concern.
For production use, it would be cleaner to manage infrastructure with CDK alone without using Amplify and serve the frontend with CloudFront + S3. For this demo purpose, I prioritized the convenience of having everything from authentication to hosting available in one shot!
About Development in the Sandbox Environment
backend.ts can create all resources including Gateway and Runtime even in sandbox. Resource names are suffixed per environment to avoid conflicts, and the callback destination points to the local development server, so you can run the 3LO flow from the local frontend. Since GitHub OAuth App can only register one callback URL, if you want to go through 3LO in both sandbox and Hosting, use separate OAuth Apps for development.
Vended Logs Are Useful for Debugging
What was useful for isolating the Slack bot token issue was Gateway's log delivery (vended logs). Setting ExceptionLevel to DEBUG returns error details to the client, and enabling vended logs in the console records requests and responses between Gateway and targets in CloudWatch Logs. Thanks to this, I was able to notice from Slack MCP server's error response that a bot token was being sent. Since the area between Gateway and targets tends to be a black box, I felt it's best to enable this first when you get stuck!
Resource Deletion
Deleting the Amplify app will delete Hosting, Cognito, and Session Binding API, as well as the CDK-managed Gateway, targets, Credential Provider, Memory, and Runtime all at once. The 3 Secrets Manager secrets and each service's OAuth apps need to be deleted manually.
References
I found this blog extremely helpful in understanding the mechanisms, just as I did before...!!
Thank you so much!