
I Tried Tagging Phone Numbers and Incoming Calls in Amazon Connect Customer and Checking Charges by Department in the Classmethod Members Portal

This page has been translated by machine translation. View original
Introduction
When multiple departments use Amazon Connect Customer, you may want to track usage charges separately for each department.
One option is to use a separate AWS account for each department, but this time I tried a method that uses tags to check charges by department within the same AWS account and the same Amazon Connect Customer instance.
I prepared two phone numbers, assuming a sales department and a support department, and added tags to each phone number resource and to the contacts for incoming calls.
To check the charges, I used the Classmethod Members Portal.
This article covers classifying and visualizing charges with tags. It is not a setup for splitting invoices by department.
Types of Charges and Targets to Tag
For Amazon Connect Customer voice usage, you need to think separately about the charges incurred by owning a phone number and the time-based charges incurred by inbound and outbound calls.
In addition, the time-based charges include telephony charges and Amazon Connect Customer voice service usage charges. The total charges are not made up of just the two items "phone number ownership charge" and "call charge."
For the pricing structure, please refer to the official page below.
The targets I tagged in order to classify charges this time are as follows.
| Charges to classify | Target to tag | Setup method this time |
|---|---|---|
| Charges related to owning a phone number | Phone number resource | AWS CLI |
| Time-based charges for inbound and outbound calls | Contact | "Contact tags" block in the flow |
As of this writing, the official documentation states that tagging phone number resources is not supported from the admin website, and is supported from the CLI/SDK.
Classifying charges using contact tags is described in the official AWS documentation below.
However, for AWS accounts under a Classmethod Members contract, the steps described in this documentation for activating cost allocation tags in AWS Billing and checking charges are not available. In this article, I check the charges using the tag-based charge display in the Classmethod Members Portal.
A custom tag attached to a phone number is not automatically applied to contacts for incoming calls to that number. This time, I set tags on both the phone number resources and the contacts.
Test Environment
In the Tokyo Region, ap-northeast-1, I used the following phone numbers and tags. Part of each phone number is masked.
| Department | Phone number | Phone number resource tag | Contact tag |
|---|---|---|---|
| Sales | 050-3116-**** |
Owner=Sales |
Owner=Sales-InboundCall |
| Support | 050-3173-**** |
Owner=Support |
Owner=Support-InboundCall |
I set the department name on the phone number resources, and set the department name with -InboundCall appended on the contacts. This way, even when aggregating by the same Owner key, phone numbers and incoming contacts can be distinguished.
I tested in an environment where the following were already set up.
- An Amazon Connect Customer instance has been created
- Two phone numbers have been claimed
- A sales flow or support flow has been associated with each phone number
- The charges for the target AWS account can be checked in the Members Portal
The AWS CLI commands below are run in AWS CloudShell. The account ID and resource IDs are examples, so replace them with the values for your environment.
Setting the Tags
Checking the Phone Number ARNs
Open AWS CloudShell and list the phone numbers associated with the target instance, along with the ARNs of the phone number resources.
REGION="ap-northeast-1"
INSTANCE_ARN="arn:aws:connect:ap-northeast-1:111111111111:instance/<instance-id>"

aws connect list-phone-numbers-v2 \
  --target-arn "$INSTANCE_ARN" \
  --region "$REGION" \
  --query 'ListPhoneNumbersSummaryList[].{PhoneNumber:PhoneNumber,PhoneNumberArn:PhoneNumberArn}' \
  --output table

------------------------------------------------------------------------------------------------------------------------------------------------
|                                                              ListPhoneNumbersV2                                                              |
+-----------------+----------------------------------------------------------------------------------------------------------------------------+
| PhoneNumber     | PhoneNumberArn                                                                                                             |
+-----------------+----------------------------------------------------------------------------------------------------------------------------+
| +81503116****   | arn:aws:connect:ap-northeast-1:111111111111:phone-number/11111111-1111-4111-8111-111111111111                                 |
| +81503173****   | arn:aws:connect:ap-northeast-1:111111111111:phone-number/22222222-2222-4222-8222-222222222222                                 |
+-----------------+----------------------------------------------------------------------------------------------------------------------------+
The instance ARN is specified for --target-arn. From the output list, check the PhoneNumberArn corresponding to the sales and support phone numbers.
The phone number ARNs obtained here are used in the next tagging commands.
Adding the Owner Tag to the Phone Numbers
Set Owner=Sales on the sales phone number and Owner=Support on the support phone number.
For ARN_SALES and ARN_SUPPORT, specify the phone number ARNs obtained in the previous step.
REGION="ap-northeast-1"

ARN_SALES="arn:aws:connect:ap-northeast-1:111111111111:phone-number/<sales-phone-number-id>"
ARN_SUPPORT="arn:aws:connect:ap-northeast-1:111111111111:phone-number/<support-phone-number-id>"

# Add the tag to the sales phone number
aws connect tag-resource \
  --resource-arn "$ARN_SALES" \
  --tags '{"Owner":"Sales"}' \
  --region "$REGION"

# Add the tag to the support phone number
aws connect tag-resource \
  --resource-arn "$ARN_SUPPORT" \
  --tags '{"Owner":"Support"}' \
  --region "$REGION"

# Check the result
aws connect list-tags-for-resource \
  --resource-arn "$ARN_SALES" \
  --region "$REGION"

aws connect list-tags-for-resource \
  --resource-arn "$ARN_SUPPORT" \
  --region "$REGION"
tag-resource adds the tags to the phone number resources, and list-tags-for-resource checks the result.
The result for the sales phone number is as follows.
{
    "tags": {
        "Owner": "Sales"
    }
}
The result for the support phone number is as follows.
{
    "tags": {
        "Owner": "Support"
    }
}
I confirmed that the specified tags were attached to each phone number.
Adding Tags to Contacts in the Flow
Next, open the flow associated with each phone number and add a "Contact tags" block in the designer.
With this block, you can assign user-defined tags to the contact being processed.
The values I set this time are as follows.
| Flow | Key | Value |
|---|---|---|
| Sales | Owner |
Sales-InboundCall |
| Support | Owner |
Support-InboundCall |
In the sales flow, I set Owner=Sales-InboundCall.
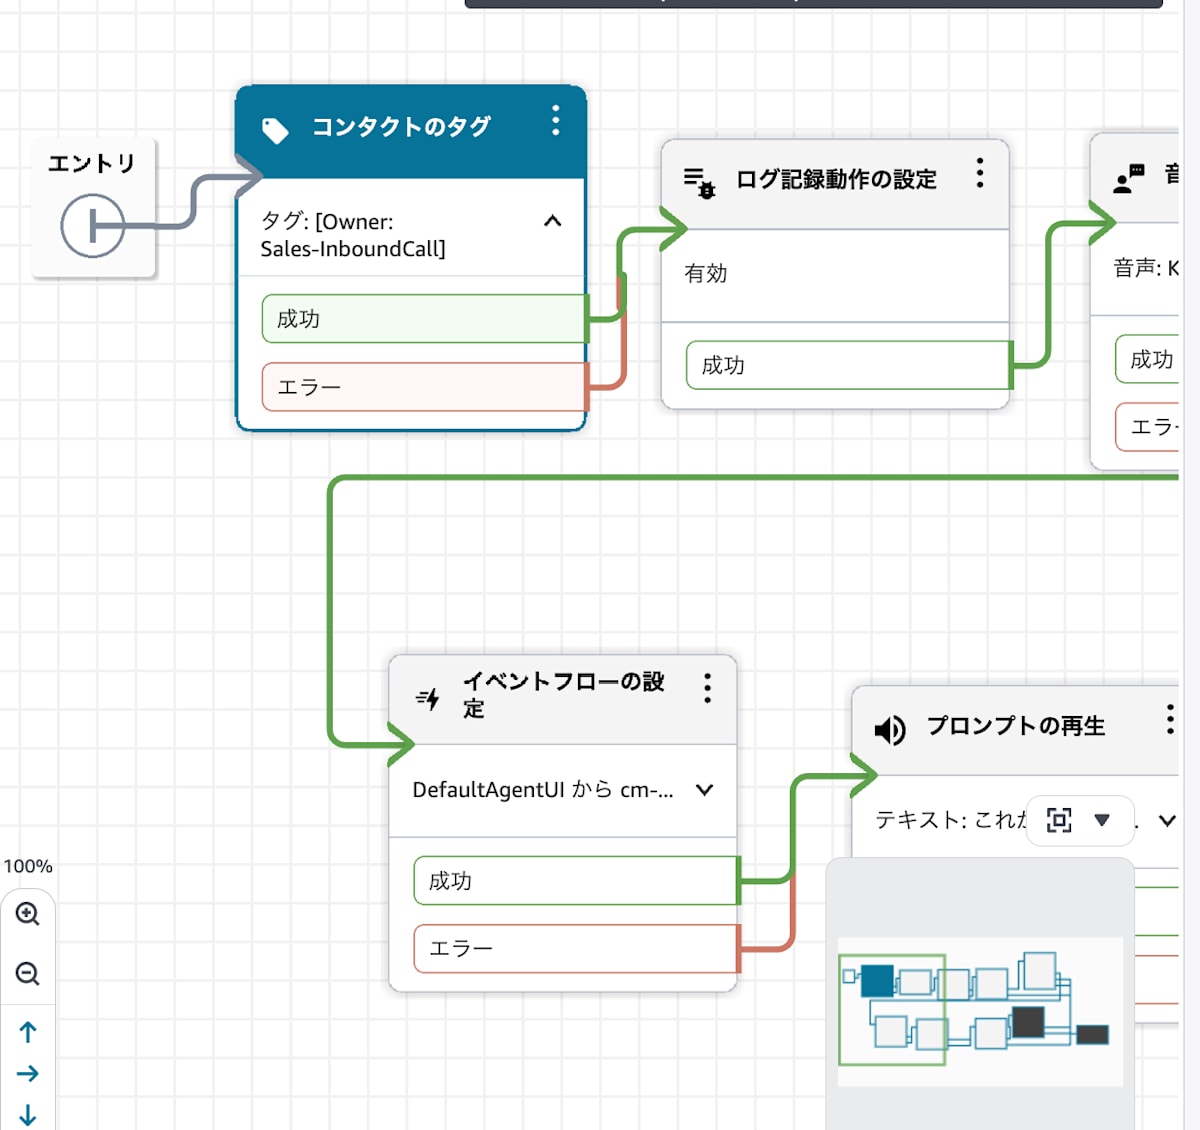
Setting that assigns Owner=Sales-InboundCall in the sales flow
In the support flow, I set Owner=Support-InboundCall.
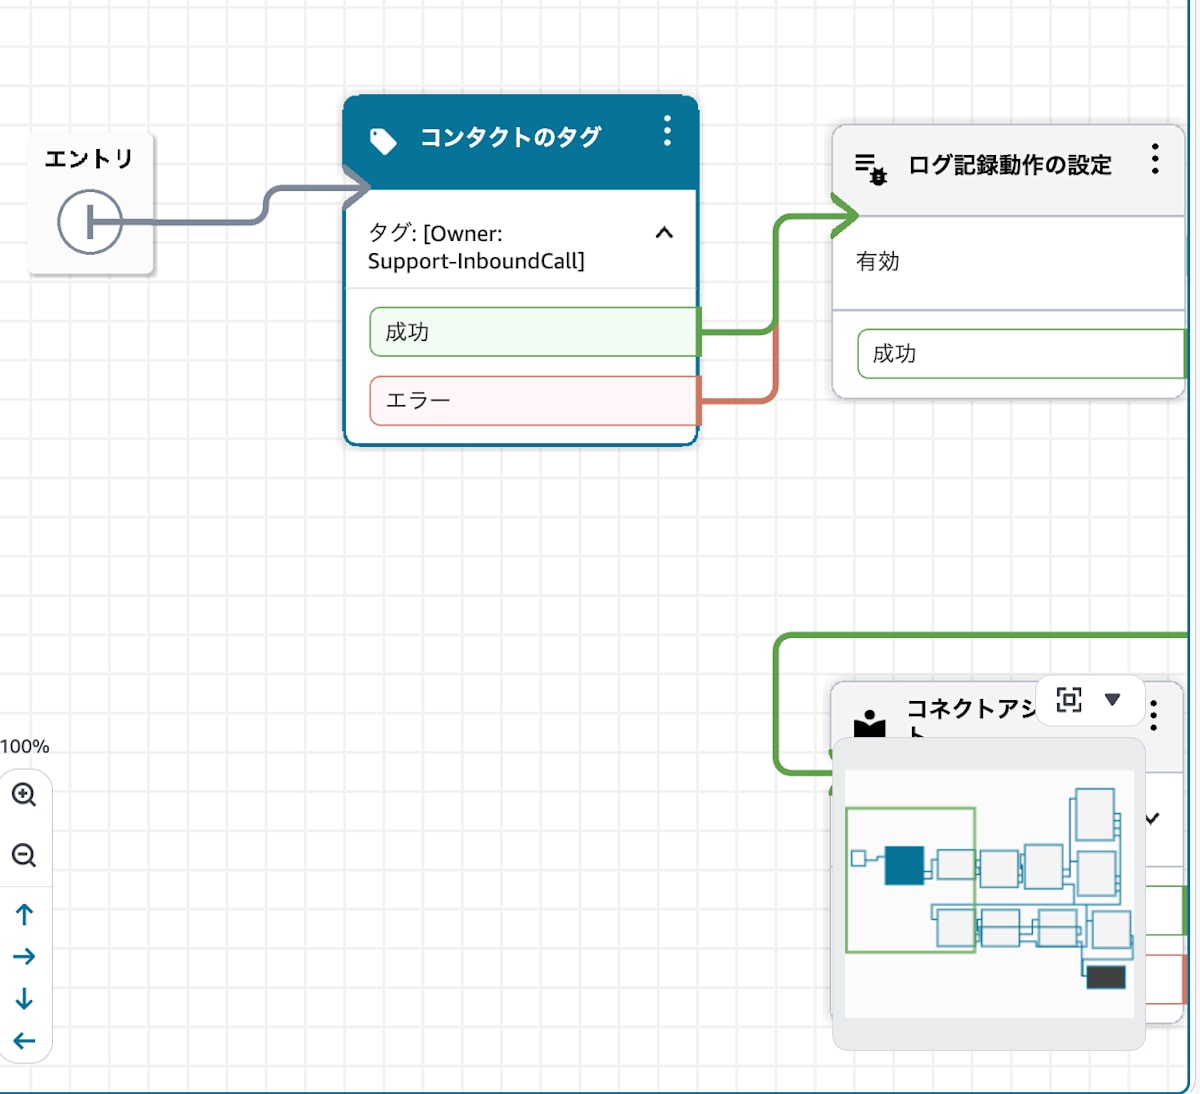
Setting that assigns Owner=Support-InboundCall in the support flow
Connect the block to the subsequent processing, then save and publish the flow.
Note that the tag field on the flow's "Details" tab is for tagging the flow resource itself. What I use this time is the "Contact tags" block in the designer.
Checking Charges in the Members Portal
After the setup, I called each number and checked the Members Portal once the charge data had been reflected.
On the charges screen for the target AWS account, open the "Tags" tab and specify Owner for "Tag category to group by."
The following user guide is helpful for operating the Tags tab.
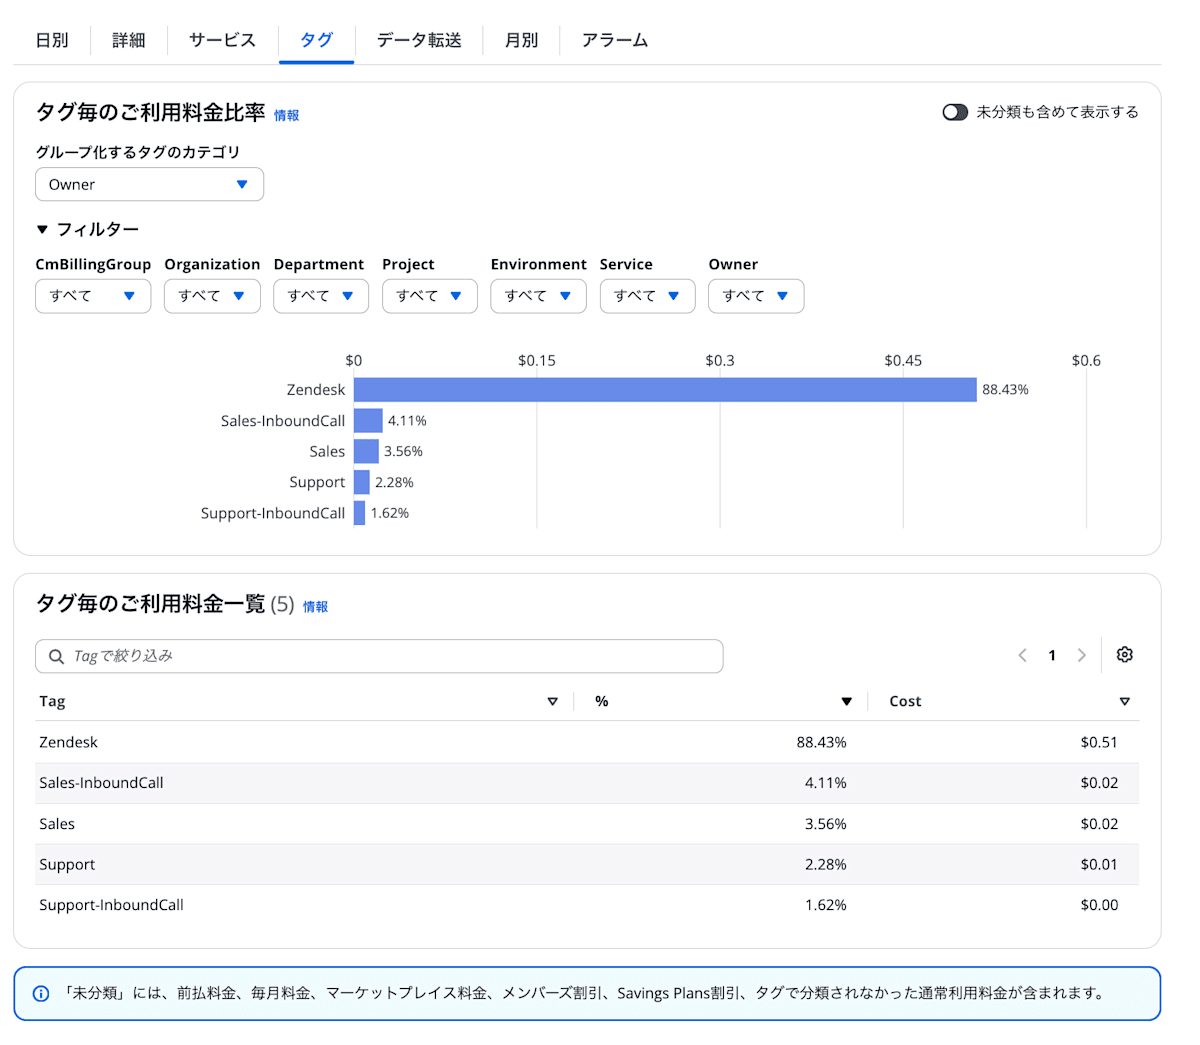
Result showing charges and ratios for each Owner value
Sales/Support attached to the phone numbers and Sales-InboundCall/Support-InboundCall attached to the contacts were displayed in separate rows, and I was able to check the amount for each tag.
Summary
Even within the same AWS account, by tagging phone number resources and contacts, I was able to check charges by department in the Members Portal.
Tags are added to phone numbers with the AWS CLI, and to incoming contacts with the "Contact tags" block in the flow. If you want to track both phone number and incoming call charges by department, set tags on each of them.