
A Step-by-Step Guide with Screenshots to Adding a Test Subscription in the Azure Portal

This page has been translated by machine translation. View original
Hello! I'm Yuji Nishimura from the Operations Department!
When you're already using Azure, you may want to keep resources for testing separate from your existing environment. The official documentation also lists the reasons for adding a subscription: avoiding hitting quota limits, separating environments for security, and isolating data for compliance.
This article introduces, with screenshots, the steps I took to add one subscription from the Azure portal to an Microsoft Customer Agreement (MCA) billing account that I already had. I also describe which fields on the creation screen determine the billing destination and which determine the directory, what I checked after creation, and what I reviewed when creation failed.
MCA is one type of contract (billing account) for paying for Azure usage. With MCA, you choose billing destination items such as the billing profile and invoice section on the subscription creation screen. How to check whether your contract is MCA is described later.
The environment I verified is as follows.
- The Azure portal as of November 5, 2026 (Japanese display)
- An MCA billing account (2 billing profiles, 2 existing subscriptions)
- Only a subscription was created (no resources were created)
This article does not cover Enterprise Agreement or contracts through CSP, Microsoft Online Services Program (MOSP) billing accounts, new Azure account sign-up or free trials, or canceling a subscription.
A subscription is tied to both the billing destination and the directory
In AWS terms, a subscription is close to an AWS account in that it is a unit that separates both resources and billing. However, the users who sign in are managed not within the subscription but in the directory, described later.
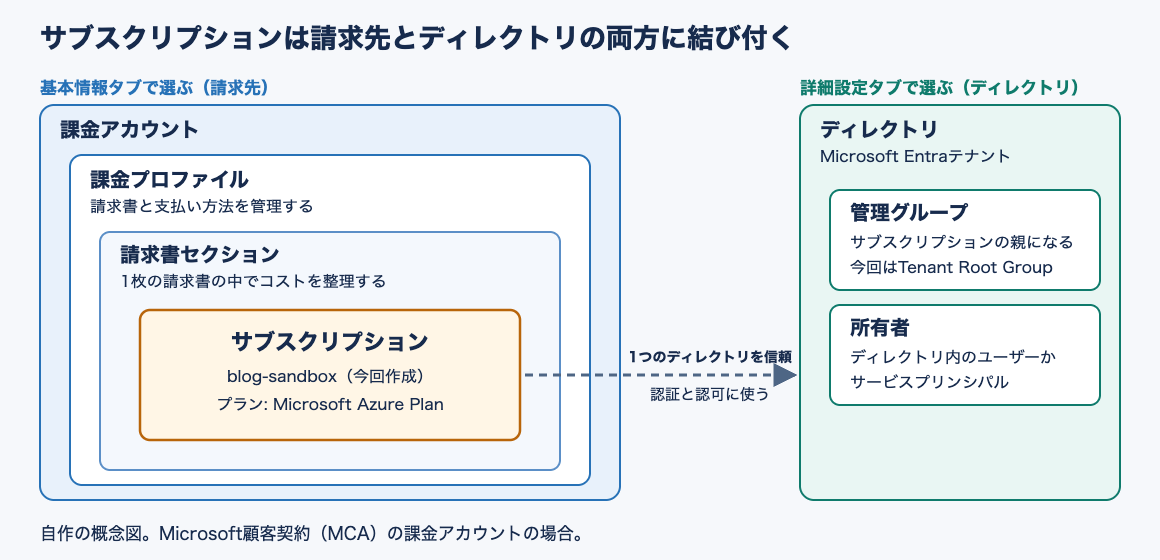
MCA billing is a hierarchy in which billing profiles sit under the billing account, and invoice sections sit under those. A billing profile is a unit that manages invoices and payment methods, and an invoice section is a unit for organizing costs within a single invoice. The usage charges of a subscription are recorded in the invoice section selected at creation.
On the other hand, a subscription trusts only one Microsoft Entra tenant (directory), and authentication and authorization of users and so on are performed in that directory.
The following diagram is a conceptual diagram I made myself, not an official architecture diagram. On the "Basics" tab of the creation screen you choose the billing hierarchy, and on the "Advanced" tab you choose the directory, along with the management group and owner within it.
What to check before creating
Whether the billing account is MCA
The steps in this article are for MCA billing accounts. Open the billing account in "Cost Management + Billing" in the Azure portal, and if "Type" under "Properties" in "Settings" is "Microsoft Customer Agreement", it applies. Even if you signed up for pay-as-you-go from the website, an MCA billing account may be created in some regions.
According to the same page, the maximum number of subscriptions that can be created in an individual MCA is 5, and whether more can be created is decided individually based on your Azure usage history. Deleted subscriptions and disabled subscriptions are also counted toward this limit.
Billing roles required for creation
According to the official documentation, creating a subscription in MCA requires one of the following billing roles.
- Owner or Contributor of any of an invoice section, a billing profile, or a billing account
- Azure subscription creator of an invoice section
These are MCA billing roles, which are separate from the Owner role assigned through a subscription's access control (IAM). By default, only the user who signed up for Azure can access the billing account. This time, I was able to create the subscription with the account I used to sign up, without adding any billing roles.
You also need to check that the account and directory at the top right of the portal are the ones you signed up with. This time, sign-in information for another account remained in the browser, and the portal first opened with that account.
Whether the billing profile's payment method is valid
Payment methods are set for each billing profile. You can check them by opening the billing account in "Cost Management + Billing", selecting the target billing profile from "Billing profiles" under "Billing", and looking at "Payment methods". In my environment, creation failed during the period when the card set as the default payment method was expired, and succeeded after I updated the card (described later).
Creating the subscription
1. Select "Add" from the subscription list
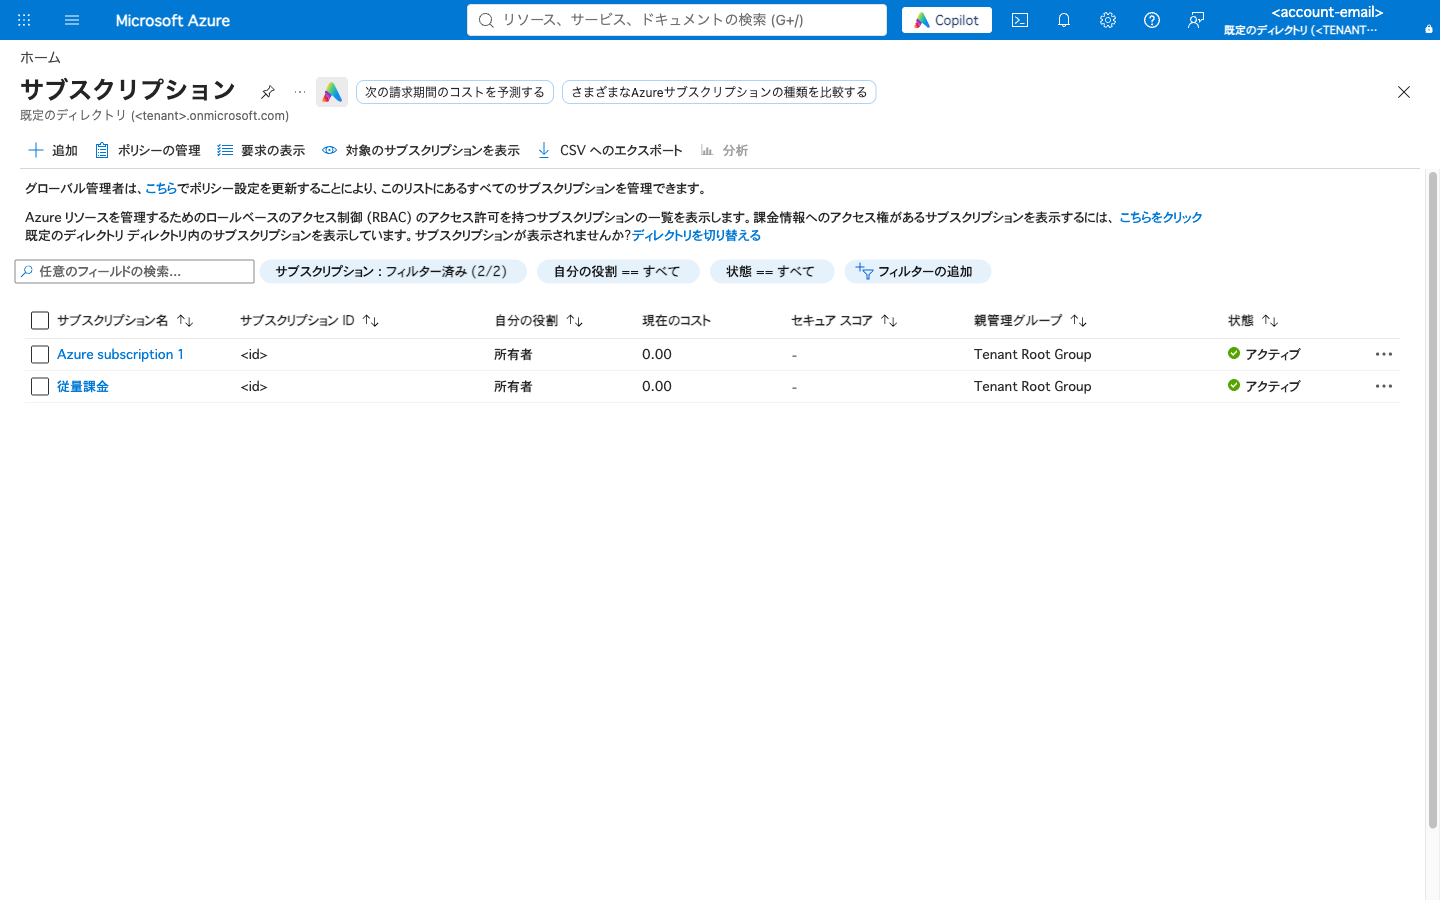
When you open "Subscriptions" in the Azure portal, the existing subscriptions are listed. There were 2 before creation. Selecting "Add" at the top opens the "Create a subscription" screen.
2. Choose the name and billing destination on the Basics tab
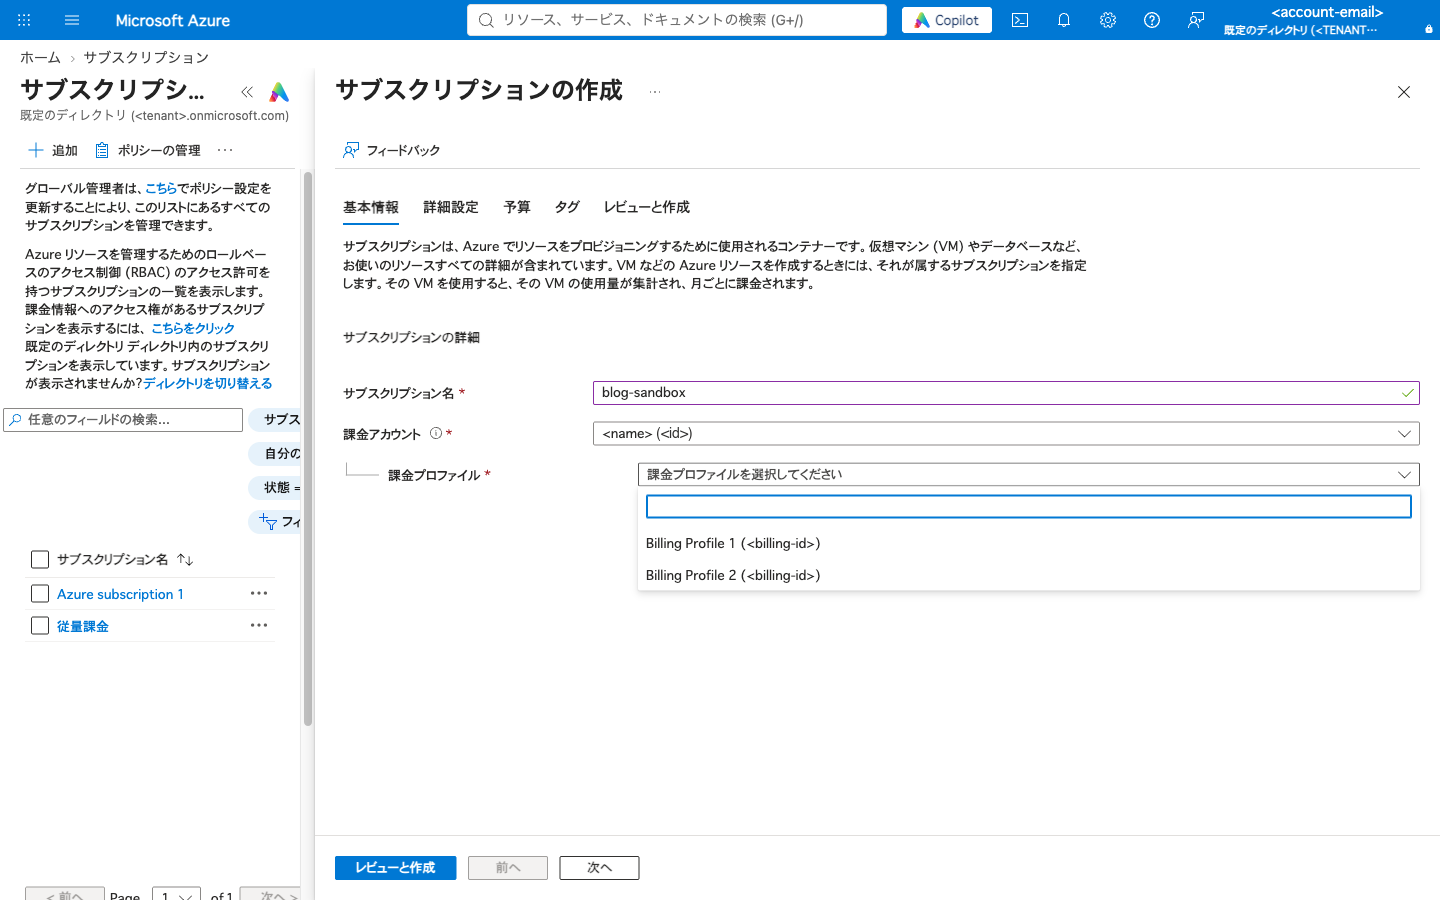
On the "Basics" tab, enter the subscription name and choose the billing account and billing profile. This time I named it blog-sandbox. The billing account was selected automatically, and the billing profile was chosen from two candidates.
Because invoices and payment methods are separated for each billing profile, choose the billing profile on which you want to consolidate billing. This time I chose Billing Profile 1, the same as the existing "Pay-As-You-Go" subscription.
When I chose the billing profile, the invoice section and plan were filled in automatically. The plan was Microsoft Azure Plan.
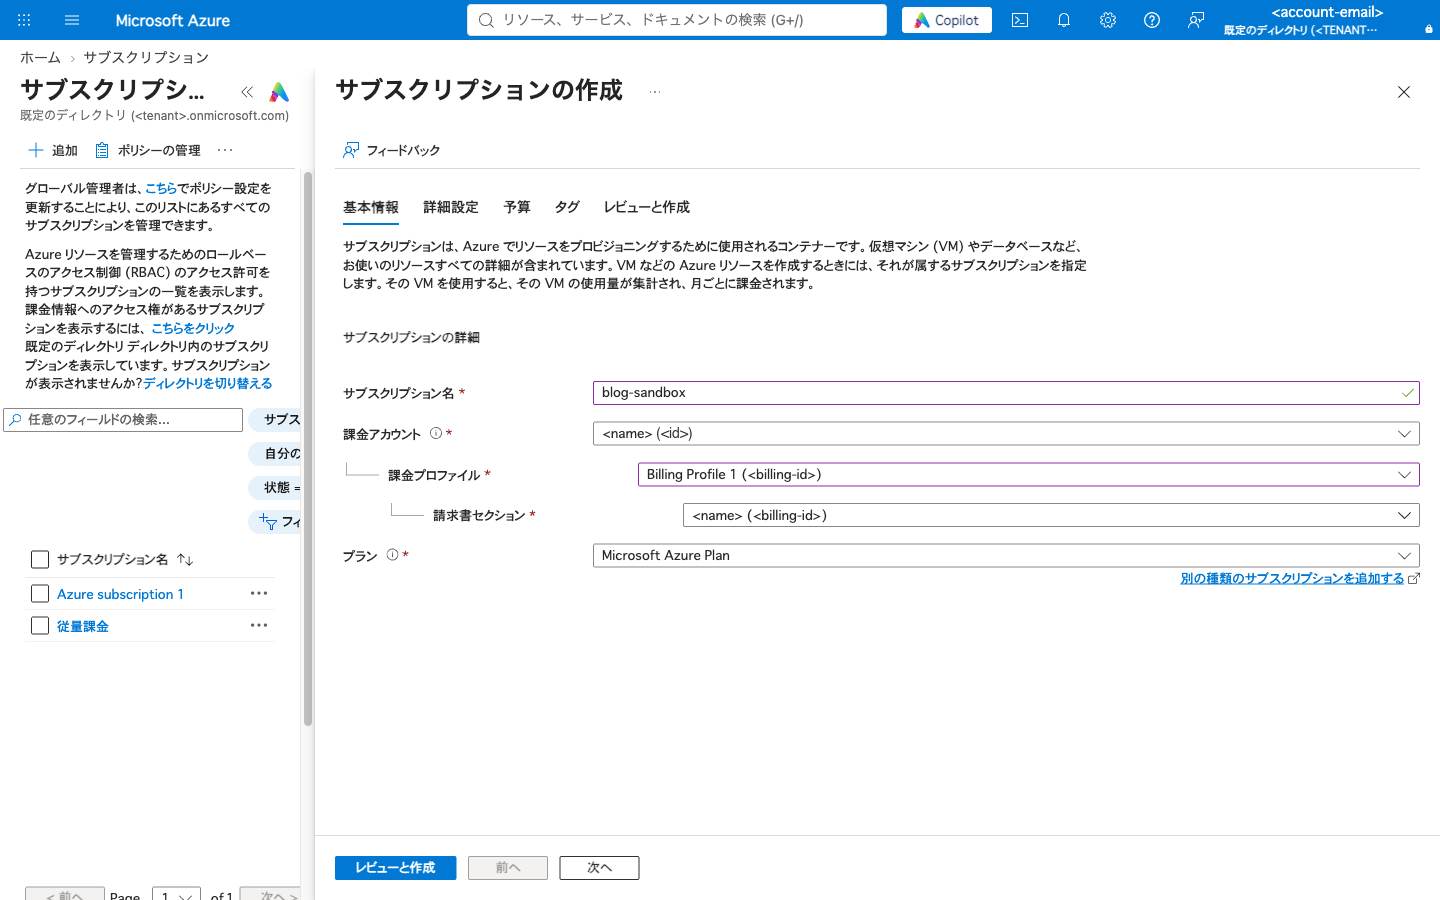
The steps in the official documentation advise choosing Microsoft Azure Plan for DevTest if you are using it for development and testing. However, this plan is for Visual Studio subscribers and is available only to MCA customers who purchased through a Microsoft sales representative. This time I did not open the plan candidates and proceeded with the automatically entered Microsoft Azure Plan.
3. Check the directory and owner on the Advanced tab
On the "Advanced" tab, you choose the directory in which to create the subscription, the management group, and the owner. I changed none of them this time. The directory was "Default Directory", the management group was "Root management group", and the owner was my own signed-in account.
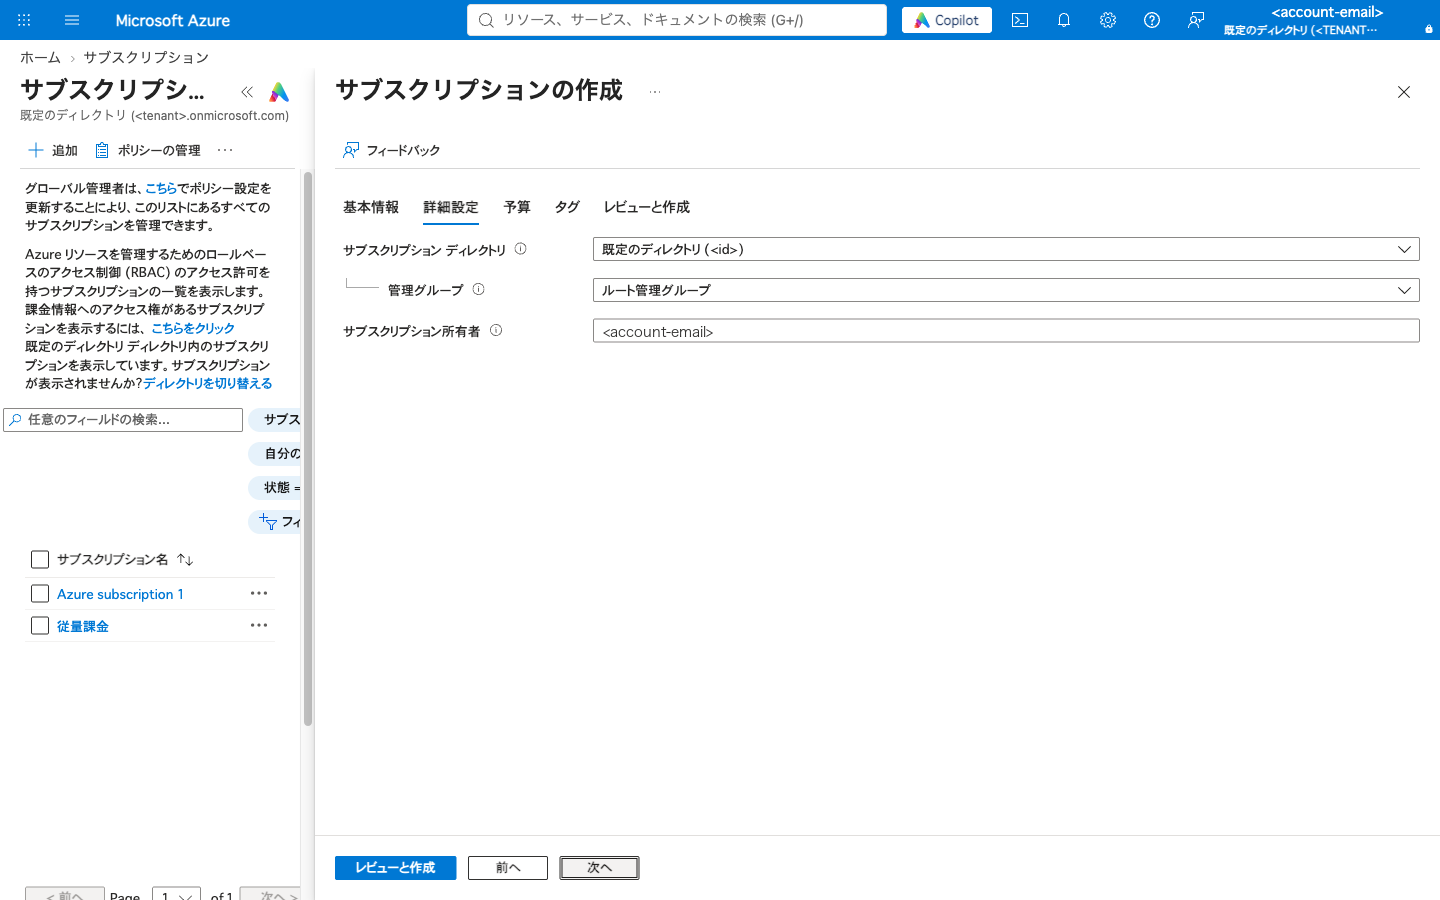
Because a subscription performs authentication and authorization with the users of the chosen directory, if it's fine to share users with your existing environment, staying with the current directory is enough. I did not try the operation of choosing a different directory.
According to the official documentation, you can choose only management groups that are in the current directory. The owner you can specify is a user or service principal of the selected directory, and guest users cannot be specified. The owner specified here is a subscription-side role, separate from the billing-side role I checked before creation.
4. Set the budget and tags as needed
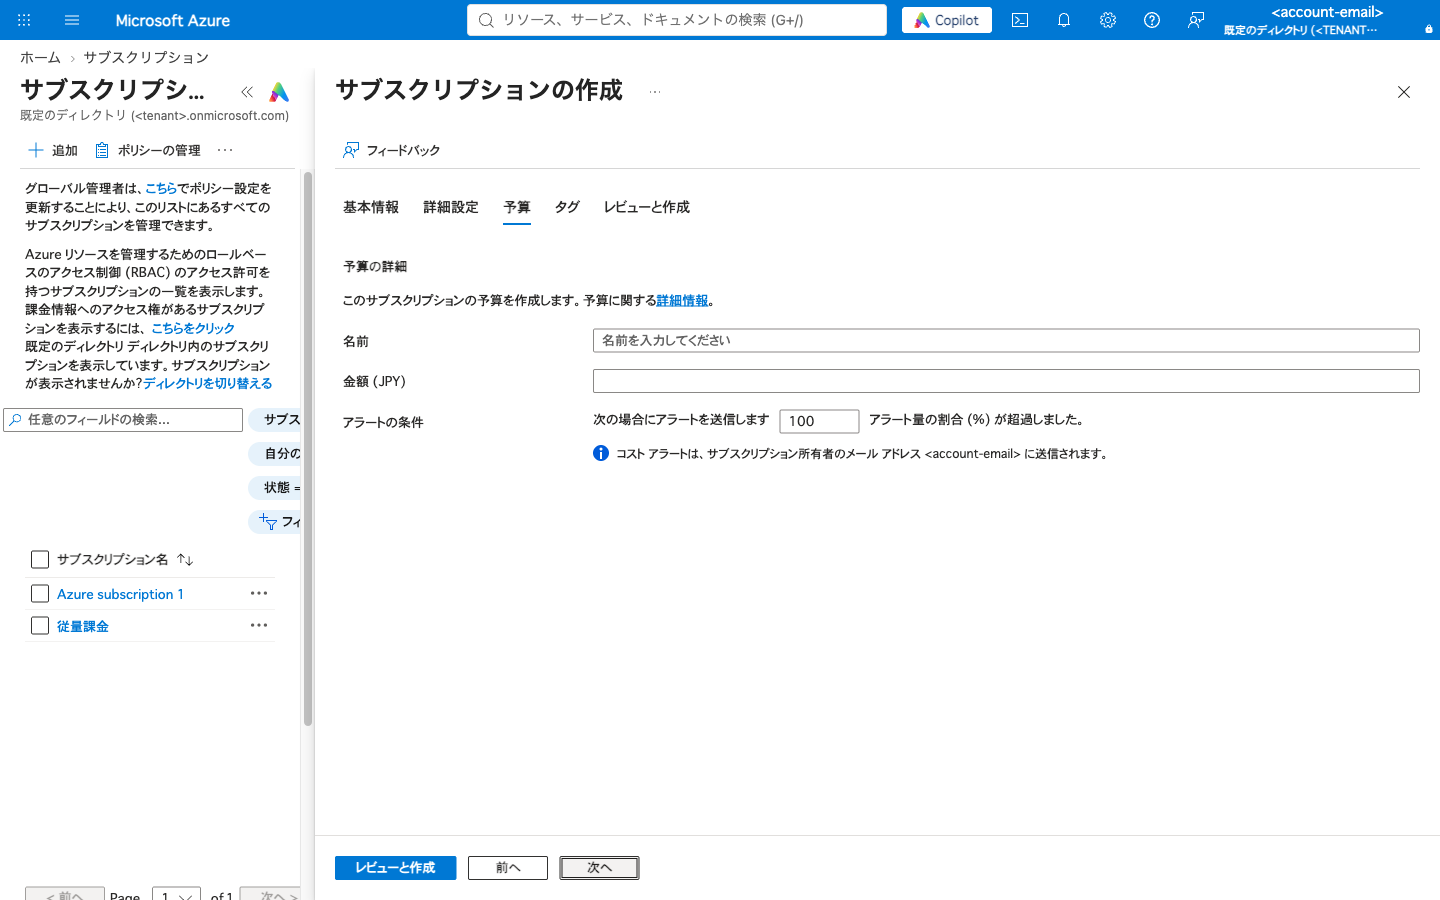
On the "Budget" tab, you can set the budget and alert conditions for this subscription at creation. The screen showed that cost alerts are sent to the subscription owner's email address. This time I left it blank, and I didn't set anything on the "Tags" tab either.
5. Review and create
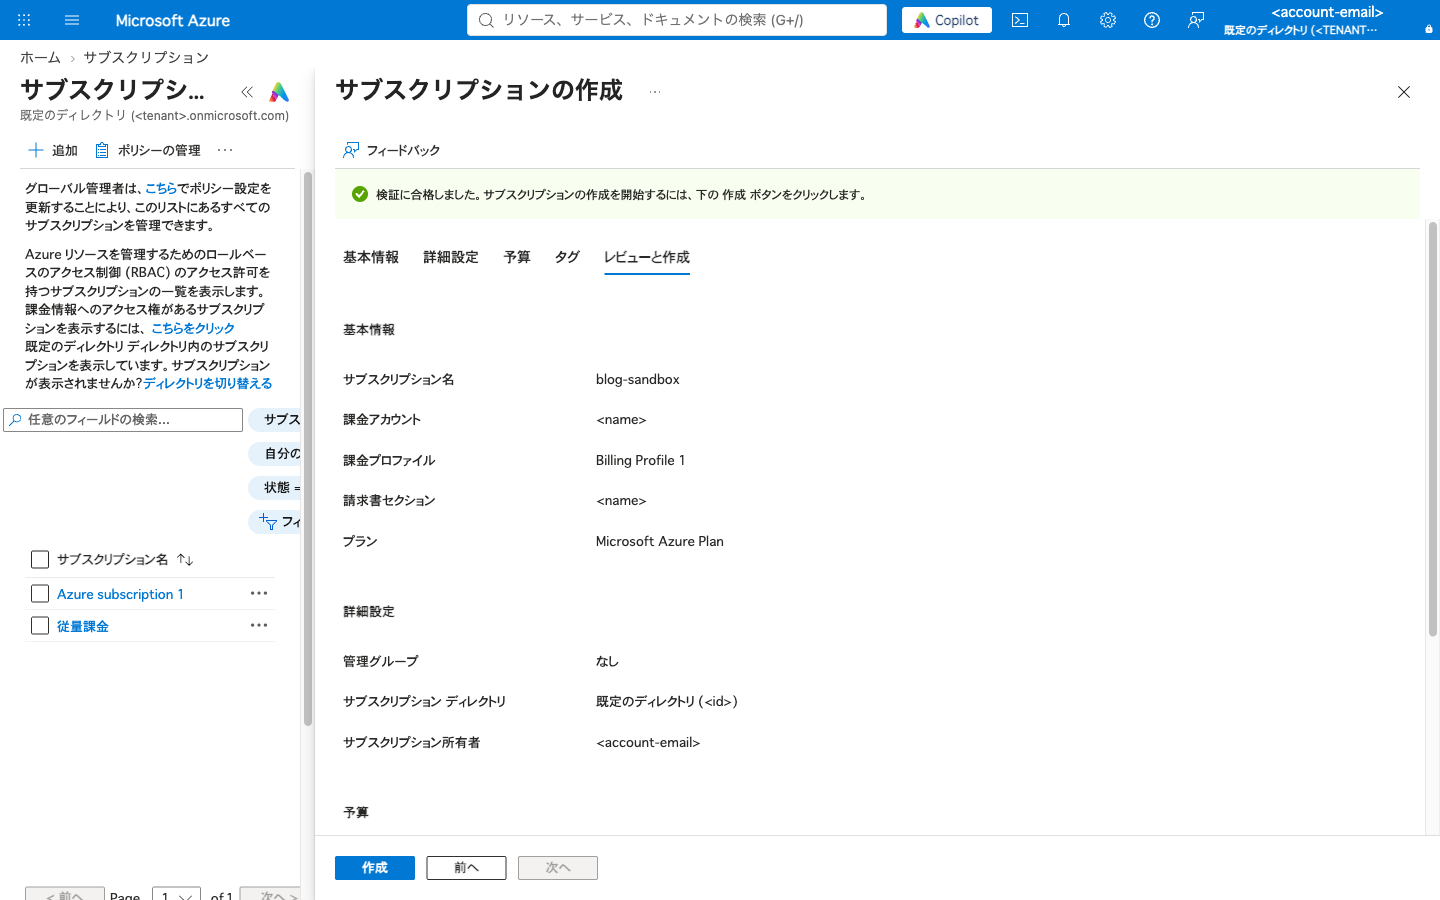
Check your entries on the "Review + create" tab. When "Validation passed" is displayed, select "Create" at the bottom.
What I checked after creation
Notification and overview
About 20 seconds after selecting "Create", a "Subscription creation complete" notification was displayed. The notification popup disappears after a while, but you can open the same notification from the bell icon at the top right.
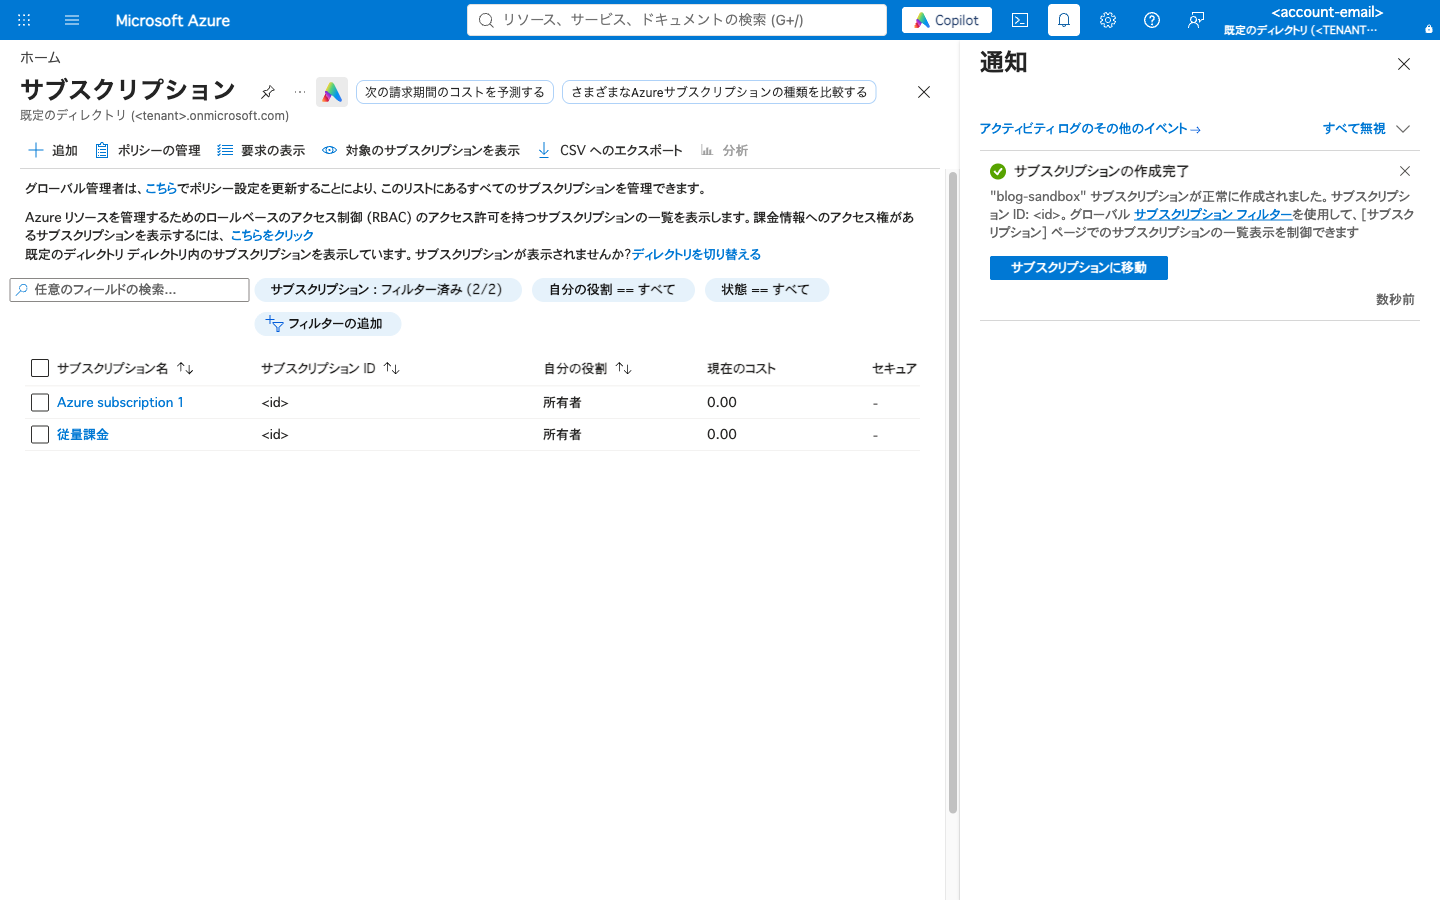
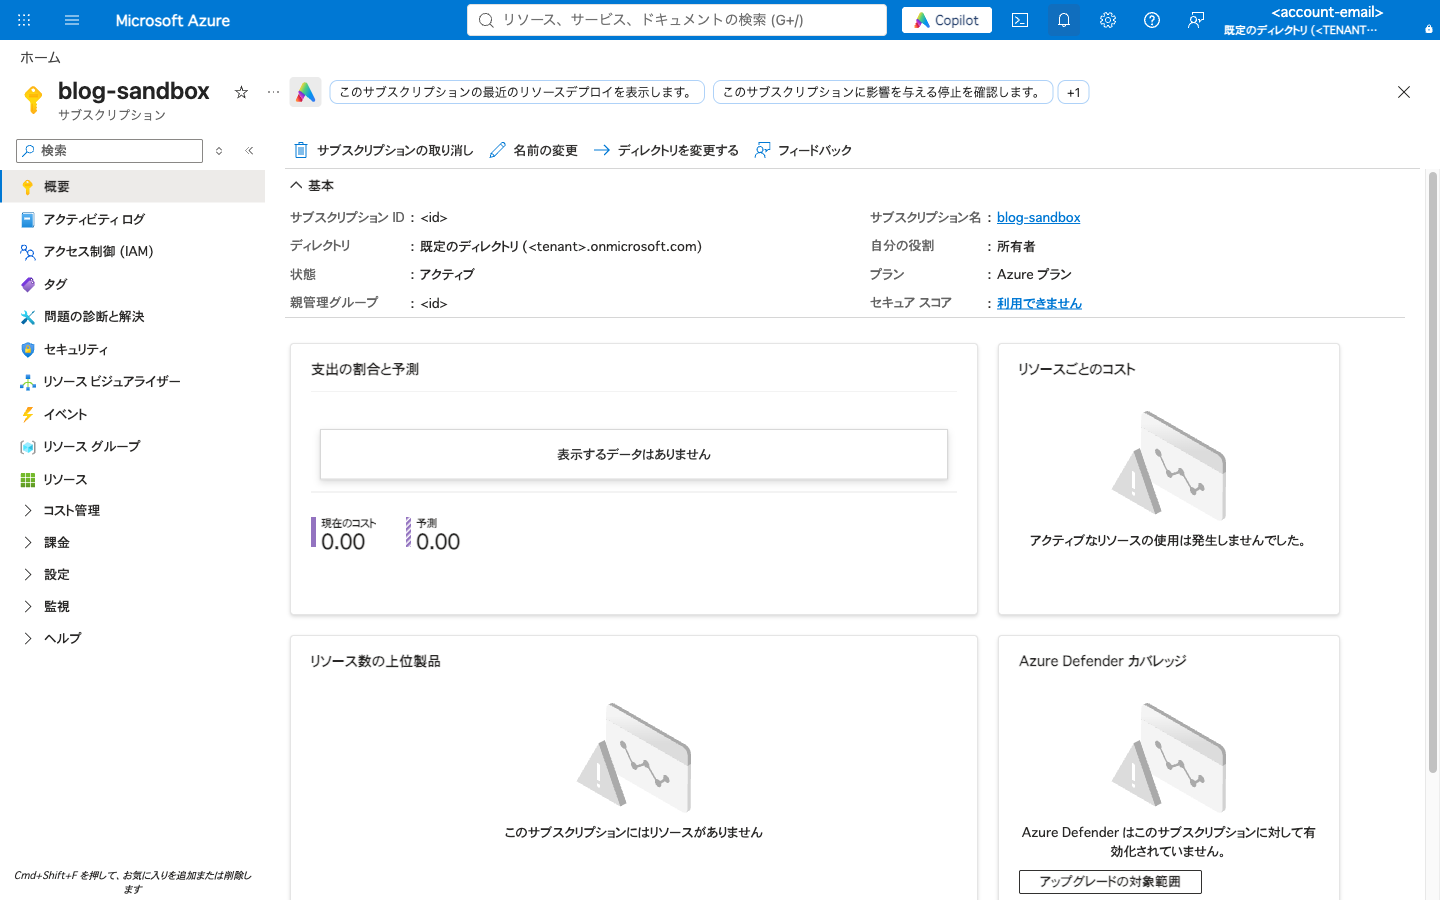
Selecting "Go to subscription" in the notification opens the overview of the created subscription. The status was "Active", my role was "Owner", the plan was "Azure plan", and the directory was the "Default Directory" I chose on the Advanced tab. There were no resources yet, and the current cost was shown as 0.00.
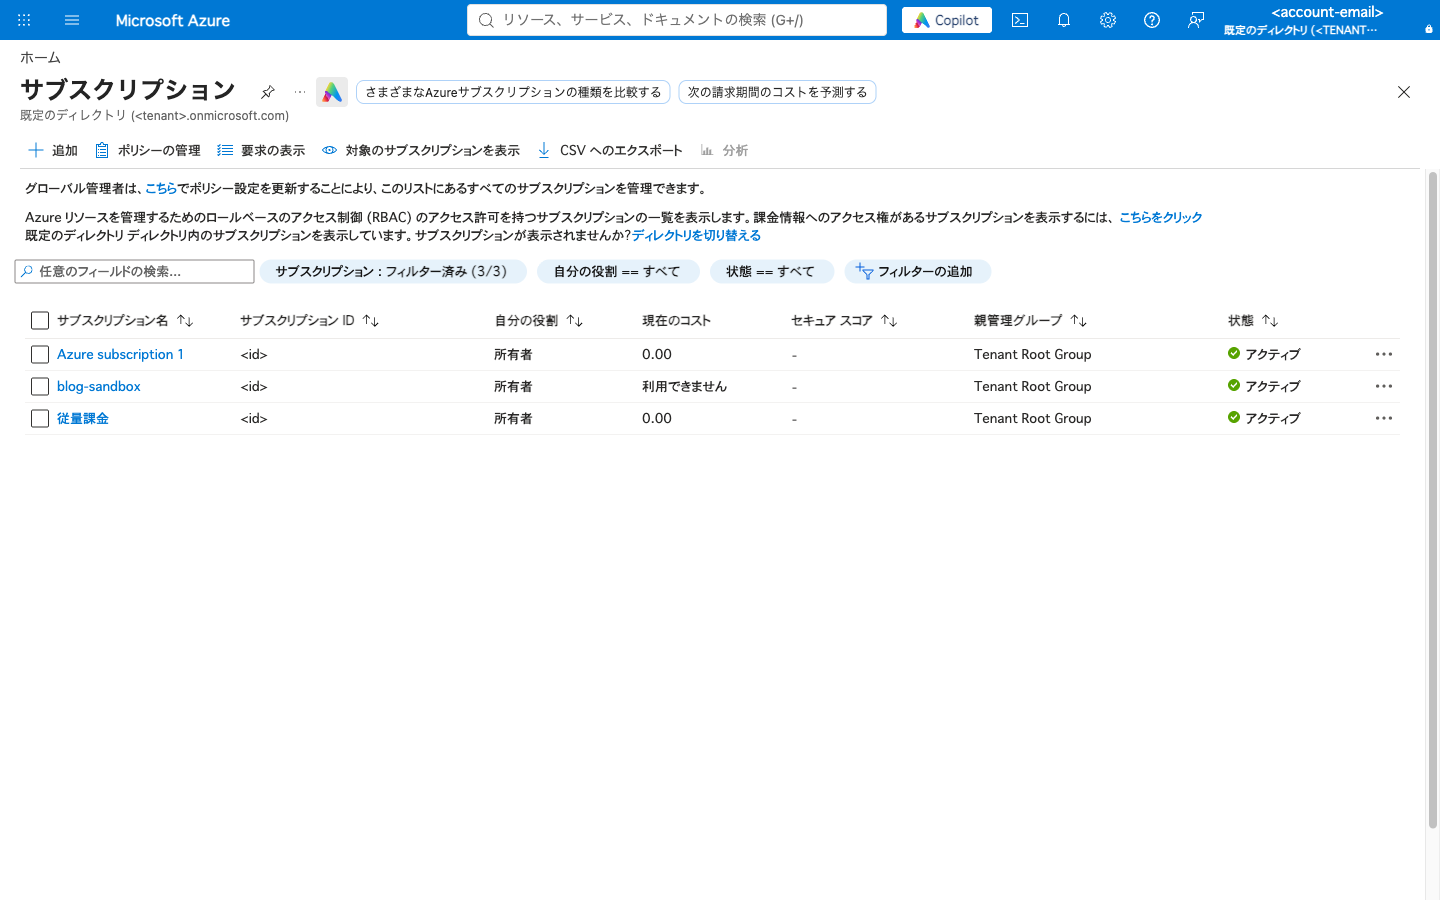
Subscription list
Immediately after creation, the subscription list still showed 2 entries. After reloading in the browser, 3 entries including blog-sandbox were displayed. The official documentation also says that if you keep the Subscriptions page open, refreshing the view will show the new subscription. In the list, only blog-sandbox showed "Not available" for current cost.
The management group was displayed as "Root management group" on the Advanced tab and "None" in the review, but in the list after creation the parent management group was "Tenant Root Group". Tenant Root Group is the default display name of the root management group, so the placement is as I chose on the Advanced tab.
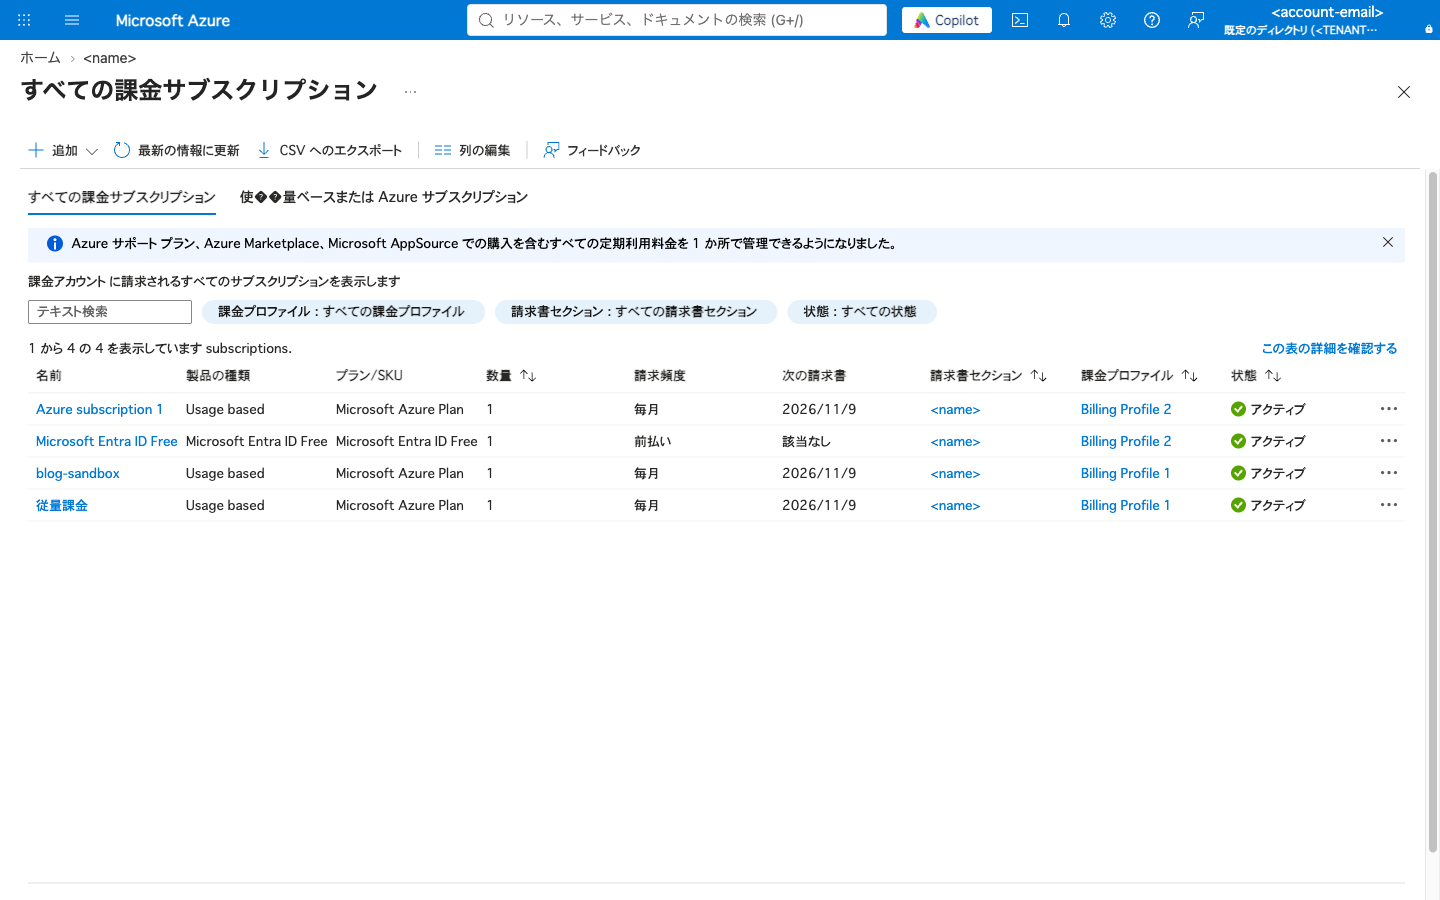
Billing destination
Finally, I checked the billing destination side. When I opened the billing account overview in "Cost Management + Billing" and selected "View billing subscriptions", the subscriptions billed to the billing account were listed with columns for billing profile and invoice section. blog-sandbox was in Billing Profile 1, which I chose on the Basics tab.
When creation failed with "not eligible for an Azure account"
When I tried to create it with the same account and billing profile on October 25, 2026, the following notification appeared after I selected "Create", and the subscription could not be created. I tried three times that day, and the notification was the same every time.
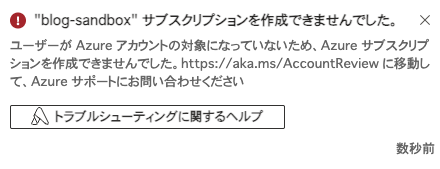
The notification directed me to contact Azure support from https://aka.ms/AccountReview. This time, before contacting them, I checked the billing profile's payment method and found that the default card had expired (the status in the list was "Expired"). When I updated the card and created it again on November 5, 2026, it was created following the steps so far.
I have not isolated whether the expired card was the cause. There was an 11-day gap from the previous attempt, and another difference is that I signed in with a newly prepared browser profile, separate from the previous one.
The official troubleshooting has the following checklist for the message "You are not eligible for an Azure subscription" shown at new sign-up. Because the wording differs from this notification, the cause is not necessarily the same.
- Whether the account profile (contact email address, address, phone number) is correct
- Whether the credit card information is correct
- Whether there is another Microsoft account using the same information
If the same notification appears, it seems you would review the billing profile's payment method in addition to these, and if it isn't resolved, contact Azure support as the notification directs.
Summary
I was able to add a subscription for testing to my existing MCA billing account from "Add" under "Subscriptions" in the Azure portal. On the "Basics" tab you choose the billing destination through the billing profile and invoice section, and on the "Advanced" tab you choose the directory, management group, and owner.
There are three things to look at before creating: whether the billing account is MCA, the billing roles, and the billing profile's payment method. After creation, in addition to the notification and the status in the overview, I checked in the billing subscriptions list that it had gone into the intended billing profile. If you cannot create it because of "not eligible for an Azure account", it seems you also need to review the billing profile's payment method. Because a budget only sends alerts and does not stop usage, you need to clean up resources yourself once testing is finished.
Reference links
- Create a Microsoft Customer Agreement subscription
- Overview of Microsoft Customer Agreement billing accounts
- Billing accounts and scopes in the Azure portal
- Understand Microsoft Customer Agreement administrative roles in Azure
- Associate or add an Azure subscription to your Microsoft Entra tenant
- What are Azure management groups?
- Tutorial: Create and manage budgets
- Troubleshoot issues when signing up for a new account in the Azure portal