I tried translating an entire PDF using the Google Cloud Translation API
This page has been translated by machine translation. View original
Hello, I'm Kema.
There are many situations where you want to translate a document into another language while preserving its layout.
For example, you might need to translate a manual or proposal that includes figures and tables into English as-is.
However, if you extract only the text from a PDF and translate it, tables and column layouts break down, making it impossible to reproduce the original appearance.
Furthermore, unique proper nouns such as product names and character names often need to be consistently translated the same way every time.
That's why this article focuses on the Document Translation feature of Google Cloud's Cloud Translation API.
Can the layout be preserved when you pass a PDF file directly to the API?
How do results differ between native PDFs and scanned PDFs?
Can a glossary be used to fix custom terminology?
I summarized the results of actually running it, focusing on these three points.
I hope this will serve as a reference when considering automating document translation.
The sample document used for verification is a setting document for a completely original fictional anime unrelated to any real works, which I had Claude create.
Since I wanted to test the translation of proper nouns, I intentionally scattered coined terms throughout.
Let me write the conclusions first.
- For native PDFs, colors, fonts, hyperlinks, tables, and graphs were all preserved almost as-is during translation
- Using a glossary fixed the translation of proper nouns that had been inconsistent, exactly as intended
- Scanned PDFs can also be translated, and the original image colors remain (though the translated text is overlaid, so formatting is not as faithful as native)
- Resources such as glossaries can only be created in
us-central1and cannot be placed in the Tokyo region
1. What is Document Translation in Cloud Translation API
The Cloud Translation API has a Document Translation feature that translates files as-is, separate from the text translation feature.
When you pass a PDF or DOCX as a file, it translates it while preserving the formatting and layout.
The official documentation explains it as follows.
Cloud Translation - Advanced provides a Document Translation API for directly translating formatted documents such as PDF and DOCX. Compared to plain text translations, Document Translation preserves the original formatting and layout in your translated documents, helping you retain much of the original context like paragraph breaks.
Source: Official documentation: Translate documents | Google Cloud
If you build document translation yourself, you would need to parse the file structure, extract only the text, translate it, and write it back to the original structure.
Document Translation handles this structural parsing and writing-back on the service side, so you can leave layout preservation to the service just by throwing the whole file at it.
The supported input formats are as follows.
In addition to PDF, Word, PowerPoint, and Excel formats (including legacy formats) are supported.
| Input format | MIME type | Output format |
|---|---|---|
application/pdf |
PDF or DOCX | |
| DOCX | application/vnd.openxmlformats-officedocument.wordprocessingml.document |
DOCX |
| DOC | application/msword |
DOC or DOCX |
| PPTX | application/vnd.openxmlformats-officedocument.presentationml.presentation |
PPTX |
| PPT | application/vnd.ms-powerpoint |
PPT or PPTX |
| XLSX | application/vnd.openxmlformats-officedocument.spreadsheetml.sheet |
XLSX |
| XLS | application/vnd.ms-excel |
XLS or XLSX |
Source: Official documentation: Translate documents | Google Cloud
For Word (DOC/DOCX), there is a caveat that text inside text boxes is not translated and remains in the source language.
Content inside text boxes aren't translated and remain in the source language.
Source: Official documentation: Translate documents | Google Cloud
1.1 Two editions: Basic (v2) and Advanced (v3)
Cloud Translation has two editions: Basic (v2) and Advanced (v3).
Document Translation used this time is a feature exclusive to Advanced, and glossaries and batch translation are also only available on the Advanced side.
Existing Cloud Translation - Basic (v2) users who want to use the latest Cloud Translation features, such as glossaries and AutoML models, must migrate their applications to use Cloud Translation - Advanced (v3).
Source: Official documentation: Migrate to Advanced from Basic | Google Cloud
Summarizing the main differences based on official documentation, it looks like the following.
| Item | Basic (v2) | Advanced (v3) |
|---|---|---|
| Text translation / language detection | Available | Available |
| Translation model | NMT only | NMT / Translation LLM / Custom (AutoML) |
| Document translation (supported formats in the table above) | × | ○ |
| Glossary (fixing custom terminology) | × | ○ |
| Batch translation (Cloud Storage) | × | ○ |
| Authentication | API key or service account | Service account (IAM). API keys not supported |
The differences in translation models and authentication are described in the official documentation as follows.
When you request a translation by using Cloud Translation - Basic, Google uses a pre-trained Neural Machine Translation (NMT) model. For Cloud Translation - Advanced, you can use the pre-trained NMT model, the Translation LLM, or a custom AutoML Translation model.
Because of this, you cannot use API keys to authenticate to the service. Instead, you must use service accounts when authenticating to Cloud Translation - Advanced.
Source: Official documentation: Migrate to Advanced from Basic | Google Cloud
A full list of features for each edition is summarized on the official comparison page (Compare Basic and Advanced | Google Cloud).
1.2 How to pass files (synchronous and batch)
In Advanced Document Translation, there are two ways to pass files: synchronous (online) and batch (asynchronous).
This time, I'll use the synchronous method, which is easier to try.
| Method | API | Input/Output | Main limits | Suitable for |
|---|---|---|---|---|
| Synchronous (online) | translateDocument |
Byte stream directly in the request | 1 file. 20MB. 300 pages for native PDF, 20 pages for scanned PDF | Small to medium scale, easy to try |
| Batch (asynchronous) | batchTranslateDocument |
Cloud Storage required for both input and output | Up to 100 files, 1 GB total or 100 million Unicode code points | Large volume/size, PDF to DOCX conversion |
The limits for each are described in the official documentation as follows.
Online translation provides real-time processing (synchronous processing) of a single file. For PDFs, the file size can be up to 20 MB and up to 300 pages for native PDFs (requires the isTranslateNativePdfOnly field to be true). If you enable the enableShadowRemovalNativePdf field, the limit is 20 pages. For scanned PDFs, the limit is 20 pages. For other document types, the file sizes can be up to 20 MB with no page limits.
Batch translation allows you to translate multiple files into multiple languages in a single request. For each request, you can send up to 100 files with a total content size of up to 1 GB or 100 million Unicode codepoints, whichever limit is hit first.
Source: Official documentation: Translate documents | Google Cloud
The requirement for batch to use Cloud Storage is also explicitly stated.
Batch translation input files are read from a Cloud Storage bucket and output files are written to a Cloud Storage bucket.
Source: Official documentation: Batch translation | Google Cloud
For the simplest configuration of synchronous translation without using a glossary, Cloud Storage is not required either.
It is complete just by loading the PDF byte stream directly into the request and receiving the translated byte stream.
1.3 PDF behavior differs between native and scanned
PDFs come in two types: "native PDFs" that contain character data, and "scanned PDFs" that contain only images, and Document Translation handles them differently.
| Item | Native PDF | Scanned PDF |
|---|---|---|
| Input content | Has character data | Image only |
| Structural preservation of text color, font, hyperlinks | Preserved | Not preserved |
| Visual color (page image color) | Preserved | Remains (original image is preserved as-is) |
| Page limit for synchronous translation | 300 pages | 20 pages |
| PDF → DOCX conversion | Possible (batch only) | Not possible |
| Notes | Translated text may overlap the original (shadow text) | Some formatting is lost. Source must be horizontally oriented |
The fact that preservation of text color, fonts, hyperlinks, and PDF → DOCX conversion are limited to native PDFs is explicitly stated in the official documentation.
Support for PDF to DOCX conversions is available for batch document translations on native PDF files only. Also, Document Translation preserves hyperlinks, font size, and font color for native PDF files only (for both synchronous and batch translations).
Source: Official documentation: Translate documents | Google Cloud
The preservation mentioned here refers to structured "text color and fonts."
Even for scanned PDFs, the original page image remains as-is, so the visual color is preserved if the original is in color (actual behavior is confirmed in §4).
The fact that scanned PDFs result in some formatting loss is also explicitly stated.
The fact that complex layouts (tables, multi-column layouts, graphs with legends) can break down is what this verification targets.
Translating scanned PDF files results in some formatting loss. Complex PDF layouts can also result in some formatting loss, which can include data tables, multi-column layouts, and graphs with labels or legends.
Source: Official documentation: Translate documents | Google Cloud
2. Preparation for Verification
2.1 Prerequisites
This article's verification was run in the following environment.
| Item | This environment |
|---|---|
| OS | macOS |
| Python | 3.12.13 (venv created within) |
| Google Cloud SDK (gcloud) | 565.0.0 |
| google-cloud-translate | 3.26.0 |
| GCP project | Personal project (billing enabled) |
In addition, the following preparations are assumed to be in place.
- A Google Cloud project with billing enabled (Document Translation incurs per-page charges)
- The
gcloudcommand is available - IAM permissions to operate translations and glossaries (equivalent to
roles/cloudtranslate.editor; write permissions to the target bucket are also required when using glossaries)
2.2 Sample document (original fictional anime)
For verification, I had Claude create a 2-page PDF as a setting document for the fictional anime "Hoshirei Monogatari: Lumina Chronicle."
The content is completely original and has no relation to any real works, people, or organizations.
This document intentionally includes elements that are prone to breaking and elements I want to verify in translation.
- Data tables, 2-column layout, bar graphs with legends (for checking layouts prone to breaking)
- Colored text in teal, purple, and orange, 3 types of fonts, and hyperlinks (for checking formatting preservation)
- A location where a sentence is split mid-way across a page break (for checking translation across page breaks)
- Coined words such as
星霊(spirit),共鳴進化(resonance evolution), and雷狼ボルテ(Thunder Wolf Volte) (for checking the glossary)
The same content was prepared in two versions: a "native PDF" with character data, and a "scanned PDF (image only)" that simulates being printed and scanned.
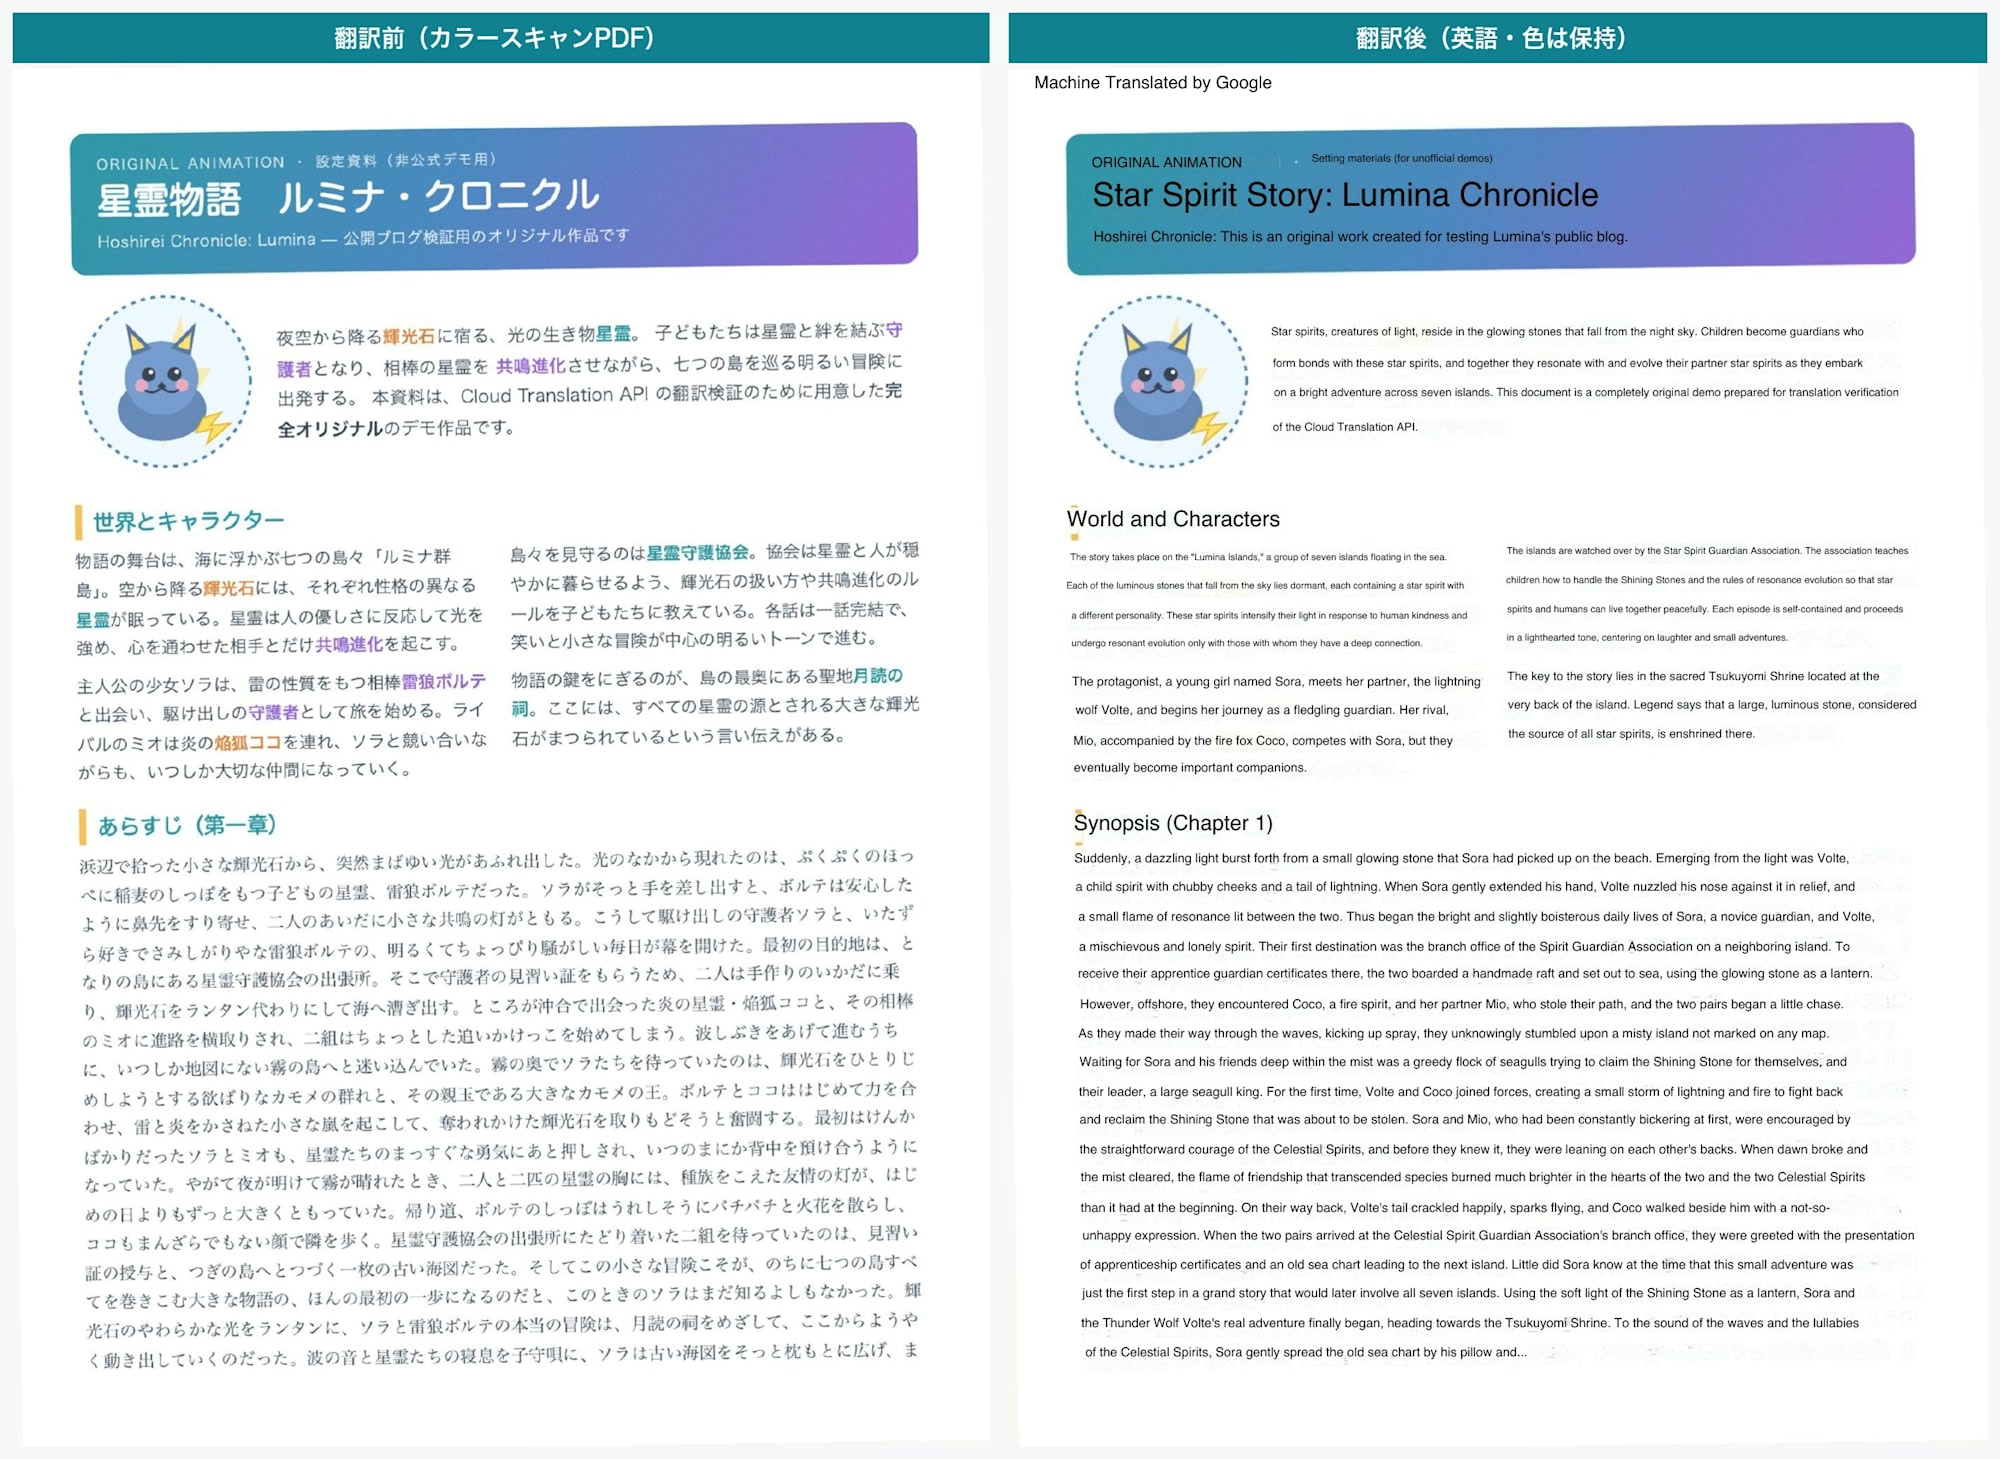
The native PDF before translation (pages 1-2) is shown here.

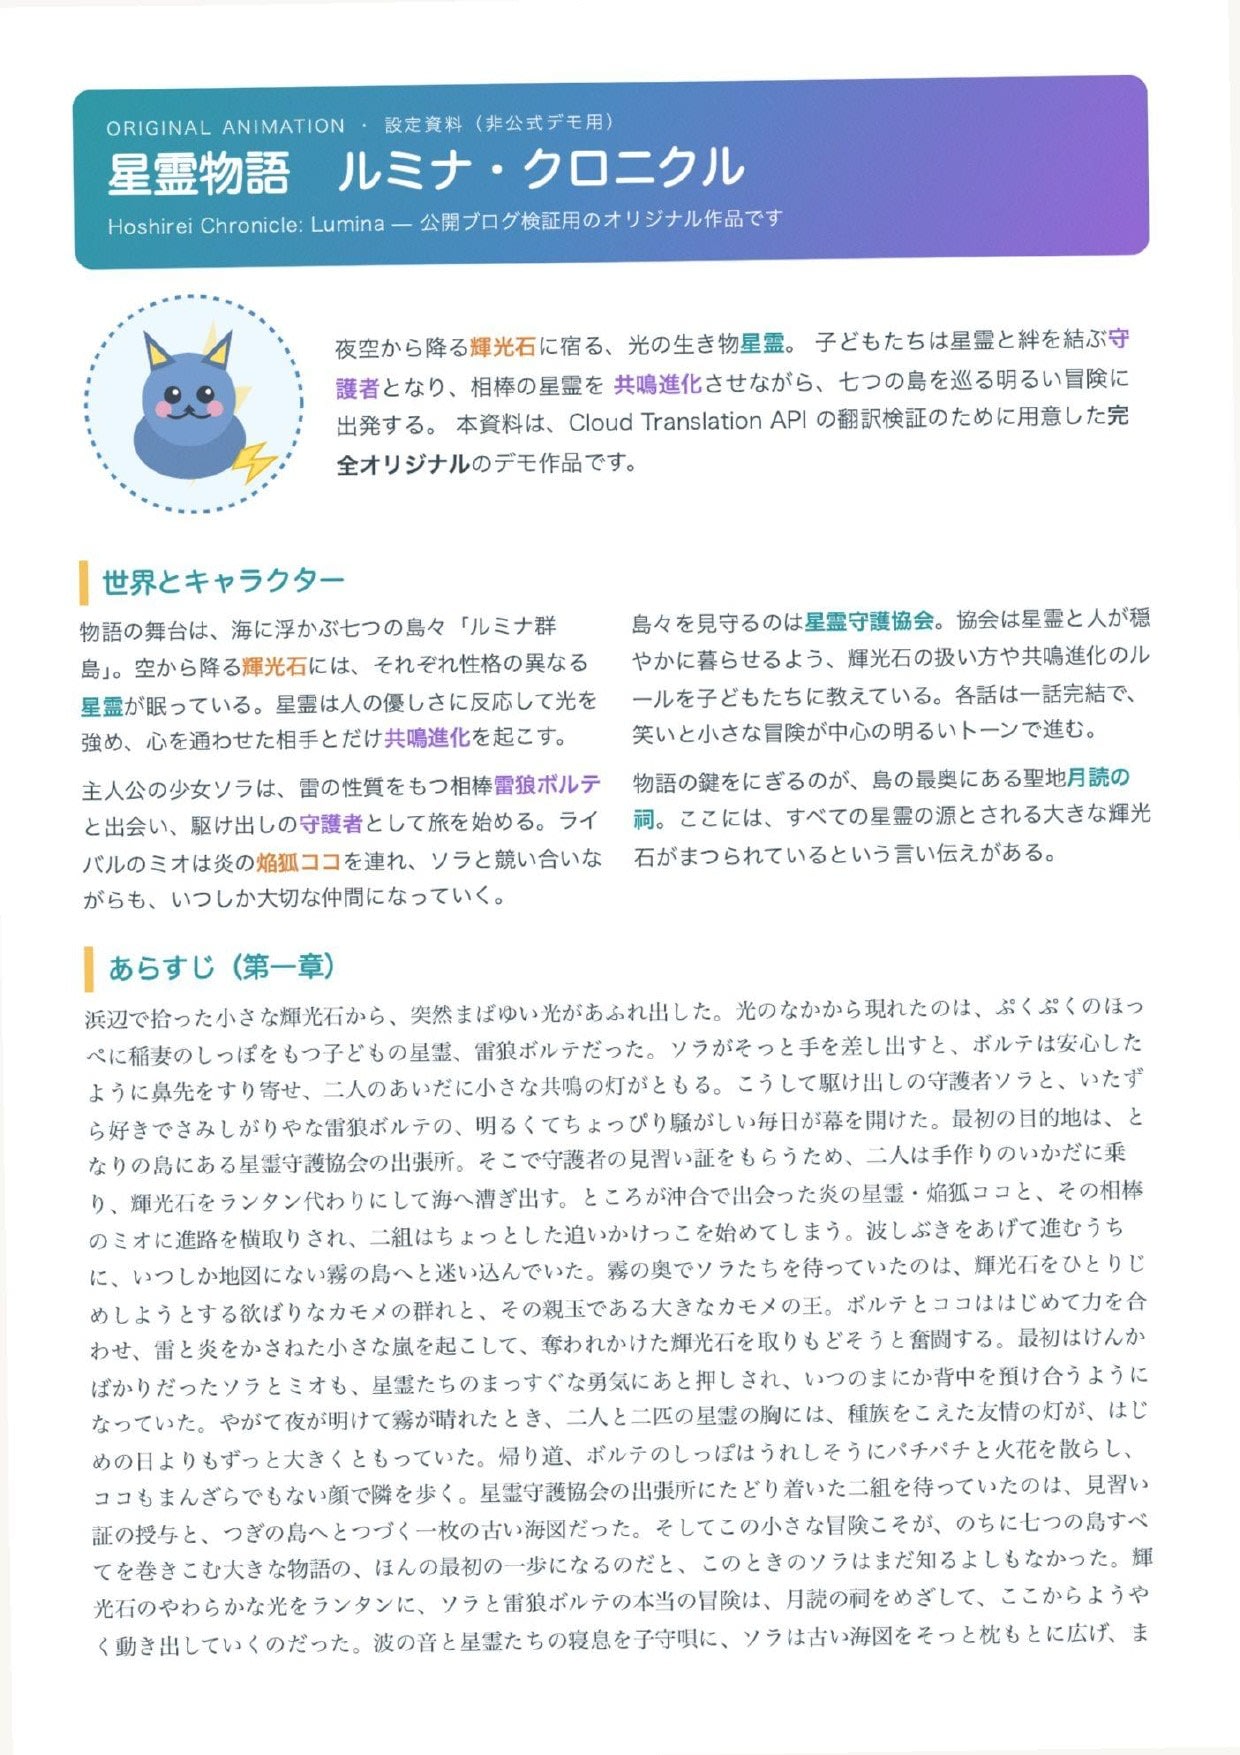
Native PDF page 1 before translation (Japanese)
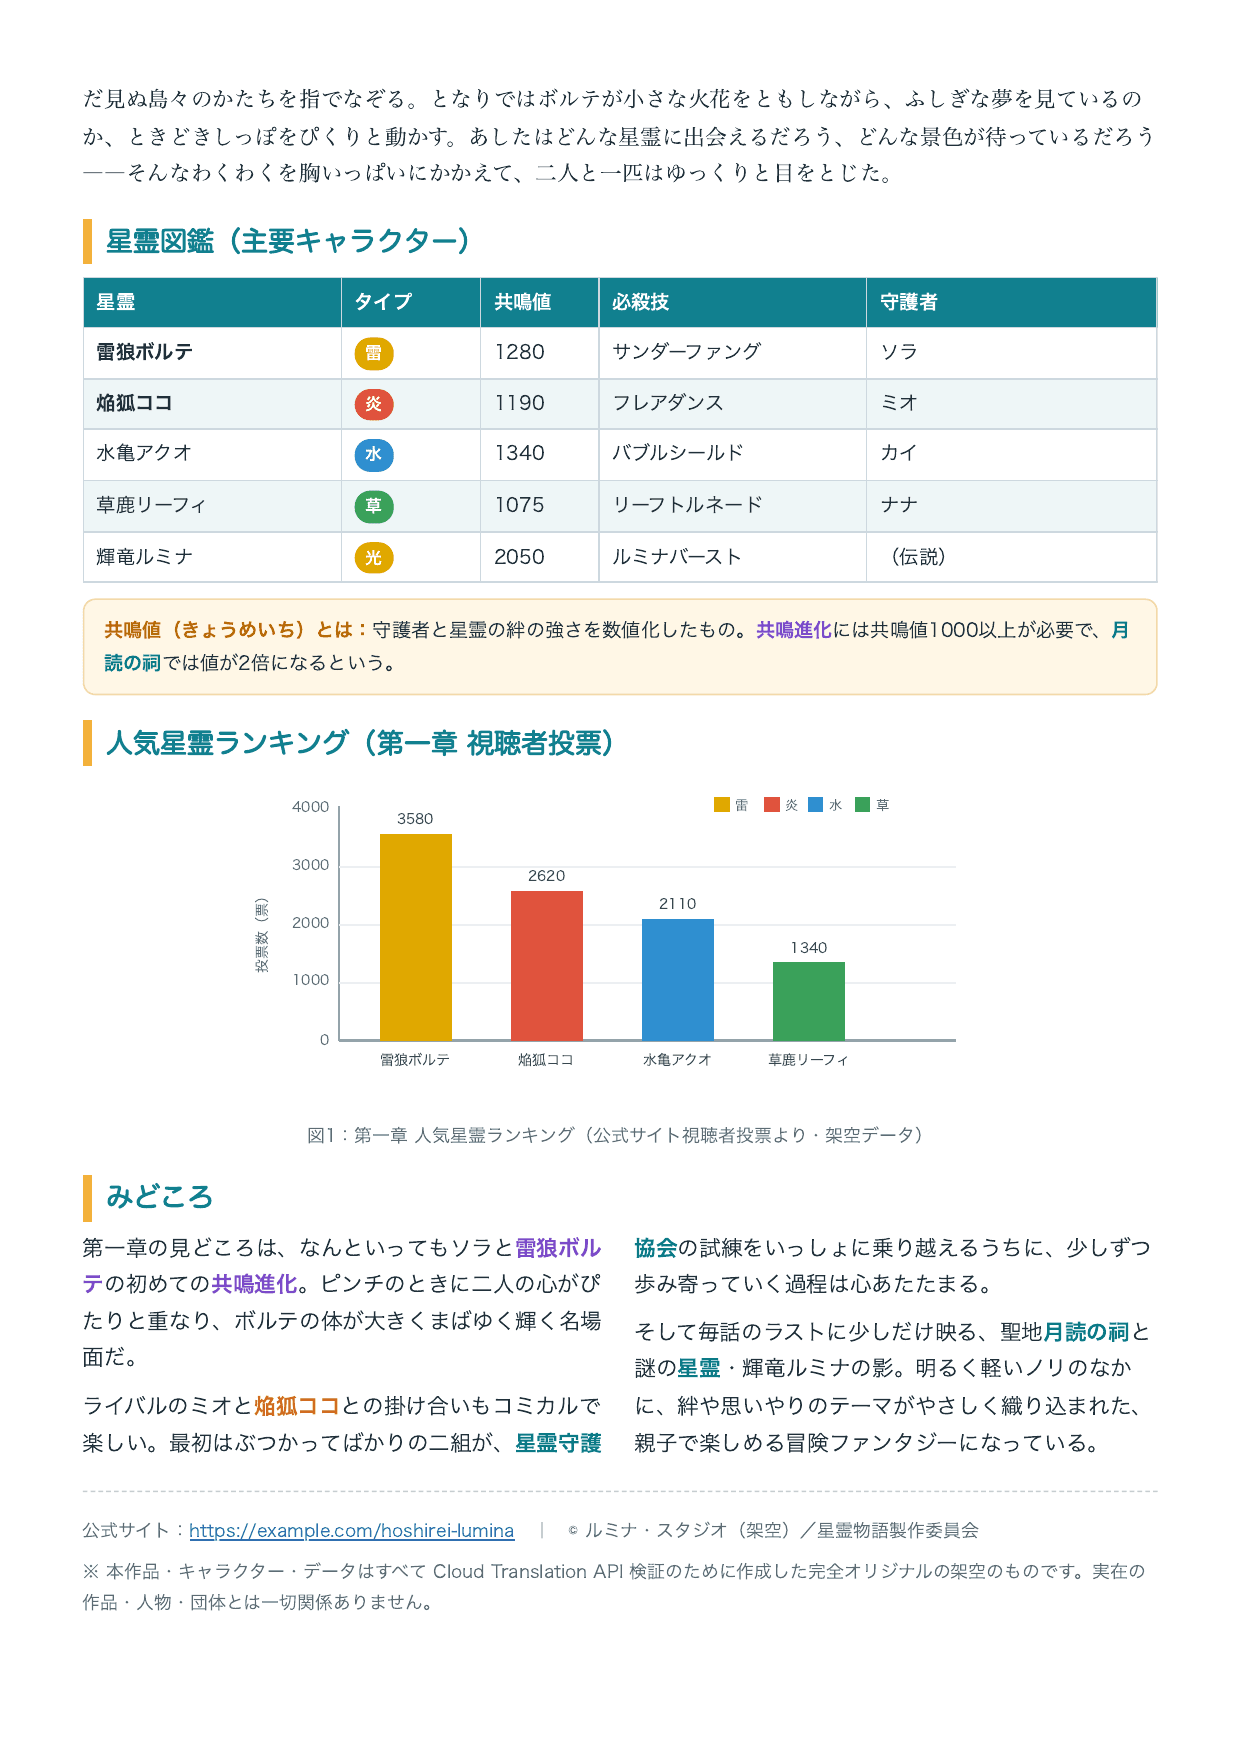
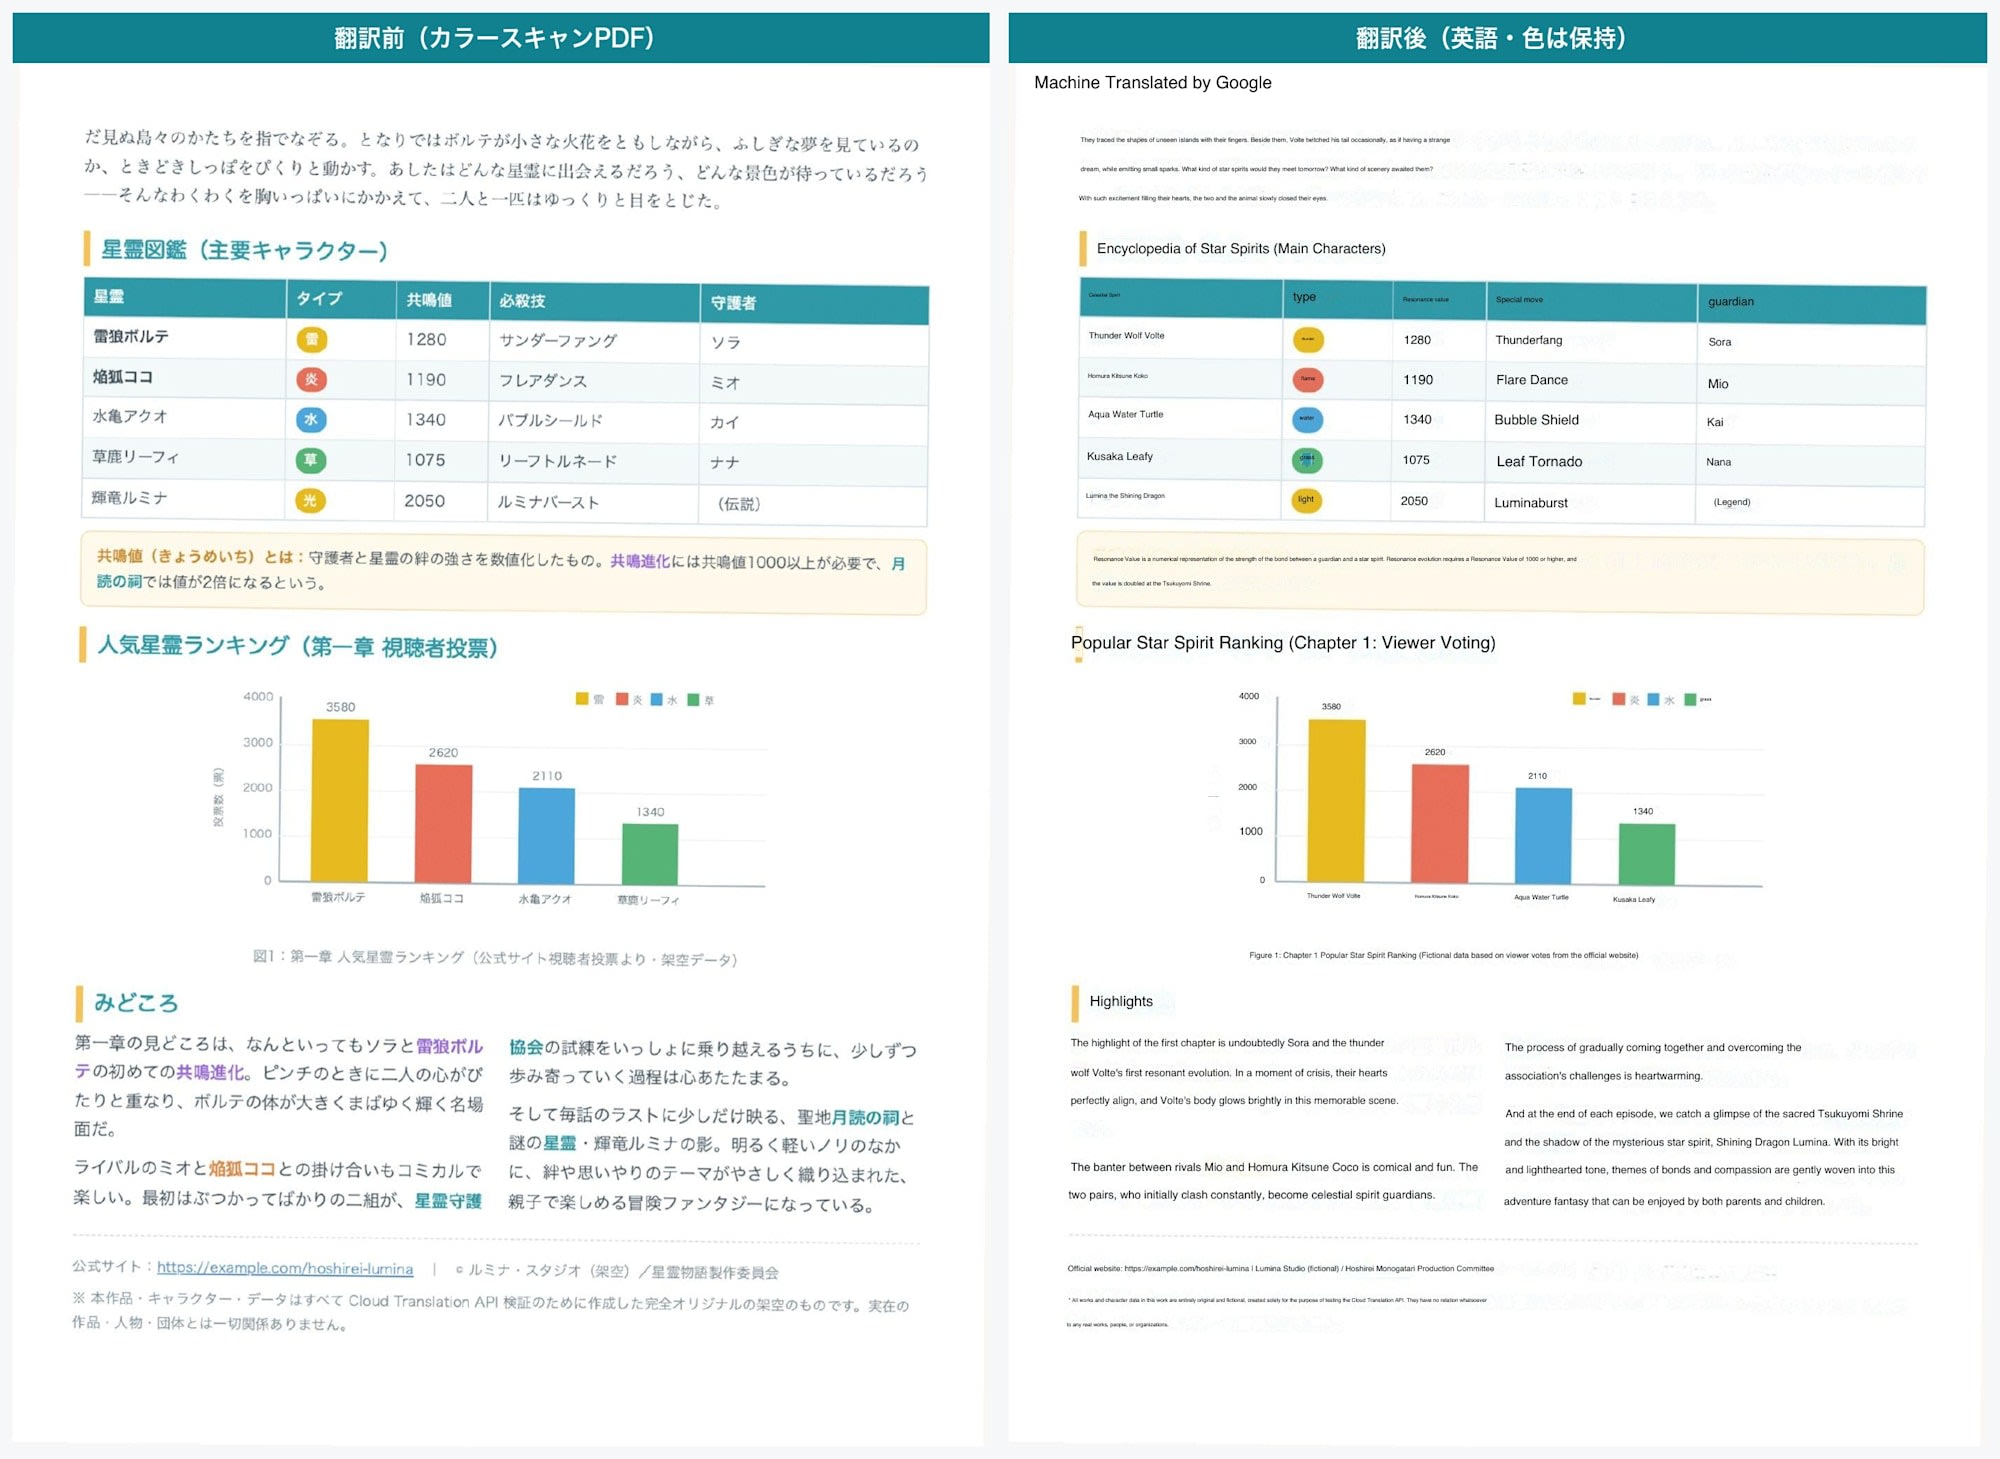
Native PDF page 2 before translation (Japanese, tables and graphs)
The scanned PDF has the same content colorized and slightly tilted to give it an appearance close to an actual scan (it is a PDF with image only, containing no character data).
Scanned PDF page 1 before translation (image only)
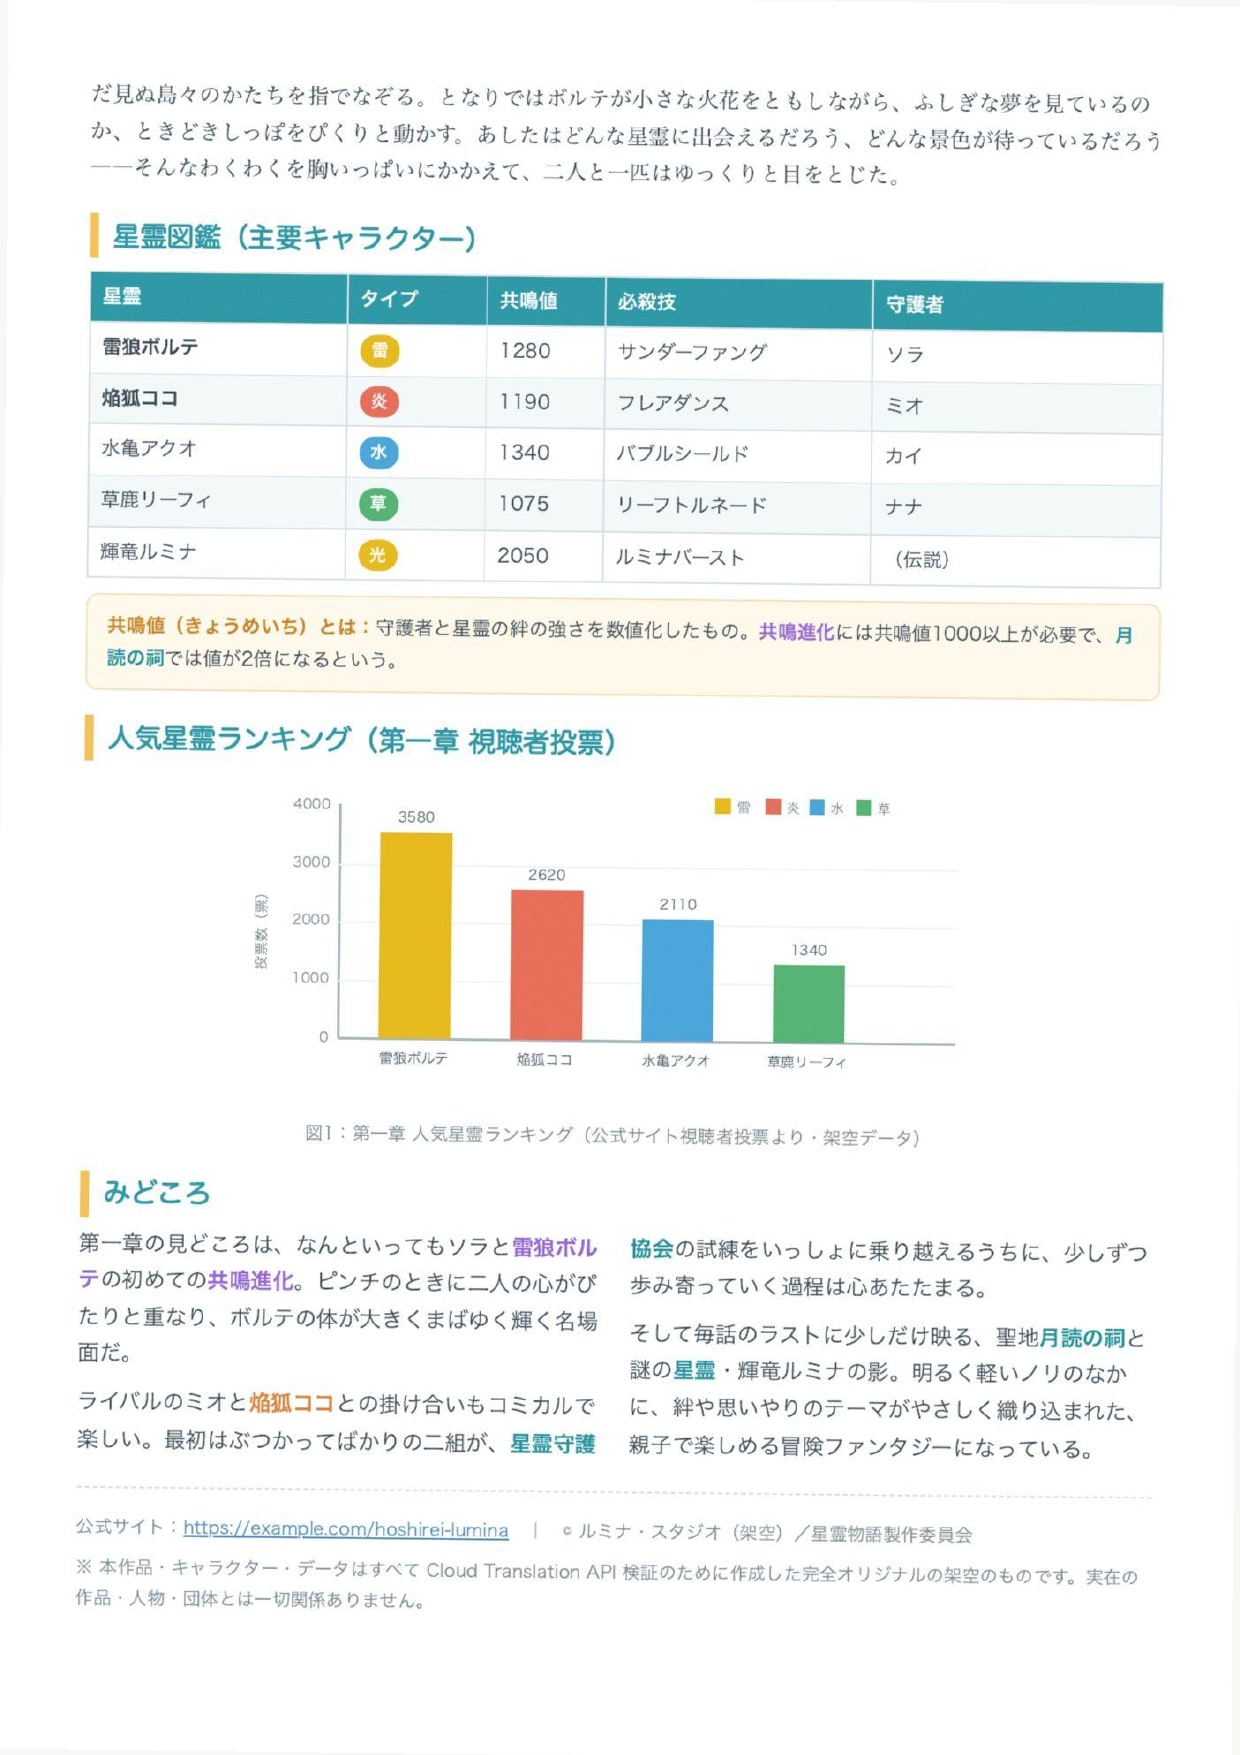
Scanned PDF page 2 before translation (image only, tables and graphs)
2.3 Environment Setup
The preparation follows this flow.
First, enable the Cloud Translation API.
Specify the target project with --project.
If it's already enabled, this command will complete without doing anything.
gcloud services enable translate.googleapis.com --project <YOUR_PROJECT_ID>
Next is authentication.
Document Translation (v3 / Advanced) does not support API keys, so ADC (Application Default Credentials) is used.
This point is also explicitly stated in the official documentation.
API keys can be used only with API methods that support API keys. Cloud Translation supports API keys for the following API methods:
- All methods for the Cloud Translation - Basic API (v2) support API keys, such as translate and detect. The Cloud Translation - Advanced API (v3) does not support API keys.
Source: Official documentation: Authentication | Google Cloud
ADC is convenient for local use.
Run the following command, and a browser will open asking for your Google account consent.
When you approve, authentication credentials are saved locally, and the client library will automatically use that information.
gcloud auth application-default login
gcloud auth application-default set-quota-project <YOUR_PROJECT_ID>
The second line, set-quota-project, specifies which project's quota and billing to use when calling the API.
Without this setting, the billing project is not determined at call time, which can result in errors.
Create a virtual environment (venv) and install libraries inside it.
python3 -m venv .venv
source .venv/bin/activate
pip install google-cloud-translate
Running source .venv/bin/activate adds (.venv) to the beginning of the prompt, and Python from the venv will be used in this terminal.
Subsequent commands are run with this venv activated.
You can verify it's installed correctly if the following import succeeds.
python -c "import google.cloud.translate_v3; print('import OK')"
# Example output
import OK
3. Translating a Native PDF (Minimal Configuration)
First, let's translate with the simplest configuration without using a glossary.
This is synchronous translation where the PDF byte stream is loaded directly into the request.
Save the code used for translation as translate_pdf.py in the same folder as the sample PDF (hoshirei_native_ja.pdf).
is_translate_native_pdf_only is set to True to treat it as a native PDF.
Full text of translate_pdf.py (click to expand)
import time
from pathlib import Path

from google.cloud import translate_v3 as translate

PROJECT_ID = "<YOUR_PROJECT_ID>"
LOCATION = "us-central1"
INPUT = "hoshirei_native_ja.pdf"
OUTPUT = "hoshirei_native_en.pdf"

content = Path(INPUT).read_bytes()
print(f"Input: {INPUT}({len(content):,} bytes, ja→en)")

client = translate.TranslationServiceClient()
request = {
    "parent": f"projects/{PROJECT_ID}/locations/{LOCATION}",
    "source_language_code": "ja",
    "target_language_code": "en",
    "document_input_config": {"content": content, "mime_type": "application/pdf"},
    # Native PDF: True for up to 300 pages. False/unspecified treats as scanned (20 pages)
    "is_translate_native_pdf_only": True,
}

started = time.perf_counter()
response = client.translate_document(request=request)
elapsed = time.perf_counter() - started

# Write out the translated PDF
out = response.document_translation.byte_stream_outputs[0]
Path(OUTPUT).write_bytes(out)
print(f"Processing time: {elapsed:.2f} seconds")
print(f"Output: {OUTPUT}({len(out):,} bytes)")
Replace PROJECT_ID in the code with your own project ID.
Then simply run it with the venv enabled from §2.3.
python translate_pdf.py
The 2-page PDF was translated in under 3 seconds.
# Example output
Input: hoshirei_native_ja.pdf(1,130,037 bytes, ja→en)
Processing time: 2.62 seconds
Output: hoshirei_native_en.pdf(119,631 bytes)
A translated PDF named hoshirei_native_en.pdf is created in the same folder.
Let's compare the results before and after translation.
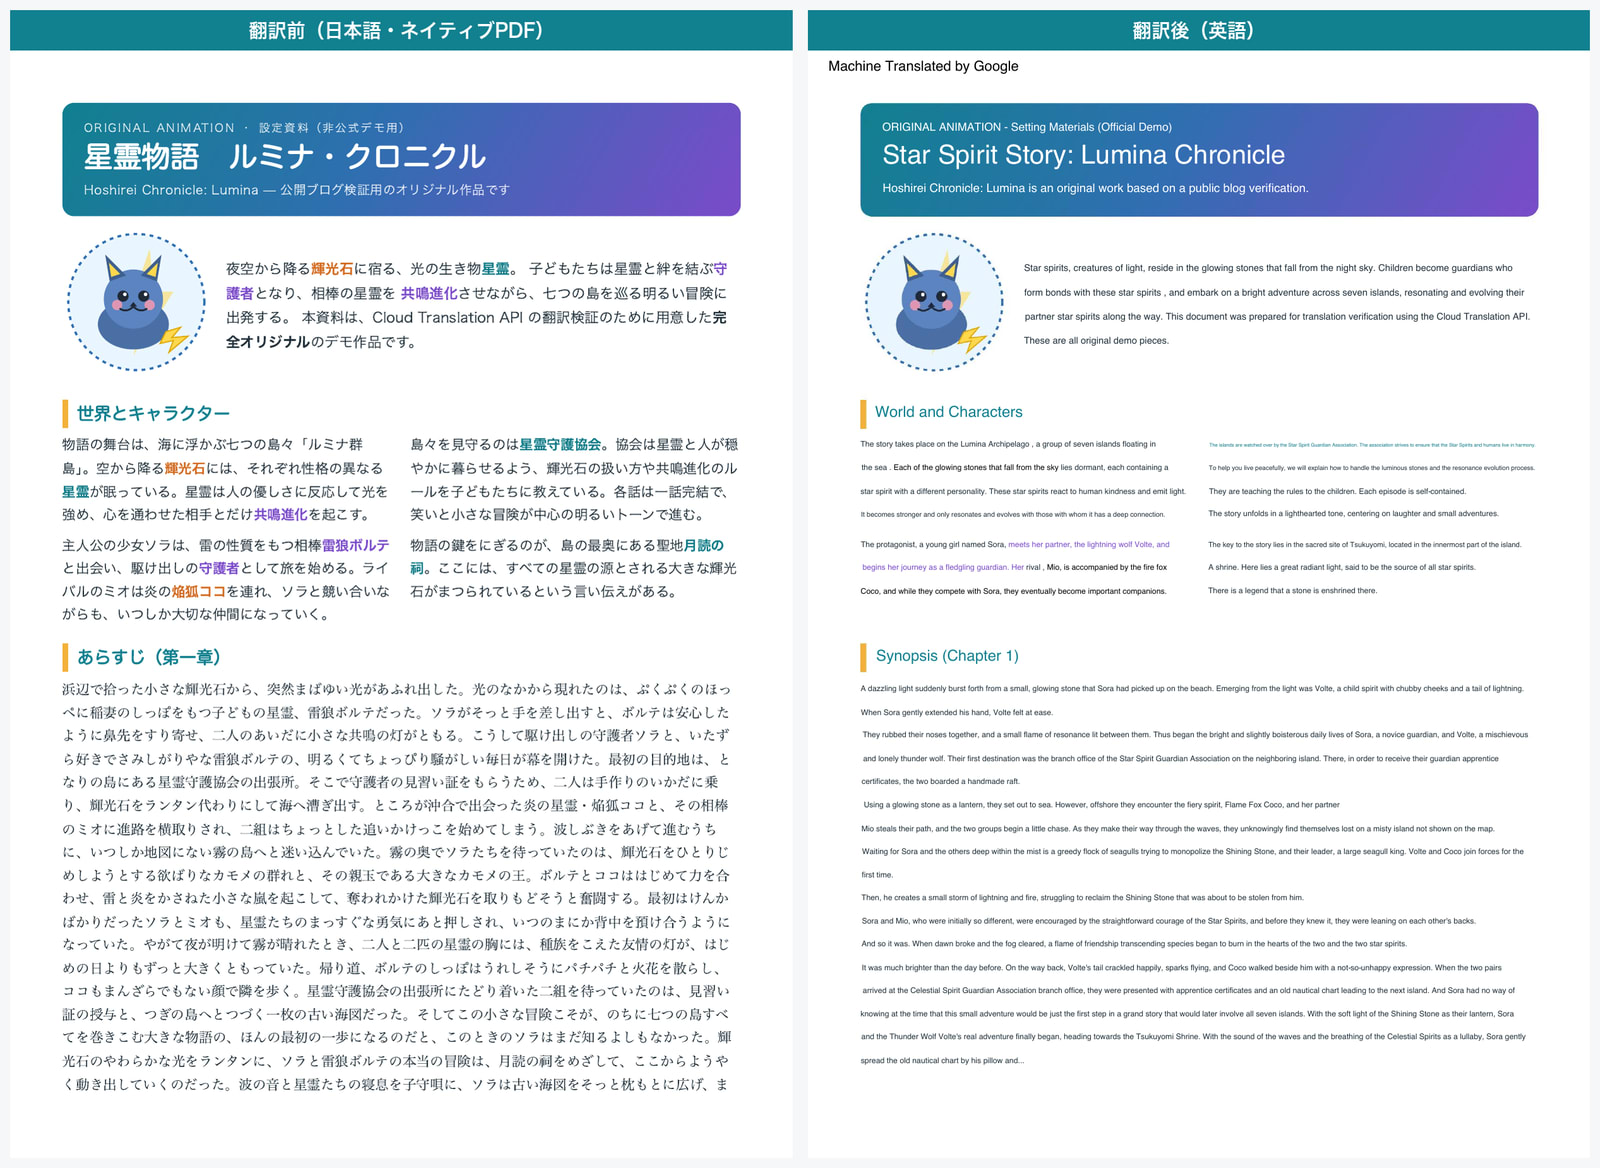
Comparison before and after translation (Native PDF, page 1)

Comparison before and after translation (Native PDF, page 2 tables and graphs)
Honestly, I didn't expect it to be preserved this well.
The banner gradient, 2-column layout, illustrations, and even hyperlinks are almost entirely preserved visually.
The table and bar graph on page 2 also maintained their placement and colors nicely.
Also, when converting from Japanese to English, since English tends to use more characters, the font size is automatically reduced to fit.
There are some areas on page 2 where the tables and bar graphs overlap or break slightly, but I think this is mostly within acceptable range.
One thing I noticed was that the colored text in 3 colors was not correctly carried over after translation.
The fact that preservation of color, fonts, and hyperlinks is limited to native PDFs was quoted from the official documentation in §1.3, and it was preserved as-is in this sample as well.
I also checked sentences split across page breaks.
In the sample, the last character on page 1 cuts off mid-word, and page 2 starts from mid-word as well.
After translation, this paragraph was connected as a natural English sentence.
Since paragraphs are treated as a single unit, the context is not broken by visual page breaks.
One more thing: looking closely at the translated PDF, there is a "Machine Translated by Google" notice in the upper left.
This is by design—it is the default attribution display when customizedAttribution is not specified in the request.
The official API reference states the following.
customizedAttribution
stringOptional. This flag is to support user customized attribution. If not provided, the default is Machine Translated by Google. Customized attribution should follow rules in https://cloud.google.com/translate/attribution#attribution_and_logos
Source: API reference: Method: projects.locations.translateDocument | Google Cloud
By passing a string to customizedAttribution, the wording of this notice can be replaced.
However, the brand guidelines require that when displaying translation results from Google Translate to users, it must be made clear that they are viewing machine translations.
Whenever you display translation results from Google Translate directly to users, you must make it clear to users that they are viewing automatic translations from Google Translate using the appropriate text or brand elements.
Source: Brand guidelines: Attribution requirements | Google Cloud
Rather than removing it completely, it seems better to plan your distribution method with the understanding that an attribution notice will be included.
4. Translating a Scanned PDF
Next, let's translate the scanned PDF with the same content.
Since scanned PDFs are images without character data, the processing path differs from native PDFs.
Native PDFs can translate the character data directly, but scanned PDFs first need to read the characters from the image.
Since scanned PDFs need to read characters from images, it is a prerequisite that the source document is horizontally oriented.
This is noted in the official documentation.
For scanned PDF translations, the source text must be oriented horizontally. If, for example, a scanned document includes text that is sloping up or down, Cloud Translation might not correctly parse all the text, which results in incorrect or incomplete translations.
Source: Official documentation: Translate documents | Google Cloud
As quoted in §1.3, the preservation of color, fonts, and hyperlinks is limited to native PDFs, and some formatting is lost for scanned PDFs.
The code uses the same translate_pdf.py from §3, with only the input file and PDF handling changed.
is_translate_native_pdf_only is set to False to treat it as scanned, and since this scanned PDF is slightly tilted, enable_rotation_correction is also added.
The full scanned PDF version is as follows.
import time
from pathlib import Path

from google.cloud import translate_v3 as translate

PROJECT_ID = "<YOUR_PROJECT_ID>"
LOCATION = "us-central1"
INPUT = "hoshirei_scanned_ja.pdf"
OUTPUT = "hoshirei_scanned_en.pdf"

content = Path(INPUT).read_bytes()
print(f"Input: {INPUT}({len(content):,} bytes, ja→en)")

client = translate.TranslationServiceClient()
request = {
    "parent": f"projects/{PROJECT_ID}/locations/{LOCATION}",
    "source_language_code": "ja",
    "target_language_code": "en",
    "document_input_config": {"content": content, "mime_type": "application/pdf"},
    # False for scanned PDF (page limit is 20)
    "is_translate_native_pdf_only": False,
    # Correct tilt before translating
    "enable_rotation_correction": True,
}

started = time.perf_counter()
response = client.translate_document(request=request)
elapsed = time.perf_counter() - started

out = response.document_translation.byte_stream_outputs[0]
Path(OUTPUT).write_bytes(out)
print(f"Processing time: {elapsed:.2f} seconds")
print(f"Output: {OUTPUT}({len(out):,} bytes)")
Running python translate_pdf.py in the same way produced the following output.
# Example output
Input: hoshirei_scanned_ja.pdf(549,573 bytes, ja→en)
Processing time: 7.45 seconds
Output: hoshirei_scanned_en.pdf(520,800 bytes)
The processing time was 7.45 seconds, compared to 2-3 seconds for native.
It takes about 2-3 times longer because of the additional step of reading characters from the image.
Let's compare the scanned PDF before and after translation.
The sample is a PDF (image only, no character data) that simulates a color scan.
Comparison before and after translation (Color scanned PDF, page 1)
Page 2 is similar.
Comparison before and after translation (Color scanned PDF, page 2 tables and graphs)
Overall it was translated well, and I felt the accuracy of reading characters from the image was high.
Table titles and body text were also correctly recognized.
The colors of bar graph data and table entries mostly matched the original placement.
The translated text was embedded as text rather than as an image, and could be selected and copied as text.
One thing I noticed was the bar graph legend labels.
The legend characters that indicate what each bar represents (in the original document: "Thunder, Fire, Water, Grass, Light") remained partially in Japanese after translation.
Even though the axis labels and values in the main body of the graph were translated to English, only the legend portion was missed.
What was surprising was the background color.
I initially thought "the color would probably be lost with a scan," but even after translating a color scan, the banner gradient, colored backgrounds, and illustration colors remained intact.
Since the color of a scanned PDF is part of the image, the API keeps the original page image as the background and overlays the translated text on top.
Therefore, if the original is colored, it remains colored after translation (if scanned in grayscale, it naturally remains grayscale).
However, the overlaid translated text all became black text.
Areas that had white text in the original document—such as numbers on top of colored bars and colored heading text—were also replaced with black text after translation.
This is because it is not inheriting text color as a structure like native PDFs do, but rather overlaying on top of an image.
The fidelity of text color and fonts is inferior to native.
| Aspect | Native PDF | Scanned PDF |
|---|---|---|
| Processing time (2 pages) | About 2-3 seconds | About 7 seconds |
| Visual color | Preserved | Remains (original page image preserved as-is; color input stays color) |
| Structural preservation of text color, font, hyperlinks | Preserved | Not preserved |
| Text handling | Translates and replaces original character data | Reads characters from image and overlays on top |
| Formatting fidelity | High | Reduced (because translated text is overlaid) |
5. Fixing Custom Terminology with a Glossary
Let's verify whether proper nouns and custom terminology can be fixed to specific translations.
5.1 Creating a Glossary
A glossary is prepared as a TSV file with source and target columns side by side.
This time, we prepared 10 coined terms fixed to their English localization names.
星霊	Hoshirei
共鳴進化	Reso-Evolution
雷狼ボルテ	Voltefang
輝光石	Lumina Shard
守護者	Warden
Save this content as glossary_ja_en.tsv and upload it to Cloud Storage.
Create the bucket in the same us-central1 region as the glossary.
# Create a bucket (skip if it already exists)
gcloud storage buckets create gs://<YOUR_BUCKET> \
    --project <YOUR_PROJECT_ID> --location us-central1

# Upload the TSV
gcloud storage cp glossary_ja_en.tsv \
    gs://<YOUR_BUCKET>/glossaries/glossary_ja_en.tsv
Next, create a glossary resource from the uploaded TSV.
Since creation is a long-running operation (LRO), run it from the client library and wait for completion.
Save this as create_glossary.py and run it inside the venv.
Full content of create_glossary.py (click to expand)
from google.cloud import translate_v3 as translate

PROJECT_ID = "<YOUR_PROJECT_ID>"
LOCATION = "us-central1"   # Glossaries are only available in us-central1
GLOSSARY_ID = "hoshirei-ja-en"
INPUT_URI = "gs://<YOUR_BUCKET>/glossaries/glossary_ja_en.tsv"

client = translate.TranslationServiceClient()
name = client.glossary_path(PROJECT_ID, LOCATION, GLOSSARY_ID)
glossary = translate.Glossary(
    name=name,
    # Unidirectional (ja→en) glossary
    language_pair=translate.Glossary.LanguageCodePair(
        source_language_code="ja", target_language_code="en"
    ),
    input_config=translate.GlossaryInputConfig(
        gcs_source=translate.GcsSource(input_uri=INPUT_URI)
    ),
)
parent = f"projects/{PROJECT_ID}/locations/{LOCATION}"
operation = client.create_glossary(parent=parent, glossary=glossary)
result = operation.result(180)   # Wait up to 180 seconds for completion
print(f"Creation complete: {result.name} (entry count: {result.entry_count})")
python create_glossary.py
# Example output
Creation complete: projects/.../locations/us-central1/glossaries/hoshirei-ja-en (entry count: 10)
Although it is a long-running operation, it completed in just a few seconds this time.
One pitfall I encountered was the region where resources can be placed.
Glossaries could not be created in the Tokyo region.
The official documentation also states that supported locations are limited.
Note: All of your resources in a single request to Cloud Translation - Advanced must have the same location. Currently, only global and us-central1 locations are supported. For all custom resources—AutoML models, glossaries, long-running-operations—you must use us-central1.
Source: Official documentation: Migrate to Cloud Translation - Advanced (v3) | Google Cloud
Custom resources like glossaries require us-central1.
If you have requirements for data residency, this needs to be considered at the design stage.
5.2 Comparing With and Without Glossary
When you call translateDocument with a glossary specified, the response returns both a "without glossary" and a "with glossary" translation result in a single response.
This is a convenient specification for verification since you can compare before and after under the same conditions.
| Output field | Content |
|---|---|
document_translation |
Translation result without glossary |
glossary_document_translation |
Translation result with glossary applied |
All you need to do is add one glossary specification (glossary_config) to the translate_pdf.py from §3.
When using a glossary, specifying the source language (source_language_code) is required, but since we already specified ja in §3, it works as-is.
The full version with glossary support is as follows.
import time
from pathlib import Path

from google.cloud import translate_v3 as translate

PROJECT_ID = "<YOUR_PROJECT_ID>"
LOCATION = "us-central1"
GLOSSARY_ID = "hoshirei-ja-en"   # Created in 5.1
INPUT = "hoshirei_native_ja.pdf"
OUTPUT = "hoshirei_native_en.pdf"                    # Without glossary
OUTPUT_GLOSSARY = "hoshirei_native_en_glossary.pdf"  # With glossary

content = Path(INPUT).read_bytes()
print(f"Input: {INPUT} ({len(content):,} bytes, ja→en)")

client = translate.TranslationServiceClient()
request = {
    "parent": f"projects/{PROJECT_ID}/locations/{LOCATION}",
    "source_language_code": "ja",
    "target_language_code": "en",
    "document_input_config": {"content": content, "mime_type": "application/pdf"},
    "is_translate_native_pdf_only": True,
    # Specify glossary
    "glossary_config": translate.TranslateTextGlossaryConfig(
        glossary=f"projects/{PROJECT_ID}/locations/{LOCATION}/glossaries/{GLOSSARY_ID}"
    ),
}

started = time.perf_counter()
response = client.translate_document(request=request)
elapsed = time.perf_counter() - started

# The response contains two results: without and with glossary
no_glossary = response.document_translation.byte_stream_outputs[0]
with_glossary = response.glossary_document_translation.byte_stream_outputs[0]
Path(OUTPUT).write_bytes(no_glossary)
Path(OUTPUT_GLOSSARY).write_bytes(with_glossary)
print(f"Processing time: {elapsed:.2f} seconds")
print(f"Output (without glossary): {OUTPUT} ({len(no_glossary):,} bytes)")
print(f"Output (with glossary): {OUTPUT_GLOSSARY} ({len(with_glossary):,} bytes)")
Running this outputs two PDFs at once — one without glossary and one with glossary.
# Example output
Input: hoshirei_native_ja.pdf (1,130,037 bytes, ja→en)
Processing time: 2.79 seconds
Output (without glossary): hoshirei_native_en.pdf (119,631 bytes)
Output (with glossary): hoshirei_native_en_glossary.pdf (119,155 bytes)
Processing time was 2.79 seconds, which was almost the same as without a glossary (2–3 seconds in §3).
Since both with and without glossary results are returned in a single request, it is convenient that adding a glossary barely increases wait time.
Looking at the results without a glossary first, the translations of key proper nouns varied considerably (as investigated with Claude).
For example, the single term 星霊 varied across contexts as follows.
Translation of 星霊 (without glossary) |
Occurrences |
|---|---|
| Star Spirit | 10 |
| star spirit | 9 |
| Spirit | 3 |
| Hoshirei | 1 |
| Other variations | Several |
The same word ended up split into about 7 different forms, including capitalization differences.
Machine translation selects the best translation for each context, so without a mechanism to align proper nouns, this is what happens.
Switching to the glossary version, this was neatly unified.
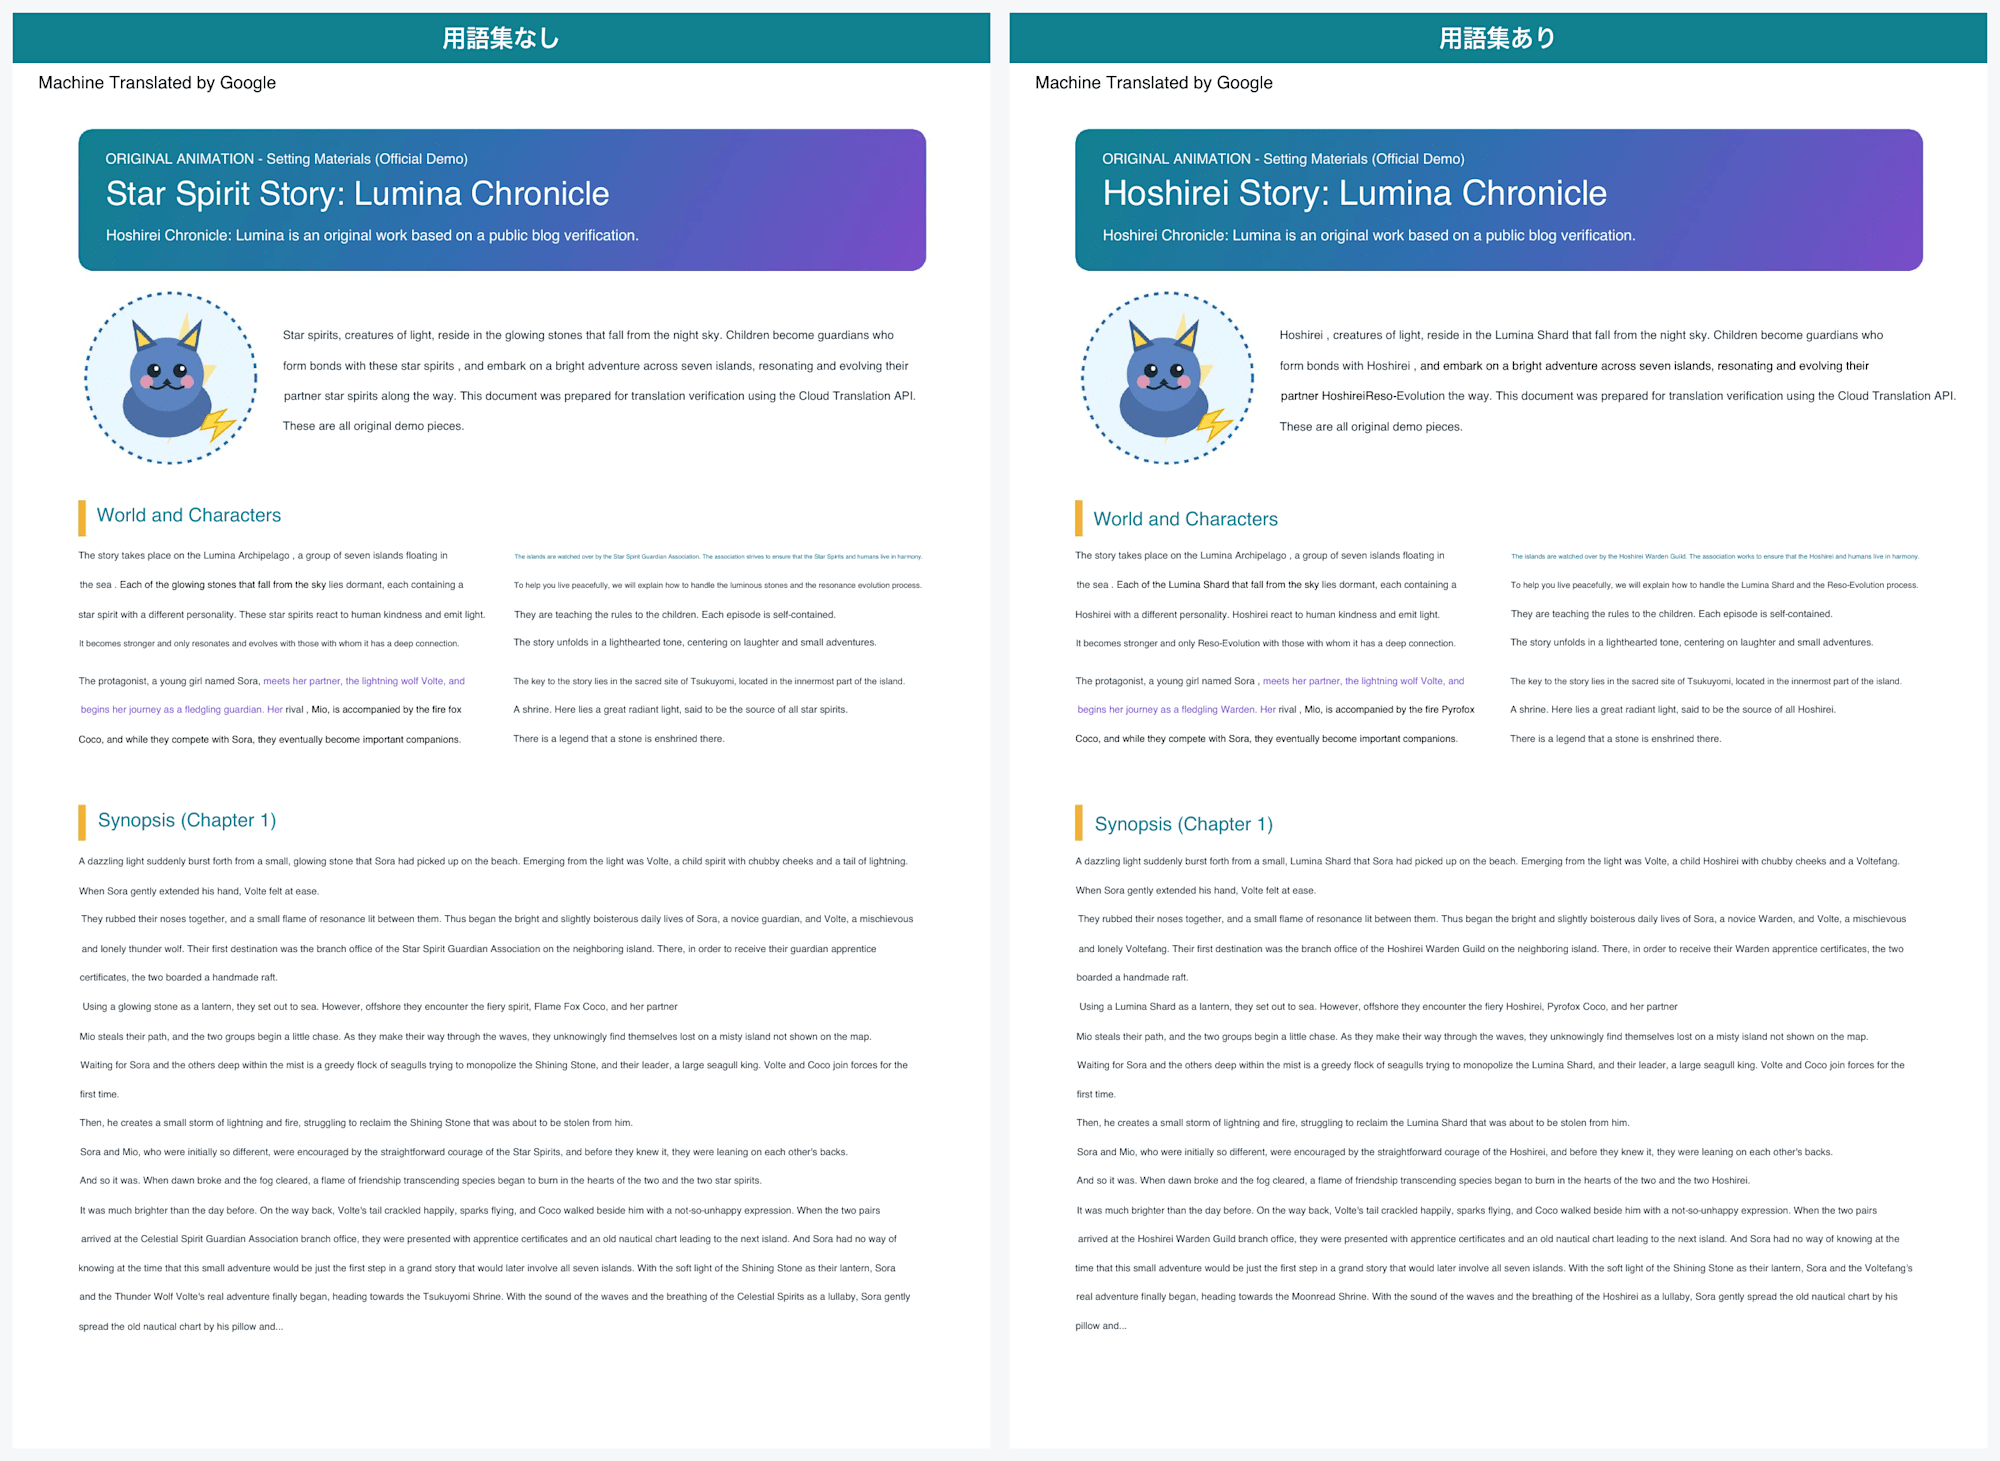
Comparison without and with glossary (page 1)
You can see the title changed from "Star Spirit Story" to "Hoshirei Story."
The 星霊 term, which had been split into 7 variations without the glossary, was unified to Hoshirei. It is impressive that the hyperlink sections were not changed to Hoshirei.
Other coined terms were also fixed to their registered translations: 雷狼ボルテ as Voltefang, 輝光石 as Lumina Shard, and 守護者 as Warden.
In the table on page 2 as well, sections with coined terms were cleanly replaced.
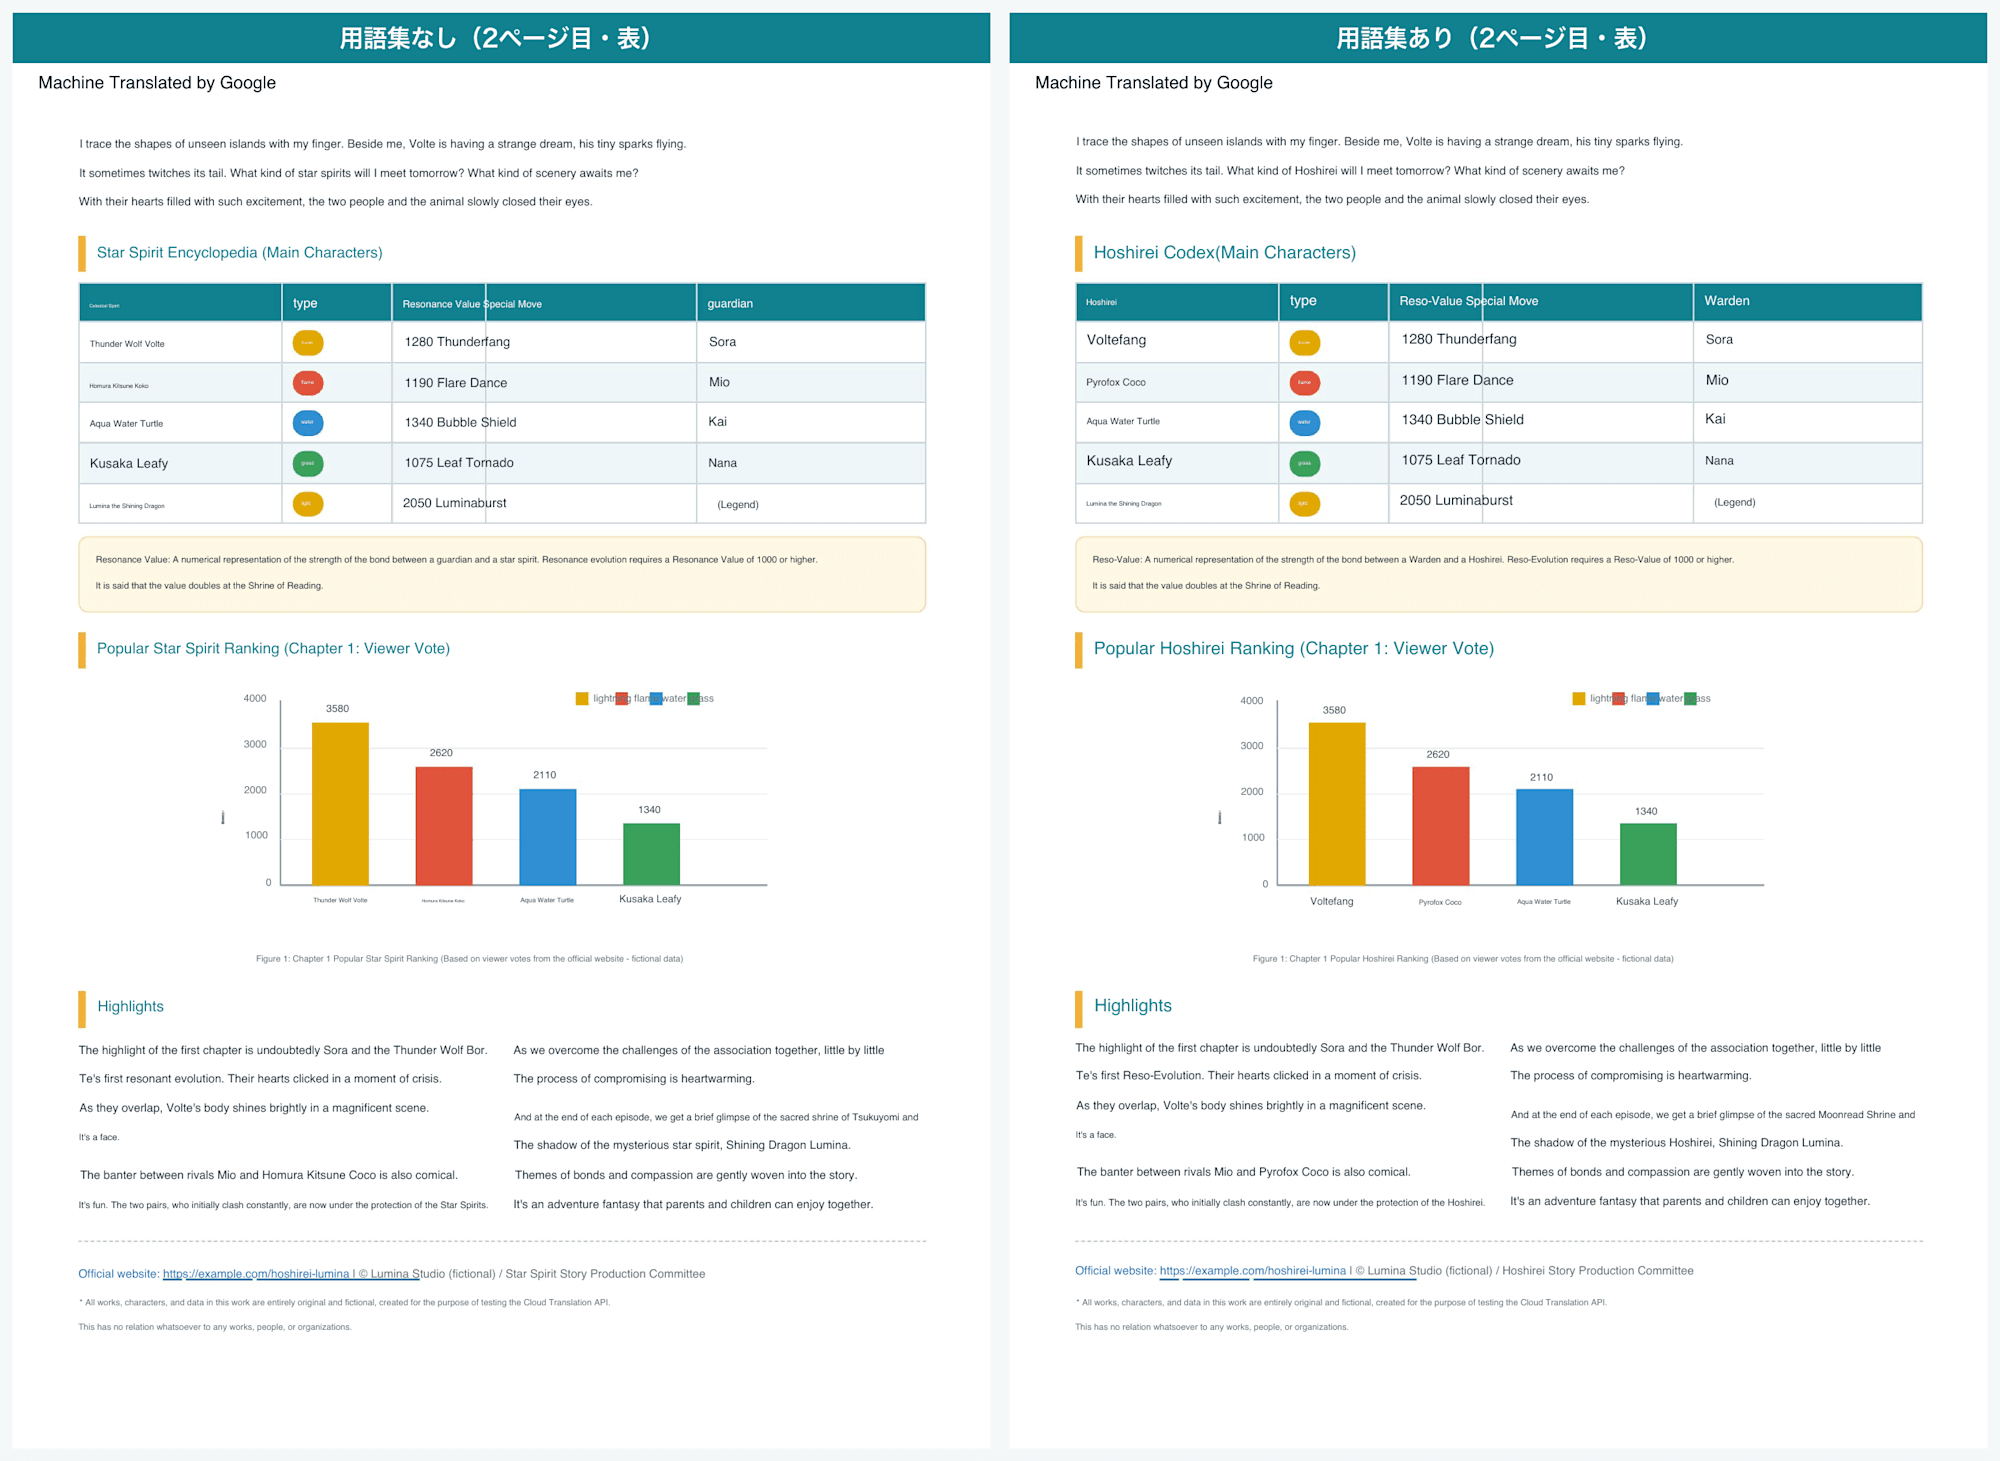
Comparison without and with glossary (page 2, table)
However, when examining the full output with the glossary, it was not a perfect 100% (as investigated with Claude).
Only 4 occurrences of registered terms were not fixed and retained their literal translations.
守護者: Fixed toWardenin 8 places, but 1 place remained asguardians輝光石: Fixed toLumina Shardin 7 places, but 1 place remained asShining Stone雷狼ボルテ: Fixed toVoltefangin 5 places, but 1 place remained asThunder Wolf月読の祠: Fixed toMoonread Shrine, but 1 place remained asTsukuyomi(literal translation)
For example, in the sentence "Children become guardians who form bonds with Hoshirei," 星霊 in the same sentence was fixed to Hoshirei, but 守護者 was left as guardians.
Since the glossary checks for matches on a per-occurrence basis, it appears that the same term can occasionally be missed depending on inflection or surrounding context.
That said, the majority were fixed successfully, so the reality is that it is "mostly unified, but misses are not zero."
6. Pricing and Processing Time
For document translation, pricing is basically per page, with the unit price varying by the translation model used.
The two models that appear in the table are as follows.
- NMT (Neural Machine Translation): Google's standard pre-trained model. No training is required, and this is used if no model is specified in the request.
- Custom model (AutoML): A dedicated model trained with your own parallel data using AutoML Translation. The unit price is higher because it can be tuned to domain-specific phrasing.
When you request a translation by using Cloud Translation - Basic, Google uses a pre-trained Neural Machine Translation (NMT) model. For Cloud Translation - Advanced, you can use the pre-trained NMT model, the Translation LLM, or a custom AutoML Translation model.
Source: Official documentation: Migrate to Advanced from Basic | Google Cloud
| Item | Unit price |
|---|---|
| NMT document translation | $0.08 / page |
| Custom model (AutoML) document translation | $0.25 / page |
Source: Pricing page: Pricing | Google Cloud
All verification in this article was run using the standard NMT ($0.08 / page).
Since no model is specified in the script, the default NMT is used automatically.
To use a custom model, you need to train a model separately with AutoML and specify that model in the model field of the request.
If not provided, the default Google model (NMT) will be used for translation.
Source: API reference: Method: projects.locations.translateDocument | Google Cloud
In this verification, we ran native 2 pages, scanned 2 pages, and with glossary (which returns 2 sets of results — without and with). The total was approximately 8 pages, coming in under $1.
Since there is no official fixed value for processing time, I am including measured values here.
They vary slightly between runs, but the rough estimates were as follows.
| Document | Pages | Processing time |
|---|---|---|
| Native PDF | 2 | Approx. 2–3 seconds |
| Scanned PDF | 2 | Approx. 7 seconds |
7. What We Learned from the Verification
The three things confirmed through actual testing are as follows.
| What was tested | Result | Notes |
|---|---|---|
| Translate native PDF while preserving layout | Succeeded | Colors, fonts, hyperlinks, tables, and charts were maintained |
| Fix proprietary terms (proper nouns) with glossary | Succeeded | Unified inconsistent translations. However, misses are not zero |
| Translate scanned PDF | Succeeded | Reads text from images and translates. Original image colors are retained, but translated text is overlaid, reducing formatting fidelity |
Beyond what works or does not work, there are two points worth knowing in advance as they are simply "how the service works."
| Specification / Constraint | Details |
|---|---|
| Regions where glossaries can be created | us-central1 only (translation itself can use global or us-central1) |
| Attribution | "Machine Translated by Google" is added by default. The wording can be changed with customizedAttribution, but displaying it is mandatory |
Of these, the glossary region is the one that matters most in production.
If you have requirements to keep data within Japan, the glossary being fixed to us-central1 means those requirements cannot be met as-is.
This is something to confirm before a full deployment.
8. Summary
Cloud Translation API's Document Translation can translate PDFs while preserving their layout simply by passing the file directly, and using a glossary allows proprietary term translations to be fixed.
With a minimal setup, neither Cloud Storage nor authentication keys are required, making the first step quite easy.
For internal documents with many proprietary terms or manuals where product names need to be consistent, the glossary feature is particularly effective.
On the other hand, scanned PDFs have somewhat lower formatting fidelity compared to native PDFs since the original image is used as-is. There are also constraints such as the region restriction for glossaries.
The choice will likely come down to whether the documents being handled are native or scanned, and whether there are data residency requirements.
I hope this article serves as a useful reference for anyone considering automating PDF translation.
References
- Official documentation: Translate documents | Google Cloud
- Official documentation: Supported formats | Google Cloud
- Official documentation: Creating and using glossaries | Google Cloud
- Official documentation: Migrate to Cloud Translation - Advanced (v3) | Google Cloud
- Pricing page: Pricing | Google Cloud
- Official documentation: Quotas and limits | Google Cloud