![[Copilot Studio] I tried making my first agent: Creation, Instructions, and Testing](https://images.ctfassets.net/ct0aopd36mqt/wp-thumbnail-00eddef75cb5ee39286e0aa370a96e4f/040bbf127b84da0ee2c483485da1dd29/microsoft-eyecatch.jpg?w=3840&fm=webp)
[Copilot Studio] I tried making my first agent: Creation, Instructions, and Testing
This page has been translated by machine translation. View original
Introduction
Hello, I'm Kema.
In enterprise settings, Microsoft products such as Microsoft 365 and Teams are already widely used. As a natural extension of this, when you want to build an internal chatbot or an AI agent to automate business tasks, Microsoft Copilot Studio becomes one of your options. That said, many people may be hesitant to adopt it because they're unsure of "what it can do and how far you can get without writing code."
In this article, as the first step in a series on building an agent (AI assistant) from scratch in Microsoft Copilot Studio, I verified hands-on the process of creating a single agent, giving it a role (instructions), and testing it. The theme of the series is an agent that auto-generates a KPI comparison report for three fictional SaaS companies. The ultimate goal is an agent that handles the entire pipeline — data collection → aggregation → charts → insights → PowerPoint/Excel output — end to end. I hope this serves as a useful reference for those considering adopting Copilot Studio.
Since the purpose this time is purely to verify behavior, I will not "publish" the agent. Publishing is required when you want others to use your agent via Teams or the Web, but if you're just building it, running it, and testing it yourself, publishing is not necessary. I'll summarize the details around publishing as a supplement at the end of the article.
The verification environment is the web browser version of Copilot Studio (copilotstudio.microsoft.com).
What is Copilot Studio?
Before getting our hands dirty, let's review what kind of tool Copilot Studio is using the official documentation. Since this forms the foundation of the series, I'll organize it thoroughly here.
A Low-Code Tool for Building Agents
Copilot Studio is a graphical, low-code tool for building agents and agent flows (described later).
Copilot Studio is a graphical, low-code tool for building agents and agent flows.
Source: Copilot Studio overview | Microsoft Learn
A key feature is that it can connect to external data via prebuilt or custom connectors, and you can construct conversations and logic without writing code. The official documentation also states that agents can be built without the need for data scientists or developers.
You can easily create agents in Copilot Studio without the need for data scientists or developers.
Source: Copilot Studio overview | Microsoft Learn
What Is an Agent?
The central deliverable you build in Copilot Studio is an "agent." The official documentation describes it as follows:
An agent is a powerful AI companion that can handle a range of interactions and tasks. It can resolve problems that require complex conversations and autonomously determine the best action to take based on its instructions and context. It coordinates language models, along with instructions, context, knowledge sources, topics, tools, inputs, and triggers to accomplish your goals.
Source: Copilot Studio overview | Microsoft Learn
In other words, an agent is a unified mechanism that bundles a language model together with components such as instructions, knowledge, topics, tools, and triggers. We will examine each of these components one by one in future articles.
| Component | Role |
|---|---|
| Instructions | Defines the agent's role, tone, and rules in natural language |
| Knowledge | Information sources used as the basis for answers |
| Topics | Defines conversation flows using a node-based approach |
| Tools | Adds "capabilities" to the agent |
| Triggers | Launches the agent autonomously on a schedule or event |
| Other Agents | Connects with child, in-environment, or external agents |
The relationship between components can be illustrated as follows. The agent (language model and orchestrator) takes user utterances, triggers, and instructions as input, then selects from knowledge, topics, tools, and other agents as needed to construct a response.
Agent structure (created based on the description in Copilot Studio overview | Microsoft Learn)
How Conversations Work (NLU and Generative Responses)
Agents interpret user input using Natural Language Understanding (NLU) and select the most appropriate topic to respond with. Furthermore, if you connect knowledge sources, generative AI can construct answers without you having to create topics one by one.
Copilot Studio agents use customized NLU models and AI capabilities to understand what a user types or says, then respond with the best topic.
Source: Copilot Studio overview | Microsoft Learn
Responding based on connected knowledge is called "grounding." This behavior will be verified hands-on in a future article.
Generative Orchestration (Default Behavior)
As of 2026, newly created agents use generative orchestration by default. The agent itself decides which tools, knowledge, topics, and other agents to use on a case-by-case basis.
Agents can use either generative or classic orchestration. By default, newly created agents use generative orchestration. An agent that uses generative orchestration can choose the best tools, knowledge, topics, and other agents to answer user queries or respond to event triggers. The alternative is classic orchestration, where an agent responds to users by triggering the topic whose trigger phrases most closely match the user's query.
Source: Orchestrate agent behavior with generative AI | Microsoft Learn
This term can be a bit confusing, so let me break it down further. "Orchestration" refers to the mechanism by which an agent decides "which components to use and in what order" in response to a user's utterance. Copilot Studio offers two approaches to this decision, and you can choose which one to use per agent.
- Generative orchestration (default): The language model interprets the user's utterance and automatically selects the necessary components (topics, tools, knowledge, other agents) from what's available to answer the question. Combining multiple components and asking the user for missing information are also handled automatically. The selection of components is based on the name and description attached to each component.
- Classic orchestration (legacy approach): "Trigger phrases (if this keyword appears, use this topic)" are registered in topics in advance, and the topic whose phrase matches the user's utterance is activated. The flow of the conversation is built by arranging nodes within the topic.
The differences between the two are summarized in the table below.
| Aspect | Generative Orchestration (Default) | Classic Orchestration |
|---|---|---|
| How components are selected | Language model selects automatically based on names and descriptions | Selected by matching registered trigger phrases |
| Use of multiple components | Can be used in combination | Basically one topic at a time |
| Follow-up questions and responses | Automatically generates questions for missing info and response text | Manually built with nodes inside topics |
| Best suited for | Flexible responses, reducing manual authoring | Precise control of fixed conversations |
To switch to classic, open the agent's "Settings", go to "Generative AI", and under "Orchestration", select "No, use classic orchestration." The default is "Yes, use available tools and knowledge as needed and make responses dynamic" (generative orchestration). This series proceeds on the premise of generative orchestration, which is the default for newly created agents.
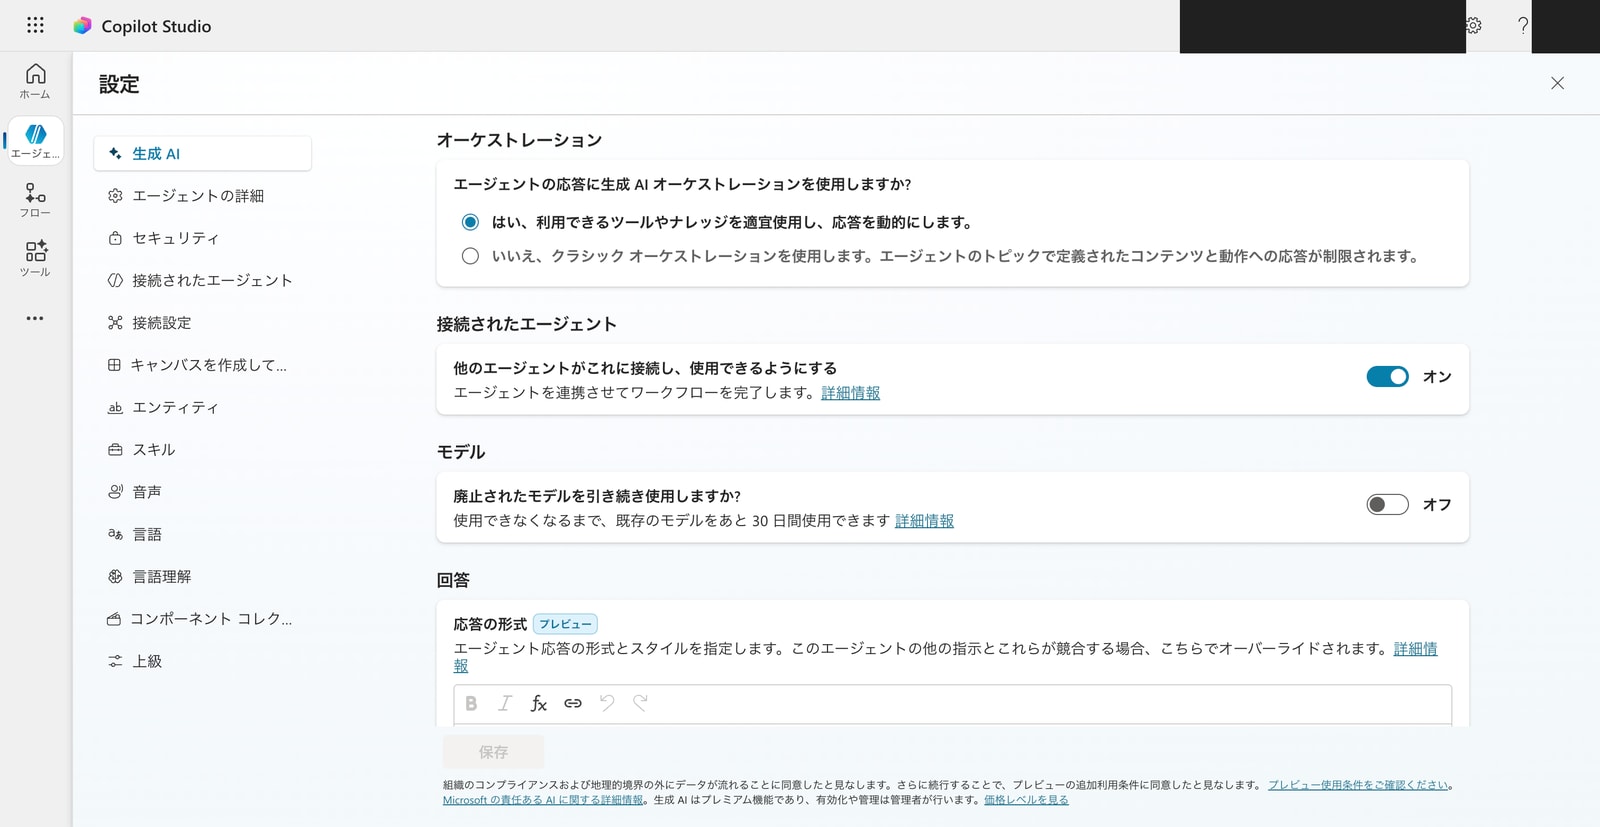
Agent "Settings" → "Generative AI" → "Orchestration". The default is Generative AI (upper radio button). Select the lower radio button to switch to Classic.
Choosing a Model
The language model used for agent inference (orchestration) can be selected from a dropdown in the "Model" section of the overview screen. In my environment (as of June 2026), the models listed in the dropdown were as follows. OpenAI GPT models and Anthropic Claude were both available. Some models had "Preview" or "Experimental" badges, indicating they are not recommended for production use.
| Provider | Model | Dropdown Description | Status |
|---|---|---|---|
| OpenAI | GPT-5 Chat | Great for most tasks | Generally Available |
| OpenAI | GPT-5 Reasoning | Maximum depth and precision for the most demanding tasks | Preview |
| OpenAI | GPT-5.3 Chat | Great for most tasks | Experimental |
| OpenAI | GPT-4.1 | Great for most tasks and quick analysis | Generally Available |
| Anthropic | Claude Sonnet 4.5 | Assists with general tasks and content creation | Generally Available |
| Anthropic | Claude Sonnet 4.6 | Assists with general tasks and content creation | Default |
| Anthropic | Claude Opus 4.5 | Performs deep reasoning and structured problem solving | Generally Available |
| Anthropic | Claude Opus 4.7 | Performs deep reasoning and structured problem solving | Generally Available |
| Anthropic | Claude Opus 4.8 | Perform deep reasoning and structured problem solving | Experimental |
In my environment, Claude Sonnet 4.6 was selected as the default model immediately after creation (it also displays "(default)" in the dropdown). Which model is the default, as well as the lineup of available models, may vary by region, admin settings, and time. For the latest list of available models and details on each, please refer to the official documentation: Select a primary AI model for your agent | Microsoft Learn.
Having a wide selection of models to choose from is a strong point, as it allows you to select the right model for your use case.
Where Can It Be Used? (Channels)
Once published, your agent can be deployed to multiple channels. In addition to Teams, Microsoft 365 Copilot, SharePoint, and Power Pages, there are also options for deploying to a demo site or a custom website for web use.
Copilot Studio natively deploys agents to many channels, such as Teams, Microsoft 365 Copilot, SharePoint, Power Pages, and more.
Source: Publish agents to channels and clients | Microsoft Learn
This channel deployment requires publishing, and publishing requires a license. Since this time our goal is to verify behavior, we will not publish. Publishing details are covered in the Supplement: About Publishing section at the end of the article.
Relationship with Microsoft 365 Copilot
There are broadly two ways to use Copilot Studio. One is to build agents that extend Microsoft 365 Copilot; the other is to build standalone agents. This series covers the latter — building standalone agents.
Overview of Billing and Licensing
To get a sense of verification costs, let's also cover the basics of billing upfront.
- Creation and testing are possible even with a trial: You can create agents and verify behavior in the test chat even with a trial license. However, publishing is not available.
- Publishing has requirements: There are licensing conditions that determine whether publishing is possible, including a Microsoft 365 Copilot license, a Copilot Studio User License with message allocation for the environment, or certain configurations that don't use Gen AI.
- Execution consumes Copilot Credits: After publishing, agent responses and action executions consume Copilot Credits depending on their complexity. The embedded test chat is not subject to billed sessions.
If you're just building, running, and testing on your own as we are this time, everything falls within the free tier. The licensing conditions required for publishing are organized along with their sources in the Supplement: About Publishing section at the end of the article.
What We're Building This Time
- Agent name: KPI Report Creation Assistant
- Role: When comparing quarterly KPIs for three fictional SaaS companies, guide users on which metrics to check first and how to frame the comparison
- What we'll verify: Agent creation, setting instructions, and basic responses in the test chat
Step 1: Create the Agent
From the Copilot Studio home screen, select "Build from scratch > Agent." There is also a method where you enter a description in the center "What would you like to build?" field and let AI create it for you, but this time we'll create it manually to understand each configuration step by step.
A dialog for entering the agent name opens. Enter "KPI Report Creation Assistant" and click "Create."
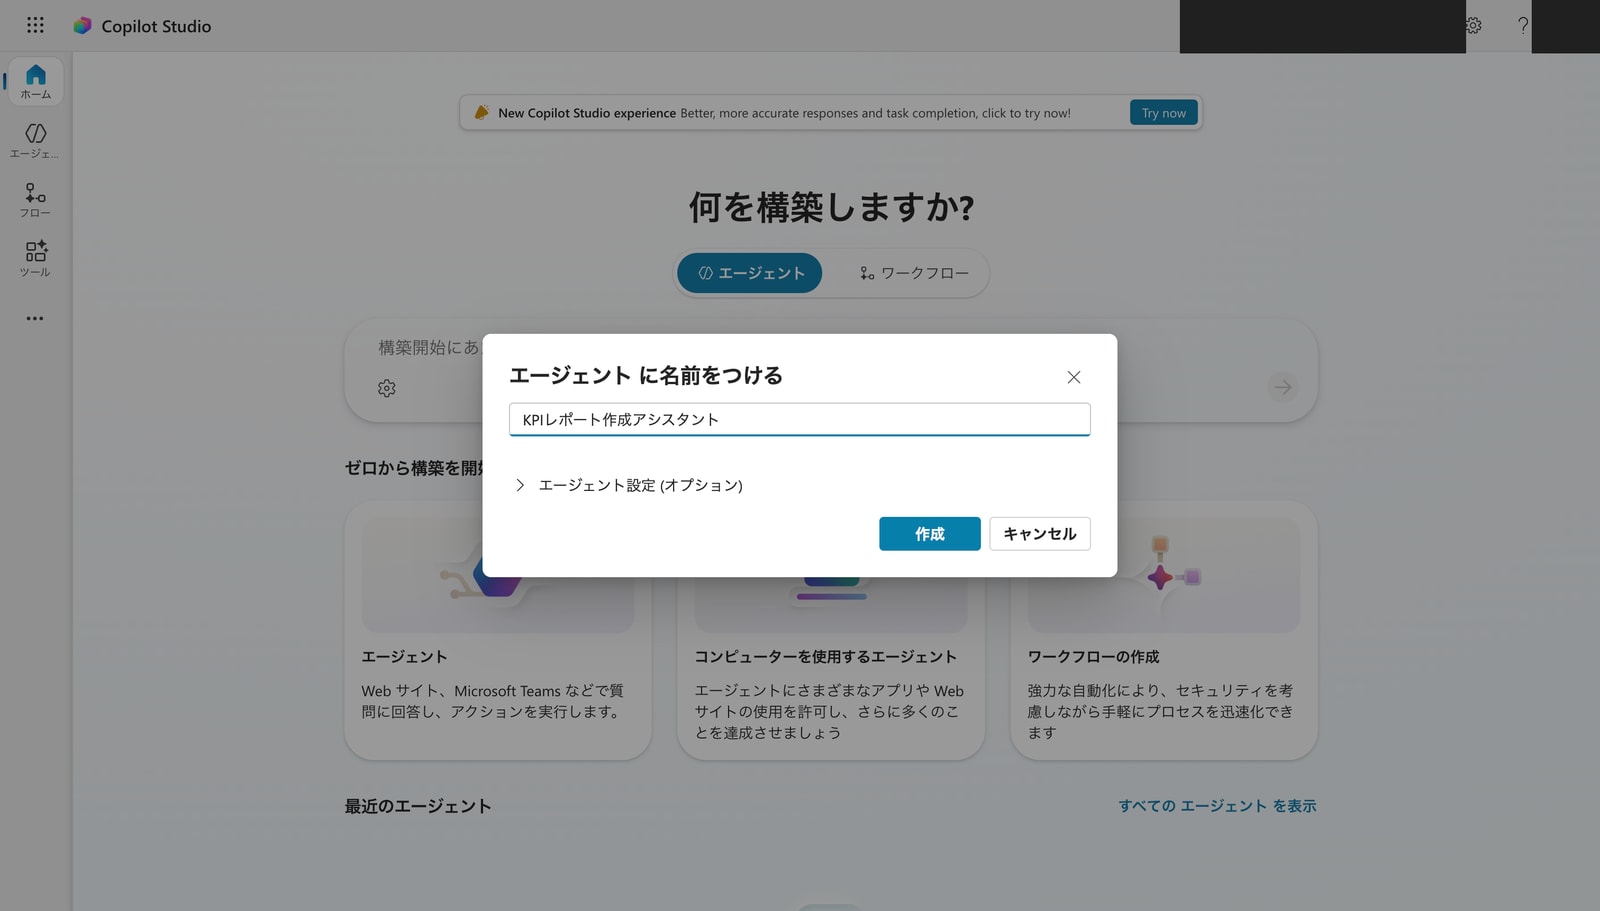
Expanding "Agent settings (optional)" lets you configure language, solution, and schema name. The schema name is an internal identifier that cannot be changed later. I left everything at the default this time.
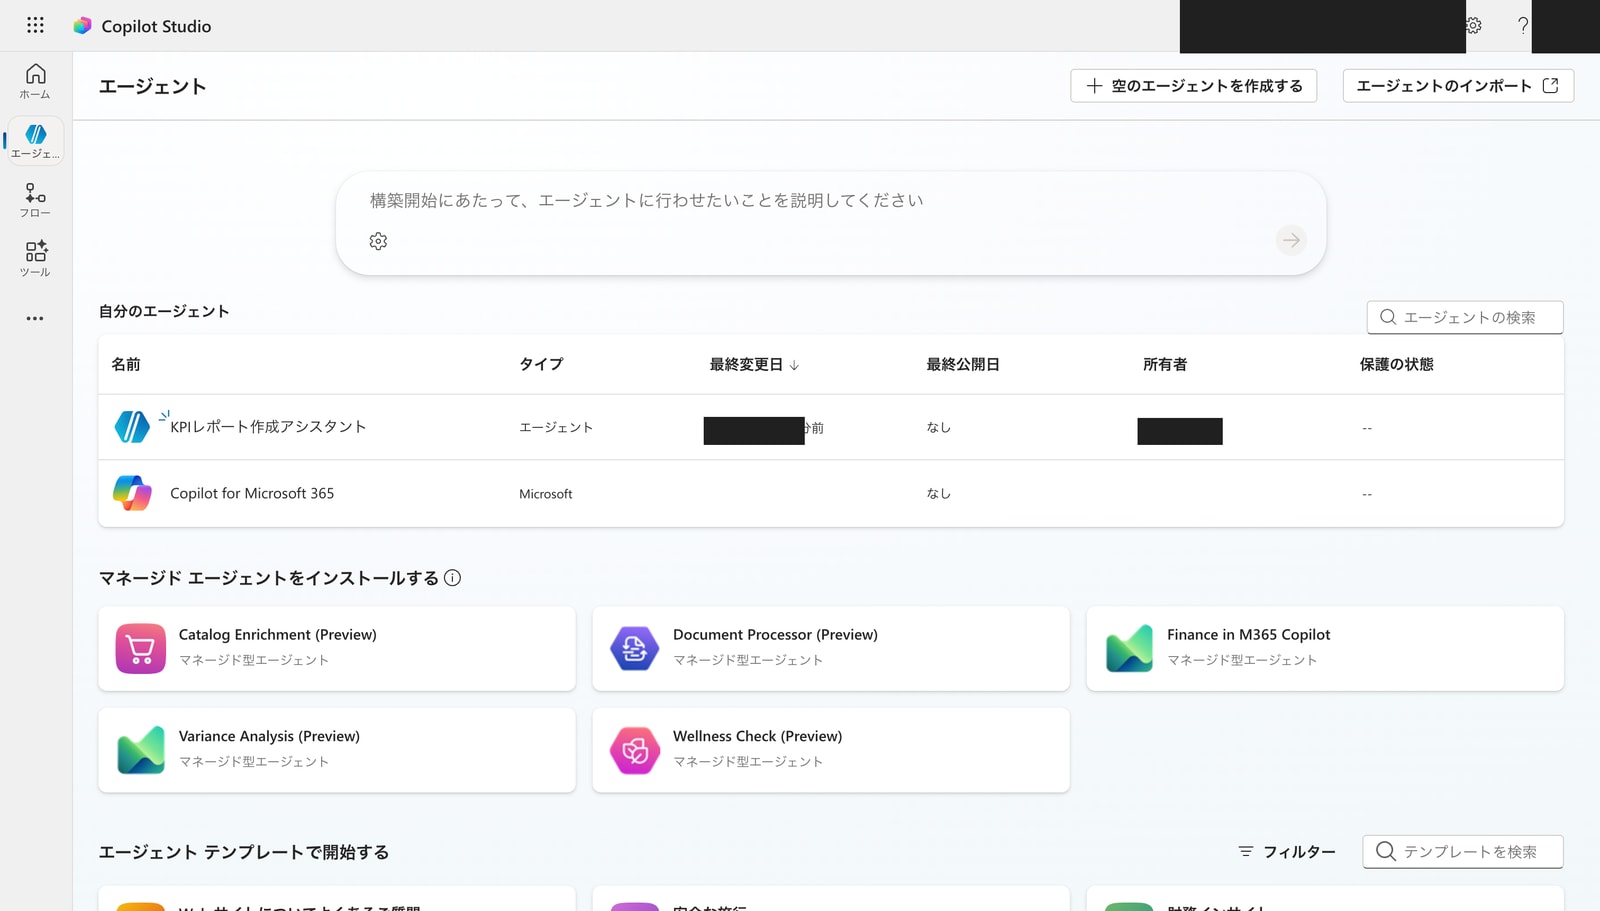
After creation, "KPI Report Creation Assistant" will appear in the agent list.
Step 2: Get to Know the Overview Screen
Opening the agent from the list displays the "Overview" screen. This is the starting point for agent configuration.
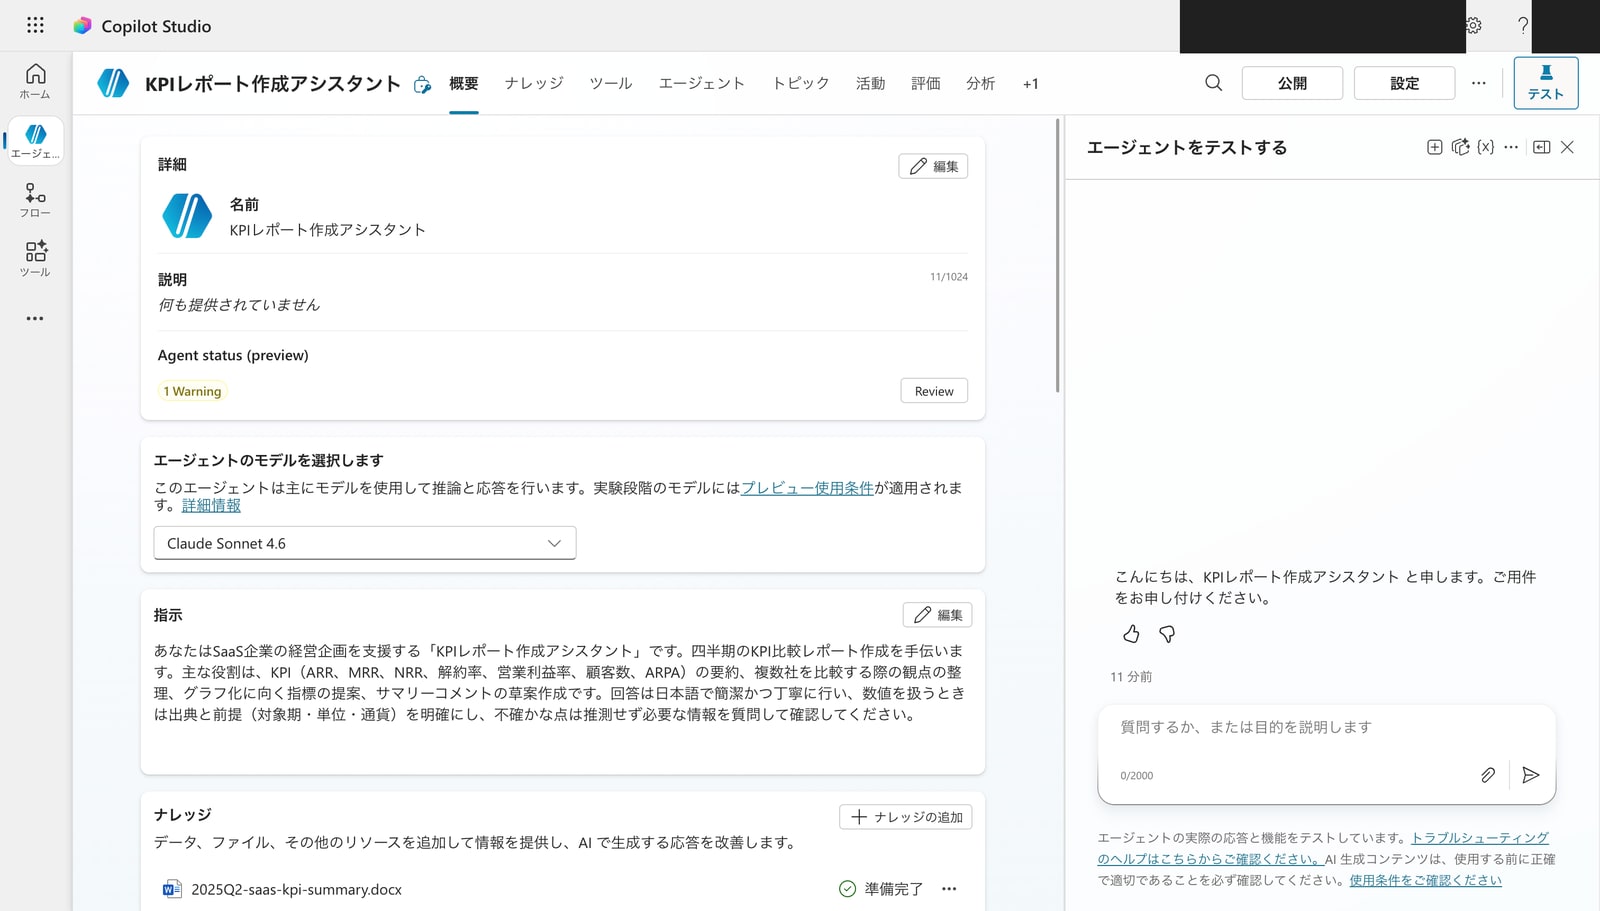
There are three key points to note first:
- "Claude Sonnet 4.6" was selected in the screen I checked: As mentioned in "What is Copilot Studio?", the model used for inference can be selected. The default model in the official documentation is GPT-4.1, but Claude Sonnet 4.6 was displayed in my screen.
- Knowledge can be added from this screen: You can attach information sources such as files to give the agent a basis for its answers (we'll look at this in detail in the Knowledge article).
- Default topics (such as "Greeting," "Thank you," etc.) are automatically generated.
Scrolling down on the overview screen reveals sections for Tools, Triggers, Agents (multi-agent), and Topics. These are the feature groups we'll dig into in future articles.
The tabs include "Overview / Knowledge / Tools / Agents / Topics / Activity / Evaluation / Analytics," and these serve as entry points for adding functionality.
Step 3: Set Instructions (Role)
"Instructions" is a field where you write the agent's role, tone, and rules in natural language. Click "Edit" to enter them.
This time, I set the following instructions:
You are the "KPI Report Creation Assistant" that supports management planning for SaaS companies. You help create quarterly KPI comparison reports. Your main roles are: summarizing KPIs (ARR, MRR, NRR, churn rate, operating profit margin, customer count, ARPA), organizing comparison perspectives when comparing multiple companies, suggesting metrics suitable for visualization, and drafting summary comments. Respond in Japanese, concisely and politely. When handling numbers, clearly state the source and assumptions (target period, unit, currency). Do not speculate on uncertain matters — instead, ask clarifying questions to confirm the necessary information.
Once entered, click "Save."
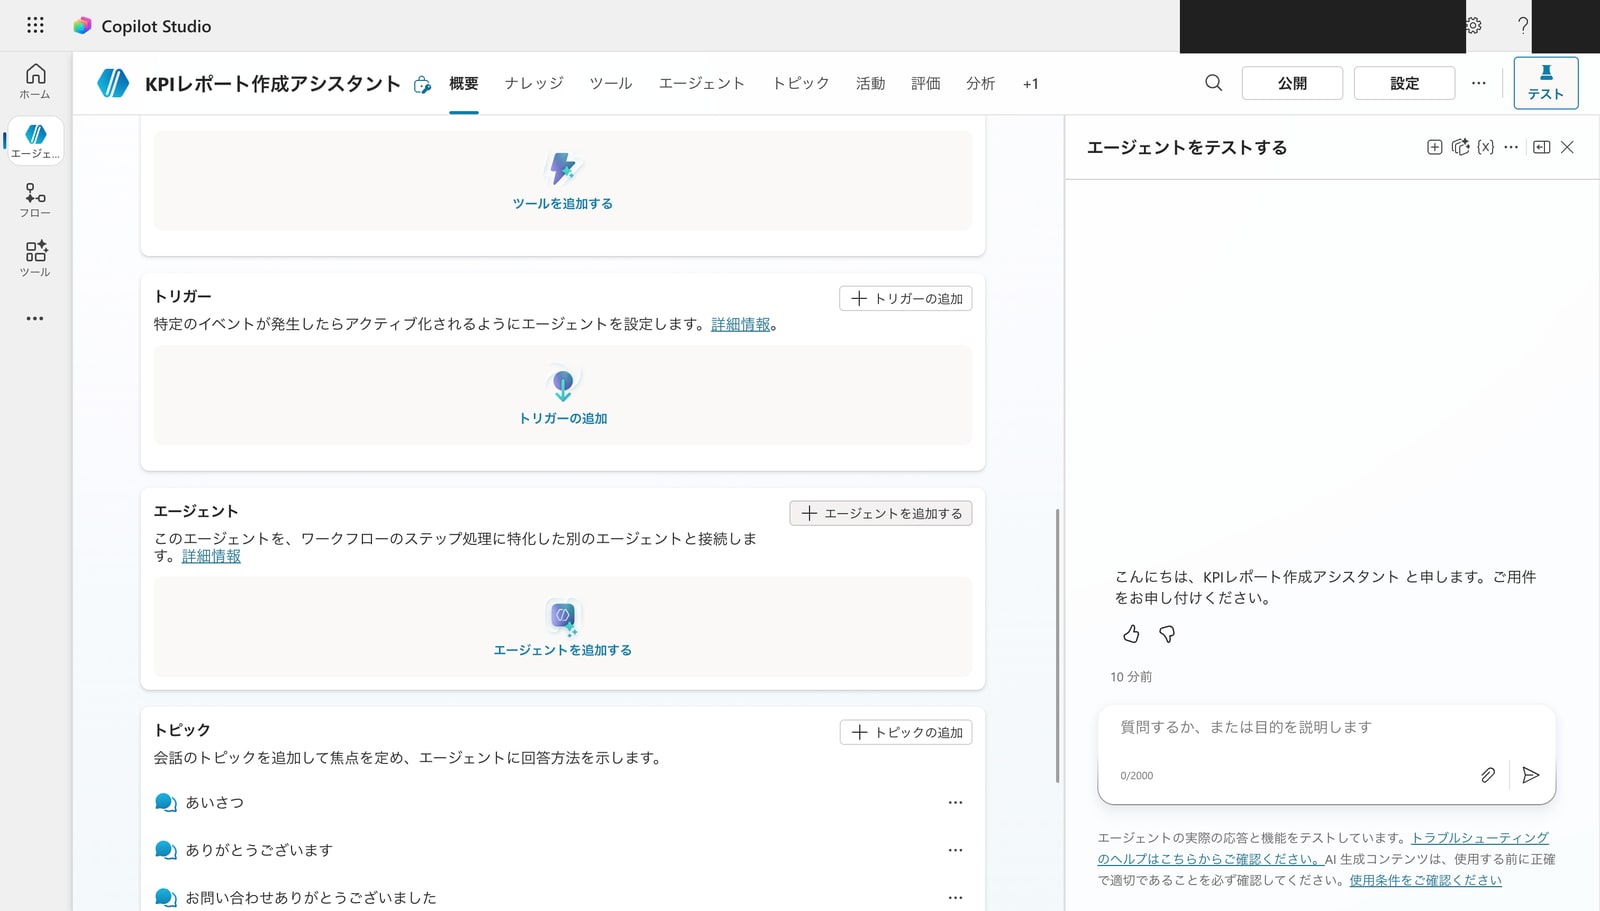
Step 4: Test It
In the "Test your agent" pane on the right side of the screen, you can verify behavior on the spot. To check whether the instructions are taking effect, I asked:
When comparing quarterly KPIs for three SaaS companies, what are the three metrics I should look at first?
Here is the response that came back. A structured response centered on ARR (Annual Recurring Revenue) and NRR (Net Revenue Retention) was returned, organized from a SaaS KPI perspective. The roles defined in the instructions — "organize perspectives for multi-company comparison" and "be explicit about numerical assumptions" — are clearly reflected.

The test chat is not subject to billed sessions charges. Even without publishing, you can thoroughly verify agent behavior here.
Supplement: About Publishing
Since the purpose this time is to verify behavior, I did not publish the agent, but publishing is required when you want others to use it via Teams or the Web. For reference, let me summarize the conditions around publishing.
When I tried clicking "Publish" in the upper right, a dialog appeared in my environment indicating that a license is required.
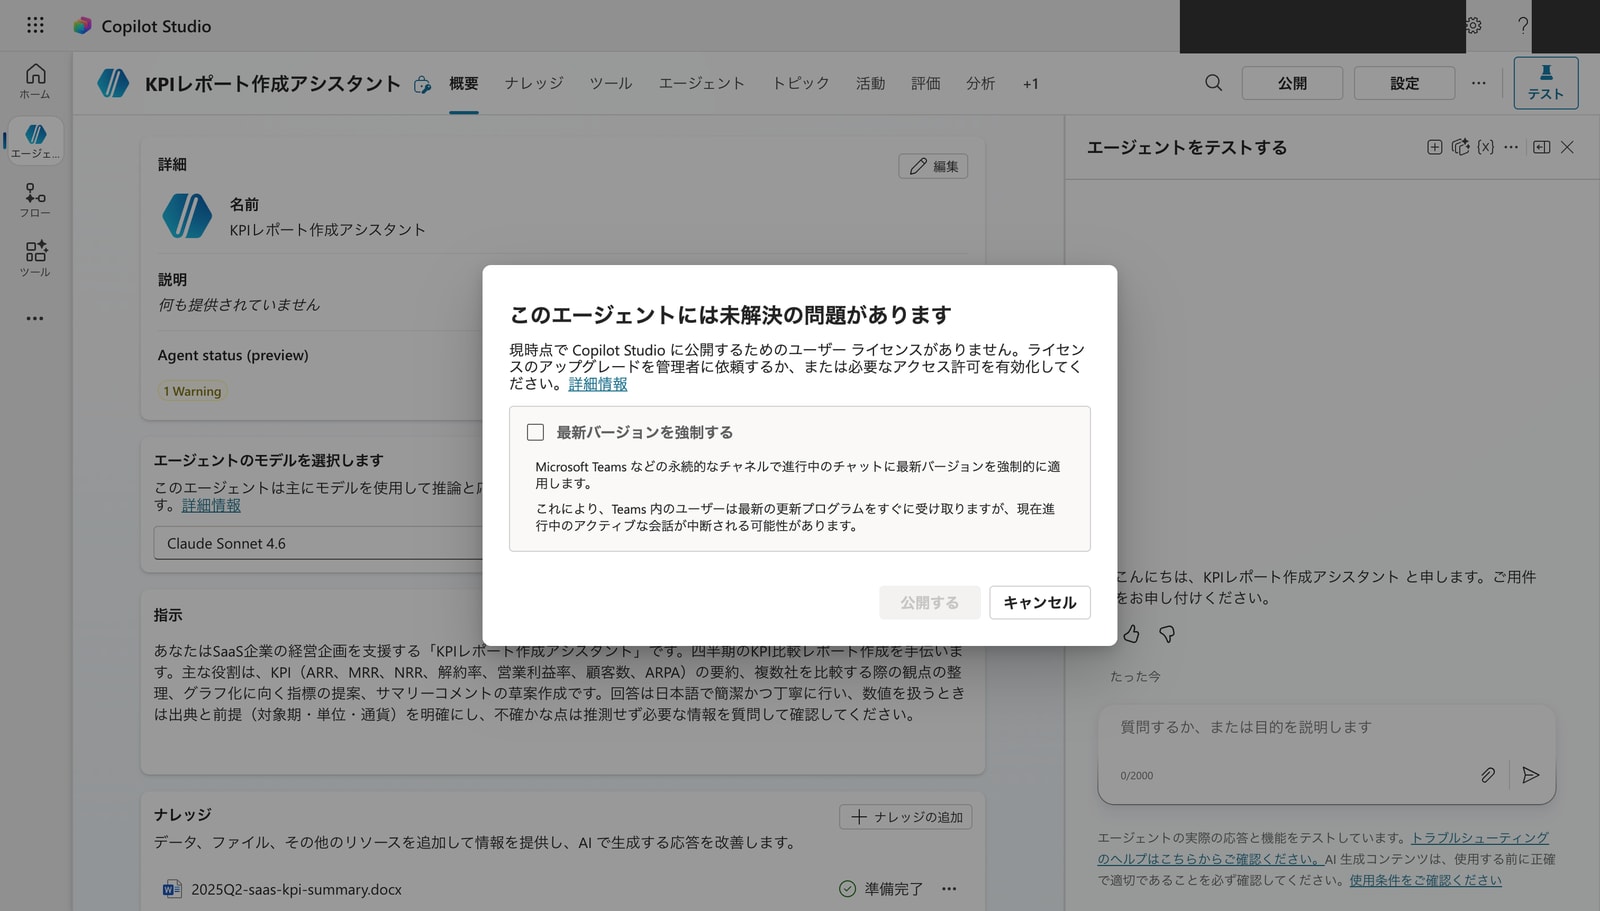
This agent has unresolved issues
You currently don't have a user license to publish to Copilot Studio. Please ask your administrator to upgrade your license or enable the required permissions.
The conditions for publishing are explicitly stated in the official FAQ as follows (any one of them must be met). Trial licenses do not qualify for publishing.
The criteria to allow publishing is one the following:
- Having a M365 Copilot license assigned.
- Having a Copilot Studio User License assigned and messages allocated to the environment.
- Having a Copilot Studio User License assigned and "Draw from tenant pool" enabled for the environment.
- Having a Office license only and agent does not use Gen AI features.
Trial licenses are not qualified to allow publishing.
Source: FAQ for Copilot Studio billing and licensing | Microsoft Learn
In other words, while creation and behavior verification via test chat are possible with a trial, publishing alone requires one of the above licenses. For the scope of building and testing what you want to do yourself (data collection, aggregation, insights, and document creation), publishing is not necessary. When you're ready to share with others, you can obtain the appropriate license, publish, and share. This series will proceed without publishing, verifying each feature through the test chat.
Summary
From creation through testing, I was able to build an agent that works as intended simply by writing instructions in a no-code environment. For something as straightforward as this, there were no significant stumbling blocks, and you can get a reasonably functional agent up and running. The ability to choose from multiple models — GPT variants, Claude, and others — and switch based on your use case is also a strong point.
Next time, I'll add "Knowledge" and test grounded responses based on KPI data (docx) for three fictional SaaS companies.