I tried reinforcement learning for a robot arm with DGX Spark (Isaac Sim + Isaac Lab + SO-ARM101)

This page has been translated by machine translation. View original
Introduction
Hello, I'm Morishige from Classmethod's Manufacturing Business Technology Division.
At CES 2026, Physical AI was prominently featured in NVIDIA's keynote, and with Physical AI Day also scheduled at GTC 2026 in March, attention to the field combining robotics and AI is rapidly growing. I need to ride this wave too!
So this time, with the theme of "first touch it and understand it yourself," I decided to study NVIDIA Isaac Sim and Isaac Lab from the basics. I'll move a robot arm in the Isaac Sim simulation environment, design my own reward function, and observe how the training results change.
Rather than just running existing training scripts, I'll dive deep into reading the reward design code, changing parameters, and writing my own reward functions. Since this is a learning log started from nearly zero experience with reinforcement learning, I hope it serves as a reference for those who, like me, are "interested in Physical AI but don't know where to start."
Goals for This Time
I'll proceed in 3 stages.
- Build the Isaac Sim + Isaac Lab environment on DGX Spark
- Manually interact with the robot arm in Isaac Sim's GUI
- Customize the reward function and observe changes in training results
Prerequisites
| Item | Version |
|---|---|
| Machine | NVIDIA DGX Spark (GB10 Grace Blackwell) |
| OS | Ubuntu 24.04 ARM64 |
| GPU Driver | 580.126.09 |
| Python | 3.11 (bundled with Isaac Sim) |
| Isaac Sim | 5.1.0-rc.19 (source build) |
| Isaac Lab | 0.54.3 |
| isaac_so_arm101 | v1.2.0 |
About SO-ARM101 and isaac_so_arm101
SO-ARM100/101 is an open-source robot arm developed by The Robot Studio. It features 6 degrees of freedom, Feetech STS3215 servo motors, and is notable for its affordable price starting from $220. It has also been adopted as reference hardware in Hugging Face's LeRobot project. This time I'll be using the improved SO-ARM101.
isaac_so_arm101 is an extension package for using this SO-ARM100/101 with Isaac Lab. It comes with a complete set of URDF models, environment configurations, and training scripts, so once the environment is set up, you can start reinforcement learning right away.
Environment Setup
I'll set up Isaac Sim, Isaac Lab, and isaac_so_arm101 on DGX Spark's ARM64 environment. On an x86_64 machine this would take just a few minutes with pip, but on ARM64 a source build is required, and there are several pitfalls. The details of the pitfalls are summarized in a table at the end of the article, so here I'll proceed mainly with commands.
Source Build of Isaac Sim
First, install GCC 11. The default on Ubuntu 24.04 is GCC 13, but the Isaac Sim build fails with GCC 13. The same procedure is documented in the NVIDIA official Isaac Playbook.
sudo apt update && sudo apt install -y gcc-11 g++-11
sudo update-alternatives --install /usr/bin/gcc gcc /usr/bin/gcc-11 200
sudo update-alternatives --install /usr/bin/g++ g++ /usr/bin/g++-11 200
Install Git LFS, then clone and build the repository.
sudo apt install -y git-lfs

git clone --depth=1 --recursive https://github.com/isaac-sim/IsaacSim.git
cd IsaacSim
git lfs install && git lfs pull
./build.sh -r  # Release build
It took about 13 minutes on DGX Spark. Make sure you have at least 50GB of free disk space.
export ISAACSIM_PATH="${PWD}/_build/linux-aarch64/release"
Isaac Lab and isaac_so_arm101
git clone --recursive https://github.com/isaac-sim/IsaacLab.git
cd IsaacLab

# Create a symbolic link to Isaac Sim (method recommended by Playbook)
ln -sfn "${ISAACSIM_PATH}" "${PWD}/_isaac_sim"

# Install (automatically upgrades to PyTorch 2.9.0+cu130)
./isaaclab.sh --install
Install isaac_so_arm101 with --no-deps. This is because uv sync mentioned in the README fails to resolve dependencies in the DGX Spark source build environment.
git clone https://github.com/MuammerBay/isaac_so_arm101.git
./isaaclab.sh -p -m pip install -e ~/works/robotics/isaac_so_arm101 --no-deps
Environment Variable Setup Before Running
Two environment variables are required to run Isaac Sim on DGX Spark.
# Workaround for OpenMP linking issue
export LD_PRELOAD="/lib/aarch64-linux-gnu/libgomp.so.1"

# When running headless such as in an SSH session (DISPLAY is required)
export DISPLAY=:0
export XAUTHORITY=/run/user/1000/.mutter-Xwaylandauth.XXXXXX
Forgetting LD_PRELOAD will cause mysterious crashes. The XAUTHORITY filename changes per session, so check it with ls /run/user/1000/.mutter-Xwaylandauth.*.
Interacting with the Robot in Isaac Sim's GUI
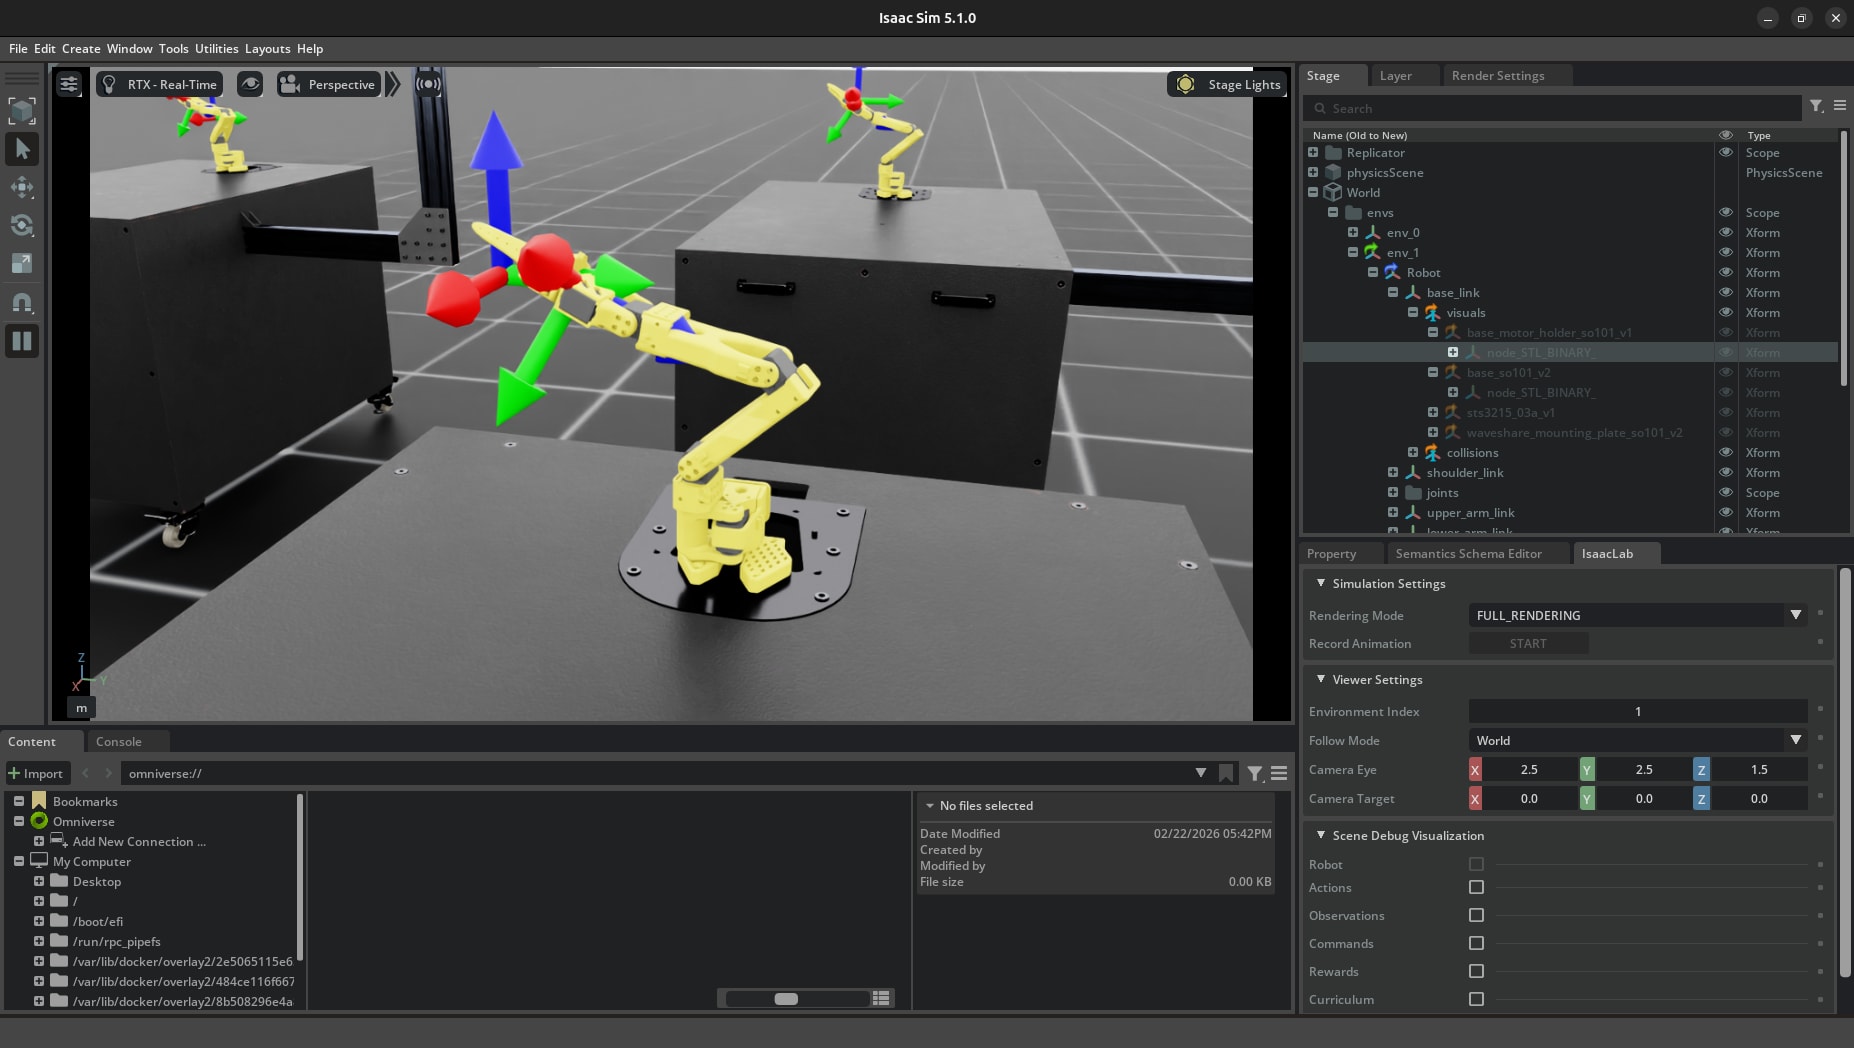
Now that the environment is ready, let's first open the Isaac Sim GUI and manually move the robot arm.
Launching the GUI and Loading SO-ARM101
Launch the Isaac Sim GUI and load the SO-ARM101 URDF.
cd ~/works/robotics/IsaacSim
./_build/linux-aarch64/release/isaac-sim.sh
The first launch takes a few minutes to generate caches for extensions and shaders. Once the GUI is up, load the SO-ARM101 URDF from File > Import.
The path is isaac_so_arm101/src/isaac_so_arm101/robots/trs_so101/urdf/so_arm101.urdf. When importing, check "Static Base" to load it as a robot arm with a fixed base.
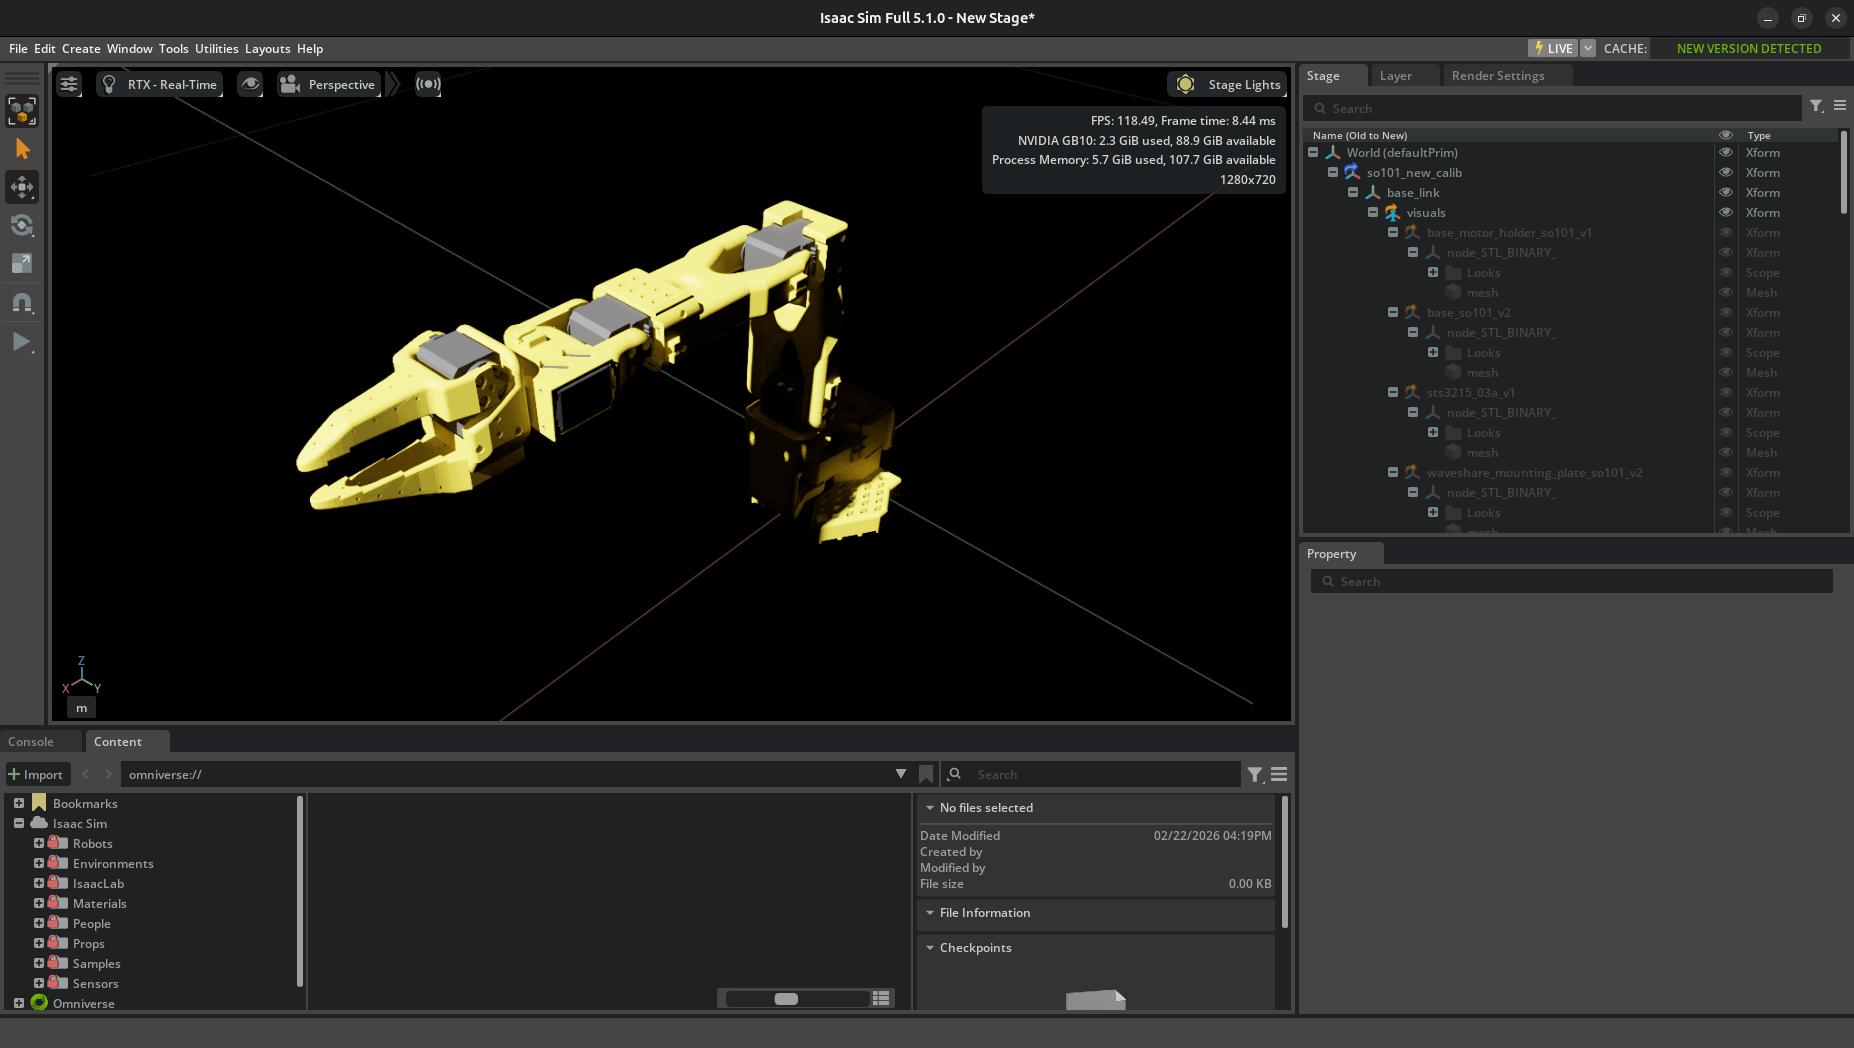
The yellow robot arm is displayed in the center of the viewport. The Stage panel on the right shows the link structure as a tree, and you can confirm the hierarchy: base_link → shoulder_link → upper_arm_link → lower_arm_link → wrist_link → gripper_link.
Operating Joints with Physics Inspector
Isaac Sim has a tool called Physics Inspector that lets you manually operate each joint of the robot with sliders. Open it from Tools > Physics > Physics Inspector.
Once the panel appears, select the robot's articulation to display a list of each joint's DOF (degrees of freedom) with sliders.
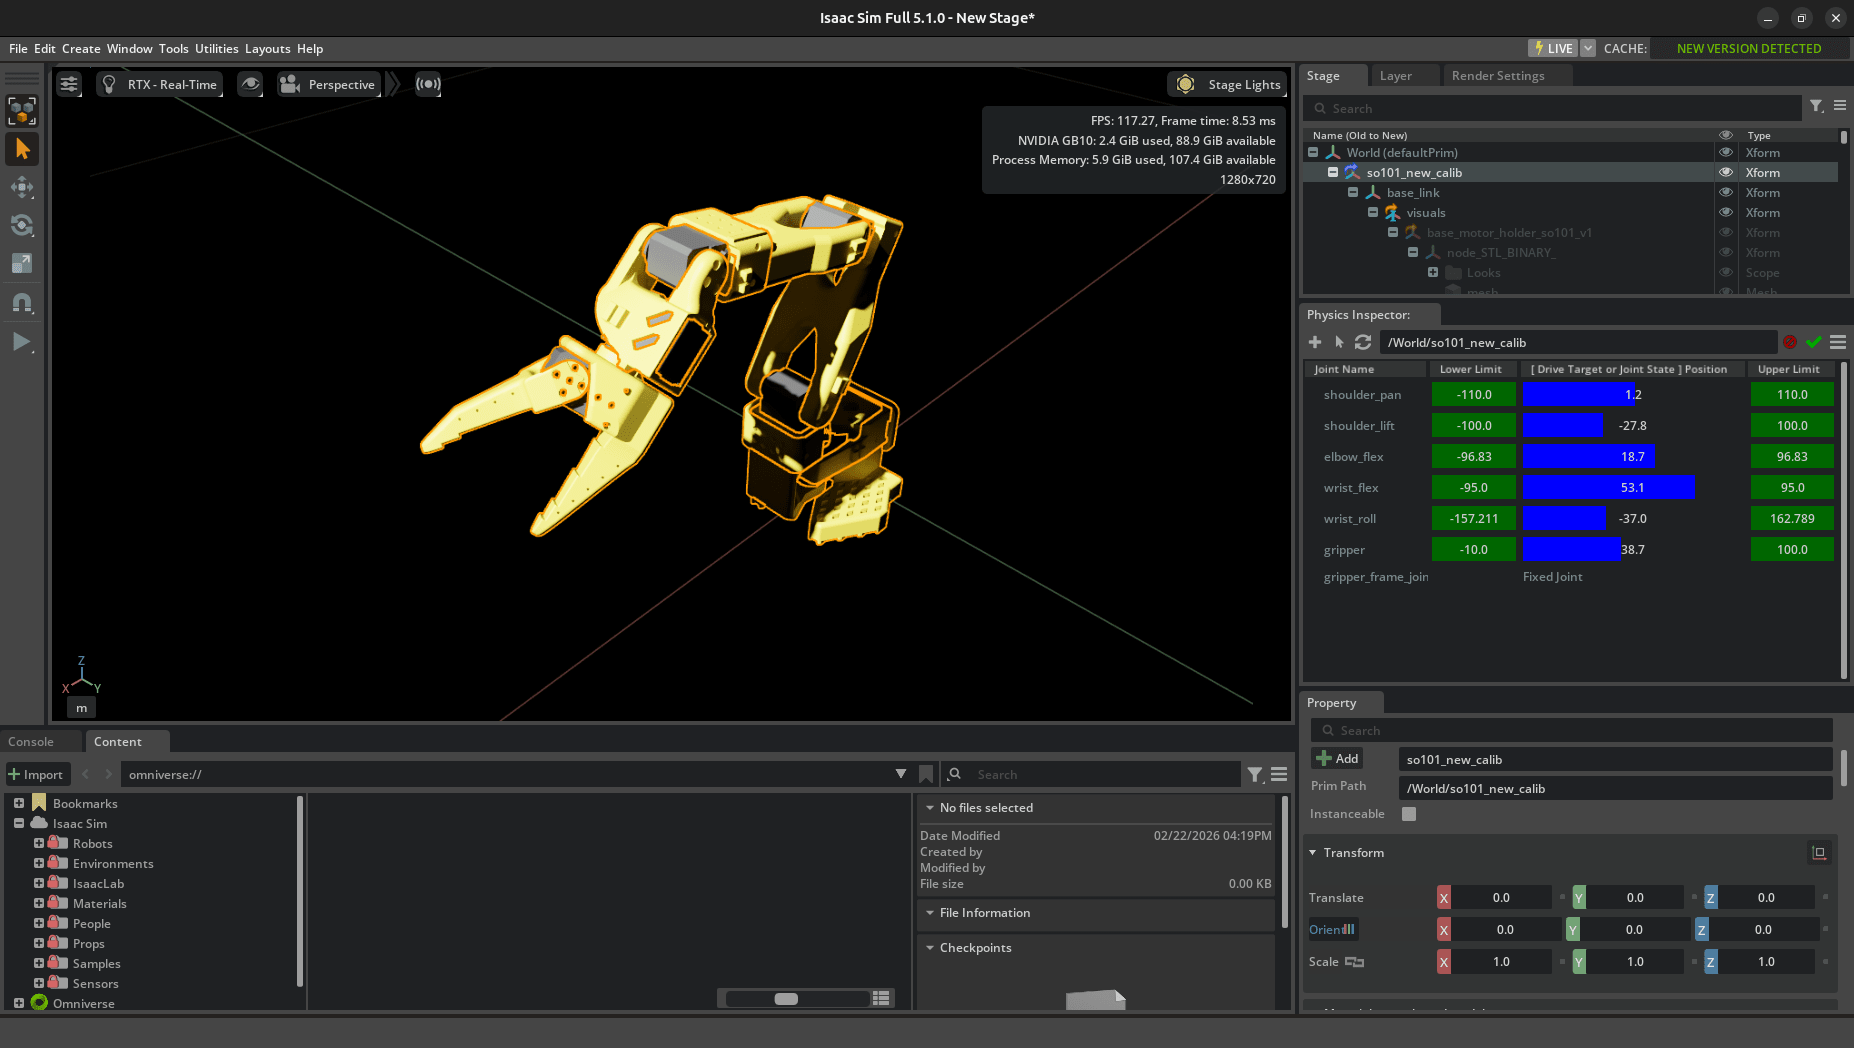
SO-ARM101 has 6 joints. shoulder_pan controls the base rotation, shoulder_lift and elbow_flex control the arm's up-down movement, and wrist_flex and wrist_roll control the wrist angle. The last one, gripper, is for opening and closing the gripper.
Actually moving the sliders reveals that just shoulder_pan and shoulder_lift determine the arm's rough position. Conversely, wrist_flex and wrist_roll are for fine angle adjustments at the tip, affecting the end-effector's orientation. When you see the reward design later defining "position tracking" and "orientation tracking" as separate reward terms, it makes sense after playing with it here.
The slider mapping mode "Joint Drive Target Position" is recommended. Since it moves to the target position through physics simulation, you can observe behavior close to that of actual servo motors.
By the way, there's also an approach called Imitation Learning, where the trajectory manually operated this way is recorded and used as "demonstrations" for training. It's a method of learning a policy from demo data operated with a leader arm, and LeRobot and GR00T are exactly this kind of approach. For now I'll focus on reward function-based reinforcement learning, but I'd like to try imitation learning with a real machine and reference arm later.
Running the Existing Reaching Task
Now that I understand the robot's movements from the GUI, let's move on to driving the robot with reinforcement learning.
In reinforcement learning for robotics, it's standard practice to gradually increase task difficulty. The typical progression is Reach (move the arm tip to a target position) → Grasp (pick up an object) → Lift (lift it) → Place (set it down). The Reaching task is the first step, a simple task that just involves "moving the end-effector (arm tip) to a randomly generated target coordinate." There's no picking up or lifting objects.
Simple as it is, it requires coordinating 6 joints to reach any arbitrary point in 3D space, making it a perfect subject for learning the basics of reward design. isaac_so_arm101 comes with the environment and training scripts for this Reaching task, so I'll use those.
Running Training
cd ~/works/robotics/IsaacLab

./isaaclab.sh -p ~/works/robotics/isaac_so_arm101/src/isaac_so_arm101/scripts/rsl_rl/train.py \
  --task Isaac-SO-ARM101-Reach-v0 \
  --headless \
  --num_envs 64 \
  --max_iterations 1000
Training with RSL-RL (PPO) in 64 parallel environments begins. Note that while the isaac_so_arm101 README says SO-ARM101-Reach-v0, the current version requires the Isaac- prefix.
Training completed in about 9 minutes with 1000 iterations. The throughput on DGX Spark's GB10 GPU is about 3,500 steps/s.
| Item | Result |
|---|---|
| Time required | About 9 minutes |
| Throughput | ~3,500 steps/s |
| position error | 0.0987 |
| Total steps | 1,536,000 |
The position error dropped rapidly in the early stages and converged around 0.1.
Evaluating the Trained Policy
./isaaclab.sh -p ~/works/robotics/isaac_so_arm101/src/isaac_so_arm101/scripts/rsl_rl/play.py \
  --task Isaac-SO-ARM101-Reach-Play-v0 \
  --num_envs 4 \
  --video \
  --video_length 200
If you get ModuleNotFoundError: No module named 'isaaclab.utils.pretrained_checkpoint' when running play.py, it's because this module doesn't exist in Isaac Lab 0.54.3. This can be worked around by wrapping the relevant section in a try-except.
When running Play, the trained policy is automatically exported in JIT and ONNX formats, which can be used later for transfer to a real machine.
Understanding the Reward Design
Now that I've got the existing script running, let's understand its internals. The reward function determines the behavior of reinforcement learning. Let me read the code to see what rewards are set for the Reaching task in isaac_so_arm101.
Reward Definition in Manager-Based Style
isaac_so_arm101 uses Isaac Lab's Manager-Based approach. It has a declarative structure where reward terms (RewTerm) are listed in the RewardsCfg class in reach_env_cfg.py.
@configclass
class RewardsCfg:
    # Task rewards
    end_effector_position_tracking = RewTerm(
        func=mdp.position_command_error,
        weight=-0.2,
        params={...},
    )
    end_effector_position_tracking_fine_grained = RewTerm(
        func=mdp.position_command_error_tanh,
        weight=0.1,
        params={..., "std": 0.1},
    )
    end_effector_orientation_tracking = RewTerm(
        func=mdp.orientation_command_error,
        weight=-0.1,
        params={...},
    )

    # Penalties
    action_rate = RewTerm(func=mdp.action_rate_l2, weight=-0.0001)
    joint_vel = RewTerm(func=mdp.joint_vel_l2, weight=-0.0001, params={...})
Five reward terms are defined. However, in SO-ARM101's Reaching task, orientation_tracking has its weight set to 0.0, so effectively 4 terms are functioning.
position_command_error (weight=-0.2) is a term that directly penalizes the L2 distance between the end-effector and the target position. The farther away, the larger the negative reward, so it plays the role of "roughly moving" the robot toward the target.
position_command_error_tanh (weight=0.1, std=0.1) has an interesting design, mapping the distance with a tanh kernel. Since tanh has the property of rapidly increasing reward as you approach the target, it strongly motivates "final fine adjustments." The smaller the std parameter, the more it insists on precision at close range.
orientation_command_error (weight=-0.1) tracks the end-effector's orientation. While the base RewardsCfg has weight=-0.1, in SO-ARM101's joint_pos_env_cfg.py the orientation weight is overridden to 0.0, so it's effectively disabled during actual training. For the Reaching task, "whether it reached the target position" is more important than "at what angle it arrived," so this is a reasonable decision.
The remaining two, action_rate_l2 and joint_vel_l2, are penalties that encourage smooth movement. They suppress abrupt changes in actions and joint velocities, with the intention of training motions that can be reproduced on real machines. The initial weight is quite small at -0.0001, but this is related to curriculum learning.
Gradual Penalty Strengthening Through Curriculum Learning
Looking at CurriculumCfg, the weights for action_rate and joint_vel are set to be strengthened as training progresses.
@configclass
class CurriculumCfg:
    action_rate = CurrTerm(
        func=mdp.modify_reward_weight,
        params={"term_name": "action_rate", "weight": -0.005, "num_steps": 4500}
    )
    joint_vel = CurrTerm(
        func=mdp.modify_reward_weight,
        params={"term_name": "joint_vel", "weight": -0.001, "num_steps": 4500}
    )
It's a mechanism that starts with almost zero penalty to prioritize "first reaching the target," then gradually strengthens the penalty over 4500 steps to require "moving smoothly." The action_rate goes from -0.0001 to -0.005, a 50x increase, and joint_vel goes from -0.0001 to -0.001, a 10x increase.
I found this approach of "first enabling rough success, then gradually demanding quality" to be a natural design that resembles human learning.
Two Approaches in Isaac Lab
Besides the Manager-Based approach used here, Isaac Lab also has an approach called the Direct Workflow. The Direct Workflow inherits from DirectRLEnv and directly implements reward calculations in the _get_rewards() method. SoftBank's Physical AI practical article uses exactly this approach.
Manager-Based is a "declarative MDP definition" style, making it convenient to add rewards and adjust weights with just configuration changes. Since I want to leverage the isaac_so_arm101 codebase as-is, I'll continue with Manager-Based.
Designing Custom Rewards
Now that I understand the reward design structure, let me actually customize it. I proceeded in 2 stages.
Step A: Adjusting Parameters
First, I'll just adjust the weights and std without changing the functions. All that's needed is to inherit SoArm101ReachEnvCfg and override parameters in __post_init__.
@configclass
class SoArm101ReachCustomACfg(SoArm101ReachEnvCfg):
    def __post_init__(self):
        super().__post_init__()

        # Strengthen distance penalty (-0.2 -> -0.5)
        self.rewards.end_effector_position_tracking.weight = -0.5
        # Increase tanh kernel sensitivity (std 0.1 -> 0.05)
        self.rewards.end_effector_position_tracking_fine_grained.params["std"] = 0.05
        # Require some smoothness from early on (-0.0001 -> -0.001)
        self.rewards.action_rate.weight = -0.001
Three changes are made: strengthening the distance penalty (-0.2→-0.5), increasing tanh sensitivity (std 0.1→0.05), and smoothing motion from the beginning (action_rate -0.0001→-0.001). The change content of each value is noted in comments in the code.
Step B: Adding a Reward Function
Next, I'll write a new reward function myself. I referenced the tanh kernel pattern from object_ee_distance in isaac_so_arm101's mdp/rewards.py.
What I added is a "joint limit avoidance reward." The closer each joint gets to the edge of its range of motion, the lower the reward, and being near the center gives a high reward. The intent is to train the habit of avoiding limits in simulation, since operating near joint limits on a real robot risks damage.
def joint_pos_limit_avoidance(
    env: ManagerBasedRLEnv,
    std: float,
    asset_cfg: SceneEntityCfg = SceneEntityCfg("robot"),
) -> torch.Tensor:
    """Returns higher reward the farther joints are from their range-of-motion limits."""
    asset = env.scene[asset_cfg.name]
    joint_pos = asset.data.joint_pos
    soft_limits = asset.data.soft_joint_pos_limits

    # Distance to the nearest limit for each joint
    dist_to_lower = joint_pos - soft_limits[..., 0]
    dist_to_upper = soft_limits[..., 1] - joint_pos
    dist_to_nearest = torch.minimum(dist_to_lower, dist_to_upper)

    # tanh kernel: far from limit → ~1.0, near limit → ~0.0
    return torch.mean(torch.tanh(dist_to_nearest / std), dim=-1)
While referencing the tanh kernel from object_ee_distance, that one uses 1 - tanh(d/σ) (higher reward when closer), while this one uses tanh(d/σ) (higher reward when farther from the limit) — an inverted design. With std=0.2, the reward drops sharply when within 0.2rad (about 11 degrees) of the limit.
This function is registered as a new reward term in a subclass of RewardsCfg, and the Step A adjustments are also applied together.
@configclass
class CustomBRewardsCfg(RewardsCfg):
    """Adds joint limit avoidance to existing rewards."""
    joint_limit_avoidance: RewTerm = RewTerm(
        func=joint_pos_limit_avoidance,
        weight=0.05,
        params={"std": 0.2, "asset_cfg": SceneEntityCfg("robot")},
    )

@configclass
class SoArm101ReachCustomBCfg(SoArm101ReachEnvCfg):
    rewards: CustomBRewardsCfg = CustomBRewardsCfg()

    def __post_init__(self):
        super().__post_init__()
        # Also apply the same adjustments as Step A
        self.rewards.end_effector_position_tracking.weight = -0.5
        self.rewards.end_effector_position_tracking_fine_grained.params["std"] = 0.05
        self.rewards.action_rate.weight = -0.001
It's implemented as a new Cfg class inheriting from SoArm101ReachEnvCfg to avoid breaking existing code. The structure adds reward terms in a subclass of RewardsCfg and replaces them in the environment Cfg. By registering it as a custom environment in Gymnasium, you can run training directly with the same train.py as the baseline.
Comparing Baseline and Custom Rewards
I ran training for 3 patterns under identical conditions (64 envs, 1000 iter) and compared the results.
| Item | Baseline | Custom A (parameter tuning) | Custom B (function added) |
|---|---|---|---|
| position error | 0.0987 | 0.1279 | 0.0802 |
| Mean reward | 0.23 | -0.72 | 0.03 |
| Throughput | 3,514 steps/s | 3,446 steps/s | 3,043 steps/s |
| Time required | ~9 minutes | ~9 minutes | ~9 minutes |
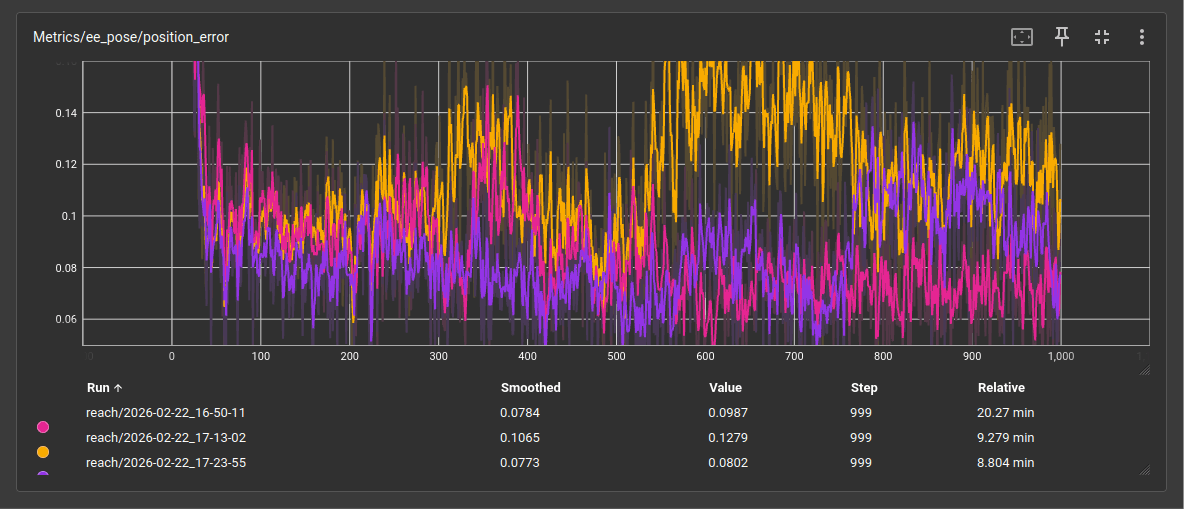
The most surprising result was Custom A (orange). I expected that strengthening the penalty would improve precision, but the position error actually worsened from 0.0987 to 0.1279. By raising the distance penalty weight from -0.2 to -0.5, the agent seemed to lean toward "avoiding punishment," which slowed the approach to the target itself. The fine_grained reward also plummeted from 0.0229 in the baseline to 0.0023, suggesting that narrowing the tanh kernel's std to 0.05 may have made the bonus range too small to obtain.
On the other hand, Custom B (purple), which applied the same parameter adjustments as Custom A while just adding the joint limit avoidance reward, achieved a position error of 0.0802, surpassing the baseline. The joint limit avoidance seems to have functioned as a kind of regularization, guiding the arm toward the center of its range of motion and ultimately improving target-reaching efficiency as well. Looking at the logs, joint_limit_avoidance stably earned 0.0461, showing it contributed to training stability.
What I felt from these results is that in reward design, "adding a reward from a different perspective as a supplement" can be more effective than "strengthening existing penalties." Custom A was an approach of "try harder," while Custom B was an approach of "move in a comfortable posture." The fact that the latter led to more stable training is interesting, as it parallels human learning.
Summary of DGX Spark aarch64-Specific Pitfalls
Here's a summary of the DGX Spark-specific issues encountered during this environment setup.
| Problem | Cause | Solution |
|---|---|---|
| No Isaac Sim binary | Official is x86_64 only | Source build (~13 minutes) |
| Build fails | Incompatibility with GCC 13 | Install GCC 11 |
uv sync fails |
Dependency packages not on PyPI for source build env | Work around with pip install --no-deps |
| Crashes (OpenMP) | libgomp linking issue |
Set LD_PRELOAD |
| Hangs via SSH | XOpenDisplay is called even in headless |
Set DISPLAY / XAUTHORITY, or run in desktop environment |
| Task name not found | Isaac- prefix required |
Use task name different from README |
| Import error in play.py | Module not implemented in Isaac Lab 0.54.3 | Work around with try-except |
I vividly experienced "losing half a day on environment setup." I hope this table saves someone else's time.
Conclusion
Starting from interacting with the robot arm in Isaac Sim's GUI, I ran the existing training scripts, read through the reward design code, and observed how training results change with custom rewards.
For me personally, the biggest learning came from reading the reward design code. Design patterns like "using a tanh kernel to give a bonus for close-range precision" and "gradually strengthening penalties with a curriculum" are hard to internalize just by reading tutorials. By actually changing parameters and seeing differences in training results, I feel I've gained an intuitive understanding of how reward functions affect learning.
The ARM64 environment on DGX Spark requires considerable effort to set up, but once it's ready, you get a throughput of about 3,500 steps/s with 64 parallel environments. Since 1000 iterations finish in about 9 minutes, it's comfortable to iterate through the cycle of changing reward design → training → checking results.
Next, I'd like to learn about actually assembling the arm, fine-tuning with GR00T N1.5, and the Sim-to-Real gap from simulation to real hardware.
Continued here
Reference Links
- Isaac Sim GitHub
- Isaac Lab GitHub
- isaac_so_arm101 GitHub
- SO-ARM100 GitHub
- DGX Spark Isaac Playbook (GitHub)
- Install and Use Isaac Sim and Isaac Lab | DGX Spark (Official Guide)
- Seeed Studio: Training SoArm101 Policy with IsaacLab
- Healthcare Robot Demo (CES 2026)
- SoftBank: Physical AI Practice with IsaacLab
- Isaac Lab: Creating a Manager-Based RL Environment
- Isaac Lab: Custom Reward Functions
- Isaac Sim: Basic Robot Tutorial
- Custom reward scripts from this article (GitHub)